brake CHEVROLET CAVALIER 1984 1.G Owners Manual
[x] Cancel search | Manufacturer: CHEVROLET, Model Year: 1984, Model line: CAVALIER, Model: CHEVROLET CAVALIER 1984 1.GPages: 105, PDF Size: 24.23 MB
Page 6 of 105
Downloaded from www.Manualslib.com manuals search engine SECTION 1
BEFORE DRIVING YOUR CAVALIER
TRANSAXLE
While reading this manual, you will nole many references 10 Ihe "transaxle." The transaxle is a transmission and differential (axle) combined in a singl ,e unit.
To avoid confusion, the word
"transaxle" will be used throughout this manual 10 refer to bolh Ihe transmission and differenlial funclions.
DRIVER DAILY CHECKUST
Be sure you know how to use your vehicle and its equipment before operating it
Before Entering the Vehicle
1. See that windows, mirrors and lights are clean and unobstructed.
2. If any lire does not look normal, check it with a pressure gage.
3. Look for fluid leaks .
4. Be sure everything is properly stowed.
5. Check the area behind the vehicle if you are about to back up.
__ Before Driving Off
1. Lock all doors.
2. Adjust the seat and any movable head restraint
3. Adjust inside and outside mirrors.
4. DO NOT allow anyone to ride where there is no seat belt ; and ALWAYS properly fasten the seat belt.
5. Check that all the warning lights work as the key is turned to "Run" or "Start"
6. Check all gages (including the fuel gage).
7 . Release the parking brake (and make sure the
"BRAKE " light turns .off).
See related topics in this manual
or the Maintenance Schedule folder H problems are found.
STOWING THINGS IN (OR ON) THE VEHICLE
CAUTION: Put luggage or cargo In the trunk, or rea' area if postible. Cargo weight,
whether In the trunk or rear area, should be located as far forward as possible. Cargo weight on the roof Shoukt be positioned .s evenly as possible. Secure all i1ems in place to help keep them -from being thrown about and injuring people during a cot"-ion or sudden maneuver. Do not pile luggage or cargo higher than the seetbaCks. Do not place anything on the filler panel, or any cargo cover between the rear seat~.ck and window.
GUARD AGAINST THEFT
Your new Cava~er has many features to help prevent then of the vehicle, its
equipment, and contents. But these anti-then features
depend upon you to work.
t -1
Page 19 of 105
Downloaded from www.Manualslib.com manuals search engine Now and then, check that all trailer hitch bolts and nuts are tight. Also see the
Maintenance
Schedule folder, and thelndax in this manual , for important facts
on
belts , cooling system care and brake ~tment.
Break-In Schedule
See the new vehicle break-in information in this manual. Also, we recommend
you drive your new vehicle for 500 miles (800 kilometers) before trailer towing.
At the end of this 500 mile (800 kilometer) break-in period, avoid speeds over
50 mph (80 km/h) and full throttle starts during the first 500 miles (800 kilometers) of trailer towing .
CAUTION:
BRAKES-To help avoid personal injury due to poor braking action :
•
Trailer brakes of adequate size are required on trailers more than 450
kilograms (1,000 pounds) loaded weight.
• If you use trailer brakes with this vehicle, follow the instailation and balance instructions of the trailer brake manufacturer.
• Do not tap into the vehicle's brake system iUhe trailer brake system uses
more than 0.3 cubic centimeter (0.02 cubic inches) 01 fluid from the
vehicle 's
mast.". cyllnd<1r .. , In this case, the vehicle's brake fluid capacity will not be enough to operate both thevehicte and trailer brakes under all kinds
of use.
• All brake fluid parts must be able to stand 20 650 kPa (3,000 psi) . The
brake fluid tap must be made at the upper rear master cylinder port.
Copper tubing is subject to fatigue failure and must not be used.
HITCHES-To help avoid personal injury due to sway caused by such things as
crosswinds, large trucks passing or road roughness , or due to separation of
the trailer :
• A properly installed and adjusted (1) frame mounted, weight-dstribut ing hitch and (2) sway control witheoough capacity are required for trailers
more than 900 kilograms (2,000 pounds) loaded weight.
• Keep the trailer tongue load at 10 percent of the loaded trailer weight for
dead-weight hitches and 12 percent for weight-distributing hitches. Tongue
loads can be adjusted by proper distribution of the load in the trailer. This
can
be checked by weighing separately the loaded trailer and then the
tongue .
• Do not use axle-mounted Mches. They can damage the axle housing , wheel bearings , wheels or tires.
• Do not allow steel hitch parts to be in direct contact with aluminum bumper
parts, if so equipped. When steel and aluminum are in contact, a galvanic
reaction (a form of corrosion) can occur which will progressively lessen the
strength of the contacting metals to the point
of failure. An organic
compound or paint should
be used as a barrier on the contacting surfaces
and on the attaching fasteners.
• When you remove a trailer hitch, be sure to seal any mounting holes in the body. This will help prevent entry 01 exhaust fumes,
"Starting and Operating ," Section 2 ollhis manual.)
2-3
Page 20 of 105
Downloaded from www.Manualslib.com manuals search engine NonCE: Use only trailer hitches which permit normal operation of the Energy
Absorbing Bumper system, If so equipped. For example, a rigid fore and aft connection between the bumper and any other part of-the vehicle may increase damage in the event of a collision.
TRAILER TOWING TIPS
Getting Started
Before entering traffic with a trailer that has electric brakes, start the vehicle and trailer moving and apply the trailer brakes by hand to be sure the trailer
brakes are working and the trailer electrical system is connected.
Engine Cooling
If your engine overheats, follow the steps under "Engine Cooling System
Overheating" in "In Case of Emergency," Section 3 of this manual.
Long Uphill Grades
When going up long grades, you can reduce the chance 01 engine overheating
by turning off the air conditioner, if so equipped.
Down Steep Or Long Grades
Before going down a steep or long grade, reduce speed and shift the transaxle
into a lower gear to help control your vehicle's speed. Try not to hold the brake pedal down too long or too often. This could cause the brakes to overheat and
reduce brake effectiveness.
Transaxle
See the method for checking the transaxle fluid level in "Service and
Maintenance,"
Section 5 of this manual.
Parkin!!
You should not park vehicles with trailers on a grade (hill). However, if you
must park on a grade, these steps must be followed:
1. Apply the regular brakes.
2. Have someone place wheel chocks under the trailer wheels.
3. When the wheel chocks are in place, release the regular brakes until the
chocks absorb the load.
4. Apply the parking brake.
5. Shift the transaxle to "P"(Park),
If the vehicle is parked on a grade, don't shift the transaxle to "P"(Park) until the trailer wheels are chocked and the parking brake is set. If you do, the
weight of the
vehicle and trailer may put so much force on the parking pawl in
the transaxle that it may be hard to shift out of "P"(Park).
When starting, after being parked
on a grade:
1. Apply the regular brakes and hold.
2. Start the engine in "P"(Park).
3. Shift into gear and release the parking brake.
4. Release the regular brakes and drive until the chocks are free.
5. Apply the regular brakes and have someone remove the chocks.
2·4
Page 24 of 105
Downloaded from www.Manualslib.com manuals search engine CAunOM: tf you need to tum oft the ... whikt the vehicte ls moving, turn the key only to "Oft." DO NOT depreSS the key release lever while turning the Ignition off._This
wln ·lock the steering column and result in loss arability to steer the vehlete.
If you have trouble turning the key to unlock the ignition, first be sure the key is
pushed in all the way . Then , try to turn the steering wheel as hard as you can .
in the direclioo the
wheels are tUrned . At the same ti me , turn the ignition kay
w~h as much eftort as you can apply with your hand. Do not try to use a tool of
any kind to
apply more force on the lock knob , as tnis could break the knob.
NOTICE: Do not park, idle, or operate your vehk:le over combustible materials, such
as grass or leaves . They couki touch the hot exhaust ay8tem and ignite.
Parking
CAUTION: Before the driver leaves this vehicle, to reduce the risk of personal injury ... resun of vehicle movement:
1. Firmly apply the parking brake.
2. Shift the automatic transtixle to Park or the manual tranSlale to "Reverse."
3. Tum the kef to "Lock. " On vehietn wrth manual transaxle$, __ ~ the key reiease tever and tum the key to·'Loclic. " .
4. Remove the key (the chime ia designed to remind you).
To reduce the chance of persona' injury and/or vehicle damage due' to engine overheating , never lellVe the engine Idling without an alert driver present. If the engine ahoukl overheat, as indicated by the Erlgine Coolant Temperature light Of gage,
Immediate action 1a required to correct the concIUon. Continued operation 01' the engine . enn FOA -A SHORT TtME may resutt In a fire.
TURN SIGNAL AND MULTI-FUNCTION LEVER
The turn signal lever on the left side of the steering column also controls headlight low-beam and high-beam, the windshield wiper/washer, and the
optional Cruise
Control. (See Cruise Control operatiOn in this section .)
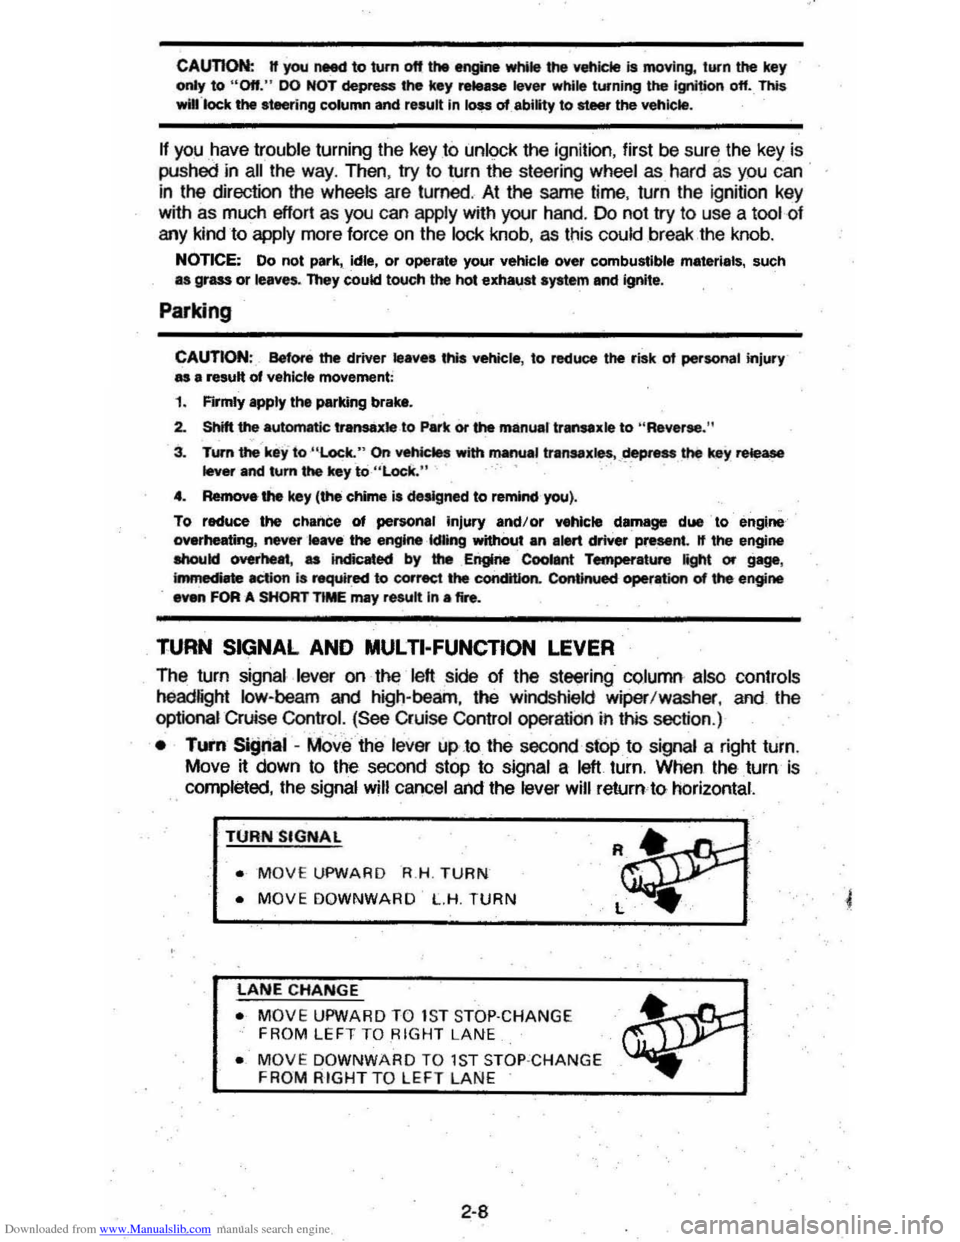
• TUI'fI Si!Jnal -MOve the lever up .to the second stop to signal a right turn.
Move
~ down to the second stop to signal a left turn. When the turn is
completed, the signal will cancel and the lever will return to horizontal.
TURN SIGNAL
• MOVE UPWARD R.H . TURN
• MOVE DOWNWARD L.H. TURN
LANE CHANGE
• MOVE UPWARD TO 1S T STOP·CHANGE
FROM LEFT TO RIGHT LANE
• MOVE DOWNWARD TO 1ST STOP ·CHANGE FROM RIGHT TO LEFT LAN E
2-8
Page 26 of 105
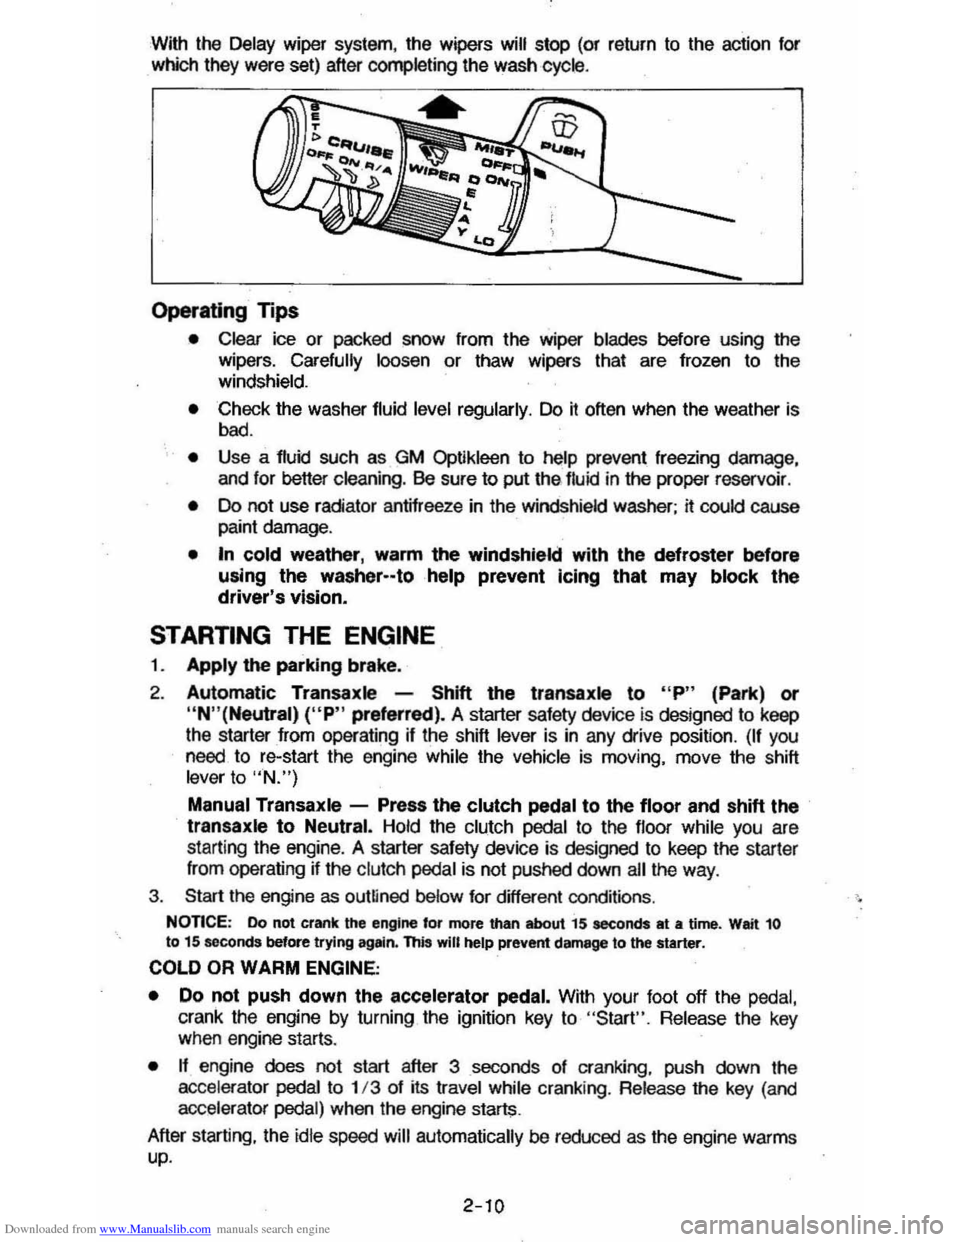
Downloaded from www.Manualslib.com manuals search engine With the Delay wiper system, the wipers will stop (or return to the action for
which they were set) after completing the wash cycle .
Operating Tips
• Clear ice or packed snow from the wiper blades before using the
wipers. Carefully loosen or thaw wipers that are frozen to the
windshield.
• Check the washer fluid level regularly. Do it often when the weather is
bad.
• Use a fluid such as GM Optikleen to help prevent freezing damage,
and lor better cleaning. Be sure to put thE> lIuid in the proper reservoir .
• Do not use radiator antifreeze in the windshield washer; it could cause paint damage.
• In cold weather, warm the windshield with the defroster before
using the washer--tohelp prevent Icing that may block the driver's vision.
STARTING THE ENGINE
1. Apply the parking brake.
2. Automatic Transaxle -Shift the transaxls to "P" (Park) or
"N"(Neutral) ("P" preferred). A starter safety device is designed to keep
the starter
from operating if the shift lever is in any drive position. (If you need. to re-start the engine while the vehicle is moving. move the shift lever to "N.")
Manual Transaxle -Press the clutch pedal to the floor and shift the transaxle to Neutral. Hold the clutch pedal to the lIoor while you are
starting the engine. A starter safety device is designed to keep the starler
Irom operating ~ the clutch pedal is not pushed down ail the way .
3. Start the engine as outlined below for different conditions .
NonCE: Do not crank the engine for more than about 15 seconds at a time. Wait 10 to 15 seconds before trying agltin. this will help prevent damage to the starter.
COLD OR WARM ENGINE;
•
Do not push down the accelerator pedal. With your foot off the pedal,
crank the engine by turning the ignition key to "Start". Release the key when engine starts.
• n engine does not start after 3 seconds 01 cranking. push down the
accelerator pedai to 1/3 of its travel while cranking . Release the key (and
accelerator pedal) when the engine starts.
After starting. the
idle speed will automatically be reduced as the engine warms up.
2-10
Page 27 of 105
Downloaded from www.Manualslib.com manuals search engine 4. Apply the regular brakes and shift into the proper gear. Release the
parking brake and drive oft.
IF ENGINE FAILS TO START AFTER NORMAL STARTING
PROCEDURE
1. If you tried the Cold or Warm Engine starting procedure and the engine still
does not start, push down the accelerator pedal to the floor and hold it
there while cranking the engine. This should clear the engine
~ II is flooded.
2. If the engine has been flooded with too much fuel, it may start to run but
not have enough power to keep running .
In that case, continue cranking
with the
accelerator pedal all the way to the floor until the engine clears itseW of excess gasoline and runs smoothly . (But, do not crank more than
15 seconds at a time or you could damage the starter .)
GaSOline Engine Block Heater
The optional gasoline engine block heater is designed to warm the block area
for improved cold weather starting.
II can also help reduce fuel consumption
when a cold engine is warming up.
To use
the block heater:
1 . Open the
hood. '~".
2. Unwrap the electrical cord which is stowed In the engine compartment.
(After using the block heater, be SUre to properly restow the cord , to help
keep it away from moving engine parts.)
3. Plug the cord into any three-prong, 11 O-voll outlet (normal household
current).
NOTICE: • the cord i, too ahort, use a ~avy·duty, three-prong extension corel Do not use an extension cord such .. you would uae for • t.np because the cord rnIIY
--Outside temperature, oil viscosity, etc. will affect how tong the block~ heater should remain plugged .in . Contact your authorized dealer for advice 'jot the
conditions in your area.
TRANSAXLE
DESCENDING A GRADE
CAunON: To reduce the risk of personaJ injUry. before going down 8 .steep or long Wade reduce speed and shift the transaxte -into second or low gear to help control your speed. (00 this with EITHER an automatic or manual transax)e.) Do not hold the brake ~I down too Iorig or too otten white going down • steep or long grade. This COUld ceu" the brakes to get hot and not work as well. As • result, the vehicle will not slow down at the usual r.t.~ Failure to u.ke these steps could r8l,,1t in. Iou of vehicle control.
DRIVING ON. SUPPERY SURFACES
While driving on a slippery surface avoid sudden acceleration, or engine
braking actions (due to shifting to a lower gear), which could cause the wheels
to skid . Skid correction is called for at these times.
2-11
Page 28 of 105
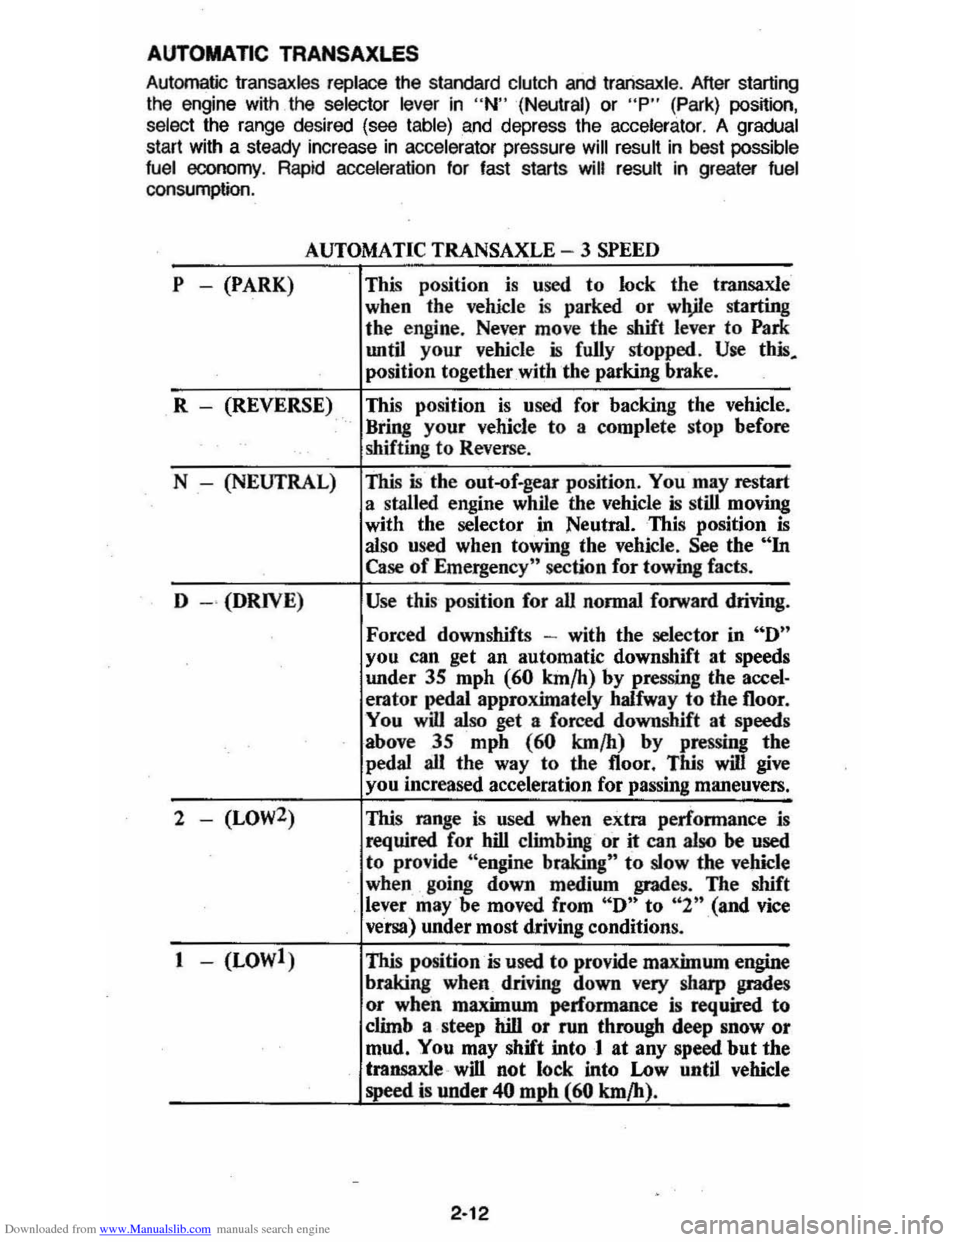
Downloaded from www.Manualslib.com manuals search engine AUTOMATIC TRANSAXLES
Automatic Iransaxles replace the standard clutch and Iransaxle . After starting
the engine with the selector lever in "N" (Neutral) or "P" (Park) posnion,
select the range desired (see table) and depress the accelerator. A gradual start with a steady increase in ac ce lerator pressure will result in best possible
fuel economy. Rapid acceleration for fast starts will result in greater fuel consumption.
P -(PARK)
AUTOMATIC TRANSAXLE - 3 SPEED
This position is used to lock the transaxle
when the vehicle
is parked or wlVle starting
the engine. Never move the shift
lever to Park
until your vehicle is fully stopped . Use this.
position together with the parking brake.
R - (REVERSE) This position
is used fot backing the vehicle.
" Bring your vehicle to a complete stop before
shifting to Reverse .
N - (NEUTRAL)
This is the out-of.gear position. You may restart
a stalled engine while the vehicle
is still moving
with the selector
"in Neutral. This position is also used when towing the vehicle. See the "In Case of Emergency" section for towing facts.
D
- " (DRIVE) Use this position for all normal forward driving.
Forced downshifts -with the selector in "D"
you can get an automatic downshift at speeds
under
3S mph (60 km/h) by pressing Ihe accel· erator pedal approximately halfway to the 1I00r.
You
will also get a forced downshift at speeds
above 35 mph
(60 km/h) by pressing the
pedal all the way to the 1I00r . This will give
you increased acceleration for passing maneuvers.
2 - (LOW2) This range is used when extra performance is
required for hill climbing or it can also be used to provide "engine braking" to slow the vehicle
when going down medium grades. The shift lever may'be moved from "D" to "2n(and vice
versa) under most driving conditions.
1 - (LOWl) This position
is used to provide maximum engine
braking
when driving down very sharp grades
or when maximum performance is required
to
climb a steep hill or run through deep snow or
mud. You may shift into 1 at any speed but the
transaxle " will not lock into Low until vehicle
speed
is under 40 mphl.60 km/h).
2-12
Page 30 of 105
Downloaded from www.Manualslib.com manuals search engine moving, such as when stuck in deep sand or when the vehicle is against a
fixed barrier.)
• Holding vehicle on an upgrade with the accelerator pedal. (Use the regular brakes to hold vehicle on an uphill grade.)
MANUAL TRANSAXLE
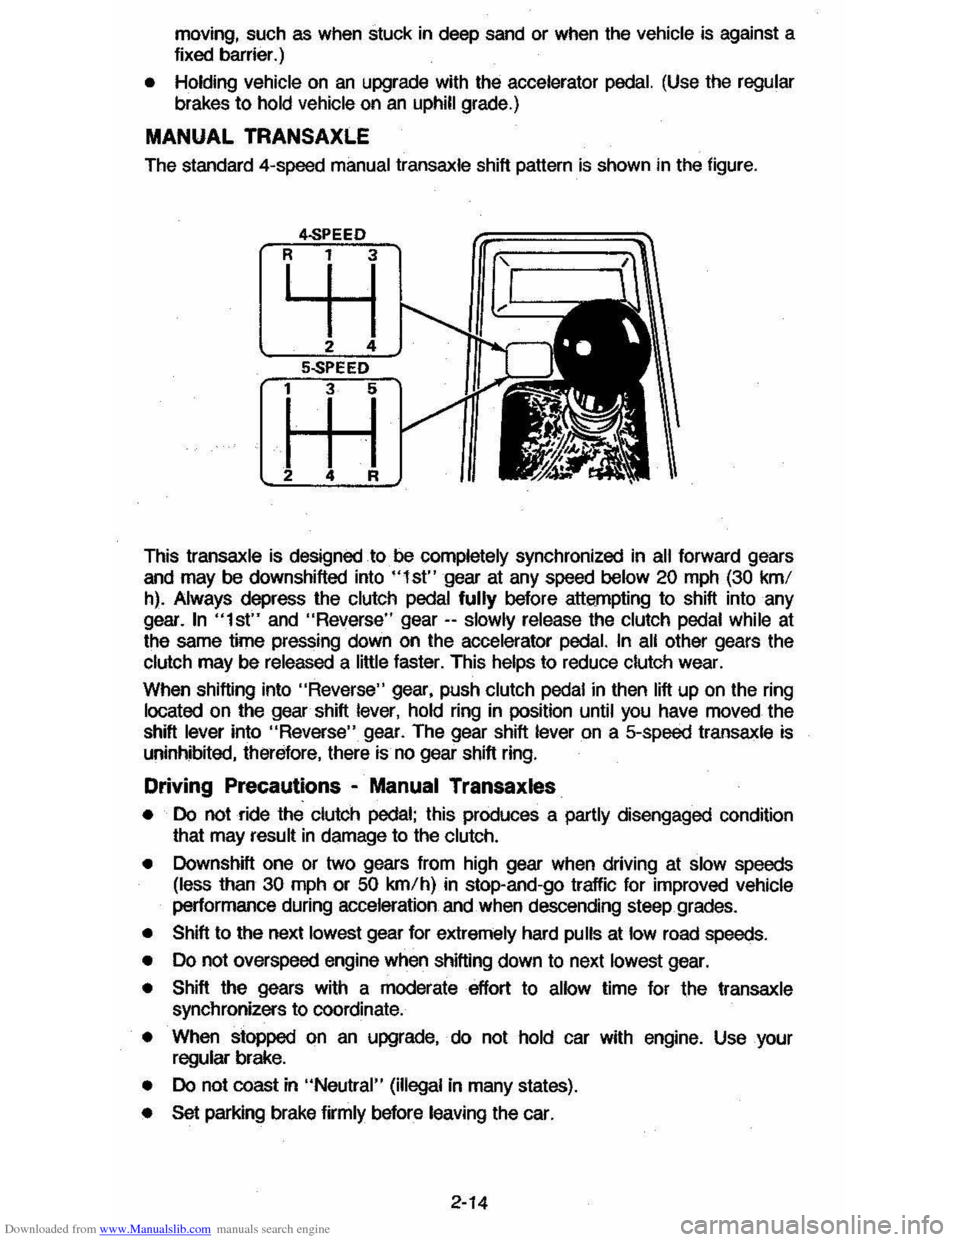
The standard 4-speed manual transaxle shift pattern is shown in the figure.
This
transaxle is designed to be completely synchronized in all forward gears
and may be downshifted into "I st" gear at any speed below 20 mph (30 kmf
h). Always depress the clutch pedal fully before attempting to shift into any
gear.
In "1st" and "Reverse" gear -- slowly release the clutch pedal while at
the same time pressing down on the accelerator pedal. In all other gears the
clutch may be released a little faster. This helps to reduce clutch wear.
When shifting into
"Reverse" gear, push clutch pedal in then lift up on the ring located on the gear shift lever, hold ring in position until you have moved the
shift
lever into "Reverse" gear. The gear shift lever on a 5-speed transaxle is
uninhibited, therefore, there is no gear shift ring.
Driving Precautions -Manual Transaxles
• Do not ride the clutch pedal; this produces a partly disengaged condition
that may result in damage to the clutch.
•
Downshift one or two gears from high gear when driving at slow speeds (less than 30 mph or 50 kmfh) in stop-and-go traffic for improved vehicle
performance during acceleration and when descending steep grades.
• Shift to the next lowest gear for extremely hard pulls at low road speeds.
• Do not overspeed engine when shifting down to next lowest gear.
• Shift the gears with a moderate effort to allow time for the transaxle synchronizers to coordinate.
• When stopped on an upgrade, do not hold car with engine. Use your regular brake.
• Do not coast in "Neutral" (illegal in many states).
• Set parking brake firmly before leaving the car.
2-14
Page 32 of 105
Downloaded from www.Manualslib.com manuals search engine CRUISE CONTROL WITH RESUME/ACCEL FEATURE
Cruise Control is an optional speed control system. The system allows the vehicle· to keep a constant forward speed during most normal driving without
keeping your foot on the accelerator pedal, thus increasing driver comfort on
long trips. The system
can hold a speed of about 30 mph (50 km/h) or higher
within the limits of your engine.
The
system is also designed to resume a pre-set cruising speed after:
• Braking. clutching with manual transaxle vehicles, without using the
accelerator pedal.
•
Accelerating from a given set speed to a higher control speed.
The system also allows the driver to "Tap-up" and increase speed or "Tap
down" to decrease vehicle speed in increments of about 1 mph (1.6 km/h)
when needed. This feature is useful when traffic conditions warrant a small
adjustment in speed. The controls are part of the turn signal lever. The
"Cruise" switch must be moved to "On" before the system will work. The "Set/Coast" button is in the end of the turn signal lever.
To Engage at Cruising Speed
Accelerate to the desired speed, push in the "Sel/Coast" button all the way
and release it (or use the "Resume/ Accel" (R/ A) switch during first
engagement only). Take your foot off the accelerator pedal and the set speed
will be maintained up Qr down hill. The Cruise Control is designed to disengage
when you apply the brakes and also with the clutch on manual transaxle
vehicles.
It will also disengage by moving the "Resume/ Accel" (R/ A) switch to
off or by turning the ignition off. (To disengage the system without coming to a
complete
stop, push the brake pedal or clutch lightly; use just enough force to
disengage the system, witi)out stopping the vehicle:)
To Change Cruising Speed
To reset the Cruise Control to a faster speed, accelerate to the speed you wish. Push in the "Set/Coast" button all the way, (for less than a second) then release it.
Or, use the "Resume/ Aceel" switch to accelerate and reset to the speed you
wish. The "Resume/ Accel" (R/ A) switch must be held (over a second) in
order to engage the accel mode. Speed may also be increased by tapping the
"Resume/
Accel" switch for less than a second while cruising. The set speed
will
be increased by about 1 mph (1.6 km/h) for every tap. "Tap-ups" are
limited to 10 mph (16 km/h) above vehicle speed.
To reset to a
slower speed, push in the "Set/Coast" button all the way and hold it there. Wait until the vehicle slows to the desired speed, then release the
button.
Speed may also be decreased by tapping the "Sel/Coast" button for less than a second while cruising and the memory speed will be decreased
about 1
mph (1.6 km/h) for every tap, "Tap-downs" are limited to a minimum
cruising speed of 23 mph (37 km/h).
To "Resume" a Pre-Set Speed
After braking or stopping the vehicle without turning off the ignition, you can "resume" to your last set cruising speed by accelerating to 30 mph (50 km/h)
or more
and sliding the cruise switch momentarily to "Resume/ Accel"; when
you release the "Resume/ Accel" switch, your vehicle will accelerate to the
cruising speed set before braking or stopping.
2-16
Page 33 of 105
Downloaded from www.Manualslib.com manuals search engine Sliding cruise switch to "Resume/ Accel" position and holding the switch in
longer than 1 second will accelerate the vehicle until the switch is released. The speed at which the switch is released will become the new cruising speed.
To Disengage
Disengage the Cruise Control by pushing the brake pedal or the clutch pedal on manual transaxle vehicles. Though not usually necessary, you can also turn
off the system by moving the
"Cruise" switch to "Off." Holding in the
engagement button until vehicle speed falls below 30 mph (50 km/h), will also
disengage the system.
To Pass A Vehicle
Use the accelerator pedal for more speed when passing. When you take your
foot off the
pedal, the vehicle will slow down to the speed set before passing.
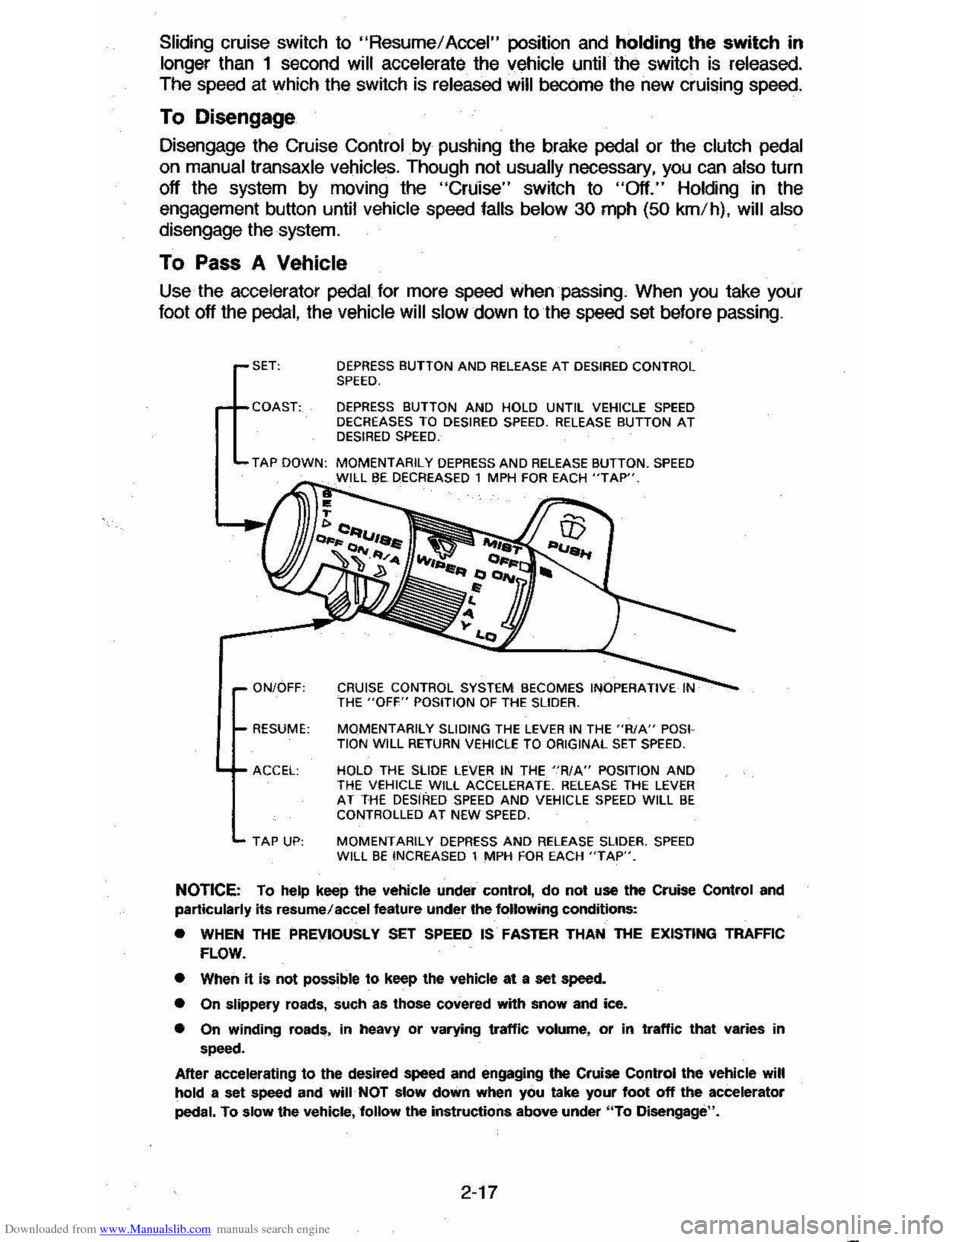
SET: DEPRESS BUTTON AND RELEASE AT DESIRED CONTROL SPEED.
DEPRESS BUTTON AND HOLD UNTIL VEHICLE SPEED
DECREASES TO DESIRED SPEED. RELEASE BUTTON AT DESIRED SPEED.
TAP DOWN: MOMENTARILY DEPRESS AND RELEASE BUTTON. SPEED I BE DECREASED 1 MPH FDA EACH "TAP".
ON/OFF: CRUISE CONTROL SYSTEM BECOMES INOPERATIVE THE "OFF" POSITION OF THE SLIDER.
RESUME:
MOMENTARilY SLIDING THE LEVER IN THE "R/A" POSI
TION WILL RETURN VEHICLE TO ORIGINAL SET SPEED.
ACCEl: HOLD THE SLIDE LEVER IN THE "RIA" POSITION AND THE veHICLE WILL ACCELERATE. RELEAse THE LEVER AT THE DESIRED SPEED AND VEHICLE SPEED WILL BE CONTROLLED AT NEW SPEED.
TAP UP: MOMENTARILY DEPRESS AND RELEASE SLIDER. SPEED WILL BE INCREASED 1 MPH FOR EACH "TAP".
NOTICE: To help keep the vehicle under control, do not use the Cruise Control and
particularly its resume/accel feature under the following conditions:
• WHEN THE PREVIOUSLY SET SPEED IS· FASTER THAN THE EXISTING TRAFFIC
FLOW.
• When
it is not possible to keep the vehicle at a set speed.
• On slippery roads, such as those covered with snow and ice.
• On winding roads, in heavy or varying traffic volume, or in traffic that varies in speed.
After accelerating
to the desired speed and engaging the Cruise Control the vehicle will hold a set speed and will· NOT slow down when you take your foot off the accelerator
pedal. To slow the vehicle,follow the instructions above under "To Disengage".
2-17