CHEVROLET CORVETTE 1996 4.G Owners Manual
Manufacturer: CHEVROLET, Model Year: 1996, Model line: CORVETTE, Model: CHEVROLET CORVETTE 1996 4.GPages: 386, PDF Size: 20.12 MB
Page 291 of 386
Downloaded from www.Manualslib.com manuals search engine Cleaning and Storage of Your
Hardtop
The optional hardtop has the same durable finish as the
painted surfaces of your Corvette. You can wash, polish
and wax it.
If you store the hardtop for a long time, keep it covered
in a dry place. Apply silicone grease to all the
weatherstrips.
Aluminum Wheels
Your aluminum wheels have a protective coating similar
to the painted surface of your vehicle. Don’t use strong
soaps, chemicals, chrome polish, abrasive cleaners or
abrasive cleaning brushes on them because you could
damage this coating. After rinsing thoroughly, a wax
may be applied.
NOTICE:
,
Don’t use an automatic car wash that has hard
silicon carbide cleaning brushes. These brushes
can take the protective coating
off your
aluminum wheels.
Tires
To clean your tires, use a stiff brush with a tire cleaner.
NOTICE:
When applying a tire dressing always take care to
wipe
off any overspray or splash from all painted
surfaces on the body
or wheels of the vehicle.
Petroleum-based products may damage the paint
finish.
Finish Damage
Any stone chips, fractures or deep scratches in the finish
should be repaired right away.
Minor chips and scratches can be repaired with touch-up
materials available from your dealer or other service
outlets. Larger areas
of finish damage can be corrected
in your dealer’s body and paint shop.
6-60
Page 292 of 386
Downloaded from www.Manualslib.com manuals search engine Underbody Maintenance
Chemicals used for ice and snow removal and, dust
control can collect on the underbody. If these
are not
removed, accelerated corrosion (rust) can occur on the
underbody parts such as fuel lines, frame, floor pan,
and exhaust system even though they have corrosion
protection.
At least every spring, flush these materials from the
underbody with plain water. Clean any areas where mud
and other debris can collect. Dirt packed in closed areas
of the frame should be loosened before being flushed.
Your dealer or an underbody vehicle washing system
can do this for you.
Fiberglass Springs
NOTICE:
I I
Don’t use corrosive or acidic cleaning agents,
engine degreasers, aluminum cleaning agents or
other harsh solvents to clean fiberglass springs;
they’ll damage the springs.
Chemical Paint Spotting
Some weather and atmospheric conditions can create a
chemical fallout. Airborne pollutants can fall upon and
attack painted surfaces on your vehicle. This damage
can take two forms: blotchy, ringlet-shaped
discolorations, and small irregular dark spots etched
into the paint surface.
Although no defect in the paint job causes this, Corvette
will repair, at no charge
to the owner, the surfaces of
new vehicles damaged by this fallout condition within
12 months or 12,000 miles (20
000 km) of purchase,
whichever occurs first.
Page 293 of 386
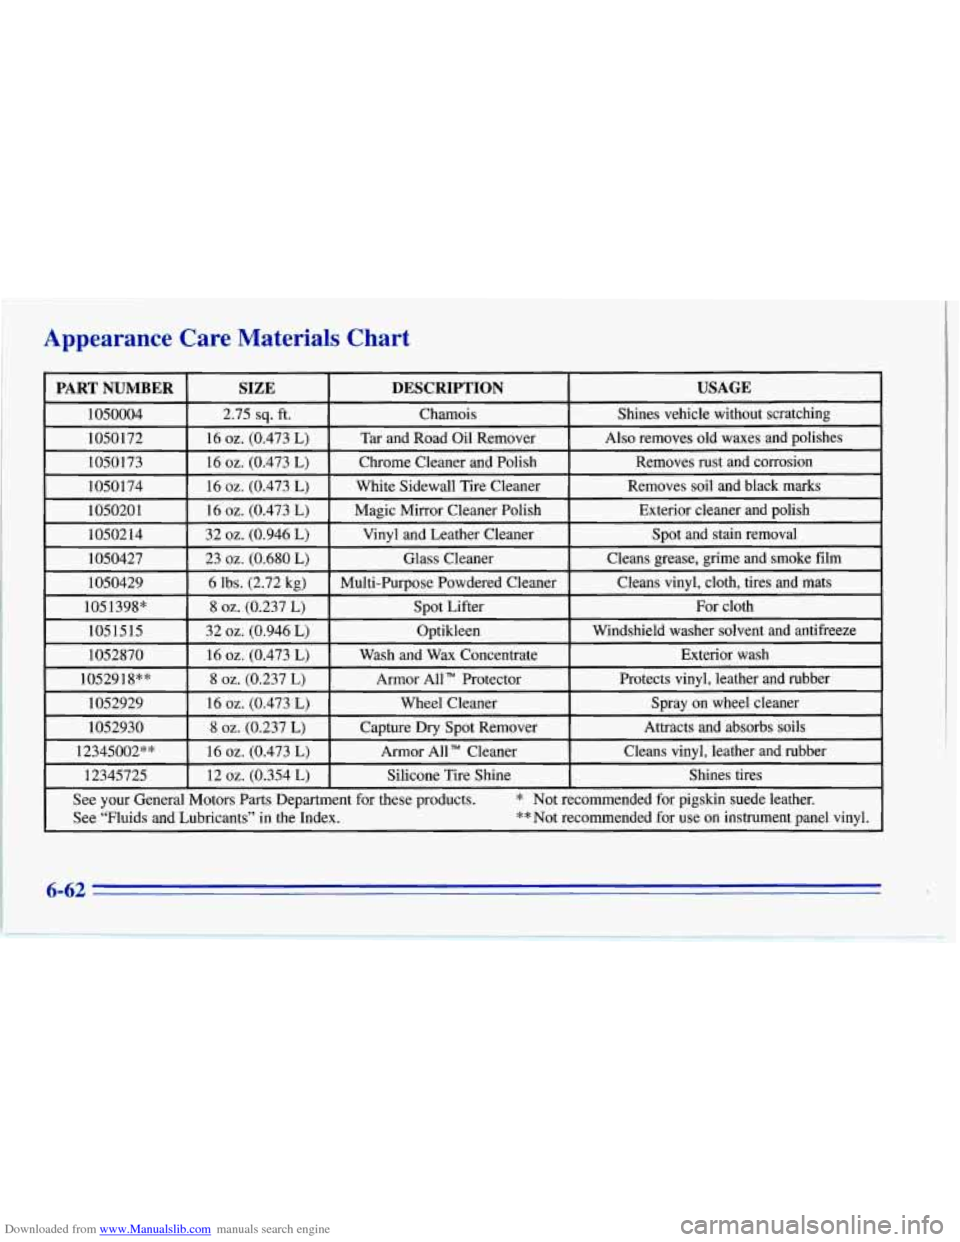
Downloaded from www.Manualslib.com manuals search engine Appearance Care Materials Chart
Page 294 of 386
Downloaded from www.Manualslib.com manuals search engine Vehicle Identification Number (VIN)
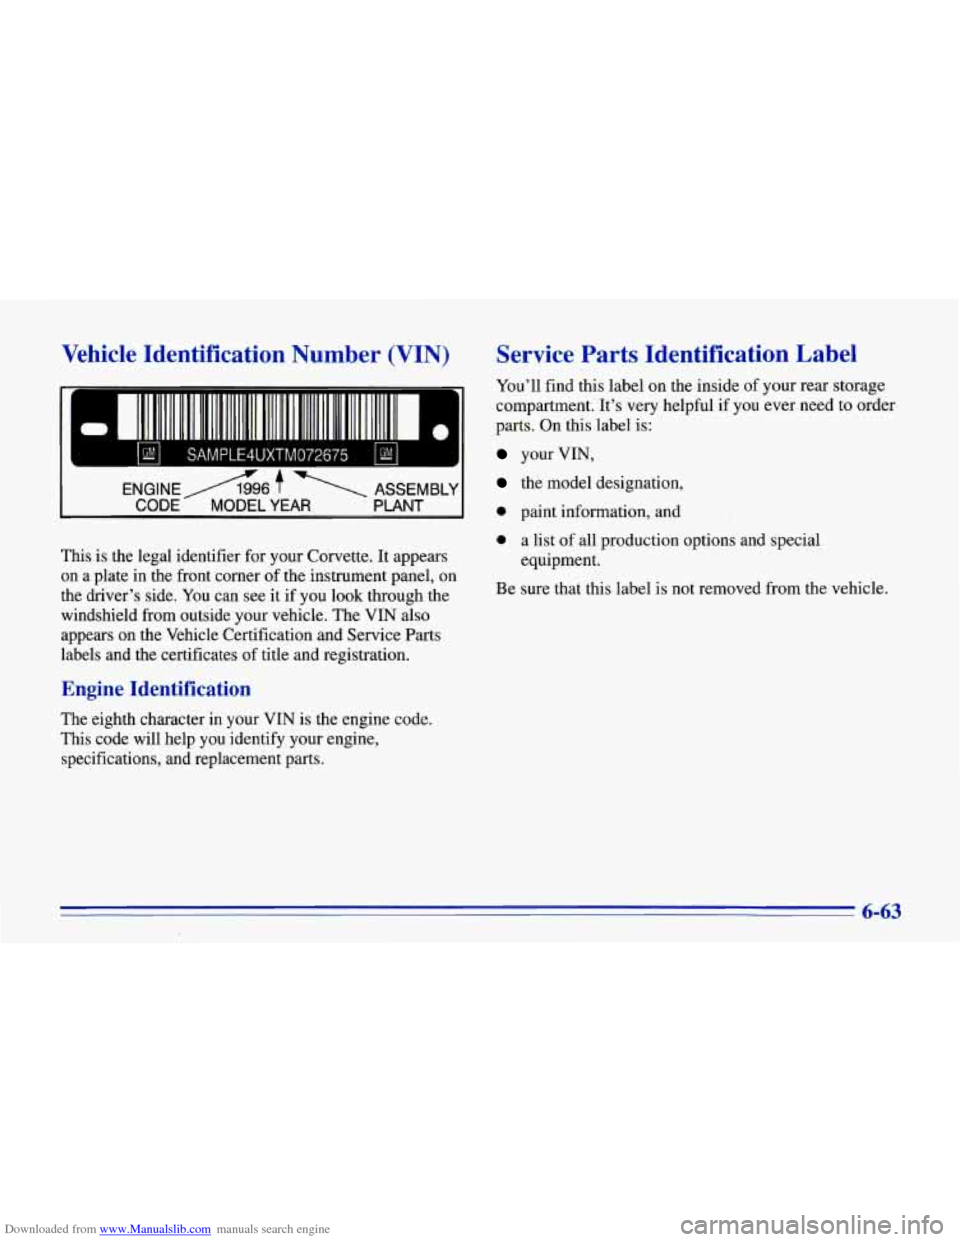
This is the legal identifier for your Corvette. It appears
on a plate
in the front corner of the instrument panel, on
the driver’s side. You can see it if you look through the
windshield from outside your vehicle. The
VIN also
appears on the Vehicle Certification and Service Parts
labels and the certificates of title and registration.
Engine Identification
The eighth character in your VIN is the engine code.
This code will help you identify your engine,
specifications, and replacement parts.
Service Parts Identification Label
You’ll find this label on the inside of your rear storage
compartment. It’s very helpful
if you ever need to order
parts. On this label
is:
your VIN,
the model designation,
0 paint information, and
0 a list of all production options and special
equipment.
Be sure that this label is not removed from the vehicle.
6-63
Page 295 of 386
Downloaded from www.Manualslib.com manuals search engine Electrical System
Add-on Electrical Equipment
NOTICE:
Don’t add anything electrical to your Corvette
unless you check with your dealer first. Some
electrical equipment can damage your vehicle
and the damage wouldn’t be covered by your
warranty. Some add-on electrical equipment can
keep other components from working as they
should.
Your vehicle has an air bag system. Before attempting to
add anything electrical to your Corvette, see “Servicing
Your Air Bag-Equipped Corvette” in the Index.
Headlamps
The headlamp wiring is protected by a circuit breaker.
An electrical overload will cause the lamps
to go on and
off,
or in some cases to remain off. If this happens, have
your headlamp wiring checked right away.
Windshield Wipers
The windshield wiper motor is protected by a fuse and
an internal circuit breaker.
If the motor overheats due to
heavy snow, etc., the wiper will stop until the motor
cools. If the overload is caused by some electrical
problem and not snow, etc., be sure to get it fixed.
Power Windows and Other Power Options
Circuit breakers protect the power windows and other
power accessories. When the current load is too heavy,
the circuit breaker opens and closes, protecting the
circuit until the problem is fixed or goes away.
Page 296 of 386
Downloaded from www.Manualslib.com manuals search engine Fuses and Circuit Breakers
The wiring circuits in your vehicle are protected from
short circuits by a combination of maxi-fuses,
mini-fuses and circuit breakers. This greatly reduces
the chance
of fires caused by electrical problems.
Look at the silver-colored band inside the fuse. If the
band is broken or melted, replace the fuse.
Be sure you
replace a bad fuse with a new one of the identical size
and rating.
If you ever have a problem
on the road and don’t have
a spare fuse,
you can borrow one that has the same
amperage. Just pick some feature of your vehicle that
you can get along without
-- like the radio or cigarette
lighter
-- and use its fuse, if it is the correct amperage.
Replace it as soon as you can.
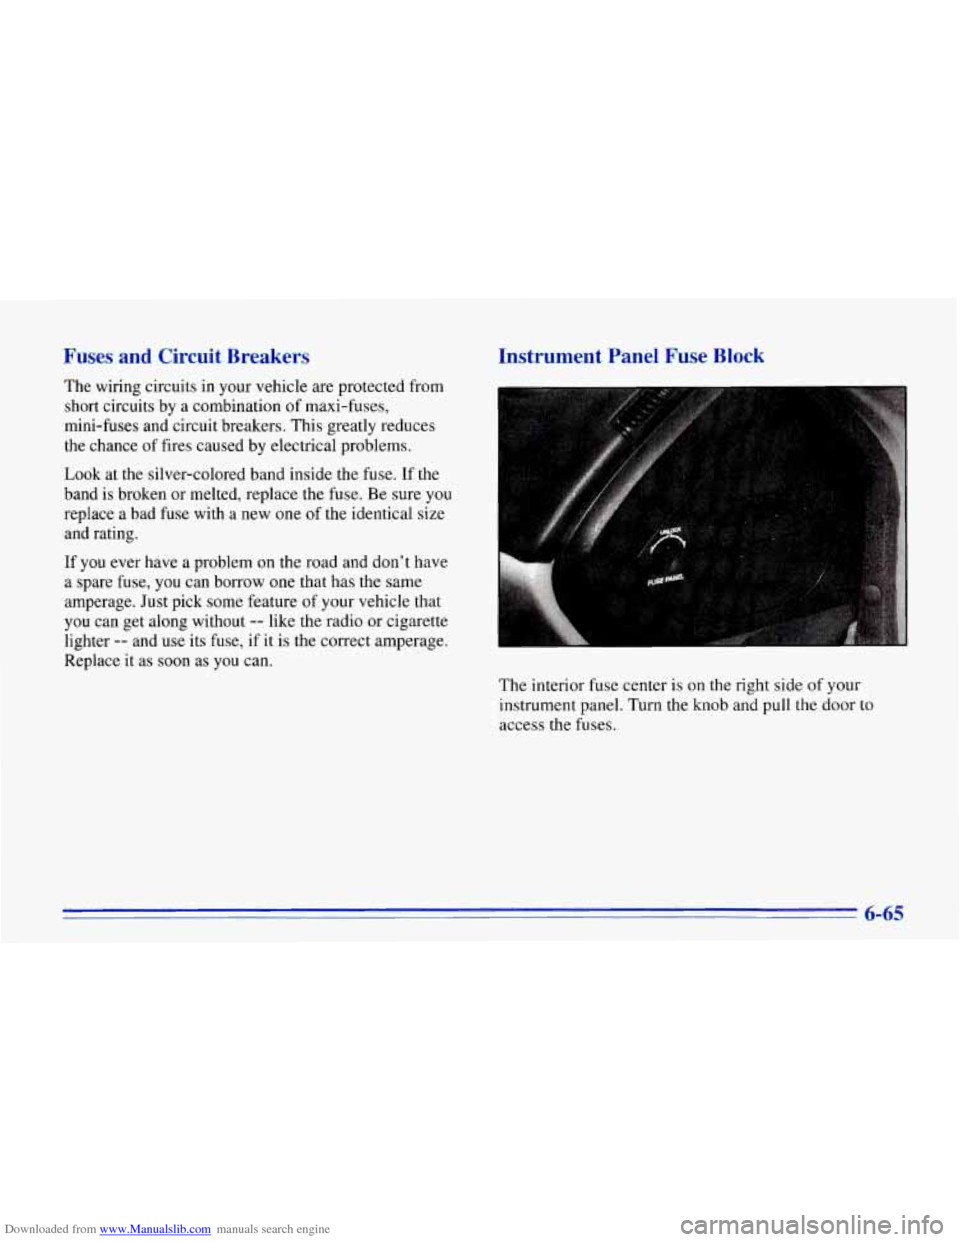
Instrument Panel Fuse Block
The interior fuse center is on the right side of your
instrument panel. Turn the knob and pull the door
to
access the fuses.
6-65
Page 297 of 386
Downloaded from www.Manualslib.com manuals search engine t'
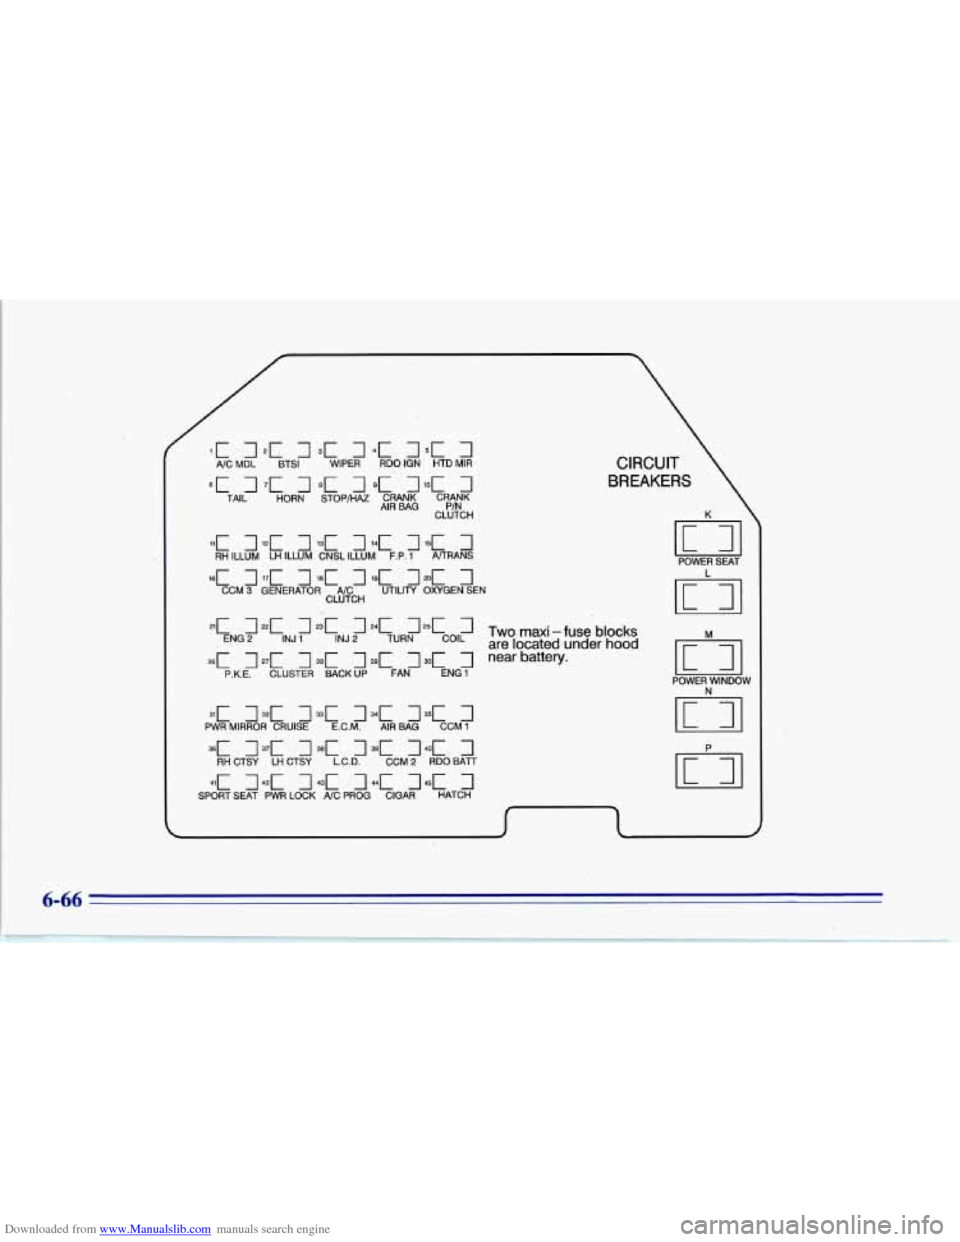
1c 7 21 7 3c 7 4c 7 5c 7 NC MDL BTSI WIPER RDO IGN. HTD MIR CIRCUIT
6C 7 71. 7 8C 7 9c 71oc 7 TAIL HORN STOP/HAZ CRANK CRANK
CLUTCH AIR BAG P/N
11c 7 12c 7 131 7 l4C 7 151 7
15c 7 171 7 18C 7 19c 7c 7
RH ILLUM LH ILLUM CNSL ILLUM F.P. 1 A/TRANS
CCMB GENERATOR A/C UTlLllY OXYGEN SEN
CLUTCH
ZC 7=c 7 =C 724c 725c 7
=c 727c 728C 7c 7c 7
ENG2 lNJl INJ 2 TURN COIL
P.K.E. CLUSTER BACKUP FAN ENG
1
31c 7-c 7=c 7c IbC 7
=E 7 37c 7 =c 7 391 74oc 7
4lC 742C 7C JC 7
PWR MIRROR CRUISE E.C.M. AIR BAG CCMl
RHCTSY LHCTSY L.C.D. CCMP RDOBATT
SPORT SEAT PWR LOCK NC PROG CIGAR HATCH
BREAKERS
ml
POWER SEAT
Two maxi -fuse blocks
are located under hood
near battery.
POWER WINDOW
N
P
6-66
Page 298 of 386
Downloaded from www.Manualslib.com manuals search engine Fuse
1
2
3
4
5
6
7
8
9
10
11
12
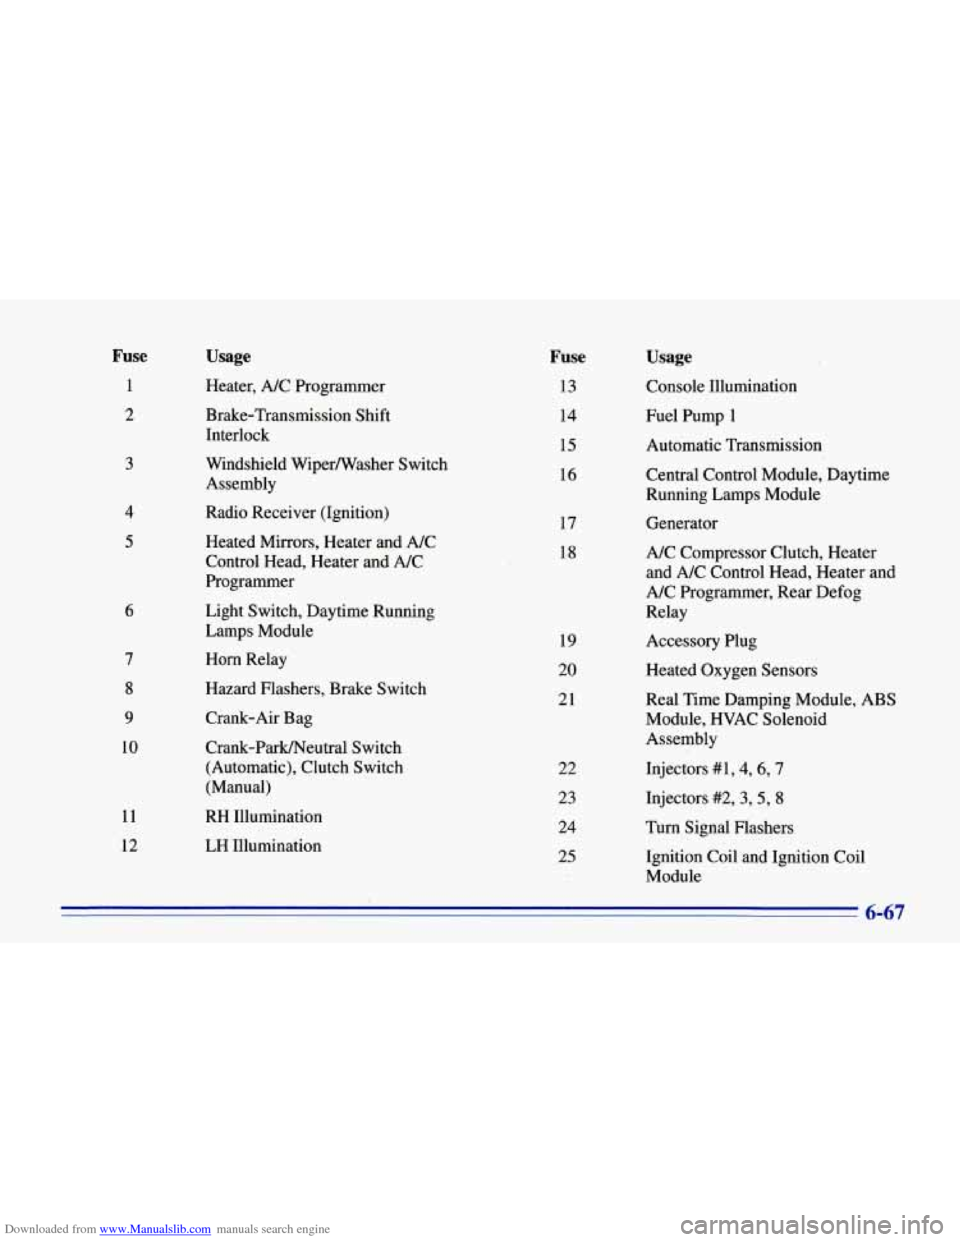
Usage
Heater, A/C Programmer
Brake-Transmission Shift
Interlock
Windshield WiperNasher Switch
Assembly
Radio Receiver (Ignition)
Heated Mirrors, Heater
and A/C
Control Head, Heater and A/C
Programmer
Light Switch, Daytime Running
Lamps Module
Horn Relay
Hazard Flashers, Brake Switch
Crank-Air Bag
Crank-Park/Neutral Switch
(Automatic), Clutch Switch
(Manual)
Usage
Console Illumination
Fuel Pump
1
Automatic Transmission
Central Control Module, Daytime
Running Lamps Module
Generator
A/C .Compressor Clutch, Heater
and A/C Control Head, Heater and
A/C Programmer, Rev Defog
Relay
Accessory Plug
Heated Oxygen Sensors
Real Time Damping Module, ABS
Module, HVAC Solenoid
Assembly
Injectors
#1,4,6,7
Injectors #2,3,5, 8
Turn Signal Flashers
Ignition Coil and Ignition Coil
Module
ti47
RH Illumination
LH Illumination
Fuse
13
14
15
16
17
18
19
20
21
22
23 24
25
Page 299 of 386
Downloaded from www.Manualslib.com manuals search engine Fuse
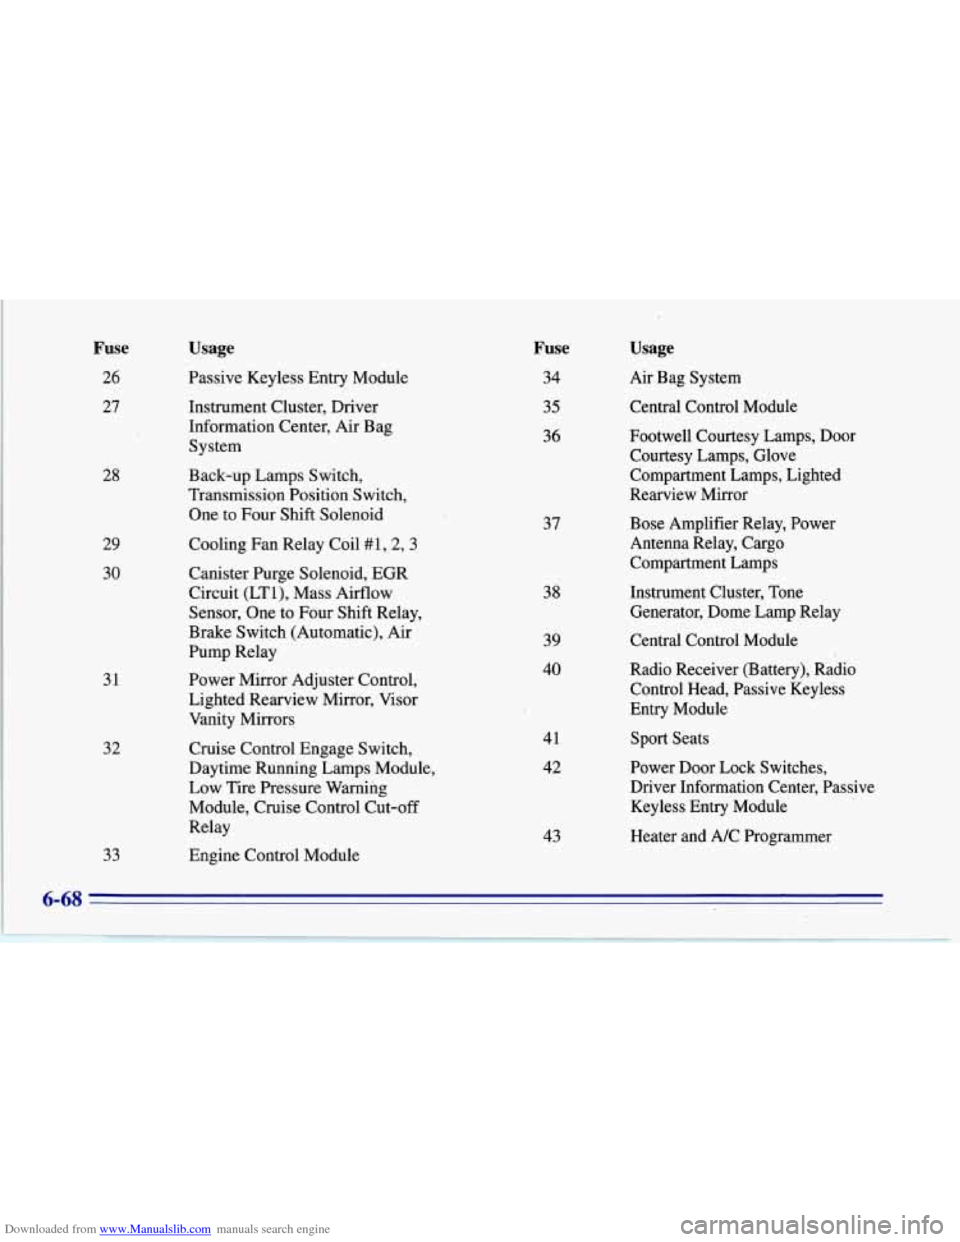
26 27
28
29
30
31
32
33
Usage
Passive Keyless Entry Module
Instrument Cluster, Driver
Information Center, Air Bag System
Back-up Lamps Switch,
Transmission Position Switch,
One to Four Shift Solenoid
Cooling Fan Relay Coil #1
, 2,3
Canister Purge Solenoid, EGR
Circuit (LTl), Mass Airflow
Sensor, One to Four Shift Relay,
Brake Switch (Automatic), Air
Pump Relay
Power Mirror Adjuster Control,
Lighted Rearview Mirror, Visor
Vanity Mirrors
Cruise Control Engage Switch,
Daytime Running Lamps Module,
Low Tire Pressure Warning
Module, Cruise Control Cut-off
Relay
Engine Control Module
Fuse
34
35
36
37
38
39
40
41 42
43
Usage
Air Bag System
Central Control Module
Footwell Courtesy Lamps, Door Courtesy Lamps, Glove
Compartment Lamps, Lighted
Rearview Mirror
Bose Amplifier Relay, Power
Antenna Relay, Cargo Compartment Lamps
Instrument Cluster, Tone
Generator, Dome Lamp Relay
Central Control Module
Radio Receiver (Battery), Radio
Control Head, Passive Keyless
Entry Module
Sport Seats
Power Door Lock Switches,
Driver Information Center, Passive Keyless Entry Module
Heater and A/C Programmer
6-68
Page 300 of 386
Downloaded from www.Manualslib.com manuals search engine Fuse
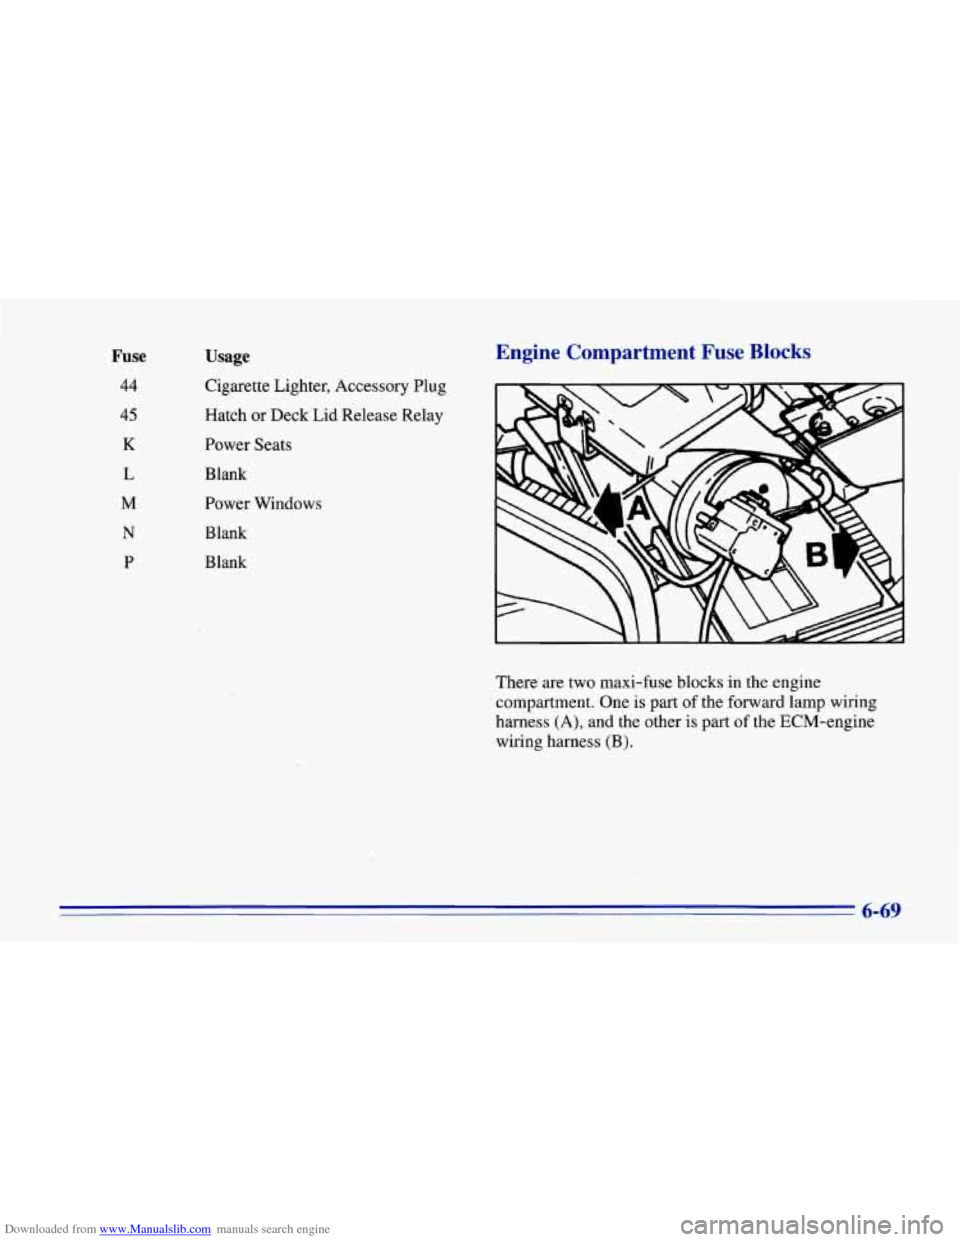
44
45
K
L
M
N
P
Usage
Cigarette Lighter, Accessory Plug
Hatch
or Deck Lid Release Relay
Power Seats
Blank
Power Windows
Blank
Blank
Engine Compartment Fuse Blocks
There are two maxi-fuse blocks in the engine
compartment. One is part of the forward lamp wiring
harness
(A), and the other is part of the ECM-engine
wiring harness (B).
6-69