CHRYSLER PACIFICA HYBRID 2019 Owner's Guide
Manufacturer: CHRYSLER, Model Year: 2019, Model line: PACIFICA HYBRID, Model: CHRYSLER PACIFICA HYBRID 2019Pages: 620, PDF Size: 4.92 MB
Page 31 of 620
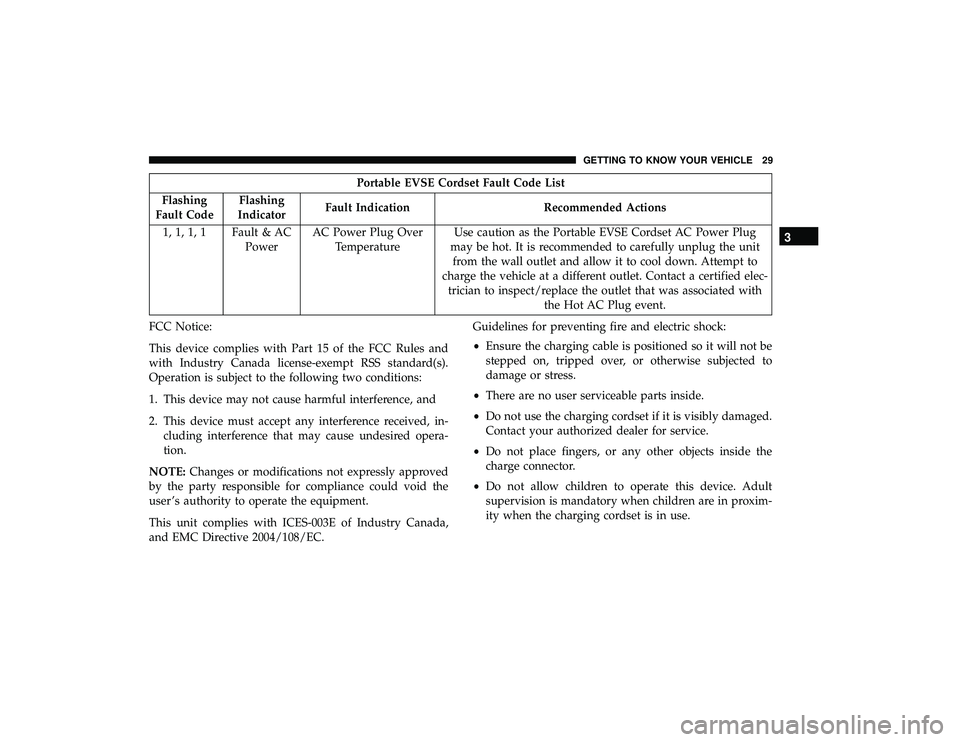
Portable EVSE Cordset Fault Code List
Flashing
Fault Code Flashing
Indicator Fault Indication Recommended Actions
1, 1, 1, 1 Fault & AC PowerAC Power Plug Over
Temperature Use caution as the Portable EVSE Cordset AC Power Plug
may be hot. It is recommended to carefully unplug the unit from the wall outlet and allow it to cool down. Attempt to
charge the vehicle at a different outlet. Contact a certified elec- trician to inspect/replace the outlet that was associated with the Hot AC Plug event.
FCC Notice:
This device complies with Part 15 of the FCC Rules and
with Industry Canada license-exempt RSS standard(s).
Operation is subject to the following two conditions:
1. This device may not cause harmful interference, and
2. This device must accept any interference received, in- cluding interference that may cause undesired opera-
tion.
NOTE: Changes or modifications not expressly approved
by the party responsible for compliance could void the
user ’s authority to operate the equipment.
This unit complies with ICES-003E of Industry Canada,
and EMC Directive 2004/108/EC. Guidelines for preventing fire and electric shock:
•
Ensure the charging cable is positioned so it will not be
stepped on, tripped over, or otherwise subjected to
damage or stress.
• There are no user serviceable parts inside.
• Do not use the charging cordset if it is visibly damaged.
Contact your authorized dealer for service.
• Do not place fingers, or any other objects inside the
charge connector.
• Do not allow children to operate this device. Adult
supervision is mandatory when children are in proxim-
ity when the charging cordset is in use.
3
GETTING TO KNOW YOUR VEHICLE 29
Page 32 of 620

NOTE:During normal operation, the charge connector or
AC plug may feel warm. If either one feels hot during
charging, unplug the charging cordset and have a qualified
electrician inspect the wall receptacle before you continue
charging.
WARNING!
Do not use the charging cordset with a receptacle that
is worn or damaged. Using the charging cordset with a
worn or damaged receptacle may cause burns or start a
fire.
AC Level 2 Charging (240V, 30 Amp Or 32 Amp)
AC Level 2 (240 V) charging requires a 240 V, Level 2 EVSE
(Charging station). A 30 Amp or 32 Amp Level 2 EVSE for
home installation is recommended.
When using public charging stations, ensure the charging
station is ready to provide charge and the vehicle is in
PARK before the charge connector is plugged into the
vehicle’s charge inlet. You will hear a “click” when the
charge connector is inserted correctly and is coupled with
the vehicle’s charge inlet. The vehicle should start charging
automatically. If not, please check the instructions at the
charging station. NOTE:
The vehicle should start charging automatically. If
not, please check the following:
• Charging Station – Check the indications and instruc-
tions at the charging station or
• Charging Schedule – Check whether the charging sched-
ule is enabled and if so, whether the vehicle is currently
within the scheduled charge time/day (weekday/
weekend). If the charging schedule is enabled within the
vehicle, you may override them for this charging event
by plugging in the charge connector, unplugging it, and
then plugging it back into the vehicle charge inlet.
Complete the double plug sequence within ten seconds
for it to override the set schedule.
To stop the charging process:
• Press the “STOP” button located on the front of the
EVSE station.
• Press the button on the charge connector first and then
remove the connector from the vehicle charge inlet.
• Plug the charge handle into the EVSE station and coil the
charging cord onto its holder. Do not leave the charging
cord laying on the ground.
30 GETTING TO KNOW YOUR VEHICLE
Page 33 of 620
Charging Times
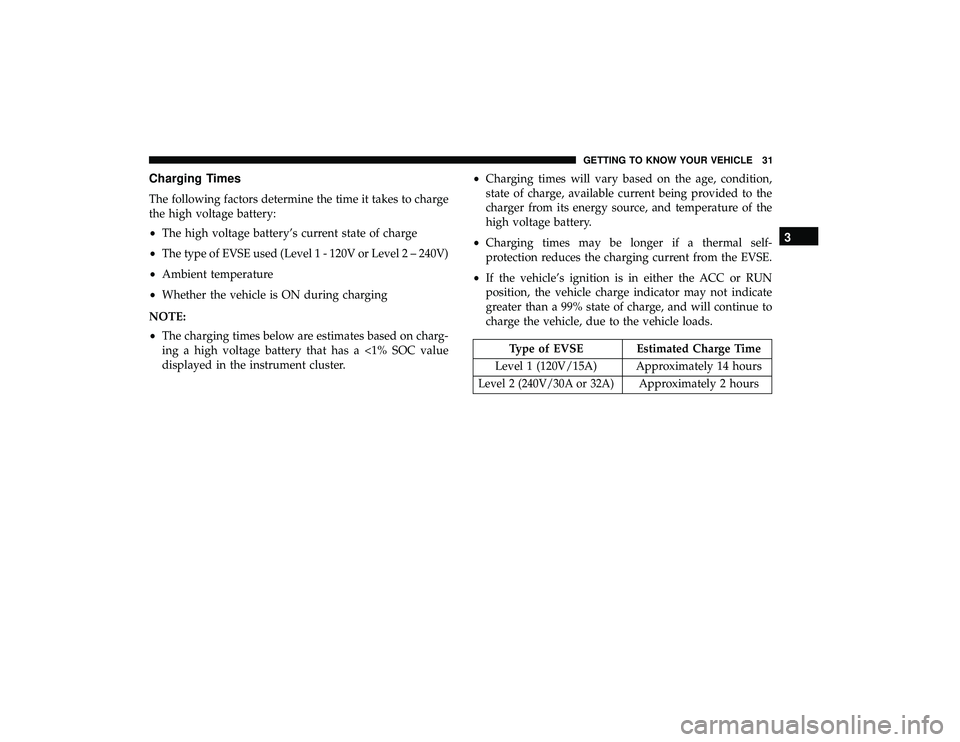
The following factors determine the time it takes to charge
the high voltage battery:
•The high voltage battery’s current state of charge
• The type of EVSE used (Level 1 - 120V or Level 2 – 240V)
• Ambient temperature
• Whether the vehicle is ON during charging
NOTE:
• The charging times below are estimates based on charg-
ing a high voltage battery that has a <1% SOC value
displayed in the instrument cluster. •
Charging times will vary based on the age, condition,
state of charge, available current being provided to the
charger from its energy source, and temperature of the
high voltage battery.
• Charging times may be longer if a thermal self-
protection reduces the charging current from the EVSE.
• If the vehicle’s ignition is in either the ACC or RUN
position, the vehicle charge indicator may not indicate
greater than a 99% state of charge, and will continue to
charge the vehicle, due to the vehicle loads.
Type of EVSE Estimated Charge Time
Level 1 (120V/15A) Approximately 14 hours
Level 2 (240V/30A or 32A)Approximately 2 hours
3
GETTING TO KNOW YOUR VEHICLE 31
Page 34 of 620

Vehicle Charge Indicators
Instrument Cluster High Voltage Battery Display
There is a battery display indicator located on the instru-
ment cluster. The battery display will display the current
state of charge for the high voltage battery; with the
percentage value located to the left of the symbol. When
plugged in, the battery symbol also gives the battery level
along with messages about the charge or whether the
system is waiting to charge due to the charge schedule.
These will appear unless there is a charging fault. A green
plug telltale will be shown in the cluster, as well as
applicable messaging when charging.Instrument Panel State Of Charge Indicator
In addition to the battery display, your vehicle is equipped
with a visual state of charge indicator. The state of charge
indicator is made up of five lights that are mounted to the
top center of the instrument panel, which will illuminate
when the vehicle is plugged into the EVSE.
The state of charge indicator provides a visual indication of
the high voltage battery’s charge status during charging.
It’s also used to indicate a charging problem, as well as,
waiting for a schedule charge to begin.
High Voltage Battery Display
State Of Charge Indicator
32 GETTING TO KNOW YOUR VEHICLE
Page 35 of 620
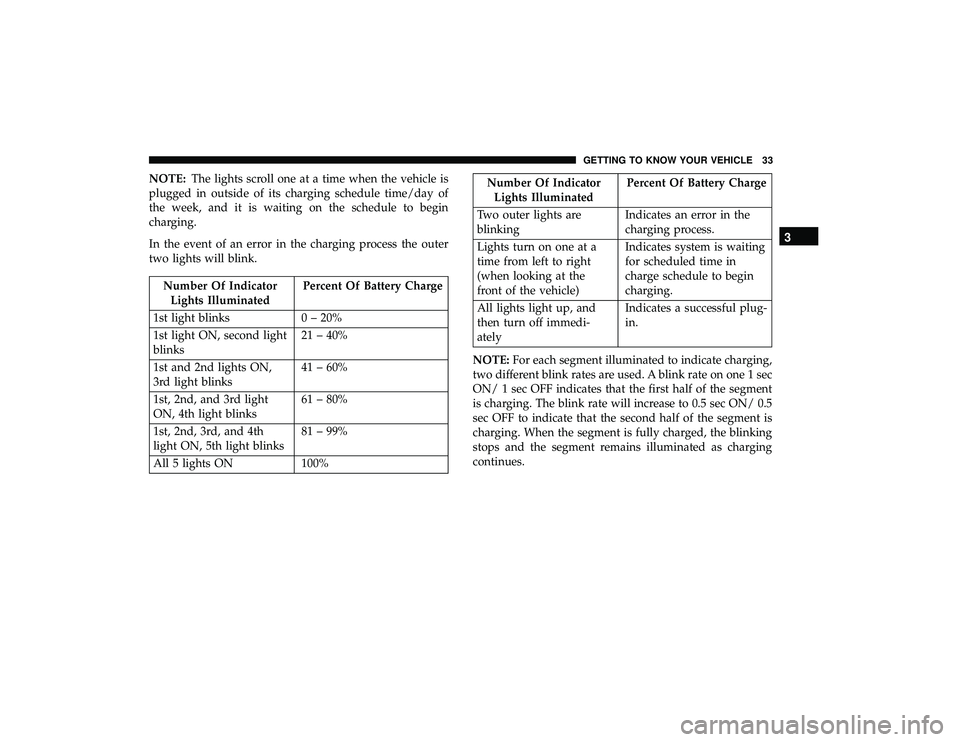
NOTE:The lights scroll one at a time when the vehicle is
plugged in outside of its charging schedule time/day of
the week, and it is waiting on the schedule to begin
charging.
In the event of an error in the charging process the outer
two lights will blink.
Number Of Indicator Lights Illuminated Percent Of Battery Charge
1st light blinks 0 – 20%
1st light ON, second light
blinks 21 – 40%
1st and 2nd lights ON,
3rd light blinks 41 – 60%
1st, 2nd, and 3rd light
ON, 4th light blinks 61 – 80%
1st, 2nd, 3rd, and 4th
light ON, 5th light blinks 81 – 99%
All 5 lights ON 100%
Number Of Indicator Lights Illuminated Percent Of Battery Charge
Two outer lights are
blinking Indicates an error in the
charging process.
Lights turn on one at a
time from left to right
(when looking at the
front of the vehicle) Indicates system is waiting
for scheduled time in
charge schedule to begin
charging.
All lights light up, and
then turn off immedi-
ately Indicates a successful plug-
in.
NOTE: For each segment illuminated to indicate charging,
two different blink rates are used. A blink rate on one 1 sec
ON/ 1 sec OFF indicates that the first half of the segment
is charging. The blink rate will increase to 0.5 sec ON/ 0.5
sec OFF to indicate that the second half of the segment is
charging. When the segment is fully charged, the blinking
stops and the segment remains illuminated as charging
continues.
3
GETTING TO KNOW YOUR VEHICLE 33
Page 36 of 620
Hybrid Electric Pages
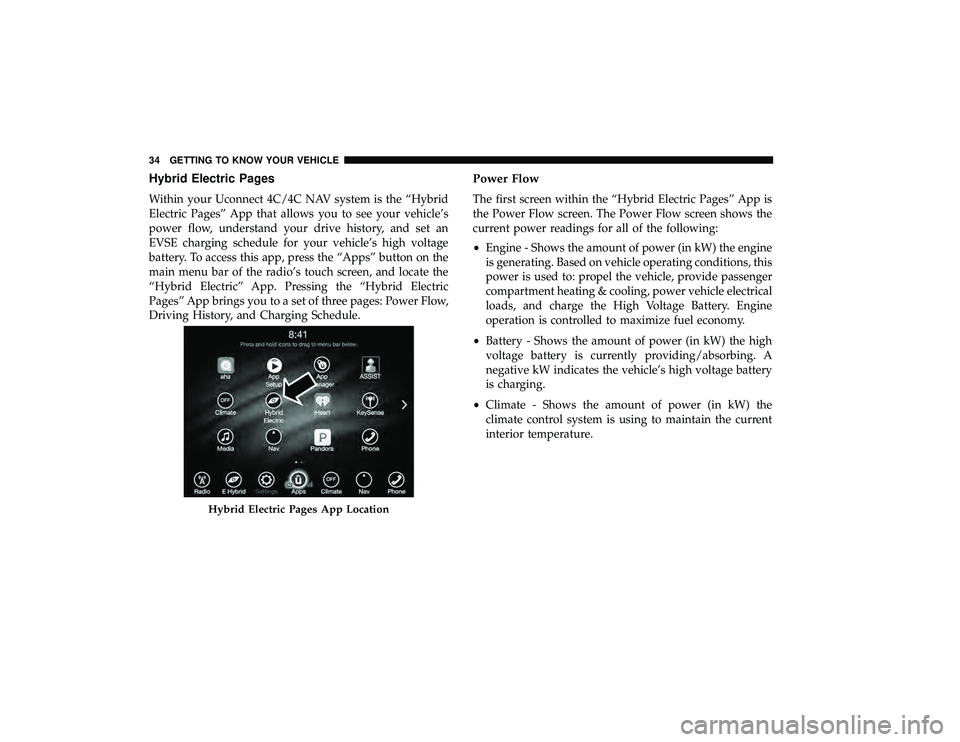
Within your Uconnect 4C/4C NAV system is the “Hybrid
Electric Pages” App that allows you to see your vehicle’s
power flow, understand your drive history, and set an
EVSE charging schedule for your vehicle’s high voltage
battery. To access this app, press the “Apps” button on the
main menu bar of the radio’s touch screen, and locate the
“Hybrid Electric” App. Pressing the “Hybrid Electric
Pages” App brings you to a set of three pages: Power Flow,
Driving History, and Charging Schedule.
Power Flow
The first screen within the “Hybrid Electric Pages” App is
the Power Flow screen. The Power Flow screen shows the
current power readings for all of the following:
•Engine - Shows the amount of power (in kW) the engine
is generating. Based on vehicle operating conditions, this
power is used to: propel the vehicle, provide passenger
compartment heating & cooling, power vehicle electrical
loads, and charge the High Voltage Battery. Engine
operation is controlled to maximize fuel economy.
• Battery - Shows the amount of power (in kW) the high
voltage battery is currently providing/absorbing. A
negative kW indicates the vehicle’s high voltage battery
is charging.
• Climate - Shows the amount of power (in kW) the
climate control system is using to maintain the current
interior temperature.
Hybrid Electric Pages App Location
34 GETTING TO KNOW YOUR VEHICLE
Page 37 of 620
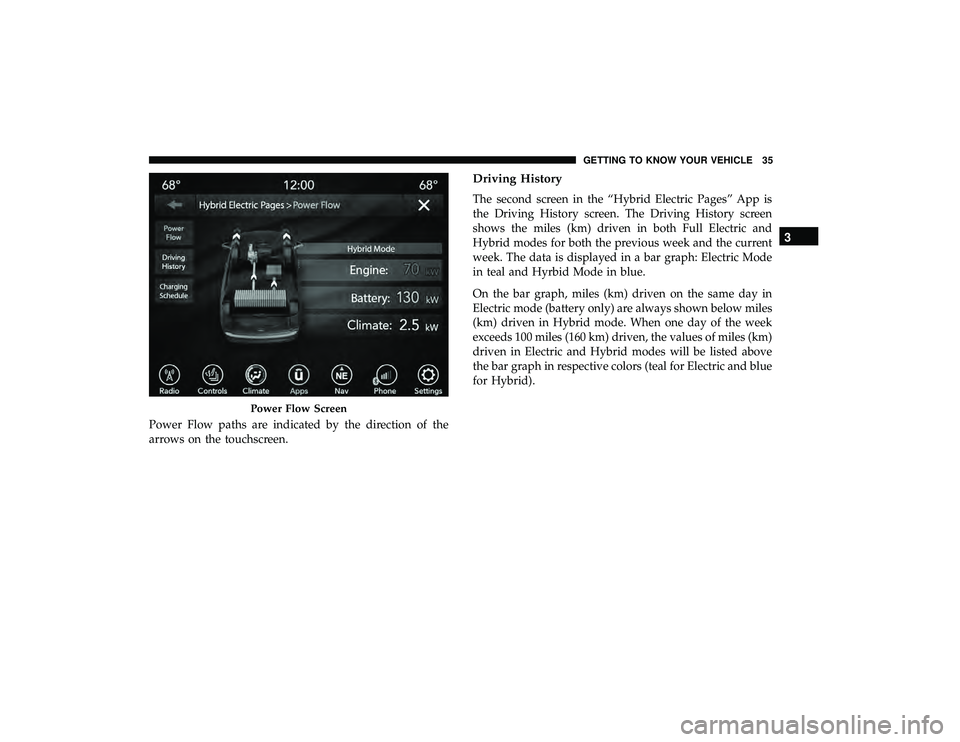
Power Flow paths are indicated by the direction of the
arrows on the touchscreen.
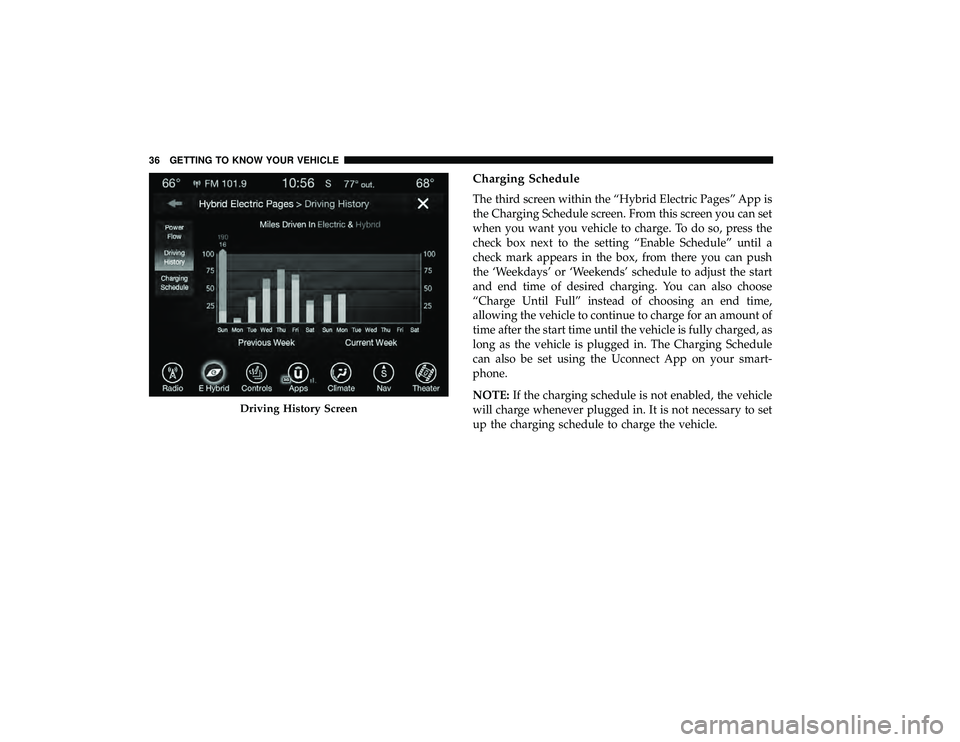
Driving History
The second screen in the “Hybrid Electric Pages” App is
the Driving History screen. The Driving History screen
shows the miles (km) driven in both Full Electric and
Hybrid modes for both the previous week and the current
week. The data is displayed in a bar graph: Electric Mode
in teal and Hyrbid Mode in blue.
On the bar graph, miles (km) driven on the same day in
Electric mode (battery only) are always shown below miles
(km) driven in Hybrid mode. When one day of the week
exceeds 100 miles (160 km) driven, the values of miles (km)
driven in Electric and Hybrid modes will be listed above
the bar graph in respective colors (teal for Electric and blue
for Hybrid).
Power Flow Screen
3
GETTING TO KNOW YOUR VEHICLE 35
Page 38 of 620
Charging Schedule
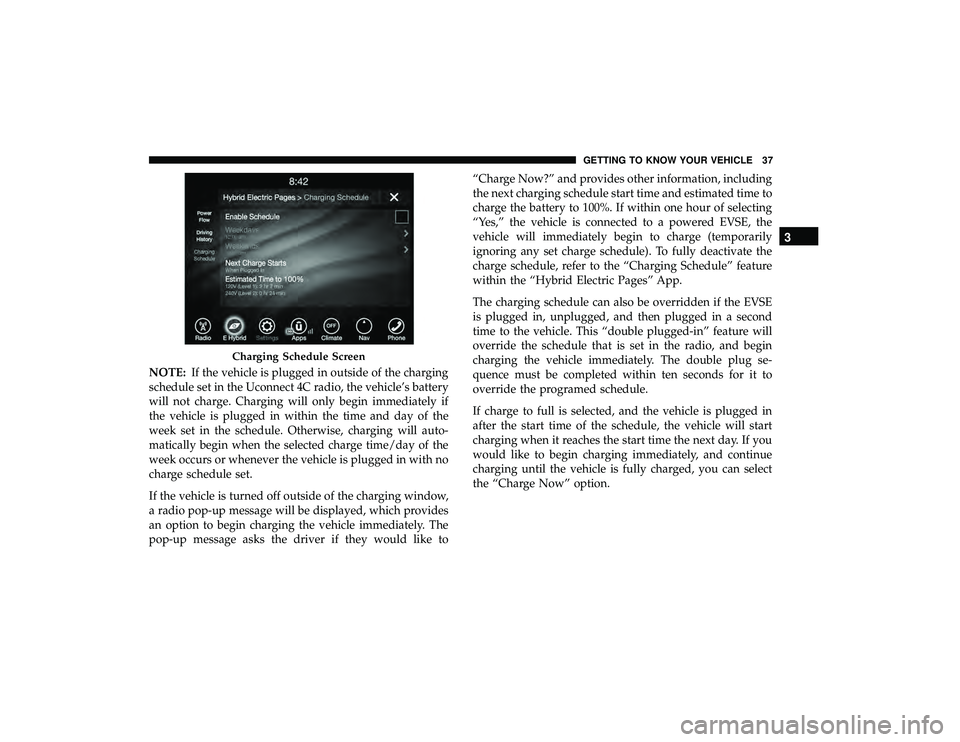
The third screen within the “Hybrid Electric Pages” App is
the Charging Schedule screen. From this screen you can set
when you want you vehicle to charge. To do so, press the
check box next to the setting “Enable Schedule” until a
check mark appears in the box, from there you can push
the ‘Weekdays’ or ‘Weekends’ schedule to adjust the start
and end time of desired charging. You can also choose
“Charge Until Full” instead of choosing an end time,
allowing the vehicle to continue to charge for an amount of
time after the start time until the vehicle is fully charged, as
long as the vehicle is plugged in. The Charging Schedule
can also be set using the Uconnect App on your smart-
phone.
NOTE:If the charging schedule is not enabled, the vehicle
will charge whenever plugged in. It is not necessary to set
up the charging schedule to charge the vehicle.
Driving History Screen
36 GETTING TO KNOW YOUR VEHICLE
Page 39 of 620
NOTE:If the vehicle is plugged in outside of the charging
schedule set in the Uconnect 4C radio, the vehicle’s battery
will not charge. Charging will only begin immediately if
the vehicle is plugged in within the time and day of the
week set in the schedule. Otherwise, charging will auto-
matically begin when the selected charge time/day of the
week occurs or whenever the vehicle is plugged in with no
charge schedule set.
If the vehicle is turned off outside of the charging window,
a radio pop-up message will be displayed, which provides
an option to begin charging the vehicle immediately. The
pop-up message asks the driver if they would like to “Charge Now?” and provides other information, including
the next charging schedule start time and estimated time to
charge the battery to 100%. If within one hour of selecting
“Yes,” the vehicle is connected to a powered EVSE, the
vehicle will immediately begin to charge (temporarily
ignoring any set charge schedule). To fully deactivate the
charge schedule, refer to the “Charging Schedule” feature
within the “Hybrid Electric Pages” App.
The charging schedule can also be overridden if the EVSE
is plugged in, unplugged, and then plugged in a second
time to the vehicle. This “double plugged-in” feature will
override the schedule that is set in the radio, and begin
charging the vehicle immediately. The double plug se-
quence must be completed within ten seconds for it to
override the programed schedule.
If charge to full is selected, and the vehicle is plugged in
after the start time of the schedule, the vehicle will start
charging when it reaches the start time the next day. If you
would like to begin charging immediately, and continue
charging until the vehicle is fully charged, you can select
the “Charge Now” option.
Charging Schedule Screen
3
GETTING TO KNOW YOUR VEHICLE 37
Page 40 of 620
KEYS
Key Fob
Your vehicle uses a keyless ignition system. The ignition
system consists of a key fob with Remote Keyless Entry
(RKE) and a START/STOP push button ignition system.
The Remote Keyless Entry system uses a receiver module
in the vehicle that wirelessly links with the key fob.
NOTE:The key fob may not be found if it is located next to
a mobile phone, laptop or other electronic device; these
devices may block the key fob’s wireless signal.
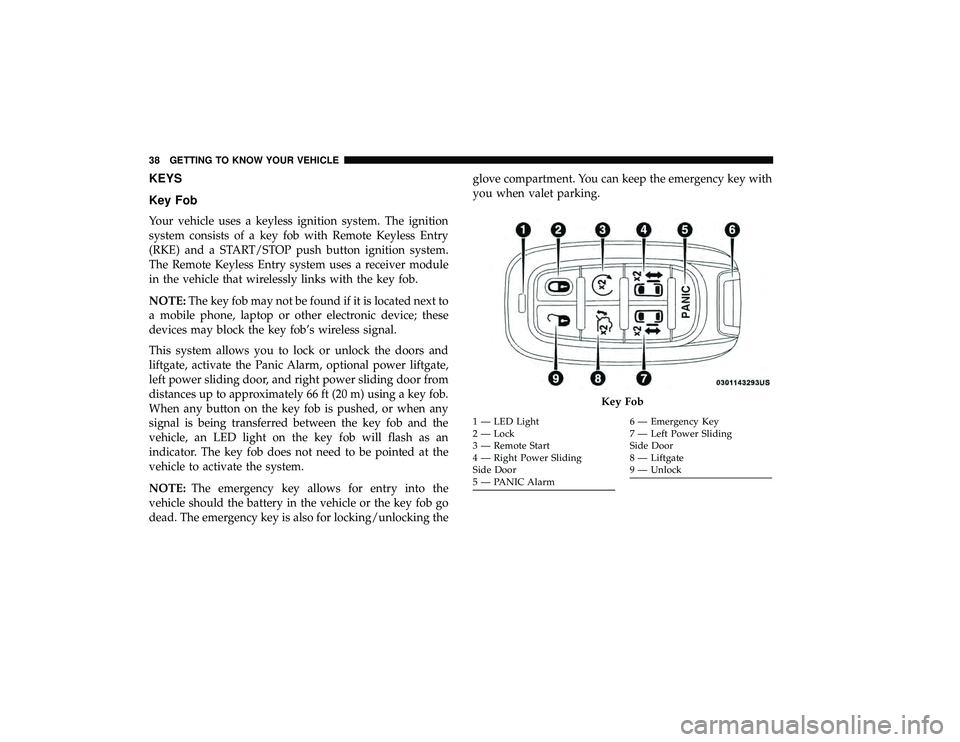
This system allows you to lock or unlock the doors and
liftgate, activate the Panic Alarm, optional power liftgate,
left power sliding door, and right power sliding door from
distances up to approximately 66 ft (20 m) using a key fob.
When any button on the key fob is pushed, or when any
signal is being transferred between the key fob and the
vehicle, an LED light on the key fob will flash as an
indicator. The key fob does not need to be pointed at the
vehicle to activate the system.
NOTE: The emergency key allows for entry into the
vehicle should the battery in the vehicle or the key fob go
dead. The emergency key is also for locking/unlocking the glove compartment. You can keep the emergency key with
you when valet parking.
Key Fob
1 — LED Light
2 — Lock
3 — Remote Start
4 — Right Power Sliding
Side Door
5 — PANIC Alarm6 — Emergency Key
7 — Left Power Sliding
Side Door
8 — Liftgate
9 — Unlock
38 GETTING TO KNOW YOUR VEHICLE