display CHRYSLER PACIFICA HYBRID 2021 Manual PDF
[x] Cancel search | Manufacturer: CHRYSLER, Model Year: 2021, Model line: PACIFICA HYBRID, Model: CHRYSLER PACIFICA HYBRID 2021Pages: 401, PDF Size: 26.88 MB
Page 190 of 401
188
MULTIMEDIA
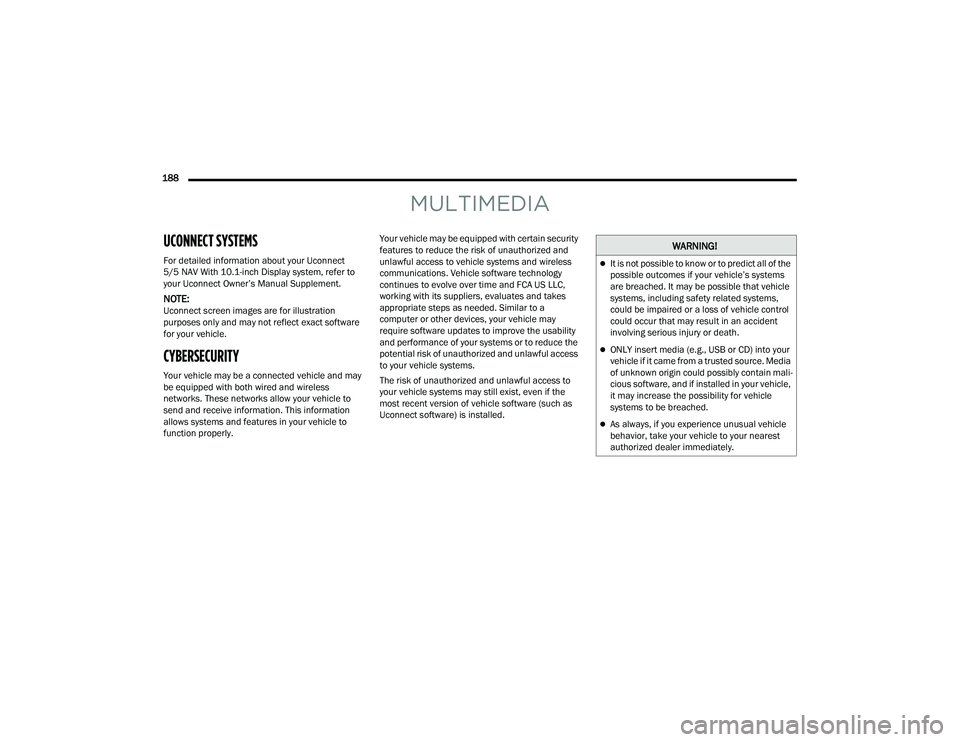
UCONNECT SYSTEMS
For detailed information about your Uconnect
5/5 NAV With 10.1-inch Display system, refer to
your Uconnect Owner’s Manual Supplement.
NOTE:Uconnect screen images are for illustration
purposes only and may not reflect exact software
for your vehicle.
CYBERSECURITY
Your vehicle may be a connected vehicle and may
be equipped with both wired and wireless
networks. These networks allow your vehicle to
send and receive information. This information
allows systems and features in your vehicle to
function properly.Your vehicle may be equipped with certain security
features to reduce the risk of unauthorized and
unlawful access to vehicle systems and wireless
communications. Vehicle software technology
continues to evolve over time and FCA US LLC,
working with its suppliers, evaluates and takes
appropriate steps as needed. Similar to a
computer or other devices, your vehicle may
require software updates to improve the usability
and performance of your systems or to reduce the
potential risk of unauthorized and unlawful access
to your vehicle systems.
The risk of unauthorized and unlawful access to
your vehicle systems may still exist, even if the
most recent version of vehicle software (such as
Uconnect software) is installed.
WARNING!
It is not possible to know or to predict all of the
possible outcomes if your vehicle’s systems
are breached. It may be possible that vehicle
systems, including safety related systems,
could be impaired or a loss of vehicle control
could occur that may result in an accident
involving serious injury or death.
ONLY insert media (e.g., USB or CD) into your
vehicle if it came from a trusted source. Media
of unknown origin could possibly contain mali
-
cious software, and if installed in your vehicle,
it may increase the possibility for vehicle
systems to be breached.
As always, if you experience unusual vehicle
behavior, take your vehicle to your nearest
authorized dealer immediately.
21_RUP_OM_EN_USC_t.book Page 188
Page 191 of 401

MULTIMEDIA189
NOTE:
FCA US LLC or your dealer may contact you
directly regarding software updates.
To help further improve vehicle security and
minimize the potential risk of a security breach,
vehicle owners should:
Routinely check www.driveuconnect.com
(US Residents) or www.driveuconnect.ca
(Canadian Residents) to learn about avail -
able Uconnect software updates.
Only connect and use trusted media
devices (e.g. personal mobile phones,
USBs, CDs).
Privacy of any wireless and wired communications
cannot be assured. Third parties may unlawfully
intercept information and private communications
without your consent. For further information, refer
to “Data Collection & Privacy” in your Uconnect
Owner’s Manual Supplement or “Onboard
Diagnostic System (OBD II) Cybersecurity” in
“Getting To Know Your Instrument Panel”
Ú page 130.
UCONNECT SETTINGS
The Uconnect system uses a combination of
buttons on the touchscreen and buttons on the
faceplate located on the center of the instrument
panel. These buttons allow you to access and
change the Customer Programmable Features.
Many features can vary by vehicle.
Buttons on the faceplate are located below and/or
beside the Uconnect system in the center of the
instrument panel. In addition, there is a Scroll/
Enter control knob located on the right side. Turn
the control knob to scroll through menus and
change settings. Push the center of the control
knob one or more times to select or change a
setting.
Your Uconnect system may also have Screen Off
and Mute buttons on the faceplate.
Push the Screen Off button on the faceplate to turn
off the Uconnect screen. Push the button again or
tap the screen to turn the screen on.
Press the Back Arrow button to exit out of a Menu
or certain option on the Uconnect system.
On the Uconnect 5/5 NAV With 10.1-inch Display,
push and hold the Power button on the radio’s
faceplate for a minimum of 15 seconds to reset
the radio.
CUSTOMER PROGRAMMABLE FEATURES
Uconnect 5/5 NAV With 10.1-inch Display
1 — Uconnect Buttons On The Touchscreen
2 — Uconnect Buttons On The Faceplate
5
21_RUP_OM_EN_USC_t.book Page 189
Page 192 of 401
190MULTIMEDIA
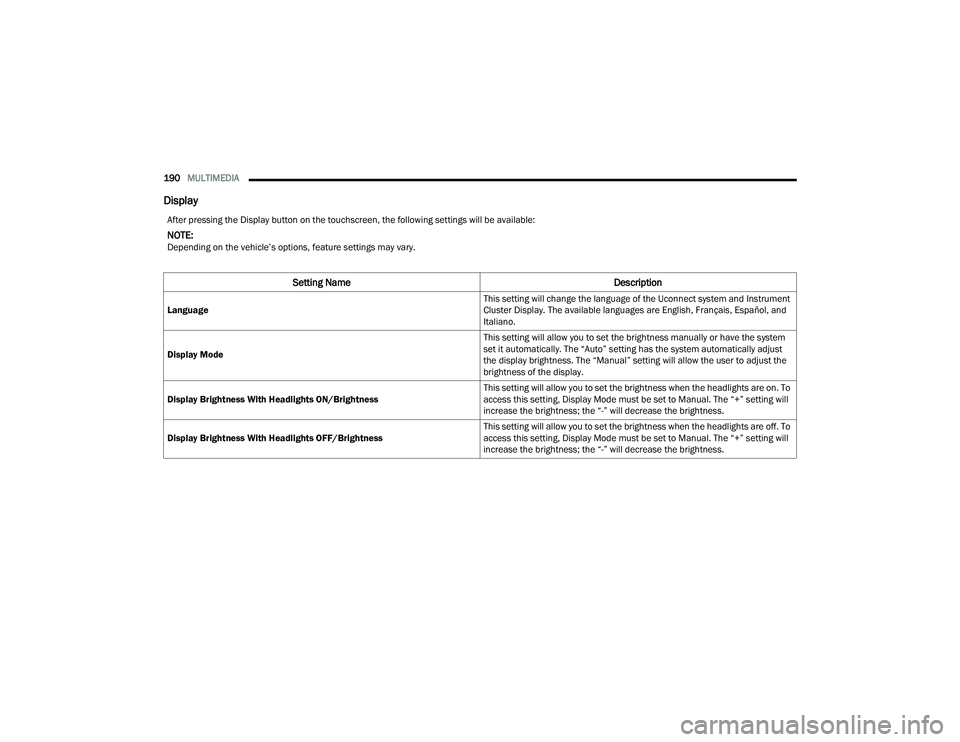
Display
After pressing the Display button on the touchscreen, the following settings will be available:
NOTE:Depending on the vehicle’s options, feature settings may vary.
Setting Name Description
Language This setting will change the language of the Uconnect system and Instrument
Cluster Display. The available languages are English, Français, Español, and
Italiano.
Display Mode This setting will allow you to set the brightness manually or have the system
set it automatically. The “Auto” setting has the system automatically adjust
the display brightness. The “Manual” setting will allow the user to adjust the
brightness of the display.
Display Brightness With Headlights ON/Brightness This setting will allow you to set the brightness when the headlights are on. To
access this setting, Display Mode must be set to Manual. The “+” setting will
increase the brightness; the “-” will decrease the brightness.
Display Brightness With Headlights OFF/Brightness This setting will allow you to set the brightness when the headlights are off. To
access this setting, Display Mode must be set to Manual. The “+” setting will
increase the brightness; the “-” will decrease the brightness.
21_RUP_OM_EN_USC_t.book Page 190
Page 193 of 401
MULTIMEDIA191
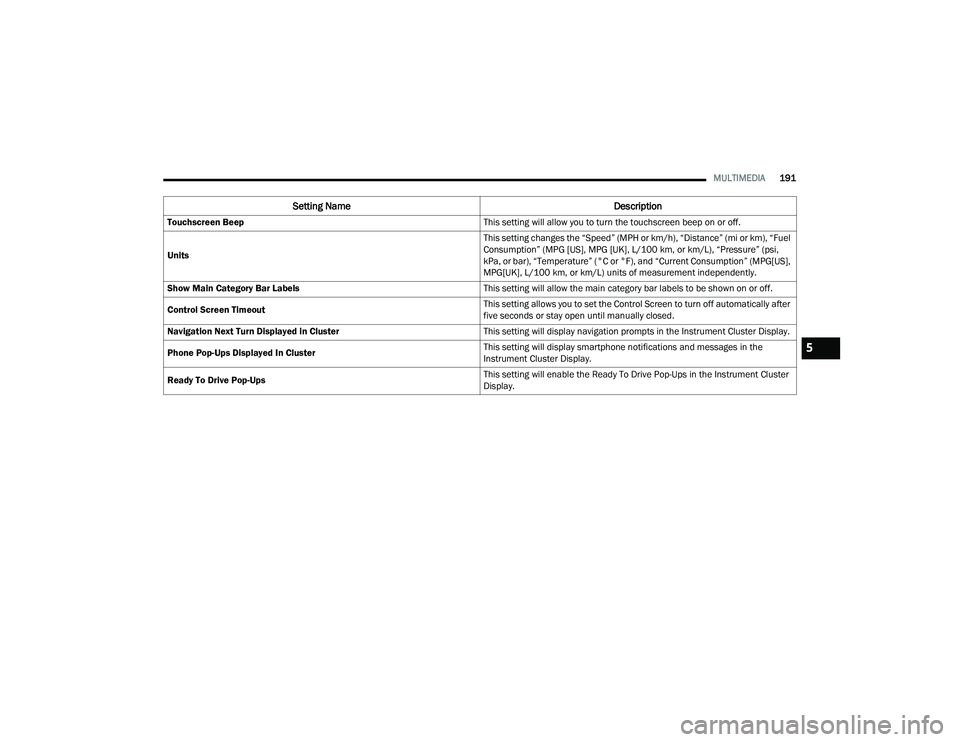
Touchscreen Beep This setting will allow you to turn the touchscreen beep on or off.
Units This setting changes the “Speed” (MPH or km/h), “Distance” (mi or km), “Fuel
Consumption” (MPG [US], MPG [UK], L/100 km, or km/L), “Pressure” (psi,
kPa, or bar), “Temperature” (°C or °F), and “Current Consumption” (MPG[US],
MPG[UK], L/100 km, or km/L) units of measurement independently.
Show Main Category Bar Labels This setting will allow the main category bar labels to be shown on or off.
Control Screen Timeout This setting allows you to set the Control Screen to turn off automatically after
five seconds or stay open until manually closed.
Navigation Next Turn Displayed in Cluster This setting will display navigation prompts in the Instrument Cluster Display.
Phone Pop-Ups Displayed In Cluster This setting will display smartphone notifications and messages in the
Instrument Cluster Display.
Ready To Drive Pop-Ups This setting will enable the Ready To Drive Pop-Ups in the Instrument Cluster
Display.
Setting Name
Description
5
21_RUP_OM_EN_USC_t.book Page 191
Page 194 of 401
192MULTIMEDIA
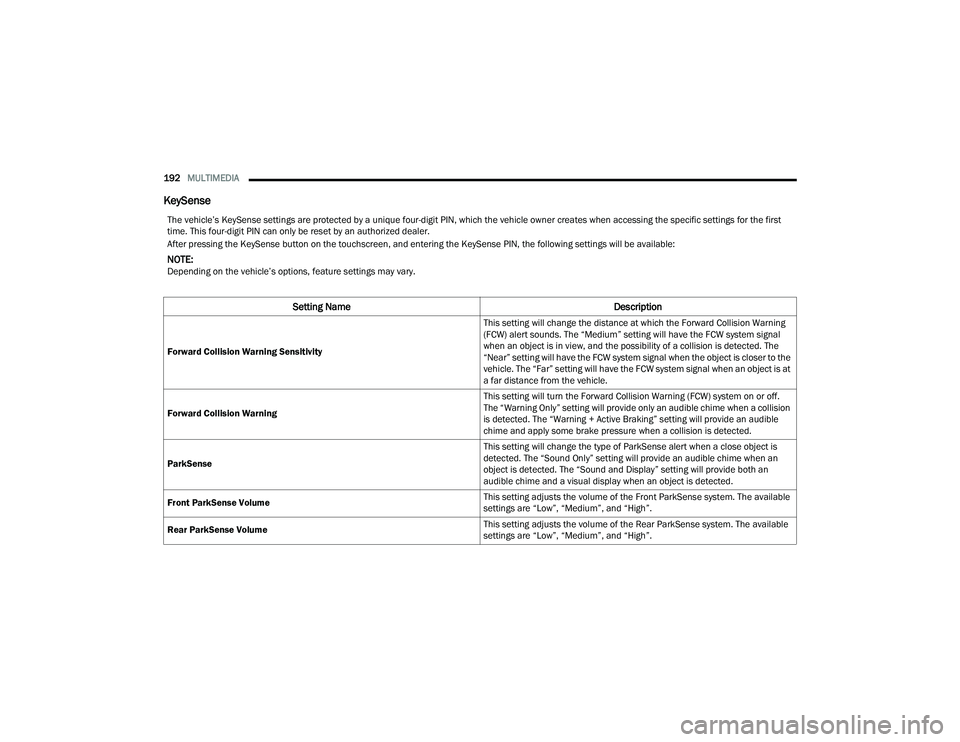
KeySense
The vehicle’s KeySense settings are protected by a unique four-digit PIN, which the vehicle owner creates when accessing the specific settings for the first
time. This four-digit PIN can only be reset by an authorized dealer.
After pressing the KeySense button on the touchscreen, and entering the KeySense PIN, the following settings will be available:
NOTE:Depending on the vehicle’s options, feature settings may vary.
Setting Name Description
Forward Collision Warning Sensitivity This setting will change the distance at which the Forward Collision Warning
(FCW) alert sounds. The “Medium” setting will have the FCW system signal
when an object is in view, and the possibility of a collision is detected. The
“Near” setting will have the FCW system signal when the object is closer to the
vehicle. The “Far” setting will have the FCW system signal when an object is at
a far distance from the vehicle.
Forward Collision Warning This setting will turn the Forward Collision Warning (FCW) system on or off.
The “Warning Only” setting will provide only an audible chime when a collision
is detected. The “Warning + Active Braking” setting will provide an audible
chime and apply some brake pressure when a collision is detected.
ParkSense This setting will change the type of ParkSense alert when a close object is
detected. The “Sound Only” setting will provide an audible chime when an
object is detected. The “Sound and Display” setting will provide both an
audible chime and a visual display when an object is detected.
Front ParkSense Volume This setting adjusts the volume of the Front ParkSense system. The available
settings are “Low”, “Medium”, and “High”.
Rear ParkSense Volume This setting adjusts the volume of the Rear ParkSense system. The available
settings are “Low”, “Medium”, and “High”.
21_RUP_OM_EN_USC_t.book Page 192
Page 195 of 401
MULTIMEDIA193
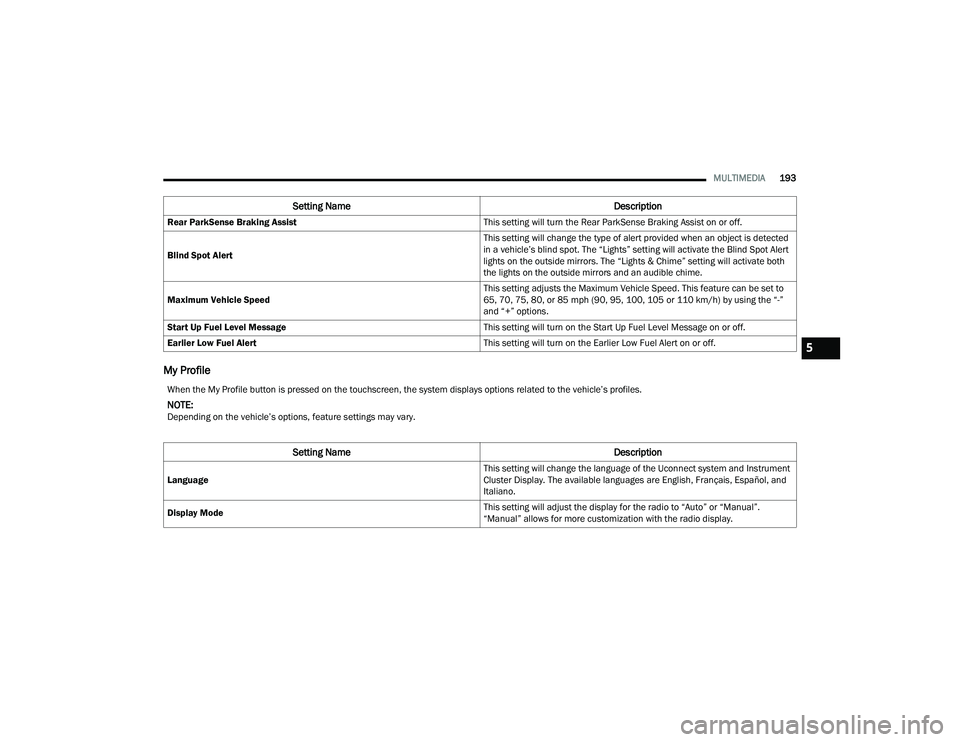
My Profile
Rear ParkSense Braking Assist This setting will turn the Rear ParkSense Braking Assist on or off.
Blind Spot Alert This setting will change the type of alert provided when an object is detected
in a vehicle’s blind spot. The “Lights” setting will activate the Blind Spot Alert
lights on the outside mirrors. The “Lights & Chime” setting will activate both
the lights on the outside mirrors and an audible chime.
Maximum Vehicle Speed This setting adjusts the Maximum Vehicle Speed. This feature can be set to
65, 70, 75, 80, or 85 mph (90, 95, 100, 105 or 110 km/h) by using the “-”
and “+” options.
Start Up Fuel Level Message This setting will turn on the Start Up Fuel Level Message on or off.
Earlier Low Fuel Alert This setting will turn on the Earlier Low Fuel Alert on or off.
Setting NameDescription
When the My Profile button is pressed on the touchscreen, the system displays options related to the vehicle’s profiles.
NOTE:Depending on the vehicle’s options, feature settings may vary.
Setting NameDescription
Language This setting will change the language of the Uconnect system and Instrument
Cluster Display. The available languages are English, Français, Español, and
Italiano.
Display Mode This setting will adjust the display for the radio to “Auto” or “Manual”.
“Manual” allows for more customization with the radio display.
5
21_RUP_OM_EN_USC_t.book Page 193
Page 196 of 401
194MULTIMEDIA
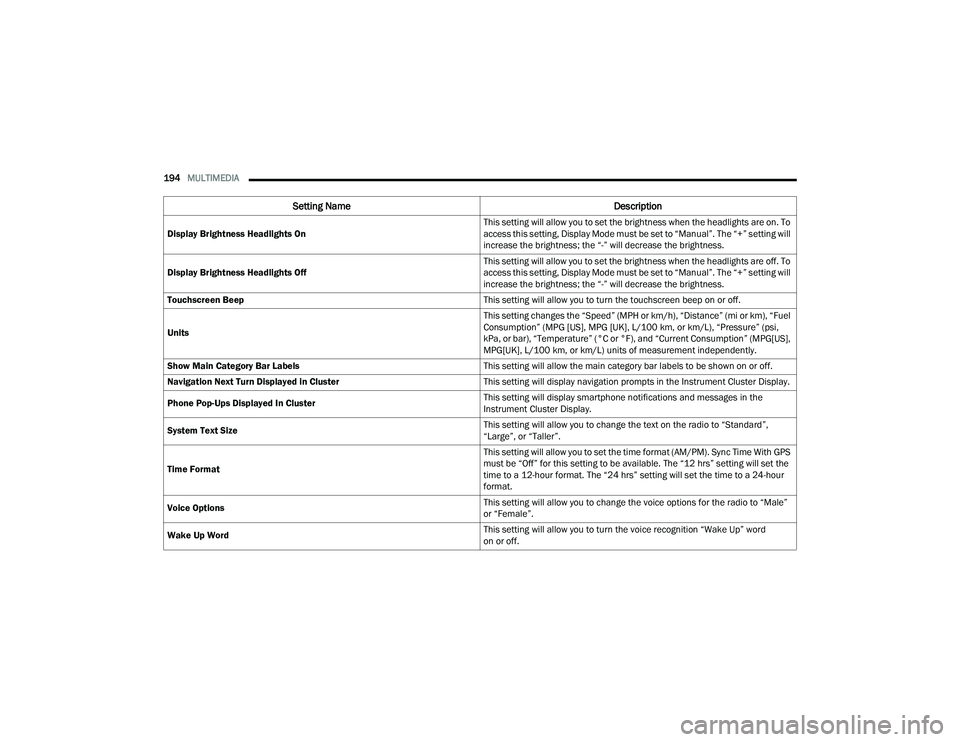
Display Brightness Headlights On This setting will allow you to set the brightness when the headlights are on. To
access this setting, Display Mode must be set to “Manual”. The “+” setting will
increase the brightness; the “-” will decrease the brightness.
Display Brightness Headlights Off This setting will allow you to set the brightness when the headlights are off. To
access this setting, Display Mode must be set to “Manual”. The “+” setting will
increase the brightness; the “-” will decrease the brightness.
Touchscreen Beep This setting will allow you to turn the touchscreen beep on or off.
Units This setting changes the “Speed” (MPH or km/h), “Distance” (mi or km), “Fuel
Consumption” (MPG [US], MPG [UK], L/100 km, or km/L), “Pressure” (psi,
kPa, or bar), “Temperature” (°C or °F), and “Current Consumption” (MPG[US],
MPG[UK], L/100 km, or km/L) units of measurement independently.
Show Main Category Bar Labels This setting will allow the main category bar labels to be shown on or off.
Navigation Next Turn Displayed in Cluster This setting will display navigation prompts in the Instrument Cluster Display.
Phone Pop-Ups Displayed In Cluster This setting will display smartphone notifications and messages in the
Instrument Cluster Display.
System Text Size This setting will allow you to change the text on the radio to “Standard”,
“Large”, or “Taller”.
Time Format This setting will allow you to set the time format (AM/PM). Sync Time With GPS
must be “Off” for this setting to be available. The “12 hrs” setting will set the
time to a 12-hour format. The “24 hrs” setting will set the time to a 24-hour
format.
Voice Options This setting will allow you to change the voice options for the radio to “Male”
or “Female”.
Wake Up Word This setting will allow you to turn the voice recognition “Wake Up” word
on or off.
Setting Name
Description
21_RUP_OM_EN_USC_t.book Page 194
Page 199 of 401
MULTIMEDIA197
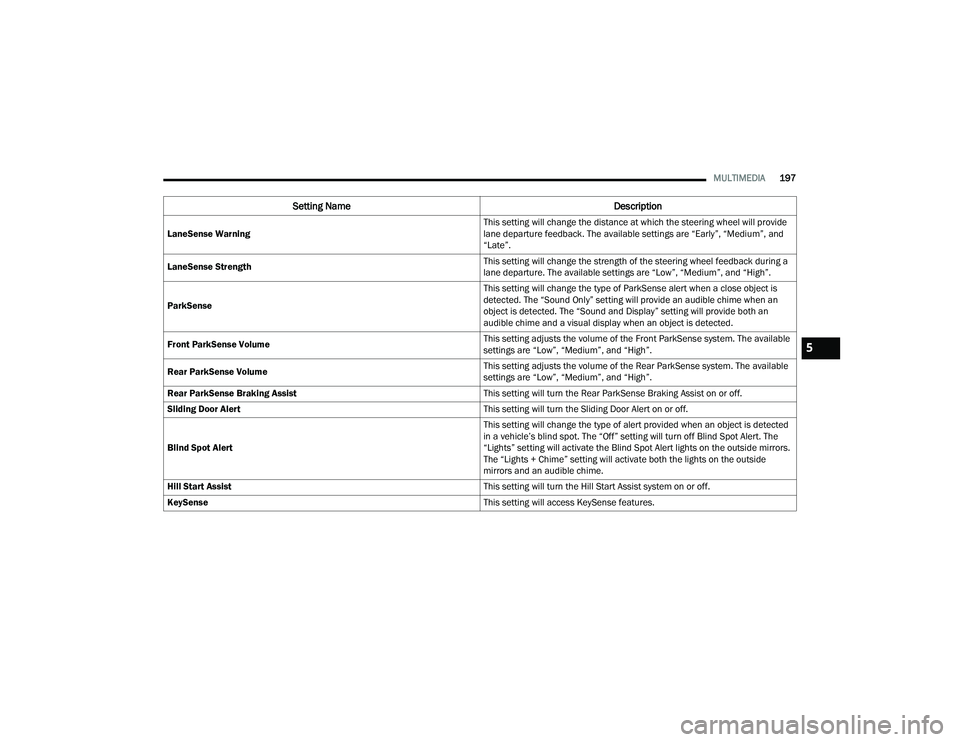
LaneSense Warning This setting will change the distance at which the steering wheel will provide
lane departure feedback. The available settings are “Early”, “Medium”, and
“Late”.
LaneSense Strength This setting will change the strength of the steering wheel feedback during a
lane departure. The available settings are “Low”, “Medium”, and “High”.
ParkSense This setting will change the type of ParkSense alert when a close object is
detected. The “Sound Only” setting will provide an audible chime when an
object is detected. The “Sound and Display” setting will provide both an
audible chime and a visual display when an object is detected.
Front ParkSense Volume This setting adjusts the volume of the Front ParkSense system. The available
settings are “Low”, “Medium”, and “High”.
Rear ParkSense Volume This setting adjusts the volume of the Rear ParkSense system. The available
settings are “Low”, “Medium”, and “High”.
Rear ParkSense Braking Assist This setting will turn the Rear ParkSense Braking Assist on or off.
Sliding Door Alert This setting will turn the Sliding Door Alert on or off.
Blind Spot Alert This setting will change the type of alert provided when an object is detected
in a vehicle’s blind spot. The “Off” setting will turn off Blind Spot Alert. The
“Lights” setting will activate the Blind Spot Alert lights on the outside mirrors.
The “Lights + Chime” setting will activate both the lights on the outside
mirrors and an audible chime.
Hill Start Assist This setting will turn the Hill Start Assist system on or off.
KeySense This setting will access KeySense features.
Setting NameDescription
5
21_RUP_OM_EN_USC_t.book Page 197
Page 201 of 401
MULTIMEDIA199
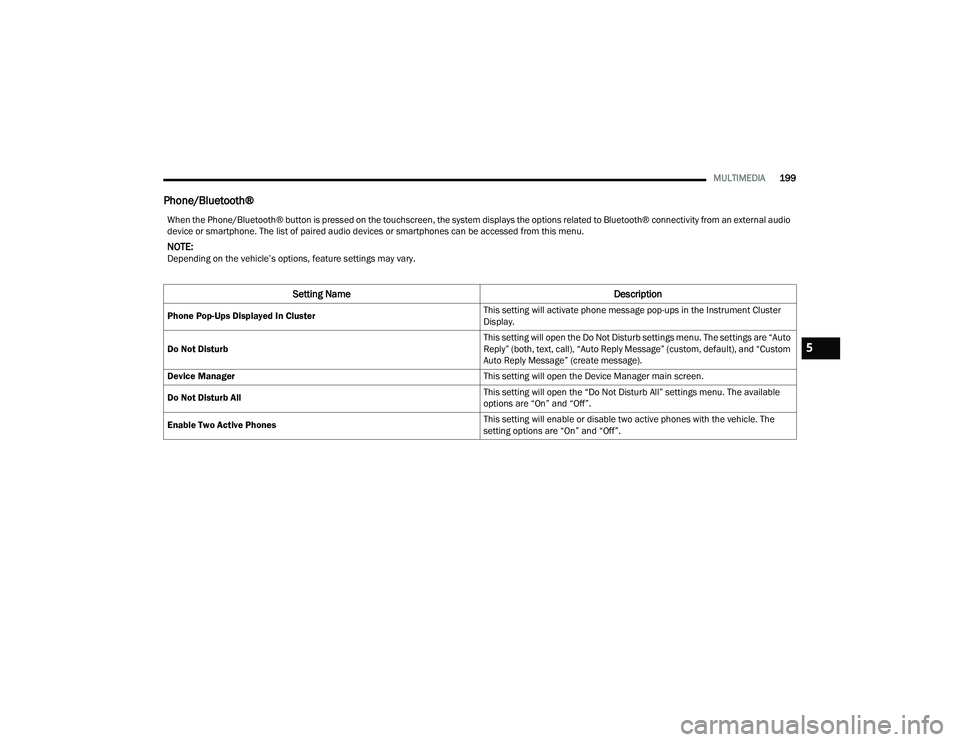
Phone/Bluetooth®
When the Phone/Bluetooth® button is pressed on the touchscreen, the system displays the options related to Bluetooth® connectivity from an external audio
device or smartphone. The list of paired audio devices or smartphones can be accessed from this menu.
NOTE:Depending on the vehicle’s options, feature settings may vary.
Setting Name Description
Phone Pop-Ups Displayed In Cluster This setting will activate phone message pop-ups in the Instrument Cluster
Display.
Do Not Disturb This setting will open the Do Not Disturb settings menu. The settings are “Auto
Reply” (both, text, call), “Auto Reply Message” (custom, default), and “Custom
Auto Reply Message” (create message).
Device Manager This setting will open the Device Manager main screen.
Do Not Disturb All This setting will open the “Do Not Disturb All” settings menu. The available
options are “On” and “Off”.
Enable Two Active Phones This setting will enable or disable two active phones with the vehicle. The
setting options are “On” and “Off”.
5
21_RUP_OM_EN_USC_t.book Page 199
Page 203 of 401
MULTIMEDIA201
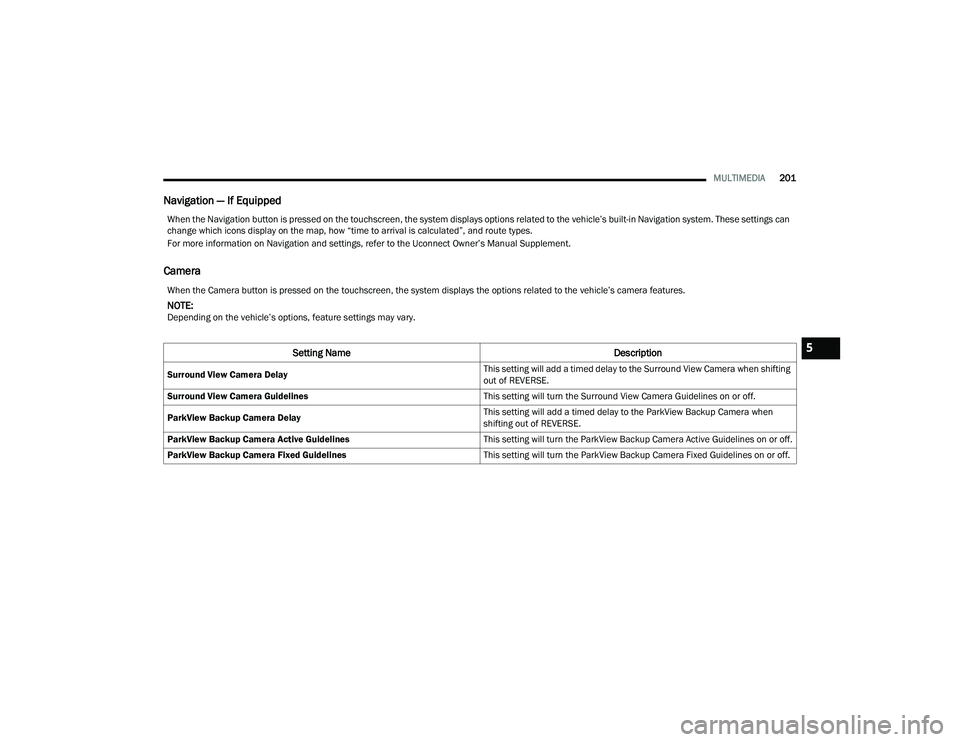
Navigation — If Equipped
Camera
When the Navigation button is pressed on the touchscreen, the system displays options related to the vehicle’s built-in Navigation system. These settings can
change which icons display on the map, how “time to arrival is calculated”, and route types.
For more information on Navigation and settings, refer to the Uconnect Owner’s Manual Supplement.
When the Camera button is pressed on the touchscreen, the system displays the options related to the vehicle’s camera features.
NOTE:Depending on the vehicle’s options, feature settings may vary.
Setting Name Description
Surround View Camera Delay This setting will add a timed delay to the Surround View Camera when shifting
out of REVERSE.
Surround View Camera Guidelines This setting will turn the Surround View Camera Guidelines on or off.
ParkView Backup Camera Delay This setting will add a timed delay to the ParkView Backup Camera when
shifting out of REVERSE.
ParkView Backup Camera Active Guidelines This setting will turn the ParkView Backup Camera Active Guidelines on or off.
ParkView Backup Camera Fixed Guidelines This setting will turn the ParkView Backup Camera Fixed Guidelines on or off.
5
21_RUP_OM_EN_USC_t.book Page 201