shaft CHRYSLER VOYAGER 1996 Service Manual
[x] Cancel search | Manufacturer: CHRYSLER, Model Year: 1996, Model line: VOYAGER, Model: CHRYSLER VOYAGER 1996Pages: 1938, PDF Size: 55.84 MB
Page 1126 of 1938
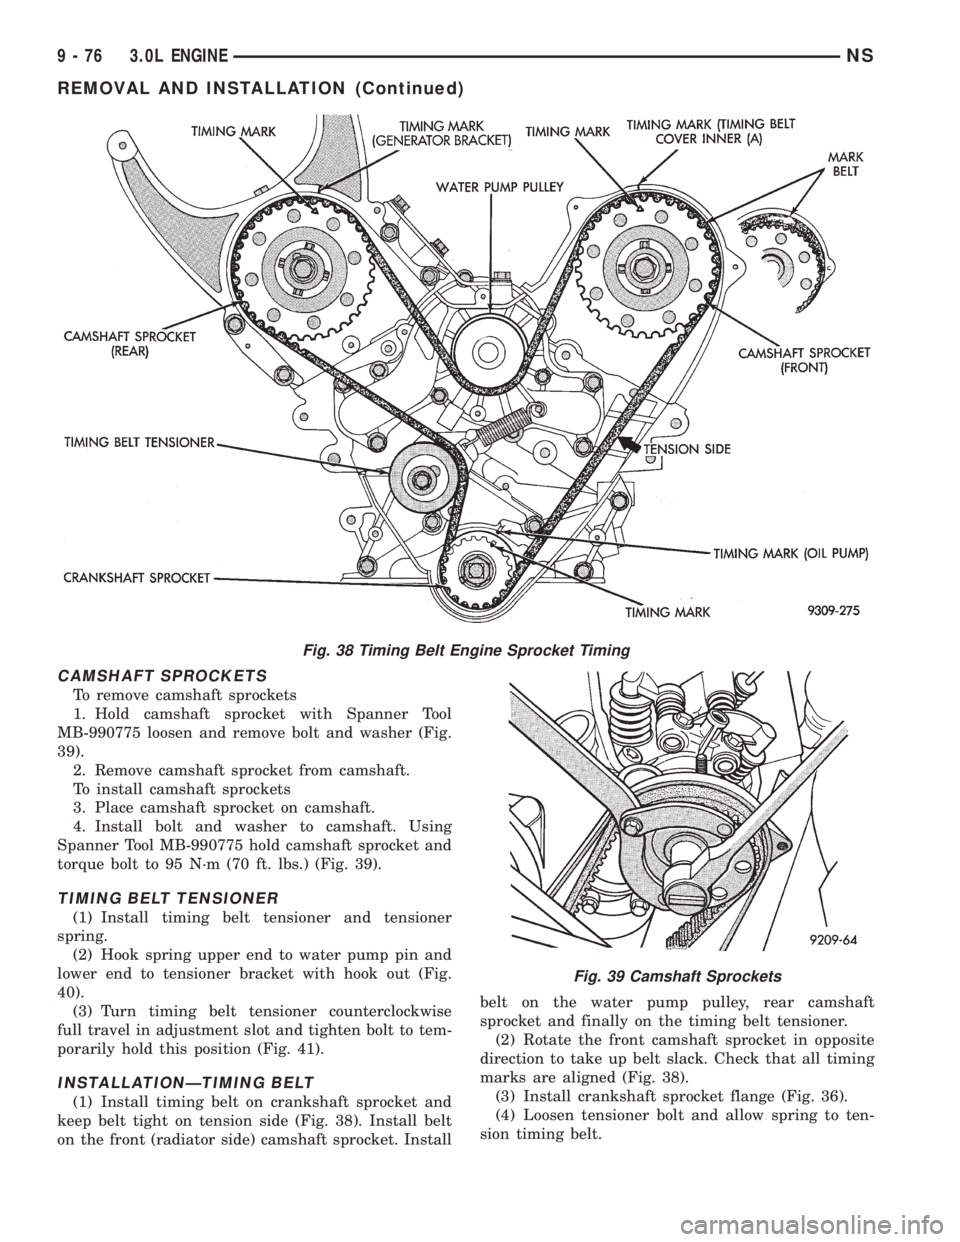
CAMSHAFT SPROCKETS
To remove camshaft sprockets
1. Hold camshaft sprocket with Spanner Tool
MB-990775 loosen and remove bolt and washer (Fig.
39).
2. Remove camshaft sprocket from camshaft.
To install camshaft sprockets
3. Place camshaft sprocket on camshaft.
4. Install bolt and washer to camshaft. Using
Spanner Tool MB-990775 hold camshaft sprocket and
torque bolt to 95 N´m (70 ft. lbs.) (Fig. 39).
TIMING BELT TENSIONER
(1) Install timing belt tensioner and tensioner
spring.
(2) Hook spring upper end to water pump pin and
lower end to tensioner bracket with hook out (Fig.
40).
(3) Turn timing belt tensioner counterclockwise
full travel in adjustment slot and tighten bolt to tem-
porarily hold this position (Fig. 41).
INSTALLATIONÐTIMING BELT
(1) Install timing belt on crankshaft sprocket and
keep belt tight on tension side (Fig. 38). Install belt
on the front (radiator side) camshaft sprocket. Installbelt on the water pump pulley, rear camshaft
sprocket and finally on the timing belt tensioner.
(2) Rotate the front camshaft sprocket in opposite
direction to take up belt slack. Check that all timing
marks are aligned (Fig. 38).
(3) Install crankshaft sprocket flange (Fig. 36).
(4) Loosen tensioner bolt and allow spring to ten-
sion timing belt.
Fig. 38 Timing Belt Engine Sprocket Timing
Fig. 39 Camshaft Sprockets
9 - 76 3.0L ENGINENS
REMOVAL AND INSTALLATION (Continued)
Page 1127 of 1938
(5) Turn crankshaft two full turns in clockwise
direction.Turn smoothly and in clockwise direc-
tion ONLY.
(6) Align the timing marks on the sprockets and
tighten the timing belt tensioner locking bolt to 25
N´m (250 in. lbs.) torque.
(7) Reassembly belt covers, engine bracket, insula-
tor, crankshaft pulleys, accessories and accessory
drive belts in reverse order.
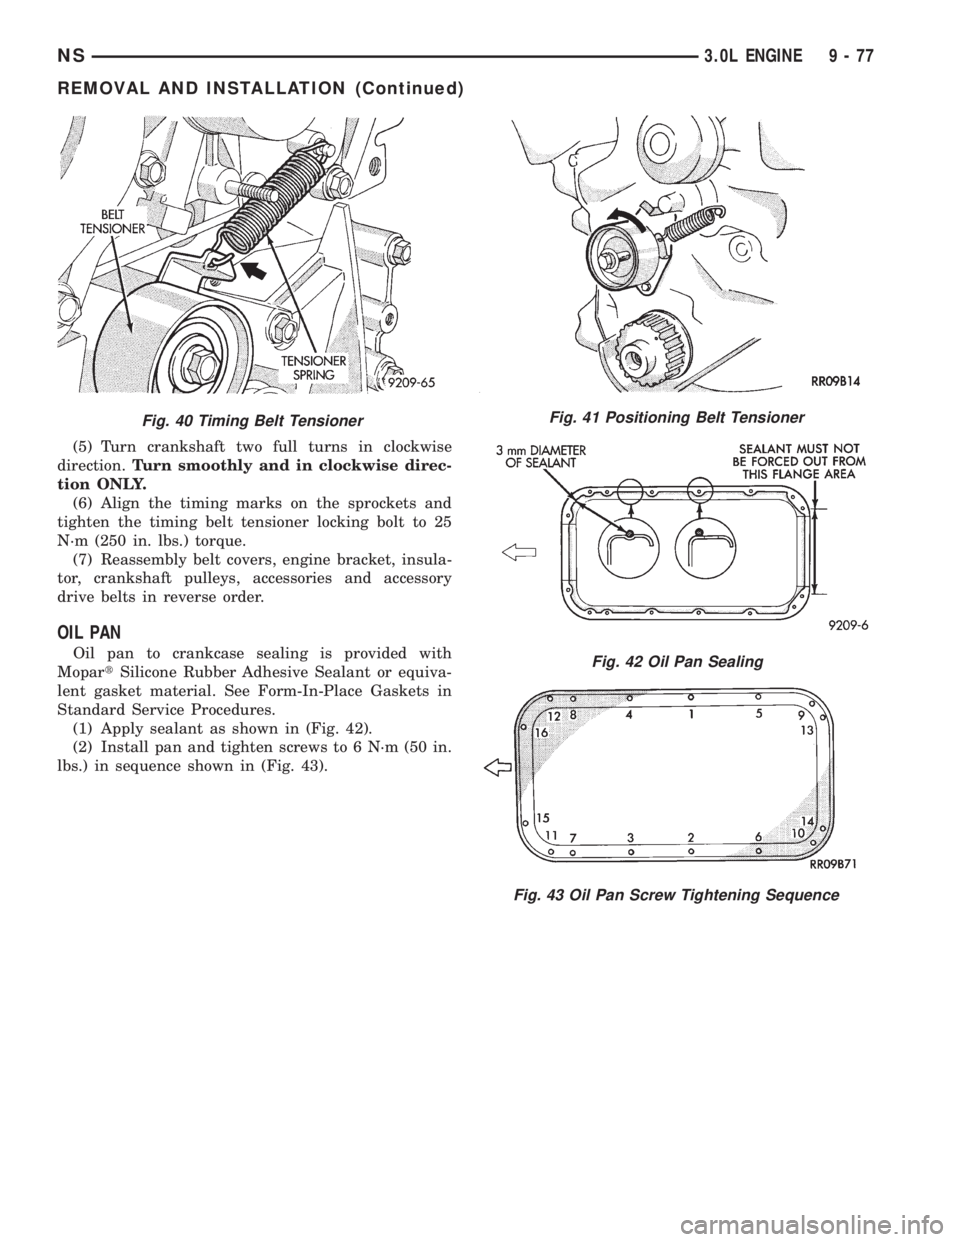
OIL PAN
Oil pan to crankcase sealing is provided with
MopartSilicone Rubber Adhesive Sealant or equiva-
lent gasket material. See Form-In-Place Gaskets in
Standard Service Procedures.
(1) Apply sealant as shown in (Fig. 42).
(2) Install pan and tighten screws to 6 N´m (50 in.
lbs.) in sequence shown in (Fig. 43).
Fig. 41 Positioning Belt Tensioner
Fig. 42 Oil Pan Sealing
Fig. 43 Oil Pan Screw Tightening Sequence
Fig. 40 Timing Belt Tensioner
NS3.0L ENGINE 9 - 77
REMOVAL AND INSTALLATION (Continued)
Page 1131 of 1938
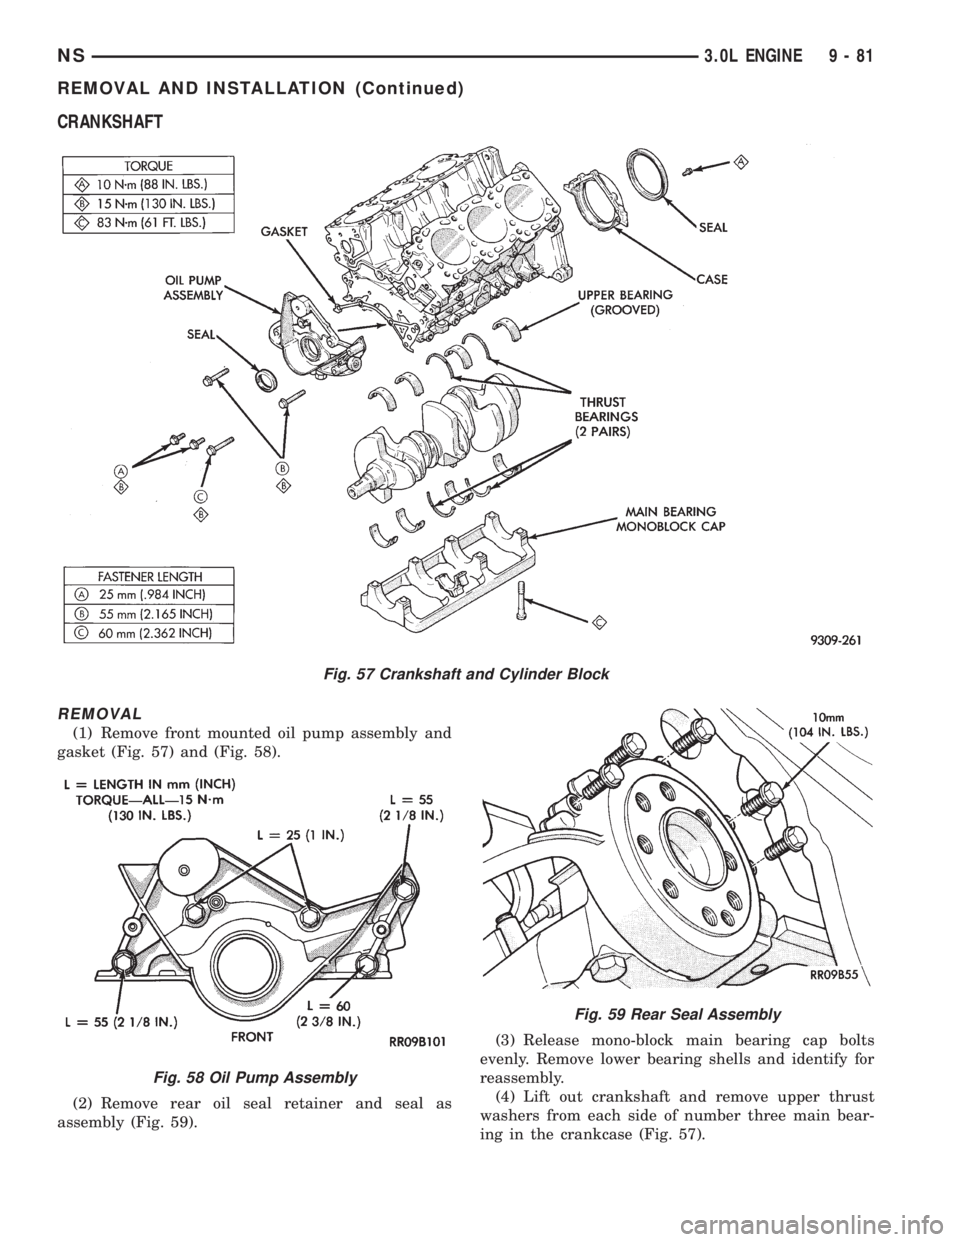
CRANKSHAFT
REMOVAL
(1) Remove front mounted oil pump assembly and
gasket (Fig. 57) and (Fig. 58).
(2) Remove rear oil seal retainer and seal as
assembly (Fig. 59).(3) Release mono-block main bearing cap bolts
evenly. Remove lower bearing shells and identify for
reassembly.
(4) Lift out crankshaft and remove upper thrust
washers from each side of number three main bear-
ing in the crankcase (Fig. 57).
Fig. 57 Crankshaft and Cylinder Block
Fig. 58 Oil Pump Assembly
Fig. 59 Rear Seal Assembly
NS3.0L ENGINE 9 - 81
REMOVAL AND INSTALLATION (Continued)
Page 1132 of 1938
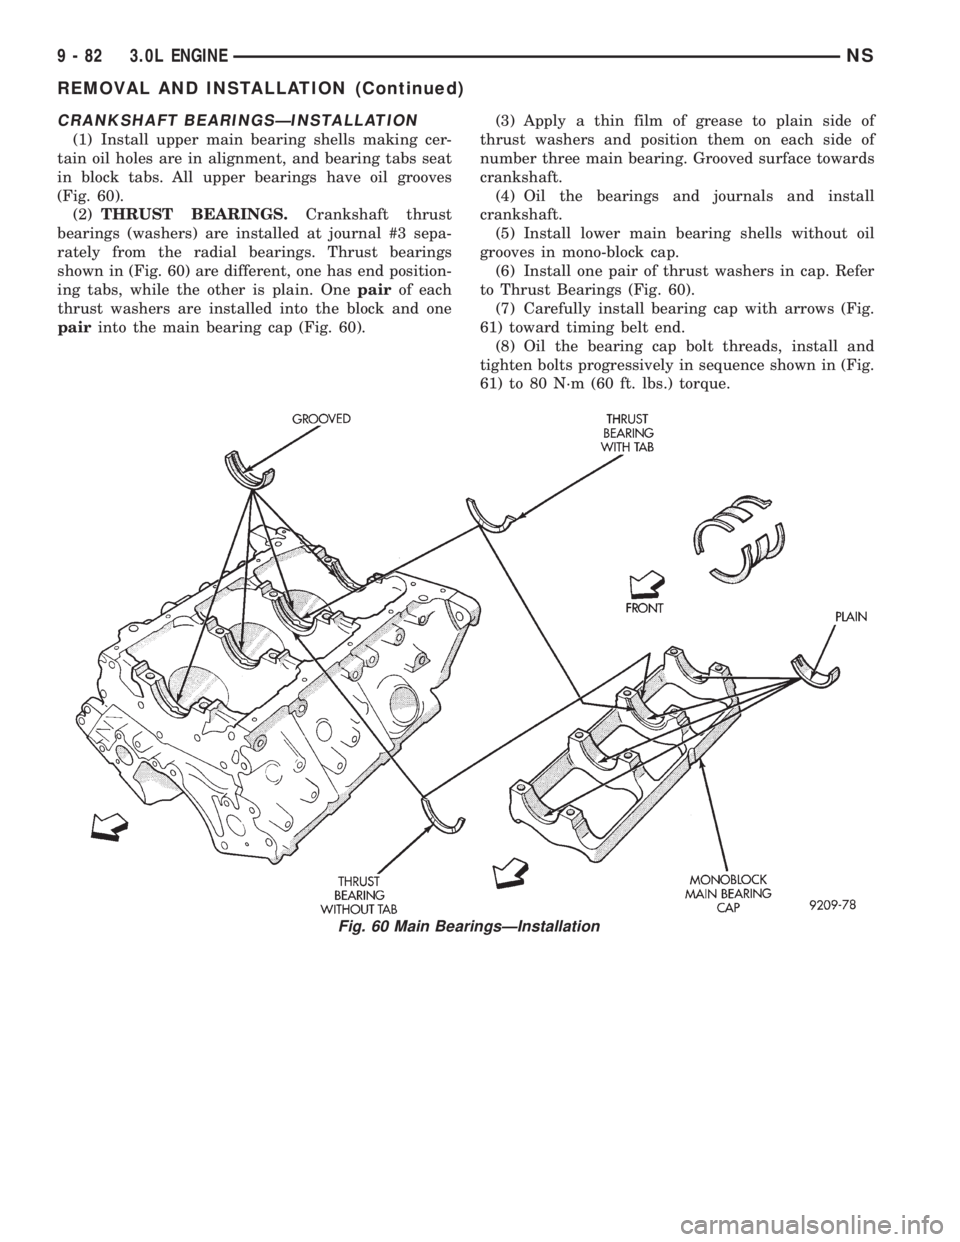
CRANKSHAFT BEARINGSÐINSTALLATION
(1) Install upper main bearing shells making cer-
tain oil holes are in alignment, and bearing tabs seat
in block tabs. All upper bearings have oil grooves
(Fig. 60).
(2)THRUST BEARINGS.Crankshaft thrust
bearings (washers) are installed at journal #3 sepa-
rately from the radial bearings. Thrust bearings
shown in (Fig. 60) are different, one has end position-
ing tabs, while the other is plain. Onepairof each
thrust washers are installed into the block and one
pairinto the main bearing cap (Fig. 60).(3) Apply a thin film of grease to plain side of
thrust washers and position them on each side of
number three main bearing. Grooved surface towards
crankshaft.
(4) Oil the bearings and journals and install
crankshaft.
(5) Install lower main bearing shells without oil
grooves in mono-block cap.
(6) Install one pair of thrust washers in cap. Refer
to Thrust Bearings (Fig. 60).
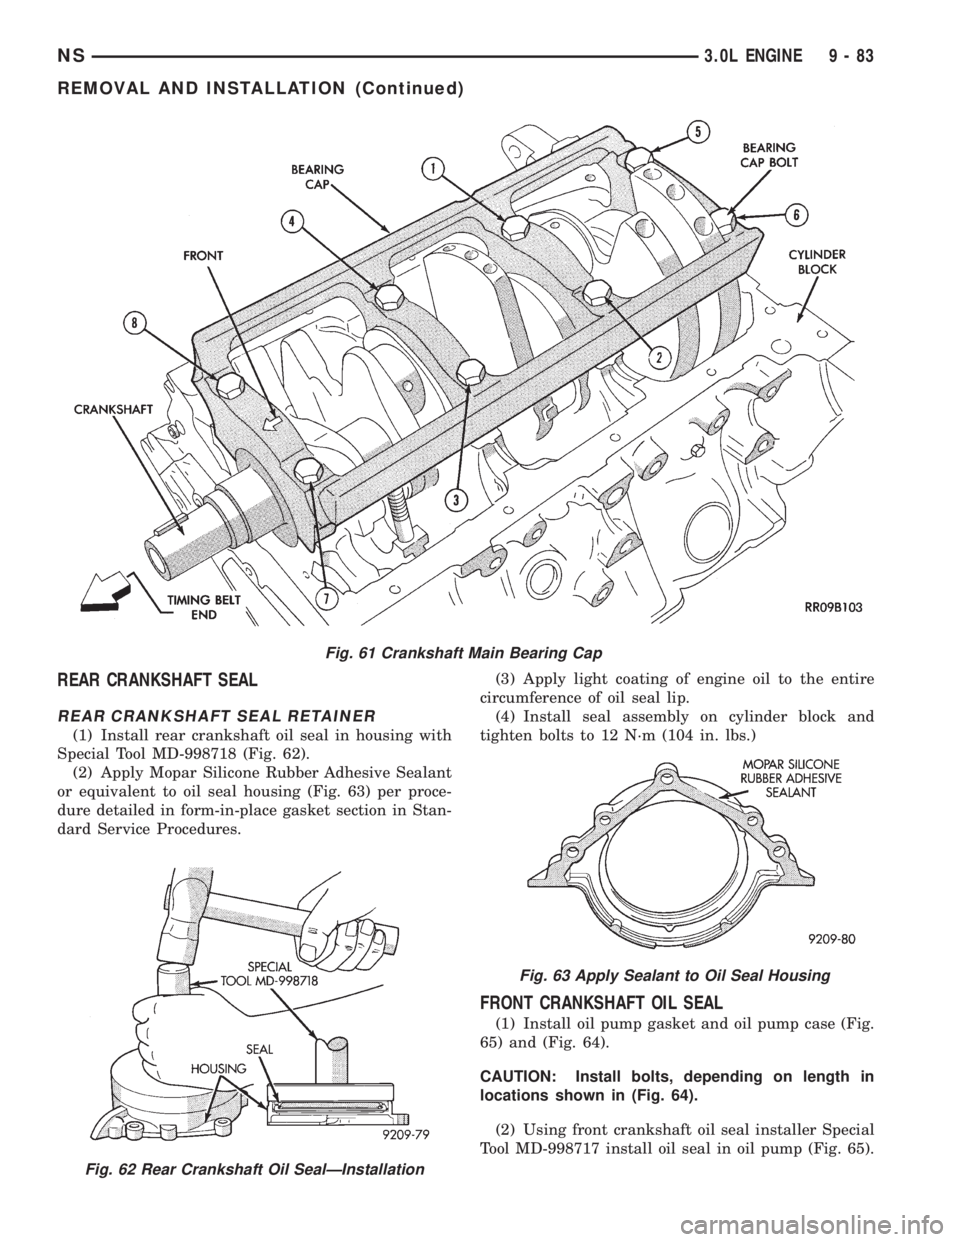
(7) Carefully install bearing cap with arrows (Fig.
61) toward timing belt end.
(8) Oil the bearing cap bolt threads, install and
tighten bolts progressively in sequence shown in (Fig.
61) to 80 N´m (60 ft. lbs.) torque.
Fig. 60 Main BearingsÐInstallation
9 - 82 3.0L ENGINENS
REMOVAL AND INSTALLATION (Continued)
Page 1133 of 1938
REAR CRANKSHAFT SEAL
REAR CRANKSHAFT SEAL RETAINER
(1) Install rear crankshaft oil seal in housing with
Special Tool MD-998718 (Fig. 62).
(2) Apply Mopar Silicone Rubber Adhesive Sealant
or equivalent to oil seal housing (Fig. 63) per proce-
dure detailed in form-in-place gasket section in Stan-
dard Service Procedures.(3) Apply light coating of engine oil to the entire
circumference of oil seal lip.
(4) Install seal assembly on cylinder block and
tighten bolts to 12 N´m (104 in. lbs.)
FRONT CRANKSHAFT OIL SEAL
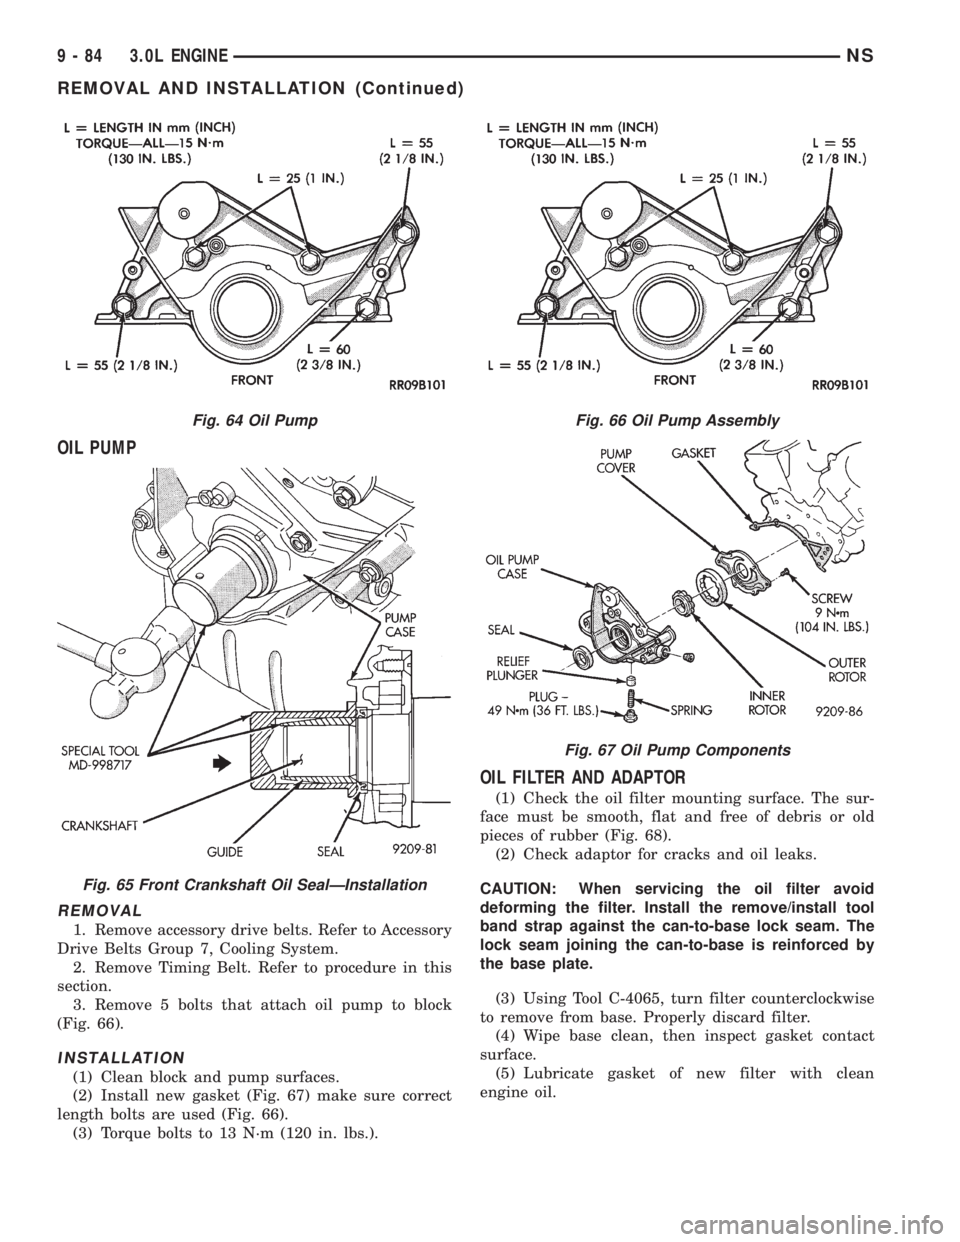
(1) Install oil pump gasket and oil pump case (Fig.
65) and (Fig. 64).
CAUTION: Install bolts, depending on length in
locations shown in (Fig. 64).
(2) Using front crankshaft oil seal installer Special
Tool MD-998717 install oil seal in oil pump (Fig. 65).
Fig. 62 Rear Crankshaft Oil SealÐInstallation
Fig. 61 Crankshaft Main Bearing Cap
Fig. 63 Apply Sealant to Oil Seal Housing
NS3.0L ENGINE 9 - 83
REMOVAL AND INSTALLATION (Continued)
Page 1134 of 1938
OIL PUMP
REMOVAL
1. Remove accessory drive belts. Refer to Accessory
Drive Belts Group 7, Cooling System.
2. Remove Timing Belt. Refer to procedure in this
section.
3. Remove 5 bolts that attach oil pump to block
(Fig. 66).
INSTALLATION
(1) Clean block and pump surfaces.
(2) Install new gasket (Fig. 67) make sure correct
length bolts are used (Fig. 66).
(3) Torque bolts to 13 N´m (120 in. lbs.).
OIL FILTER AND ADAPTOR
(1) Check the oil filter mounting surface. The sur-
face must be smooth, flat and free of debris or old
pieces of rubber (Fig. 68).
(2) Check adaptor for cracks and oil leaks.
CAUTION: When servicing the oil filter avoid
deforming the filter. Install the remove/install tool
band strap against the can-to-base lock seam. The
lock seam joining the can-to-base is reinforced by
the base plate.
(3) Using Tool C-4065, turn filter counterclockwise
to remove from base. Properly discard filter.
(4) Wipe base clean, then inspect gasket contact
surface.
(5) Lubricate gasket of new filter with clean
engine oil.
Fig. 64 Oil Pump
Fig. 65 Front Crankshaft Oil SealÐInstallation
Fig. 66 Oil Pump Assembly
Fig. 67 Oil Pump Components
9 - 84 3.0L ENGINENS
REMOVAL AND INSTALLATION (Continued)
Page 1135 of 1938
(6) Install new filter until gasket contacts base.
Tighten filter 1 turn or 20 N´m (15 ft. lbs.). Use filter
wrench if necessary.
(7) Start engine and check for leaks.
DISASSEMBLY AND ASSEMBLY
ROCKER ARMS AND SHAFTS
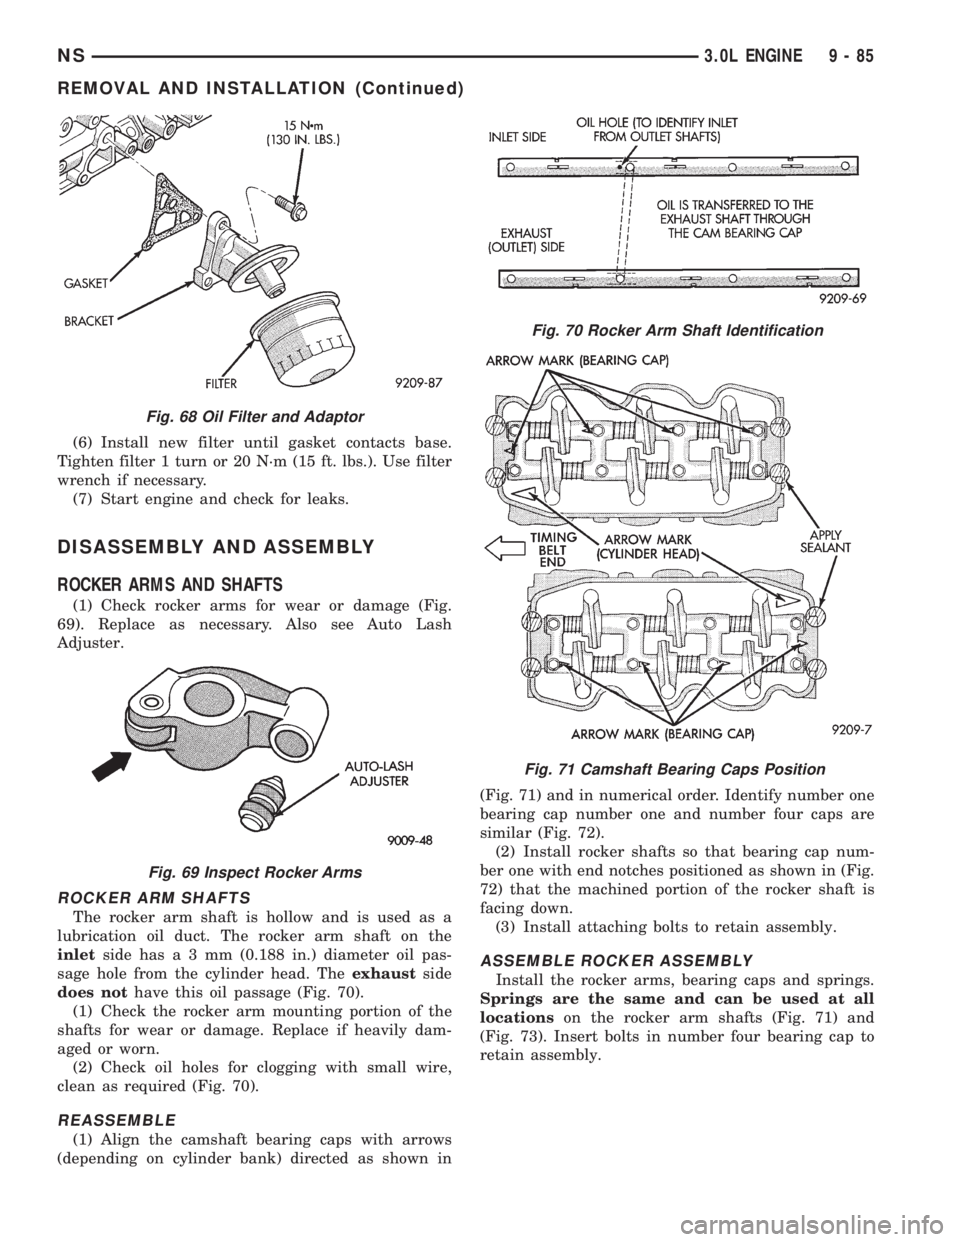
(1) Check rocker arms for wear or damage (Fig.
69). Replace as necessary. Also see Auto Lash
Adjuster.
ROCKER ARM SHAFTS
The rocker arm shaft is hollow and is used as a
lubrication oil duct. The rocker arm shaft on the
inletside hasa3mm(0.188 in.) diameter oil pas-
sage hole from the cylinder head. Theexhaustside
does nothave this oil passage (Fig. 70).
(1) Check the rocker arm mounting portion of the
shafts for wear or damage. Replace if heavily dam-
aged or worn.
(2) Check oil holes for clogging with small wire,
clean as required (Fig. 70).
REASSEMBLE
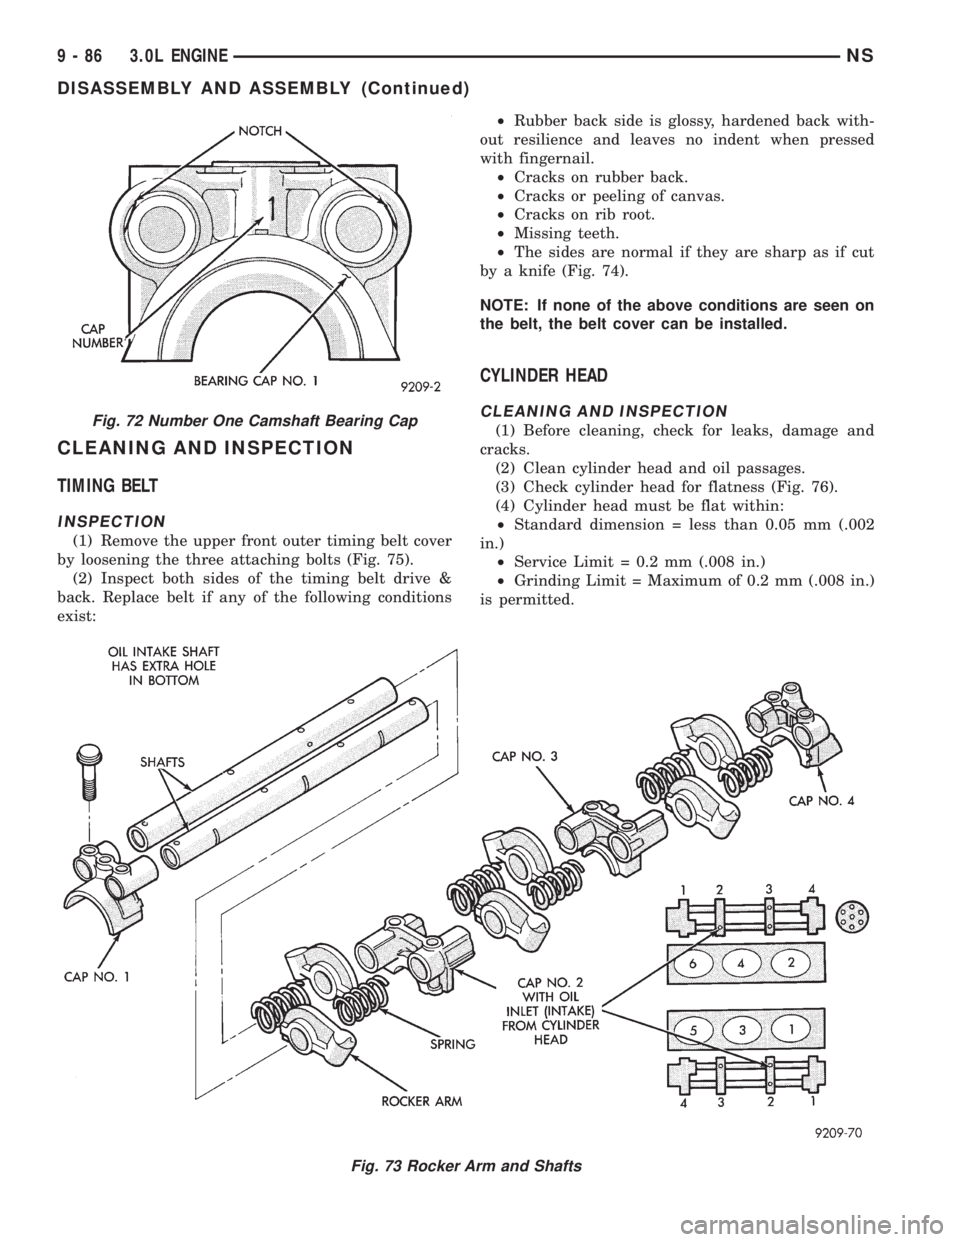
(1) Align the camshaft bearing caps with arrows
(depending on cylinder bank) directed as shown in(Fig. 71) and in numerical order. Identify number one
bearing cap number one and number four caps are
similar (Fig. 72).
(2) Install rocker shafts so that bearing cap num-
ber one with end notches positioned as shown in (Fig.
72) that the machined portion of the rocker shaft is
facing down.
(3) Install attaching bolts to retain assembly.
ASSEMBLE ROCKER ASSEMBLY
Install the rocker arms, bearing caps and springs.
Springs are the same and can be used at all
locationson the rocker arm shafts (Fig. 71) and
(Fig. 73). Insert bolts in number four bearing cap to
retain assembly.
Fig. 68 Oil Filter and Adaptor
Fig. 69 Inspect Rocker Arms
Fig. 70 Rocker Arm Shaft Identification
Fig. 71 Camshaft Bearing Caps Position
NS3.0L ENGINE 9 - 85
REMOVAL AND INSTALLATION (Continued)
Page 1136 of 1938
CLEANING AND INSPECTION
TIMING BELT
INSPECTION
(1) Remove the upper front outer timing belt cover
by loosening the three attaching bolts (Fig. 75).
(2) Inspect both sides of the timing belt drive &
back. Replace belt if any of the following conditions
exist:²Rubber back side is glossy, hardened back with-
out resilience and leaves no indent when pressed
with fingernail.
²Cracks on rubber back.
²Cracks or peeling of canvas.
²Cracks on rib root.
²Missing teeth.
²The sides are normal if they are sharp as if cut
by a knife (Fig. 74).
NOTE: If none of the above conditions are seen on
the belt, the belt cover can be installed.
CYLINDER HEAD
CLEANING AND INSPECTION
(1) Before cleaning, check for leaks, damage and
cracks.
(2) Clean cylinder head and oil passages.
(3) Check cylinder head for flatness (Fig. 76).
(4) Cylinder head must be flat within:
²Standard dimension = less than 0.05 mm (.002
in.)
²Service Limit = 0.2 mm (.008 in.)
²Grinding Limit = Maximum of 0.2 mm (.008 in.)
is permitted.
Fig. 73 Rocker Arm and Shafts
Fig. 72 Number One Camshaft Bearing Cap
9 - 86 3.0L ENGINENS
DISASSEMBLY AND ASSEMBLY (Continued)
Page 1138 of 1938
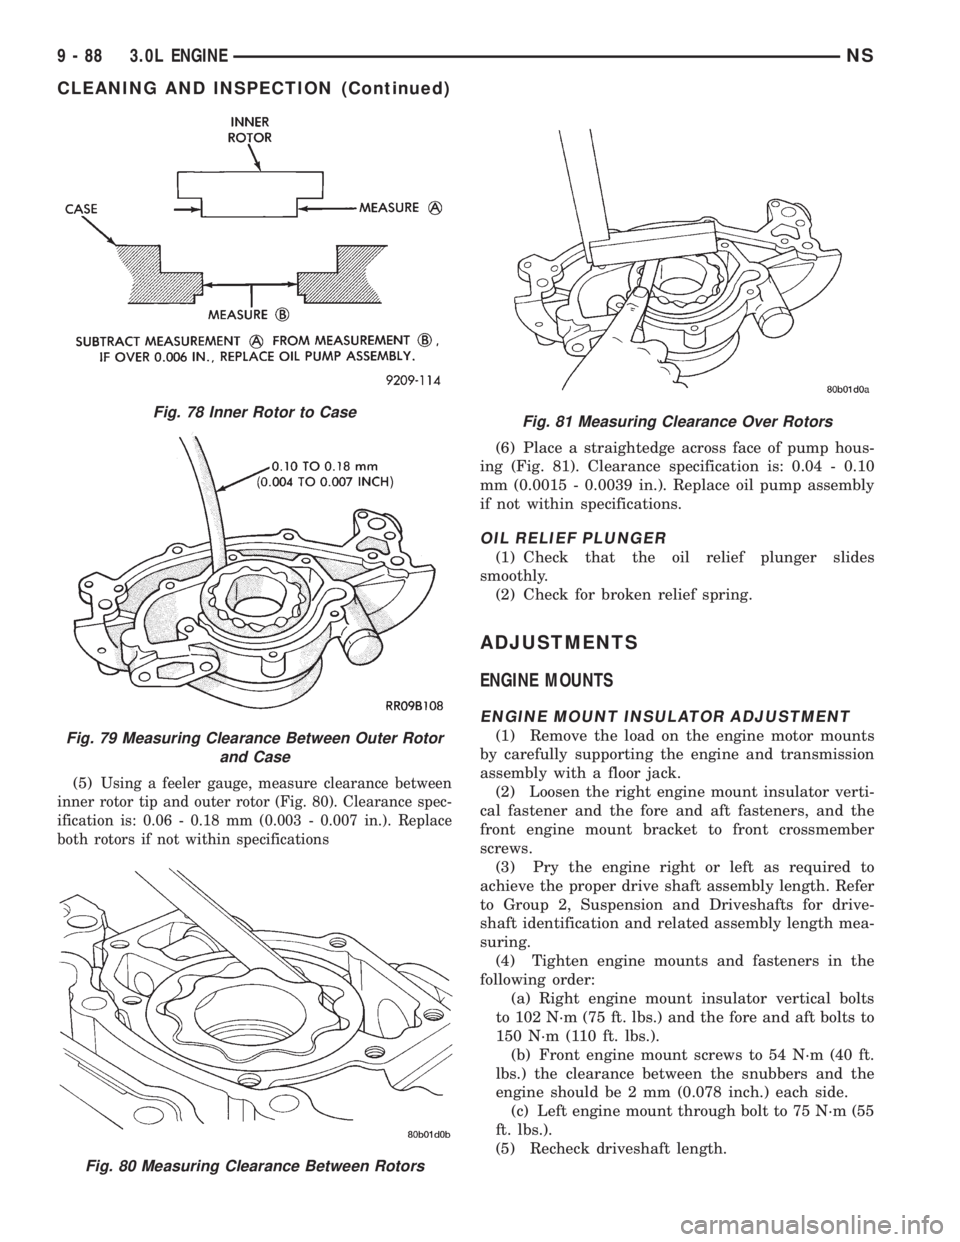
(5)Using a feeler gauge, measure clearance between
inner rotor tip and outer rotor (Fig. 80). Clearance spec-
ification is: 0.06 - 0.18 mm (0.003 - 0.007 in.). Replace
both rotors if not within specifications
(6) Place a straightedge across face of pump hous-
ing (Fig. 81). Clearance specification is: 0.04 - 0.10
mm (0.0015 - 0.0039 in.). Replace oil pump assembly
if not within specifications.
OIL RELIEF PLUNGER
(1) Check that the oil relief plunger slides
smoothly.
(2) Check for broken relief spring.
ADJUSTMENTS
ENGINE MOUNTS
ENGINE MOUNT INSULATOR ADJUSTMENT
(1) Remove the load on the engine motor mounts
by carefully supporting the engine and transmission
assembly with a floor jack.
(2) Loosen the right engine mount insulator verti-
cal fastener and the fore and aft fasteners, and the
front engine mount bracket to front crossmember
screws.
(3) Pry the engine right or left as required to
achieve the proper drive shaft assembly length. Refer
to Group 2, Suspension and Driveshafts for drive-
shaft identification and related assembly length mea-
suring.
(4) Tighten engine mounts and fasteners in the
following order:
(a) Right engine mount insulator vertical bolts
to 102 N´m (75 ft. lbs.) and the fore and aft bolts to
150 N´m (110 ft. lbs.).
(b) Front engine mount screws to 54 N´m (40 ft.
lbs.) the clearance between the snubbers and the
engine should be 2 mm (0.078 inch.) each side.
(c) Left engine mount through bolt to 75 N´m (55
ft. lbs.).
(5) Recheck driveshaft length.
Fig. 78 Inner Rotor to Case
Fig. 79 Measuring Clearance Between Outer Rotor
and Case
Fig. 80 Measuring Clearance Between Rotors
Fig. 81 Measuring Clearance Over Rotors
9 - 88 3.0L ENGINENS
CLEANING AND INSPECTION (Continued)
Page 1139 of 1938
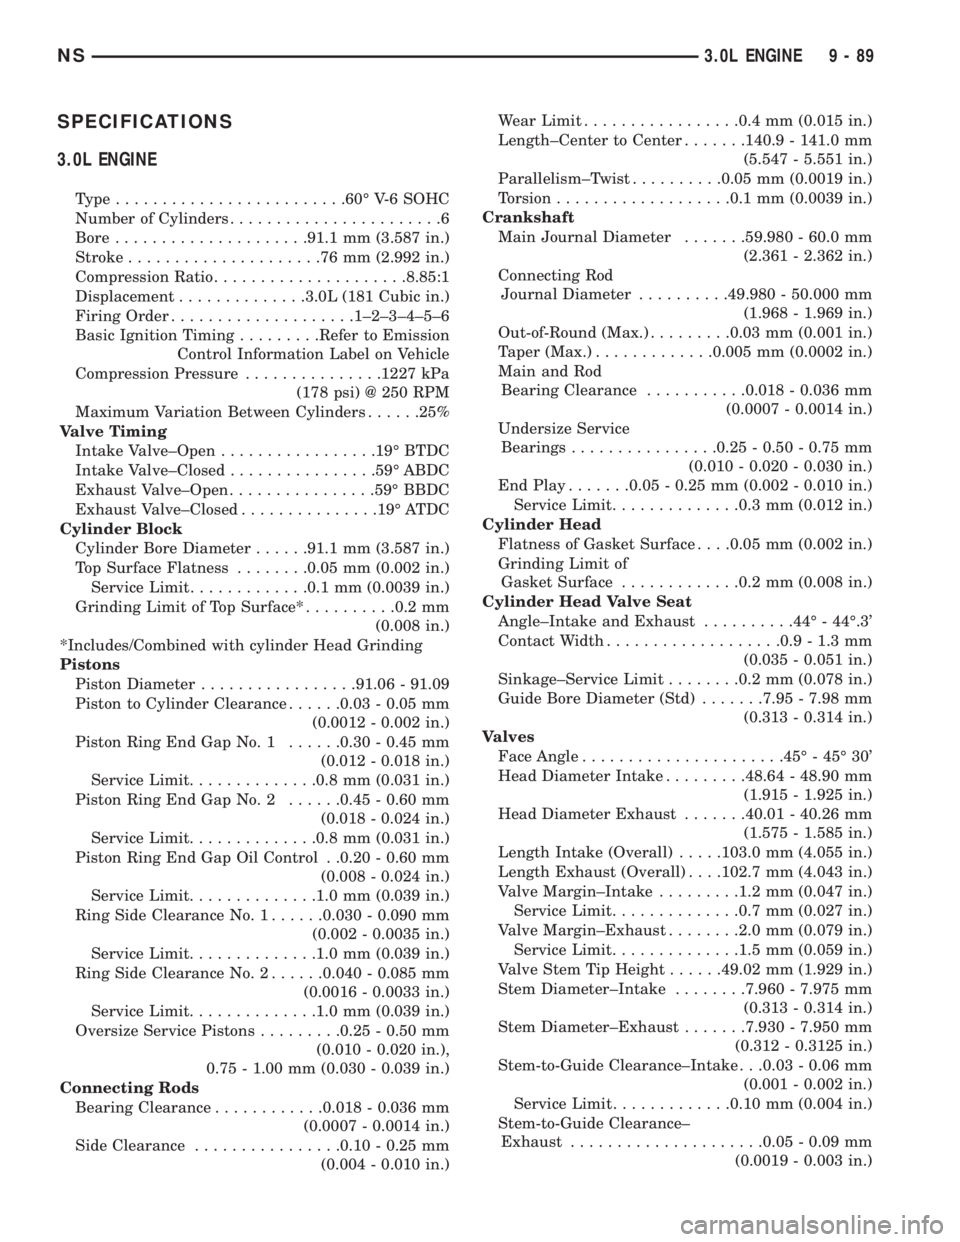
SPECIFICATIONS
3.0L ENGINE
Type.........................60É V-6 SOHC
Number of Cylinders.......................6
Bore.....................91.1 mm (3.587 in.)
Stroke.....................76mm(2.992 in.)
Compression Ratio.....................8.85:1
Displacement..............3.0L (181 Cubic in.)
Firing Order....................1±2±3±4±5±6
Basic Ignition Timing.........Refer to Emission
Control Information Label on Vehicle
Compression Pressure...............1227 kPa
(178 psi) @ 250 RPM
Maximum Variation Between Cylinders......25%
Valve Timing
Intake Valve±Open.................19É BTDC
Intake Valve±Closed................59É ABDC
Exhaust Valve±Open................59É BBDC
Exhaust Valve±Closed...............19É ATDC
Cylinder Block
Cylinder Bore Diameter......91.1 mm (3.587 in.)
Top Surface Flatness........0.05 mm (0.002 in.)
Service Limit.............0.1 mm (0.0039 in.)
Grinding Limit of Top Surface*..........0.2 mm
(0.008 in.)
*Includes/Combined with cylinder Head Grinding
Pistons
Piston Diameter.................91.06 - 91.09
Piston to Cylinder Clearance......0.03 - 0.05 mm
(0.0012 - 0.002 in.)
Piston Ring End Gap No. 1......0.30 - 0.45 mm
(0.012 - 0.018 in.)
Service Limit..............0.8 mm (0.031 in.)
Piston Ring End Gap No. 2......0.45 - 0.60 mm
(0.018 - 0.024 in.)
Service Limit..............0.8 mm (0.031 in.)
Piston Ring End Gap Oil Control . .0.20 - 0.60 mm
(0.008 - 0.024 in.)
Service Limit..............1.0 mm (0.039 in.)
Ring Side Clearance No. 1......0.030 - 0.090 mm
(0.002 - 0.0035 in.)
Service Limit..............1.0 mm (0.039 in.)
Ring Side Clearance No. 2......0.040 - 0.085 mm
(0.0016 - 0.0033 in.)
Service Limit..............1.0 mm (0.039 in.)
Oversize Service Pistons.........0.25 - 0.50 mm
(0.010 - 0.020 in.),
0.75 - 1.00 mm (0.030 - 0.039 in.)
Connecting Rods
Bearing Clearance............0.018 - 0.036 mm
(0.0007 - 0.0014 in.)
Side Clearance................0.10 - 0.25 mm
(0.004 - 0.010 in.)Wear Limit.................0.4 mm (0.015 in.)
Length±Center to Center.......140.9 - 141.0 mm
(5.547 - 5.551 in.)
Parallelism±Twist..........0.05 mm (0.0019 in.)
Torsion...................0.1 mm (0.0039 in.)
Crankshaft
Main Journal Diameter.......59.980 - 60.0 mm
(2.361 - 2.362 in.)
Connecting Rod
Journal Diameter..........49.980 - 50.000 mm
(1.968 - 1.969 in.)
Out-of-Round (Max.).........0.03 mm (0.001 in.)
Taper (Max.).............0.005 mm (0.0002 in.)
Main and Rod
Bearing Clearance...........0.018 - 0.036 mm
(0.0007 - 0.0014 in.)
Undersize Service
Bearings................0.25 - 0.50 - 0.75 mm
(0.010 - 0.020 - 0.030 in.)
End Play.......0.05 - 0.25 mm (0.002 - 0.010 in.)
Service Limit..............0.3 mm (0.012 in.)
Cylinder Head
Flatness of Gasket Surface. . . .0.05 mm (0.002 in.)
Grinding Limit of
Gasket Surface.............0.2 mm (0.008 in.)
Cylinder Head Valve Seat
Angle±Intake and Exhaust..........44É - 44É.3'
Contact Width...................0.9 - 1.3 mm
(0.035 - 0.051 in.)
Sinkage±Service Limit........0.2 mm (0.078 in.)
Guide Bore Diameter (Std).......7.95 - 7.98 mm
(0.313 - 0.314 in.)
Valves
Face Angle......................45É - 45É 30'
Head Diameter Intake.........48.64 - 48.90 mm
(1.915 - 1.925 in.)
Head Diameter Exhaust.......40.01 - 40.26 mm
(1.575 - 1.585 in.)
Length Intake (Overall).....103.0 mm (4.055 in.)
Length Exhaust (Overall). . . .102.7 mm (4.043 in.)
Valve Margin±Intake.........1.2 mm (0.047 in.)
Service Limit..............0.7 mm (0.027 in.)
Valve Margin±Exhaust........2.0 mm (0.079 in.)
Service Limit..............1.5 mm (0.059 in.)
Valve Stem Tip Height......49.02 mm (1.929 in.)
Stem Diameter±Intake........7.960 - 7.975 mm
(0.313 - 0.314 in.)
Stem Diameter±Exhaust.......7.930 - 7.950 mm
(0.312 - 0.3125 in.)
Stem-to-Guide Clearance±Intake . . .0.03 - 0.06 mm
(0.001 - 0.002 in.)
Service Limit.............0.10 mm (0.004 in.)
Stem-to-Guide Clearance±
Exhaust.....................0.05 - 0.09 mm
(0.0019 - 0.003 in.)
NS3.0L ENGINE 9 - 89