seats CHRYSLER VOYAGER 1996 Owner's Manual
[x] Cancel search | Manufacturer: CHRYSLER, Model Year: 1996, Model line: VOYAGER, Model: CHRYSLER VOYAGER 1996Pages: 1938, PDF Size: 55.84 MB
Page 861 of 1938

BK12Z1
BK20Z1
B09 S021
BK14Z1 GND
C27
P117
14
RD/LBP115
14
YL/LB
YL/WT14 P111RD/WT14 P113 P121
14
RD/LG
P119
14
YL/LG
GY/LB14 P43GY/WT14 P41
BA
M
9C2
RECLINE
RWD FWD RECLINE
C24
DOWN VERTICALFRONT
C210
UP VERTICALFRONT
C25
DOWN VERTICALREAR
C26
UP VERTICALREAR
C231C2
HORIZ.
RWD FWD HORIZ.
C22
G300
2
MOTOR
RECLINER
BA
M
M
BA
M
AB
MOTOR
HORIZONTALFRONT
VERTICAL
MOTOR
REAR
VERTICAL
MOTOR
RD20 P9
P17
22
RD/LBP15
22
YL/LB
RD/WT22 P13YL/WT22 P11 P48
22
GY/WT
P40
22
GY/LB
RD/LG22 P21YL/LG22 P19
SEAT
RECLINE
RWD
4C3
SEAT
RECLINE
FWD
15C3
SEAT
FRONT
DOWN
1C3
SEAT
FRONT
UP
12C3 C313
UP REARSEAT
C32
DOWNREARSEAT SEAT
FWD
14C3
SEAT
RWD
3C3 C311
B(+) FUSED
5
POWER
SEAT
SWITCH
3619824107
MEMORY
MODULE MIRROR
SEAT/
MEMORY
43121234
SEAT
MEMORY
SEAT MEMORY
SEAT MEMORY
MEMORY
SEAT
4 REARWARD 2 DOWN 1 UP
3 FORWARD
(8W-15-5)
NS/GS8W-63 POWER SEATS
MEMORY8W - 63 - 5
GS006305J988W-3
Page 862 of 1938

BR22 P26LB/RD22 P27VT/RD22 P25LB22 P47BR/RD20 P28
BR/RD20 P28BR/RD20 P28BR/RD20 P28BR/RD20 P28
BR/WT20 P29BR/WT20 P29BR/WT20 P29BR/WT20 P29BR/WT20 P29
SS01 SS02
SENSOR POSITION
RECLINE
SEAT
MEMORY MEMORY
SEAT
HORIZONTAL
POSITION
SENSOR
SENSOR MEMORY
SEAT
FRONT
VERTICAL
POSITION
POSITION VERTICAL
REAR
SEAT
MEMORY
SENSORA B
C
C
BA
A B
C
C317C318C310C37C38 20C3
A
BC
SENSE POSITION RECLINER
HORIZONTAL
POSITION
SENSE FRONT
SENSE POSITIONSEAT
VERTICAL 6V
SUPPLY
MEMORY
SEAT/
MIRROR
MODULE
VERTICALSEAT
POSITION
SENSEREAR SEAT
COMMONSENSE POSITIONSEAT SEAT
8W - 63 - 6 8W-63 POWER SEATS
MEMORYNS/GS
J988W-3GS006306
Page 863 of 1938

SWITCH SEAT
HEATED
DRIVER
DRIVER
HEATED
SEAT
CUSHION
DRIVER
HEATED
SEAT
BACK
DRIVER
HEATED
SEAT
MODULE
A (8W-63-2)
FUSIBLE
LINK
FROM
DAEFCB
AB
D
DB
AFE
ACB2
G300
FUSED
B(+)GROUND FEED
BACKHEATED
SEAT
DRIVERGROUND DRIVERSEAT HEATED GROUND
HS1
F35
18
RDP86
20
VTP7
20
WT/BKZ1
18
BK
Z1
18
BKZ1
14
BK
P87
18
RD/WT
P89
20
BK/RDP88
18
RD/WT
Z1
18
BK
B09 HS5D1
Z1
12
BK
Z1
18
BK
HEATED
SEAT
BACK DRIVERSEAT HEATED GROUND FUSED
IGNITION
(RUN) (RUN)IGNITIONFUSED
HS2
4B09
HS5D
F20
20
WT
10A
FUSE
12
RUN A22
JUNCTION
BLOCK
14C2
1S02
HS6D
Z1
14
BK
MODULE MIRROR
SEAT/
MEMORY
Z1
14
BK
7
BK20Z1 1
MEMORY
POWER
SEAT
SWITCH
HEATED
SEAT
DRIVER
C2
HEATED
SEAT
TEMPERATURE
SENSOR SWITCHSEAT HEATEDDRIVER
DRIVER
HEATED
SEAT
SWITCH SENSOR TEMPERATURESEAT HEATEDGROUND GROUND
(8W-15-5) (8W-12-12)(8W-12-2) (8W-10-14)
(8W-63-5) (8W-63-5)
NS/GS8W-63 POWER SEATS
HEATED8W - 63 - 7
GS006307J988W-3
Page 864 of 1938

SWITCH SEAT
HEATED
PASSENGER
PASSENGER
HEATED
SEAT
CUSHION
PASSENGER
HEATED
SEAT
BACK
PASSENGER
HEATED
SEAT
MODULE
B (8W-63-3)
FUSIBLE
LINK
FROM
DAEFCB
AB
D
DB
AFE
ACB7
G300
FUSED
B(+)GROUNDHEATED
SEAT
DRIVERGROUND DRIVERSEAT HEATED GROUND
HS3
F35
18
RDP86
20
VTP8
20
WT/BKZ1
18
BK
Z1
18
BKZ1
14
BK
P87
18
RD/WT
P89
20
BK/RDP88
18
RD/WTZ1
18
BK
B56 HS5P1
Z1
12
BK
Z1
18
BK
HEATED
SEAT
BACK DRIVERSEAT HEATED GROUND FUSED
IGNITION
(RUN) (RUN)IGNITIONFUSED
HS4
4B56
HS5P
F20
20
WT
10A
FUSE
12
RUN A22
JUNCTION
BLOCK
7C2
HEATED
SEAT
DRIVER HEATED
SEAT
TEMPERATURE
SENSOR SWITCHSEAT HEATED PASSENGER
PASSENGER
HEATED
SEAT
SWITCH SENSOR TEMPERATURESEAT HEATED
BACKSEAT HEATED(8W-15-9) (8W-12-12)(8W-12-2) (8W-10-14)
8W - 63 - 8 8W-63 POWER SEATS
HEATEDNS/GS
J988W-3GS006308
Page 1062 of 1938
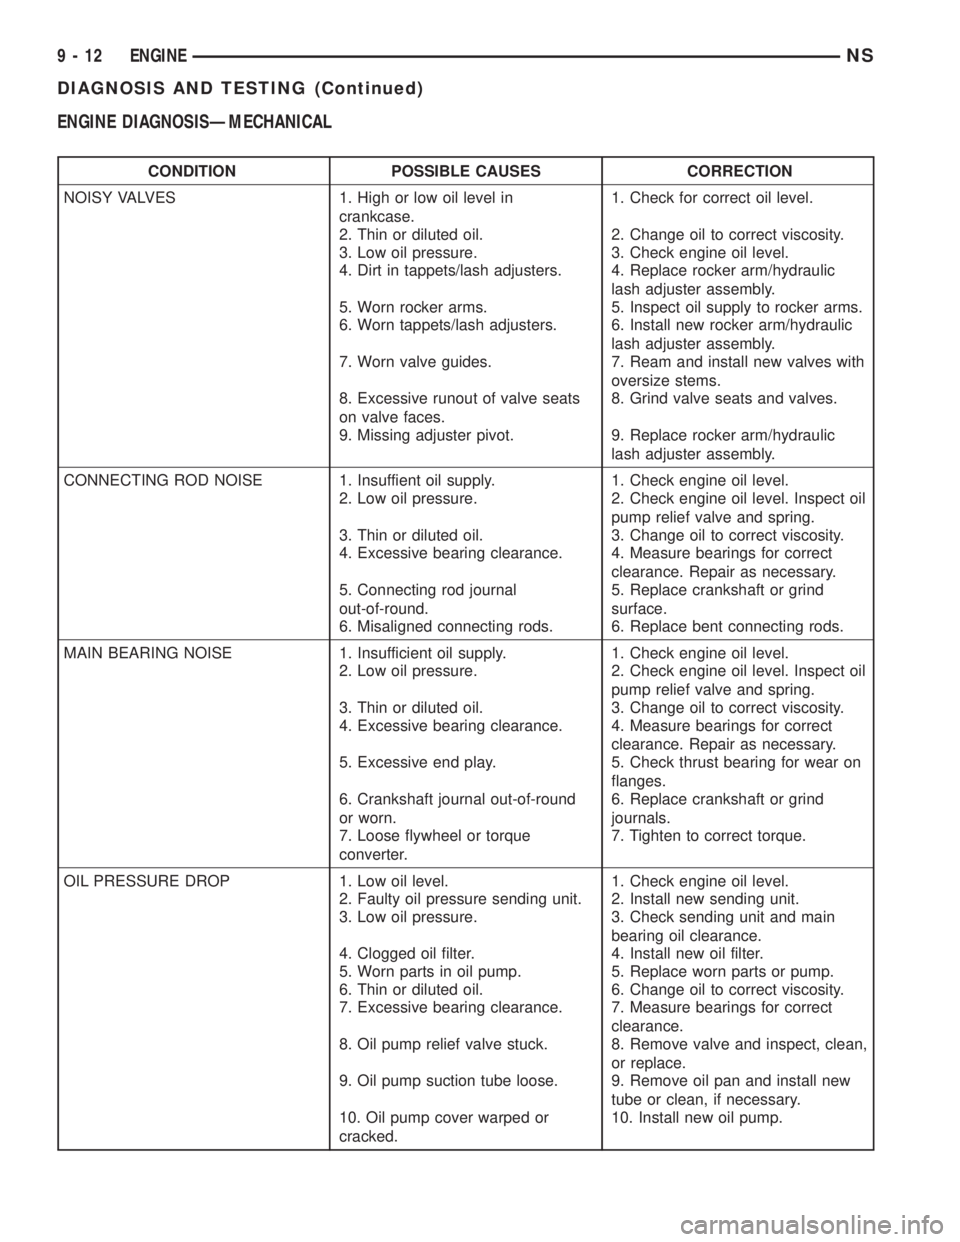
ENGINE DIAGNOSISÐMECHANICAL
CONDITION POSSIBLE CAUSES CORRECTION
NOISY VALVES 1. High or low oil level in
crankcase.1. Check for correct oil level.
2. Thin or diluted oil. 2. Change oil to correct viscosity.
3. Low oil pressure. 3. Check engine oil level.
4. Dirt in tappets/lash adjusters. 4. Replace rocker arm/hydraulic
lash adjuster assembly.
5. Worn rocker arms. 5. Inspect oil supply to rocker arms.
6. Worn tappets/lash adjusters. 6. Install new rocker arm/hydraulic
lash adjuster assembly.
7. Worn valve guides. 7. Ream and install new valves with
oversize stems.
8. Excessive runout of valve seats
on valve faces.8. Grind valve seats and valves.
9. Missing adjuster pivot. 9. Replace rocker arm/hydraulic
lash adjuster assembly.
CONNECTING ROD NOISE 1. Insuffient oil supply. 1. Check engine oil level.
2. Low oil pressure. 2. Check engine oil level. Inspect oil
pump relief valve and spring.
3. Thin or diluted oil. 3. Change oil to correct viscosity.
4. Excessive bearing clearance. 4. Measure bearings for correct
clearance. Repair as necessary.
5. Connecting rod journal
out-of-round.5. Replace crankshaft or grind
surface.
6. Misaligned connecting rods. 6. Replace bent connecting rods.
MAIN BEARING NOISE 1. Insufficient oil supply. 1. Check engine oil level.
2. Low oil pressure. 2. Check engine oil level. Inspect oil
pump relief valve and spring.
3. Thin or diluted oil. 3. Change oil to correct viscosity.
4. Excessive bearing clearance. 4. Measure bearings for correct
clearance. Repair as necessary.
5. Excessive end play. 5. Check thrust bearing for wear on
flanges.
6. Crankshaft journal out-of-round
or worn.6. Replace crankshaft or grind
journals.
7. Loose flywheel or torque
converter.7. Tighten to correct torque.
OIL PRESSURE DROP 1. Low oil level. 1. Check engine oil level.
2. Faulty oil pressure sending unit. 2. Install new sending unit.
3. Low oil pressure. 3. Check sending unit and main
bearing oil clearance.
4. Clogged oil filter. 4. Install new oil filter.
5. Worn parts in oil pump. 5. Replace worn parts or pump.
6. Thin or diluted oil. 6. Change oil to correct viscosity.
7. Excessive bearing clearance. 7. Measure bearings for correct
clearance.
8. Oil pump relief valve stuck. 8. Remove valve and inspect, clean,
or replace.
9. Oil pump suction tube loose. 9. Remove oil pan and install new
tube or clean, if necessary.
10. Oil pump cover warped or
cracked.10. Install new oil pump.
9 - 12 ENGINENS
DIAGNOSIS AND TESTING (Continued)
Page 1066 of 1938

sealing and a chrome plated taper faced intermediate
ring for additional cylinder pressure control. There
are also standard oil control rings.
CYLINDER HEAD:Features a Dual Over Head
Camshaft (DOHC) 4 valves per cylinder cross flow
design. The valves are arranged in two inline banks,
with the ports of the bank of two intake valves per
cylinder facing toward the radiator side of engine
and ports of the bank of two exhaust valves per cyl-
inder facing toward the dash panel. Incorporates
powder metal valve guides and seats. Integral oil gal-
leys within the cylinder head supplies oil to the
hydraulic lash adjusters, camshaft and valve mecha-
nisms.
CAMSHAFTS:The nodular iron camshafts have
six bearing journals and 2 cam lobes per cylinder.
Flanges at the rear journals control camshaft end
play. Provision for cam position sensor is located on
the intake camshaft at the rear of cylinder head. A
hydrodynamic oil seal is used for oil control at the
front of the camshaft.
VALVES:4 valves per cylinder are actuated by
roller cam followers which pivot on stationary
hydraulic lash adjusters. All valves have 6 mm diam-
eter chrome plated valve stems. The valve sizes are
34.8 mm (1.370 inch.) diameter intake valves and
30.5 mm (1.20 inch.) diameter exhaust valves. Viton
rubber valve stem seals are integral with the spring
seats. Valve springs, spring retainers, and locks are
conventional.
INTAKE MANIFOLD:The intake manifold is a
two piece aluminum casting, attached to the cylinder
head with ten screws. This long branch fan design
enhances low and midspeed torque, while minimizing
undesirable inlet noise.
EXHAUST MANIFOLD:The exhaust manifold is
made of cast iron for strength and high tempera-
tures.
ENGINE LUBRICATION:Refer to Group 0
Lubrication and Maintenance for recommended oil to
be used in various engine application. System is full
flow filtration, pressure feed type. The oil pump is
mounted in the front engine cover and driven by the
crankshaft. Pressurized oil is then routed through
the main oil gallery, running the length of the cylin-
der block, supplying main and rod bearings with fur-
ther routing. Pistons are lubricated from rod bearing
throw off and lubricating slots on the connecting rod
assemblies. Camshaft and valve mechanisms are
lubricated from a full length cylinder head oil gallery
supplied from the crankcase main oil gallery.DIAGNOSIS AND TESTING
CHECKING ENGINE OIL PRESSURE
(1) Remove oil pressure sending unit and install
gauge assembly C-3292.
(2) Run engine until thermostat opens.
CAUTION: If oil pressure is 0 at idle, Do Not Run
engine at 3000 RPM
(3) Oil Pressure:Curb Idle25 kPa (4 psi) mini-
mum3000 RPM170/550 kPa (25/80 psi).
(4) If oil pressure is 0 at idle. Shut off engine,
check for pressure relief valve stuck open or a
clogged oil pickup screen.
SERVICE PROCEDURES
FITTING PISTONS
Piston and cylinder wall must be clean and dry.
Piston diameter should be measured 90 degrees to
piston pin about 14 mm (9/16 inch.) from the bottom
of the skirt as shown in (Fig. 3). Cylinder bores
should be measured halfway down the cylinder bore
and transverse to the engine crankshaft center line
shown in (Fig. 2). Refer to Cylinder Bore and Piston
Specification Chart.
Correct piston to bore clearance must be estab-
lished in order to assure quiet and economical oper-
ation.
Chrysler engines use pistons designed specifically
for each engine model. Clearance and sizing locations
vary with respect to engine model.
NOTE: Pistons and cylinder bores should be mea-
sured at normal room temperature, 70ÉF (21ÉC).
FITTING PISTON RINGS
(1) Wipe cylinder bore clean. Insert ring and push
down with piston to ensure it is square in bore. The
ring gap measurement must be made with the ring
positioning at least 12 mm (0.50 inch) from bottom of
cylinder bore. Check gap with feeler gauge (Fig. 4).
Refer to specification in Piston Ring Specification
Chart.
(2) Check piston ring to groove side clearance (Fig.
5). Refer to specification in Piston Ring Specification
Chart.
9 - 16 2.4L ENGINENS
DESCRIPTION AND OPERATION (Continued)
Page 1071 of 1938
OPTIONAL CRANKSHAFT END PLAY CHECK
(1) Move crankshaft all the way to the rear of its
travel using a lever inserted between a main bearing
cap and a crankshaft cheek, using care not to dam-
age any bearing surface.DO NOTloosen main bear-
ing cap.
(2) Use a feeler gauge between number three
thrust bearing and machined crankshaft surface to
determine end play.
VALVE SERVICE RECONDITION
VALVE REMOVAL
(1) With cylinder head removed, compress valve
springs using Special Tool C-3422-B or equivalent.
(2) Remove valve retaining locks, valve spring
retainers, valve stem seals and valve springs.
(3) Before removing valves,remove any burrs
from valve stem lock grooves to prevent dam-
age to the valve guides.Identify valves to insure
installation in original location.
VALVE INSPECTION
(1) Clean valves thoroughly and discard burned,
warped and cracked valves.
(2) Measure valve stems for wear. Measure stem
about 60 mm beneath the valve lock grooves.
(3) If valve stems are worn more than 0.05 mm
(0.002 in.), replace valve.
VALVE GUIDES
(1) Remove carbon and varnish deposits from
inside of valve guides with a reliable guide cleaner.
(2) Using a small hole gauge and a micrometer,
measure valve guides in 3 places top, middle and bot-
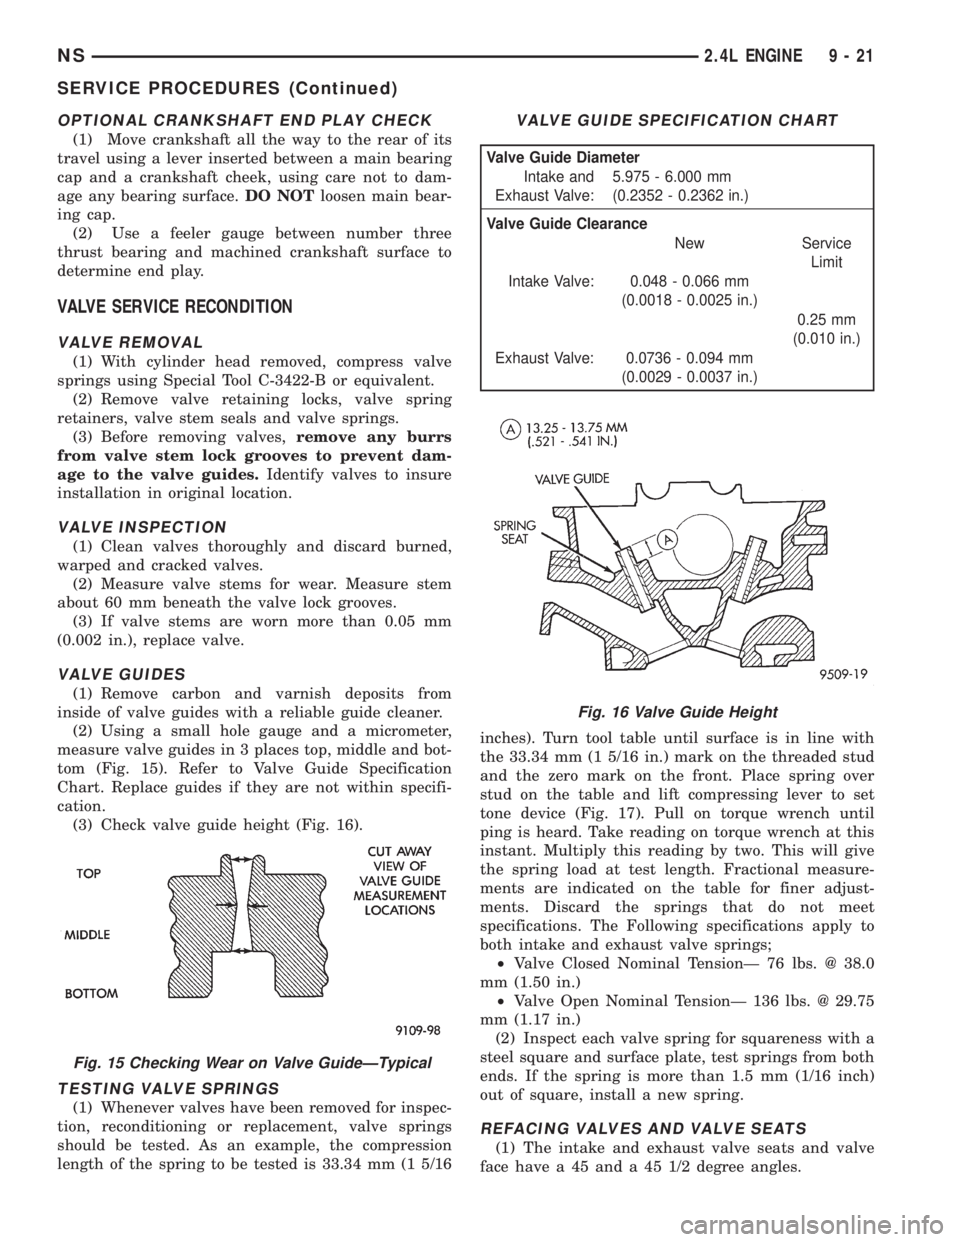
tom (Fig. 15). Refer to Valve Guide Specification
Chart. Replace guides if they are not within specifi-
cation.
(3) Check valve guide height (Fig. 16).
TESTING VALVE SPRINGS
(1) Whenever valves have been removed for inspec-
tion, reconditioning or replacement, valve springs
should be tested. As an example, the compression
length of the spring to be tested is 33.34 mm (1 5/16inches). Turn tool table until surface is in line with
the 33.34 mm (1 5/16 in.) mark on the threaded stud
and the zero mark on the front. Place spring over
stud on the table and lift compressing lever to set
tone device (Fig. 17). Pull on torque wrench until
ping is heard. Take reading on torque wrench at this
instant. Multiply this reading by two. This will give
the spring load at test length. Fractional measure-
ments are indicated on the table for finer adjust-
ments. Discard the springs that do not meet
specifications. The Following specifications apply to
both intake and exhaust valve springs;
²Valve Closed Nominal TensionÐ 76 lbs. @ 38.0
mm (1.50 in.)
²Valve Open Nominal TensionÐ 136 lbs. @ 29.75
mm (1.17 in.)
(2) Inspect each valve spring for squareness with a
steel square and surface plate, test springs from both
ends. If the spring is more than 1.5 mm (1/16 inch)
out of square, install a new spring.
REFACING VALVES AND VALVE SEATS
(1) The intake and exhaust valve seats and valve
face have a 45 and a 45 1/2 degree angles.
Fig. 15 Checking Wear on Valve GuideÐTypical
VALVE GUIDE SPECIFICATION CHART
Valve Guide Diameter
Intake and
Exhaust Valve:5.975 - 6.000 mm
(0.2352 - 0.2362 in.)
Valve Guide Clearance
New Service
Limit
Intake Valve: 0.048 - 0.066 mm
(0.0018 - 0.0025 in.)
0.25 mm
(0.010 in.)
Exhaust Valve: 0.0736 - 0.094 mm
(0.0029 - 0.0037 in.)
Fig. 16 Valve Guide Height
NS2.4L ENGINE 9 - 21
SERVICE PROCEDURES (Continued)
Page 1072 of 1938
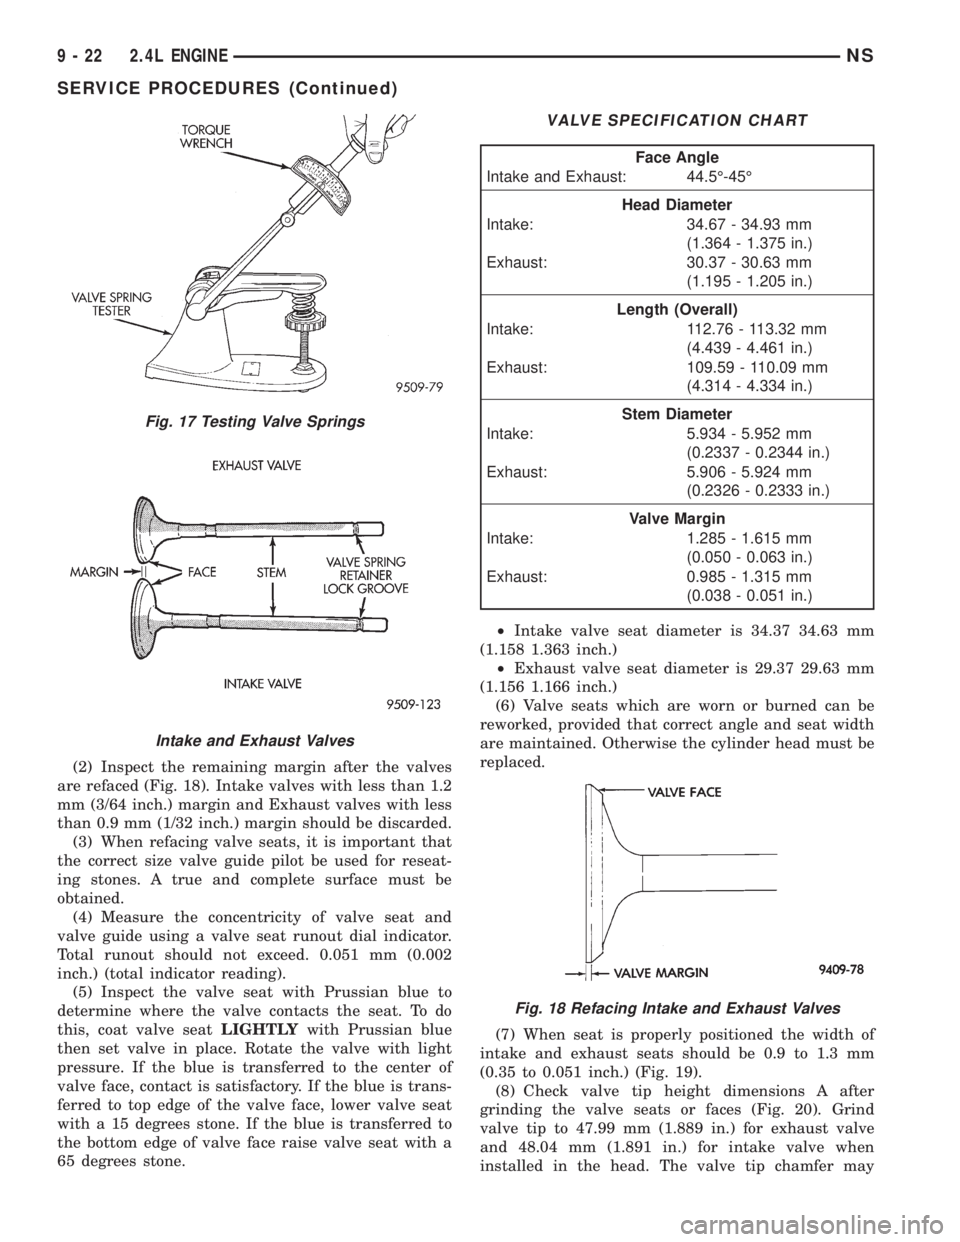
(2) Inspect the remaining margin after the valves
are refaced (Fig. 18). Intake valves with less than 1.2
mm (3/64 inch.) margin and Exhaust valves with less
than 0.9 mm (1/32 inch.) margin should be discarded.
(3) When refacing valve seats, it is important that
the correct size valve guide pilot be used for reseat-
ing stones. A true and complete surface must be
obtained.
(4) Measure the concentricity of valve seat and
valve guide using a valve seat runout dial indicator.
Total runout should not exceed. 0.051 mm (0.002
inch.) (total indicator reading).
(5) Inspect the valve seat with Prussian blue to
determine where the valve contacts the seat. To do
this, coat valve seatLIGHTLYwith Prussian blue
then set valve in place. Rotate the valve with light
pressure. If the blue is transferred to the center of
valve face, contact is satisfactory. If the blue is trans-
ferred to top edge of the valve face, lower valve seat
with a 15 degrees stone. If the blue is transferred to
the bottom edge of valve face raise valve seat with a
65 degrees stone.²Intake valve seat diameter is 34.37 34.63 mm
(1.158 1.363 inch.)
²Exhaust valve seat diameter is 29.37 29.63 mm
(1.156 1.166 inch.)
(6) Valve seats which are worn or burned can be
reworked, provided that correct angle and seat width
are maintained. Otherwise the cylinder head must be
replaced.
(7) When seat is properly positioned the width of
intake and exhaust seats should be 0.9 to 1.3 mm
(0.35 to 0.051 inch.) (Fig. 19).
(8) Check valve tip height dimensions A after
grinding the valve seats or faces (Fig. 20). Grind
valve tip to 47.99 mm (1.889 in.) for exhaust valve
and 48.04 mm (1.891 in.) for intake valve when
installed in the head. The valve tip chamfer may
Fig. 17 Testing Valve Springs
Intake and Exhaust Valves
VALVE SPECIFICATION CHART
Face Angle
Intake and Exhaust: 44.5É-45É
Head Diameter
Intake: 34.67 - 34.93 mm
(1.364 - 1.375 in.)
Exhaust: 30.37 - 30.63 mm
(1.195 - 1.205 in.)
Length (Overall)
Intake: 112.76 - 113.32 mm
(4.439 - 4.461 in.)
Exhaust: 109.59 - 110.09 mm
(4.314 - 4.334 in.)
Stem Diameter
Intake: 5.934 - 5.952 mm
(0.2337 - 0.2344 in.)
Exhaust: 5.906 - 5.924 mm
(0.2326 - 0.2333 in.)
Valve Margin
Intake: 1.285 - 1.615 mm
(0.050 - 0.063 in.)
Exhaust: 0.985 - 1.315 mm
(0.038 - 0.051 in.)
Fig. 18 Refacing Intake and Exhaust Valves
9 - 22 2.4L ENGINENS
SERVICE PROCEDURES (Continued)
Page 1073 of 1938
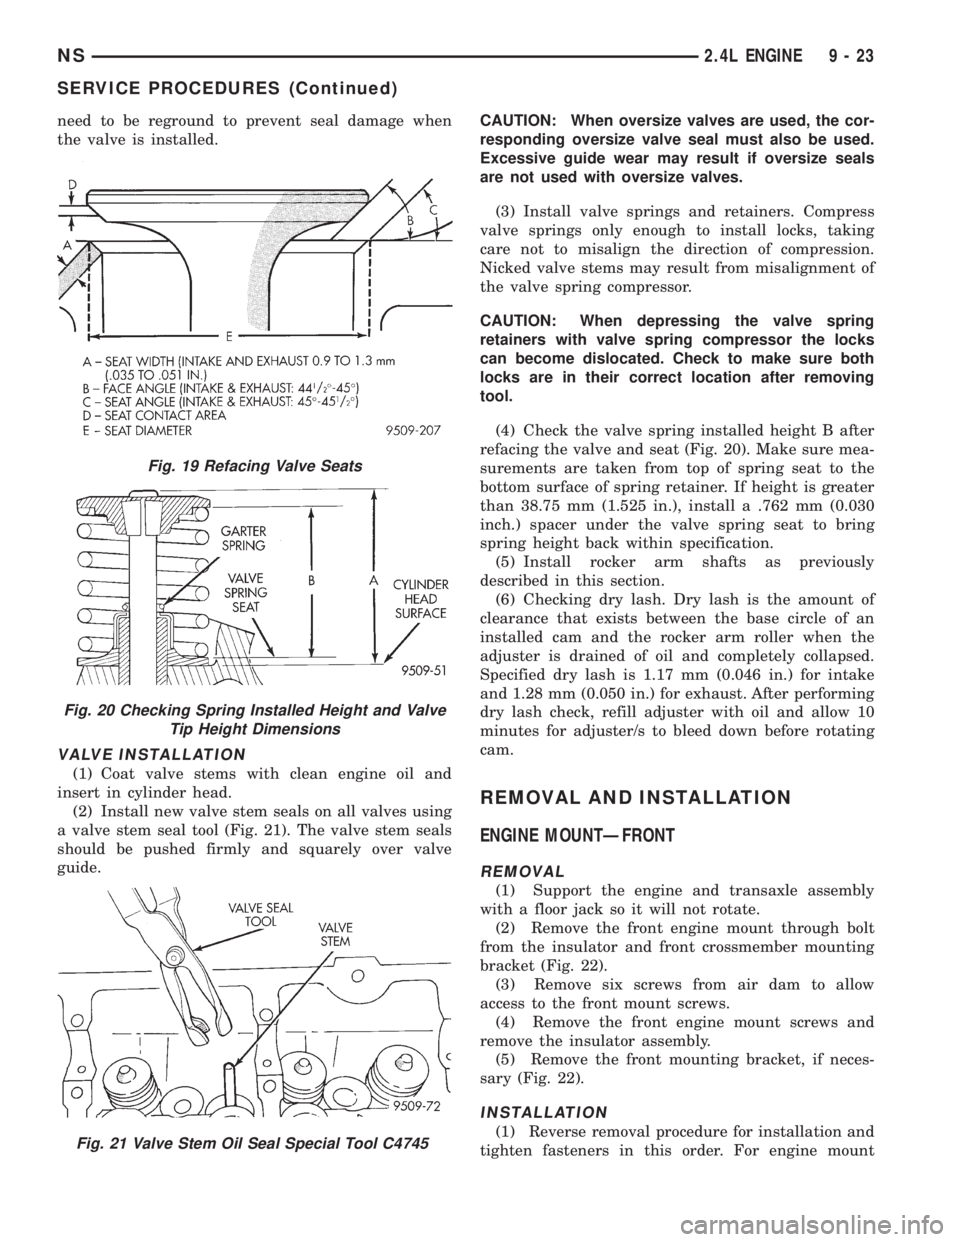
need to be reground to prevent seal damage when
the valve is installed.
VALVE INSTALLATION
(1) Coat valve stems with clean engine oil and
insert in cylinder head.
(2) Install new valve stem seals on all valves using
a valve stem seal tool (Fig. 21). The valve stem seals
should be pushed firmly and squarely over valve
guide.CAUTION: When oversize valves are used, the cor-
responding oversize valve seal must also be used.
Excessive guide wear may result if oversize seals
are not used with oversize valves.
(3) Install valve springs and retainers. Compress
valve springs only enough to install locks, taking
care not to misalign the direction of compression.
Nicked valve stems may result from misalignment of
the valve spring compressor.
CAUTION: When depressing the valve spring
retainers with valve spring compressor the locks
can become dislocated. Check to make sure both
locks are in their correct location after removing
tool.
(4) Check the valve spring installed height B after
refacing the valve and seat (Fig. 20). Make sure mea-
surements are taken from top of spring seat to the
bottom surface of spring retainer. If height is greater
than 38.75 mm (1.525 in.), install a .762 mm (0.030
inch.) spacer under the valve spring seat to bring
spring height back within specification.
(5) Install rocker arm shafts as previously
described in this section.
(6) Checking dry lash. Dry lash is the amount of
clearance that exists between the base circle of an
installed cam and the rocker arm roller when the
adjuster is drained of oil and completely collapsed.
Specified dry lash is 1.17 mm (0.046 in.) for intake
and 1.28 mm (0.050 in.) for exhaust. After performing
dry lash check, refill adjuster with oil and allow 10
minutes for adjuster/s to bleed down before rotating
cam.
REMOVAL AND INSTALLATION
ENGINE MOUNTÐFRONT
REMOVAL
(1) Support the engine and transaxle assembly
with a floor jack so it will not rotate.
(2) Remove the front engine mount through bolt
from the insulator and front crossmember mounting
bracket (Fig. 22).
(3) Remove six screws from air dam to allow
access to the front mount screws.
(4) Remove the front engine mount screws and
remove the insulator assembly.
(5) Remove the front mounting bracket, if neces-
sary (Fig. 22).
INSTALLATION
(1) Reverse removal procedure for installation and
tighten fasteners in this order. For engine mount
Fig. 19 Refacing Valve Seats
Fig. 20 Checking Spring Installed Height and Valve
Tip Height Dimensions
Fig. 21 Valve Stem Oil Seal Special Tool C4745
NS2.4L ENGINE 9 - 23
SERVICE PROCEDURES (Continued)
Page 1151 of 1938
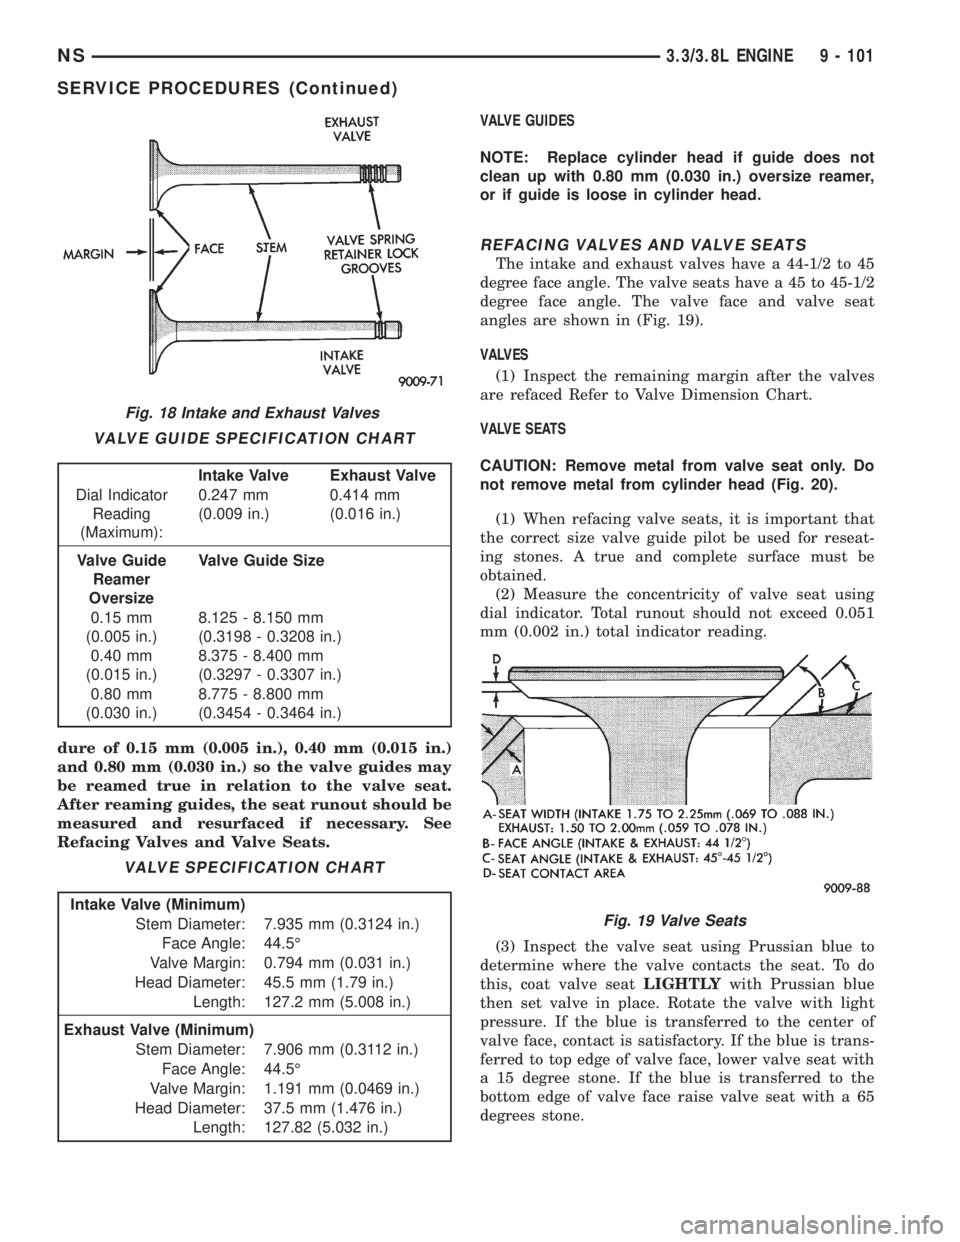
dure of 0.15 mm (0.005 in.), 0.40 mm (0.015 in.)
and 0.80 mm (0.030 in.) so the valve guides may
be reamed true in relation to the valve seat.
After reaming guides, the seat runout should be
measured and resurfaced if necessary. See
Refacing Valves and Valve Seats.VALVE GUIDES
NOTE: Replace cylinder head if guide does not
clean up with 0.80 mm (0.030 in.) oversize reamer,
or if guide is loose in cylinder head.
REFACING VALVES AND VALVE SEATS
The intake and exhaust valves have a 44-1/2 to 45
degree face angle. The valve seats have a 45 to 45-1/2
degree face angle. The valve face and valve seat
angles are shown in (Fig. 19).
VALVES
(1) Inspect the remaining margin after the valves
are refaced Refer to Valve Dimension Chart.
VALVE SEATS
CAUTION: Remove metal from valve seat only. Do
not remove metal from cylinder head (Fig. 20).
(1) When refacing valve seats, it is important that
the correct size valve guide pilot be used for reseat-
ing stones. A true and complete surface must be
obtained.
(2) Measure the concentricity of valve seat using
dial indicator. Total runout should not exceed 0.051
mm (0.002 in.) total indicator reading.
(3) Inspect the valve seat using Prussian blue to
determine where the valve contacts the seat. To do
this, coat valve seatLIGHTLYwith Prussian blue
then set valve in place. Rotate the valve with light
pressure. If the blue is transferred to the center of
valve face, contact is satisfactory. If the blue is trans-
ferred to top edge of valve face, lower valve seat with
a 15 degree stone. If the blue is transferred to the
bottom edge of valve face raise valve seat with a 65
degrees stone.
Fig. 18 Intake and Exhaust Valves
VALVE GUIDE SPECIFICATION CHART
Intake Valve Exhaust Valve
Dial Indicator
Reading
(Maximum):0.247 mm
(0.009 in.)0.414 mm
(0.016 in.)
Valve Guide
Reamer
OversizeValve Guide Size
0.15 mm
(0.005 in.)8.125 - 8.150 mm
(0.3198 - 0.3208 in.)
0.40 mm
(0.015 in.)8.375 - 8.400 mm
(0.3297 - 0.3307 in.)
0.80 mm
(0.030 in.)8.775 - 8.800 mm
(0.3454 - 0.3464 in.)
VALVE SPECIFICATION CHART
Intake Valve (Minimum)
Stem Diameter: 7.935 mm (0.3124 in.)
Face Angle: 44.5É
Valve Margin: 0.794 mm (0.031 in.)
Head Diameter: 45.5 mm (1.79 in.)
Length: 127.2 mm (5.008 in.)
Exhaust Valve (Minimum)
Stem Diameter: 7.906 mm (0.3112 in.)
Face Angle: 44.5É
Valve Margin: 1.191 mm (0.0469 in.)
Head Diameter: 37.5 mm (1.476 in.)
Length: 127.82 (5.032 in.)
Fig. 19 Valve Seats
NS3.3/3.8L ENGINE 9 - 101
SERVICE PROCEDURES (Continued)