service CHRYSLER VOYAGER 1996 Service Manual
[x] Cancel search | Manufacturer: CHRYSLER, Model Year: 1996, Model line: VOYAGER, Model: CHRYSLER VOYAGER 1996Pages: 1938, PDF Size: 55.84 MB
Page 1688 of 1938
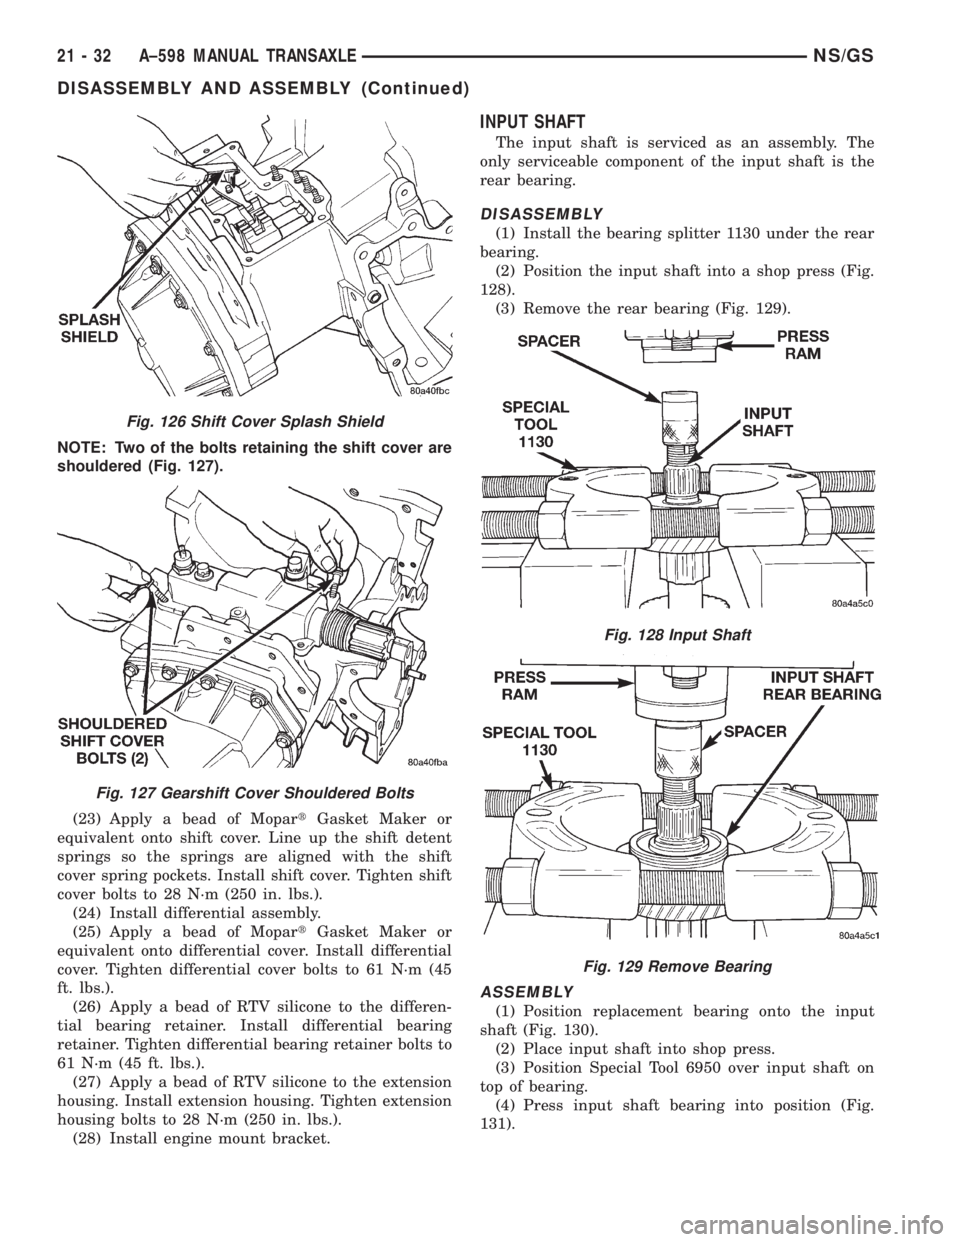
NOTE: Two of the bolts retaining the shift cover are
shouldered (Fig. 127).
(23) Apply a bead of MopartGasket Maker or
equivalent onto shift cover. Line up the shift detent
springs so the springs are aligned with the shift
cover spring pockets. Install shift cover. Tighten shift
cover bolts to 28 N´m (250 in. lbs.).
(24) Install differential assembly.
(25) Apply a bead of MopartGasket Maker or
equivalent onto differential cover. Install differential
cover. Tighten differential cover bolts to 61 N´m (45
ft. lbs.).
(26) Apply a bead of RTV silicone to the differen-
tial bearing retainer. Install differential bearing
retainer. Tighten differential bearing retainer bolts to
61 N´m (45 ft. lbs.).
(27) Apply a bead of RTV silicone to the extension
housing. Install extension housing. Tighten extension
housing bolts to 28 N´m (250 in. lbs.).
(28) Install engine mount bracket.
INPUT SHAFT
The input shaft is serviced as an assembly. The
only serviceable component of the input shaft is the
rear bearing.
DISASSEMBLY
(1) Install the bearing splitter 1130 under the rear
bearing.
(2) Position the input shaft into a shop press (Fig.
128).
(3) Remove the rear bearing (Fig. 129).
ASSEMBLY
(1) Position replacement bearing onto the input
shaft (Fig. 130).
(2) Place input shaft into shop press.
(3) Position Special Tool 6950 over input shaft on
top of bearing.
(4) Press input shaft bearing into position (Fig.
131).
Fig. 126 Shift Cover Splash Shield
Fig. 127 Gearshift Cover Shouldered Bolts
Fig. 128 Input Shaft
Fig. 129 Remove Bearing
21 - 32 A±598 MANUAL TRANSAXLENS/GS
DISASSEMBLY AND ASSEMBLY (Continued)
Page 1695 of 1938
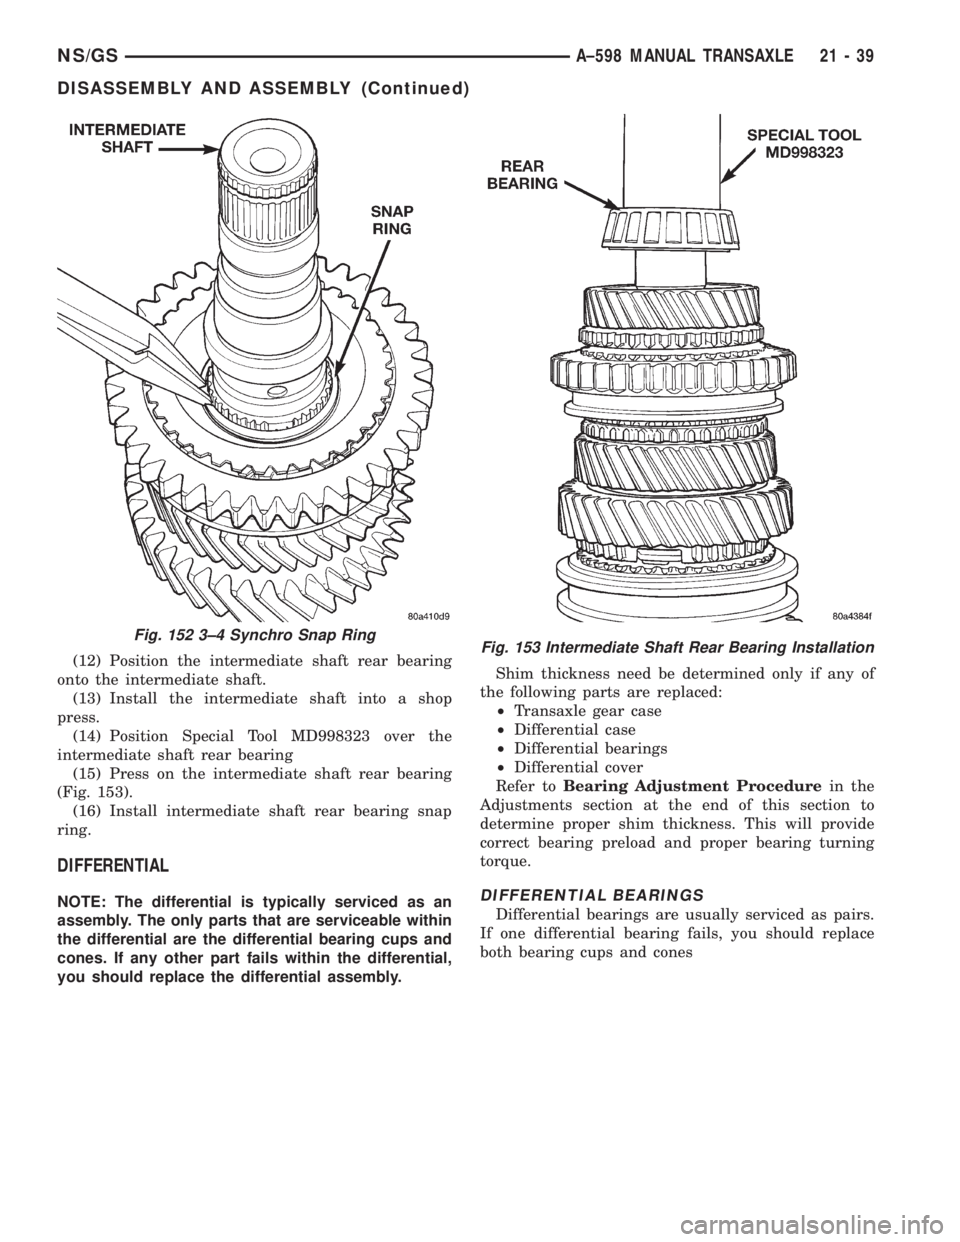
(12) Position the intermediate shaft rear bearing
onto the intermediate shaft.
(13) Install the intermediate shaft into a shop
press.
(14) Position Special Tool MD998323 over the
intermediate shaft rear bearing
(15) Press on the intermediate shaft rear bearing
(Fig. 153).
(16) Install intermediate shaft rear bearing snap
ring.
DIFFERENTIAL
NOTE: The differential is typically serviced as an
assembly. The only parts that are serviceable within
the differential are the differential bearing cups and
cones. If any other part fails within the differential,
you should replace the differential assembly.Shim thickness need be determined only if any of
the following parts are replaced:
²Transaxle gear case
²Differential case
²Differential bearings
²Differential cover
Refer toBearing Adjustment Procedurein the
Adjustments section at the end of this section to
determine proper shim thickness. This will provide
correct bearing preload and proper bearing turning
torque.DIFFERENTIAL BEARINGS
Differential bearings are usually serviced as pairs.
If one differential bearing fails, you should replace
both bearing cups and cones
Fig. 152 3±4 Synchro Snap RingFig. 153 Intermediate Shaft Rear Bearing Installation
NS/GSA±598 MANUAL TRANSAXLE 21 - 39
DISASSEMBLY AND ASSEMBLY (Continued)
Page 1716 of 1938
SPECIAL TOOLS
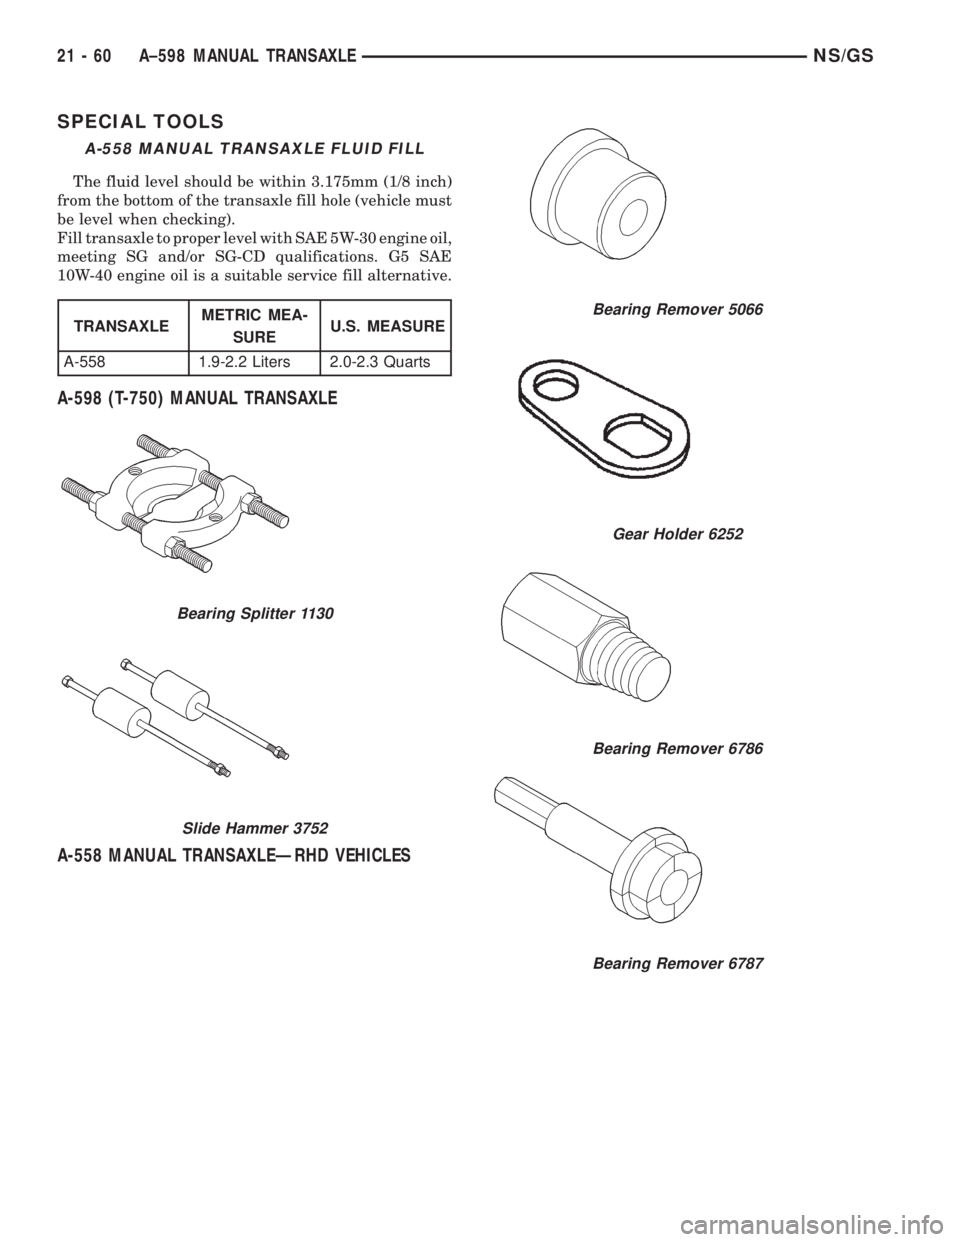
A-598 (T-750) MANUAL TRANSAXLE
A-558 MANUAL TRANSAXLEÐRHD VEHICLES
A-558 MANUAL TRANSAXLE FLUID FILL
The fluid level should be within 3.175mm (1/8 inch)
from the bottom of the transaxle fill hole (vehicle must
be level when checking).
Fill transaxle to proper level with SAE 5W-30 engine oil,
meeting SG and/or SG-CD qualifications. G5 SAE
10W-40 engine oil is a suitable service fill alternative.
TRANSAXLEMETRIC MEA-
SUREU.S. MEASURE
A-558 1.9-2.2 Liters 2.0-2.3 Quarts
Bearing Splitter 1130
Slide Hammer 3752
Bearing Remover 5066
Gear Holder 6252
Bearing Remover 6786
Bearing Remover 6787
21 - 60 A±598 MANUAL TRANSAXLENS/GS
Page 1719 of 1938
TIRES AND WHEELS
CONTENTS
page page
TIRES.................................. 1WHEELS................................ 9
TIRES
INDEX
page page
DESCRIPTION AND OPERATION
RADIAL-PLY TIRES....................... 2
REPLACEMENT TIRES.................... 3
SPARE TIRE (TEMPORARY)................ 2
TIRE INFLATION PRESSURES.............. 2
TIRE INFORMATION...................... 1
TIRE PRESSURE FOR HIGH-SPEED DRIVING . . 3
DIAGNOSIS AND TESTING
LEAD CORRECTION CHART................ 4
PRESSURE GAUGES..................... 3
TIRE NOISE OR VIBRATION................ 4TIRE WEAR PATTERNS.................... 4
TREAD WEAR INDICATORS................ 3
SERVICE PROCEDURES
REPAIRING TIRE LEAKS................... 6
TIRE AND WHEEL MATCH MOUNTING........ 6
TIRE AND WHEEL ROTATION (NON-
DIRECTIONAL THREAD PATTERN).......... 6
CLEANING AND INSPECTION
CLEANING TIRES........................ 7
SPECIFICATIONS
TIRE SPECIFICATIONS.................... 8
DESCRIPTION AND OPERATION
TIRE INFORMATION
Tires are designed and engineered for each specific
vehicle. They provide the best overall performance
for normal operation. The ride and handling charac-
teristics match the vehicle's requirements. With
proper care they will give excellent reliability, trac-
tion, skid resistance, and tread life.
Driving habits have more effect on tire life than
any other factor. Careful drivers will obtain, in most
cases, much greater mileage than severe use or care-
less drivers. A few of the driving habits which will
shorten the life of any tire are:
²Rapid acceleration
²Severe application of brakes
²High-speed driving
²Taking turns at excessive speeds
²Striking curbs and other obstacles
Radial ply tires are more prone to irregular tread
wear. It is important to follow the tire rotation inter-
val shown in the section on Tire Rotation. This will
help to achieve a greater tread-life potential.
TIRE IDENTIFICATION
Tire type, size, aspect ratio and speed rating are
encoded in the letters and numbers imprinted on the
side wall of the tire. Refer to the chart to decipher
the tire identification code (Fig. 1).
Performance tires will have a speed rating letter
after the aspect ratio number. The speed rating is not
always printed on the tire sidewall. The letterSindi-
cates that the tire is speed rated up to 112 mph.
²Qup to 100 mph
²Tup to 118 mph
²Uup to 124 mph
²Hup to 130 mph
²Vup to 149 mph
²Zmore than 149 mph (consult the tire manu-
facturer for the specific speed rating)
An All Season type tire will have eitherM+S,M
&SorM±S(indicating mud and snow traction)
imprinted on the side wall.
TIRE CHAINS
This vehicle was designed to allow the use of a
specified type of snow chain on the tires. Only com-
pact snow chains or other traction aidsmeeting SAE
type ªClass Sº specifications may be used.Any style
NSTIRES AND WHEELS 22 - 1
Page 1724 of 1938
SERVICE PROCEDURES
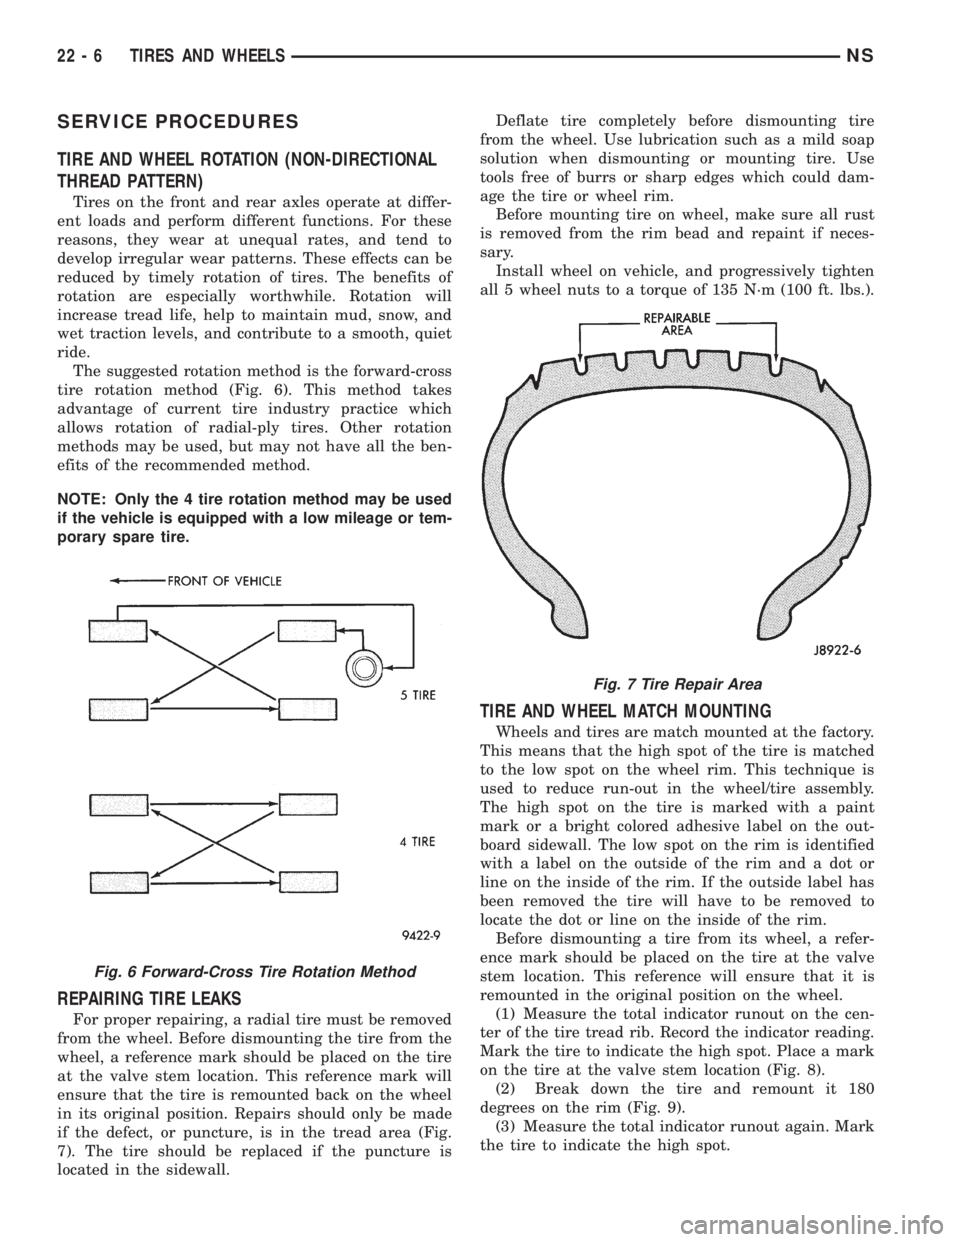
TIRE AND WHEEL ROTATION (NON-DIRECTIONAL
THREAD PATTERN)
Tires on the front and rear axles operate at differ-
ent loads and perform different functions. For these
reasons, they wear at unequal rates, and tend to
develop irregular wear patterns. These effects can be
reduced by timely rotation of tires. The benefits of
rotation are especially worthwhile. Rotation will
increase tread life, help to maintain mud, snow, and
wet traction levels, and contribute to a smooth, quiet
ride.
The suggested rotation method is the forward-cross
tire rotation method (Fig. 6). This method takes
advantage of current tire industry practice which
allows rotation of radial-ply tires. Other rotation
methods may be used, but may not have all the ben-
efits of the recommended method.
NOTE: Only the 4 tire rotation method may be used
if the vehicle is equipped with a low mileage or tem-
porary spare tire.
REPAIRING TIRE LEAKS
For proper repairing, a radial tire must be removed
from the wheel. Before dismounting the tire from the
wheel, a reference mark should be placed on the tire
at the valve stem location. This reference mark will
ensure that the tire is remounted back on the wheel
in its original position. Repairs should only be made
if the defect, or puncture, is in the tread area (Fig.
7). The tire should be replaced if the puncture is
located in the sidewall.Deflate tire completely before dismounting tire
from the wheel. Use lubrication such as a mild soap
solution when dismounting or mounting tire. Use
tools free of burrs or sharp edges which could dam-
age the tire or wheel rim.
Before mounting tire on wheel, make sure all rust
is removed from the rim bead and repaint if neces-
sary.
Install wheel on vehicle, and progressively tighten
all 5 wheel nuts to a torque of 135 N´m (100 ft. lbs.).
TIRE AND WHEEL MATCH MOUNTING
Wheels and tires are match mounted at the factory.
This means that the high spot of the tire is matched
to the low spot on the wheel rim. This technique is
used to reduce run-out in the wheel/tire assembly.
The high spot on the tire is marked with a paint
mark or a bright colored adhesive label on the out-
board sidewall. The low spot on the rim is identified
with a label on the outside of the rim and a dot or
line on the inside of the rim. If the outside label has
been removed the tire will have to be removed to
locate the dot or line on the inside of the rim.
Before dismounting a tire from its wheel, a refer-
ence mark should be placed on the tire at the valve
stem location. This reference will ensure that it is
remounted in the original position on the wheel.
(1) Measure the total indicator runout on the cen-
ter of the tire tread rib. Record the indicator reading.
Mark the tire to indicate the high spot. Place a mark
on the tire at the valve stem location (Fig. 8).
(2) Break down the tire and remount it 180
degrees on the rim (Fig. 9).
(3) Measure the total indicator runout again. Mark
the tire to indicate the high spot.
Fig. 6 Forward-Cross Tire Rotation Method
Fig. 7 Tire Repair Area
22 - 6 TIRES AND WHEELSNS
Page 1725 of 1938
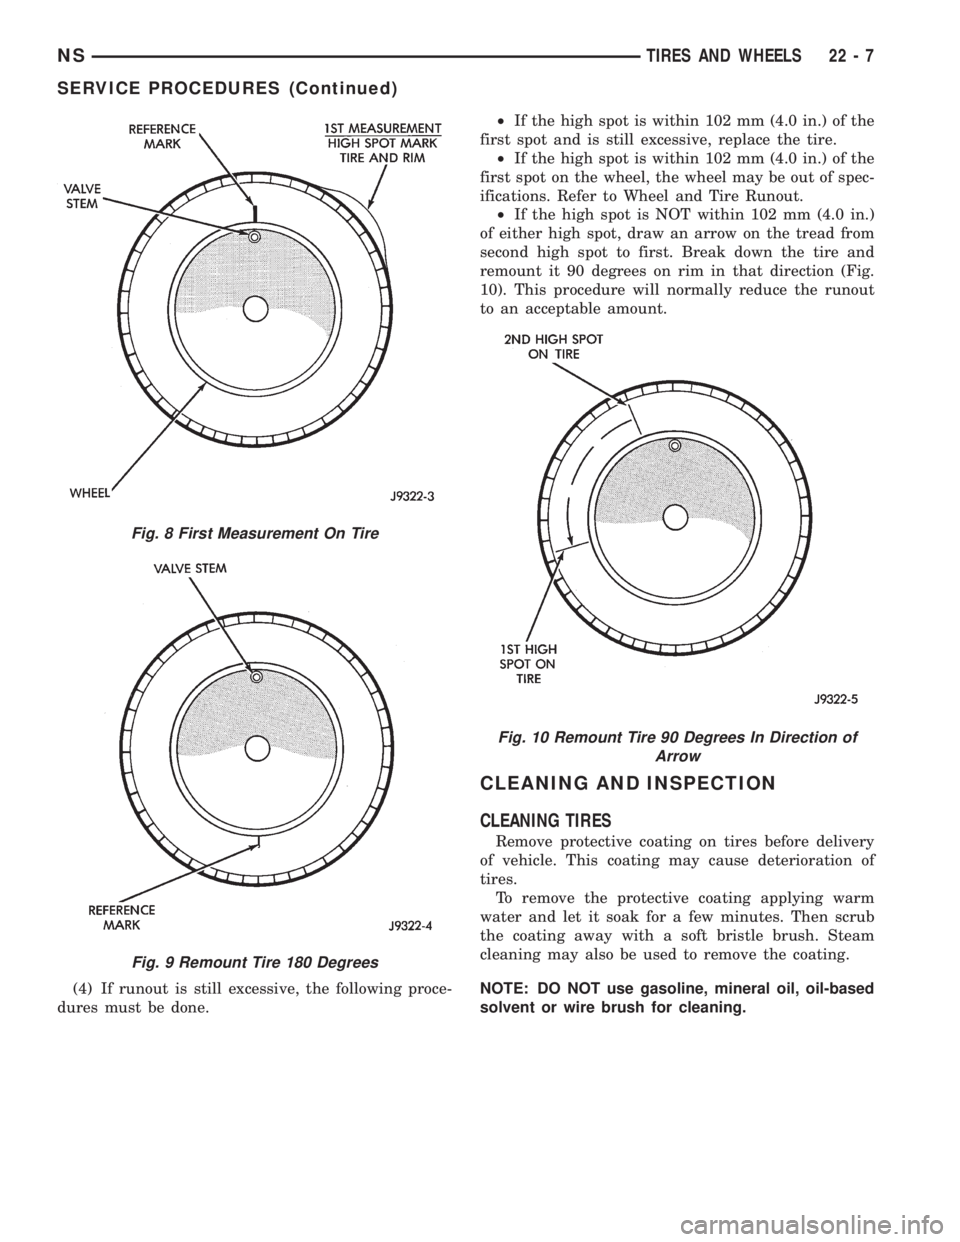
(4) If runout is still excessive, the following proce-
dures must be done.²If the high spot is within 102 mm (4.0 in.) of the
first spot and is still excessive, replace the tire.
²If the high spot is within 102 mm (4.0 in.) of the
first spot on the wheel, the wheel may be out of spec-
ifications. Refer to Wheel and Tire Runout.
²If the high spot is NOT within 102 mm (4.0 in.)
of either high spot, draw an arrow on the tread from
second high spot to first. Break down the tire and
remount it 90 degrees on rim in that direction (Fig.
10). This procedure will normally reduce the runout
to an acceptable amount.
CLEANING AND INSPECTION
CLEANING TIRES
Remove protective coating on tires before delivery
of vehicle. This coating may cause deterioration of
tires.
To remove the protective coating applying warm
water and let it soak for a few minutes. Then scrub
the coating away with a soft bristle brush. Steam
cleaning may also be used to remove the coating.
NOTE: DO NOT use gasoline, mineral oil, oil-based
solvent or wire brush for cleaning.
Fig. 8 First Measurement On Tire
Fig. 9 Remount Tire 180 Degrees
Fig. 10 Remount Tire 90 Degrees In Direction of
Arrow
NSTIRES AND WHEELS 22 - 7
SERVICE PROCEDURES (Continued)
Page 1727 of 1938
WHEELS
INDEX
page page
DESCRIPTION AND OPERATION
WHEEL INFORMATION.................... 9
DIAGNOSIS AND TESTING
TIRE AND WHEEL RUNOUT............... 10
WHEEL INSPECTION...................... 9SERVICE PROCEDURES
TIRE AND WHEEL BALANCE............... 11
WHEEL INSTALLATION................... 11
SPECIFICATIONS
WHEEL SPECIFICATIONS................. 12
DESCRIPTION AND OPERATION
WHEEL INFORMATION
Original equipment wheels are designed for proper
operation at all loads up to the specified maximum
vehicle capacity.
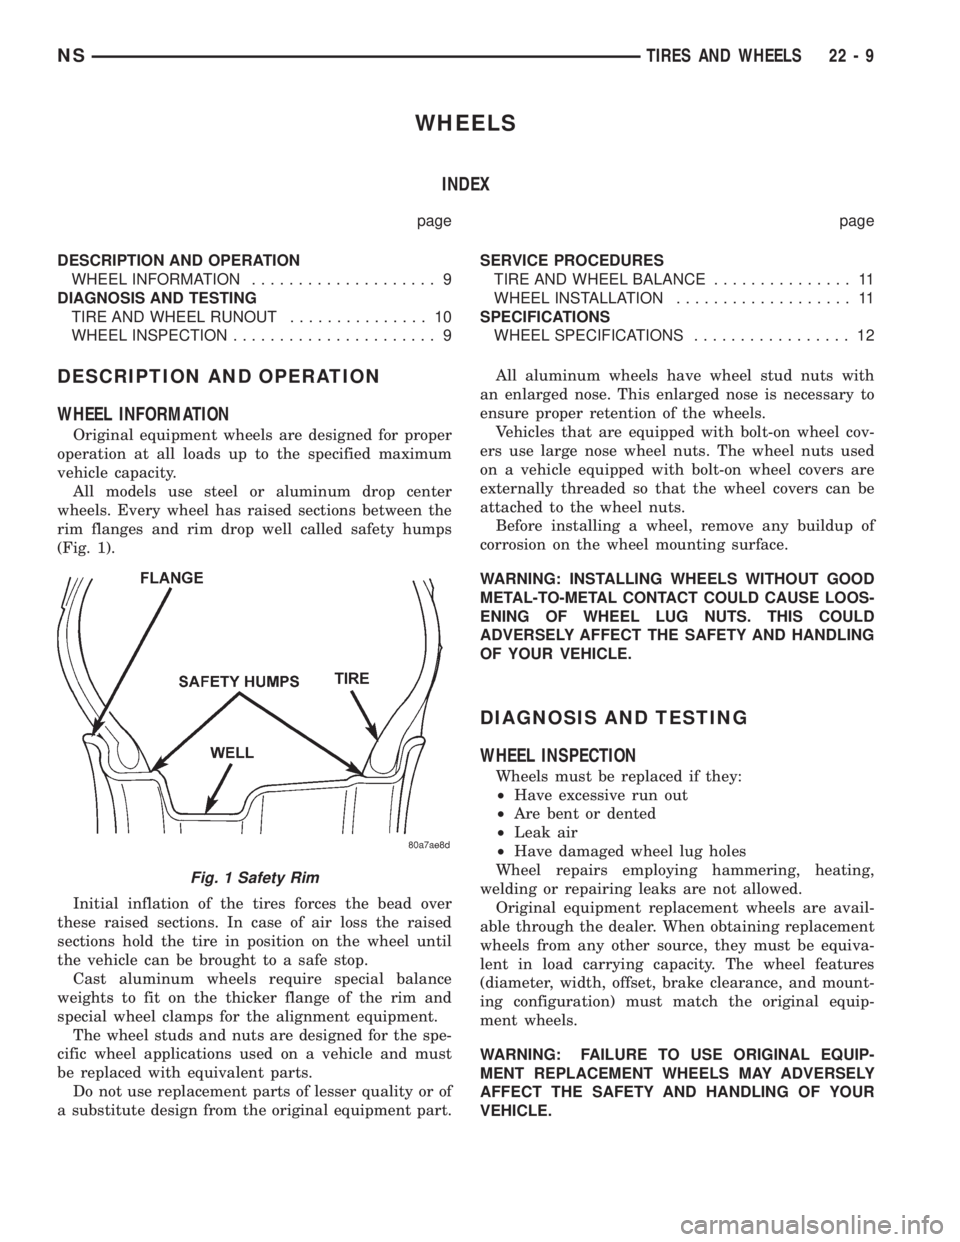
All models use steel or aluminum drop center
wheels. Every wheel has raised sections between the
rim flanges and rim drop well called safety humps
(Fig. 1).
Initial inflation of the tires forces the bead over
these raised sections. In case of air loss the raised
sections hold the tire in position on the wheel until
the vehicle can be brought to a safe stop.
Cast aluminum wheels require special balance
weights to fit on the thicker flange of the rim and
special wheel clamps for the alignment equipment.
The wheel studs and nuts are designed for the spe-
cific wheel applications used on a vehicle and must
be replaced with equivalent parts.
Do not use replacement parts of lesser quality or of
a substitute design from the original equipment part.All aluminum wheels have wheel stud nuts with
an enlarged nose. This enlarged nose is necessary to
ensure proper retention of the wheels.
Vehicles that are equipped with bolt-on wheel cov-
ers use large nose wheel nuts. The wheel nuts used
on a vehicle equipped with bolt-on wheel covers are
externally threaded so that the wheel covers can be
attached to the wheel nuts.
Before installing a wheel, remove any buildup of
corrosion on the wheel mounting surface.
WARNING: INSTALLING WHEELS WITHOUT GOOD
METAL-TO-METAL CONTACT COULD CAUSE LOOS-
ENING OF WHEEL LUG NUTS. THIS COULD
ADVERSELY AFFECT THE SAFETY AND HANDLING
OF YOUR VEHICLE.
DIAGNOSIS AND TESTING
WHEEL INSPECTION
Wheels must be replaced if they:
²Have excessive run out
²Are bent or dented
²Leak air
²Have damaged wheel lug holes
Wheel repairs employing hammering, heating,
welding or repairing leaks are not allowed.
Original equipment replacement wheels are avail-
able through the dealer. When obtaining replacement
wheels from any other source, they must be equiva-
lent in load carrying capacity. The wheel features
(diameter, width, offset, brake clearance, and mount-
ing configuration) must match the original equip-
ment wheels.
WARNING: FAILURE TO USE ORIGINAL EQUIP-
MENT REPLACEMENT WHEELS MAY ADVERSELY
AFFECT THE SAFETY AND HANDLING OF YOUR
VEHICLE.
Fig. 1 Safety Rim
NSTIRES AND WHEELS 22 - 9
Page 1728 of 1938
WARNING: REPLACEMENT WITH USED WHEELS
IS NOT RECOMMENDED. THE SERVICE HISTORY
OF THE RIM MAY HAVE INCLUDED SEVERE TREAT-
MENT OR VERY HIGH MILEAGE. THE RIM COULD
FAIL WITHOUT WARNING.
TIRE AND WHEEL RUNOUT
NOTE: Runout should always be measured off the
vehicle and on a suitable balance machine.
Radial run out is the difference between the high
and low points on the outer edge of the tire or wheel.
Lateral run out is the total side±to±side wobble of
the tire or wheel.
Radial run out of more than 0.762 mm (.030 inch)
measured at the center line of the tread may cause
the vehicle to shake.
Lateral run out of more than 0.762 mm (.030 inch)
measured at the side of the tire as close to the tread
as possible may cause the vehicle to shake.
Sometimes radial run out can be reduced by relo-
cating the wheel and tire on the wheel studs (See
Method 1). If this does not reduce run out to an
acceptable level, the tire can be rotated on the wheel.
(See Method 2).
METHOD 1 (RELOCATE WHEEL ON HUB)
Check accuracy of the wheel mounting surface;
adjust wheel bearings.
Drive vehicle a short distance to eliminate tire flat
spotting from a parked position.
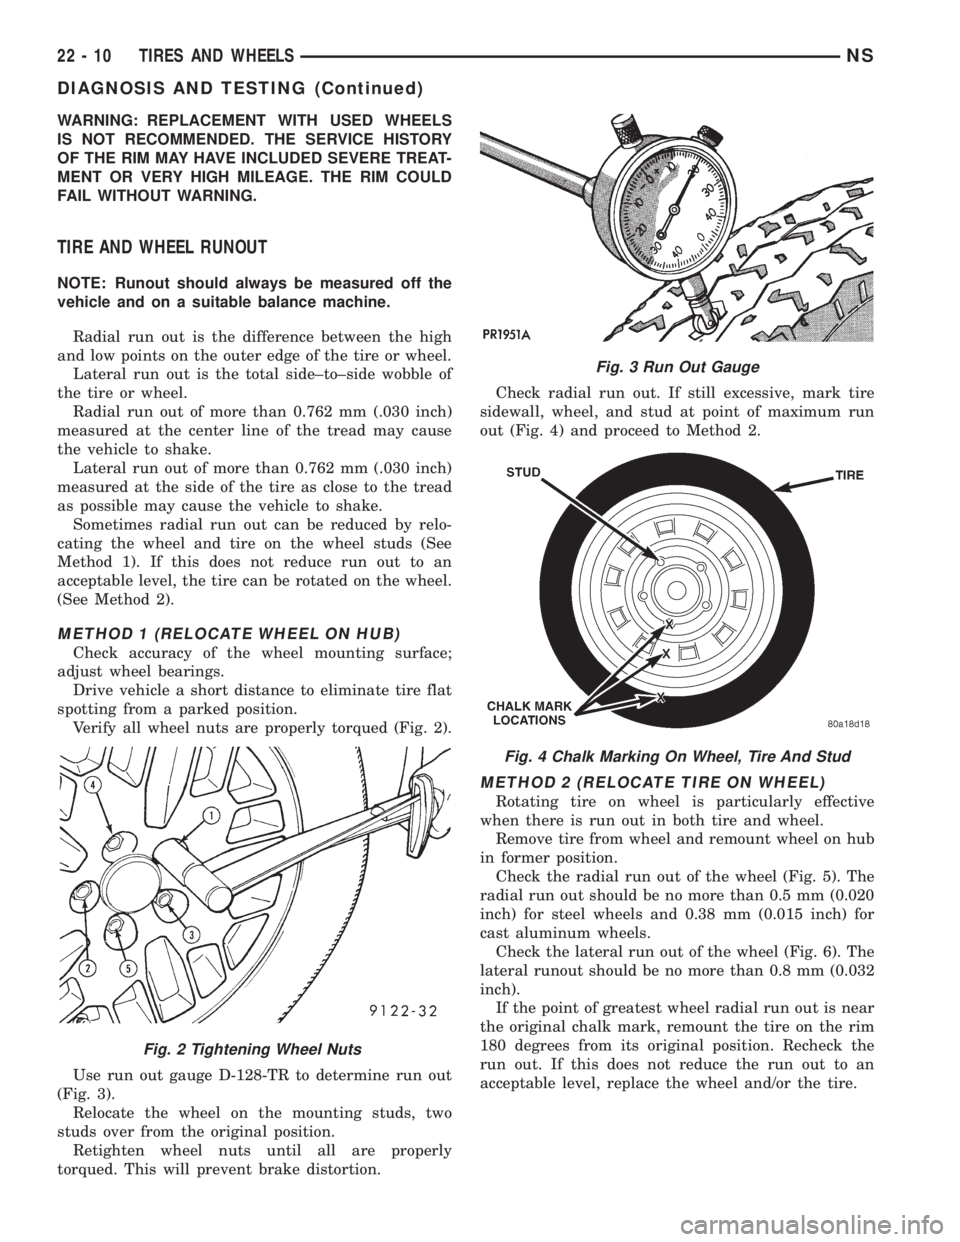
Verify all wheel nuts are properly torqued (Fig. 2).
Use run out gauge D-128-TR to determine run out
(Fig. 3).
Relocate the wheel on the mounting studs, two
studs over from the original position.
Retighten wheel nuts until all are properly
torqued. This will prevent brake distortion.Check radial run out. If still excessive, mark tire
sidewall, wheel, and stud at point of maximum run
out (Fig. 4) and proceed to Method 2.
METHOD 2 (RELOCATE TIRE ON WHEEL)
Rotating tire on wheel is particularly effective
when there is run out in both tire and wheel.
Remove tire from wheel and remount wheel on hub
in former position.
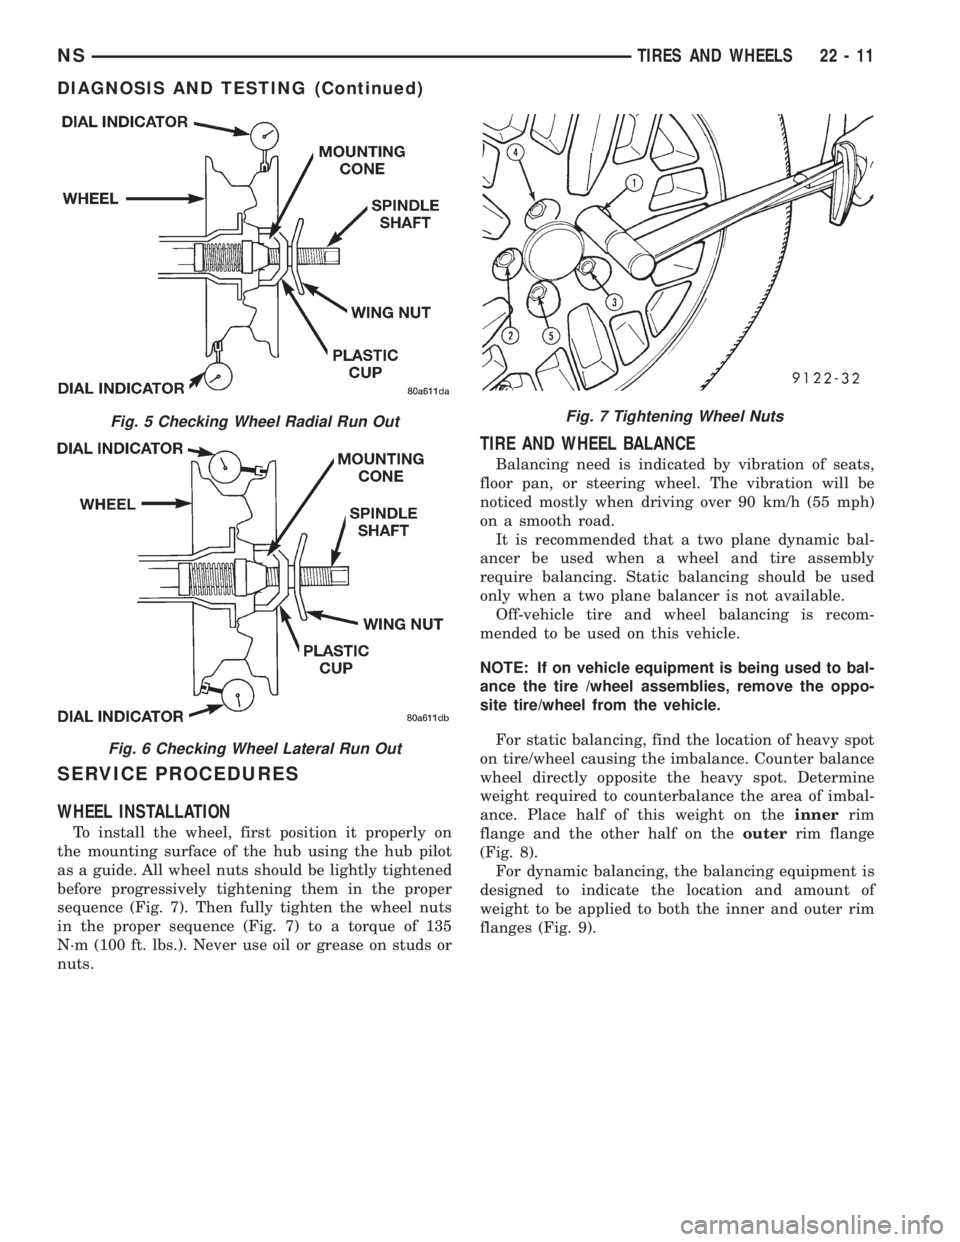
Check the radial run out of the wheel (Fig. 5). The
radial run out should be no more than 0.5 mm (0.020
inch) for steel wheels and 0.38 mm (0.015 inch) for
cast aluminum wheels.
Check the lateral run out of the wheel (Fig. 6). The
lateral runout should be no more than 0.8 mm (0.032
inch).
If the point of greatest wheel radial run out is near
the original chalk mark, remount the tire on the rim
180 degrees from its original position. Recheck the
run out. If this does not reduce the run out to an
acceptable level, replace the wheel and/or the tire.
Fig. 2 Tightening Wheel Nuts
Fig. 3 Run Out Gauge
Fig. 4 Chalk Marking On Wheel, Tire And Stud
22 - 10 TIRES AND WHEELSNS
DIAGNOSIS AND TESTING (Continued)
Page 1729 of 1938
SERVICE PROCEDURES
WHEEL INSTALLATION
To install the wheel, first position it properly on
the mounting surface of the hub using the hub pilot
as a guide. All wheel nuts should be lightly tightened
before progressively tightening them in the proper
sequence (Fig. 7). Then fully tighten the wheel nuts
in the proper sequence (Fig. 7) to a torque of 135
N´m (100 ft. lbs.). Never use oil or grease on studs or
nuts.
TIRE AND WHEEL BALANCE
Balancing need is indicated by vibration of seats,
floor pan, or steering wheel. The vibration will be
noticed mostly when driving over 90 km/h (55 mph)
on a smooth road.
It is recommended that a two plane dynamic bal-
ancer be used when a wheel and tire assembly
require balancing. Static balancing should be used
only when a two plane balancer is not available.
Off-vehicle tire and wheel balancing is recom-
mended to be used on this vehicle.
NOTE: If on vehicle equipment is being used to bal-
ance the tire /wheel assemblies, remove the oppo-
site tire/wheel from the vehicle.
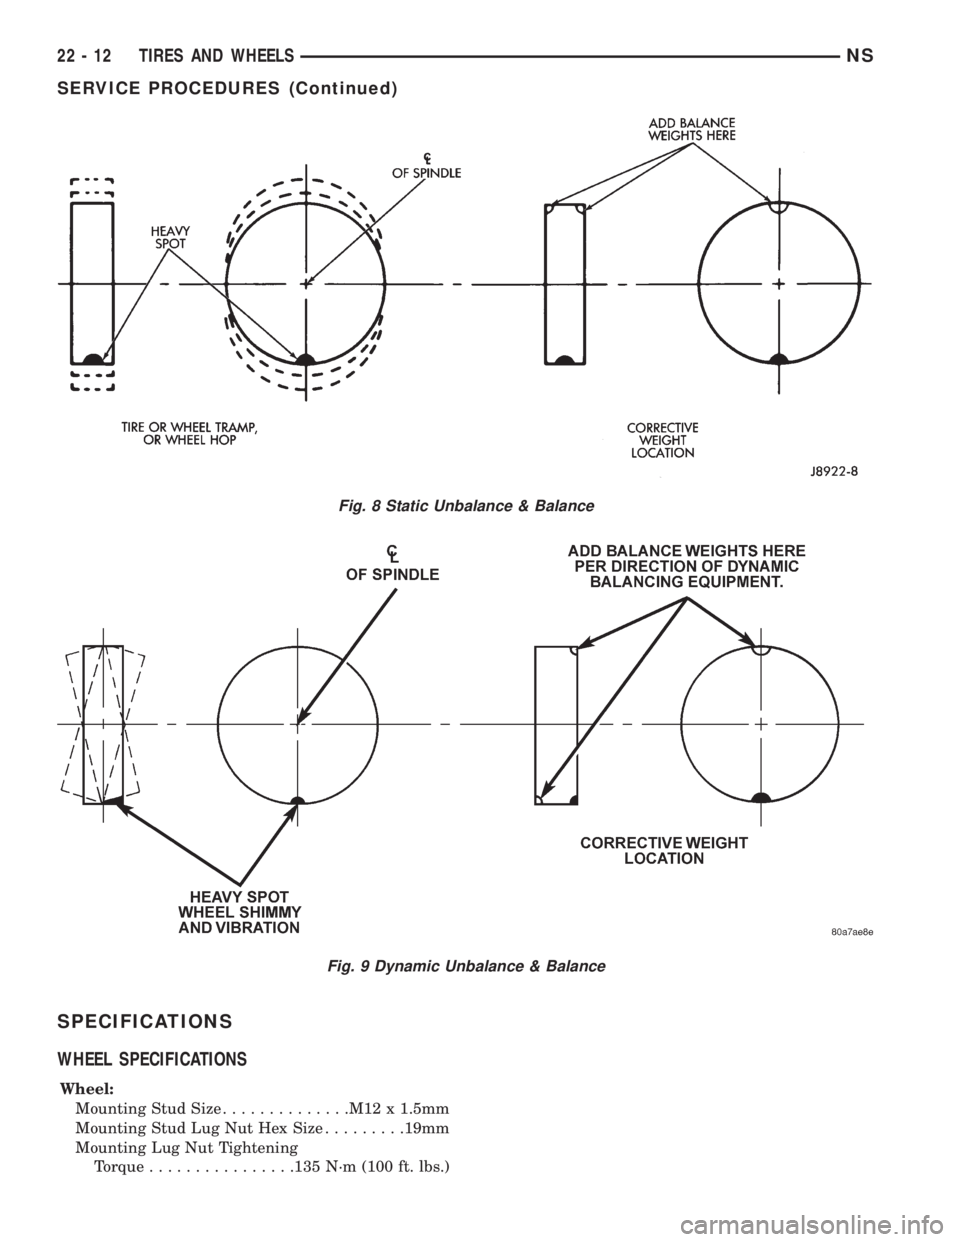
For static balancing, find the location of heavy spot
on tire/wheel causing the imbalance. Counter balance
wheel directly opposite the heavy spot. Determine
weight required to counterbalance the area of imbal-
ance. Place half of this weight on theinnerrim
flange and the other half on theouterrim flange
(Fig. 8).
For dynamic balancing, the balancing equipment is
designed to indicate the location and amount of
weight to be applied to both the inner and outer rim
flanges (Fig. 9).
Fig. 5 Checking Wheel Radial Run Out
Fig. 6 Checking Wheel Lateral Run Out
Fig. 7 Tightening Wheel Nuts
NSTIRES AND WHEELS 22 - 11
DIAGNOSIS AND TESTING (Continued)
Page 1730 of 1938
SPECIFICATIONS
WHEEL SPECIFICATIONS
Wheel:
Mounting Stud Size..............M12 x 1.5mm
Mounting Stud Lug Nut Hex Size.........19mm
Mounting Lug Nut Tightening
Torque................135 N´m (100 ft. lbs.)
Fig. 8 Static Unbalance & Balance
Fig. 9 Dynamic Unbalance & Balance
22 - 12 TIRES AND WHEELSNS
SERVICE PROCEDURES (Continued)