weight CHRYSLER VOYAGER 1996 Repair Manual
[x] Cancel search | Manufacturer: CHRYSLER, Model Year: 1996, Model line: VOYAGER, Model: CHRYSLER VOYAGER 1996Pages: 1938, PDF Size: 55.84 MB
Page 1539 of 1938

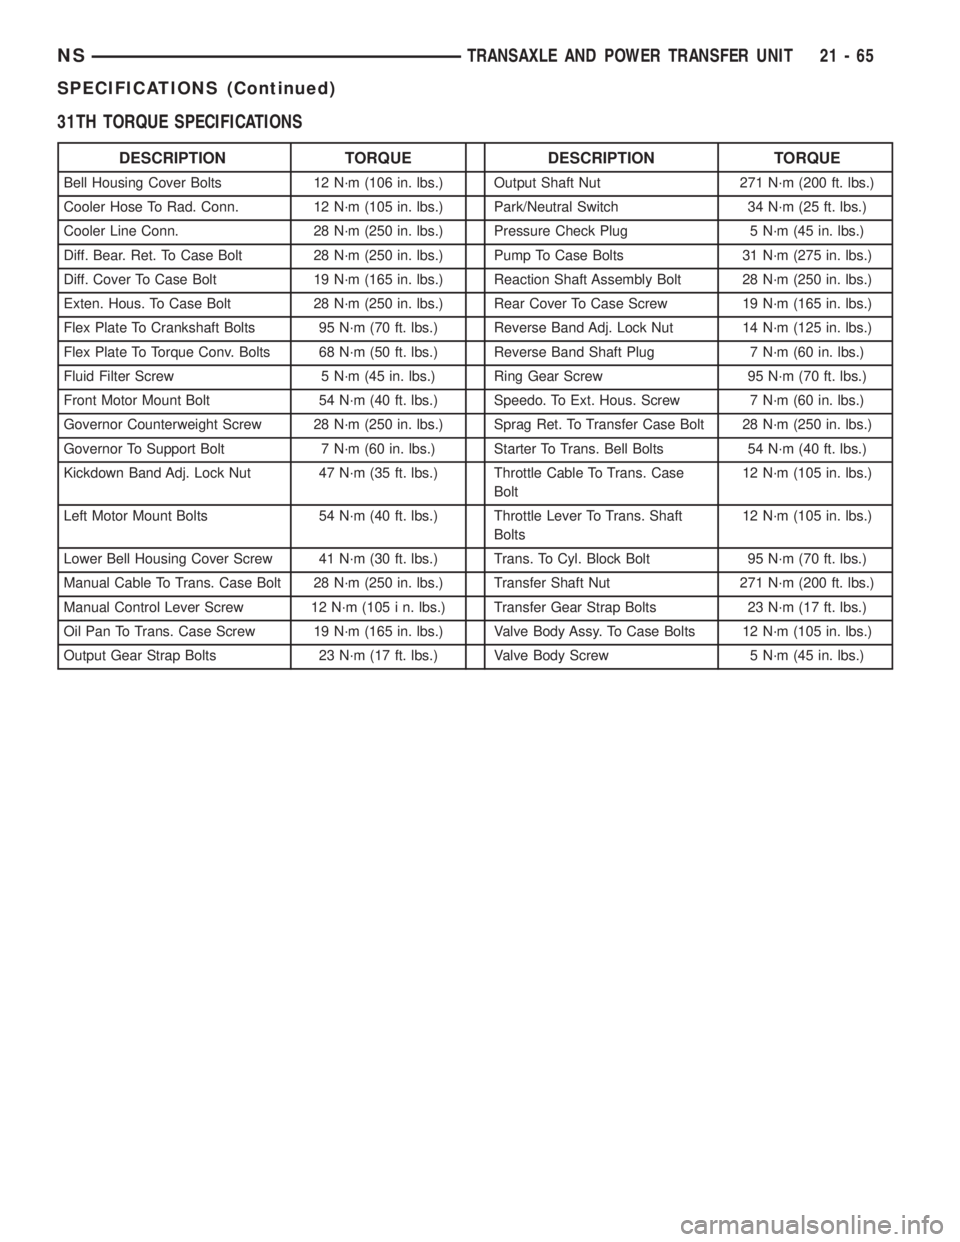
31TH TORQUE SPECIFICATIONS
DESCRIPTION TORQUE DESCRIPTION TORQUE
Bell Housing Cover Bolts 12 N´m (106 in. lbs.) Output Shaft Nut 271 N´m (200 ft. lbs.)
Cooler Hose To Rad. Conn. 12 N´m (105 in. lbs.) Park/Neutral Switch 34 N´m (25 ft. lbs.)
Cooler Line Conn. 28 N´m (250 in. lbs.) Pressure Check Plug 5 N´m (45 in. lbs.)
Diff. Bear. Ret. To Case Bolt 28 N´m (250 in. lbs.) Pump To Case Bolts 31 N´m (275 in. lbs.)
Diff. Cover To Case Bolt 19 N´m (165 in. lbs.) Reaction Shaft Assembly Bolt 28 N´m (250 in. lbs.)
Exten. Hous. To Case Bolt 28 N´m (250 in. lbs.) Rear Cover To Case Screw 19 N´m (165 in. lbs.)
Flex Plate To Crankshaft Bolts 95 N´m (70 ft. lbs.) Reverse Band Adj. Lock Nut 14 N´m (125 in. lbs.)
Flex Plate To Torque Conv. Bolts 68 N´m (50 ft. lbs.) Reverse Band Shaft Plug 7 N´m (60 in. lbs.)
Fluid Filter Screw 5 N´m (45 in. lbs.) Ring Gear Screw 95 N´m (70 ft. lbs.)
Front Motor Mount Bolt 54 N´m (40 ft. lbs.) Speedo. To Ext. Hous. Screw 7 N´m (60 in. lbs.)
Governor Counterweight Screw 28 N´m (250 in. lbs.) Sprag Ret. To Transfer Case Bolt 28 N´m (250 in. lbs.)
Governor To Support Bolt 7 N´m (60 in. lbs.) Starter To Trans. Bell Bolts 54 N´m (40 ft. lbs.)
Kickdown Band Adj. Lock Nut 47 N´m (35 ft. lbs.) Throttle Cable To Trans. Case
Bolt12 N´m (105 in. lbs.)
Left Motor Mount Bolts 54 N´m (40 ft. lbs.) Throttle Lever To Trans. Shaft
Bolts12 N´m (105 in. lbs.)
Lower Bell Housing Cover Screw 41 N´m (30 ft. lbs.) Trans. To Cyl. Block Bolt 95 N´m (70 ft. lbs.)
Manual Cable To Trans. Case Bolt 28 N´m (250 in. lbs.) Transfer Shaft Nut 271 N´m (200 ft. lbs.)
Manual Control Lever Screw 12 N´m (105 i n. lbs.) Transfer Gear Strap Bolts 23 N´m (17 ft. lbs.)
Oil Pan To Trans. Case Screw 19 N´m (165 in. lbs.) Valve Body Assy. To Case Bolts 12 N´m (105 in. lbs.)
Output Gear Strap Bolts 23 N´m (17 ft. lbs.) Valve Body Screw 5 N´m (45 in. lbs.)
NSTRANSAXLE AND POWER TRANSFER UNIT 21 - 65
SPECIFICATIONS (Continued)
Page 1563 of 1938

INSTALLATION
To install valve body, reverse removal procedure
CAUTION: The valve body manual shaft pilot may
distort and bind the manual valve if the valve body
is mishandled or dropped.
NOTE: To ease installation of the valve body, turn
the manual valve lever fully clockwise.
Guide park rod rollers into guide bracket, while
shifting manual lever assembly out of the installation
position.
TRANSAXLE
Transaxle removal does NOT require engine
removal.
See Group 7, Cooling to drain engine cooling sys-
tem and remove coolant return extension (3.0 liter
engine only).The transaxle and torque converter must be
removed as an assembly; otherwise, the torque con-
verter drive plate, pump bushing or oil seal may be
damaged. The drive plate will not support a load;
therefore, none of the weight of the transaxle should
be allowed to rest on the drive plate during removal.
REMOVAL
(1) Disconnect negative battery cable.
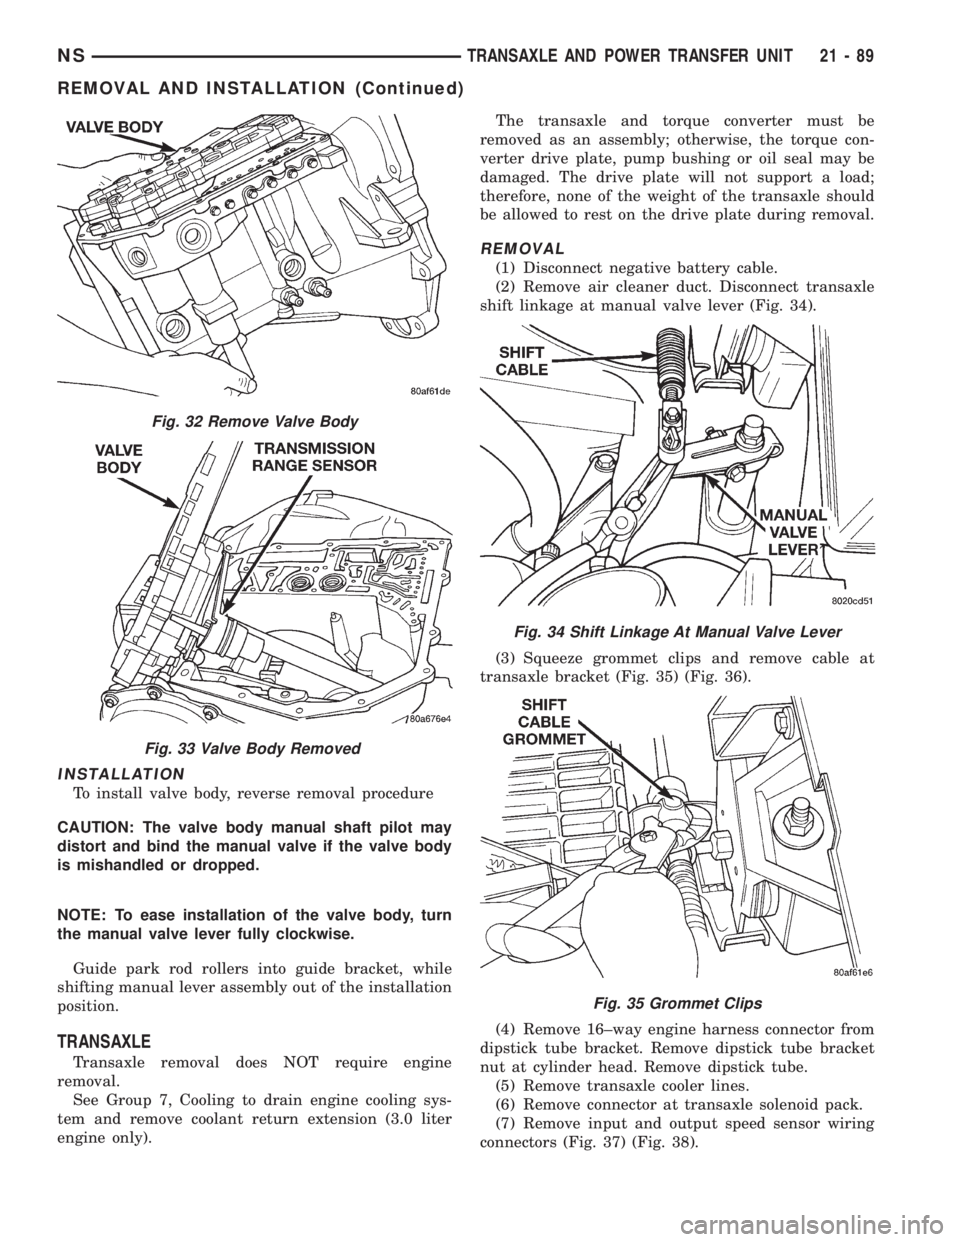
(2) Remove air cleaner duct. Disconnect transaxle
shift linkage at manual valve lever (Fig. 34).
(3) Squeeze grommet clips and remove cable at
transaxle bracket (Fig. 35) (Fig. 36).
(4) Remove 16±way engine harness connector from
dipstick tube bracket. Remove dipstick tube bracket
nut at cylinder head. Remove dipstick tube.
(5) Remove transaxle cooler lines.
(6) Remove connector at transaxle solenoid pack.
(7) Remove input and output speed sensor wiring
connectors (Fig. 37) (Fig. 38).
Fig. 32 Remove Valve Body
Fig. 33 Valve Body Removed
Fig. 34 Shift Linkage At Manual Valve Lever
Fig. 35 Grommet Clips
NSTRANSAXLE AND POWER TRANSFER UNIT 21 - 89
REMOVAL AND INSTALLATION (Continued)
Page 1727 of 1938

WHEELS
INDEX
page page
DESCRIPTION AND OPERATION
WHEEL INFORMATION.................... 9
DIAGNOSIS AND TESTING
TIRE AND WHEEL RUNOUT............... 10
WHEEL INSPECTION...................... 9SERVICE PROCEDURES
TIRE AND WHEEL BALANCE............... 11
WHEEL INSTALLATION................... 11
SPECIFICATIONS
WHEEL SPECIFICATIONS................. 12
DESCRIPTION AND OPERATION
WHEEL INFORMATION
Original equipment wheels are designed for proper
operation at all loads up to the specified maximum
vehicle capacity.
All models use steel or aluminum drop center
wheels. Every wheel has raised sections between the
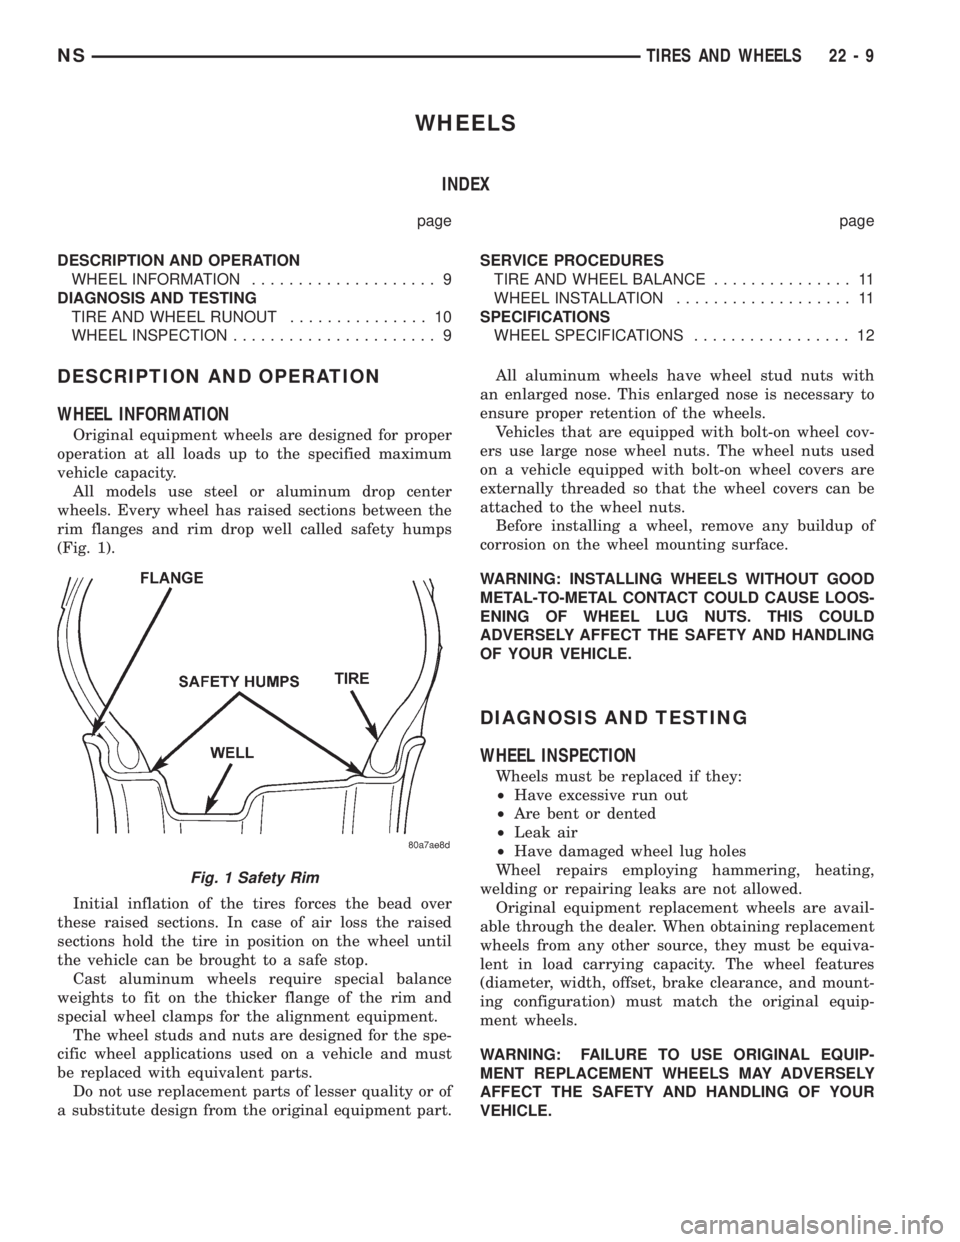
rim flanges and rim drop well called safety humps
(Fig. 1).
Initial inflation of the tires forces the bead over
these raised sections. In case of air loss the raised
sections hold the tire in position on the wheel until
the vehicle can be brought to a safe stop.
Cast aluminum wheels require special balance
weights to fit on the thicker flange of the rim and
special wheel clamps for the alignment equipment.
The wheel studs and nuts are designed for the spe-
cific wheel applications used on a vehicle and must
be replaced with equivalent parts.
Do not use replacement parts of lesser quality or of
a substitute design from the original equipment part.All aluminum wheels have wheel stud nuts with
an enlarged nose. This enlarged nose is necessary to
ensure proper retention of the wheels.
Vehicles that are equipped with bolt-on wheel cov-
ers use large nose wheel nuts. The wheel nuts used
on a vehicle equipped with bolt-on wheel covers are
externally threaded so that the wheel covers can be
attached to the wheel nuts.
Before installing a wheel, remove any buildup of
corrosion on the wheel mounting surface.
WARNING: INSTALLING WHEELS WITHOUT GOOD
METAL-TO-METAL CONTACT COULD CAUSE LOOS-
ENING OF WHEEL LUG NUTS. THIS COULD
ADVERSELY AFFECT THE SAFETY AND HANDLING
OF YOUR VEHICLE.
DIAGNOSIS AND TESTING
WHEEL INSPECTION
Wheels must be replaced if they:
²Have excessive run out
²Are bent or dented
²Leak air
²Have damaged wheel lug holes
Wheel repairs employing hammering, heating,
welding or repairing leaks are not allowed.
Original equipment replacement wheels are avail-
able through the dealer. When obtaining replacement
wheels from any other source, they must be equiva-
lent in load carrying capacity. The wheel features
(diameter, width, offset, brake clearance, and mount-
ing configuration) must match the original equip-
ment wheels.
WARNING: FAILURE TO USE ORIGINAL EQUIP-
MENT REPLACEMENT WHEELS MAY ADVERSELY
AFFECT THE SAFETY AND HANDLING OF YOUR
VEHICLE.
Fig. 1 Safety Rim
NSTIRES AND WHEELS 22 - 9
Page 1729 of 1938

SERVICE PROCEDURES
WHEEL INSTALLATION
To install the wheel, first position it properly on
the mounting surface of the hub using the hub pilot
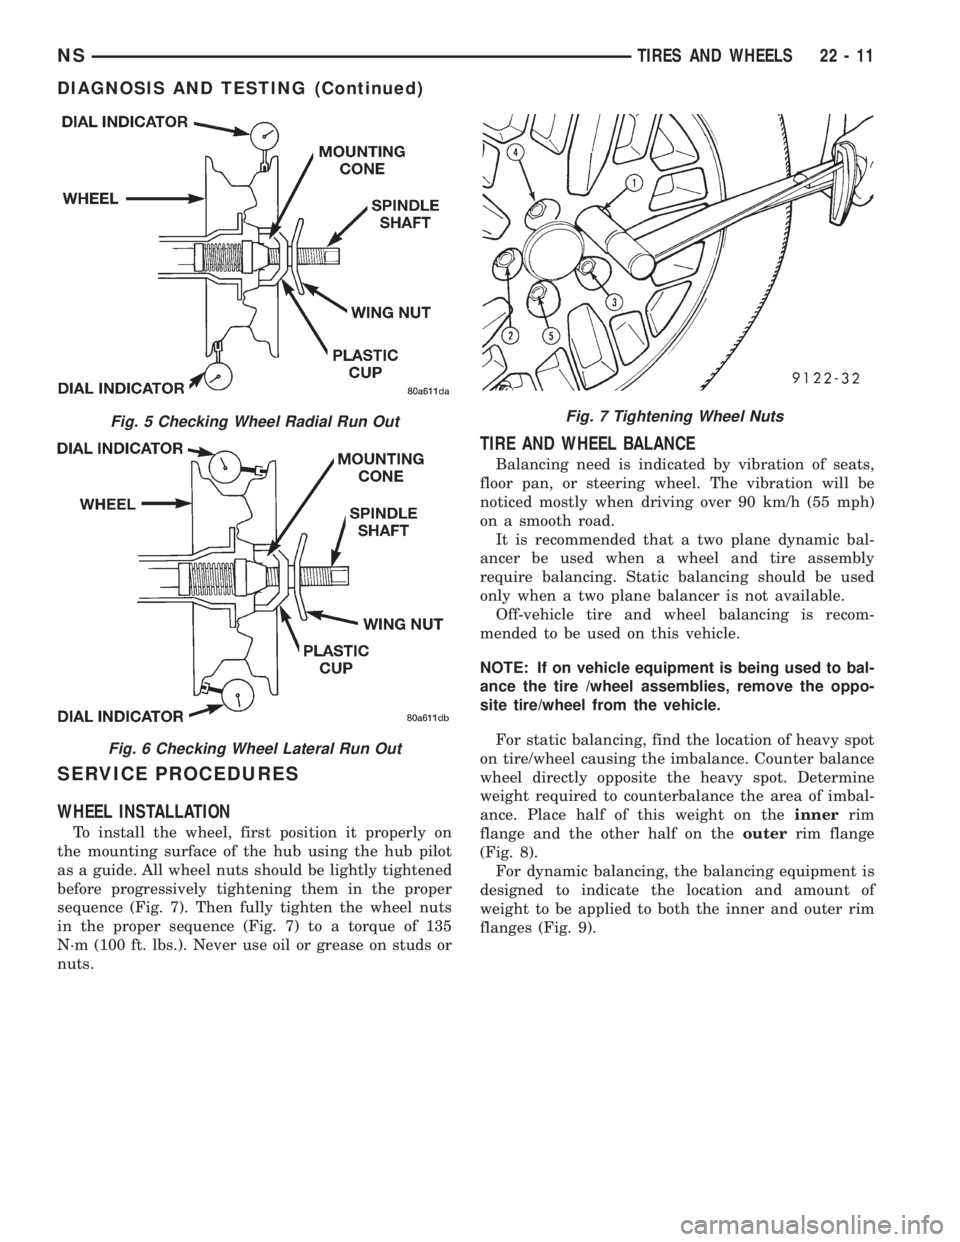
as a guide. All wheel nuts should be lightly tightened
before progressively tightening them in the proper
sequence (Fig. 7). Then fully tighten the wheel nuts
in the proper sequence (Fig. 7) to a torque of 135
N´m (100 ft. lbs.). Never use oil or grease on studs or
nuts.
TIRE AND WHEEL BALANCE
Balancing need is indicated by vibration of seats,
floor pan, or steering wheel. The vibration will be
noticed mostly when driving over 90 km/h (55 mph)
on a smooth road.
It is recommended that a two plane dynamic bal-
ancer be used when a wheel and tire assembly
require balancing. Static balancing should be used
only when a two plane balancer is not available.
Off-vehicle tire and wheel balancing is recom-
mended to be used on this vehicle.
NOTE: If on vehicle equipment is being used to bal-
ance the tire /wheel assemblies, remove the oppo-
site tire/wheel from the vehicle.
For static balancing, find the location of heavy spot
on tire/wheel causing the imbalance. Counter balance
wheel directly opposite the heavy spot. Determine
weight required to counterbalance the area of imbal-
ance. Place half of this weight on theinnerrim
flange and the other half on theouterrim flange
(Fig. 8).
For dynamic balancing, the balancing equipment is
designed to indicate the location and amount of
weight to be applied to both the inner and outer rim
flanges (Fig. 9).
Fig. 5 Checking Wheel Radial Run Out
Fig. 6 Checking Wheel Lateral Run Out
Fig. 7 Tightening Wheel Nuts
NSTIRES AND WHEELS 22 - 11
DIAGNOSIS AND TESTING (Continued)