CHRYSLER VOYAGER 2001 Service Manual
Manufacturer: CHRYSLER, Model Year: 2001, Model line: VOYAGER, Model: CHRYSLER VOYAGER 2001Pages: 4284, PDF Size: 83.53 MB
Page 531 of 4284
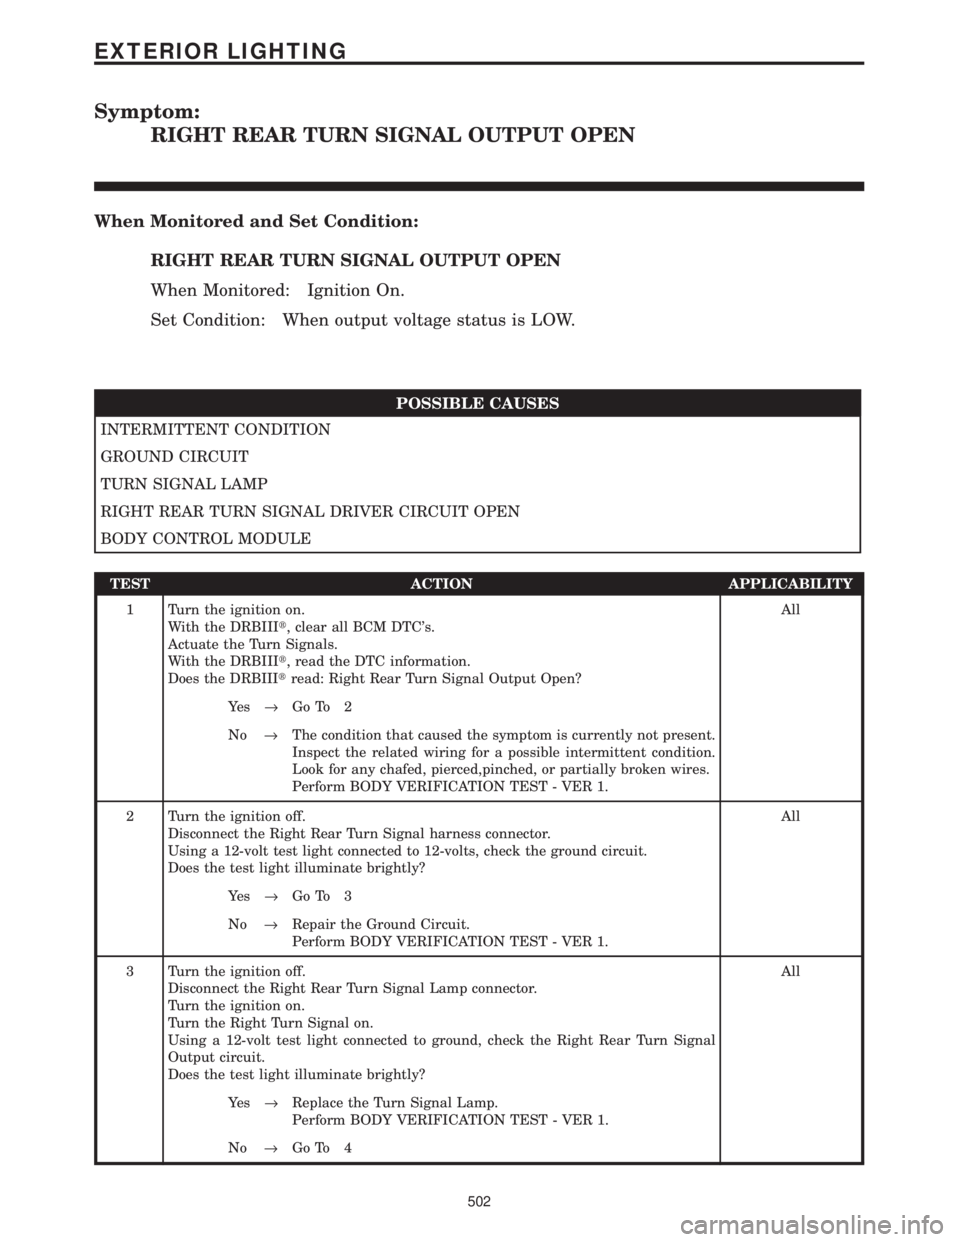
Symptom:
RIGHT REAR TURN SIGNAL OUTPUT OPEN
When Monitored and Set Condition:
RIGHT REAR TURN SIGNAL OUTPUT OPEN
When Monitored: Ignition On.
Set Condition: When output voltage status is LOW.
POSSIBLE CAUSES
INTERMITTENT CONDITION
GROUND CIRCUIT
TURN SIGNAL LAMP
RIGHT REAR TURN SIGNAL DRIVER CIRCUIT OPEN
BODY CONTROL MODULE
TEST ACTION APPLICABILITY
1 Turn the ignition on.
With the DRBIIIt, clear all BCM DTC's.
Actuate the Turn Signals.
With the DRBIIIt, read the DTC information.
Does the DRBIIItread: Right Rear Turn Signal Output Open?All
Ye s®Go To 2
No®The condition that caused the symptom is currently not present.
Inspect the related wiring for a possible intermittent condition.
Look for any chafed, pierced,pinched, or partially broken wires.
Perform BODY VERIFICATION TEST - VER 1.
2 Turn the ignition off.
Disconnect the Right Rear Turn Signal harness connector.
Using a 12-volt test light connected to 12-volts, check the ground circuit.
Does the test light illuminate brightly?All
Ye s®Go To 3
No®Repair the Ground Circuit.
Perform BODY VERIFICATION TEST - VER 1.
3 Turn the ignition off.
Disconnect the Right Rear Turn Signal Lamp connector.
Turn the ignition on.
Turn the Right Turn Signal on.
Using a 12-volt test light connected to ground, check the Right Rear Turn Signal
Output circuit.
Does the test light illuminate brightly?All
Ye s®Replace the Turn Signal Lamp.
Perform BODY VERIFICATION TEST - VER 1.
No®Go To 4
502
EXTERIOR LIGHTING
Page 532 of 4284
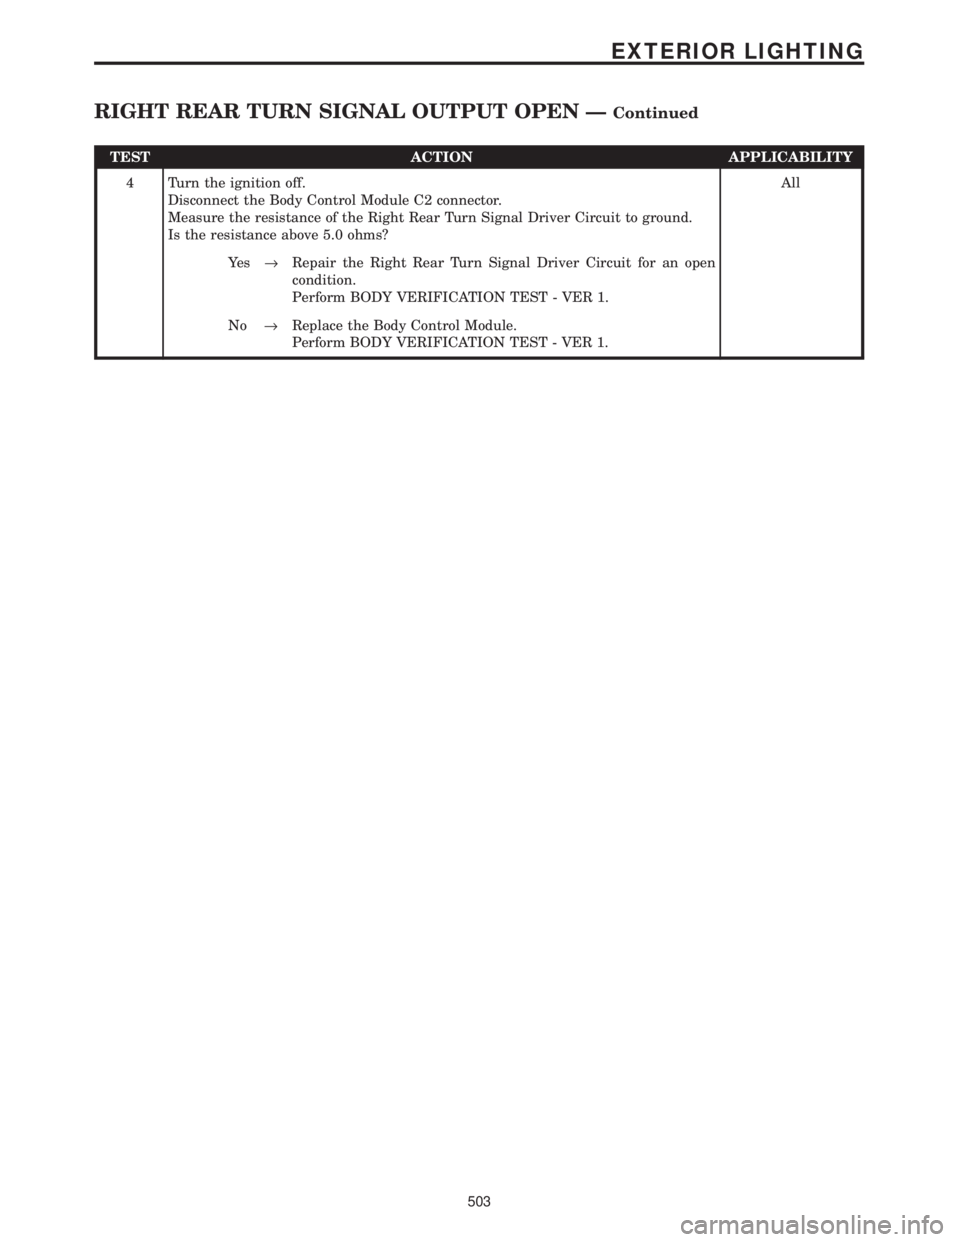
TEST ACTION APPLICABILITY
4 Turn the ignition off.
Disconnect the Body Control Module C2 connector.
Measure the resistance of the Right Rear Turn Signal Driver Circuit to ground.
Is the resistance above 5.0 ohms?All
Ye s®Repair the Right Rear Turn Signal Driver Circuit for an open
condition.
Perform BODY VERIFICATION TEST - VER 1.
No®Replace the Body Control Module.
Perform BODY VERIFICATION TEST - VER 1.
503
EXTERIOR LIGHTING
RIGHT REAR TURN SIGNAL OUTPUT OPEN ÐContinued
Page 533 of 4284
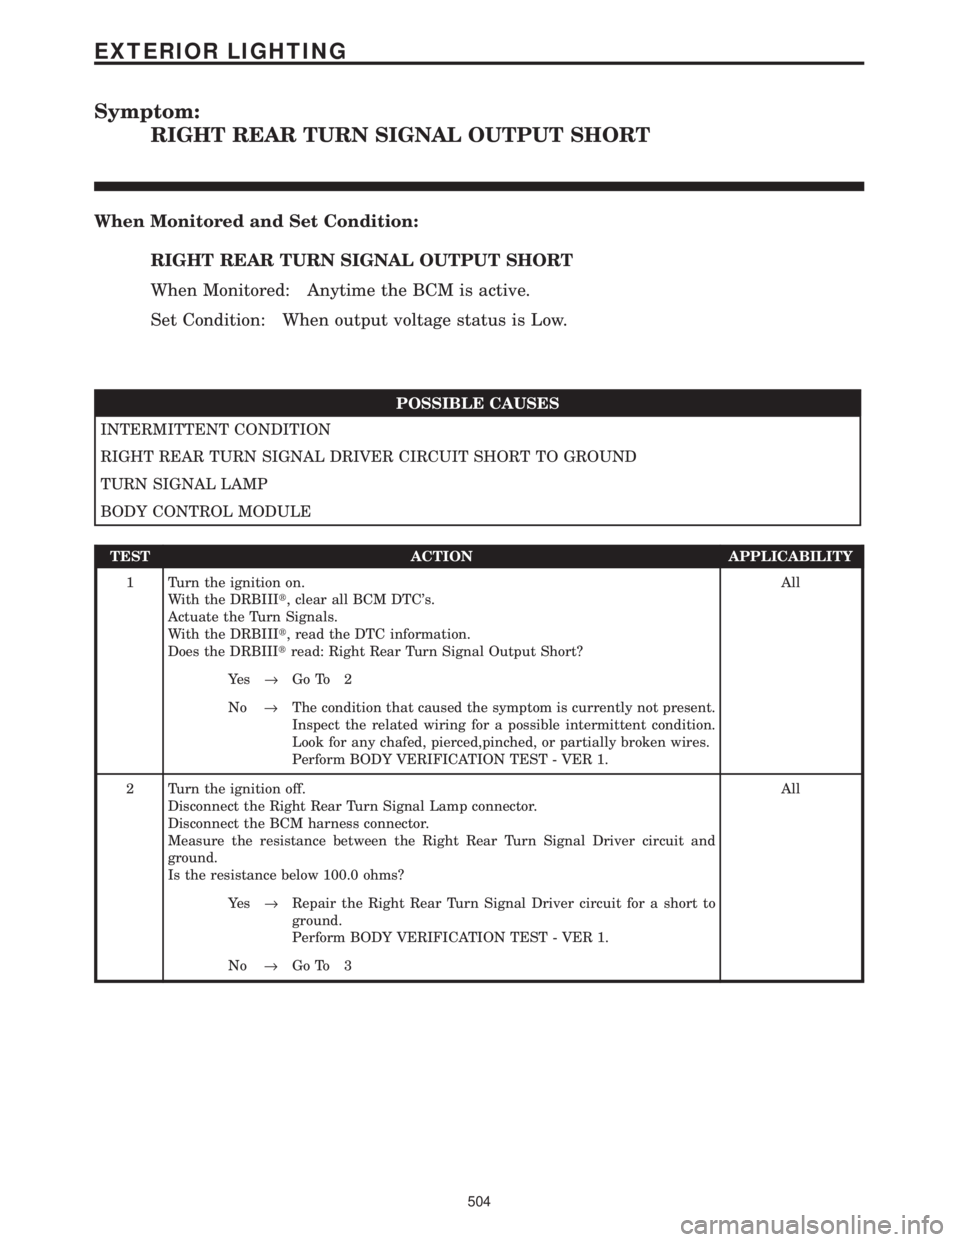
Symptom:
RIGHT REAR TURN SIGNAL OUTPUT SHORT
When Monitored and Set Condition:
RIGHT REAR TURN SIGNAL OUTPUT SHORT
When Monitored: Anytime the BCM is active.
Set Condition: When output voltage status is Low.
POSSIBLE CAUSES
INTERMITTENT CONDITION
RIGHT REAR TURN SIGNAL DRIVER CIRCUIT SHORT TO GROUND
TURN SIGNAL LAMP
BODY CONTROL MODULE
TEST ACTION APPLICABILITY
1 Turn the ignition on.
With the DRBIIIt, clear all BCM DTC's.
Actuate the Turn Signals.
With the DRBIIIt, read the DTC information.
Does the DRBIIItread: Right Rear Turn Signal Output Short?All
Ye s®Go To 2
No®The condition that caused the symptom is currently not present.
Inspect the related wiring for a possible intermittent condition.
Look for any chafed, pierced,pinched, or partially broken wires.
Perform BODY VERIFICATION TEST - VER 1.
2 Turn the ignition off.
Disconnect the Right Rear Turn Signal Lamp connector.
Disconnect the BCM harness connector.
Measure the resistance between the Right Rear Turn Signal Driver circuit and
ground.
Is the resistance below 100.0 ohms?All
Ye s®Repair the Right Rear Turn Signal Driver circuit for a short to
ground.
Perform BODY VERIFICATION TEST - VER 1.
No®Go To 3
504
EXTERIOR LIGHTING
Page 534 of 4284
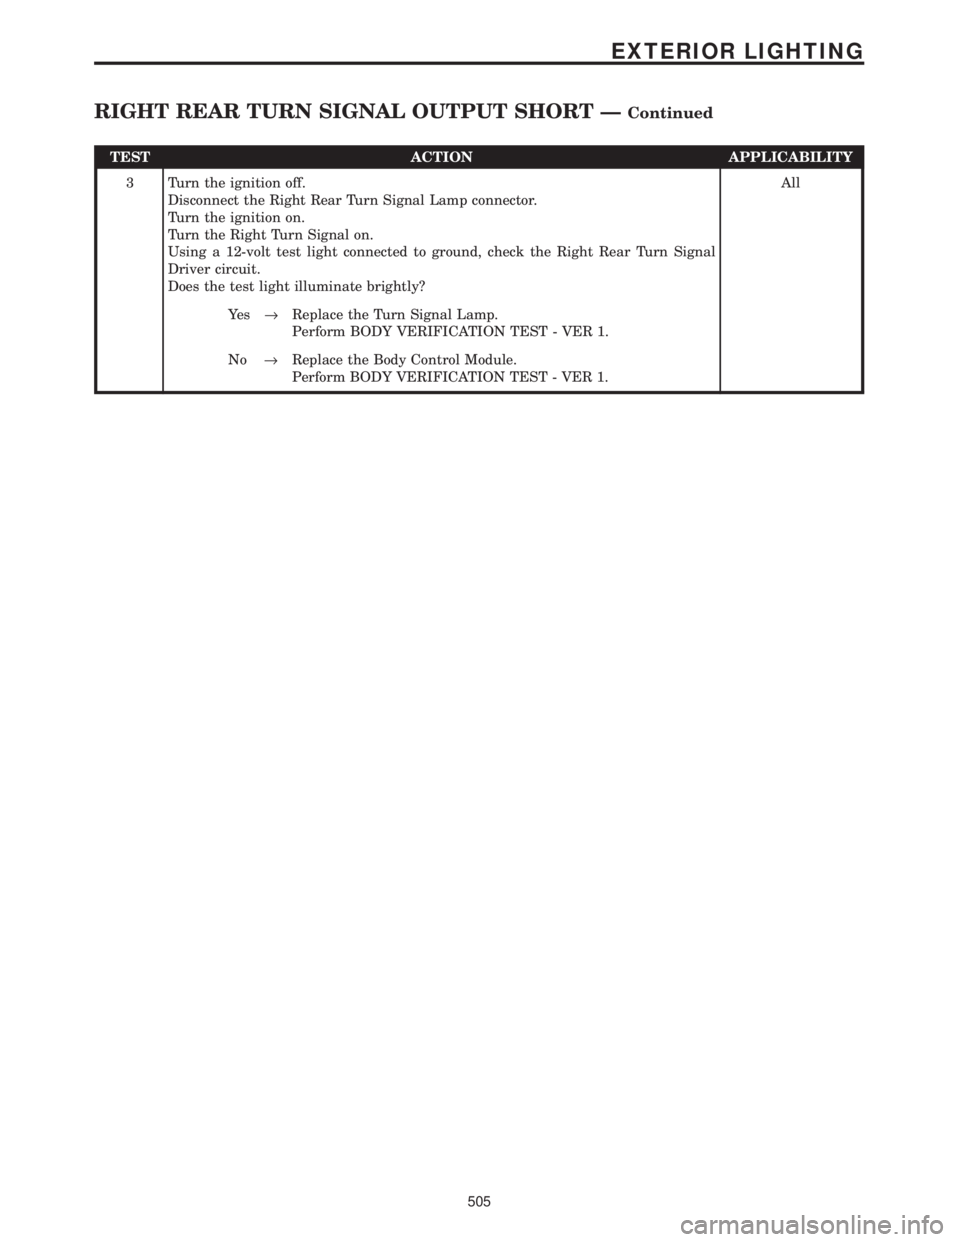
TEST ACTION APPLICABILITY
3 Turn the ignition off.
Disconnect the Right Rear Turn Signal Lamp connector.
Turn the ignition on.
Turn the Right Turn Signal on.
Using a 12-volt test light connected to ground, check the Right Rear Turn Signal
Driver circuit.
Does the test light illuminate brightly?All
Ye s®Replace the Turn Signal Lamp.
Perform BODY VERIFICATION TEST - VER 1.
No®Replace the Body Control Module.
Perform BODY VERIFICATION TEST - VER 1.
505
EXTERIOR LIGHTING
RIGHT REAR TURN SIGNAL OUTPUT SHORT ÐContinued
Page 535 of 4284
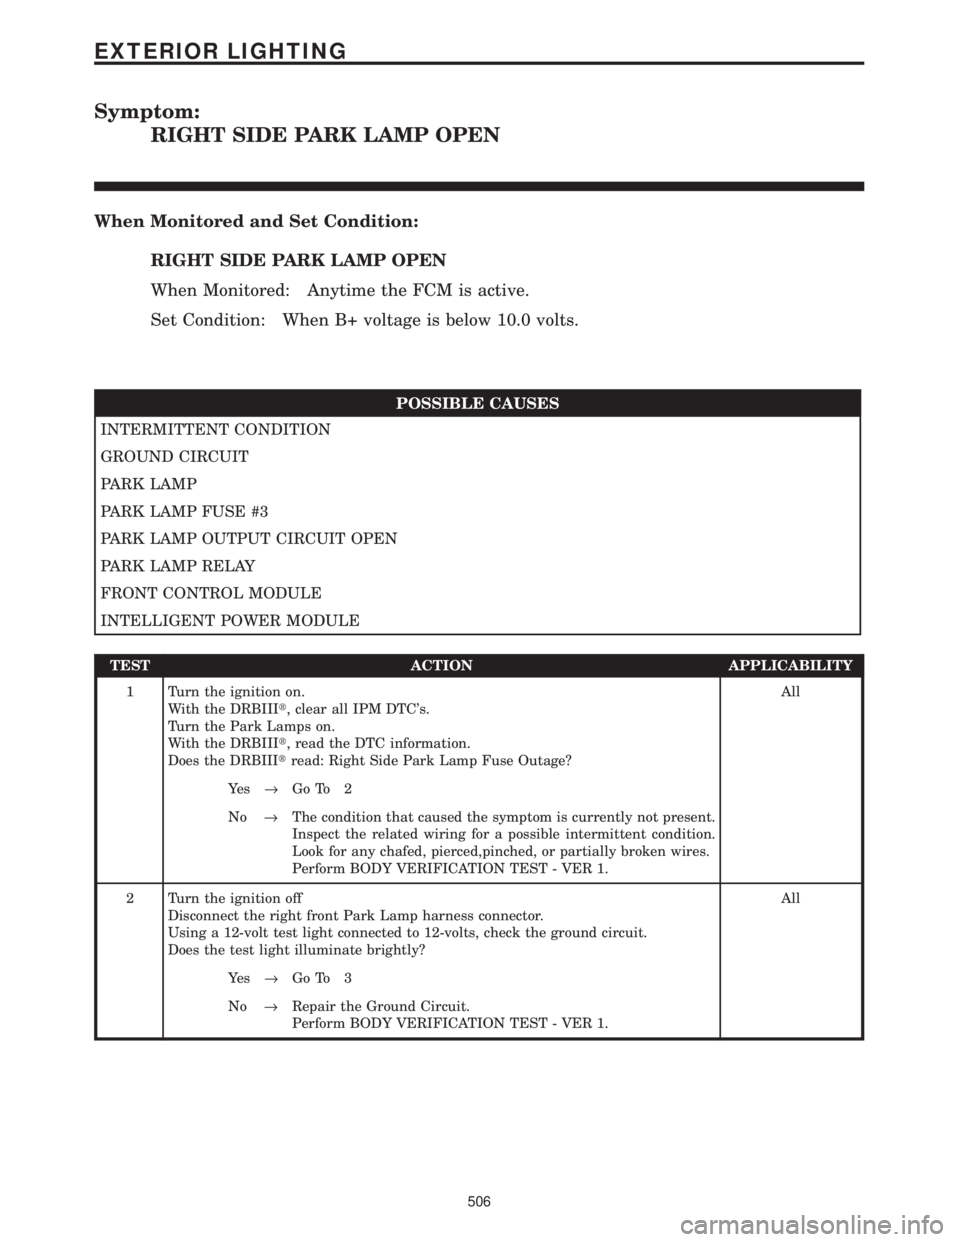
Symptom:
RIGHT SIDE PARK LAMP OPEN
When Monitored and Set Condition:
RIGHT SIDE PARK LAMP OPEN
When Monitored: Anytime the FCM is active.
Set Condition: When B+ voltage is below 10.0 volts.
POSSIBLE CAUSES
INTERMITTENT CONDITION
GROUND CIRCUIT
PARK LAMP
PARK LAMP FUSE #3
PARK LAMP OUTPUT CIRCUIT OPEN
PARK LAMP RELAY
FRONT CONTROL MODULE
INTELLIGENT POWER MODULE
TEST ACTION APPLICABILITY
1 Turn the ignition on.
With the DRBIIIt, clear all IPM DTC's.
Turn the Park Lamps on.
With the DRBIIIt, read the DTC information.
Does the DRBIIItread: Right Side Park Lamp Fuse Outage?All
Ye s®Go To 2
No®The condition that caused the symptom is currently not present.
Inspect the related wiring for a possible intermittent condition.
Look for any chafed, pierced,pinched, or partially broken wires.
Perform BODY VERIFICATION TEST - VER 1.
2 Turn the ignition off
Disconnect the right front Park Lamp harness connector.
Using a 12-volt test light connected to 12-volts, check the ground circuit.
Does the test light illuminate brightly?All
Ye s®Go To 3
No®Repair the Ground Circuit.
Perform BODY VERIFICATION TEST - VER 1.
506
EXTERIOR LIGHTING
Page 536 of 4284
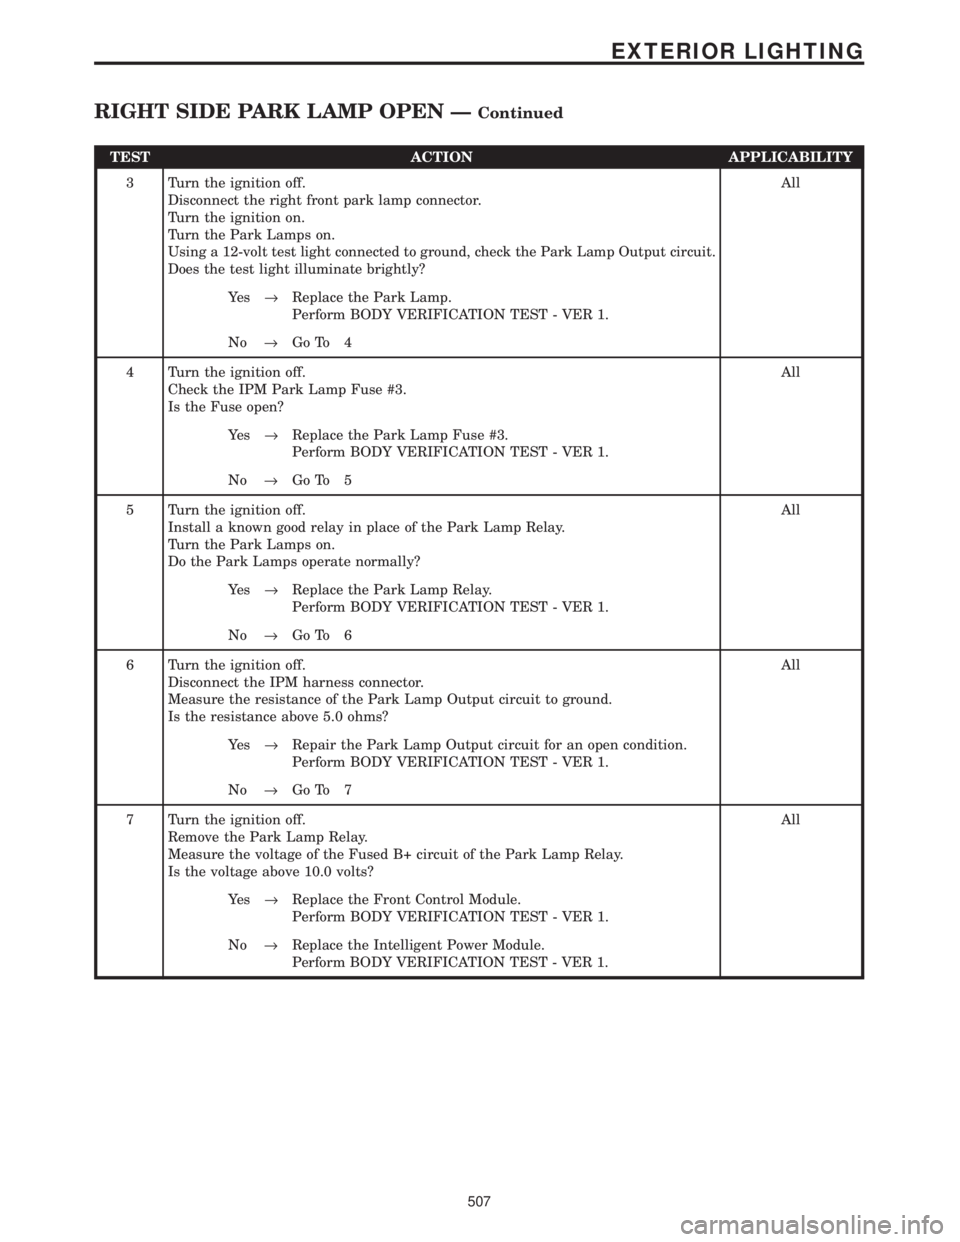
TEST ACTION APPLICABILITY
3 Turn the ignition off.
Disconnect the right front park lamp connector.
Turn the ignition on.
Turn the Park Lamps on.
Using a 12-volt test light connected to ground, check the Park Lamp Output circuit.
Does the test light illuminate brightly?All
Ye s®Replace the Park Lamp.
Perform BODY VERIFICATION TEST - VER 1.
No®Go To 4
4 Turn the ignition off.
Check the IPM Park Lamp Fuse #3.
Is the Fuse open?All
Ye s®Replace the Park Lamp Fuse #3.
Perform BODY VERIFICATION TEST - VER 1.
No®Go To 5
5 Turn the ignition off.
Install a known good relay in place of the Park Lamp Relay.
Turn the Park Lamps on.
Do the Park Lamps operate normally?All
Ye s®Replace the Park Lamp Relay.
Perform BODY VERIFICATION TEST - VER 1.
No®Go To 6
6 Turn the ignition off.
Disconnect the IPM harness connector.
Measure the resistance of the Park Lamp Output circuit to ground.
Is the resistance above 5.0 ohms?All
Ye s®Repair the Park Lamp Output circuit for an open condition.
Perform BODY VERIFICATION TEST - VER 1.
No®Go To 7
7 Turn the ignition off.
Remove the Park Lamp Relay.
Measure the voltage of the Fused B+ circuit of the Park Lamp Relay.
Is the voltage above 10.0 volts?All
Ye s®Replace the Front Control Module.
Perform BODY VERIFICATION TEST - VER 1.
No®Replace the Intelligent Power Module.
Perform BODY VERIFICATION TEST - VER 1.
507
EXTERIOR LIGHTING
RIGHT SIDE PARK LAMP OPEN ÐContinued
Page 537 of 4284
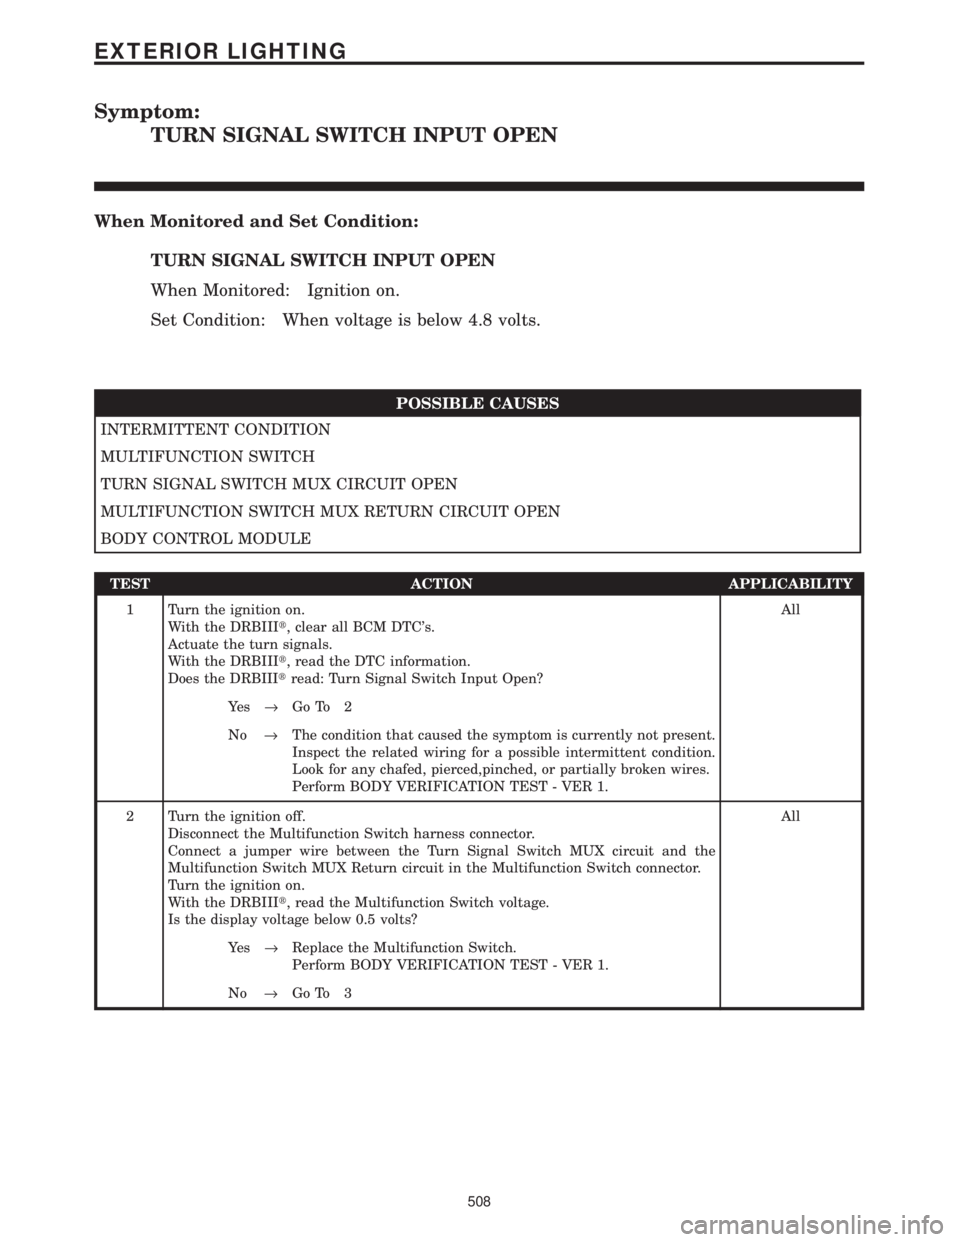
Symptom:
TURN SIGNAL SWITCH INPUT OPEN
When Monitored and Set Condition:
TURN SIGNAL SWITCH INPUT OPEN
When Monitored: Ignition on.
Set Condition: When voltage is below 4.8 volts.
POSSIBLE CAUSES
INTERMITTENT CONDITION
MULTIFUNCTION SWITCH
TURN SIGNAL SWITCH MUX CIRCUIT OPEN
MULTIFUNCTION SWITCH MUX RETURN CIRCUIT OPEN
BODY CONTROL MODULE
TEST ACTION APPLICABILITY
1 Turn the ignition on.
With the DRBIIIt, clear all BCM DTC's.
Actuate the turn signals.
With the DRBIIIt, read the DTC information.
Does the DRBIIItread: Turn Signal Switch Input Open?All
Ye s®Go To 2
No®The condition that caused the symptom is currently not present.
Inspect the related wiring for a possible intermittent condition.
Look for any chafed, pierced,pinched, or partially broken wires.
Perform BODY VERIFICATION TEST - VER 1.
2 Turn the ignition off.
Disconnect the Multifunction Switch harness connector.
Connect a jumper wire between the Turn Signal Switch MUX circuit and the
Multifunction Switch MUX Return circuit in the Multifunction Switch connector.
Turn the ignition on.
With the DRBIIIt, read the Multifunction Switch voltage.
Is the display voltage below 0.5 volts?All
Ye s®Replace the Multifunction Switch.
Perform BODY VERIFICATION TEST - VER 1.
No®Go To 3
508
EXTERIOR LIGHTING
Page 538 of 4284
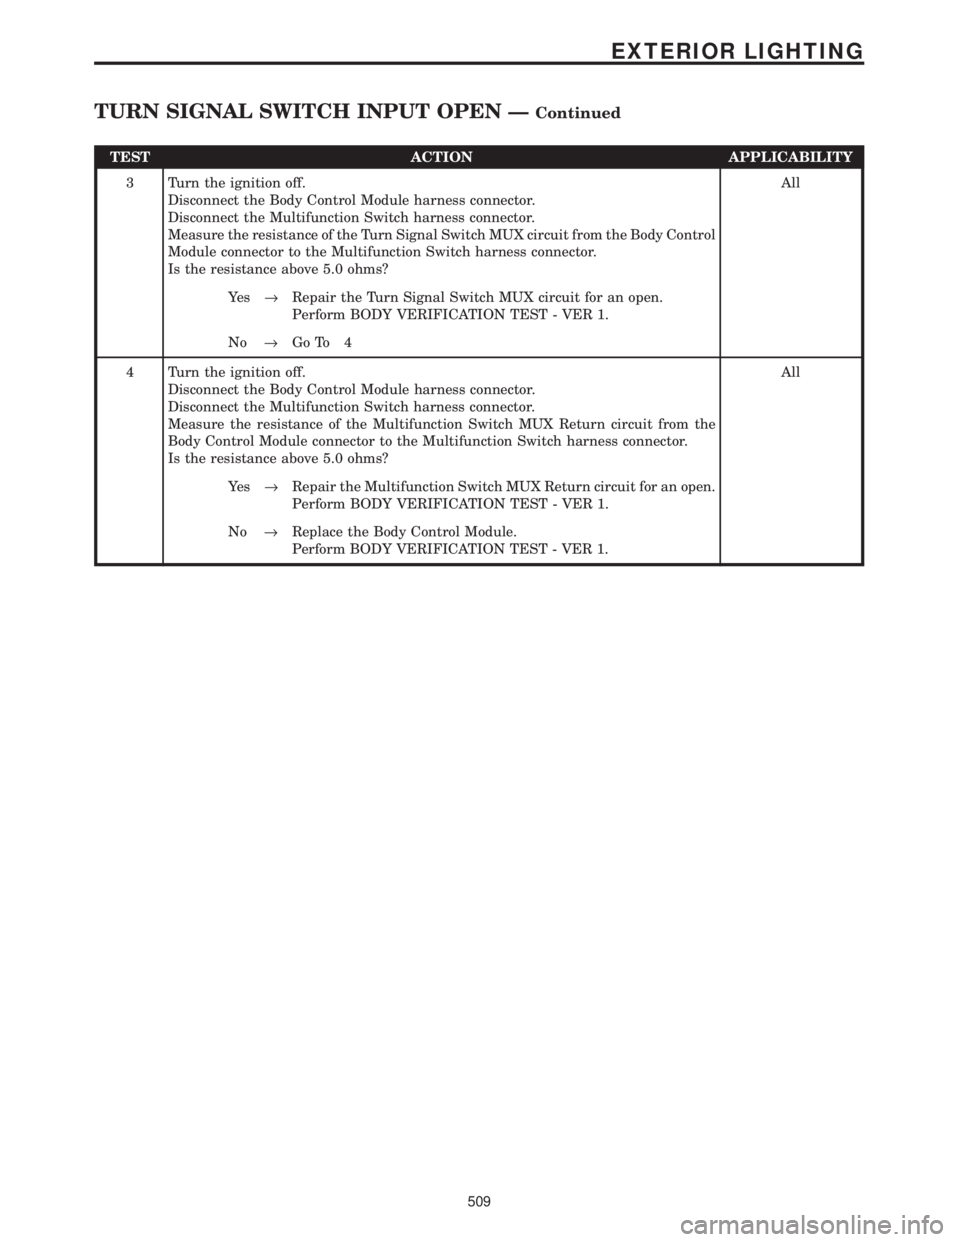
TEST ACTION APPLICABILITY
3 Turn the ignition off.
Disconnect the Body Control Module harness connector.
Disconnect the Multifunction Switch harness connector.
Measure the resistance of the Turn Signal Switch MUX circuit from the Body Control
Module connector to the Multifunction Switch harness connector.
Is the resistance above 5.0 ohms?All
Ye s®Repair the Turn Signal Switch MUX circuit for an open.
Perform BODY VERIFICATION TEST - VER 1.
No®Go To 4
4 Turn the ignition off.
Disconnect the Body Control Module harness connector.
Disconnect the Multifunction Switch harness connector.
Measure the resistance of the Multifunction Switch MUX Return circuit from the
Body Control Module connector to the Multifunction Switch harness connector.
Is the resistance above 5.0 ohms?All
Ye s®Repair the Multifunction Switch MUX Return circuit for an open.
Perform BODY VERIFICATION TEST - VER 1.
No®Replace the Body Control Module.
Perform BODY VERIFICATION TEST - VER 1.
509
EXTERIOR LIGHTING
TURN SIGNAL SWITCH INPUT OPEN ÐContinued
Page 539 of 4284
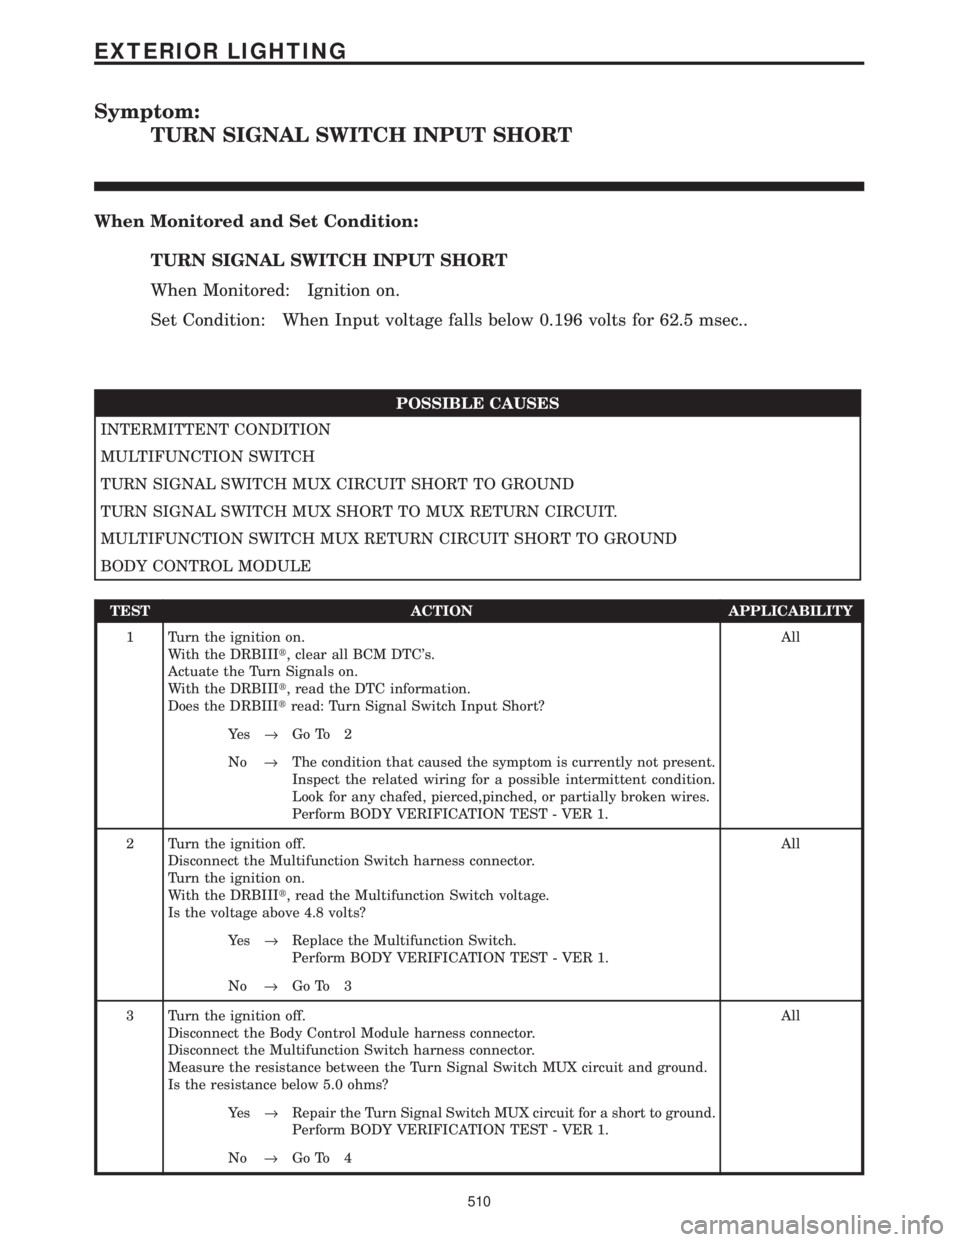
Symptom:
TURN SIGNAL SWITCH INPUT SHORT
When Monitored and Set Condition:
TURN SIGNAL SWITCH INPUT SHORT
When Monitored: Ignition on.
Set Condition: When Input voltage falls below 0.196 volts for 62.5 msec..
POSSIBLE CAUSES
INTERMITTENT CONDITION
MULTIFUNCTION SWITCH
TURN SIGNAL SWITCH MUX CIRCUIT SHORT TO GROUND
TURN SIGNAL SWITCH MUX SHORT TO MUX RETURN CIRCUIT.
MULTIFUNCTION SWITCH MUX RETURN CIRCUIT SHORT TO GROUND
BODY CONTROL MODULE
TEST ACTION APPLICABILITY
1 Turn the ignition on.
With the DRBIIIt, clear all BCM DTC's.
Actuate the Turn Signals on.
With the DRBIIIt, read the DTC information.
Does the DRBIIItread: Turn Signal Switch Input Short?All
Ye s®Go To 2
No®The condition that caused the symptom is currently not present.
Inspect the related wiring for a possible intermittent condition.
Look for any chafed, pierced,pinched, or partially broken wires.
Perform BODY VERIFICATION TEST - VER 1.
2 Turn the ignition off.
Disconnect the Multifunction Switch harness connector.
Turn the ignition on.
With the DRBIIIt, read the Multifunction Switch voltage.
Is the voltage above 4.8 volts?All
Ye s®Replace the Multifunction Switch.
Perform BODY VERIFICATION TEST - VER 1.
No®Go To 3
3 Turn the ignition off.
Disconnect the Body Control Module harness connector.
Disconnect the Multifunction Switch harness connector.
Measure the resistance between the Turn Signal Switch MUX circuit and ground.
Is the resistance below 5.0 ohms?All
Ye s®Repair the Turn Signal Switch MUX circuit for a short to ground.
Perform BODY VERIFICATION TEST - VER 1.
No®Go To 4
510
EXTERIOR LIGHTING
Page 540 of 4284
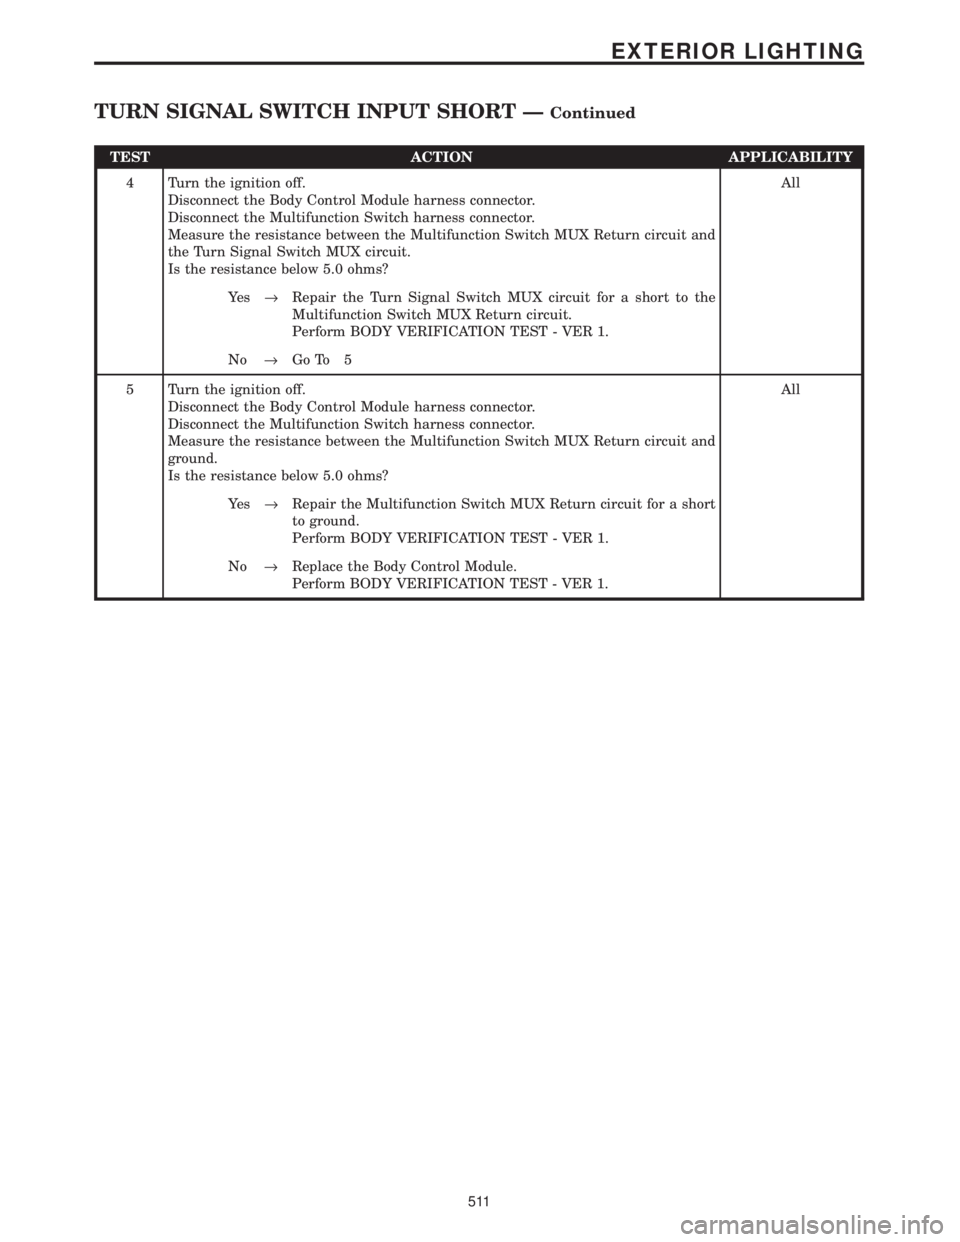
TEST ACTION APPLICABILITY
4 Turn the ignition off.
Disconnect the Body Control Module harness connector.
Disconnect the Multifunction Switch harness connector.
Measure the resistance between the Multifunction Switch MUX Return circuit and
the Turn Signal Switch MUX circuit.
Is the resistance below 5.0 ohms?All
Ye s®Repair the Turn Signal Switch MUX circuit for a short to the
Multifunction Switch MUX Return circuit.
Perform BODY VERIFICATION TEST - VER 1.
No®Go To 5
5 Turn the ignition off.
Disconnect the Body Control Module harness connector.
Disconnect the Multifunction Switch harness connector.
Measure the resistance between the Multifunction Switch MUX Return circuit and
ground.
Is the resistance below 5.0 ohms?All
Ye s®Repair the Multifunction Switch MUX Return circuit for a short
to ground.
Perform BODY VERIFICATION TEST - VER 1.
No®Replace the Body Control Module.
Perform BODY VERIFICATION TEST - VER 1.
511
EXTERIOR LIGHTING
TURN SIGNAL SWITCH INPUT SHORT ÐContinued