cruise control CITROEN BERLINGO VAN 2019 Handbook (in English)
[x] Cancel search | Manufacturer: CITROEN, Model Year: 2019, Model line: BERLINGO VAN, Model: CITROEN BERLINGO VAN 2019Pages: 320, PDF Size: 8.91 MB
Page 5 of 320
3
bit.ly/helpPSA
.
.
Driving advice 120
Starting/switching off the engine 1 21
Anti-theft protection
1
26
Manual parking brake
1
26
Electric parking brake
1
26
Hill start assist
1
30
5-speed manual gearbox
1
30
6-speed manual gearbox
1
31
Automatic gearbox
1
31
Gear ef ficiency indicator
1
35
Stop & Start
1
35
Head-up display
1
38
Speed Limit recognition and
recommendation
139
Speed limiter
1
43
Programmable cruise control
1
45
Adaptive cruise control
1
48
Memorising speeds
1
55
Active Safety Brake with Collision Risk Alert
and Intelligent emergency braking
assistance
1
56
Active Lane Departure Warning System
1
59
Blind Spot Detection
1
62
Fatigue detection system
1
65
Parking sensors
1
66
Top Rear Vision
1
69
Park Assist
1
71
Under-inflation detection
1
76Compatibility of fuels 1
79
Fuel tank 1 80
Diesel misfuel prevention
1
81
Snow chains
1
81
Towing device
1
82
Towing devices
1
83
Towing device with quickly detachable
towball
183
Energy economy mode
1
85
Load reduction mode
1
85
Roof bars/Roof rack
1
85
Bonnet
18
6
Engine
187
Checking levels
1
87
Checks
19
0
AdBlue
® (BlueHDi engines) 1 92
Advice on care 1 95
Running out of fuel (Diesel)
1
96
Tool kit
1
96
Temporary puncture repair kit
1
97
Spare wheel
20
0
Changing a bulb
2
04
Changing a fuse
2
11
12
V battery
2
13
To w i n g
2 16Dimensions
218
Engine technical data and towed loads
2
19
Identification markings
2
26
Engines and towed loads – PETROL
2
20
Engines and towed loads – DIESEL
2
22
Driving
Practical information
In the event of a breakdown Technical data
Access to additional videos
Alphabetical index
Audio equipment and telematics
Bluetooth audio system
CITROËN Connect Radio
CITROËN Connect Nav
.
Contents
Page 8 of 320
6
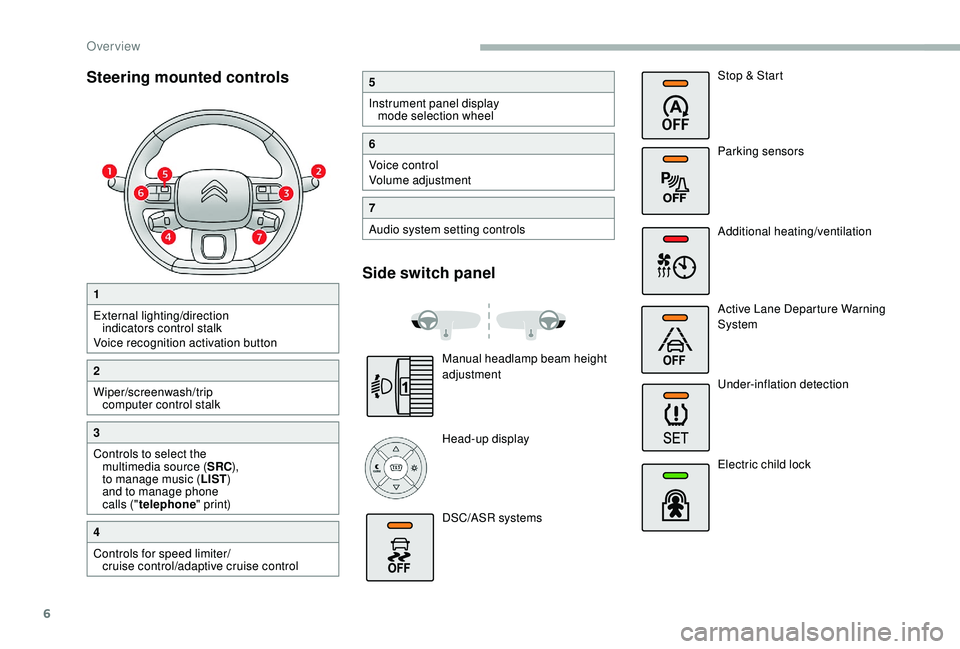
Steering mounted controls
1
External lighting/direction indicators control stalk
Voice recognition activation button
2
Wiper/screenwash/trip computer control stalk
3
Controls to select the multimedia source ( SRC),
to manage music ( LIST)
and to manage phone
calls (" telephone " print)
4
Controls for speed limiter/
cruise control/adaptive cruise control
5
Instrument panel display mode selection wheel
6
Voice control
Volume adjustment
7
Audio system setting controls
Side switch panel
Manual headlamp beam height
adjustment
Head-up display
DSC/ASR systems Stop & Start
Parking sensors
Additional heating/ventilation
Active Lane Departure Warning
System
Under-inflation detection
Electric child lock
Over view
Page 10 of 320
8
As a passenger, if you avoid connecting your
multimedia devices (film, music, video game,
etc.), you will contribute towards limiting the
consumption of electrical energy, and so of
fuel.
Disconnect your portable devices before
leaving the vehicle.
Eco- driving
Eco-driving is a range of everyday practices that allow the motorist to optimise their fuel consumption and CO2 emissions.
Optimise the use of your
gearbox
With a manual gearbox, move off gently and
change up without waiting. While accelerating,
change up early.
With an automatic gearbox, give preference
to automatic mode and avoid pressing the
accelerator pedal heavily or suddenly.
The gear efficiency indicator invites you to
engage the most suitable gear: as soon as the
indication is displayed in the instrument panel,
follow it straight away.
For vehicles fitted with an automatic gearbox,
this indicator appears only in manual mode.
Drive smoothly
Maintain a safe distance between vehicles,
use engine braking rather than the
brake pedal, and press the accelerator
progressively. These practices contribute
towards a reduction in fuel consumption and
CO
2 emissions and also help reduce the
background traffic noise.
If your vehicle has cruise control, make use of
the system at speeds above 25
mph (40 km/h)
when the traffic is flowing well.
Control the use of your electrical
equipment
Before moving off, if the passenger
compartment is too warm, ventilate it by opening
the windows and air vents before using the air
conditioning.
Above 31
mph (50 km/h), close the windows and
leave the air vents open.
Consider using equipment that can help keep
the temperature in the passenger compartment
down (sunroof blind and window blinds, etc.).
Switch off the headlamps and foglamps when
the visibility conditions do not require their
use.
Avoid running the engine before moving off,
particularly in winter; your vehicle will warm up
much faster while driving.
Unless it has automatic regulation, switch off
the air conditioning as soon as the desired
temperature has been reached.
Switch off the demisting and defrosting controls,
if these are not automatically managed.
Switch off the heated seat as soon as possible.
Eco-driving
Page 13 of 320
11
Instrument panel
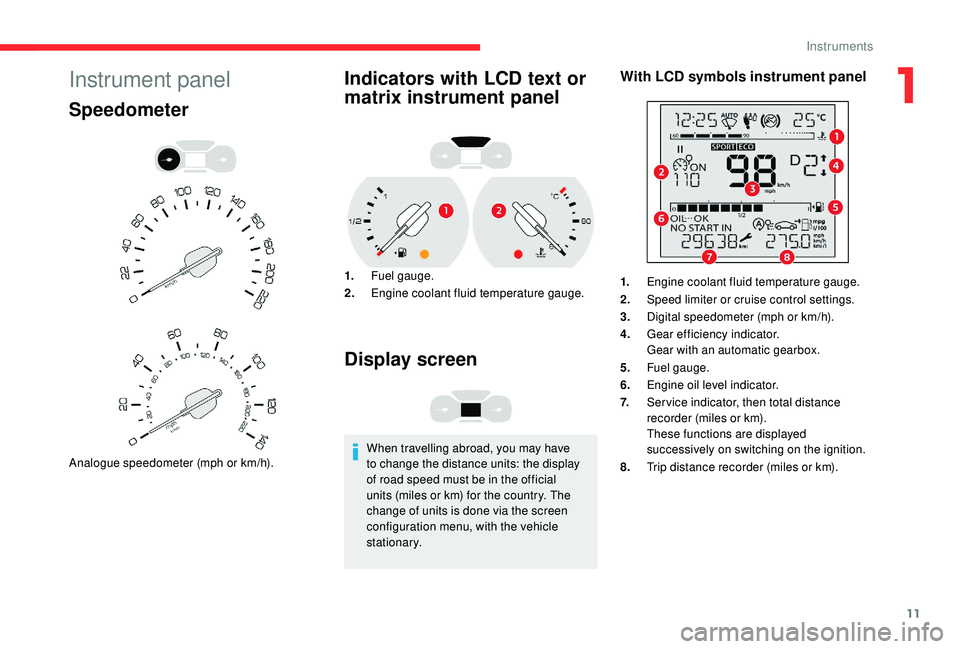
Speedometer
Analogue speedometer (mph or km/h).
Indicators with LCD text or
matrix instrument panel
1.Fuel gauge.
2. Engine coolant fluid temperature gauge.
Display screen
When travelling abroad, you may have
to change the distance units: the display
of road speed must be in the official
units (miles or km) for the country. The
change of units is done via the screen
configuration menu, with the vehicle
stationary.
With LCD symbols instrument panel
1.Engine coolant fluid temperature gauge.
2. Speed limiter or cruise control settings.
3. Digital speedometer (mph or km/h).
4. Gear efficiency indicator.
Gear with an automatic gearbox.
5. Fuel gauge.
6. Engine oil level indicator.
7. Ser vice indicator, then total distance
recorder (miles or km).
These functions are displayed
successively on switching on the ignition.
8. Trip distance recorder (miles or km).
1
Instruments
Page 14 of 320
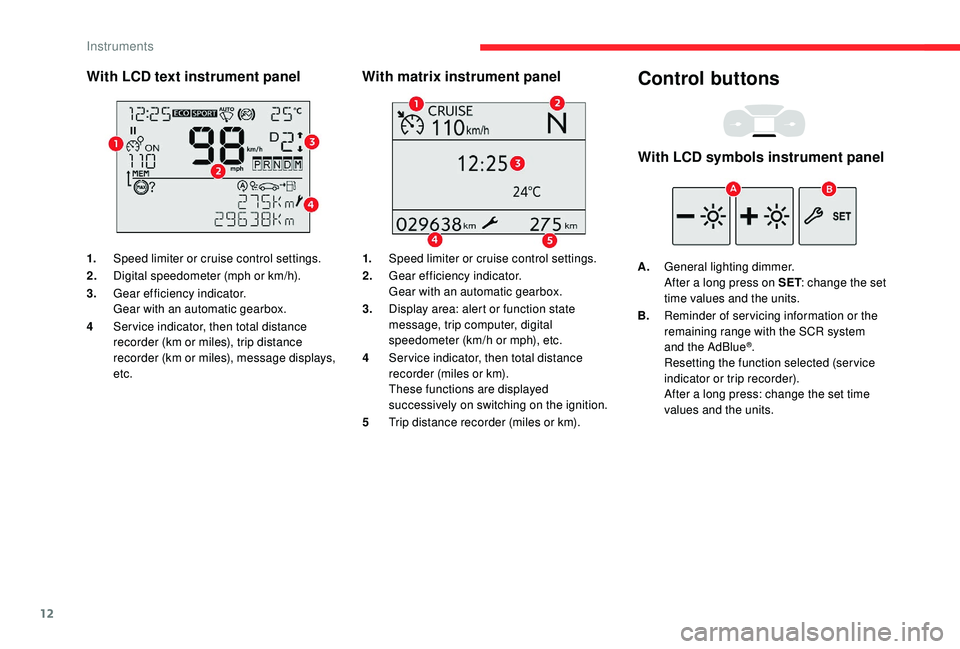
12
With LCD text instrument panel
1.Speed limiter or cruise control settings.
2. Digital speedometer (mph or km/h).
3. Gear efficiency indicator.
Gear with an automatic gearbox.
4 Ser vice indicator, then total distance
recorder (km or miles), trip distance
recorder (km or miles), message displays,
etc.
With matrix instrument panel
1.Speed limiter or cruise control settings.
2. Gear efficiency indicator.
Gear with an automatic gearbox.
3. Display area: alert or function state
message, trip computer, digital
speedometer (km/h or mph), etc.
4 Ser vice indicator, then total distance
recorder (miles or km).
These functions are displayed
successively on switching on the ignition.
5 Trip distance recorder (miles or km).
Control buttons
With LCD symbols instrument panel
A.General lighting dimmer.
After a long press on SET : change the set
time values and the units.
B. Reminder of servicing information or the
remaining range with the SCR system
and the AdBlue
®.
Resetting the function selected (service
indicator or trip recorder).
After a long press: change the set time
values and the units.
Instruments
Page 65 of 320
63
Interior fittings
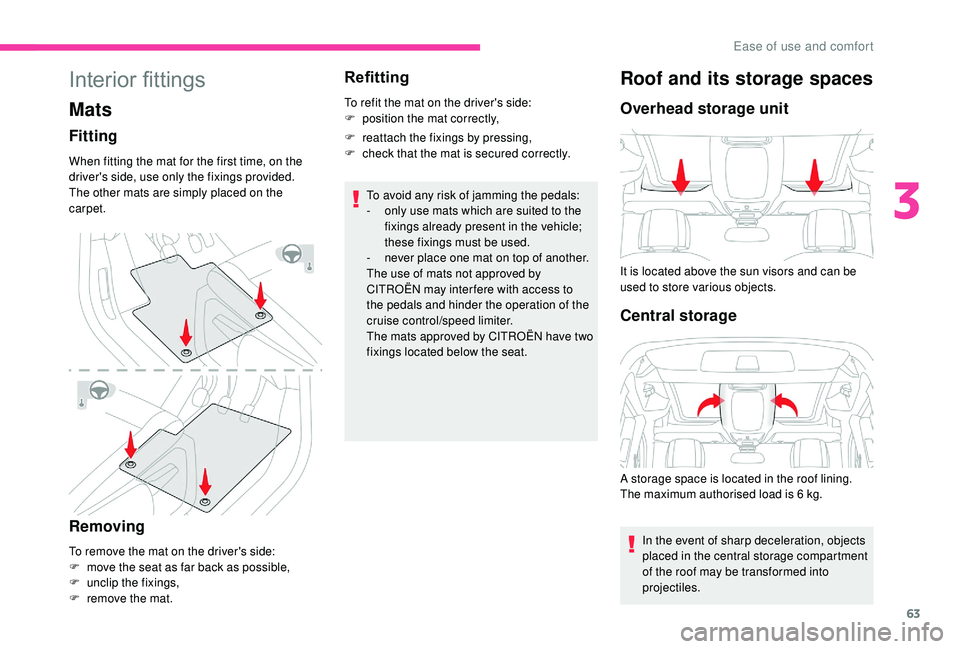
Mats
Fitting
When fitting the mat for the first time, on the
driver's side, use only the fixings provided.
The other mats are simply placed on the
carpet.
Removing
To remove the mat on the driver's side:
F m ove the seat as far back as possible,
F
un
clip the fixings,
F
r
emove the mat.
Refitting
To refit the mat on the driver's side:
F p osition the mat correctly,
F
r
eattach the fixings by pressing,
F
c
heck that the mat is secured correctly.
To avoid any risk of jamming the pedals:
-
o
nly use mats which are suited to the
fixings already present in the vehicle;
these fixings must be used.
-
n
ever place one mat on top of another.
The use of mats not approved by
CITROËN may inter fere with access to
the pedals and hinder the operation of the
cruise control/speed limiter.
The mats approved by CITROËN have two
fixings located below the seat.
Roof and its storage spaces
Overhead storage unit
It is located above the sun visors and can be
used to store various objects.
Central storage
A storage space is located in the roof lining.
The maximum authorised load is 6 kg.
In the event of sharp deceleration, objects
placed in the central storage compartment
of the roof may be transformed into
projectiles.
3
Ease of use and comfort
Page 101 of 320
99
For the system to activate, the slope must
be greater than 5%.
The system can be used with the gearbox
in neutral.
Otherwise engage a gear corresponding
to the speed to prevent the engine stalling.
With an automatic gearbox, the system
can be used with the selector at N, D or R.
When the system is regulating, the Active
Safety Brake system is automatically
deactivated.
The system is not available:
-
i
f the speed of the vehicle is above
43
mph (70 km/h),
-
i
f the speed of the vehicle is being
controlled by the Adaptive cruise
control, depending on the type of
gearbox.
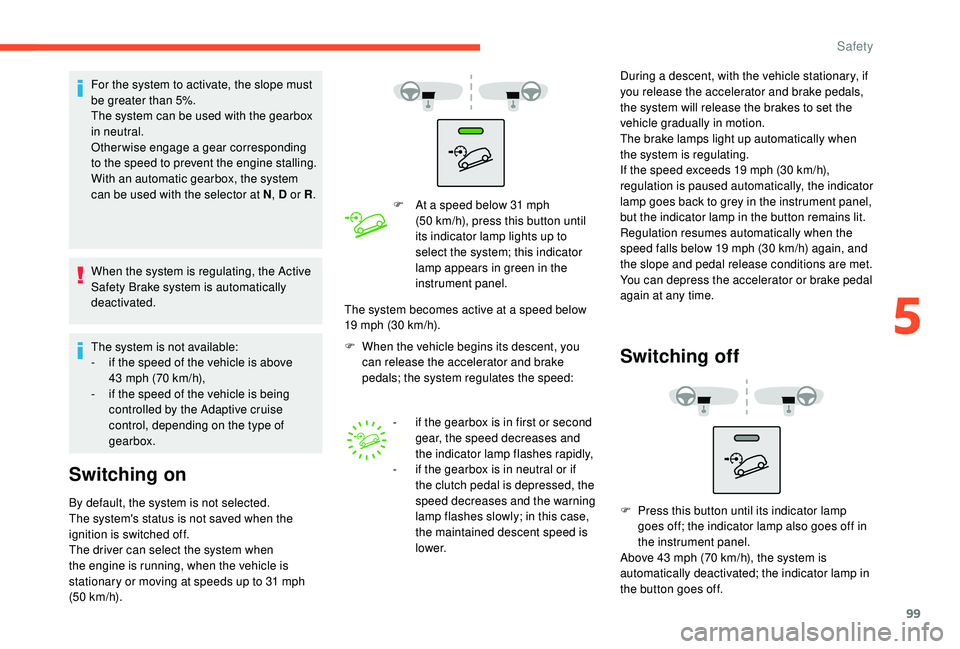
Switching on
By default, the system is not selected.
The system's status is not saved when the
ignition is switched off.
The driver can select the system when
the engine is running, when the vehicle is
stationary or moving at speeds up to 31
mph
(50
km/h). F
A
t a speed below 31 mph
(50 km/h), press this button until
its indicator lamp lights up to
select the system; this indicator
lamp appears in green in the
instrument panel.
F
W
hen the vehicle begins its descent, you
can release the accelerator and brake
pedals; the system regulates the speed:
-
i
f the gearbox is in first or second
gear, the speed decreases and
the indicator lamp flashes rapidly,
-
i
f the gearbox is in neutral or if
the clutch pedal is depressed, the
speed decreases and the warning
lamp flashes slowly; in this case,
the maintained descent speed is
l o w e r. During a descent, with the vehicle stationary, if
you release the accelerator and brake pedals,
the system will release the brakes to set the
vehicle gradually in motion.
The brake lamps light up automatically when
the system is regulating.
If the speed exceeds 19
mph (30 km/h),
regulation is paused automatically, the indicator
lamp goes back to grey in the instrument panel,
but the indicator lamp in the button remains lit.
Regulation resumes automatically when the
speed falls below 19 mph (30 km/h) again, and
the slope and pedal release conditions are met.
You can depress the accelerator or brake pedal
again at any time.
Switching off
The system becomes active at a speed below
19 mph (30 km/h).
F
P
ress this button until its indicator lamp
goes off; the indicator lamp also goes off in
the instrument panel.
Above 43
mph (70 km/h), the system is
automatically deactivated; the indicator lamp in
the button goes off.
5
Safety
Page 124 of 320
122
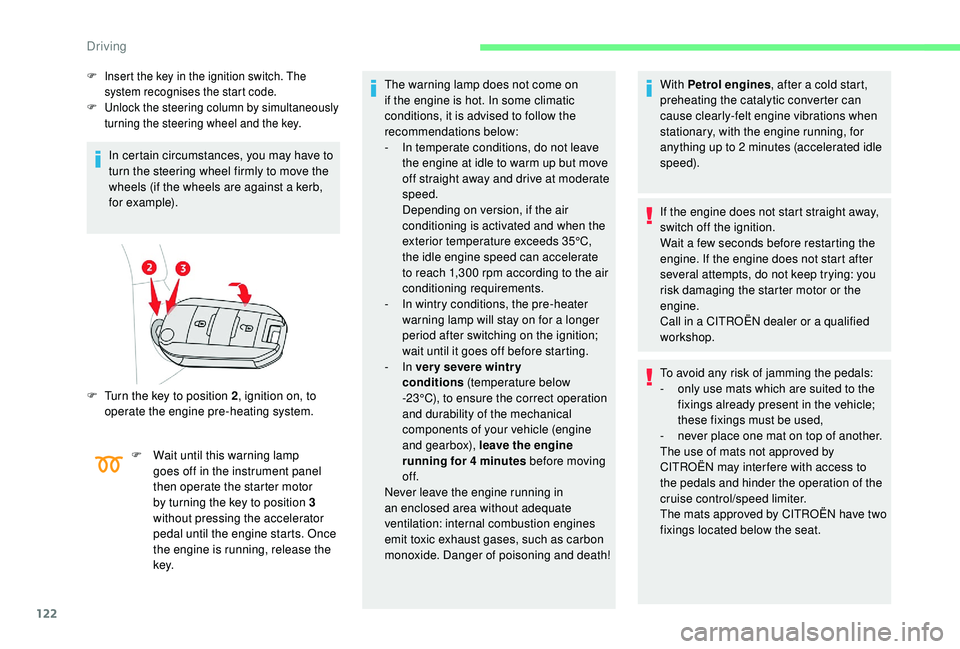
F Insert the key in the ignition switch. The system recognises the start code.
F
U
nlock the steering column by simultaneously
turning the steering wheel and the key.
In certain circumstances, you may have to
turn the steering wheel firmly to move the
wheels (if the wheels are against a kerb,
for example).
F
T
urn the key to position 2 , ignition on, to
operate the engine pre-heating system. The warning lamp does not come on
if the engine is hot. In some climatic
conditions, it is advised to follow the
recommendations below:
-
I n temperate conditions, do not leave
the engine at idle to warm up but move
off straight away and drive at moderate
speed.
Depending on version, if the air
conditioning is activated and when the
exterior temperature exceeds 35°C,
the idle engine speed can accelerate
to reach 1,300
rpm according to the air
conditioning requirements.
-
I
n wintry conditions, the pre-heater
warning lamp will stay on for a longer
period after switching on the ignition;
wait until it goes off before starting.
-
In ver y severe wintr y
conditions
(temperature below
-23°C), to ensure the correct operation
and durability of the mechanical
components of your vehicle (engine
and gearbox), leave the engine
running for 4
minutes before moving
of f.
Never leave the engine running in
an enclosed area without adequate
ventilation: internal combustion engines
emit toxic exhaust gases, such as carbon
monoxide. Danger of poisoning and death! With Petrol engines
, after a cold start,
preheating the catalytic converter can
cause clearly-felt engine vibrations when
stationary, with the engine running, for
anything up to 2 minutes (accelerated idle
speed).
If the engine does not start straight away,
switch off the ignition.
Wait a few seconds before restarting the
engine. If the engine does not start after
several attempts, do not keep trying: you
risk damaging the starter motor or the
engine.
Call in a CITROËN dealer or a qualified
workshop.
To avoid any risk of jamming the pedals:
-
o
nly use mats which are suited to the
fixings already present in the vehicle;
these fixings must be used,
-
n
ever place one mat on top of another.
The use of mats not approved by
CITROËN may inter fere with access to
the pedals and hinder the operation of the
cruise control/speed limiter.
The mats approved by CITROËN have two
fixings located below the seat.
F
W
ait until this warning lamp
goes off in the instrument panel
then operate the starter motor
by turning the key to position 3
without pressing the accelerator
pedal until the engine starts. Once
the engine is running, release the
key.
Driving
Page 127 of 320
125
Forced switch-off with
Keyless Entry and Starting
In the event of an emergency only and with the
vehicle stationary, you can switch off the engine.
With Keyless Entry and Starting
F With the remote control in the recognition zone, press the " START/STOP" button.
With a manual gearbox, the engine switches off
and the steering column locks.
With the EAT8 automatic gearbox, the engine
switches off. If the vehicle is not immobilised, the
engine will not switch off.
To avoid any risk of jamming the pedals:
-
o
nly use mats which are suited to the
fixings already present in the vehicle;
these fixings must be used,
-
n
ever place one mat on top of another.
The use of mats not approved by
CITROËN may inter fere with access to
the pedals and hinder the operation of the
cruise control/speed limiter.
The mats approved by CITROËN have two
fixings located below the seat.
Switching the ignition on
with
K
eyless Entry and
Starting
F Press the " START/STOP" button, the
instrument panel comes on but the engine
does not start.
F
P
ress this button again to switch off the
ignition and allow the vehicle to be locked.
With the ignition on, the system will
automatically go into energy economy
mode to maintain an adequate state of
charge in the battery.
Back-up starting with
K
eyless Entry and Starting
Should your vehicle not detect the electronic
key in the recognition zone, because the
remote control battery is flat, a back-up reader
is provided to the left, behind the steering
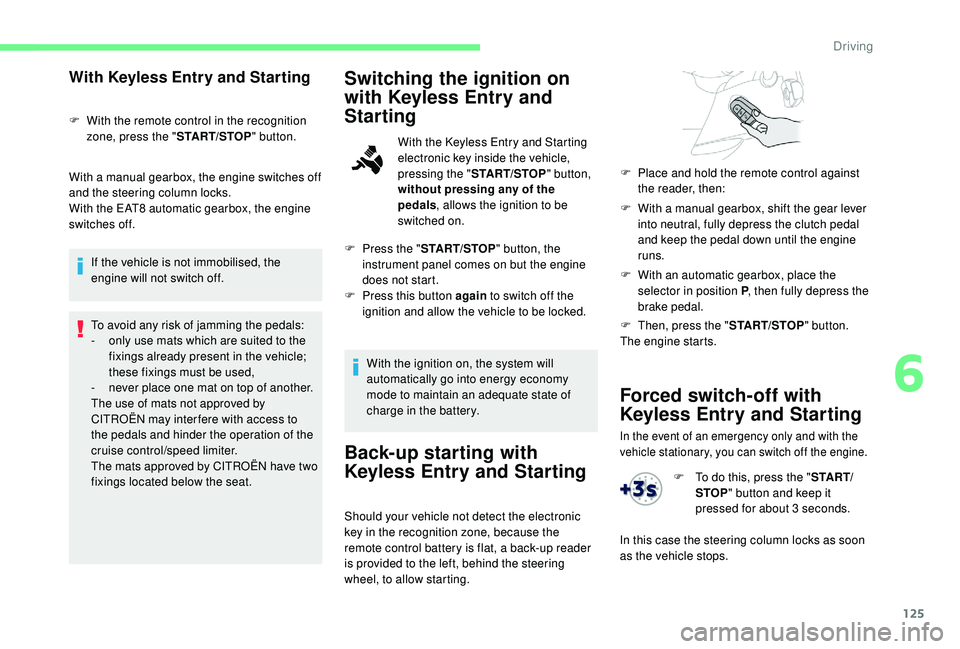
wheel, to allow starting. F
W
ith a manual gearbox, shift the gear lever
into neutral, fully depress the clutch pedal
and keep the pedal down until the engine
runs.
F
W
ith an automatic gearbox, place the
selector in position P , then fully depress the
brake pedal.
F
P
lace and hold the remote control against
the reader, then:
F
T
hen, press the "
START/STOP" button.
The engine starts.
With the
K
eyless Entry and Starting
electronic key inside the vehicle,
pressing the " START/STOP " button,
without pressing any of the
pedals , allows the ignition to be
switched on.
F
T
o do this, press the "
S TA R T/
STOP " button and keep it
pressed for about 3 seconds.
In this case the steering column locks as soon
as the vehicle stops.
6
Driving
Page 140 of 320
138
Have it checked by a CITROËN dealer or a
qualified workshop.
If a fault occurs in STOP mode, the vehicle may
stall.
All of the instrument panel warning lamps come
on.
Depending on version, a warning message may
also be displayed, asking you to place the gear
selector in position N and to press the brake
pedal.
With the vehicle stationary, you must switch off
the ignition and then start the engine again.
Head-up display
System which projects various information onto
a smoked blade in the driver's field of vision so
that they do not have to take their eyes off the
road.
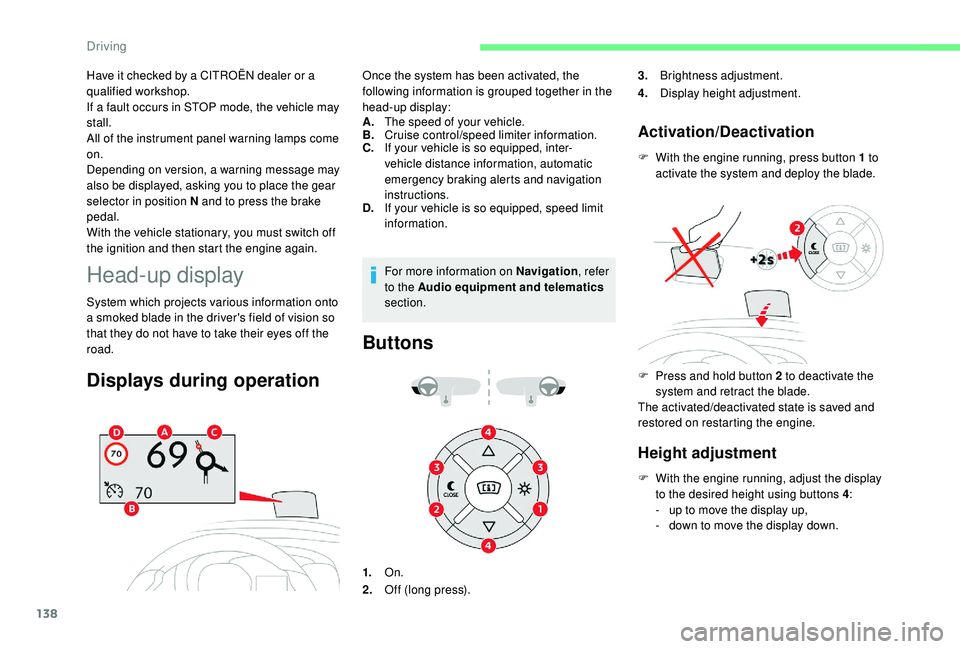
Displays during operation
A.The speed of your vehicle.
B. Cruise control/speed limiter information.
C. If your vehicle is so equipped, inter-
vehicle distance information, automatic
emergency braking alerts and navigation
instructions.
D. If your vehicle is so equipped, speed limit
information.
For more information on Navigation , refer
to the Audio equipment and telematics
section.
Buttons
Once the system has been activated, the
following information is grouped together in the
head-up display:
Activation/Deactivation
F With the engine running, press button 1 to activate the system and deploy the blade.
1. On.
2. Off (long press). 3.
Brightness adjustment.
4. Display height adjustment.
Height adjustment
F With the engine running, adjust the display
to the desired height using buttons 4 :
-
u
p to move the display up,
-
d
own to move the display down.
F
P
ress and hold button 2 to deactivate the
system and retract the blade.
The activated/deactivated state is saved and
restored on restarting the engine.
Driving