ESP CITROEN BERLINGO VAN 2021 Handbook (in English)
[x] Cancel search | Manufacturer: CITROEN, Model Year: 2021, Model line: BERLINGO VAN, Model: CITROEN BERLINGO VAN 2021Pages: 260, PDF Size: 7.57 MB
Page 32 of 260

30
Access
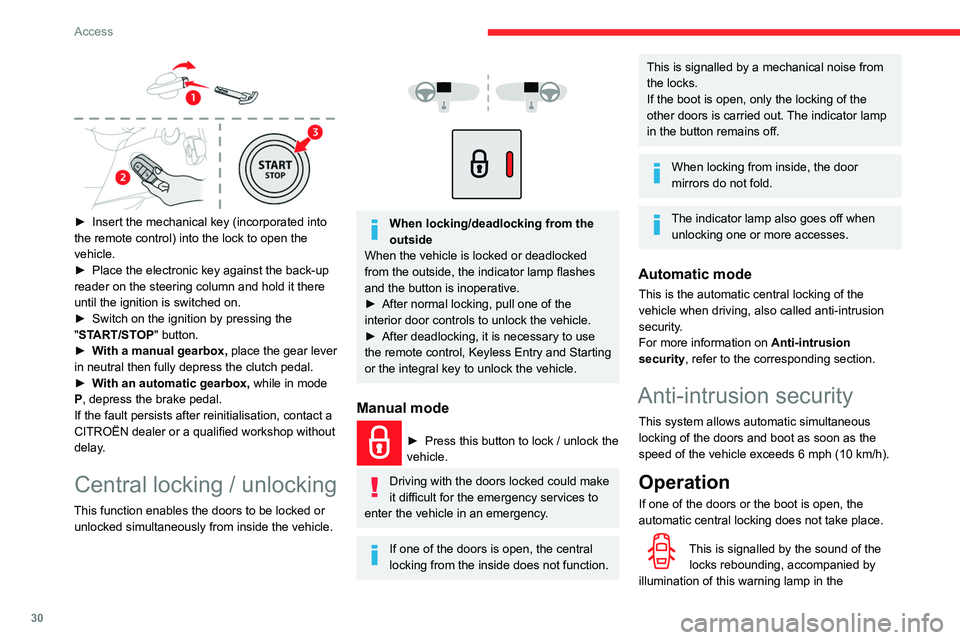
► Insert the mechanical key (incorporated into
the remote control) into the lock to open the
vehicle.
►
Place the electronic key against the back-up
reader on the steering column and hold it there
until the ignition is switched on.
►
Switch on the ignition by pressing the
"
START/STOP" button.
►
W
ith a manual gearbox, place the gear lever
in neutral then fully depress the clutch pedal.
►
W
ith an automatic gearbox, while in mode
P, depress the brake pedal.
If the fault persists after reinitialisation, contact a
CITROËN dealer or a qualified workshop without
delay.
Central locking / unlocking
This function enables the doors to be locked or unlocked simultaneously from inside the vehicle.
When locking/deadlocking from the
outside
When the vehicle is locked or deadlocked
from the outside, the indicator lamp flashes
and the button is inoperative.
►
After normal locking, pull one of the
interior door controls to unlock the vehicle.
►
After deadlocking, it is necessary to use
the remote control, Keyless Entry and Starting
or the integral key to unlock the vehicle.
Manual mode
► Press this button to lock / unlock the
vehicle.
Driving with the doors locked could make
it difficult for the emergency services to
enter the vehicle in an emergency.
If one of the doors is open, the central
locking from the inside does not function.
This is signalled by a mechanical noise from
the locks.
If the boot is open, only the locking of the
other doors is carried out. The indicator lamp
in the button remains off.
When locking from inside, the door
mirrors do not fold.
The indicator lamp also goes off when unlocking one or more accesses.
Automatic mode
This is the automatic central locking of the
vehicle when driving, also called anti-intrusion
security.
For more information on Anti-intrusion
security, refer to the corresponding section.
Anti-intrusion security
This system allows automatic simultaneous
locking of the doors and boot as soon as the
speed of the vehicle exceeds 6 mph (10 km/h).
Operation
If one of the doors or the boot is open, the
automatic central locking does not take place.
This is signalled by the sound of the locks rebounding, accompanied by
illumination of this warning lamp in the
Page 33 of 260

31
Access
2instrument panel, an audible signal and the
display of an alert message.
Activation/Deactivation
You can activate or deactivate this function
permanently.
►
With the ignition on, press the central locking
button until an audible signal is triggered and
a corresponding message of confirmation is
displayed.
The state of the system stays in the memory
when the ignition is switched off.
Driving with the doors locked may render
access by the emergency services to the
interior difficult in an emergency.
Carrying long or voluminous objects
If you want to drive with the boot open,
you should press the central locking button
to lock the doors. Otherwise, every time the
speed of the vehicle exceeds 6 mph (10
km/h), the locks will rebound and the alerts
mentioned above will appear.
Pressing the central locking button unlocks
the vehicle.
Above 6 mph (10 km/h), this unlocking is
temporary.
Side-hinged doors
Keeping the left-hand door closed with the
right-hand door open
It is possible to drive with the right-hand
door open, to enable the transportation
of long loads.
The left-hand door is kept closed by the
distinctive "yellow" lock, positioned at the
base of the door.
This closed door must not be used to retain
loads.
Driving with the right-hand door open is a
special dispensation. Please comply with the
usual safety instructions on how to warn other
drivers.
Opening to approximately 180°
If fitted to your vehicle, a check strap system
allows the doors to be opened from about 90° to
about 180°.
►
Pull the yellow control when the door is open.
The check strap will engage again automatically
on closing.
General
recommendations for the
sliding side doors
Doors must only be operated when the
vehicle is stationary.
For your safety and that of your passengers,
as well as for correct operation of the doors,
you are strongly advised not to drive with a
door open.
Always check that it is safe to operate the
door and in particular, be sure not to leave
children or animals near the door controls
without supervision.
Page 35 of 260

33
Access
2Alarm
System which protects and provides a deterrent
against theft and break-ins.
Self-protection function
The system checks for the disconnection
of any of its components.
The alarm is triggered if the battery, button or
siren wiring is disconnected or damaged.
For all work on the alarm system, contact a
CITROËN dealer or a qualified workshop.
Exterior perimeter
The system checks whether the vehicle is
opened.
The alarm is triggered if anyone tries to open
one of the doors or the bonnet.
Volumetric
The system checks for any variation in volume in
the passenger compartment.
The alarm is triggered if anyone breaks a
window, enters the passenger compartment or
moves inside the vehicle.
If your vehicle is fitted with Additional
Heating / Ventilation, volumetric
monitoring is not compatible with this system.
For more information on Additional Heating
/ Ventilation , refer to the corresponding
section.
Anti-tilt monitoring
The system checks for any change in the attitude
of the vehicle.
The alarm is triggered if the vehicle is lifted or
moved.
When the vehicle is parked, the alarm
will not be triggered if the vehicle is
knocked.
Locking the vehicle with full
alarm system
Activation
► Switch off the engine and exit the vehicle.
► Lock the vehicle using the remote control or
the "Keyless Entry and Starting" system.
The monitoring system is active: the red indicator
lamp in the button flashes every second and
the direction indicators come on for about 2
seconds.
Following an instruction to lock the
vehicle, the exterior perimeter monitoring
is activated after 5 seconds and the interior
volumetric and anti-tilt monitoring after 45
seconds.
If an opening (door, boot or bonnet) is not
closed properly, the vehicle is not locked
but the exterior perimeter monitoring will be
activated after 45 seconds at the same time
as the interior volumetric and anti-tilt
monitoring.
Deactivation
► Press the unlocking button on the remote
control.
or
►
Unlock the vehicle with the Keyless Entry and
Starting system.
The monitoring system is deactivated: the
indicator lamp in the button goes off and the
direction indicators flash for about 2 seconds.
When the vehicle automatically locks
itself again (as happens if a door or the
boot is not opened within 30 seconds of
unlocking), the monitoring system is also
reactivated automatically.
Page 37 of 260

35
Access
2Electric windows
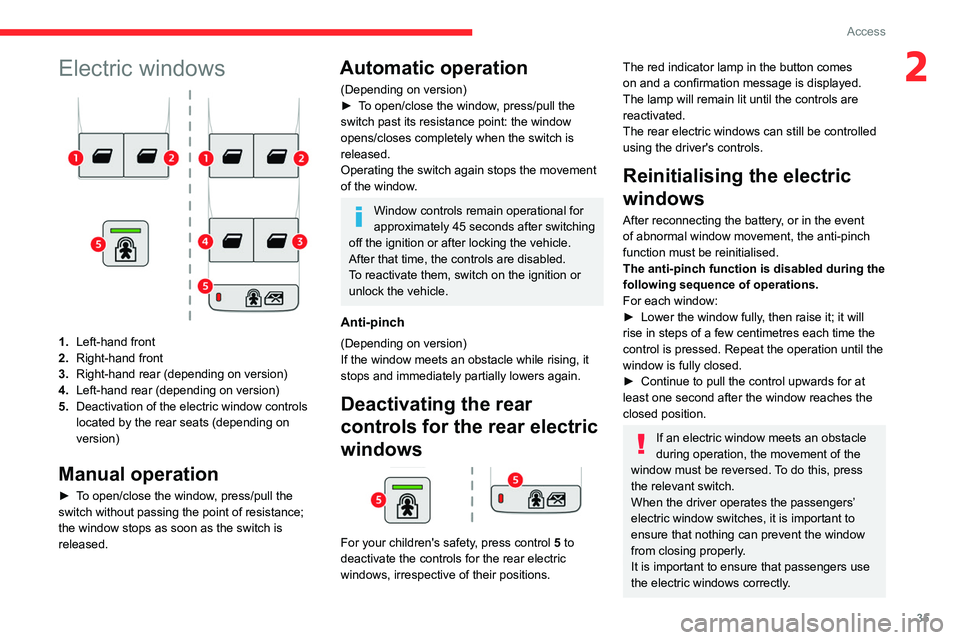
1.Left-hand front
2. Right-hand front
3. Right-hand rear (depending on version)
4. Left-hand rear (depending on version)
5. Deactivation of the electric window controls
located by the rear seats (depending on
version)
Manual operation
► To open/close the window, press/pull the
switch without passing the point of resistance;
the window stops as soon as the switch is
released.
Automatic operation
(Depending on version)
►
T o open/close the window, press/pull the
switch past its resistance point: the window
opens/closes completely when the switch is
released.
Operating the switch again stops the movement
of the window.
Window controls remain operational for
approximately 45 seconds after switching
off the ignition or after locking the vehicle.
After that time, the controls are disabled.
To reactivate them, switch on the ignition or
unlock the vehicle.
Anti-pinch
(Depending on version)
If the window meets an obstacle while rising, it
stops and immediately partially lowers again.
Deactivating the rear
controls for the rear electric
windows
For your children's safety, press control 5 to
deactivate the controls for the rear electric
windows, irrespective of their positions.
The red indicator lamp in the button comes
on and a confirmation message is displayed.
The lamp will remain lit until the controls are
reactivated.
The rear electric windows can still be controlled
using the driver's controls.
Reinitialising the electric
windows
After reconnecting the battery, or in the event
of abnormal window movement, the anti-pinch
function must be reinitialised.
The anti-pinch function is disabled during the
following sequence of operations.
For each window:
►
Lower the window fully
, then raise it; it will
rise in steps of a few centimetres each time the
control is pressed. Repeat the operation until the
window is fully closed.
►
Continue to pull the control upwards for at
least one second after the window reaches the
closed position.
If an electric window meets an obstacle
during operation, the movement of the
window must be reversed. To do this, press
the relevant switch.
When the driver operates the passengers’
electric window switches, it is important to
ensure that nothing can prevent the window
from closing properly.
It is important to ensure that passengers use
the electric windows correctly.
Page 40 of 260

38
Ease of use and comfort
Refitting the armrest
► Slot the armrest into the backrest, ensuring
that you align the bayonet lugs with the holes.
► Push the armrest shaft towards the backrest.
► While holding it in this position, rotate the
armrest towards the front. The armrest is once
again secured onto the backrest.
Retractable position
Adjustments
Longitudinal
► Raise the control and slide the seat forwards
or backwards.
Height
(driver only)
► If the vehicle is so equipped, pull the control
upwards to raise or push it downwards to lower ,
as many times as necessary to obtain the
position required.
For more information on the Seat belts,
refer to the corresponding section.
Tilting the backrest
► Push the control backwards then use your
weight and your legs to adjust the backrest.
Lumbar
(driver only)
► Turn the knob manually to obtain the desired
level of lumbar support.
Armrest
► To put the armrest in the vertical position,
raise it until it locks into place.
►
Lower the armrest to return it to the position
for use.
The armrest can be removed from the passenger
seat.
Removing the armrest
►
Raise the armrest into the vertical position.
► Push the armrest shaft towards the backrest.
► While holding it in this position, rotate the
armrest towards the rear
.
►
Pull the armrest to detach it from the
backrest.
Page 42 of 260

40
Ease of use and comfort
Heated mirrors
► Press this button.
For more information on Rear screen
demisting/defrosting , refer to the
corresponding section.
Interior rear view mirror
Equipped with an anti-dazzle system, which
darkens the mirror glass and reduces the
nuisance to the driver caused by the sun,
headlamps of other vehicles, etc.
Manual model
Day/night position
Steering wheel
adjustment
► When stationary , pull the control lever to
release the steering wheel.
►
Adjust the height and reach.
►
Lower the control lever to lock the steering
wheel.
As a safety precaution, these operations must only be carried out while the vehicle
is stationary.
Mirrors
Door mirrors
Adjustment
► Move control A or turn control C (depending
on the version you have) to the right or to the left
to select the corresponding mirror.
►
Move control
B or C (depending on the
version you have) in any of the four directions to
adjust.
►
Return control A
or C (depending on the
version you have) to its centre position.
As a safety measure, the mirrors should be adjusted to reduce the blind spots.
The objects observed are, in reality, closer
than they appear.
Take this into account when assessing the
distance of vehicles approaching from behind.
Manual folding
You can manually fold the mirrors (parking
obstruction, narrow garage, etc.)
►
T
urn the mirror towards the vehicle.
Electric folding
If the vehicle is so equipped, the mirrors can
be folded electrically from the inside, with the
vehicle parked and the ignition on:
► Place control A in the centre
position.
►
Pull control A
back.
►
Lock the vehicle from the outside.
Electric unfolding
The electric unfolding of the mirrors is via the
remote control or the key when unlocking the
vehicle. Unless folding was selected with control
A, pull the control back again to the central
position.
The folding / unfolding on locking / unlocking can be deactivated. Contact a
CITROËN dealer or a qualified workshop.
If necessary, it is possible to fold the mirrors
manually.
Page 43 of 260

41
Ease of use and comfort
3Heated mirrors
► Press this button.
For more information on Rear screen
demisting/defrosting , refer to the
corresponding section.
Interior rear view mirror
Equipped with an anti-dazzle system, which
darkens the mirror glass and reduces the
nuisance to the driver caused by the sun,
headlamps of other vehicles, etc.
Manual model
Day/night position
► Pull the lever to change to the anti-dazzle
"night” position.
►
Push the lever to change to the normal "day"
position.
Adjustment
►
Set the mirror to the normal “day” position.
Automatic "electrochrome" model
This system automatically and gradually
transitions between day and night use, with the
aid of a sensor that measures the light arriving
from the rear of the vehicle.
To ensure optimum visibility while manoeuvring, the mirror lightens
automatically when reverse gear is engaged.
Child-monitoring mirror
A child-monitoring mirror is installed above
the interior rear view mirror. It allows the
vehicle's rear passengers to be observed and
facilitates discussion between the front and rear
passengers without changing the mirror setting
and without turning around. It can be folded
easily to avoid dazzle.
Rear bench seat (row 2)
Folding the backrests
First steps:
► lower the head restraints,
►
if necessary
, move the front seats forward,
►
check that nothing or no person might
interfere with the folding of the backrests
(clothing, luggage, etc.),
►
check that the outer seat belts are lying flat
on the backrests.
The folding of the backrest is accompanied by a slight lowering of the
corresponding seat cushion.
When the backrest is released, the red
indicator is visible in the release grips on the
outer seats.
► Turn the backrest release handle 1.
Page 44 of 260

42
Ease of use and comfort
Central seat
► Pull the backrest release paddle 2 or 3
towards you.
The backrest folds fully onto the cushion.
Repositioning the backrests
Outer seat (left-hand or right-hand)
First check that the outer seat belts are
lying vertically flat alongside the backrest
latching rings.
► Put the backrest in the upright position and
push it firmly to latch it home.
► Check that the red indicator on the release
grips 1 of the outer seats is no longer visible.
► Ensure that the outer seat belts are not
trapped during the manoeuvre.
Check that the backrest of the upright
central seat is correctly aligned with the
backrests of the outer seats.
► Guide the backrest down to the horizontal
position.
Repositioning the backrests
First check that the outer seat belts are
lying vertically flat alongside the backrest
latching rings.
►
Put the backrest in the upright position and
push it firmly to latch it home.
►
Check that the red indicator in the release
grip
1 is no longer visible.
►
Ensure that the outer seat belts are not
trapped during the manoeuvre.
Rear seats (row 2)
Folding the backrests
First steps:
► lower the head restraints,
►
if necessary
, move the front seats forward,
►
check that nothing or no person might
interfere with the folding of the backrests
(clothing, luggage, etc.),
►
check that the outer seat belts are lying flat
on the backrests.
The folding of the backrest is accompanied by a slight lowering of the
corresponding seat cushion.
When the backrest is released, the red
indicator is visible in the release grips on the
outer seats.
Folding from the passenger
compartment
Outer seat (left-hand or right-hand)
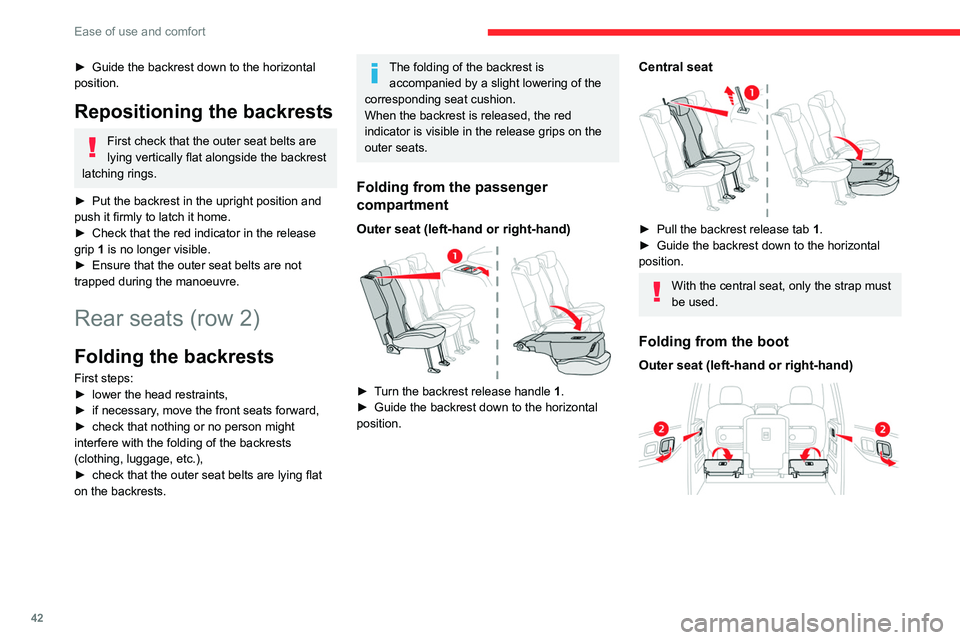
► Turn the backrest release handle 1.
► Guide the backrest down to the horizontal
position.
Central seat
► Pull the backrest release tab 1 .
► Guide the backrest down to the horizontal
position.
With the central seat, only the strap must
be used.
Folding from the boot
Outer seat (left-hand or right-hand)
Page 47 of 260

45
Ease of use and comfort
3► Fold the seat backwards to fix its rear
anchorage feet.
►
Use the control
1 to lift the backrest to its
original position.
►
Raise the head restraint.
Head restraint height
adjustment
► To raise it, pull it upwards as far as possible
(notch).
►
T
o remove it, press the lug A and pull it
upwards.
►
T
o put it back in place, engage the head
restraint rods in the openings keeping them in
line with the seat backrest.
►
T
o lower it, press the lug A and push down on
the head restraint at the same time.
The head restraint has a frame with notches which prevents it from lowering;
this is a safety device in case of impact.
The adjustment is correct when the upper
edge of the head restraint is level with the
top of the head.
Never drive with the head restraints removed;
they must be fitted and correctly adjusted.
Never drive with passengers seated at
the rear when the head restraints are
removed or not in the high position; the head
restraints must be in place and in the high
position.
For more information on the Seat belts,
refer to the corresponding section.
Interior fittings
Mats
Fitting
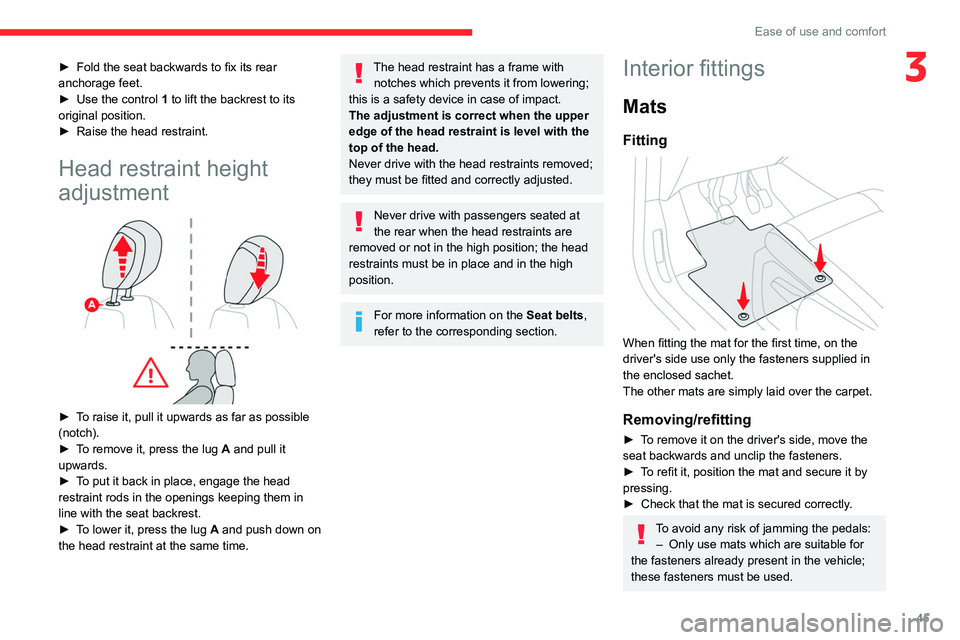
When fitting the mat for the first time, on the
driver's side use only the fasteners supplied in
the enclosed sachet.
The other mats are simply laid over the carpet.
Removing/refitting
► To remove it on the driver's side, move the
seat backwards and unclip the fasteners.
►
T
o refit it, position the mat and secure it by
pressing.
►
Check that the mat is secured correctly
.
To avoid any risk of jamming the pedals:– Only use mats which are suitable for
the fasteners already present in the vehicle;
these fasteners must be used.
Page 52 of 260

50
Ease of use and comfort
low position, you can store it folded by sliding it
towards the backrests of the rear seats.
► To deploy it from the boot, grasp it and unfold
it to the boot pillars.
The maximum authorised weight on the luggage cover shelf is 25 kg.
Luggage cover
XL
XL
In the 5-seat configuration, it is installed behind
the second row seats, with the third row seats
stored folded away.
In the 7-seat configuration, it is stored behind the
third row seats.
In the event of sudden deceleration,
objects placed on the load space cover
can turn into projectiles.
Installation behind row 1
► Open the covers on the upper mountings 1 .
► Unroll the high load retaining net.
►
Position one end of the net's metal bar in the
corresponding upper mounting 1
, then do the
same with the other end.
►
Fully extend the straps.
► Wind each strap around bar 3 located under
the front seat cushion (row 1), then secure each spring hook to the ring on the corresponding
strap.
►
Fold down the rear seats.
►
T
ighten the straps without raising the bench
seat.
►
Check that the net is hooked and tightened
correctly
.
Installation behind row 2
► Fold or remove the luggage cover
.
► Open the covers on the upper mountings 2
.
►
Unroll the high load retaining net.
►
Position one end of the net's metal bar in the
corresponding upper mounting 2
, then do the
same with the other end.
►
Attach the hook on each of the net's straps
to the corresponding stowing ring 4
(located on
the floor).
►
T
ighten the straps.
►
Check that the net is hooked and tightened
correctly
.
Never use the ISOFIX ring, which is for
fixing the strap of a child seat with Top
Tether.
Two-position luggage cover
shelf (removable)
M
M
It can be installed in two different positions: high
and low.
It consists of two sections which can be folded
back on each other.
►
T
o fold it from the boot, grasp it and fold it
back on itself up to the rear seats. From the