Cate CITROEN C-ELYSÉE 2016 Service Manual
[x] Cancel search | Manufacturer: CITROEN, Model Year: 2016, Model line: C-ELYSÉE, Model: CITROEN C-ELYSÉE 2016Pages: 260, PDF Size: 7.11 MB
Page 142 of 260

140
C-elysee_en_Chap09_info-pratiques_ed01-2016
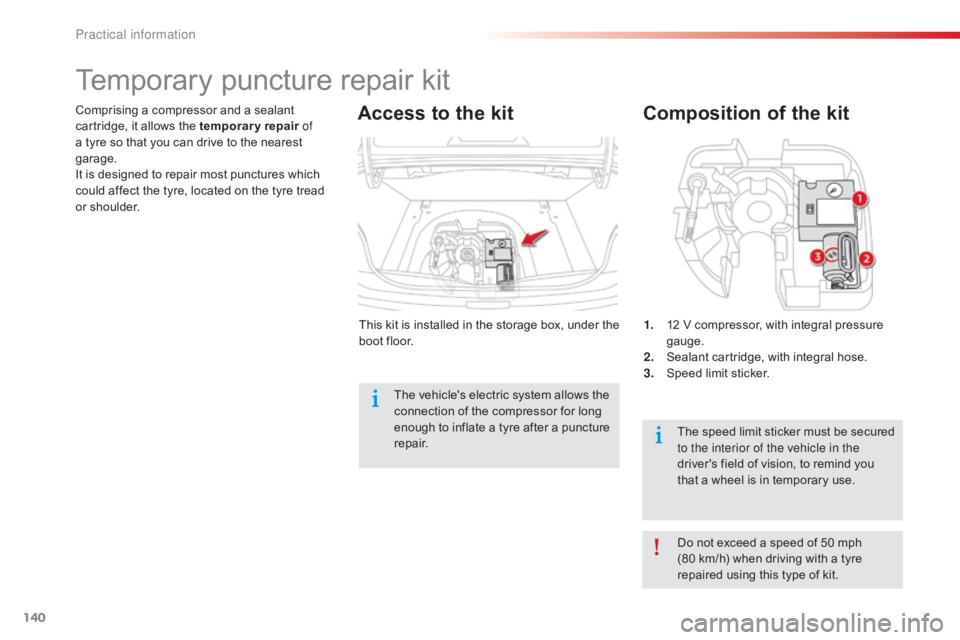
1. 12 V compressor, with integral pressure ga
uge.
2.
S
ealant cartridge, with integral hose.
3.
S
peed limit sticker.
Composition of the kit
The speed limit sticker must be secured to the interior of the vehicle in the
driver's
field of vision, to remind you
t
hat a wheel is in temporary use.
This
k
it
i
s
i
nstalled
i
n
t
he
s
torage
b
ox,
u
nder
t
he
b
oot
floor.
Comprising
a
compressor
and
a
sealant
c
artridge,
it
allows
the
temporary repair
of
a
tyre
so
that
you
can
drive
to
the
nearest
g
arage.
It
is
designed
to
repair
most
punctures
which
c
ould
affect
the
tyre,
located
on
the
tyre
tread
o
r
shoulder.
Temporary pu
ncture r epair k it
Access to the kit
The vehicle's electric system allows the c
onnection of the compressor for long
e
nough to inflate a tyre after a puncture
r
epair.
Do
not exceed a speed of 50 mph
(
80 km/h) when driving with a tyre
r
epaired using this type of kit.
Practical information
Page 144 of 260

142
C-elysee_en_Chap09_info-pratiques_ed01-2016
F Check that the compressor switch is at t
he "O "
position.
F
U
ncoil fully the electric cable, stowed under
t
he compressor.
F
C
onnect compressor's plug to the vehicle's
1
2 V socket.
F
S
witch on the ignition. If
after around 5 to 7 minutes the
p
ressure is not attained, this indicates
t
hat the tyre is not repairable; contact
a
CITROËN dealer or a qualified
w
orkshop for assistance.
Take care, the sealant product is
h
armful if swallowed and causes i
rritation to the eyes.
Keep this product out of the reach of
c
hildren.
The
use-by date is marked on the
c
artridge.
After
use, do not discard the
c
artridge by the roadside, take it to
a
CITROËN dealer or an authorised
w
aste disposal site.
Don't
forget to obtain a new sealant
c
artridge, available from a CITROËN
d
ealer or a qualified workshop.
F
S tart the compressor by placing the switch a
t the "I"
position and leave it running until
t
he tyre pressure reaches 2.0 bar.
T
he sealant product is injected into the tyre
u
nder pressure; do not disconnect the pipe
f
rom the valve during this operation (risk of
sp
lashing
an
d
s
tains).
Practical information
Page 156 of 260

154
C-elysee_en_Chap09_info-pratiques_ed01-2016
Amber coloured bulbs, such as the direction indicators, must be replaced
w
ith bulbs of identical specifications
a
nd colour.
When
refitting, close the protective
c
over carefully to preserve the sealing
o
f the headlamp.
Rapid
flashing
of
the
direction
indicator
w
arning
lamp
(right
or
left)
indicates
the
f
ailure
of
a
bulb
on
that
side.
Changing direction indicator
bulbs
F Turn the bulb holder an eighth of a turn a
nti-clockwise and extract it.
F
R
emove the bulb and change it.
To
reassemble, carry out these operations in
r
everse
o
rder.
Changing main beam headlamp
bulbs
F Remove the protective cover by pulling on t
he tab.
F
D
isconnect the bulb connector.
F
P
ush the spring to one side to release
t
he bulb.
F
R
emove the bulb and change it.
To refit, carry out these operations in reverse
o r d e r.
Practical information
Page 166 of 260

164
C-elysee_en_Chap09_info-pratiques_ed01-2016
12 V battery
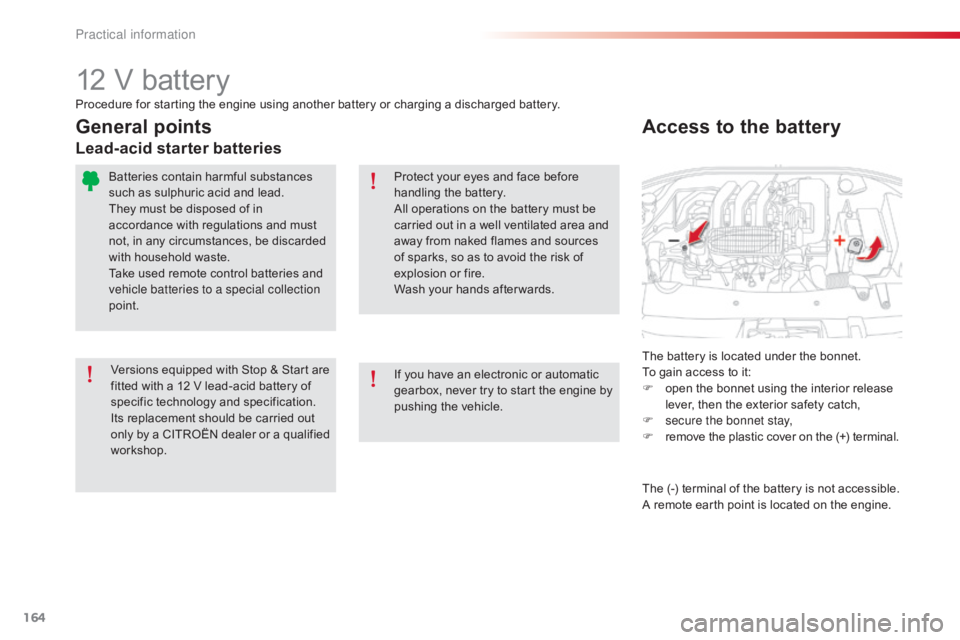
Procedure for starting the engine using another battery or charging a discharged battery.T he battery is located under the bonnet.
To
gain access to it:
F
o
pen the bonnet using the interior release
l
ever, then the exterior safety catch,
F
s
ecure the bonnet stay,
F
r
emove the plastic cover on the (+) terminal.
Access to the battery
General points
Lead-acid starter batteries
Protect your eyes and face before h
andling the battery.
All
operations on the battery must be
c
arried out in a well ventilated area and
a
way from naked flames and sources
o
f sparks, so as to avoid the risk of
e
xplosion or fire.
Wash
your hands after wards.
Batteries
contain
harmful
substances
s
uch
as
sulphuric
acid
and
lead.
They
must
be
disposed
of
in
a
ccordance
with
regulations
and
must
n
ot,
in
any
circumstances,
be
discarded
w
ith
household
waste.
Take
used
remote
control
batteries
and
v
ehicle batteries to a special collection
point.
Versions
equipped
with
Stop
&
Start
are
f
itted
with
a
12
V
lead-acid
battery
of
s
pecific
t
echnology
a
nd
s
pecification.
Its
replacement
should
be
carried
out
o
nly
by
a
CITROËN
dealer
or
a
qualified
w
orkshop. If
you have an electronic or automatic
g
earbox, never try to start the engine by
p
ushing the vehicle. The
(-) terminal of the battery is not accessible.
A
remote earth point is located on the engine.
Practical information
Page 180 of 260

178
C-elysee_en_Chap09_info-pratiques_ed01-2016
Roof bars
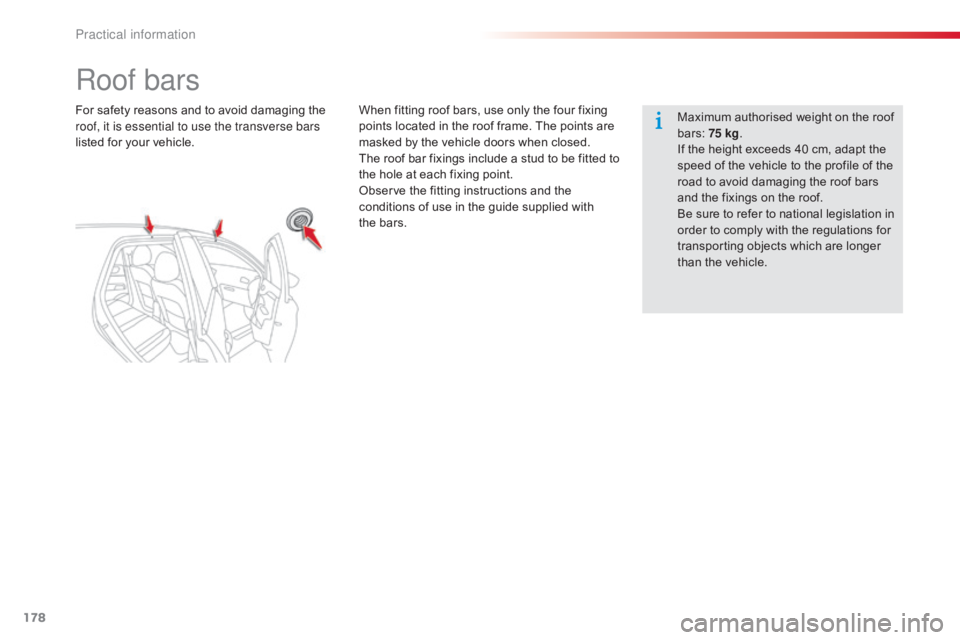
For safety reasons and to avoid damaging the roof, it is essential to use the transverse bars
listed
for your vehicle. When
fitting roof bars, use only the four fixing p
oints located in the roof frame. The points are
m
asked by the vehicle doors when closed.
The
roof bar fixings include a stud to be fitted to
t
he hole at each fixing point.
Observe
the fitting instructions and the
c
onditions of use in the guide supplied with
t
he bars. Maximum
authorised weight on the roof
b
ars:
75
kg.
If
the height exceeds 40 cm, adapt the
s
peed of the vehicle to the profile of the
r
oad to avoid damaging the roof bars
a
nd the fixings on the roof.
Be
sure to refer to national legislation in
o
rder to comply with the regulations for
t
ransporting objects which are longer
t
han the vehicle.
Practical information
Page 182 of 260

180
C-elysee_en_Chap10_verifications_ed01-2016
Bonnet
Closing
F Take the stay out of the support notch.
F C lip the stay in its housing.
F
L
ower the bonnet and release it near the
e
nd of its travel.
F
P
ull on the bonnet to check that it is fully
l
atched.
F
U
nclip the bonnet stay from its housing.
F
F
ix the stay in the notch to hold the bonnet
ope
n.
Do not open the bonnet when there is a
very
strong
wind.
When
the
engine
is
hot,
handle
the
e
xterior
safety
catch
and
the
stay
with
c
are
(risk
of
burns).
Opening
F Push
the exterior safety catch to the left a
nd raise the bonnet.
F
P
ull
towards
you
the
interior
release
lever,
l
ocated
in
the
lower
dashboard.
Because
of the presence of electrical
e
quipment under the bonnet, it is
r
ecommended that exposure to water
(
rain, washing, ...) be limited.
Checks
Page 185 of 260

183
C-elysee_en_Chap10_verifications_ed01-2016
Checking levels
Engine oil level
The check of the oil level is carried out with the dipstick, located under
t
he bonnet. For the position of the
d
ipstick, refer to the under-bonnet
v
iew on a previous page.Checking with dipstick
If you find that the oil level is above the A mark or below the B mark, do not star t the engine.
Take
care
when
working
under
the
bonnet,
as
certain
areas
of
the
engine
may
be
extremely
hot
(risk of burns) and the cooling fan could start at
a
ny
time
(even
with
the
ignition
off).
Check
all
of
these
levels
regularly,
in
line
with
the
manufacturer's
service
schedule.
Top
them
up
if
necessary, unless other wise indicated.
If
a
level
drops
significantly,
have
the
corresponding
system
checked
by
a
CITROËN
dealer
or
a
qualified workshop.
It
is
normal
to
top
up
the
oil
level
b
etween
two
services
(or
oil
changes).
C
ITROËN
recommends
that
you
check
t
he
level,
and
top
up
if
necessary,
every
3
000
miles
(5
000
km).
To
ensure
the
accuracy
of
the
reading,
your
v
ehicle
must
be
on
a
level
sur face,
with
the
e
ngine
off
for
at
least
30
minutes. -
I
f the level is above
t
he MAX
mark (risk of
e
ngine damage), contact
a
CITROËN dealer or a
q
ualified
w
orkshop.
-
I
f the level is below the
MIN
mark, you must
top-up
the engine oil.
Refer
to
the
under-bonnet
view
for
the
location
o
f
the
dipstick
on
your
vehicle.
F
T
ake
the
dipstick
by
its
coloured
grip
and
p
ull
it
out
completely.
F
W
ith
the
end
of
the
dipstick
with
a
clean
a
nd
non-fluffy
cloth.
F
R
efit
the
dipstick
and
push
it
fully
down,
t
hen
pull
it
out
again
for
a
visual
check
of
t
he
oil
level:
the
level
must
be
between
the
t
wo
marks
A
and
B .
10
Checks
Page 187 of 260

185
C-elysee_en_Chap10_verifications_ed01-2016
Coolant level
The coolant level should be close to the "MA X" mark but should never
e
xceed it.
In
addition, as the cooling system is pressurised,
w
ait
at
least one hour after switching off the
e
ngine
before carrying out any work.
To
avoid
any risk of scalding, unscrew the cap
b
y
two
turns to allow the pressure to drop.
W
hen
the
pressure has dropped, remove the
c
ap
and
top up the level.
Changing the coolant
The coolant does not have to be replaced at routine ser vices.
Fluid specification
The coolant must conform to the manufacturer's r ecommendations.
When
the engine is warm, the temperature of
t
he coolant is regulated by the fan.
The cooling fan may star t after switching
off the engine: take care with ar ticles and
clothing that might be caught by the fan
blades.
Fluid specification
For optimum cleaning and to avoid freezing, t his fluid must not be topped up or replaced
w
ith plain water.
In
w
intry
c
onditions,
i
t
i
s
r
ecommended
t
hat
y
ou
u
se an ethyl alcohol or methanol based fluid.
Screenwash fluid level
Top up the level when necessary.
To p p i n g u p
This additive must be topped up by a CITROËN dealer or a qualified workshop without delay.
Diesel additive level (Diesel
engine with particle filter)
A low additive level is indicated by illumination of the service warning lamp, accompanied
b
y an audible warning and a message in the
s
creen (if a display screen is fitted).Avoid
prolonged contact of used oil or
f
luids with the skin.
Most of these fluids are harmful to
h
ealth or indeed very corrosive.
Do not discard used oil or fluids into
s
ewers or onto the ground.
Take used oil to a CITROËN dealer or
a
qualified workshop (France) or to an
a
uthorised waste disposal site.
Used products
10
Checks
Page 188 of 260

186
C-elysee_en_Chap10_verifications_ed01-2016
Checks
12 V battery
The battery does not require any maintenance.
However,
check regularly that the
t
erminals are correctly tightened
(
versions without quick release
Particle filter (Diesel)
The start of saturation of the
particle filter is indicated by
t
he
fixed
illumination of this warning lamp
a
ccompanied by a warning message in the
s
creen
(if
a
display screen is fitted).
As
soon
as
the traffic conditions permit,
r
egenerate
the filter by driving at a speed of at
l
east
40
mph
(60 km/h) until the warning lamp
g
oes
off.
If
the
warning lamp stays on, this indicates a
l
ow
additive
level.
On a new vehicle, the first particle
filter
regeneration operations may be
a
ccompanied by a "burnt" smell, which
i
s
per fectly normal.
Following
prolonged operation of the
v
ehicle at very low speed or at idle,
y
ou
may, in exceptional circumstances,
n
otice
the emission of water vapour at
t
he
exhaust on acceleration. This does
n
ot affect the behaviour of the vehicle
or
the
environment.
Unless
other wise
indicated,
check
these
components
in
accordance
with
the
manufacturer's
service
schedule
and
according to your engine.
Other wise,
have
them
checked
by
a
CITROËN
dealer
or
a
qualified
workshop.
Air filter and passenger compartment filter
Refer to the manufacturer's s
ervice schedule for details of the
r
eplacement intervals for these
c
omponents.
Oil filter
Replace the oil filter each time the e ngine oil is changed.
Refer
to the manufacturer's
s
ervice schedule for details of
t
he replacement interval for this
c
omponent.
terminals)
and
that
the
connections
are
clean.
When
carrying
out
any
operation
on
the
12
V
b
attery,
refer
to
the
corresponding
section
for
d
etails
of
the
precautions
to
be
taken
before
s
tarting
work.
Depending on the environment (e.g. dusty
a
tmosphere) and the use of the vehicle
(
e.g. city
driving), replace them twice as often
if necessar y .
A
clogged passenger compartment filter may
h
ave
an
adverse effect on the per formance
o
f
the
air
conditioning system and generate
u
ndesirable
o
dours.
Checks
Page 189 of 260

187
C-elysee_en_Chap10_verifications_ed01-2016
Manual gearbox
The gearbox does not require any maintenance (no oil change).
Refer
to the manufacturer's service
s
chedule for the checking interval for
t
his
c
omponent.
Electronic gearbox
The gearbox does not require any maintenance (no oil change).
Refer
to the manufacturer's service
s
chedule for details of the checking
i
nterval for this component.
Automatic gearbox
The gearbox does not require any maintenance (no oil change).
Refer
to the manufacturer's service
s
chedule for details of the level
c
hecking interval for this component. Brake
wear depends on the style
o
f driving, particularly in the case
o
f vehicles used in town, over short
d
istances. It may be necessary to have
t
he condition of the brakes checked,
e
ven between vehicle services.
Brake pads
For information on checking brake d
isc wear, contact a CITROËN dealer
o
r a qualified workshop.
Brake disc wear Parking brake
If excessive travel or a loss of e
ffectiveness of this system is
n
oticed, the parking brake must be
c
hecked, even between two services.
Only
use products recommended by
C
ITROËN or products of equivalent
q
uality
an
d
sp
ecification.
In
order to optimise the operation of
u
nits as important as those in the
b
raking system, CITROËN selects and
o
ffers very specific products.
After
washing the vehicle, dampness,
o
r
in wintry conditions, ice can form
o
n
the brake discs and pads: braking
e
fficiency may be reduced. Make light
b
rake applications to dry and defrost
t
he
brakes.
Checking
this system must be done by a
C
ITROËN dealer or a qualified workshop.
Unless
there
is
a
leak
in
the
circuit,
a
drop
in
t
he
brake
fluid
level
indicates
that
the
brake
p
ads
are
worn.
10
Checks