reset CITROEN C-ELYSÉE 2017 Owners Manual
[x] Cancel search | Manufacturer: CITROEN, Model Year: 2017, Model line: C-ELYSÉE, Model: CITROEN C-ELYSÉE 2017Pages: 260, PDF Size: 7.11 MB
Page 25 of 260
23
C-elysee_en_Chap01_controle-de-marche_ed01-2016
C-elysee_en_Chap01_controle-de-marche_ed01-2016
Service indicator
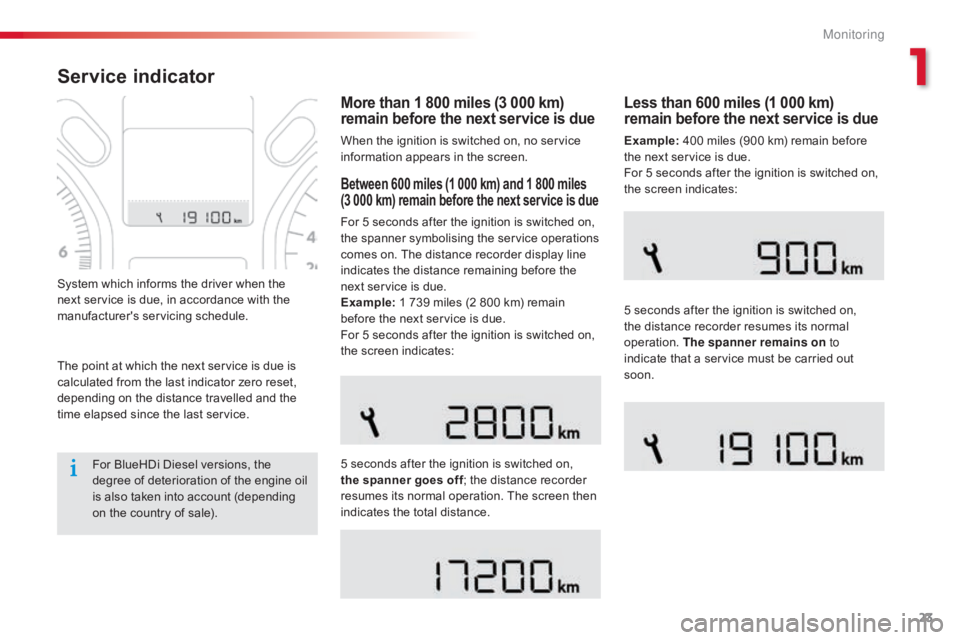
More than 1 800 miles (3 000 km)
remain before the next service is due
When the ignition is switched on, no service information appears in the screen.
System
which
informs
the
driver
when
the
n
ext
service
is
due,
in
accordance
with
the
ma
nufacturer's
ser
vicing
s
chedule.
Between 600 miles (1 000 km) and 1 800 miles
(3 000 km) remain before the next service is due
For 5 seconds after the ignition is switched on, t
he spanner symbolising the service operations
c
omes on. The distance recorder display line
i
ndicates the distance remaining before the
n
ext service is due.
Example:
1 739 miles (2 800 km) remain
b
efore the next service is due.
For
5 seconds after the ignition is switched on,
t
he screen indicates:
5
seconds after the ignition is switched on,
t
he spanner goes off ;
the distance recorder
r
esumes its normal operation. The screen then
i
ndicates the total distance.
Less than 600 miles (1 000 km)
remain before the next service is due
Example: 400 miles (900 km) remain before t
he next service is due.
For
5 seconds after the ignition is switched on,
t
he screen indicates:
5
seconds after the ignition is switched on,
t
he distance recorder resumes its normal
ope
ration.
T
he spanner remains on to
indicate
that a service must be carried out
s
oon.
For
BlueHDi
Diesel
versions,
the
d
egree
of
deterioration
of
the
engine
oil
i
s
also
taken
into
account
(depending
o
n
the
country
of
sale).
The
point
at
which
the
next
service
is
due
is
c
alculated
from
the
last
indicator
zero
reset,
d
epending
on
the
distance
travelled
and
the
t
ime
elapsed
since
the
last
service.
1
Monitoring
Page 26 of 260
24
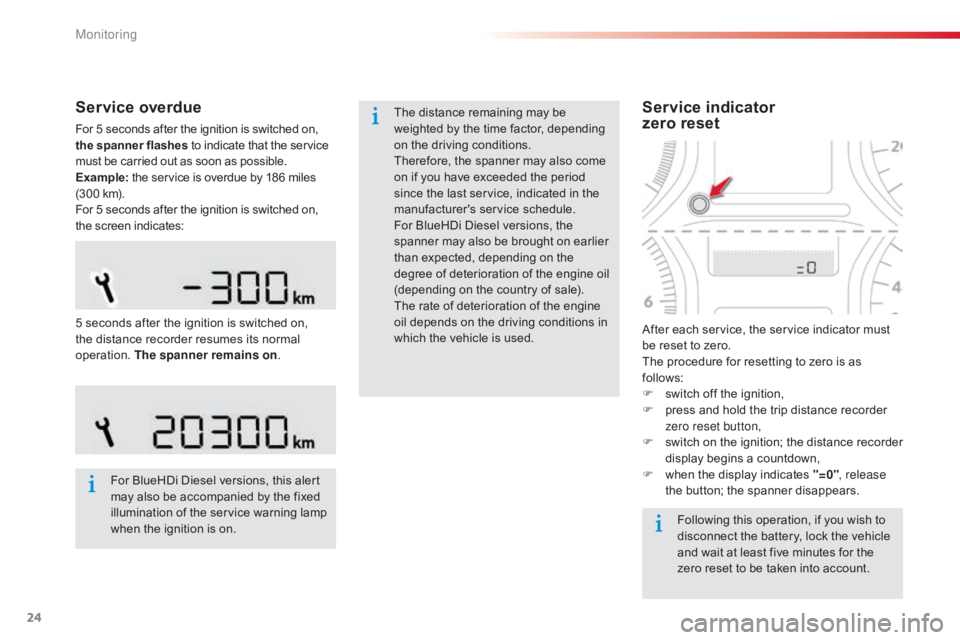
Service overdue
For 5 seconds after the ignition is switched on, the spanner flashes to indicate that the service m
ust be carried out as soon as possible.
Example:
the service is overdue by 186 miles
(
300 km).
For
5 seconds after the ignition is switched on,
t
he screen indicates:
For
BlueHDi Diesel versions, this alert
m
ay also be accompanied by the fixed
i
llumination of the service warning lamp
w
hen the ignition is on. Following
this operation, if you wish to
d
isconnect the battery, lock the vehicle
a
nd wait at least five minutes for the
z
ero reset to be taken into account.
Service indicator
zero reset
After each service, the service indicator must b
e reset to zero.
The
procedure for resetting to zero is as
f
ollows:
F
s
witch off the ignition,
F
p
ress and hold the trip distance recorder
z
ero reset button,
F
s
witch
o
n
t
he
i
gnition;
t
he
d
istance
r
ecorder
d
isplay begins a countdown,
F
w
hen the display indicates "=0", release
the
button; the spanner disappears.
5
seconds
after
the
ignition
is
switched
on,
t
he
distance
recorder
resumes
its
normal
ope
ration.
T
he spanner remains on .The
distance
remaining
may
be
w
eighted
by
the
time
factor,
depending
o
n
the
driving
conditions.
Therefore,
the
spanner
may
also
come
o
n
if
you
have
exceeded
the
period
s
ince
the
last
service,
indicated
in
the
ma
nufacturer's
ser
vice
s
chedule.
For
BlueHDi
Diesel
versions,
the
s
panner
may
also
be
brought
on
earlier
t
han
expected,
depending
on
the
d
egree
of
deterioration
of
the
engine
oil
(
depending
on
the
country
of
sale).
The
rate
of
deterioration
of
the
engine
o
il
depends
on
the
driving
conditions
in
w
hich
the
vehicle
is
used.
Monitoring
Page 27 of 260
25
C-elysee_en_Chap01_controle-de-marche_ed01-2016
C-elysee_en_Chap01_controle-de-marche_ed01-2016
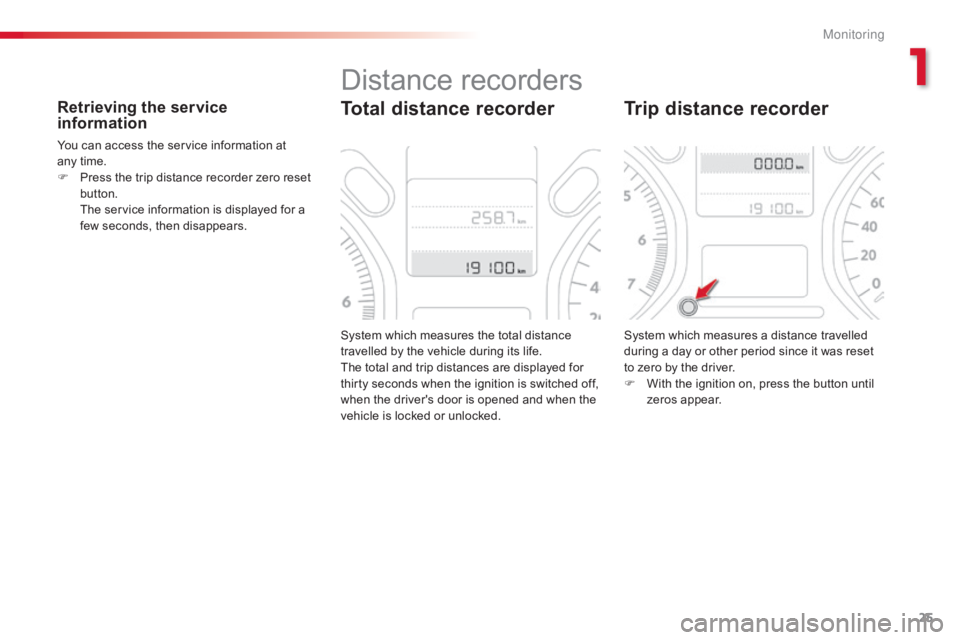
Retrieving the service
information
You can access the service information at any time.
F
P
ress the trip distance recorder zero reset
b
utton.
T
he service information is displayed for a
f
ew seconds, then disappears.
System
which measures the total distance
t
ravelled by the vehicle during its life.
The
total and trip distances are displayed for
t
hirty seconds when the ignition is switched off,
w
hen the driver's door is opened and when the
v
ehicle is locked or unlocked.
Total distance recorder
System which measures a distance travelled during a day or other period since it was reset
t
o zero by the driver.
F
W
ith the ignition on, press the button until
z
eros appear.
Trip distance recorder
Distance recorders
1
M
Page 29 of 260
27
C-elysee_en_Chap01_controle-de-marche_ed01-2016
C-elysee_en_Chap01_controle-de-marche_ed01-2016
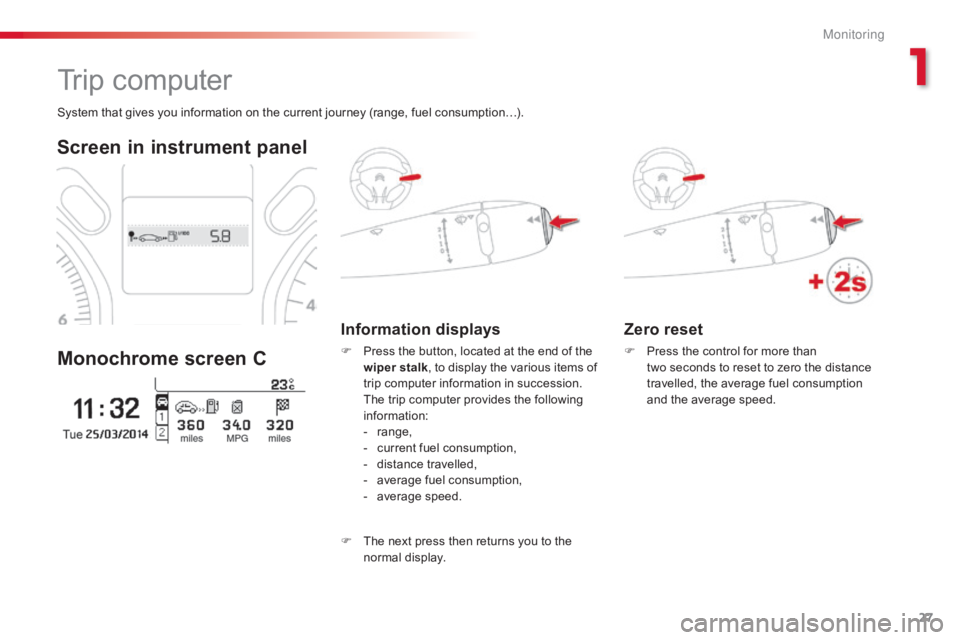
Zero reset
F Press the control for more than t
wo seconds to reset to zero the distance
t
ravelled, the average fuel consumption
a
nd the average speed.
System
that
gives
you
information
on
the
current
journey
(range,
fuel
consumption…).
Trip computer
Screen in instrument panel
Monochrome screen C
Information displays
F Press the button, located at the end of the w
iper stalk ,
to display the various items of
t
rip computer information in succession.
T
he trip computer provides the following
i
nformation:
-
ra
nge,
-
c
urrent fuel consumption,
-
d
istance travelled,
-
a
verage fuel consumption,
-
a
verage
s
peed.
F
T
he next press then returns you to the
n
ormal
d
isplay.
1
M
Page 30 of 260
28
If dashes are displayed continuously while driving in place of the digits,
c
ontact a CITROËN dealer or a
q
ualified
w
orkshop. This
function is only displayed from
3
0 km/h.
This value may vary following a change
i
n the style of driving or the relief,
r
esulting in a significant change in the
c
urrent fuel consumption.
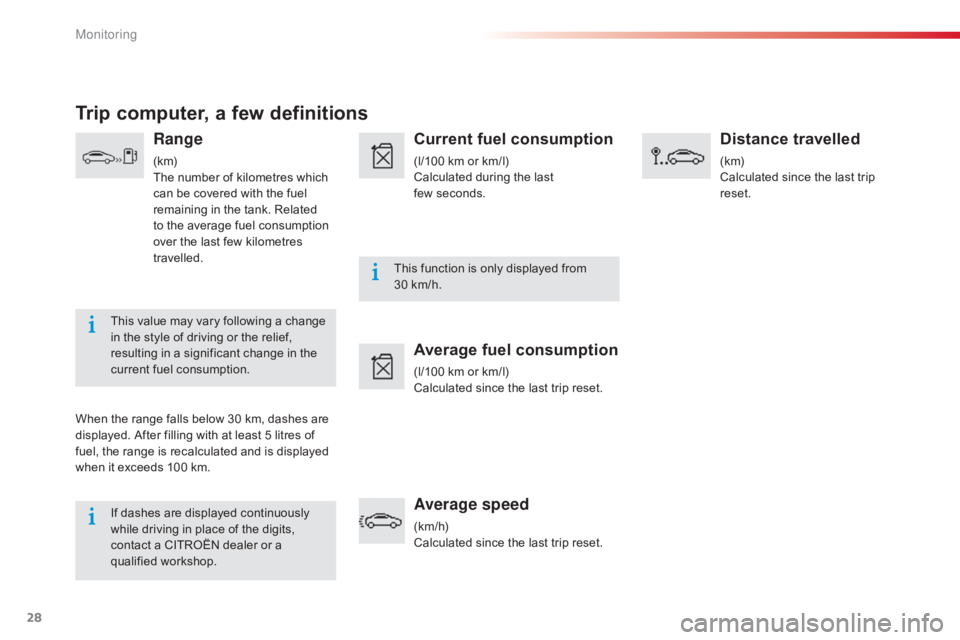
Trip computer, a few definitions
Range
(k m)
The
number of kilometres which
c
an be covered with the fuel
r
emaining in the tank. Related
t
o the average fuel consumption
ov
er the last few kilometres
t
ravelled.
When
the
range falls below 30 km, dashes are
d
isplayed.
After filling with at least 5 litres of
f
uel,
the
range is recalculated and is displayed
w
hen
it
exceeds 100 km.
Current fuel consumption
(l/100 km or km/l)
C alculated during the last
f
ew seconds.
Average fuel consumption
(l/100 km or km/l)
C alculated since the last trip reset.
Average speed
(km/h)
Calculated since the last trip reset.
Distance travelled
(k m)
Calculated since the last trip
r
eset.
Monitoring
Page 169 of 260
167
C-elysee_en_Chap09_info-pratiques_ed01-2016
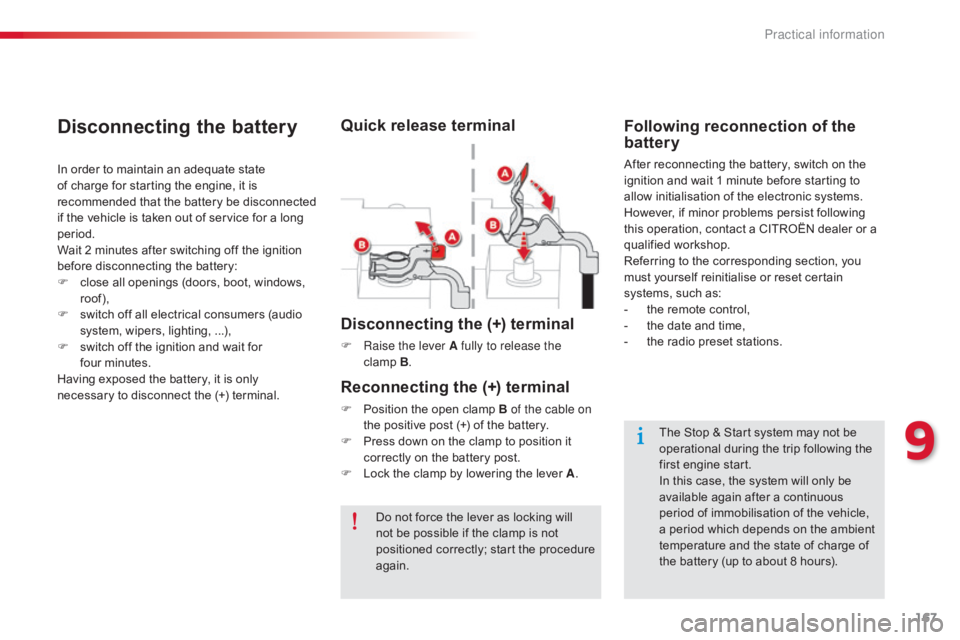
Disconnecting the (+) terminal
F Raise the lever A fully to release the clamp B.
Reconnecting the (+) terminal
F Position the open clamp B of the cable on
the positive post (+) of the battery.
F
P
ress down on the clamp to position it
c
orrectly on the battery post.
F
L
ock the clamp by lowering the lever A.
Do
not force the lever as locking will
n
ot be possible if the clamp is not
p
ositioned correctly; start the procedure
ag
ain.
Disconnecting the battery
In order to maintain an adequate state of charge for starting the engine, it is
r
ecommended that the battery be disconnected
i
f the vehicle is taken out of service for a long
p
eriod.
Wait
2 minutes after switching off the ignition
b
efore disconnecting the battery:
F
c
lose all openings (doors, boot, windows,
r
oof),
F
s
witch off all electrical consumers (audio
s
ystem, wipers, lighting, ...),
F
s
witch off the ignition and wait for
f
our minutes.
Having
exposed the battery, it is only
n
ecessary to disconnect the (+) terminal.
Following reconnection of the
battery
After reconnecting the battery, switch on the ignition and wait 1 minute before starting to
a
llow initialisation of the electronic systems.
However,
if minor problems persist following
t
his operation, contact a CITROËN dealer or a
q
ualified
w
orkshop.
Referring
to the corresponding section, you
m
ust yourself reinitialise or reset certain
s
ystems, such as:
-
t
he remote control,
-
t
he date and time,
-
t
he radio preset stations.
Quick release terminal
The Stop & Start system may not be operational during the trip following the
f
irst engine start.
In
this case, the system will only be
a
vailable again after a continuous
p
eriod of immobilisation of the vehicle,
a
period which depends on the ambient
t
emperature and the state of charge of
t
he battery (up to about 8 hours).
9
Practical information
Page 198 of 260
01
196
C-elysee_en_Chap12a_RD5(RD45)_ed01-2016
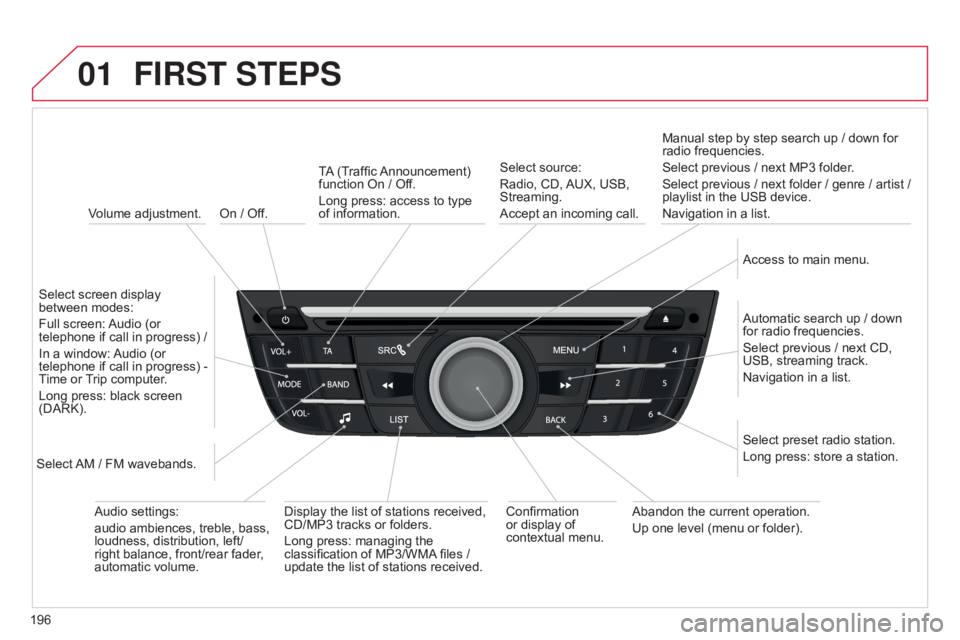
On / Off.
FIRST STEPS
Volume adjustment.
Select
screen display
between
modes:
Full
screen:
Audio
(or
telephone
if call in progress) /
In
a
window:
Audio
(or
telephone
if call in progress) -
Time
or
T
rip computer.
Long
press: black screen
(DARK).
Select
AM
/ FM wavebands. Select
preset radio station.
Long
press: store a station.
Display
the list of stations received,
CD/MP3
tracks or folders.
Long
press: managing the
classification
of MP3/WMA
files /
update
the list of stations received.
TA
(Traffic
Announcement)
function
On / Off.
Long press: access to type of
information.
Confirmation
or
display of
contextual
menu.Automatic
search up / down
for
radio frequencies.
Select
previous / next CD,
USB,
streaming track.
Navigation
in a list.
Abandon
the current operation.
Up
one level (menu or folder).
Manual
step by step search up / down for
radio
frequencies.
Select previous / next MP3 folder.
Select previous / next folder / genre / artist /
playlist
in the USB device.
Navigation in a list.
Select source:
Radio, CD,
AUX,
USB,
Streaming.
Accept
an incoming call.
Access to main menu.
Audio
settings:
audio
ambiences, treble, bass,
loudness,
distribution, left/
right
balance, front/rear fader,
automatic
volume.
Page 223 of 260
221
C-elysee_en_Chap12a_RD5(RD45)_ed01-2016
FREqUENTLY ASKED q UESTIONS
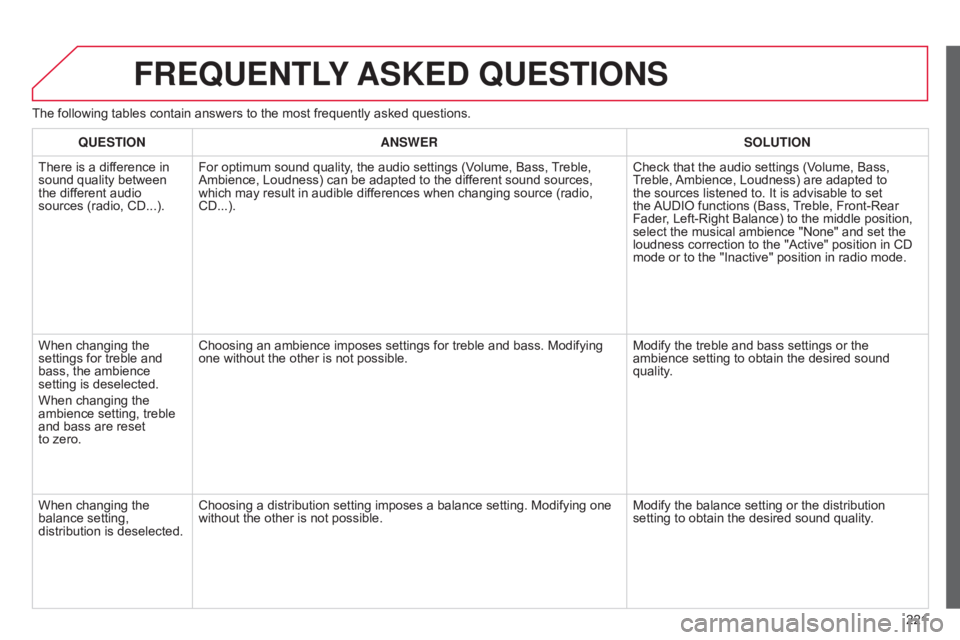
The following tables contain answers to the most frequently asked questions.
q
UESTION ANSWER SOLUTION
There
is a difference in
sound
quality between
the
different audio
sources
(radio, CD...).For
optimum sound quality, the audio settings (Volume, Bass,
T
reble,
Ambience,
Loudness) can be adapted to the different sound sources,
which
may result in audible differences when changing source (radio,
CD...).Check
that the audio settings (Volume, Bass,
T
reble,
Ambience,
Loudness) are adapted to
the
sources listened to. It is advisable to set
the
AUDIO
functions (Bass,
T
reble, Front-Rear
Fader
, Left-Right Balance) to the middle position,
select
the musical ambience "None" and set the
loudness
correction to the "Active" position in CD
mode
or to the "Inactive" position in radio mode.
When
changing the
settings
for treble and
bass,
the ambience
setting
is deselected.
When
changing the
ambience
setting, treble
and
bass are reset
to zero. Choosing
an ambience imposes settings for treble and bass. Modifying
one
without the other is not possible.Modify
the treble and bass settings or the
ambience
setting to obtain the desired sound
quality
.
When
changing the
balance
setting,
distribution
is deselected.Choosing
a distribution setting imposes a balance setting. Modifying one
without
the other is not possible. Modify
the balance setting or the distribution
setting
to obtain the desired sound quality.
Page 230 of 260
01
C-elysee_en_Chap12b_RDE1_ed01-2016
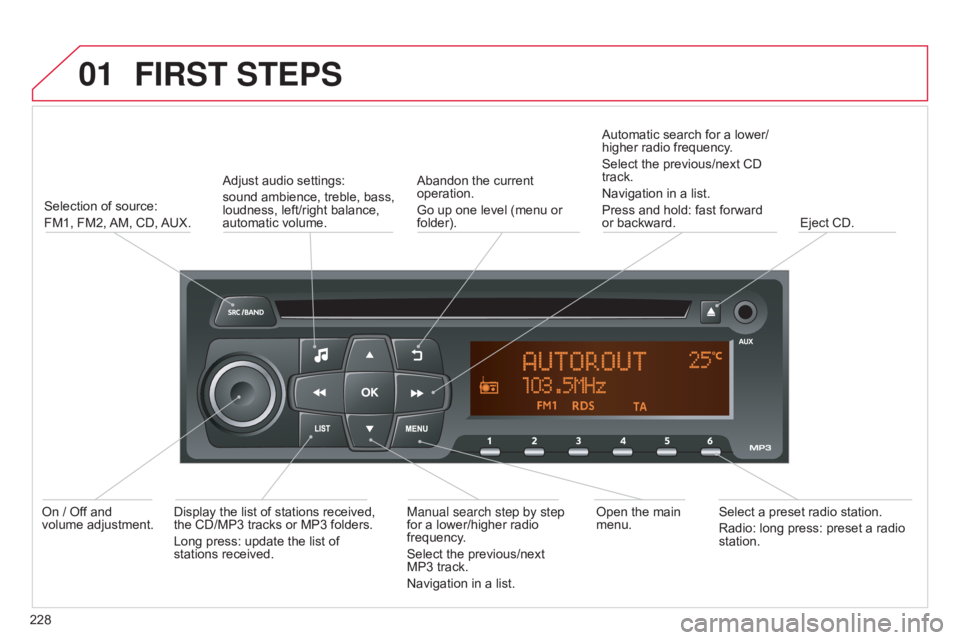
FIRST STEPS
228Selection of source:
FM1, FM2,
AM,
CD,
AUX.
Adjust
audio settings:
sound ambience, treble, bass,
loudness,
left/right balance,
automatic
volume.
Abandon the current
operation.
Go
up one level (menu or
folder).
Automatic
search for a lower/
higher radio frequency.
Select the previous/next CD
track.
Navigation
in a list.
Press and hold: fast forward
or
backward.
Eject CD.
Manual search step by step
for a lower/higher radio
frequency
.
Select the previous/next
MP3
track.
Navigation in a list.Open the main
menu.
Select
a preset radio station.
Radio: long press: preset a radio
station.
Display
the list of stations received,
the
CD/MP3 tracks or MP3 folders.
Long press: update the list of
stations
received.
On / Off and
volume
adjustment.
Page 231 of 260
02
229
C-elysee_en_Chap12b_RDE1_ed01-2016
AUDIO
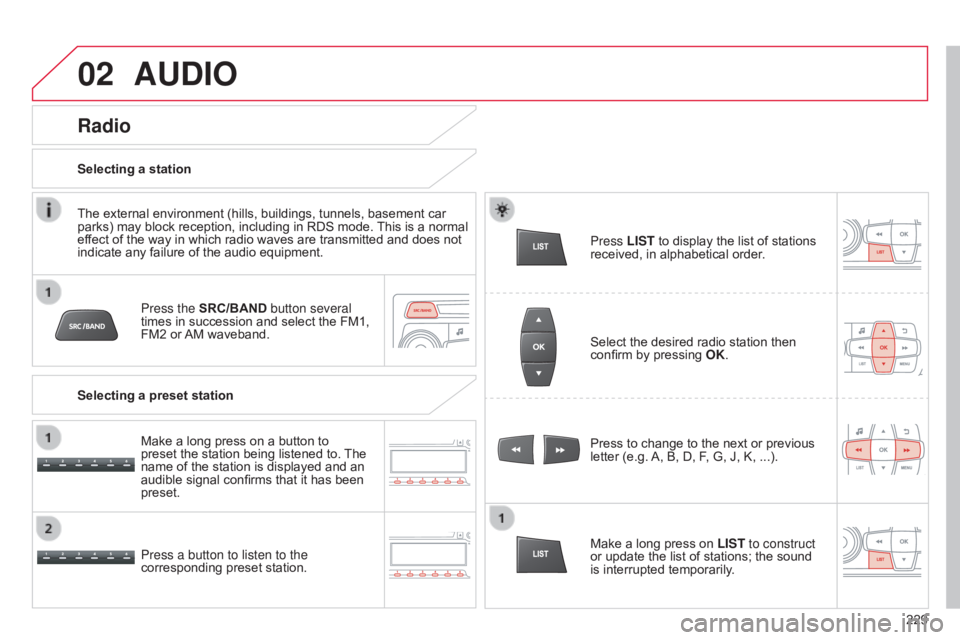
Press the SRC/BAND button several
times in succession and select the FM1,
FM2
or
AM
waveband.
Press a button to listen to the
corresponding
preset station. Press
to change to the next or previous
letter
(e.g.
A,
B, D, F, G, J, K, ...).
Radio
Select the desired radio station then confirm by pressing OK .
Selecting a station
Make a long press on
LIST to construct
or
update the list of stations; the sound
is
interrupted temporarily.
The
external
environment
(hills,
buildings,
tunnels,
basement
car
parks)
may
block
reception,
including
in
RDS
mode.
This
is
a
normal
ef
fect
of
the
way
in
which
radio
waves
are
transmitted
and
does
not
indicate
any
failure
of
the
audio
equipment.
Selecting a preset station Make
a
long
press
on
a
button
to
preset
the
station
being
listened
to.
The
name
of
the
station
is
displayed
and
an
audible
signal
confirms
that
it
has
been
preset. Press
LIST
to display the list of stations
received,
in alphabetical order.