window CITROEN C-ELYSÉE 2017 Owners Manual
[x] Cancel search | Manufacturer: CITROEN, Model Year: 2017, Model line: C-ELYSÉE, Model: CITROEN C-ELYSÉE 2017Pages: 260, PDF Size: 7.11 MB
Page 4 of 260

.
.
C-elysee_en_Chap00a_sommaire_ed01-2016
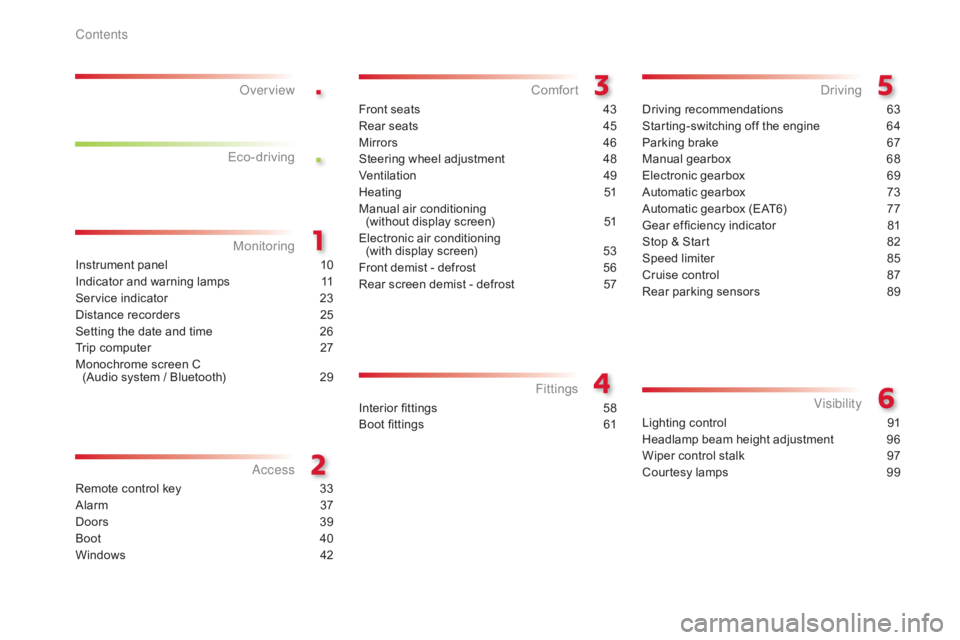
Instrument panel 10
Indicator and warning lamps
1
1
Service
indicator
2
3
Distance
recorders
2
5
Setting
the date and time
2
6
Trip
computer
2
7
Monochrome
screen C
(Audio
system / Bluetooth)
2
9
MonitoringOver view
Remote control key 3
3
Alarm
3
7
Doors
39
Boo
t
4
0
Windows
4
2
Access
Front seats 43
Rear seats
4
5
Mirrors
4
6
Steering
wheel adjustment
4
8
Ventilation
4
9
Heating
5
1
Manual
a
ir
c
onditioning
(
without display screen)
5
1
Electronic
air conditioning
(with
display screen)
5
3
Front
demist - defrost
5
6
Rear
screen demist - defrost
5
7
Comfort
Driving recommendations 63
Starting-switching off the engine
6
4
Parking
brake
6
7
Manual
g
earbox
6
8
Electronic
gearbox
6
9
Automatic
gearbox
7
3
Automatic
gearbox (EAT6)
7
7
Gear
ef ficiency indicator
8
1
Stop
& Start
8
2
Speed
limiter
8
5
Cruise
control
87
R
ear parking sensors
8
9
Driving
Lighting control 91
Headlamp beam height adjustment
9
6
Wiper
control stalk
9
7
Courtesy
lamps
9
9
Visibility
Eco-drivingInterior fittings 5
8
Boot fittings
6
1
Fittings
Contents
Page 9 of 260

7
C-elysee_en_Chap00b_vue-ensemble_ed01-2016
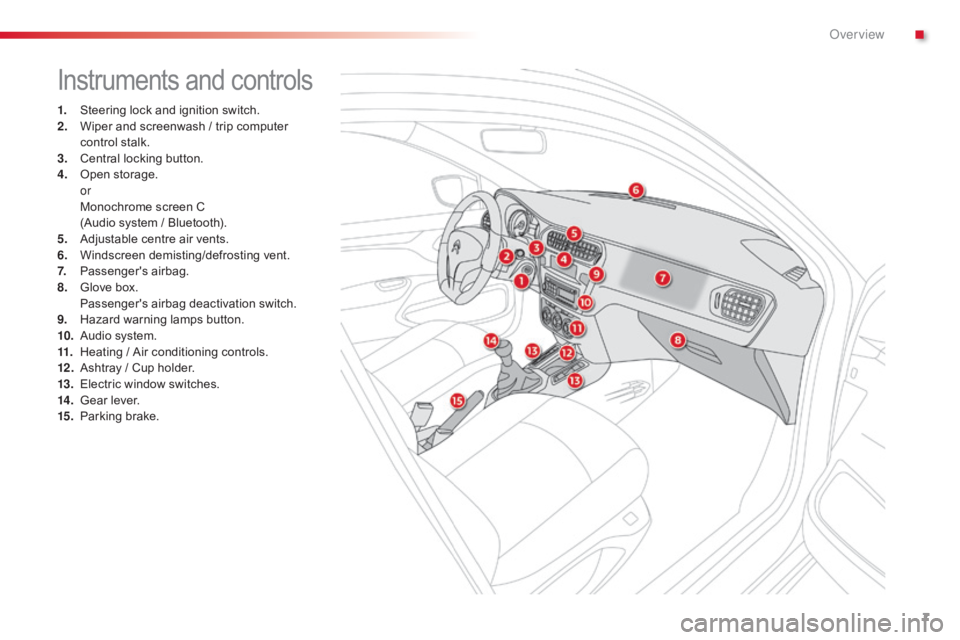
Instruments and controls
1. Steering lock and ignition switch.
2. W iper and screenwash / trip computer
c
ontrol stalk.
3.
C
entral locking button.
4.
O
pen
s
torage.
or
M
onochrome screen C
(Audio
system / Bluetooth).
5.
A
djustable centre air vents.
6.
W
indscreen
d
emisting/defrosting
v
ent.
7.
P
assenger's
ai
rbag.
8.
G
love box.
P
assenger's airbag deactivation switch.
9.
H
azard warning lamps button.
10.
A
udio system.
11.
H
eating / Air conditioning controls.
12 .
A
shtray / Cup holder.
13.
E
lectric window switches.
14 .
G
ear lever.
15.
P
arking brake.
.
Over view
Page 10 of 260

8
As a passenger, if you avoid connecting your multimedia devices (film, music, video game...), you will contribute towards limiting the
c
onsumption of electrical energy, and so of fuel.
Disconnect
your portable devices before leaving the vehicle.
Eco-driving
Eco-driving is a range of everyday practices that allow the motorist to optimise their fuel consumption and CO2 emissions.
Optimise the use of your gearbox
With a manual gearbox, move off gently, change up without waiting and drive by changing up quite soon.
With
an automatic or electronic gearbox, stay in Drive "D" or Auto "A" ,
according
to the type of gearbox, without pressing the accelerator pedal
hea
vily
o
r
s
uddenly.
The
gear shift indicator invites you to select the most suitable gear:
o
nce the indication is displayed in the instrument panel, follow the
a
dvice straight away.
For
vehicles fitted with an electronic or automatic gearbox, this indicator
o
nly appears in manual mode.
Drive smoothly
Maintain a safe distance between vehicles, use engine braking rather than the brake pedal, and press the accelerator progressively. These
p
ractices contribute towards a reduction in fuel consumption and CO
2
emissions
and
also
helps
reduce
the
background
traffic
noise.
If
your
vehicle
has
cruise
control,
make
use
of
the
system
at
speeds
a
bove
25
mph
(40
km/h)
when
the
traffic
is
flowing
well.
Control the use of your electrical
equipment
Before moving off, if the passenger compartment is too warm, v entilate it by opening the windows and air vents before using the air
c
onditioning.
Above
30 mph (50 km/h), close the windows and leave the air vents
ope
n.
Remember
to make use of equipment that can help keep the
t
emperature in the passenger compartment down (window blinds...).
Switch
off the air conditioning as soon as the desired temperature is
a
ttained.
Switch
off the demisting and defrosting controls, if not automatic.
Switch
off the heated seat as soon as possible.
Switch
off the headlamps and foglamp when the level of light does not
r
equire their use.
Avoid
running the engine before moving off, particularly in winter; your
v
ehicle will warm up much faster while driving.
Eco-driving
Page 44 of 260

42
C-elysee_en_Chap02_ouvertures_ed01-2016
Windows
Electric controls Manual controls
The electric window switches remain operational for about 45 seconds after
s
witching off the ignition or until a front
d
oor is opened. During this period of
4
5 seconds, if you open a door while
o
perating a window, the window stops.
O
perating the switch again has no
e
ffect until the ignition is switched on
ag
ain. Always
remove the key from the ignition
w
hen leaving the vehicle, even for a
s
hort time.
In the event of contact during operation
o
f the windows, you must reverse the
m
ovement of the window. To do this,
p
ress the switch concerned.
When operating the passenger electric w
indow switches, the driver must e
nsure that no one is preventing correct
c
losing of the windows.
The
driver must ensure that the
p
assengers use the electric windows
c
o r r e c t l y.
Be
particularly aware of children when
o
perating
t
he
w
indows.
1.
L
eft hand front electric window.
2.
R
ight hand front electric window.
3.
R
ight hand rear electric window.
4.
L
eft hand rear electric window.
5.
D
eactivating the rear electric window
switches .
To
open or close the window, press or pull the
s
witch.
T
he
w
indow
s
tops
a
s
s
oon
a
s
t
he
s
witch
i
s
r
eleased.
Turn
the
window
winder
located
on
the
door
t
rim
pan
el.
Deactivating the rear window
controls
For the safety of your children, press switch 5
t o prevent operation of all of the windows,
i
rrespective of their position.
With
the warning lamp on, the switches are
d
eactivated. With the warning lamp off, the
s
witches are active.
Model with front electric windows
Model with front and rear electric windows
Access
Page 51 of 260

49
C-elysee_en_Chap03_confort_ed01-2016
Ventilation
Air intake flow
The incoming air follows various paths depending on the controls selected by
t
he driver:
-
d
irect arrival in the passenger
c
ompartment (air intake),
-
p
assage through a heating circuit (heating),
-
p
assage through a cooling circuit (air
c
onditioning).
Control panel
The controls of this system are grouped together on control panel A on the centre
console. 1.
W
indscreen
d
emisting-defrosting
v
ents.
2.
F
ront side window demisting-defrosting
ve
nts.
3.
S
ide adjustable air vents.4.
C
entral adjustable air vents.
5.
A
ir outlets to the front footwells.
6.
A
ir outlets to the rear footwells.
Air distribution
Air intake
The air circulating in the passenger compartment i
s filtered and originates either from the outside via t
he grille located at the base of the windscreen or
f
rom the inside in air recirculation mode.
3
Comfort
Page 54 of 260

52
C-elysee_en_Chap03_confort_ed01-2016
3. Air distribution adjustment
Windscreen and side windows.
W indscreen, side windows and
f
ootwells.
Footwells.
Centre
and side air vents, footwells.
The
air distribution can be adapted
b
y placing the control knob in an
i
ntermediate position or by closing
t
he vents. F
M
ove the manual control to the
r
ight to return to the "Exterior air
i
ntake" position.
F
M
ove the manual control to the
l
eft for the "Recirculation of
interior
air" position.
5. Air conditioning On / Off
It enables you to:
- l ower the temperature, in summer,
-
i
ncrease the effectiveness of the demisting
i
n winter, above 3 °C.
Switching on
F Press the button 5 , the associated indicator l
amp comes on.
Switching off
F Press the button 5 again, the associated i
ndicator lamp goes off.
Switching
off may affect comfort levels
(
humidity,
c
ondensation).
The
air conditioning is designed to
ope
rate effectively in all seasons,
with the windows closed.
The air conditioning does not operate
w
hen the air flow adjustment control 2
is in position " 0".
To obtain cooled air more quickly, you can use
r
ecirculation of interior air for a few moments.
T
hen return to fresh air intake.
Centre
and
side
vents.
4. Air intake / Air recirculation
The recirculation of interior air insulates the
passenger
compartment from exterior odours
a
nd smoke.
Return
to exterior air intake as soon as possible
t
o prevent deterioration of the air quality and
t
he formation of mist.
Comfort
Page 56 of 260

54
C-elysee_en_Chap03_confort_ed01-2016
4. Air conditioning On/Off
F Press the "A /C " button, the
symbol in the air conditioning
s
creen comes on.
Switching off
This button allows the rapid cooling of the air in the passenger
c
ompartment.
5. Air conditioning: A/C MAX button
Switching on
F Press the "A /C MA X" button, the symbol in t
he air conditioning screen comes on.
F
P
ress the "A /C "
button
again,
the
symbol
i
n
the
air
conditioning
screen
goes
off.
Switching
o
ff
m
ay
l
ead
t
o
u
npleasant
c
onditions
(h
umidity,
m
isting).
Switching on
Switching off
F Press the "A /C MA X" button again, the s
ymbol in the air conditioning screen
g
oes off.
6. Air distribution adjustment
F Press this button successively to direct the air flow towards:
-
w
indscreen and side windows
(
demisting or defrosting),
-
w
indscreen, side windows and
a
ir vents,
-
w
indscreen, side windows, air
v
ents and footwells,
-
w
indscreen, side windows and
f
ootwells,
-
f
ootwells,
-
a
ir vents and footwells,
-
a
ir vents.
Comfort
Page 58 of 260

56
C-elysee_en_Chap03_confort_ed01-2016
Front demist - defrost
These markings on the control panel indicate the control positions for rapid demisting or defrosting of the windscreen and side windows.
With the heating /
ventilation systemWith the manual air
conditioning system
(without screen)With electronic air
conditioning
(with screen)
F Put the temperature and air flow controls to t
he dedicated marked position.
F
P
ut the air intake control to the "Exterior air
i
ntake" position
(
manual control moved to the right).
F
P
ut the air distribution control to the
"
Windscreen"
p
osition. F
P ress this button. T
he l amp i n t he b utton c omes o n.
F
P
ress this button again to switch
i
t off.
T
he lamp in the button goes off.
F
P ut the temperature and air flow controls to t
he dedicated marked position.
F
P
ut the air intake control to the "Exterior air
i
ntake" position
(
manual control to the right).
F
P
ut the air distribution control to the
"
Windscreen"
p
osition.
F
S
witch on the air conditioning by pressing
t
he appropriate button; the lighting of the
a
ssociated control comes on.
Comfort
Page 59 of 260

57
C-elysee_en_Chap03_confort_ed01-2016
Rear screen demist - defrost
The control button is located on the heating / ventilation or air conditioning system control panel.
Switching on
The rear screen demisting/defrosting can only operate when the engine is running.
F
P
ress this button to demist /defrost the
r
ear screen and (depending on version)
t
he door mirrors. The indicator lamp
a
ssociated with the button comes on.
Switching off
The demisting/defrosting switches off automatically to prevent an excessive
c
onsumption of current.
F
I
t is possible to stop the demisting/
defrosting
operation before it is switched
o
ff automatically by pressing the button
a
gain. The indicator lamp associated with
t
he button goes off.
F
S
witch off the demisting/defrosting of the
r
ear screen and door mirrors, if fitted,
a
s soon as appropriate, as lower current
consumption
results in reduced fuel
c
onsumption.
Heated lower
windscreen*
In cold conditions, the heated rear window s
witch also allows the lower windscreen to be
h
eated, so as to free the wiper blades when
f
rozen to the glass by frost or snow.
The
function is active when the ambient
t
emperature is below 0°C.
*
Depending on the country of sale.
3
Comfort
Page 124 of 260

122
C-elysee_en_Chap08_securite-enfants_ed01-2016
The incorrect installation of a child seat in a vehicle compromises the child's protection in
t
he event of an accident.
Ensure
that there is no seat belt or seat belt
b
uckle under the child seat, as this could
de
stabilise
i
t.
Remember
to fasten the seat belts or the
c
hild seat harnesses keeping the slack
r
elative to the child's body to a minimum,
e
ven for short journeys.
When
installing a child seat using the seat
b
elt, ensure that the seat belt is tightened
c
orrectly on the child seat and that it secures
t
he child seat firmly on the seat of your
v
ehicle. If your passenger seat is adjustable,
m
ove it for wards if necessary.
At
rear seating positions, always leave
s
ufficient space between the front seat and:
-
a
rear ward facing child seat,
-
t
he child's feet for a child seat fitted
fo
rward
f
acing.
To
do this, move the front seat for wards
a
nd, if necessary, move its backrest into the
u
pright
p
osition.
Advice
As a safety precaution, do not leave:
- a child or children alone and
u
nsupervised in a vehicle,
-
a
child or an animal in a vehicle which
i
s exposed to the sun, with the windows
c
losed,
-
t
he keys within reach of children inside
t
he vehicle.
To
prevent accidental opening of the doors
a
nd rear windows, use the child lock.
Take
care not to open the rear windows by
m
ore than one third.
To
protect young children from the rays of
t
he sun, fit side blinds on the rear windows.
For
o
ptimum
in
stallation
o
f
t
he
fo
rward
f
acing
c
hild
seat,
ensure
that
the
back
of
the
child
s
eat
is
as
close
as
possible
to
the
backrest
o
f
the
vehicle's
seat
,
in
contact
if
possible.
You
must
remove
the
head
restraint
before
i
nstalling
a
child
seat
with
backrest
to
a
p
assenger
sea
t.
Ensure
that
the
head
restraint
is
stored
or
a
ttached
securely
to
prevent
it
from
being
t
hrown
around
the
vehicle
in
the
event
of
s
harp
braking.
Refit
the
head
restraint
when
t
he
child
seat
is
removed.
Children at the front
The legislation on carrying children on the f
ront passenger seat is specific to each
c
ountry. Refer to the legislation in force in
y
our country.
Deactivate
the passenger's front airbag
w
hen a rear ward facing child seat is installed
o
n the front passenger seat.
Otherwise,
t
he
c
hild
r
isks
b
eing
ser
iously
i
njured or killed if the airbag is deployed.
Installing a booster seat
The chest part of the seat belt must be positioned on the child's shoulder without
t
ouching the neck.
Ensure
that the lap part of the seat belt
p
asses correctly over the child's thighs.
CITROËN
recommends the use of a booster
s
eat which has a back, fitted with a seat belt
g
uide at shoulder level.
C