height adjustment CITROEN C3 AIRCROSS 2021 Handbook (in English)
[x] Cancel search | Manufacturer: CITROEN, Model Year: 2021, Model line: C3 AIRCROSS, Model: CITROEN C3 AIRCROSS 2021Pages: 244, PDF Size: 6.29 MB
Page 102 of 244

100
Driving
Information displayed
during operation
Once the system has been activated, the
following information is grouped together in the
head-up display:
A.The speed of your vehicle.
B. Cruise control/speed limiter information.
C. If your vehicle is suitably equipped, automatic
emergency braking alerts and navigation
instructions.
D. If your vehicle is suitably equipped, speed
limit information.
For more information on Navigation,
refer to the section Audio equipment
and telematics.
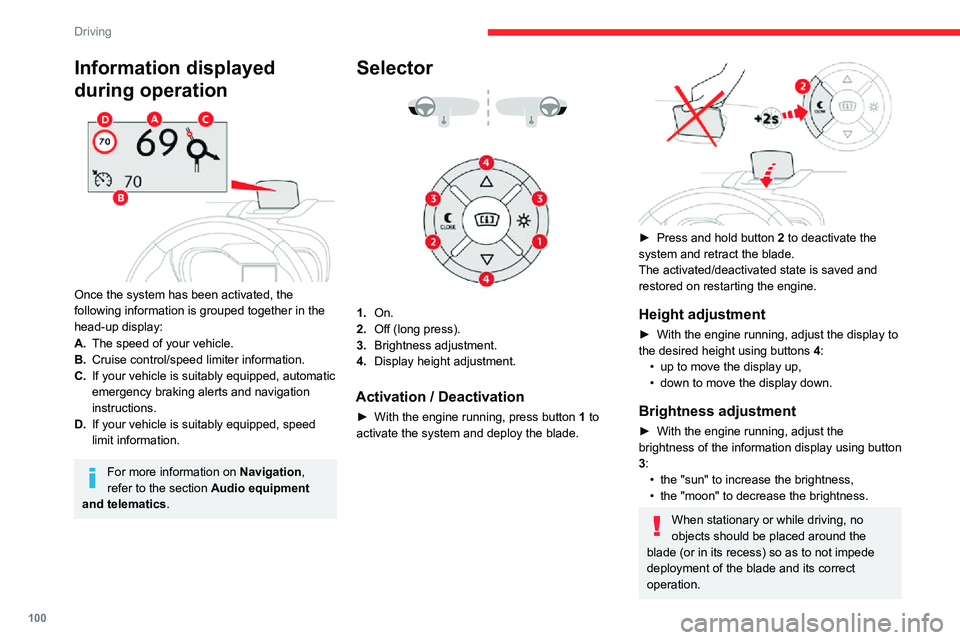
Selector
1. On.
2. Off (long press).
3. Brightness adjustment.
4. Display height adjustment.
Activation / Deactivation
► With the engine running, press button 1 to
activate the system and deploy the blade.
► Press and hold button 2 to deactivate the
system and retract the blade.
The activated/deactivated state is saved and
restored on restarting the engine.
Height adjustment
► With the engine running, adjust the display to the desired height using buttons 4:• up to move the display up,• down to move the display down.
Brightness adjustment
► With the engine running, adjust the brightness of the information display using button
3:
• the "sun" to increase the brightness,• the "moon" to decrease the brightness.
When stationary or while driving, no
objects should be placed around the
blade (or in its recess) so as to not impede
deployment of the blade and its correct
operation.
In certain extreme weather conditions (rain and/or snow, bright sunshine, etc.)
the head-up display may not be legible or
may suffer temporary interference.
Some sunglasses may hamper reading of the
information.
To clean the blade, use a clean, soft cloth
(such as a spectacles cloth or microfibre
cloth). Do not use a dry or abrasive cloth
or detergent or solvent products as these
could scratch the blade or damage the anti-
reflection coating.
This system operates when the engine is running, and the settings are saved when
the ignition is switched off.
Memorising speeds
This function allows speeds to be saved, which
can then be offered to set the two systems: the
speed limiter (to limit the speed of the vehicle) or
the cruise control (for a vehicle cruising speed).
You can memorise up to six speed settings for
each of the two systems.
By default, some speed settings are already
memorised.
As a safety measure, the driver must only modify the speed settings when
stationary.
Page 128 of 244

126
Practical information
– the green mark on the star wheel is in line
with the white mark on the ball joint,
– the locking wheel is in contact with the towball (position A),– the security key lock is on and the key removed; the locking wheel can no longer be
operated,
– the towball must not be able to move in its carrier; test by shaking it with your hand.
If the towball is not locked, the trailer can
detach - accident risk!
During use
Never release the locking system with a
trailer or load carrier on the towball.
Never exceed the maximum authorised
weight for the vehicle - the Gross Train
Weight or GTW.
It is essential that the maximum authorised
load be complied with on the towing device:
if it is exceeded, this device may detach from
the vehicle, which is a serious accident risk.
Check that the trailer lamps work correctly.
Before setting off, check the adjustment of the
headlamp beam height.
For more information on Headlamp
adjustment, refer to the corresponding
section.
Following use
When travelling without a trailer or load
on a towbar-mounted carrier, the towball
must be removed and the protective plug
inserted in the carrier. This measure applies
particularly where the towball might obscure
visibility of the number plate or its lighting.
Fitting the towball
► Below the rear bumper , remove the protective plug 2 from the towball carrier 1.
► Insert the end of towball 5 into carrier 1 and
push it upwards; the locking will take place
automatically.
► The locking wheel 6 turns a quarter of a turn
anti-clockwise ; take care to keep your hands
clear!
► Check that the mechanism has correctly locked into place and that the green mark on the
star wheel is in line with the white mark on the
towball (position A).
► Close the lock 7 using the key.