Citroen C4 CACTUS 2015 1.G Owner's Manual
Manufacturer: CITROEN, Model Year: 2015, Model line: C4 CACTUS, Model: Citroen C4 CACTUS 2015 1.GPages: 326, PDF Size: 8.56 MB
Page 181 of 326
179
C4-cactus_en_Chap09_info-pratiques_ed02-2014
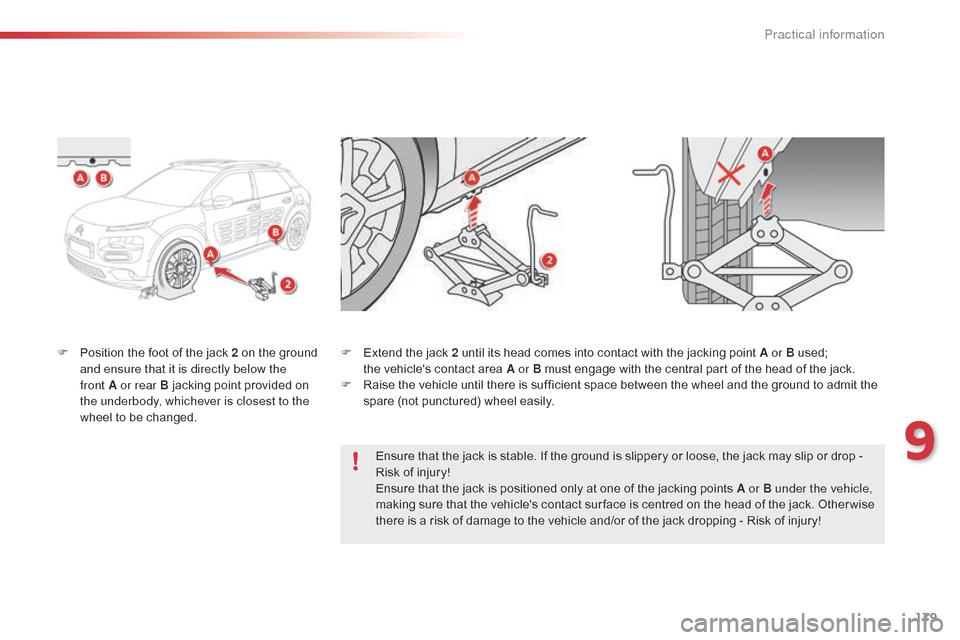
F Position the foot of the jack 2 on the ground a
nd ensure that it is directly below the
front
A or rear B jacking point provided on
t
he underbody, whichever is closest to the
wheel
to be changed. F
E xtend the jack 2 until its head comes into contact with the jacking point A or B used; t
he vehicle's contact area A or B must engage with the central part of the head of the jack.
F
R
aise the vehicle until there is sufficient space between the wheel and the ground to admit the
s
pare (not punctured) wheel easily.
Ensure
that the jack is stable. If the ground is slippery or loose, the jack may slip or drop -
R
isk of injury!
Ensure
that the jack is positioned only at one of the jacking points A or B under the vehicle,
making
sure that the vehicle's contact sur face is centred on the head of the jack. Other wise
t
here is a risk of damage to the vehicle and/or of the jack dropping - Risk of injury!
9
Practical information
Page 182 of 326
180
C4-cactus_en_Chap09_info-pratiques_ed02-2014
Fitting a wheel
Fitting the spare wheel
If your vehicle is fitted with alloy wheels,
when tightening the bolts on fitting, it is
n
ormal
t
o
n
otice
t
hat
t
he
w
ashers
d
o
n
ot
c
ome into contact with the spare wheel.
T
he wheel is secured by the conical
sur face
of each bolt.
After changing a wheel
Have the tightening of the bolts and the pressure of the spare wheel checked
b
y a CITROËN dealer or a qualified
w
orkshop without delay.
Have the punctured wheel repaired
and refitted to the vehicle as soon as
possible.
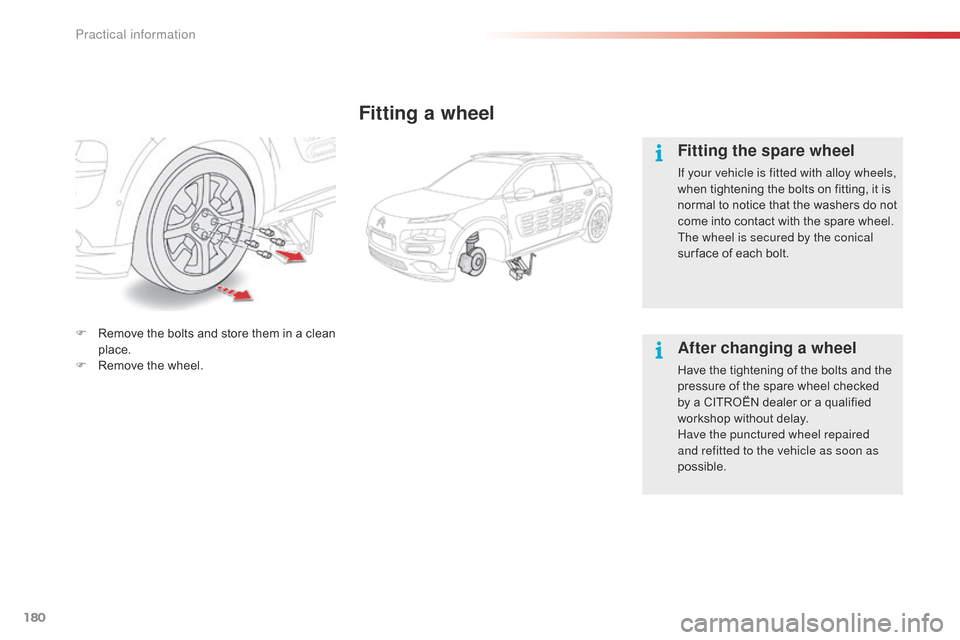
F
R
emove
the
bolts
and
store
them
in
a
clean
p
lace.
F
R
emove
the
wheel.
Practical information
Page 183 of 326
181
C4-cactus_en_Chap09_info-pratiques_ed02-2014
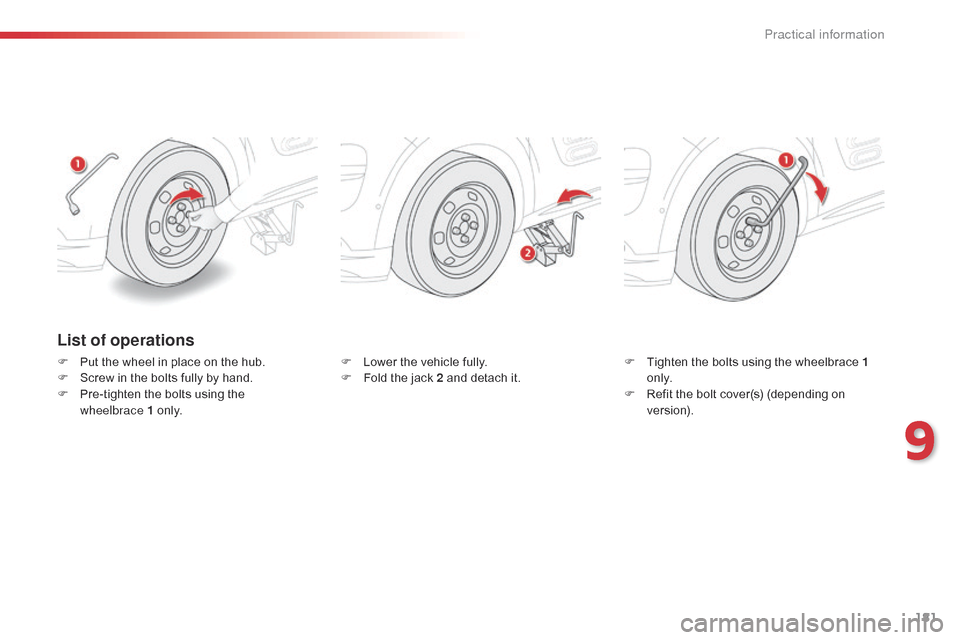
List of operations
F Put the wheel in place on the hub.
F S crew in the bolts fully by hand.
F
P
re-tighten the bolts using the
w
heelbrace
1
o
n l y. F
L ower the vehicle fully.
F F old the jack 2 and detach it.F
T ighten the bolts using the wheelbrace 1
o n l y.
F
R
efit the bolt cover(s) (depending on
v
e r s i o n).
9
Practical information
Page 184 of 326

182
C4-cactus_en_Chap09_info-pratiques_ed02-2014
Snow chains
In wintry conditions, snow chains improve traction as well as the behaviour of the vehicle when braking.
Use
only the chains designed to be fitted to the
t
ype of wheel fitted to your vehicle:
Original
t
yre
s
izeMaximum
link
size.
195/65
R159
mm
205/55
R16
205/50
R17
cannot be fitted with chains
For more information on snow chains, contact a CITROËN dealer or a qualified workshop.
Advice on installation
F If you have to fit the chains during a j
ourney, stop the vehicle on a flat sur face
o
n the side of the road.
F
A
pply the parking brake and position any
w
heel chocks to prevent movement of your
v
ehicle.
F
F
it the chains following the instructions
p
rovided by the manufacturer.
F
M
ove off gently and drive for a few
m
oments, without exceeding 30 mph
(
50 km/h).
F
S
top your vehicle and check that the snow
c
hains are correctly tightened.
Take
account
of
the
legislation
in
force
i
n your country on the use of snow
chains
and
the
maximum
running
speed
a
uthorised.
The
snow
chains
must
be
fitted
only
t
o
the
front
wheels.
They
must
never
b
e fitted to "space-saver" type spare
wheels.
Avoid
driving with snow chains on roads
t
hat have been cleared of snow, to
avoid
damaging your vehicle's tyres and
t
he road sur face. If your vehicle is fitted
w
ith alloy wheels, check that no part of
t
he chain or its fixings is in contact with
t
he wheel rim.
It
is
strongly
recommended
that
before
y
ou
leave,
you
practise
fitting
the
snow
c
hains
on
a
level
and
dry
sur face.
Practical information
Page 185 of 326

183
C4-cactus_en_Chap09_info-pratiques_ed02-2014
Changing a bulb
Front lamps
1. Daytime running lamps / Sidelamps (LEDs).
2.
D
ipped beam headlamps (H7).
3.
M
ain beam headlamps (H1).
4.
D
irection indicators (PY21W).
5.
F
ront foglamps (PS24W). In
some weather conditions (e.g. low
t
emperature or humidity), the presence
o
f misting on the internal sur face of the
g
lass of the headlamps and rear lamps
i
s normal; it disappears after the lamps
h
ave been on for a few minutes.
The headlamps are fitted with
p
olycarbonate glass with a protective
c
oating:
F
d
o not clean them using a dr y
or abrasive cloth, nor with a
detergent or solvent product,
F
u
se a sponge and soapy water or a
p
H neutral product,
F
w
hen using a high pressure washer
o
n persistent marks, do not keep
t
he lance directed towards the
lamps or their edges for too long, s
o as not to damage their protective c
oating a nd sea ls.
Changing
a bulb should only be done
a
fter the headlamp has been switched
o
ff for several minutes (risk of serious
b
urns).
F
d
o n
ot touch the bulb directly with
your
fingers, use a lint-free cloth.
It
is imperative to use only anti-
ultraviolet
(UV) type bulbs to avoid
d
amaging
t
he
h
eadlamp.
al
ways replace a failed bulb with a
new
bulb with the same type and
s
pecification.
9
Practical information
Page 186 of 326

184
C4-cactus_en_Chap09_info-pratiques_ed02-2014
Daytime running lamps /
S idelamps (LEDs)
For the replacement of the light-emitting d
iodes (LEDs), contact a CITROËN dealer or a
q
ualified
w
orkshop. F
D isconnect the bulb connector.
F
R
emove the bulb and change it.
Dipped beam headlamps
F Remove the protective cover by pulling the t
ab.
F
T
ake the connector and bulb holder, then
l
ift the assembly upwards to unclip it.
F
R
emove the assembly of connector and
b
ulb holder. To
reassemble, carry out these operations in
r
everse order, positioning the alignment lug
at the top .
Practical information
Page 187 of 326

185
C4-cactus_en_Chap09_info-pratiques_ed02-2014
Main beam headlamps
F Remove the protective cover by pulling the t
ab.
F
D
isconnect the bulb connector (do not
r
emove
t
he
e
arth
c
onnector
lo
cated
belo
w).
F
P
ush on the spring, then move it towards
t
he middle of the vehicle to release the
b
ulb.
F
R
emove the bulb and change it.
Direction indicators
Amber coloured bulbs, such as the direction indicators, must be replaced
w
ith bulbs of identical specifications
and
colour.
Rapid
flashing
of
the
direction
indicator
w
arning
lamp
(right
or
left)
indicates
the
f
ailure
of
a
bulb
on
that
side.
F
T
urn
the
bulb
holder
an
eighth
of
a
turn
a
nti-clockwise
and
extract
it.
F
R
emove
the
bulb
and
change
it.
To
reassemble,
carry
out
these
operations
in
r
everse
o
rder. To
reassemble,
carry
out
these
operations
in
r
everse
o
rder.
9
Practical information
Page 188 of 326
186
C4-cactus_en_Chap09_info-pratiques_ed02-2014
Front foglamps
You can also contact a CITRoËn
dealer or a qualified workshop for the
r
eplacement of these bulbs.
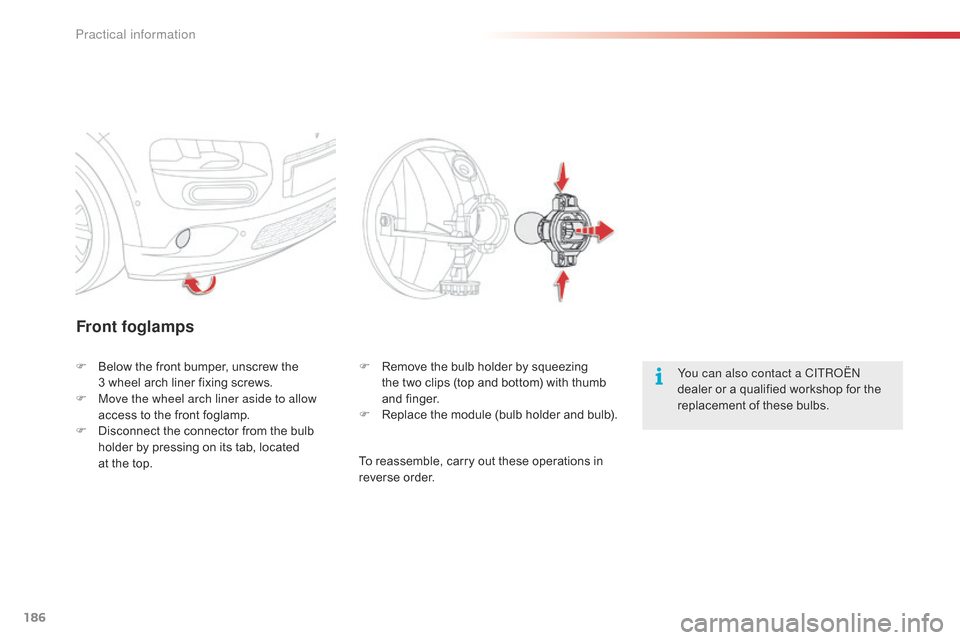
F
B
elow
the
front
bumper,
unscrew
the
3
wheel
arch
liner
fixing
screws.
F
M
ove the wheel arch liner aside to allow
access
to
the
front
foglamp.
F
D
isconnect
the
connector
from
the
bulb
h
older
by
pressing
on
its
tab,
located
at
the
top. F
R
emove
the
bulb
holder
by
squeezing
the
two
clips
(top
and
bottom)
with
thumb
a
nd
f
inger.
F
R
eplace
the
module
(bulb
holder
and
bulb).
To
reassemble,
carry
out
these
operations
in
r
everse
o
rder.
Practical information
Page 189 of 326
187
C4-cactus_en_Chap09_info-pratiques_ed02-2014
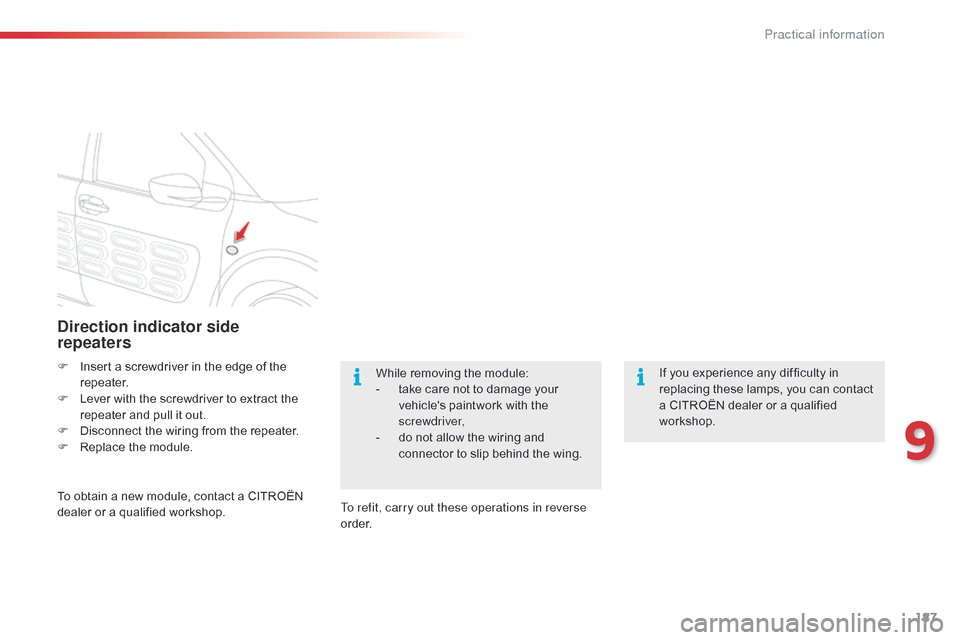
Direction indicator side
repeaters
F Insert a screwdriver in the edge of the r
epeater.
F
L
ever with the screwdriver to extract the
r
epeater and pull it out.
F
D
isconnect the wiring from the repeater.
F
R
eplace the module.
To
obtain a new module, contact a CITROËN
d
ealer or a qualified workshop. To refit, carry out these operations in reverse
o r d e r.While
removing the module:
-
t
ake care not to damage your
v
ehicle's paintwork with the
sc
rewdriver,
-
d
o not allow the wiring and
c
onnector to slip behind the wing.If
you experience any difficulty in
r
eplacing these lamps, you can contact
a
CITROËN dealer or a qualified
w
orkshop.
9
Practical information
Page 190 of 326
188
C4-cactus_en_Chap09_info-pratiques_ed02-2014
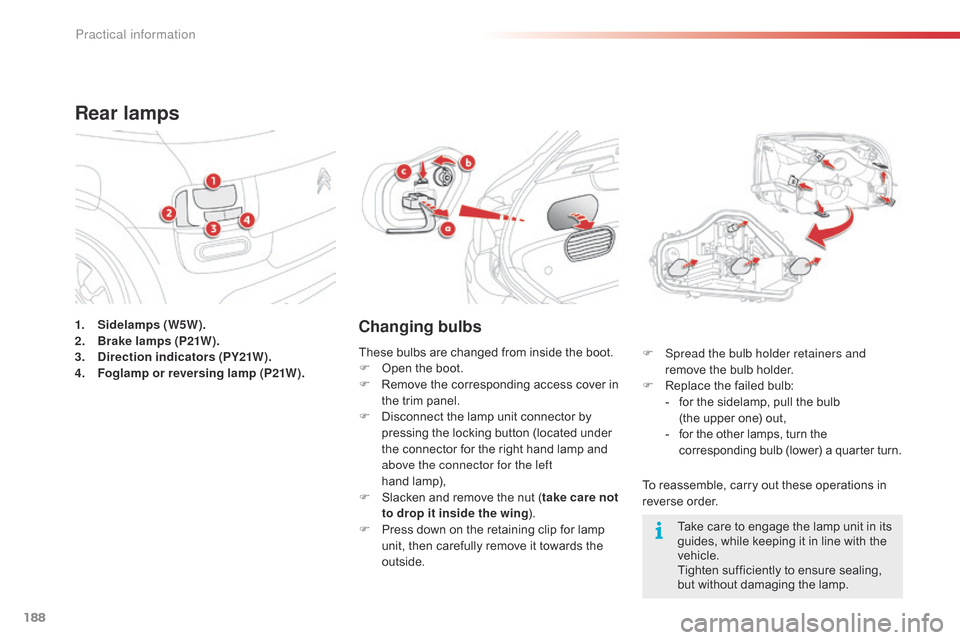
1. Sidelamps (W5W).
2. Brake lamps (P21W).
3.
D
irection indicators (PY21W).
4.
F
oglamp or reversing lamp (P21W).
Rear lamps
Changing bulbs
To reassemble, carry out these operations in reverse o rder.
F
S
pread the bulb holder retainers and
remove the bulb holder.
F
R
eplace the failed bulb:
-
f
or the sidelamp, pull the bulb
(
the upper one) out,
-
f
or the other lamps, turn the
c
orresponding bulb (lower) a quarter turn.
These
bulbs
are
changed
from
inside
the
boot.
F
O
pen
the
boot.
F
R
emove
the
corresponding
access
cover
in
t
he
trim
panel.
F
D
isconnect
the
lamp
unit
connector
by
p
ressing
the
locking
button
(located
under
t
he
connector
for
the
right
hand
lamp
and
a
bove the connector for the left
hand lam
p),
F
S
lacken
and
remove
the
nut
( take care not
to drop it inside the wing ).
F
P
ress
down
on
the
retaining
clip
for
lamp
u
nit,
then
carefully
remove
it
towards
the
o
utside. Take
care to engage the lamp unit in its
g
uides, while keeping it in line with the
v
ehicle.
Tighten
sufficiently to ensure sealing,
b
ut without damaging the lamp.
Practical information