Citroen C4 CACTUS 2016 1.G Owner's Manual
Manufacturer: CITROEN, Model Year: 2016, Model line: C4 CACTUS, Model: Citroen C4 CACTUS 2016 1.GPages: 308, PDF Size: 7.96 MB
Page 161 of 308
159
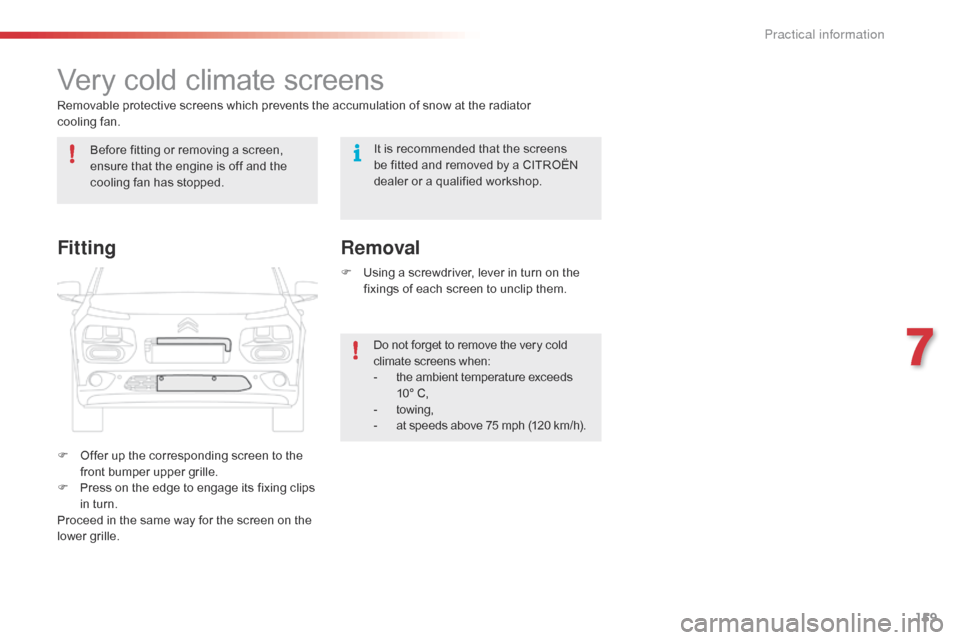
Very cold climate screens
Removable protective screens which prevents the accumulation of snow at the radiator
c ooling fan.
F
O
ffer up the corresponding screen to the
f
ront bumper upper grille.
F
P
ress on the edge to engage its fixing clips
i
n turn.
Proceed
in the same way for the screen on the
l
ower grille. F
U
sing a screwdriver, lever in turn on the
f
ixings of each screen to unclip them.
Do
not forget to remove the very cold
c
limate screens when:
-
t
he ambient temperature exceeds
1
0° C,
-
tow
ing,
-
a
t speeds above 75 mph (120 km/h).
Removal
Fitting
Before fitting or removing a screen, e
nsure that the engine is off and the
c
ooling fan has stopped. It
is recommended that the screens b
e fitted and removed by a CITROËN
d
ealer or a qualified workshop.
7
Practical information
Page 162 of 308
160
When not towing a trailer, remove the quickly-detachable tow ball before
d
riving.
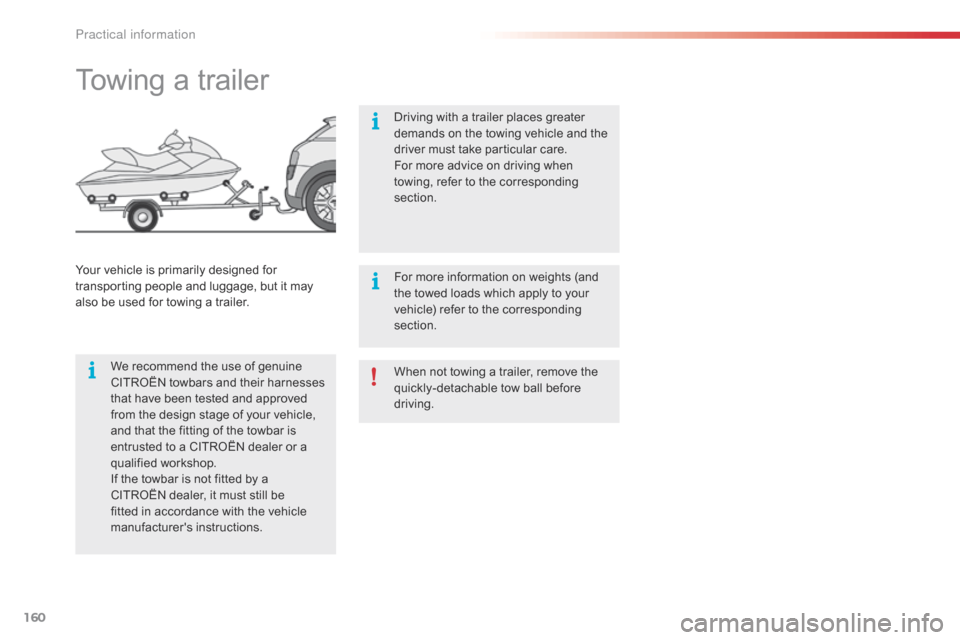
Towing a trailer
We recommend the use of genuine C ITROËN towbars and their harnesses
t
hat have been tested and approved
f
rom the design stage of your vehicle,
a
nd that the fitting of the towbar is
e
ntrusted to a CITROËN dealer or a
q
ualified
w
orkshop.
If
the towbar is not fitted by a
C
ITROËN dealer, it must still be
f
itted in accordance with the vehicle
m
anufacturer's
i
nstructions.
Your
vehicle is primarily designed for
t
ransporting people and luggage, but it may
a
lso
be used for towing a trailer. Driving with a trailer places greater
d
emands on the towing vehicle and the
d
river must take particular care.
For more advice on driving when
t
owing, refer to the corresponding
s
ection.
For more information on weights (and
t
he towed loads which apply to your
v
ehicle) refer to the corresponding
s
ection.
Pr
Page 163 of 308
161
Load reduction mode
System which manages the use of certain functions according to the level of charge
r
emaining in the battery.
When
the vehicle is being driven, the load
r
eduction function temporarily deactivates
c
ertain functions, such as the air conditioning,
t
he heated rear screen...
The
deactivated functions are reactivated
a
utomatically as soon as conditions permit.System
which manages the duration of use of c
ertain functions to conserve a sufficient level
of
charge in the battery.
After
the engine has stopped, you can
s
till use functions such as the audio and
t
elematics system, windscreen wipers, dipped
b
eam headlamps, courtesy lamps, etc. for
a
maximum combined duration of about
f
orty minutes.
Energy economy mode
Switching to economy mode
A message then appears in the instrument p
anel screen indicating that the vehicle has
s
witched to economy mode and the active
f
unctions are put on standby.
If
a telephone call is being made at this time, it
w
ill be maintained for around 10 minutes with
t
he Bluetooth hands-free system of your audio
s
ystem.
Exiting economy mode
These functions are reactivated automatically n ext time the vehicle is driven.
In
order to restore the use of these functions
i
mmediately, start the engine and let it run:
-
f
or less than ten minutes, to use the
e
quipment for approximately five minutes,
-
f
or more than ten minutes, to use the
e
quipment for up to approximately
t
hirty minutes.
Let
the engine run for the duration specified to
e
nsure that the battery charge is sufficient.
Do
not repeatedly and continuously restart the
e
ngine in order to charge the battery.
A
flat battery prevents the engine from
s
tarting.
For
more information on the battery,
r
efer to the corresponding section.
7
Practical information
Page 164 of 308

162
Accessories
A wide range of accessories and genuine parts is available from the CITROËN dealer network.
T hese accessories and parts are all suitable for your vehicle and benefit from CITROËN's recommendation and warranty.
"Comfort"
Door deflectors, side sun blinds, insulated module, coat hanger fixed to head restraint,
m
obile reading lamp, front and rear parking
s
ensors, portable ashtray, scented air
f
reshener, blind for sunroof...
"Transport systems"
Boot carpet, boot liner, boot net, boot spacers,
transverse roof bars, ski carrier, roof box,
t
owbar,
t
owbar
w
iring
h
arnesses,
b
icycle
c
arrier
f
or mounting on the towbar and on the roof
b
ars, towbars with fixed and quickly detachable
t
owball...
"Styling"
Aluminium foot rest, alloy wheels, front spoiler, r ear diffuser, exterior expressive stickers...
"Security and safety":
Anti-intrusion alarm, vehicle tracking system, first aid kit, fire extinguisher, warning triangle,
h
igh visibility vest, wheel security bolts, snow
c
hains, non-slip covers, front foglamp kit, dog
g
uard, pet seat belt, seat belt cutter/glass
h
ammer...
"Protection"
Mats*, seat covers, mud flaps, vehicle cover...
I
f
a
towbar
and
wiring
harness
are
f
itted
outside
the
CITROËN
dealer
n
etwork,
the
installation
must
be
done
s
trictly
in
line
with
the
manufacturer's
r
ecommendations. *
T
o avoid any risk of jamming the pedals:
-
e
nsure that mats are correctly positioned
a
nd secured,
-
n
ever fit one mat on top of another.
"Multimedia"
Bluetooth hands-free kits, portable satellite navigation system, driving assistance systems,
s
martphone carriers, DVD player, CD player,
2
30 V socket, semi-integral satellite navigation
s
ystem, rear multimedia carrier, navigation
m
apping updates, aftermarket digital radio...
By
visiting a CITROËN dealer you can also
o
btain cleaning and maintenance products
(
interior and exterior) - including ecological
p
roducts in the "TECHNATURE" range,
p
roducts for topping up (screenwash...), paint
t
ouch-up pens and aerosols for the exact
c
olour of your vehicle, refills (sealant cartridge
f
or the temporary puncture repair kit...)...
Practical information
Page 165 of 308
163
The fitting of electrical equipment or accessories which are not recommended b
y CITROËN may result in a failure of
y
our vehicle's electronic system and
e
xcessive electrical consumption.
Contact
a CITROËN dealer
f
or information on the range of
r
ecommended equipment and
a
ccessories.
Installation of radio
communication
transmitters
Before installing any after-market radio communication transmitter, you can
c
ontact a CITROËN dealer for the
s
pecification of transmitters which can
b
e fitted (frequency, maximum power,
a
erial position, specific installation
requirements),
in line with the Vehicle
E
lectromagnetic
C
ompatibility
D
irective (2004/104/EC). Depending
on the legislation in force in
t
he country, certain safety equipment
m
ay be compulsory: high visibility s
afety vests, warning triangles, b
reathalyzers, spare bulbs, spare fuses,
fire
extinguisher, first aid kit, mud flaps
a
t the rear of the vehicle.
7
Practical information
Page 166 of 308
164
Changing a wiper blade
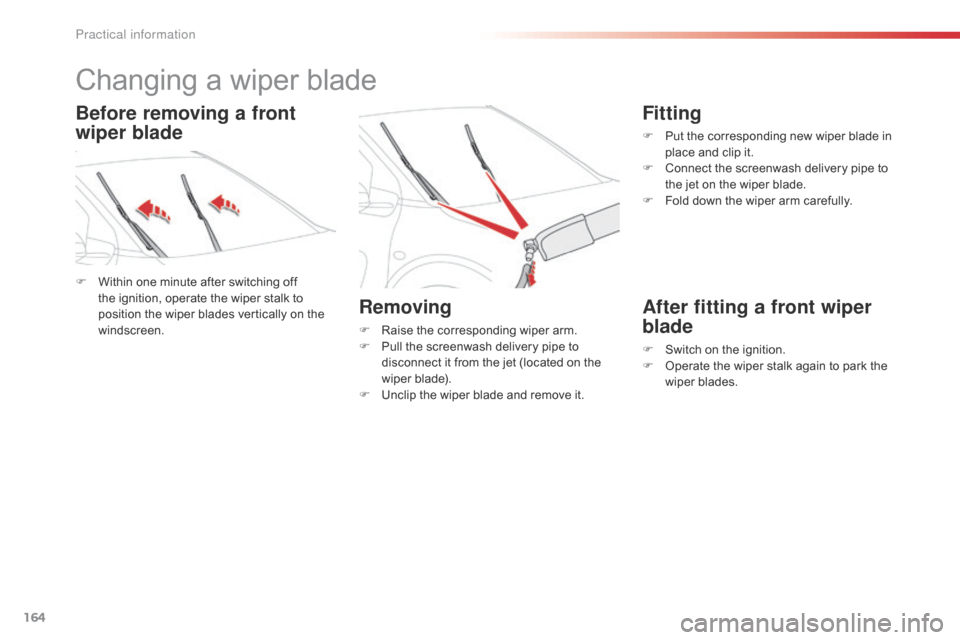
F Within one minute after switching off t
he ignition, operate the wiper stalk to
p
osition the wiper blades vertically on the
w
indscreen.
Removing
F Raise the corresponding wiper arm.
F P ull the screenwash delivery pipe to
d
isconnect it from the jet (located on the
w
iper blade).
F
U
nclip the wiper blade and remove it.
Fitting
F Put the corresponding new wiper blade in p
lace and clip it.
F
C
onnect the screenwash delivery pipe to
t
he jet on the wiper blade.
F
F
old down the wiper arm carefully.
After fitting a front wiper
blade
F Switch on the ignition.
F O perate the wiper stalk again to park the
w
iper blades.
Before removing a front
wiper blade
Practical information
Page 167 of 308
165
Roof bars
For safety reasons and to avoid damaging the roof, it is essential to use
t
ransverse roof bars that are approved
f
or your vehicle.
Observe
the fitting instructions and
t
he conditions of use given in the
i
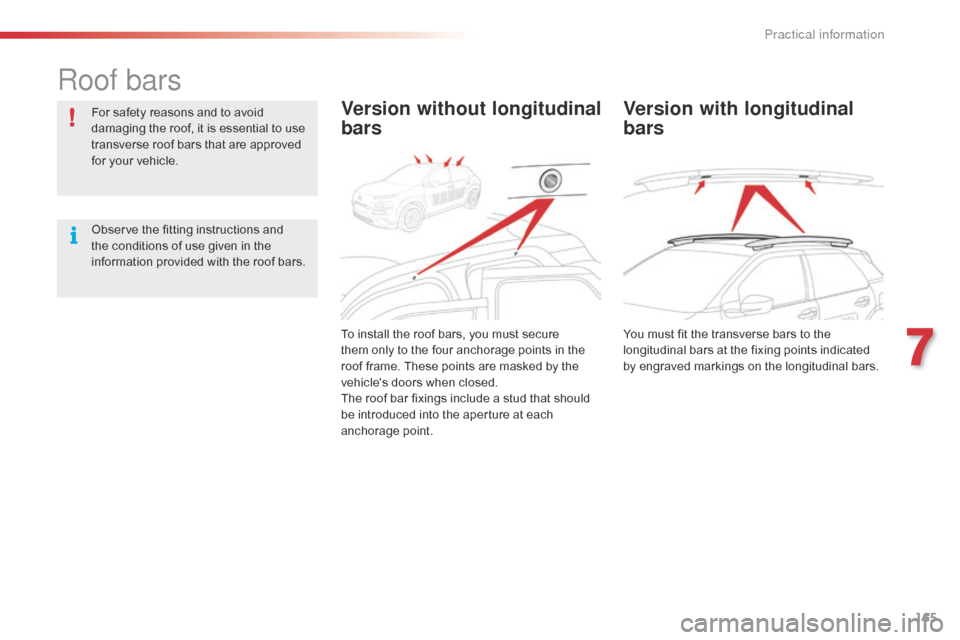
nformation provided with the roof bars.Version without longitudinal
bars
To install the roof bars, you must secure them only to the four anchorage points in the
r
oof frame. These points are masked by the
v
ehicle's doors when closed.
The
roof bar fixings include a stud that should
b
e introduced into the aperture at each
anc
horage
p
oint.
Version with longitudinal
bars
You must fit the transverse bars to the longitudinal bars at the fixing points indicated
b
y engraved markings on the longitudinal bars.
7
Practical information
Page 168 of 308
166
Maximum load, distributed over the roof bars, for a loading height not exceeding
4
0 cm: 80 kg.
This
value is subject to change, please
c
heck the maximum load stated in the
i
nstructions provided with he roof bars.
If
the height exceeds 40 cm, adapt the
s
peed of the vehicle to the profile of the
r
oad to avoid damaging the roof bars
a
nd the fixings on the vehicle.
Please
refer to national legislation so as
t
o meet the requirements on carrying
o
bjects that are longer than the vehicle.
Recommendations
F Distribute the load evenly, avoiding ov
erloading on one side.
F
A
rrange the heaviest part of the load as
c
lose as possible to the roof.
F
A
nchor the load securely and fit a warning
f
lag if part of it overhangs the vehicle.
F
D
rive gently, as the vehicle will be more
l
iable to the effects of side winds (vehicle
s
tability may be affected).
F
R
emove the roof bars as soon as they are
n
o
lon
ger
n
eeded.
Practical information
Page 169 of 308

167
TOTAL & CITROËN
Partners in performance
and protecting
the environment
Innovation in the search for
performance
For over 40 year, the TOTAL Research and D
evelopment departments have developed lubricants
f
or CITROËN, to match the latest technical innovations
o
n CITROËN vehicles, both for competition and for
e
veryday motoring.
For you, this is an assurance that you will obtain the
best
per formance from your engine.
Optimum protection for
your engine
By having your CITROËN vehicle serviced with TOTAL lubricants, you are
c
ontributing towards improving the life
a
nd per formance of your engine, while
a
lso protecting the environment.
7
Practical information
Page 170 of 308
168
Bonnet
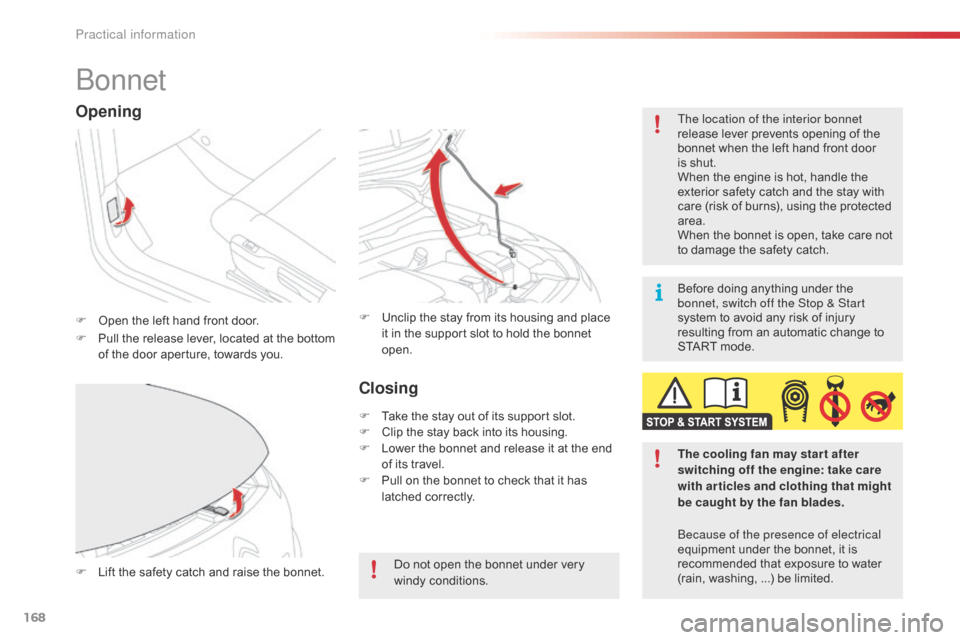
F Open the left hand front door. The location of the interior bonnet
release
lever prevents opening of the
b
onnet when the left hand front door
i
s shut.
When the engine is hot, handle the
e
xterior safety catch and the stay with
c
are (risk of burns), using the protected
a
rea.
When the bonnet is open, take care not
t
o damage the safety catch.
F
L
ift the safety catch and raise the bonnet.F
U nclip the stay from its housing and place i
t in the support slot to hold the bonnet
ope
n.
Opening
F Pull the release lever, located at the bottom o
f the door aperture, towards you.
The cooling fan may star t after
switching off the engine: take care
with articles and clothing that might
be caught by the fan blades.
Do
not open the bonnet under very
wi
ndy
c
onditions.
Closing
F Take the stay out of its support slot.
F C lip the stay back into its housing.
F
L
ower the bonnet and release it at the end
o
f its travel.
F
P
ull on the bonnet to check that it has
l
atched correctly. Because of the presence of electrical
equipment
under the bonnet, it is
r
ecommended that exposure to water
(
rain, washing, ...) be limited.
Before
doing anything under the
b
onnet, switch off the Stop & Start
system to avoid any risk of injury
r
esulting from an automatic change to
S
TART mode.
Practical information