Citroen C4 RHD 2015 2.G Owner's Manual
Manufacturer: CITROEN, Model Year: 2015, Model line: C4 RHD, Model: Citroen C4 RHD 2015 2.GPages: 328, PDF Size: 12.72 MB
Page 111 of 328
77
109
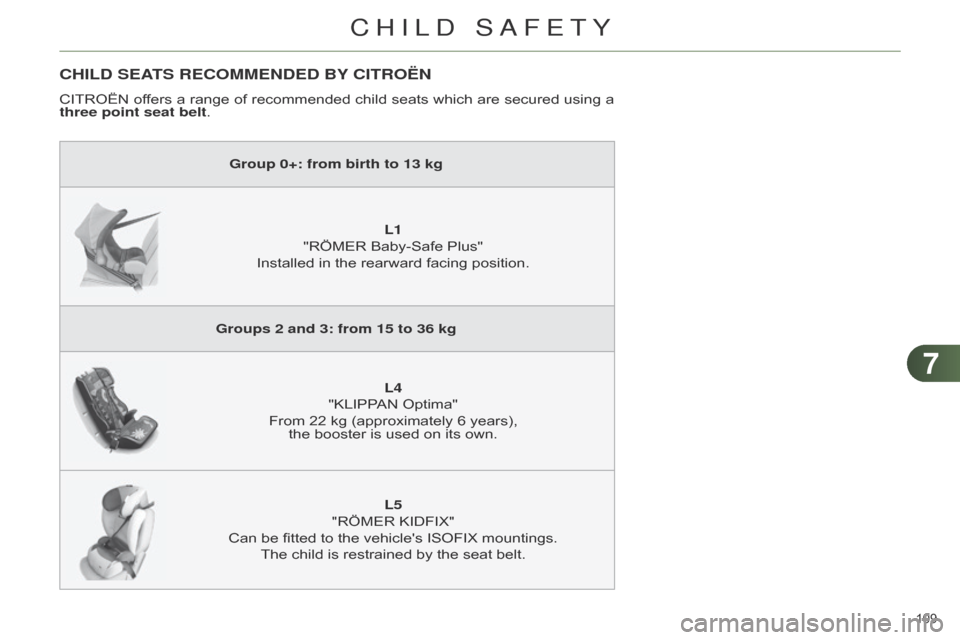
CHILD SEATS RECOMMENDED BY CITROËN
CITROËN offers a range of recommended child seats which are secured using a three point seat belt
.
Group 0+: from birth to 13 kg
L1
"RÖMER
Baby-Safe Plus"
Installed
in the rearward facing position.
Groups 2 and 3: from 15 to 36 kg L4
"KLIPPAN
Optima"
From
22 kg (approximately 6 years),
the
booster is used on its own.
L5
"RÖMER
KIDFIX"
Can
be fitted to the vehicle's ISOFIX mountings.
The
child is restrained by the seat belt.
CHILD SAFETY
Page 112 of 328
77
110
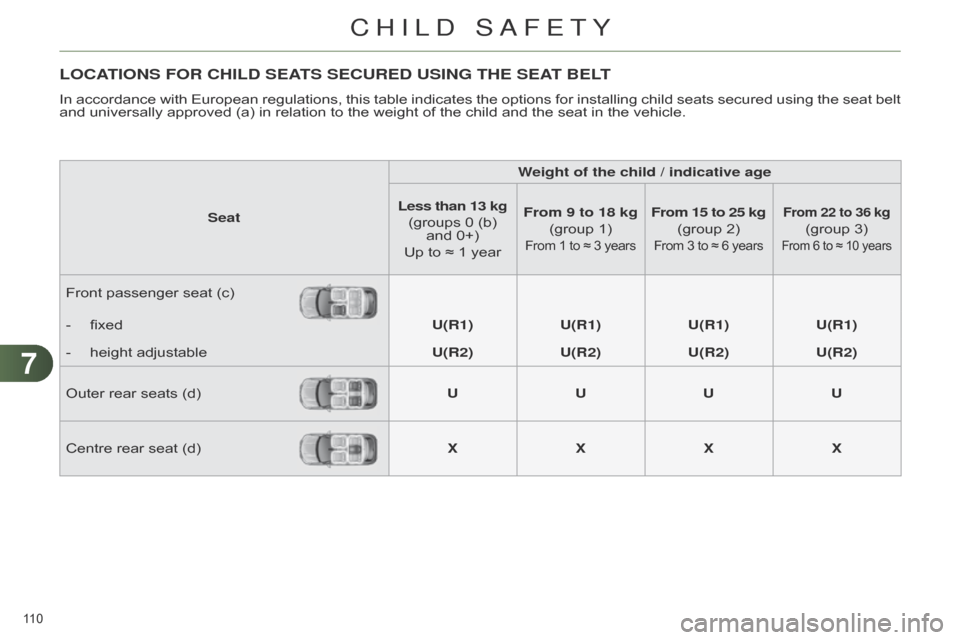
LOCATIONS FOR CHILD SEATS SECURED USING THE SEAT BELT
In accordance with European regulations, this table indicates the options for installin g child seats secured using the seat belt and
universally approved (a) in relation to the weight of the child and the seat in the vehicle.
Seat Weight of the child / indicative age
Less than 13
kg
(groups
0 (b)
and
0+)
Up
to ≈ 1 yearFrom 9 to 18 kg
(group
1)
From 1 to ≈ 3 years
From 15 to 25 kg
(group 2)
From 3 to ≈ 6 years
From 22 to 36 kg
(group 3)
From 6 to ≈ 10 years
Front passenger seat (c)
-
fixed U(R1)U(R1)U(R1)U(R1)
-
height
adjustable U(R2)U(R2)U(R2)U(R2)
Outer
rear seats (d) UUUU
Centre
rear seat (d) XXXX
CHILD SAFETY
Page 113 of 328
77
111
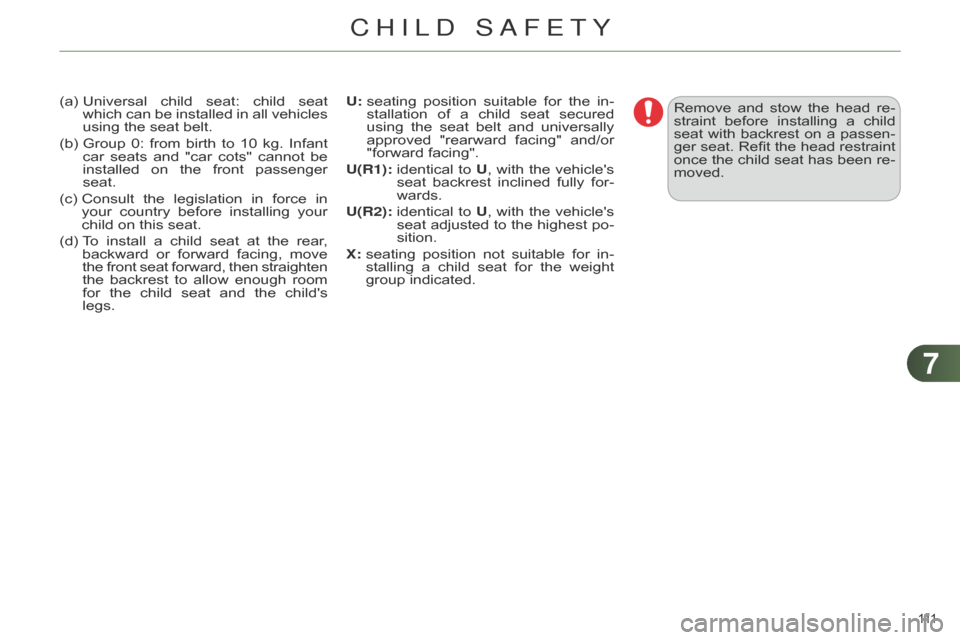
(a) Universal child seat: child seat which
can be installed in all vehicles
using
the seat belt.
(b)
Group
0:
from
birth
to
10
kg.
Infant
car
seats
and
"car
cots"
cannot
be
installed
on
the
front
passenger
seat.
(c)
Consult
the
legislation
in
force
in
your
country
before
installin
g
your
child
on this seat.
(d)
T
o
install
a
child
seat
at
the
rear
,
backward
or
forward
facing,
move
the front seat forward, then straighten
the
backrest
to
allow
enough
room
for
the
child
seat
and
the
child's
legs. Remove
and
stow
the
head
re
-
straint
before
installin
g
a
child
seat
with
backrest
on
a
passen
-
ger
seat.
Refit
the
head
restraint
once
the
child
seat
has
been
re
-
moved.
U:
seating
position
suitable
for
the
in
-
stallation
of
a
child
seat
secured
using
the
seat
belt
and
universally
approved
"rearward
facing"
and/or
"forward
facing".
U(R1):
identical
to
U
,
with
the
vehicle's
seat
backrest
inclined
fully
for
-
wards.
U(R2):
identical
to
U
,
with
the
vehicle's
seat
adjusted
to
the
highest
po
-
sition.
X: seating position not suitable for in -
stalling a child seat for the weight group
indicated.
CHILD SAFETY
Page 114 of 328
77
112
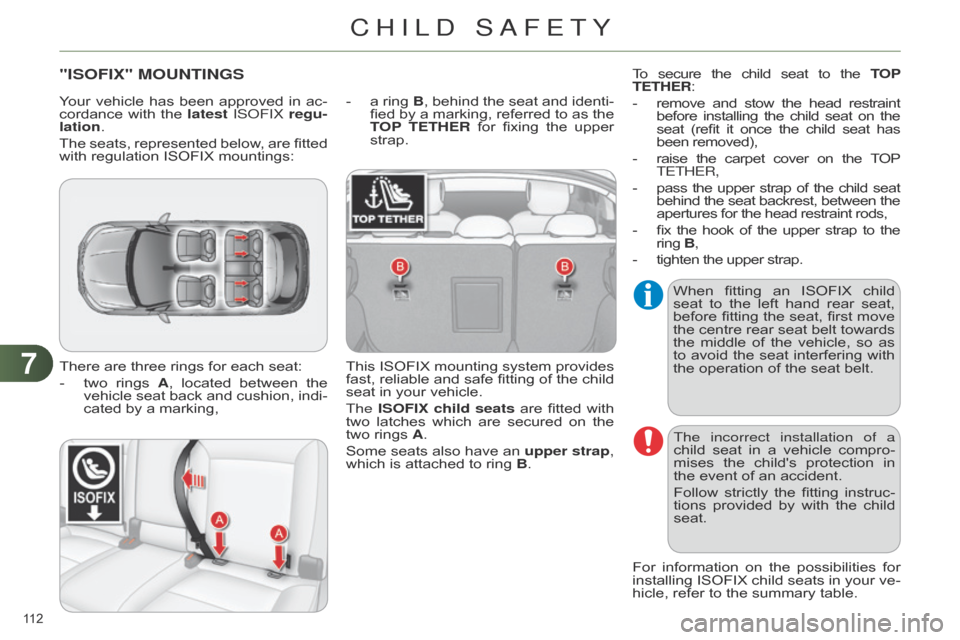
"ISOFIX" MOUNTINGS
There are three rings for each seat:
-
two
rings
A
,
located
between
the
vehicle
seat
back
and
cushion,
indi
-
cated
by a marking, -
a
ring
B
,
behind
the
seat
and
identi
-
fied
by
a
marking,
referred
to
as
the
T
OP TETHER
for
fixing
the
upper
strap.
This
ISOFIX mounting system provides fast,
reliable and safe fitting of the child
seat
in your vehicle.
The ISOFIX child seats
are
fitted
with
two
latches
which
are
secured
on
the
two
rings A.
Some
seats
also
have
an
upper strap
,
which
is attached to ring B.The incorrect installation of a
child
seat
in
a
vehicle
compro
-
mises
the
child's
protection
in
the
event of an accident.
Follow
strictly
the
fitting
instruc
-
tions
provided
by
with
the
child
seat.
For
information
on
the
possibilities
for
installin
g
ISOFIX
child
seats
in
your
ve
-
hicle,
refer to the summary table.
When
fitting
an
ISOFIX
child
seat
to
the
left
hand
rear
seat,
before
fitting
the
seat,
first
move
the
centre
rear
seat
belt
towards
the
middle
of
the
vehicle,
so
as
to
avoid the seat interfering with the
operation of the seat belt.
Your
vehicle
has
been
approved
in
ac
-
cordance
with
the
latest
IS o FI x regu-
lation.
The
seats,
represented
below
,
are
fitted
with
regulation ISOFIX mountings:
To
secure
the
child
seat
to
the
TO
P
TETHER:
-
remove
and
stow
the
head
restraint before
installing
the
child
seat
on
the seat
(refit
it
once
the
child
seat
has been
removed),
-
raise
the
carpet
cover
on
the
T
OP
TETHER,
-
pass
the
upper
strap
of
the
child
seat behind
the
seat
backrest,
between
the apertures
for the head restraint rods,
-
fix
the
hook
of
the
upper
strap
to
the ring
B
,
-
tighten
the upper strap.
CHILD SAFETY
Page 115 of 328
77
113
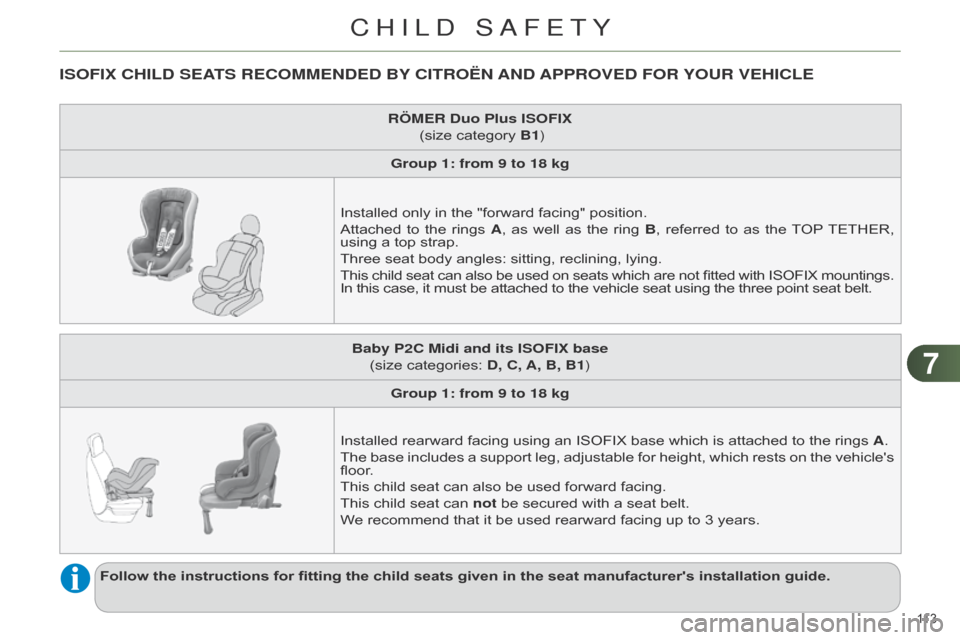
ISOFIX CHILD SEATS RECOMMENDED BY CITROËN AND APPROVED FOR YOUR VEHICLE
RÖMER Duo Plus ISOFIX
(size category B1)
Group 1: from 9 to 18 kg
Installed
only in the "forward facing" position.
Attached
to
the
rings
A
,
as
well
as
the
ring
B
,
referred
to
as
the
T
OP
TETHER,
using
a top strap.
Three
seat body angles: sitting, reclining, lying.
This
child
seat
can
also
be
used
on
seats
which
are
not
fitted
with
ISOFIX
mountings. In
this
case, it must be attached to the vehicle seat using the three point seat belt.
Follow the instructions for fitting the child seats given in the seat manufacturer's installation guide. Baby P2C Midi and its ISOFIX base
(size
categories: D, C, A, B, B1)
Group 1: from 9 to 18 kg
Installed
rearward facing using an ISOFIX base which is attached to the rings A.
The
base
includes
a
support
leg,
adjustable
for
height,
which
rests
on
the
vehicle's
floor
.
This
child seat can also be used forward facing.
This
child seat can not be secured with a seat belt.
We
recommend that it be used rearward facing up to 3 years.
CHILD SAFETY
Page 116 of 328
77
114
* Infant car seats and "car cots" cannot be installed on the front passenger seat.
**
The
ISOFIX infant car seat, secured on the lower rings of a vehicle ISOFIX seat, occupies two rear seats.
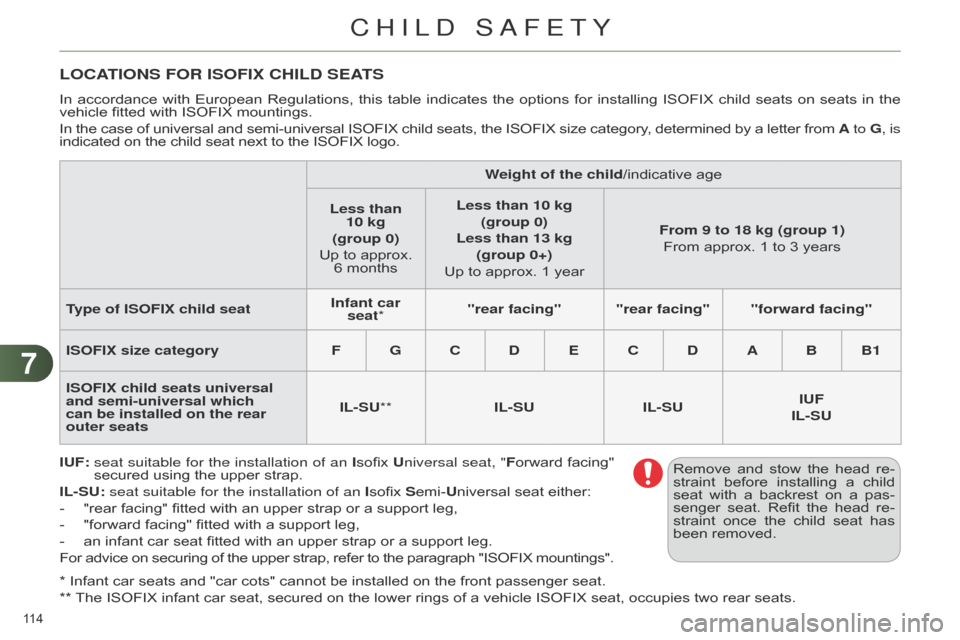
LOCATIONS FOR ISOFIX CHILD SEATS
In accordance with European Regulations, this table indicates the options for installin g ISOFIX child seats on seats in the vehicle
fitted with ISOFIX mountings.
In
the
case
of
universal
and
semi-universal
ISOFIX
child
seats,
the
ISOFIX
size
category
,
determined
by
a
letter
from
A to
G, is
indicated
on the child seat next to the ISOFIX logo.
IUF:
seat suitable for the installation of an
Isofix
U
niversal seat, "Forward
facing"
secured
using the upper strap.
IL-SU: seat suitable for the installation of an Isofix
Semi-Universal seat either:
-
"rear
facing" fitted with an upper strap or a support leg,
-
"forward
facing" fitted with a support leg,
-
an
infant car seat fitted with an upper strap or a support leg.
For
advice
on
securing
of
the
upper
strap,
refer
to
the
paragraph
"ISOFIX
mountings".
W
eight of the child/indicative age
Less than 10
kg
(group 0)
Up
to approx.
6
monthsLess than 10 kg
(group 0)
Less than 13 kg (group 0+)
Up
to approx. 1 yearFrom 9 to 18 kg (group 1)
From
approx. 1 to 3 years
Type of ISOFIX child seat Infant car
seat* "rear facing" "rear facing" "forward facing"
ISOFIX size category F G C D E C D A B B1
ISOFIX child seats universal
and semi-universal which
can be installed on the rear
outer seats IL-SU**
IL-SUIL-SU IUF
IL-SU
Remove
and
stow
the
head
re
-
straint
before
installin
g
a
child
seat
with
a
backrest
on
a
pas
-
senger
seat.
Refit
the
head
re
-
straint
once
the
child
seat
has
been
removed.
CHILD SAFETY
Page 117 of 328
77
115
For optimum installation of the "for -
ward-facing" child seat, ensure that
the
back
of
the
child
seat
is
as
close
as
possible
to
the
backrest
of
the
ve
-
hicle's
seat, in contact if possible.
You
mst
remove
the
head
restraint
before
installin
g
a
child
seat
with
backrest
to a passenger seat.
Ensure
that
the
head
restraint
is
stored
or
attached
securely
to
pre
-
vent
it
from
being
thrown
around
the
vehicle
in
the
event
of
sharp
brak
-
ing.
Refit
the
head
restraint
when
the
child
seat is removed.
ADVICE ON CHILD SEATS
Installing a booster seat
Children at the frontThe incorrect installation of a child seat
in a vehicle compromises the
child's
protection
in
the
event
of
an
accident.
Ensure that there is no seat belt or
seat
belt
buckle
under
the
child
seat,
as
this could destabilise it.
Remember
to
fasten
the
seat
belts
or
the
child
seat
harnesses
keeping
the
slack
relative
to
the
child's
body
to
a
minimum,
even for short journeys.
When
installin
g
a
child
seat
using
the
seat belt, ensure that the seat belt is
tightened
correctly
on
the
child
seat
and that it secures the child seat firmly on the seat of your vehicle. If your passenger
seat is adjustable, move
it
forwards if necessary.
The
legislation
on
carrying
children
on the
front
passenger
seat
is
specific
to each
country
.
Refer
to
the
legislation in
force in your country.
Deactivate
the
passenger
airbag
when
a
"rearward-facing"
child
seat
is
installed on the front seat.
Otherwise,
the
child
would
risk
being
seriously
injured
or
kille
d
if
the
airbag
were
to inflate.The
chest
part
of
the
seat
belt
must
be
positioned
on
the
child's
shoulder
without
touching the neck.
Ensure that the lap part of the seat
belt
passes
correctly
over
the
child's
thighs.
CITROËN
recommends
the
use
of
a
booster
seat
which
has
a
back,
fit
-
ted
with
a
seat
belt
guide
at
shoulder
level.
As
a safety precaution, do not leave:
- a child or children alone and un -
supervised in a vehicle,
- a child or an animal in a vehicle
which
is
exposed
to
the
sun,
with
the
windows closed,
-
the
keys
within
reach
of
children
inside
the vehicle.
At
rear
seating
positions,
always
leave
sufficient
space
between
the
front
seat and:
-
a
"rearward facing" child seat,
-
the
child's
feet
for
a
child
seat
fit
-
ted
"forward facing".
To
do
this,
move
the
front
seat
for
-
wards
and,
if
necessary
,
move
its
backrest
into the upright position. To
prevent
accidental
opening
of
the
doors
and
rear
windows,
use
the
"Child
lock".
Take
care
not
to
open
the
rear
win
-
dows
by more than one third.
To
protect
young
children
from
the
rays
of
the
sun,
fit
side
blinds
on
the
rear
windows.
CHILD SAFETY
Page 118 of 328
77
116
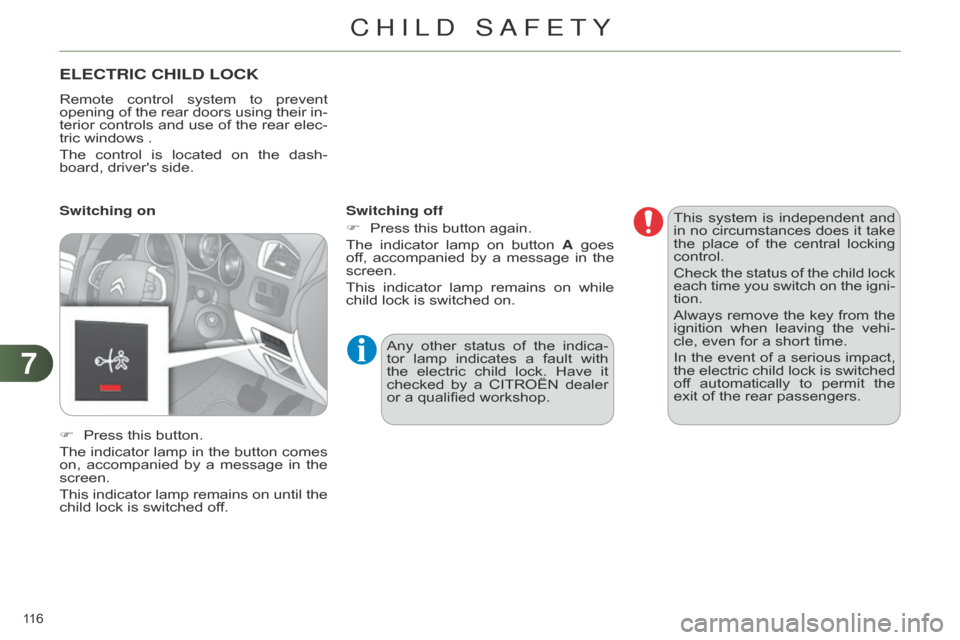
ELECTRIC CHILD LOCK
Remote control system to prevent opening
of the rear doors using their in -
terior
controls
and
use
of
the
rear
elec
-
tric
windows .
The
control
is
located
on
the
dash
-
board,
driver's side.
F
Press
this button.
The
indicator
lamp
in
the
button
comes
on,
accompanied
by
a
message
in
the
screen.
This
indicator
lamp
remains
on
until
the
child
lock is switched off.
Switching on
Switching off
F
Press
this button again.
The
indicator
lamp
on
button
A
goes
of
f,
accompanied
by
a
message
in
the
screen.
This
indicator
lamp
remains
on
while
child
lock is switched on.This
system
is
independent
and
in
no
circumstances
does
it
take
the
place
of
the
central
locking
control.
Check
the
status
of
the
child
lock
each
time
you
switch
on
the
igni
-
tion.
Always
remove
the
key
from
the
ignition
when
leaving
the
vehi
-
cle,
even for a short time.
In
the
event
of
a
serious
impact,
the
electric
child
lock
is
switched
of
f
automatically
to
permit
the
exit
of the rear passengers.
Any
other
status
of
the
indica
-
tor
lamp
indicates
a
fault
with
the
electric
child
lock.
Have
it
checked
by
a
CITROËN
dealer
or
a qualified workshop.
CHILD SAFETY
Page 119 of 328
88
117
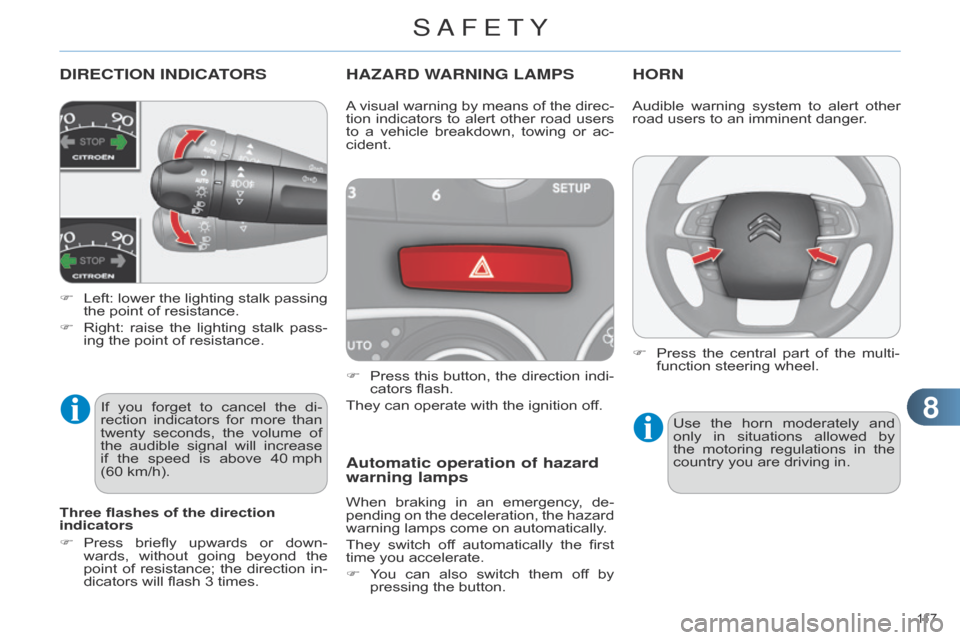
DIRECTION INDICATORS
F Left: lower the lighting stalk passing the
point of resistance.
F
Right:
raise
the
lighting
stalk
pass
-
ing
the point of resistance.
HAZARD WARNING LAMPS
F Press this button, the direction indi -
cators flash.
They
can operate with the ignition off.
Automatic operation of hazard
warning lamps
When braking in an emergency , de -
pending on the deceleration, the hazard
warning
lamps come on automatically.
They
switch
of
f
automatically
the
first
time
you accelerate.
F
Y
ou
can
also
switch
them
of
f
by
pressing
the button.
HORN
A visual warning by means of the direc -
tion indicators to alert other road users
to
a
vehicle
breakdown,
towing
or
ac
-
cident.
Three flashes of the direction
indicators
F
Press
briefly
upwards
or
down
-
wards,
without
going
beyond
the
point
of
resistance;
the
direction
in
-
dicators
will
flash
3
times.
If
you
forget
to
cancel
the
di
-
rection
indicators
for
more
than
twenty
seconds,
the
volume
of
the
audible
signal
will
increase
if
the
speed
is
above
40
mph
(60
km/h). Audible
warning system to alert other road
users to an imminent danger.
Use
the
horn
moderately
and
only
in
situations
allowed
by
the
motoring
regulations
in
the
country
you are driving in.
F
Press
the
central
part
of
the
multi
-
function
steering wheel.
SAFETY
Page 120 of 328
88
118
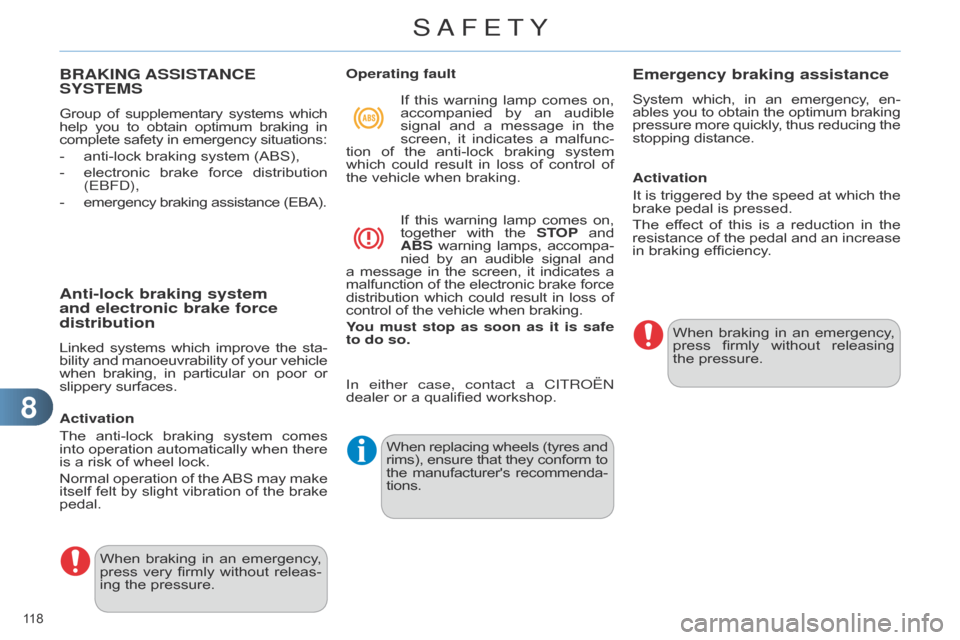
BRAKING ASSISTANCE SYSTEMS
Group of supplementary systems which help
you to obtain optimum braking in complete
safety in emergency situations:
-
anti-lock
braking system (ABS),
-
electronic
brake
force
distribution
(E
b F d ),
-
emergency
braking assistance (EBA).
When
braking
in
an
emergency
,
press
very
firmly
without
releas
-
ing
the pressure. When
replacing
wheels
(tyres
and rims),
ensure
that
they
conform
to the
manufacturer's
recommenda
-
tions. When
braking
in
an
emergency
,
press
firmly
without
releasing
the
pressure.
Anti-lock braking system
and electronic brake force
distribution
Linked systems which improve the sta -
bility and manoeuvrability of your vehicle when
braking,
in
particular
on
poor
or slippery
surfaces.
Activation
The
anti-lock
braking
system
comes
into
operation
automatically
when
there
is
a risk of wheel lock.
Normal
operation
of
the
ABS
may
make
itself
felt
by
slight
vibration
of
the
brake
pedal. Operating fault
If
this
warning
lamp
comes
on,
accompanied
by
an
audible
signal
and
a
message
in
the
screen,
it
indicates
a
malfunc
-
tion
of
the
anti-lock
braking
system
which
could
result
in
loss
of
control
of
the
vehicle when braking.
If
this
warning
lamp
comes
on, together
with
the
ST
OP
and ABS
warning
lamps,
accompa
-
nied
by
an
audible
signal
and a
message
in
the
screen,
it
indicates
a malfunction
of
the
electronic
brake
force distribution
which
could
result
in
loss
of control
of the vehicle when braking.
You must stop as soon as it is safe
to do so.
Emergency braking assistance
System which, in an emergency , en -
ables you to obtain the optimum braking pressure
more
quickly
,
thus
reducing
the stopping
distance.
Activation
It
is
triggered
by
the
speed
at
which
the
brake
pedal is pressed.
The
ef
fect
of
this
is
a
reduction
in
the
resistance
of
the
pedal
and
an
increase
in
braking efficiency.
In either case, contact a CITR
o
Ë
n
dealer
or
a
qualified
workshop.
SAFETY