Citroen C4 RHD 2015 2.G Owners Manual
Manufacturer: CITROEN, Model Year: 2015, Model line: C4 RHD, Model: Citroen C4 RHD 2015 2.GPages: 328, PDF Size: 12.72 MB
Page 91 of 328
55
89
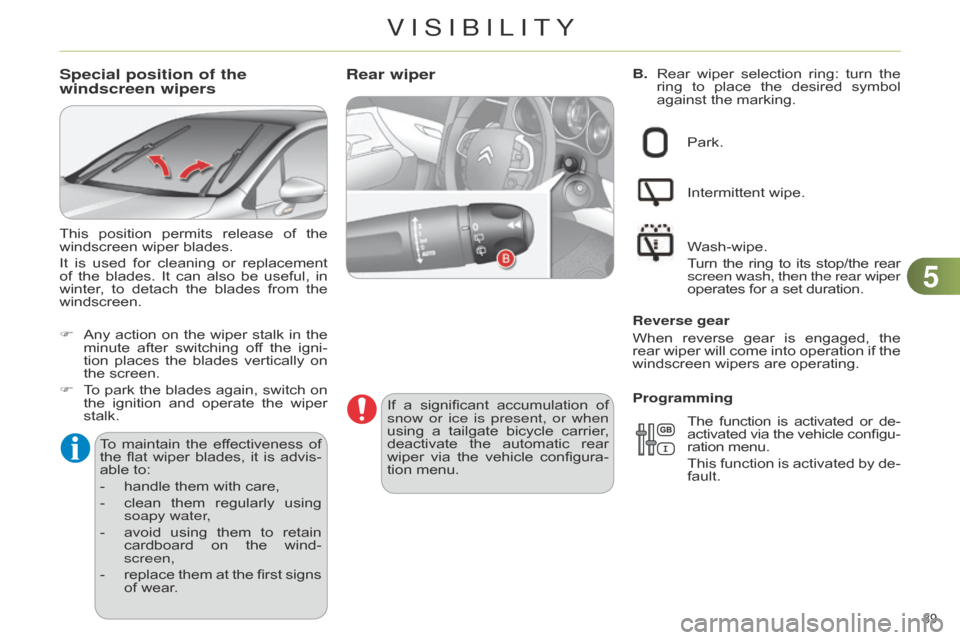
B. Rear wiper selection ring: turn the ring
to place the desired symbol
against
the marking.Rear wiper
If a significant accumulation of snow
or ice is present, or when
using
a
tailgate
bicycle
carrier
,
deactivate
the
automatic
rear
wiper
via
the
vehicle
configura
-
tion
menu. Park.
Intermittent
wipe.
Wash-wipe.
T
urn
the
ring
to
its
stop/the
rear screen wash, then the rear wiper
operates for a set duration.
Reverse gear
When
reverse
gear
is
engaged,
the
rear
wiper
will
come
into
operation
if
the
windscreen
wipers are operating.
The function is activated or de -
activated
via
the
vehicle
configu
-
ration
menu.
This
function
is
activated
by
de
-
fault.
Programming
Special position of the
windscreen wipers
To maintain
the ef fectiveness of the
flat wiper blades, it is advis -
able
to:
-
handle
them with care,
-
clean
them
regularly
using
soapy water
,
-
avoid
using
them
to
retain
cardboard
on
the
wind
-
screen,
-
replace
them
at
the
first
signs
of
wear.
This
position
permits
release
of
the
windscreen
wiper blades.
It
is
used
for
cleaning
or
replacement
of
the
blades.
It
can
also
be
useful,
in
winter
,
to
detach
the
blades
from
the
windscreen.
F
Any
action
on
the
wiper
stalk
in
the
minute
after
switching
of
f
the
igni
-
tion
places
the
blades
vertically
on
the
screen.
F
T
o
park
the
blades
again,
switch
on
the
ignition
and
operate
the
wiper
stalk.
VISIBILITY
Page 92 of 328
55
90
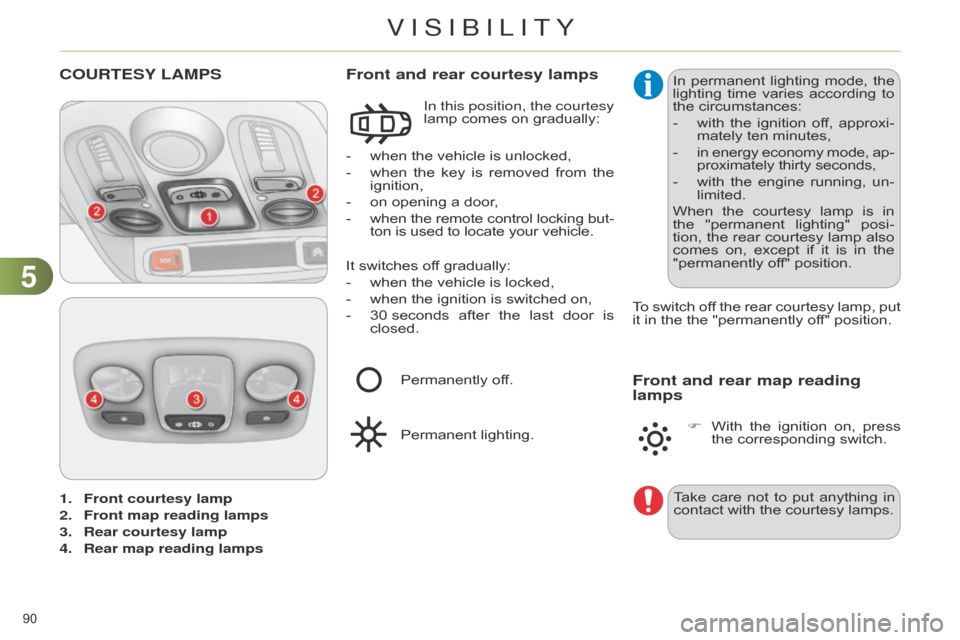
1. Front courtesy lamp
2.
Front map reading lamps
3.
Rear courtesy lamp
4.
Rear map reading lamps
COURTESY LAMPS
- when the vehicle is unlocked,
-
when
the
key
is
removed
from
the
ignition,
-
on
opening a door,
-
when
the
remote
control
locking
but
-
ton
is used to locate your vehicle.
Front and rear courtesy lamps
In this position, the courtesy
lamp comes on gradually:
It
switches
off gradually:
-
when
the vehicle is locked,
-
when
the ignition is switched on,
-
30
seconds
after
the
last
door
is
closed. T
o
switch
of
f
the
rear
courtesy
lamp,
put
it
in the the "permanently off" position.
Permanently
off.
Permanent
lighting. In
permanent
lighting
mode,
the
lighting
time varies according to the
circumstances:
-
with
the
ignition
of
f,
approxi
-
mately
ten minutes,
-
in
energy
economy
mode,
ap
-
proximately
thirty seconds,
-
with
the
engine
running,
un
-
limited.
When
the
courtesy
lamp
is
in
the
"permanent
lighting"
posi
-
tion,
the
rear
courtesy
lamp
also
comes
on,
except
if
it
is
in
the
"permanently
off" position.
Front and rear map reading
lamps
Take care not to put anything in contact
with the courtesy lamps.
F
With
the
ignition
on,
press
the
corresponding switch.
VISIBILITY
Page 93 of 328
55
91
INTERIOR MOOD LIGHTING
The dimmed passenger compartment lighting
improves visibility in the vehicle
when
the light is poor.
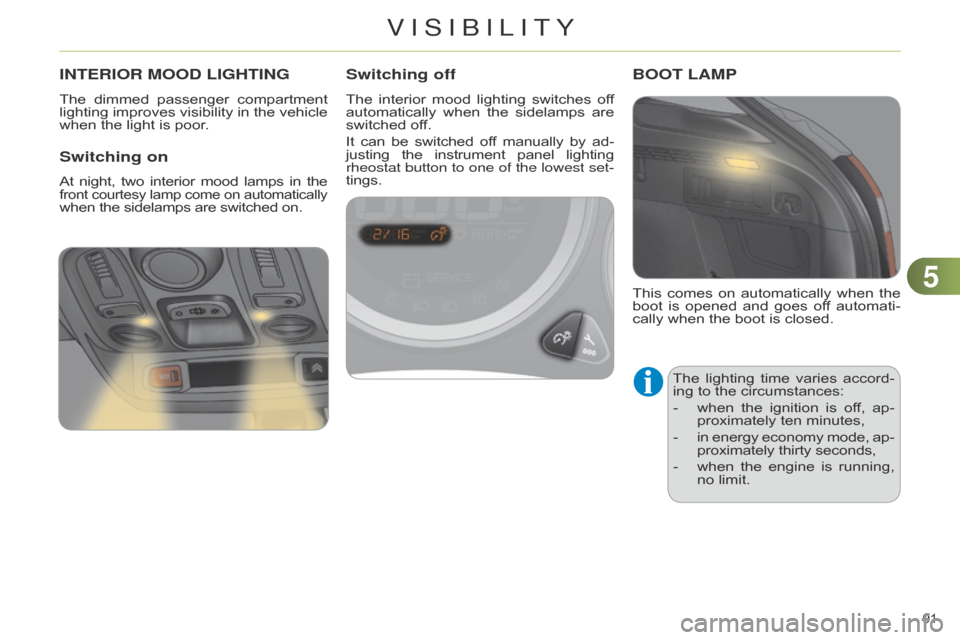
Switching on
At night, two interior mood lamps in the front courtesy lamp come on automatically
when
the
sidelamps
are
switched
on.
Switching off
The interior mood lighting switches of f automatically
when the sidelamps are
switched
off.
It
can
be
switched
of
f
manually
by
ad
-
justing
the
instrument
panel
lighting rheostat button to one of the lowest set
-
tings.
This
comes
on
automatically
when
the
boot
is
opened
and
goes
of
f
automati
-
cally
when the boot is closed.
BOOT LAMP
The lighting time varies accord -
ing to the circumstances:
-
when
the
ignition
is
of
f,
ap
-
proximately
ten minutes,
-
in
energy
economy
mode,
ap
-
proximately
thirty seconds,
-
when
the
engine
is
running,
no
limit.
VISIBILITY
Page 94 of 328
92
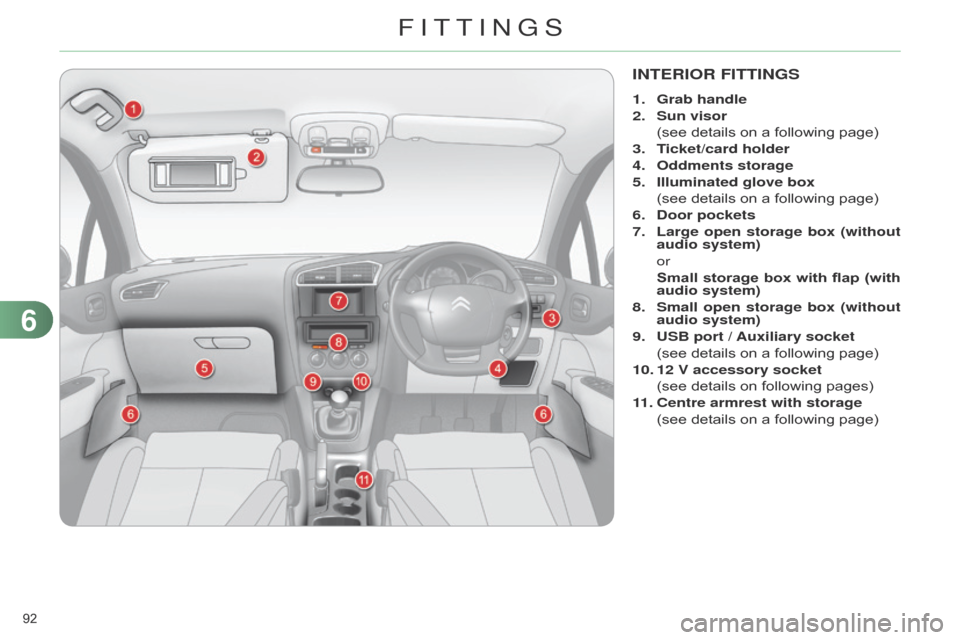
INTERIOR FITTINGS
1. Grab handle
2.
Sun visor
(see
details on a following page)
3.
T
icket/card holder
4.
Oddments storage
5.
Illuminated
glove box
(see
details on a following page)
6.
Door pocket
s
7.
Large open storage box (without
audio system)
or
Small
storage box with flap (with
audio system)
8.
Small open storage box
(without
audio system)
9.
USB port /
Auxiliary socket
(see
details on a following page)
10.
12 V accessory socket
(see
details on following pages)
11 .
Centre armrest with storage
(see
details on a following page)
6
FITTINGS
Page 95 of 328
93
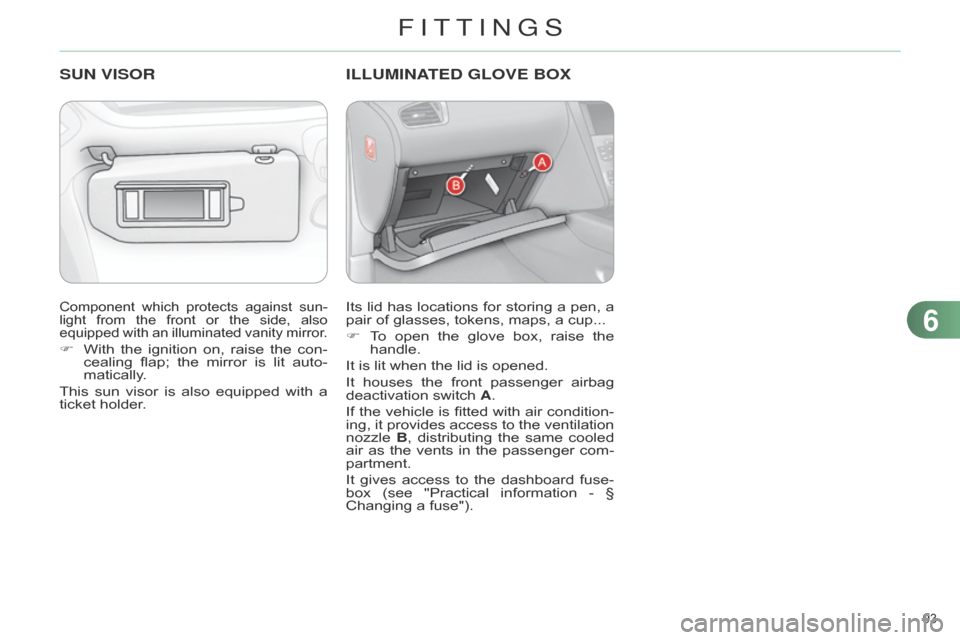
Component which protects against sun -
light from the front or the side, also
equipped
with
an
illuminated
vanity
mirror
.
F With the ignition on, raise the con -
cealing flap; the mirror is lit auto -
matically.
This
sun
visor
is
also
equipped
with
a
ticket
holder.
SUN VISORI LLUMINATED GLOVE BOX
Its lid has locations for storing a pen, a pair
of glasses, tokens, maps, a cup...
F
T
o
open
the
glove
box,
raise
the
handle.
It
is lit when the lid is opened.
It
houses
the
front
passenger
airbag
deactivation
switch A.
If
the
vehicle
is
fitted
with
air
condition
-
ing,
it
provides
access
to
the
ventilation
nozzle
B
,
distributing
the
same
cooled
air
as
the
vents
in
the
passenger
com
-
partment.
It
gives
access
to
the
dashboard
fuse
-
box
(see
"Practical
information
-
§
Changing
a fuse").
6
FITTINGS
Page 96 of 328
94
12 V ACCESSORY SOCKET
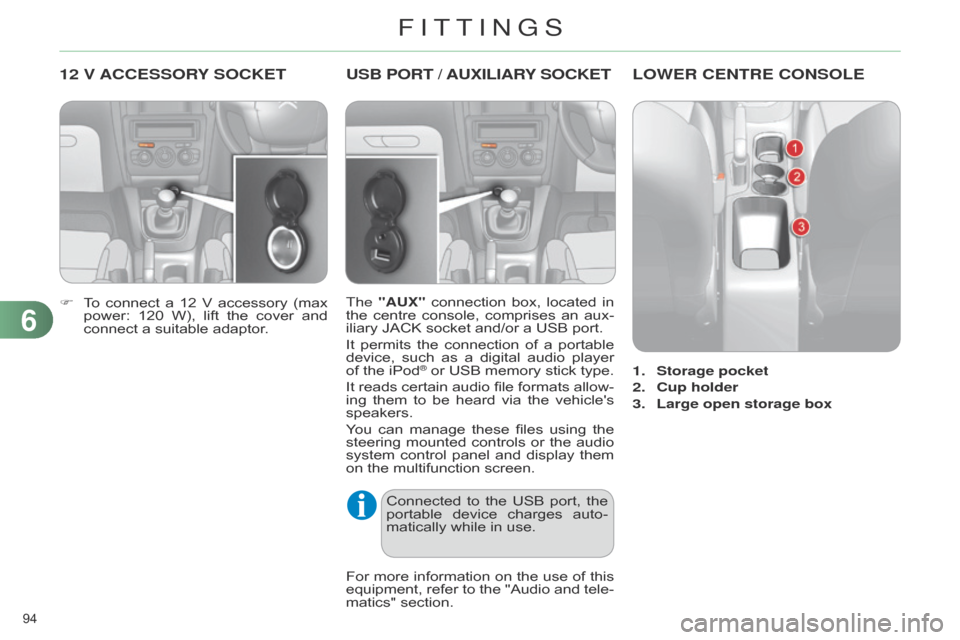
F To connect a 12 V accessory (max power:
120 W), lift the cover and
connect
a suitable adaptor.
USB PORT / AUXILIAR Y SOCKET
The "AUX" connection box, located in the
centre console, comprises an aux -
iliary
JACK socket and/or a USB port.
It
permits
the
connection
of
a
portable
device,
such
as
a
digital
audio
player
of
the iPod
® or USB memory stick type.
It
reads
certain
audio
file
formats
allow
-
ing
them
to
be
heard
via
the
vehicle's
speakers.
Y
ou
can
manage
these
files
using
the
steering
mounted
controls
or
the
audio
system
control
panel
and
display
them
on
the
multifunction screen.
For
more
information
on
the
use
of
this
equipment,
refer
to
the
"Audio
and
tele
-
matics"
section.
Connected
to
the
USB
port,
the
portable
device
charges
auto
-
matically
while in use.
LOWER CENTRE CONSOLE
1. Storage pocket
2.
Cup holder
3.
Large open storage box
6
FITTINGS
Page 97 of 328
95
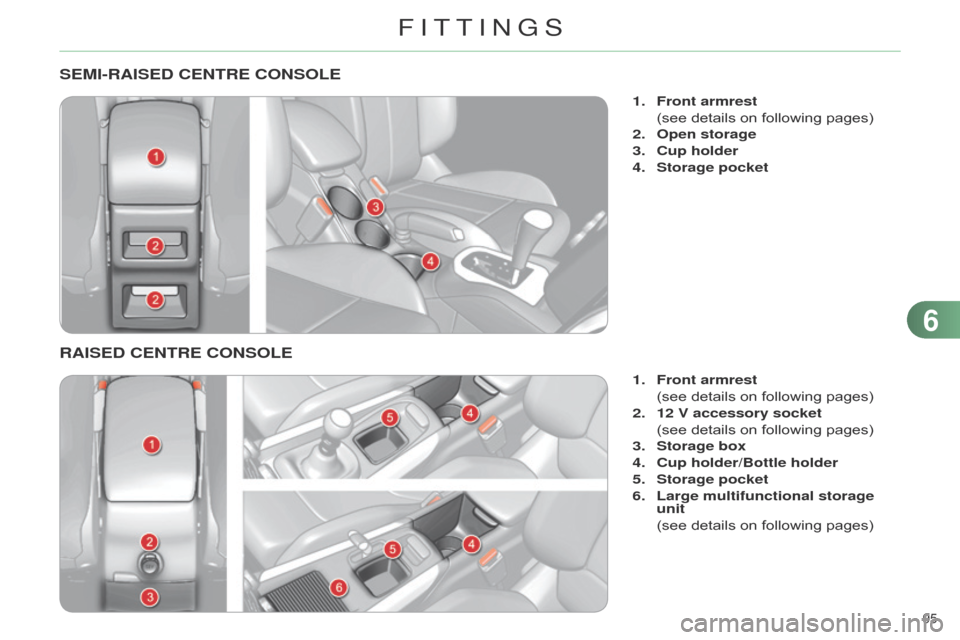
SEMI-RAISED CENTRE CONSOLE
1. Front armrest
(see
details on following pages)
2.
Open storage
3.
Cup holder
4.
Storage pocket
RAISED CENTRE CONSOLE
1. Front armrest
(see
details on following pages)
2.
12 V accessory socket
(see
details on following pages)
3.
Storage box
4.
Cup holder/Bottle holder
5.
Storage pocket
6.
Large multifunctional storage
unit
(see
details on following pages)
6
FITTINGS
Page 98 of 328
96
LARGE MULTIFUNCTIONAL STORAGE UNIT
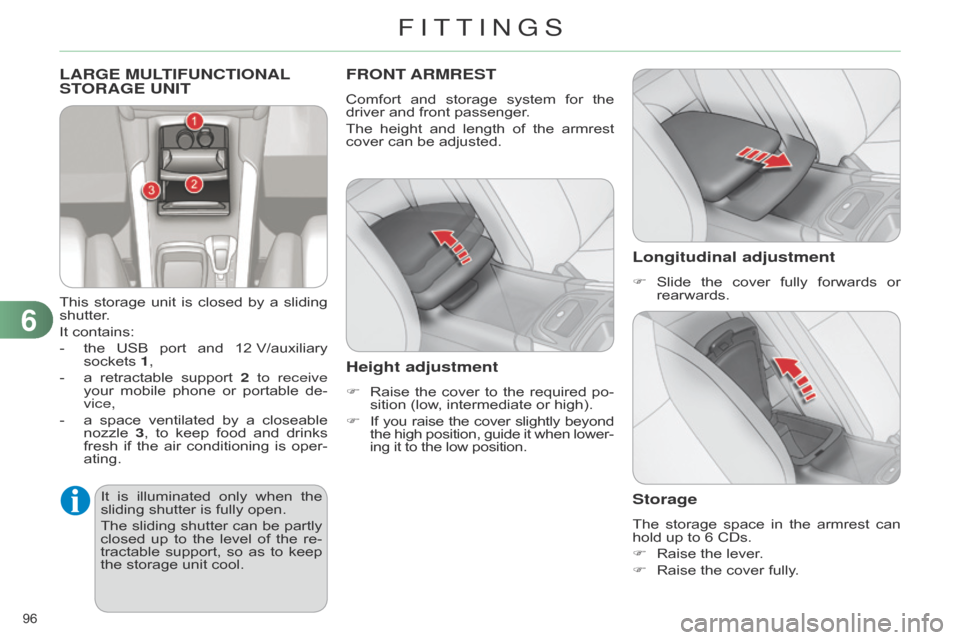
This storage unit is closed by a sliding shutter
.
It
contains:
-
the
USB
port
and
12
V/auxiliary
sockets
1,
-
a
retractable
support
2
to receive
your
mobile
phone
or
portable
de
-
vice,
-
a
space
ventilated
by
a
closeable
nozzle
3
,
to
keep
food
and
drinks
fresh
if
the
air
conditioning
is
oper
-
ating.
FRONT ARMREST
Comfort and storage system for the driver
and front passenger.
The
height
and
length
of
the
armrest
cover
can be adjusted.
Height adjustment
F Raise the cover to the required po -
sition (low, intermediate or high).
F
If
you
raise
the
cover
slightly
beyond the
high
position,
guide
it
when
lower
-
ing
it to the low position.
Longitudinal adjustment
F Slide the cover fully forwards or rearwards.
Storage
The storage space in the armrest can hold
up to 6 CDs.
F
Raise
the lever.
F
Raise
the cover fully.
It
is
illu
minated
only
when
the
sliding
shutter
is
fully
open.
The
sliding
shutter
can
be
partly
closed
up
to
the
level
of
the
re
-
tractable
support,
so
as
to
keep
the
storage
unit
cool.
6
FITTINGS
Page 99 of 328
97
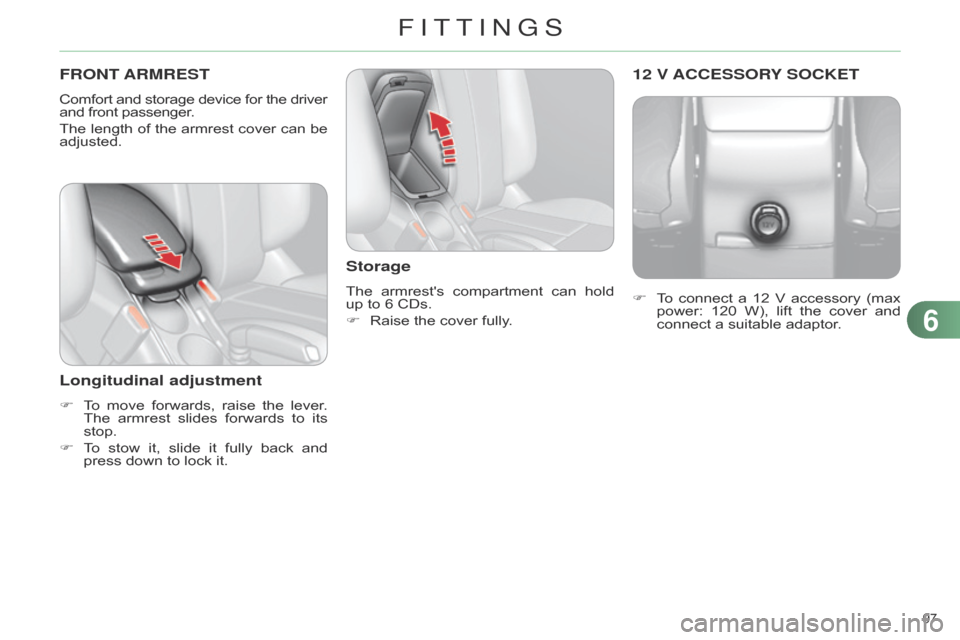
FRONT ARMREST
Comfort and storage device for the driver and
front passenger.
The
length
of
the
armrest
cover
can
be
adjusted.
Longitudinal adjustment
F To move forwards, raise the lever . The
armrest slides forwards to its
stop.
F
T
o
stow
it,
slide
it
fully
back
and
press
down to lock it.
Storage
The armrest's compartment can hold up
to 6 CDs.
F
Raise
the cover fully. F
T o connect a 12 V accessory (max
power:
120
W),
lift
the
cover
and
connect
a suitable adaptor.
12 V ACCESSORY SOCKET
6
FITTINGS
Page 100 of 328
98
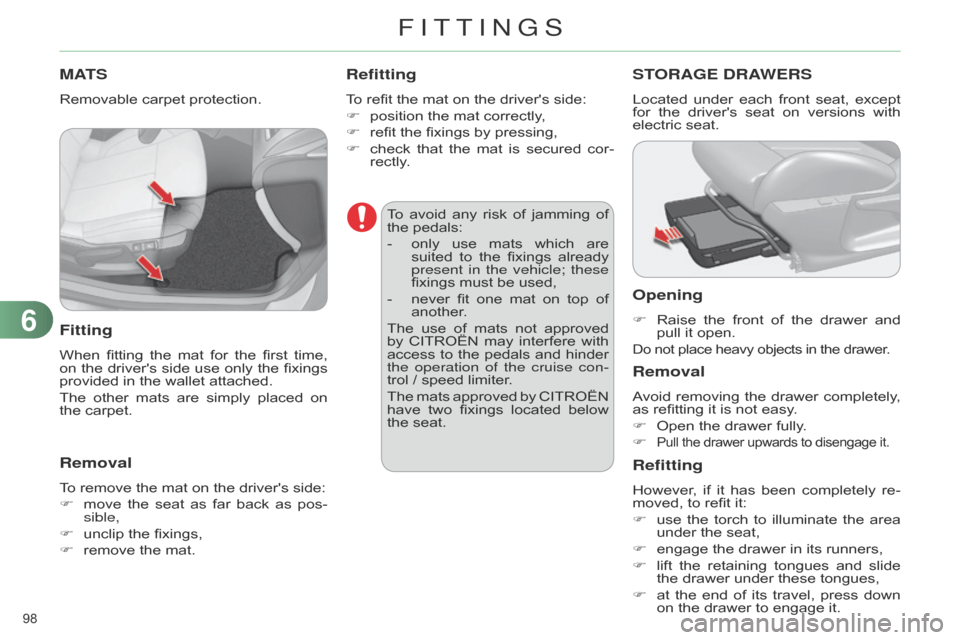
MATS
Removable carpet protection.
Fitting
When fitting the mat for the first time, on
the driver's side use only the fixings
provided
in the wallet attached.
The
other
mats
are
simply
placed
on
the
carpet.
Removal
To remove the mat on the driver's side:
F
move
the
seat
as
far
back
as
pos
-
sible,
F
unclip
the fixings,
F
remove
the mat.
Refitting
To refit the mat on the driver's side:
F
position
the mat correctly,
F
refit
the fixings by pressing,
F
check
that
the
mat
is
secured
cor
-
rectly.
To
avoid
any
risk
of
jamming
of
the
pedals:
-
only
use
mats
which
are
suited
to
the
fixings
already
present
in the vehicle; these
fixings
must be used,
-
never
fit
one
mat
on
top
of
another
.
The
use
of
mats
not
approved
by
CITROËN
may
interfere
with
access
to
the
pedals
and
hinder
the operation of the cruise con
-
trol
/ speed limiter.
The
mats
approved
by
CITROËN
have
two
fixings
located
below
the
seat.
STORAGE DRAWERS
Located under each front seat, except for
the driver's seat on versions with
electric
seat.
Opening
F Raise the front of the drawer and pull
it open.
Do not place heavy objects in the drawer.
Removal
Avoid removing the drawer completely , as
refitting it is not easy.
F
Open
the drawer fully.
F
Pull the drawer upwards to disengage it.
Refitting
However, if it has been completely re -
moved, to refit it:
F
use
the
torch
to
illu
minate
the
area
under
the seat,
F
engage
the drawer in its runners,
F
lift
the
retaining
tongues
and
slide
the
drawer under these tongues,
F
at
the
end
of
its
travel,
press
down
on
the drawer to engage it.
6
FITTINGS