CITROEN DS3 CABRIO 2015 Handbook (in English)
Manufacturer: CITROEN, Model Year: 2015, Model line: DS3 CABRIO, Model: CITROEN DS3 CABRIO 2015Pages: 404, PDF Size: 13.2 MB
Page 341 of 404
339
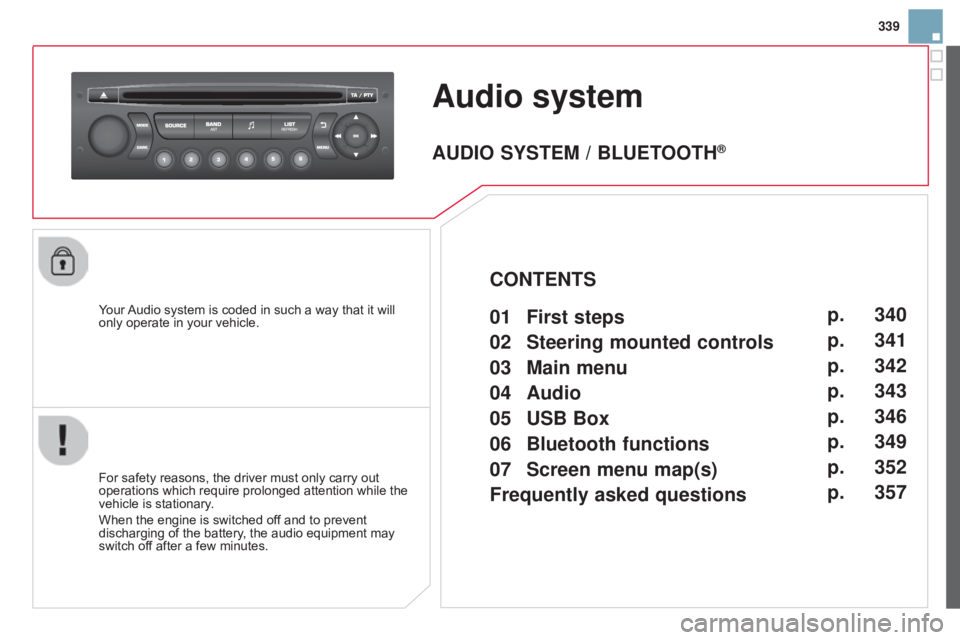
Audio system
Yourô Audioô system ô is ô coded ô in ô such ô a ô way ô that ô it ô will ô only
ô operate ô in ô your ô vehicle.
For
ô safety ô reasons, ô the ô driver ô must ô only ô carry ô out ô
operations
ô which ô require ô prolonged ô attention ô while ô the ô
vehicle
ô is ô stationary.
When
ô the ô engine ô is ô switched ô off ô and ô to ô prevent ô
discharging
ô of ô the ô battery, ô the ô audio ô equipment ô may ô
switch
ô off ô after ô a ô few ô minutes.
AUdIO SYSTEM / BLUETOOTHôÛ
01 First steps
02
Steering mounted
controls
03
Main
menu
04
Audio
05
USB Box
06
Bluetooth
functions
07
Screen menu map(s)
Frequently
asked questions p.
p.
p.
p.
p.
p.
p.
p.
340
341
342
343
346
349
352
357
CONTENTS
Page 342 of 404
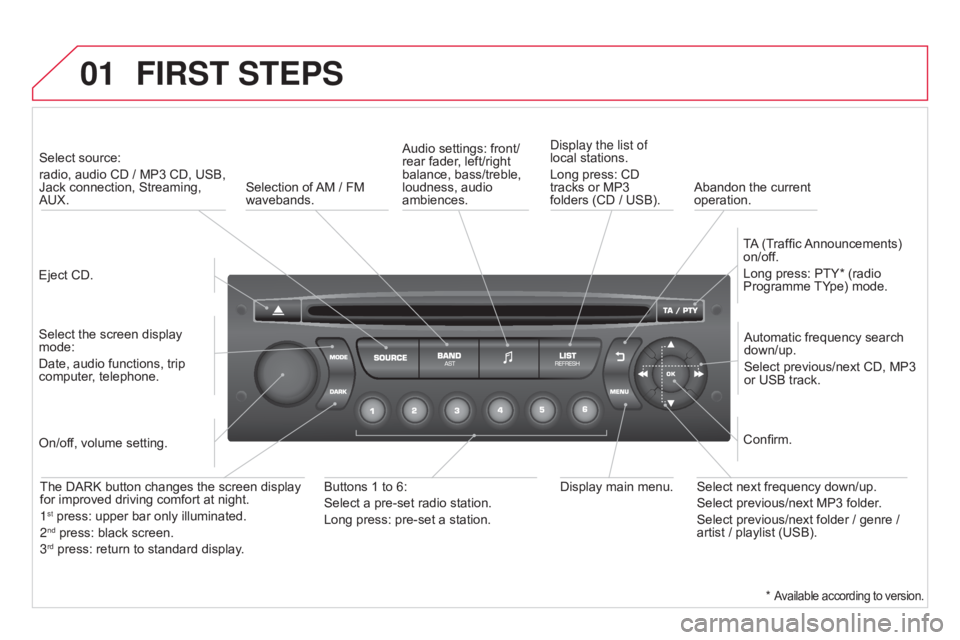
01FIRST STEPS
Ejectô CD.
Select ô source: ô
radio,
ô audio ô CD ô / ô MP3 ô CD, ô USB, ô
Jack
ô connection, ô Streaming, ô
AUX.
Select
ô the ô screen ô display ô
mode:
Date,
ô audio ô functions, ô trip ô
computer
, ô telephone. Automatic
ô frequency ô search ô
down/up.
Select
ô previous/next ô CD, ô MP3 ô
or
ô USB ô track.
Audio
ô settings: ô front/
rear ô fader, ô left/right ô
balance,
ô bass/treble, ô
loudness,
ô audio ô
ambiences.
d
isplay the list of
local ô stations.
Long ô press: ô CD ô
tracks
ô or ô MP3 ô
folders
ô (CD ô / ô USB).
TA
ô
(Traffic ô
Announcements)
ô
on/of
f.
Long ô press: ô PTY* ô (radio ô Programme
ô TY pe) ô mode.
Display
ô main ô menu.
The
ô DARK ô button ô changes ô the ô screen ô display ô
for
ô improved ô driving ô comfort ô at ô night.
1
stô press:ô upperô barô onlyô illuminated.
2ndô press:ô blackô screen.
3rdô press:ô returnô toô standardô display.
On/of f, ô volume ô setting.
Buttons ô 1 ô to ô 6:
Select ô a ô pre-set ô radio ô station.
Long ô press: ô pre-set ô a ô station.Select ô next ô frequency ô down/up.
Select ô previous/next ô MP3 ô folder.
Select ô previous/next ô folder ô / ô genre ô / ô
artist
ô / ô playlist ô (USB).
Confirm.
Selection ô of ô
AM
ô / ô FM ô
wavebands.
Abandon
ô the ô current ô
operation.
*
Availableô accordingô toô version.
Page 343 of 404
02
341
STEERING MOUNTEd CONTROLS
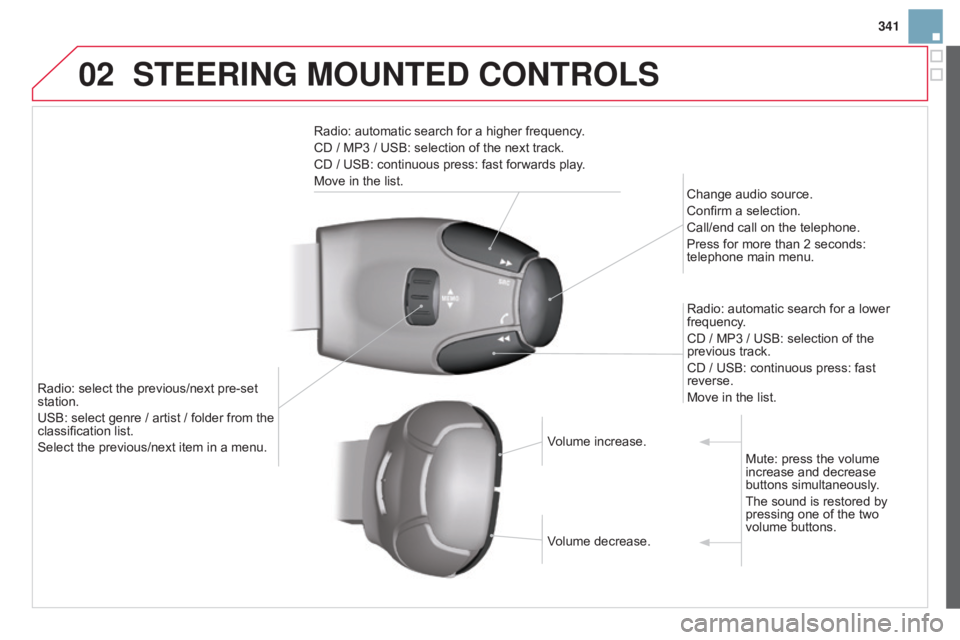
Radio:ô automaticô searchô forô aô higherô frequency.
CD ô / ô MP3 ô / ô USB: ô selection ô of ô the ô next ô track.
CD
ô / ô USB: ô continuous ô press: ô fast ô forwards ô play.
Move
ô in ô the ô list. Change
ô audio ô source.
Confirm
ô a ô selection.
Call/end
ô call ô on ô the ô telephone.
Press
ô for ô more ô than ô 2 ô seconds: ô
telephone
ô main ô menu.
Radio:
ô automatic ô search ô for ô a ô lower ô
frequency
.
CD
ô / ô MP3 ô / ô USB: ô selection ô of ô the ô
previous
ô track.
CD
ô / ô USB: ô continuous ô press: ô fast ô
reverse.
Move
ô in ô the ô list.
Radio:
ô
select
ô
the
ô
previous/next
ô
pre-set
ô
station.
USB:
ô
select
ô
genre
ô
/
ô
artist
ô
/
ô
folder
ô
from
ô
the
ô
classification
ô
list.
Select
ô
the
ô
previous/next
ô
item
ô
in
ô
a
ô
menu. Volume
ô increase.
Volume
ô decrease.Mute:
ô press ô the ô volume ô
increase
ô and ô decrease ô
buttons
ô simultaneously.
The
ô sound ô is ô restored ô by ô
pressing
ô one ô of ô the ô two ô
volume
ô buttons.
Page 344 of 404
03MAIN MENU
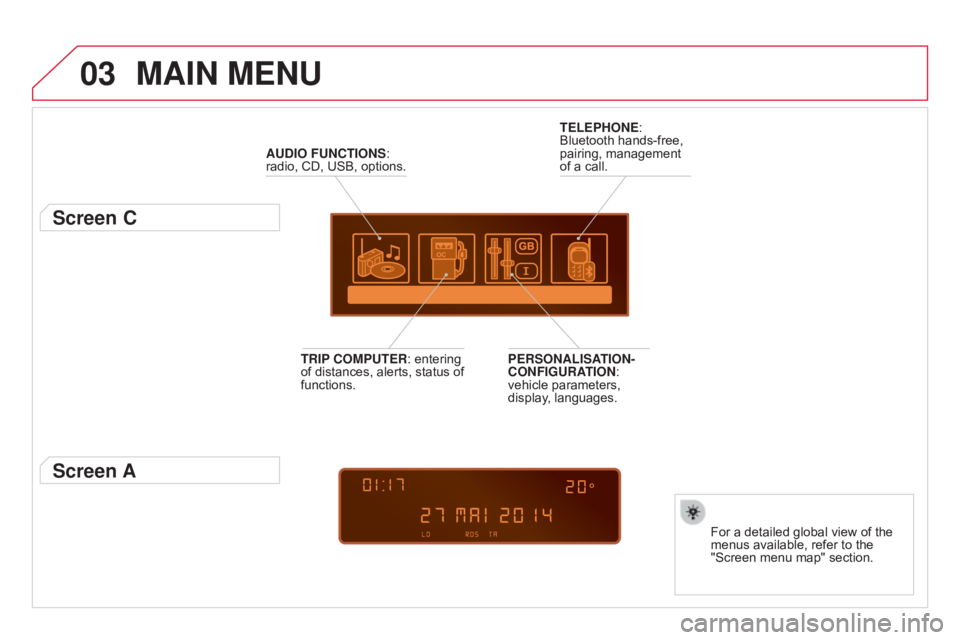
AUdIO FUNCTIONS:ô radio,ô CD, ô USB, ô options.
Screen C
Forô aô detailedô globalô viewô ofô theô menusô available, ô refer ô to ô the ô
"Screen
ô menu ô map" ô section.
TELEPHONE:
ô
Bluetooth
ô
hands-free,
ô
pairing,
ô
management
ô
of
ô
a
ô
call.
PERSONALISATION-
CONFIGURATION:
ô
vehicle
ô
parameters,
ô
display
,
ô
languages.
TRIP COMPUTER:
ô
entering
ô
of
ô
distances,
ô
alerts,
ô
status
ô
of
ô
functions.
Screen A
Page 345 of 404
04
343
AUdIO
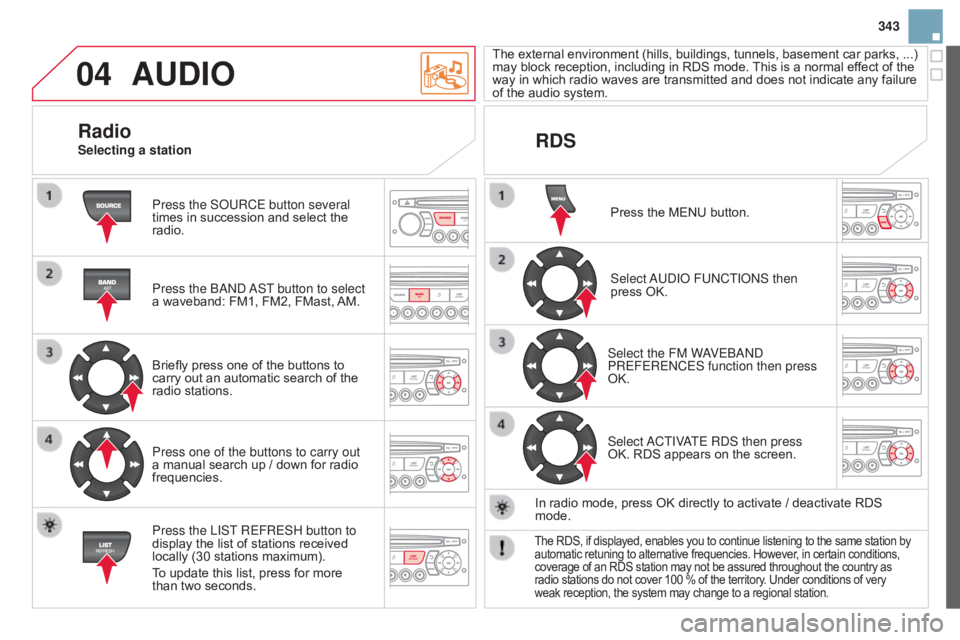
Press the SoURCE button several
times ô in ô succession ô and ô select ô the ô
radio.
Press the
band
a
ST button to select
a
ô waveband: ô FM1, ô FM2, ô FMast, ô
AM.
Briefly
ô press ô one ô of ô the ô buttons ô to ô
carry
ô out ô an ô automatic ô search ô of ô the ô
radio
ô stations.
Press one of the buttons to carry out
a
ô manual ô search ô up ô / ô down ô for ô radio ô
frequencies.
Press the LIST
REFRESH button to
display
ô the ô list ô of ô stations ô received ô
locally
ô (30 ô stations ô maximum).
To
ô update ô this ô list, ô press ô for ô more ô
than
ô two ô seconds. The
ô
external
ô
enviro
nment ô
(hills,
ô
build
ings, ô
tunnels,
ô
basement
ô
car
ô
parks,
ô ...) ô
may
ô block ô reception, ô including ô in ô RDS ô mode. ô
This
ô is ô a ô normal ô effect ô of ô the ô
way
ô in ô which ô radio ô waves ô are ô transmitted ô and ô does ô not ô indicate ô any ô failure ô
of
ô the ô audio ô system.
RdS
RadioSelecting a station
Press ô the ô MENU ô button.
Select
a
U d I o FU n CTI on S then
press
ô OK.
Select the FM W
aVE
band
PREFERE
n CES function then press
OK.
Select
a
CTIV
aTE R
d S then press
OK.
ô RDS ô appears ô on ô the ô screen.
In
ô radio ô mode, ô press ô OK ô directly ô to ô activate ô / ô deactivate ô RDS ô
mode.
Theô RDS,ô if ô displayed, ô enables ô you ô to ô continue ô listening ô to ô the ô same ô station ô byô automatic
ô retuning ô to ô alternative ô frequencies. ô However, ô in ô certain ô conditions,ô coverage
ô of ô an ô RDS ô station ô may ô not ô be ô assured ô throughout ô the ô country ô as
ô radio
ô stations ô do ô not ô cover ô 100 ô % ô of ô the ô territory. ô Under ô conditions ô of ô very
ô weak
ô reception, ô the ô system ô may ô change ô to ô a ô regional ô station.
Page 346 of 404
04AUdIO
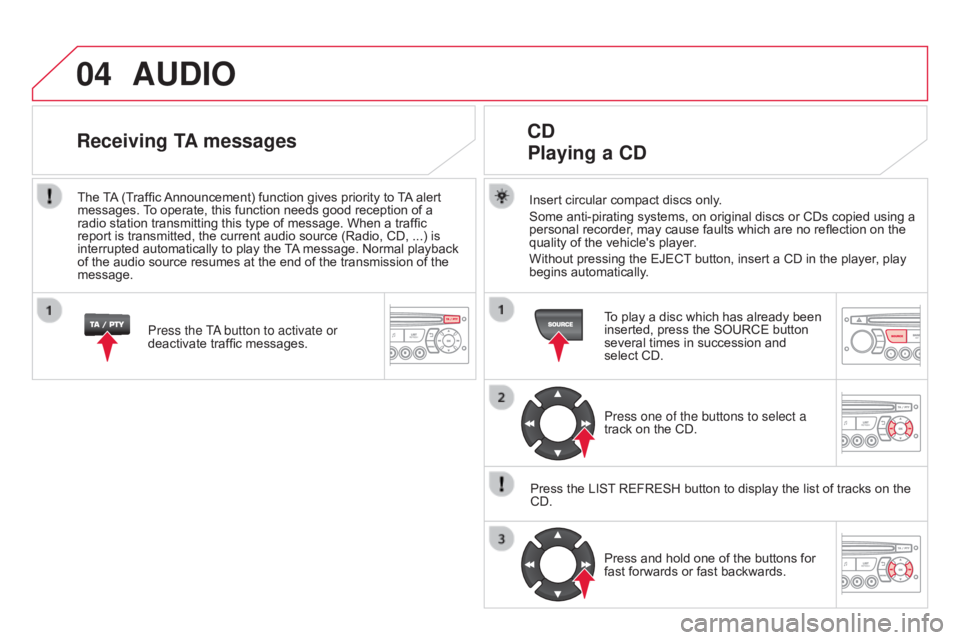
Insertô circularô compactô discsô only.
Some ô anti-pirating ô systems, ô on ô original ô discs ô or ô CDs ô copied ô using ô a ô
personal
ô recorder, ô may ô cause ô faults ô which ô are ô no ô reflection ô on ô the ô
quality
ô of ô the ô vehicle's ô player.
Without
ô pressing ô the ô EJECT
ô
button, ô insert ô a ô CD ô in ô the ô player, ô play ô
begins
ô automatically.
Cd
Playing
a C d
Toô playô aô discô whichô hasô alreadyô beenô inserted,ô press ô the ô SOURCE ô button ô
several
ô times ô in ô succession ô and ô
select
ô CD.
Press one of the buttons to select a
track
ô on ô the ô CD.
Press
ô
the
ô
LIST
ô
REFRESH ô button ô to ô display ô the ô list ô of ô tracks ô on ô the ô
CD.Press
ô and ô hold ô one ô of ô the ô buttons ô for ô
fast
ô forwards ô or ô fast ô backwards.
Receiving TA messages
Press the Ta button to activate or
deactivate ô traffic ô messages.
The
ô
T
A
ô
(Traffic ô
Announcement)
ô function ô gives ô priority ô to ô
T
A
ô
alert ô
messages.
ô
T
o ô operate, ô this ô function ô needs ô good ô reception ô of ô a ô
radio
ô
station
ô transmitting ô this ô type ô of ô message. ô When ô a ô traffic ô
report
ô
is
ô
transmitted, ô the ô current ô audio ô source ô (Radio, ô CD, ô ...) ô is ô
interrupted
ô
automatically ô to ô play ô the ô
T
A
ô
message. ô Normal ô playback ô
of
ô
the
ô
audio
ô source ô resumes ô at ô the ô end ô of ô the ô transmission ô of ô the ô
message.
Page 347 of 404
04
345
The
ô
MP3
ô
format,
ô
an
ô
abbreviation
ô
of
ô
MPEG
ô
1.2
ô
&
ô
2.5
ô
Audio
ô
Layer ô 3,
is
ô
an
ô
audio
ô
compression
ô
standard
ô
which
ô
permits
ô
the
ô
recording ô of ô
several
ô
tens
ô
of
ô
music
ô
files
ô
on
ô
a
ô
single
ô
disc.
In
ô
order
ô
to
ô
be
ô
able
ô
to
ô
play
ô
a
ô
recorded
ô
CDR
ô
or
ô
CDRW,
ô
when
ô
recording,
ô
the
ô
ISO
ô
9660
ô
level
ô
1.2
ô
or
ô
Joliet
ô
file
ô
format
ô
is
ô
recommended.
If
ô
the
ô
disc
ô
is
ô
recorded
ô
in
ô
another
ô
format,
ô
it
ô
may
ô
not
ô
be
ô
played
ô
correctly
.
It
ô
is
ô
recommended
ô
that
ô
the
ô
same
ô
recording
ô
format
ô
is
ô
always
ô
used
ô
for
ô
an
ô
individual
ô
disc,
ô
with
ô
as
ô
low
ô
a
ô
speed
ô
as
ô
possible
ô
(4x
ô
maximum)
ô
for
ô
optimum
ô
sound
ô
quality.
In
ô
the
ô
particular
ô
case
ô
of
ô
a
ô
multi-session
ô
CD,
ô
the
ô
Joliet
ô
format
ô
is ô
recommended.
The
ô
audio
ô
system
ô
will
ô
only
ô
play
ô
files
ô
with
ô
the
ô
extension
ô
".mp3" ô with ô
a
ô
sampling
ô
rate
ô
of
ô
22.05
ô
KHz
ô
or
ô
44.1
ô
KHz.
ô
No
ô
other
ô
type
ô
of
ô
file ô
(.wma,
ô
.mp4,
ô
.m3u...)
ô
can
ô
be
ô
played.
It
ô
is
ô
advisable
ô
to
ô
restrict
ô
file
ô
names
ô
to
ô
20
ô
characters
ô
without
ô
using ô
special
ô
characters
ô
(e.g.
ô
"
ô
?
ô
;
ô
û¿)
ô
to
ô
avoid
ô
any
ô
playing
ô
or
ô
displaying ô
problems.
MP3 Cd
Information
and advice
AUdIO
Emptyô CDsô areô notô recognisedô andô mayô damageô theô system.
Insert
ô
an
ô
MP3
ô
compilation
ô
in
ô
the
ô
player.
The
ô
audio
ô
equipment
ô
searches
ô
for
ô
all
ô
of
ô
the
ô
music
ô
tracks,
ô
which
ô
may
ô
take
ô
anything
ô
between
ô
a
ô
few
ô
seconds
ô
and
ô
several
ô
tens
ô
of
ô
seconds,
ô
before
ô
play
ô
begins.
MP3 Cd
Playing
an MP3 compilation
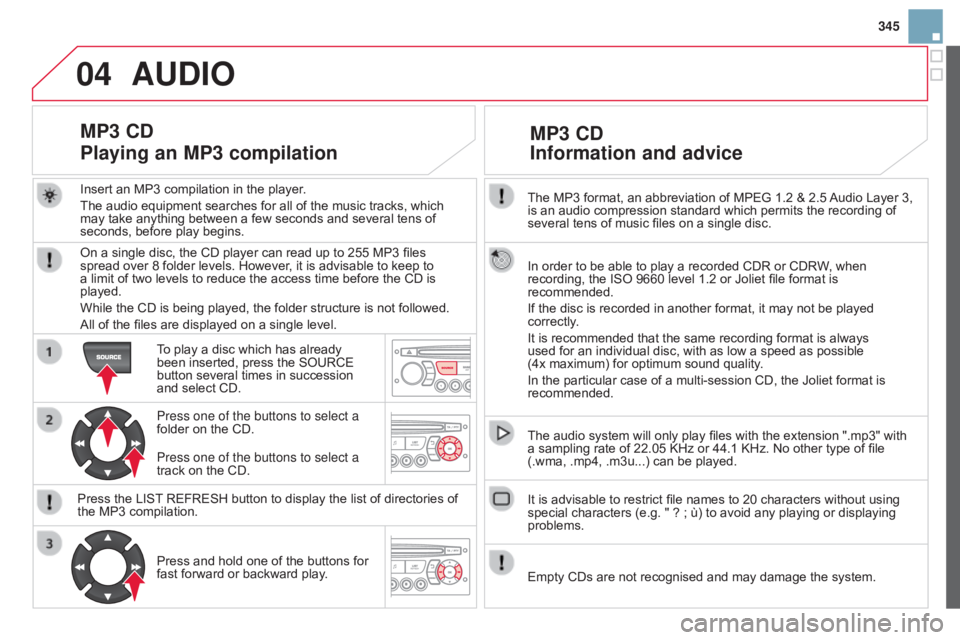
Onô aô singleô disc,ô theô CDô playerô canô readô upô toô 255ô MP3ô filesô spreadô over ô 8 ô folder ô levels. ô However, ô it ô is ô advisable ô to ô keep ô to ô
a
ô limit ô of ô two ô levels ô to ô reduce ô the ô access ô time ô before ô the ô CD ô is ô
played.
While
ô the ô CD ô is ô being ô played, ô the ô folder ô structure ô is ô not ô followed.
All
ô of ô the ô files ô are ô displayed ô on ô a ô single ô level.
To
ô play ô a ô disc ô which ô has ô already ô
been
ô inserted, ô press ô the ô SOURCE ô
button
ô several ô times ô in ô succession ô
and
ô select ô CD.
Press one of the buttons to select a
folder
ô on ô the ô CD.
Press
ô the ô LIST
ô
REFRESH ô button ô to ô display ô the ô list ô of ô directories ô of ô
the
ô MP3 ô compilation.Press
ô and ô hold ô one ô of ô the ô buttons ô for ô
fast
ô forward ô or ô backward ô play.
Press one of the buttons to select a
track
ô on ô the ô CD.
Page 348 of 404
05USB PLAYER
Theô systemô putsô togetherô playlistsô (temporaryô memory)ô createdô overô a ô period ô which ô depends ô on ô the ô capacity ô of ô the ô USB ô device.
The
ô other ô sources ô are ô available ô during ô this ô time.
The
ô playlists ô are ô updated ô each ô time ô the ô ignition ô is ô switched ô off ô or ô
each
ô time ô a ô USB ô memory ô stick ô is ô connected.
When
ô connecting ô for ô the ô first ô time, ô the ô classification ô suggested ô
is
ô by ô folder. ô When ô you ô reconnect, ô the ô classification ô selected ô
previously
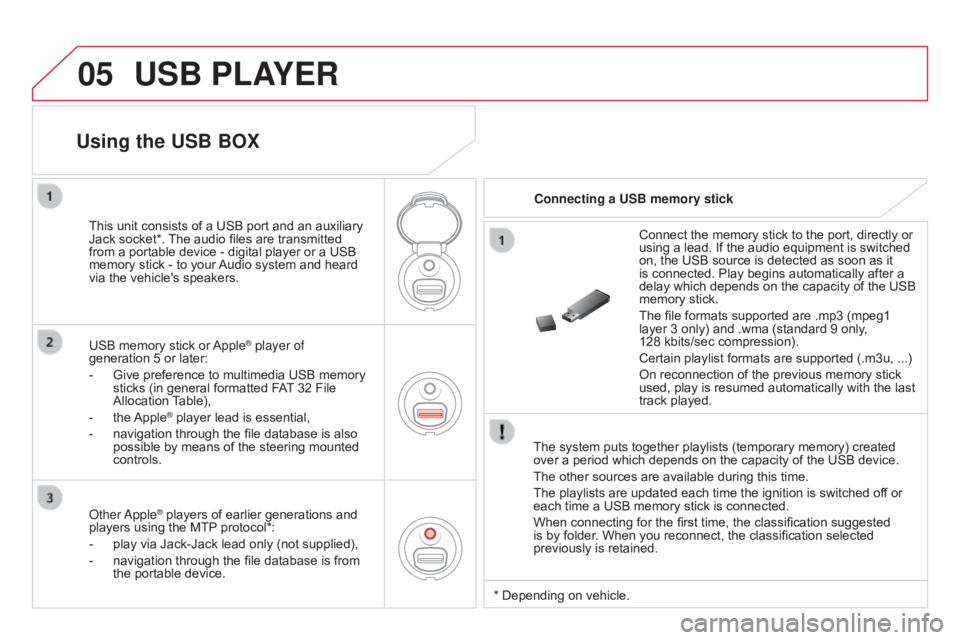
ô is ô retained.Connect
ô the ô memory ô stick ô to ô the ô port, ô directly ô or ô
using
ô a ô lead. ô If ô the ô audio ô equipment ô is ô switched ô
on,
ô the ô USB ô source ô is ô detected ô as ô soon ô as ô it ô
is
ô connected. ô Play ô begins ô automatically ô after ô a ô
delay
ô which ô depends ô on ô the ô capacity ô of ô the ô USB ô
memory
ô stick.
The ô file ô formats ô supported ô are ô .mp3 ô (mpeg1 ô
layer
ô 3 ô only) ô and ô .wma ô (standard ô 9 ô only, ô
128ô kbits/sec
ô compression).
Certain ô playlist ô formats ô are ô supported ô (.m3u, ô ...)
On ô reconnection ô of ô the ô previous ô memory ô stick ô
used,
ô play ô is ô resumed ô automatically ô with ô the ô last ô
track
ô played.
This
ô
unit
ô
consists
ô
of
ô
a
ô
USB
ô
port
ô
and
ô
an
ô
auxiliary
ô
Jack
ô
socket*.
ô
The
ô
audio
ô
files
ô
are
ô
transmitted
ô
from
ô
a
ô
portable
ô
device
ô
-
ô
digital
ô
player
ô
or
ô
a
ô
USB
ô
memory
ô
stick
ô
-
ô
to
ô
your
ô
Audio
ô
system
ô
and
ô
heard
ô
via
ô
the
ô
vehicle's
ô
speakers.
USB
ô
memory
ô
stick
ô
or
ô
AppleôÛ player of
generation
ô
5
ô
or
ô
later:
-
ô
Give
ô
preference
ô
to
ô
multimedia ô USB ô memory ô
sticks
ô
(in
ô
general
ô
formatted ô FAT
ô
32 ô File ô
Allocation
ô
T
able),
-
ô
the
ô
AppleôÛô playerô leadô isô essential,
-
ô
navigation
ô through ô the ô file ô database ô is ô also ô
possible
ô
by ô means ô of ô the ô steering ô mounted ô
controls.
Using the USB BOX
Connecting a USB memory stick
o
ther
a
pple
ôÛô playersô ofô earlierô generationsô andô players
ô
using ô the ô MTPô protocol*:
-
ô
play
ô
via
ô
Jack-Jack ô lead ô only ô (not ô supplied),
-
ô
navigation
ô through ô the ô file ô database ô is ô from ô
the
ô
portable ô device. *ô Depending
ô on ô vehicle.
Page 349 of 404
05
347
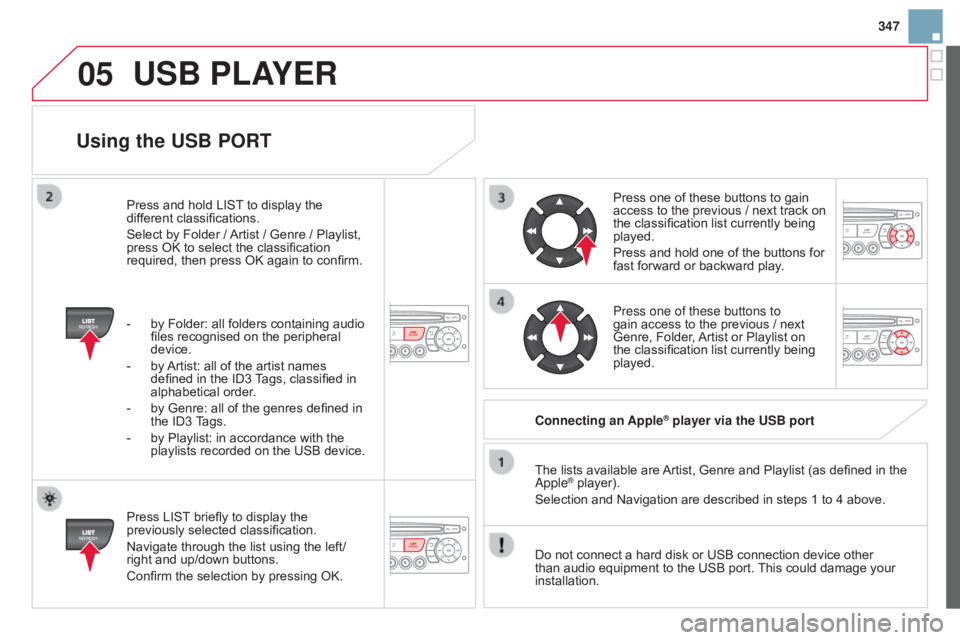
Using the USB PORT
Pressô LISTô briefly ô to ô display ô the ô previously
ô selected ô classification.
Navigate
ô through ô the ô list ô using ô the ô left/
right
ô and ô up/down ô buttons.
Confirm
ô the ô selection ô by ô pressing ô OK. The
ô lists ô available ô are ô
Artist,
ô Genre ô and ô Playlist ô (as ô defined ô in ô the ô
a pple
ôÛô player).
Selection ô and ô Navigation ô are ô described ô in ô steps ô 1 ô to ô 4 ô above.
Do
ô
not
ô connect ô a ô hard ô disk ô or ô USB ô connection ô device ô other ô
than
ô
audio ô equipment ô to ô the ô USB ô port. ô
This
ô could ô damage ô your ô
installation. Connecting
an Apple
ôÛ player via the USB port
Press
ô
one ô of ô these ô buttons ô to ô gain ô
access
ô
to
ô the ô previous ô / ô next ô track ô on ô
the
ô
classification ô list ô currently ô being ô
played.
Press
ô
and ô hold ô one ô of ô the ô buttons ô for ô
fast
ô
forward ô or ô backward ô play.
Press one of these buttons to
gain
ô
access ô to ô the ô previous ô / ô next ô
Genre,
ô
Folder, ô
Artist
ô or ô Playlist ô on ô
the
ô
classification ô list ô currently ô being ô
played.
Press
ô
and
ô
hold
ô
LIST
ô
to
ô
display
ô
the
ô
dif
ferent
ô
classifications.
Select
ô
by
ô
Folder
ô
/
ô
Artist
ô
/
ô
Genre
ô
/
ô
Playlist,
ô
press
ô
OK
ô
to
ô
select
ô
the
ô
classification
ô
required,
ô
then
ô
press
ô
OK
ô
again
ô
to
ô
confirm.
-
ô
by
ô
Folder:
ô
all
ô
folders
ô
containing
ô
audio
ô
files
ô
recognised
ô
on
ô
the
ô
peripheral
ô
device.
-
ô
by
ô
Artist:
ô
all
ô
of
ô
the
ô
artist
ô
names
ô
defined
ô
in
ô
the
ô
ID3
ô
T
ags,
ô
classified
ô
in
ô
alphabetical
ô
order.
-
ô by
ô
Genre:
ô
all
ô
of
ô
the
ô
genres
ô
defined
ô
in
ô the
ô
ID3
ô T
ags.
-
ô
by
ô
Playlist:
ô
in
ô
accordance
ô
with
ô
the
ô
playlists
ô
recorded
ô
on
ô
the
ô
USB
ô
device.
USB PLAYER
Page 350 of 404
05
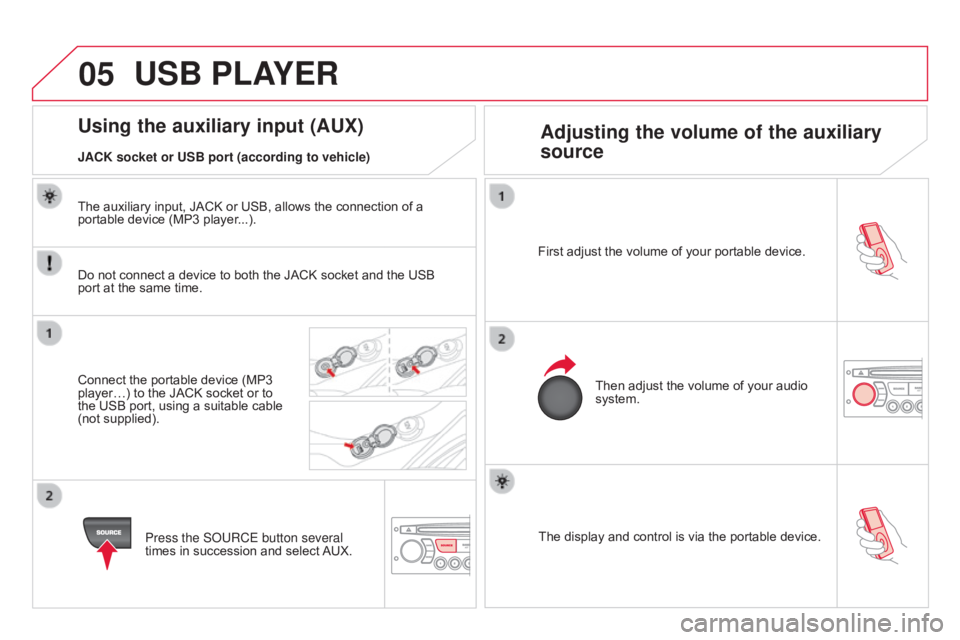
Theô displayô andô controlô isô viaô theô portableô device.
First ô adjust ô the ô volume ô of ô your ô portable ô device.
Then ô adjust ô the ô volume ô of ô your ô audio ô
system.
Using the auxiliary input (AUX)
Adjusting the volume of the auxiliary
source
JACK socket or USB port (according to vehicle)
USB PLAYER
Doô notô connectô aô deviceô toô bothô theô JACKô socketô andô theô USBô port
ô at ô the ô same ô time.
Connect
ô the ô portable ô device ô (MP3 ô
playerãÎ)
ô to ô the ô JACK ô socket ô or ô to ô
the
ô USB ô port, ô using ô a ô suitable ô cable ô
(not
ô supplied). Press the S
o URCE button several
times
ô in ô succession ô and ô select ô
AUX.
The
ô auxiliary ô input, ô JACK ô or ô USB, ô allows ô the ô connection ô of ô a ô
portable
ô device ô (MP3 ô player...).