CITROEN DS3 CABRIO 2016 Handbook (in English)
Manufacturer: CITROEN, Model Year: 2016, Model line: DS3 CABRIO, Model: CITROEN DS3 CABRIO 2016Pages: 450, PDF Size: 17.47 MB
Page 211 of 450

209
Fitting a wheel
After changing a wheel
To store the punctured wheel in the boot correctly, first remove the central
c
ove r.
When
using the "space-saver" type
t
emporary-use spare wheel, do not
e
xceed 50 mph (80 km/h).
Have
the tightening of the bolts and the
p
ressure of the spare wheel checked
b
y a CITROËN dealer or a qualified
w
orkshop without delay.
Have
the punctured wheel repaired and
r
eplace it on the vehicle as soon as
possible.
Do
not drive with more than one
t
emporary-use spare wheel fitted to the
v
ehicle at one time.
List of operations
F Put the wheel in place on the hub.
F S crew in the bolts by hand.
F
P
re-tighten the security bolt (if your vehicle
i
s fitted with them) using the wheelbrace 1
fitted
with the socket 4.
F
P
re-tighten the other bolts using the
w
heelbrace 1
o
n l y.
Practical information
Page 212 of 450
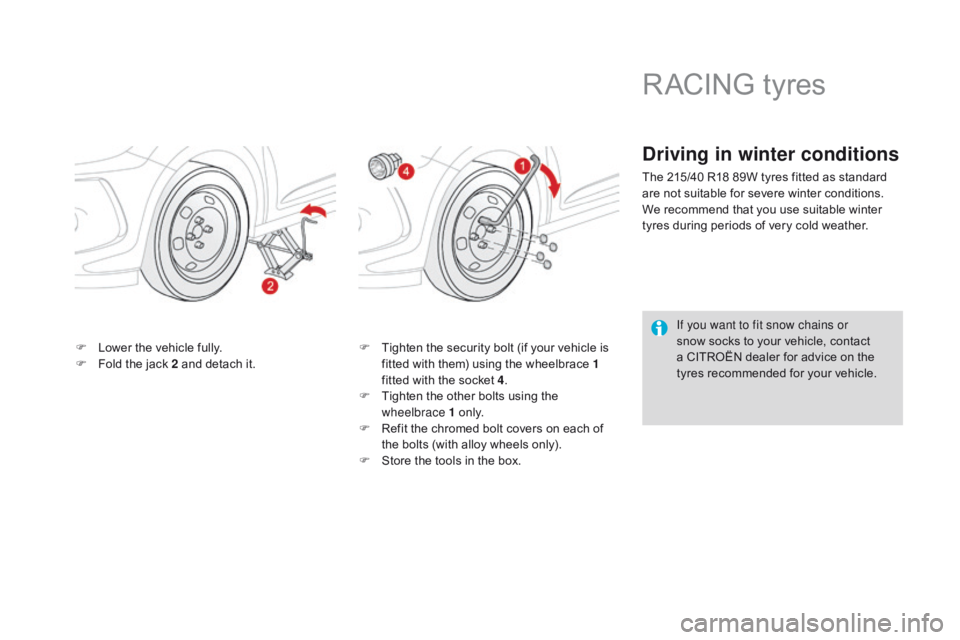
F Lower the vehicle fully.
F F old the jack 2 and detach it.F
T ighten the security bolt (if your vehicle is f
itted with them) using the wheelbrace 1
fitted
with the socket 4.
F
T
ighten the other bolts using the
w
heelbrace 1
o
n l y.
F
R
efit the chromed bolt covers on each of
t
he bolts (with alloy wheels only).
F
S
tore the tools in the box.
RACING tyres
driving in winter conditions
The 215/40 R18 89W tyres fitted as standard are not suitable for severe winter conditions.
W
e recommend that you use suitable winter
t
yres during periods of very cold weather.
If you want to fit snow chains or
snow
socks to your vehicle, contact
a
CITROËN dealer for advice on the
t
yres recommended for your vehicle.
Page 213 of 450
2 11
It is strongly recommended that before you leave, you practise fitting the snow
c
hains on a level and dry sur face.
Snow chains
In wintry conditions, snow chains improve traction as well as the behaviour of the vehicle when braking.
T he snow chains must be fitted only
t
o the front wheels. They must never
b
e fitted to "space-saver" type spare
w
heels.
Take
account of the legislation in force
i
n your country on the use of snow
chains
and the maximum running
s
peed
a
uthorised.
Avoid
driving with snow chains on
r
oads that have been cleared of snow,
t
o avoid damaging your vehicle's tyres
a
nd the road sur face. If your vehicle
i
s fitted with alloy wheels, check that
n
o part of the chain or its fixings is in
c
ontact with the wheel rim.
Advice on installation
F If you have to fit the chains during a journey, stop the vehicle on a flat sur face on the side of t
he road.
F
A
pply the parking brake and position any wheel chocks to prevent movement of your vehicle.
F
F
it the chains following the instructions provided by the manufacturer.
F
M
ove off gently and drive for a few moments, without exceeding 30 mph (50 km/h).
F
S
top your vehicle and check that the snow chains are correctly tightened.
Use
only the chains designed to be fitted to the type of wheel fitted to your vehicle:
Vehicle Original
tyre sizeMaximum
link size.
DS
3 185/65
R159
mm
195/55
R16
205/45
R17cannot
be fitted with chains
DS
3 R ACING 215/40
R18cannot
be fitted with chains
For
more information on snow chains, contact a CITROËN dealer or a qualified workshop.
Practical information
Page 214 of 450
Changing a bulb
The headlamps are fitted with polycarbonate glass with a protective
c
oating:
F
d
o not clean them using a dr y
or abrasive cloth, nor with a
detergent or solvent product,
F
u
se a sponge and soapy water or a
p
H neutral product,
F
w
hen using a high pressure
w
asher on persistent marks, do not
k
eep the lance directed towards
t
he lamps or their edges for too
l
ong, so as not to damage their
p
rotective coating and seals.
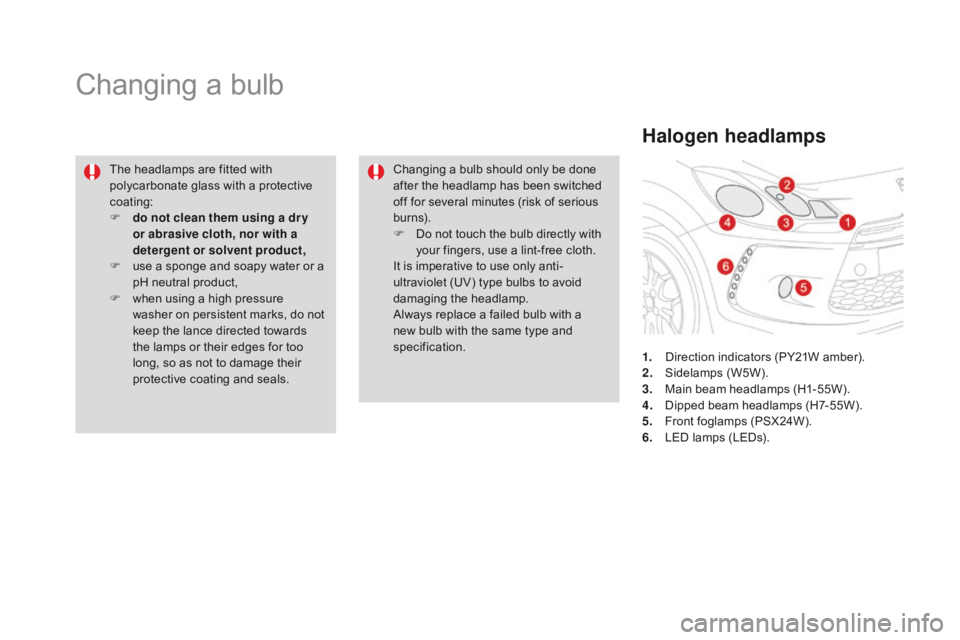
Halogen headlamps
1. Direction indicators (PY21W amber).
2. S idelamps ( W5W).
3.
M
ain beam headlamps (H1-55W).
4.
D
ipped beam headlamps (H7-55W).
5.
F
ront foglamps (PSX24W).
6.
L
ED lamps (LEDs).
Changing
a
bulb
should
only
be
done
a
fter
the
headlamp
has
been
switched
o
ff
for
several
minutes
(risk
of
serious
b
urns).
F
D
o
not
touch
the
bulb
directly
with
y
our
fingers,
use
a
lint-free
cloth.
It
is
imperative
to
use
only
anti-
ultraviolet
(UV)
type
bulbs
to
avoid
d
amaging
t
he
h
eadlamp.
Always
replace
a
failed
bulb
with
a
n
ew
bulb
with
the
same
type
and
s
pecification.
Page 215 of 450
213
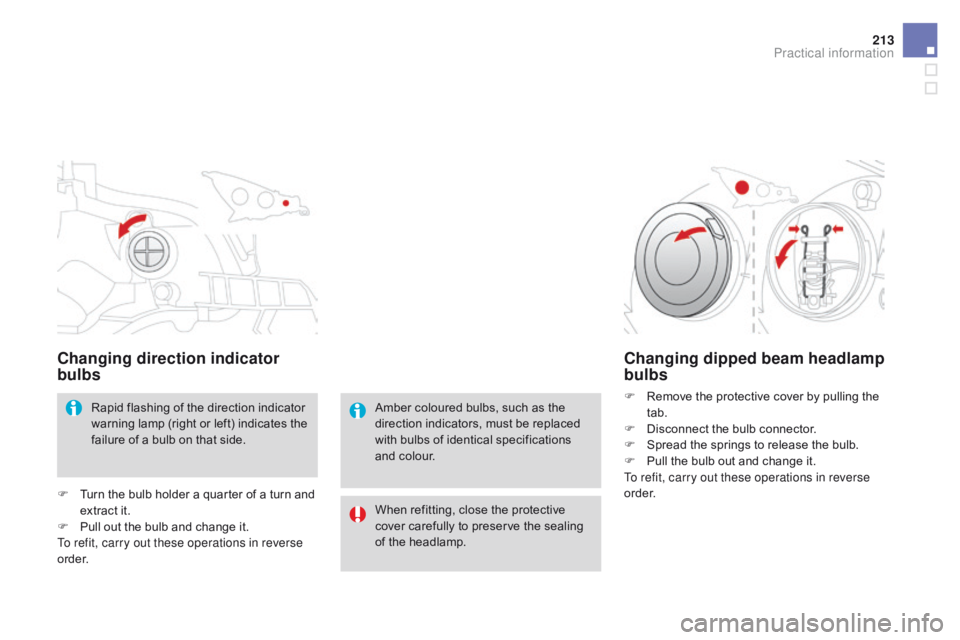
Changing direction indicator
bulbs
Rapid flashing of the direction indicator warning lamp (right or left) indicates the
f
ailure of a bulb on that side.
F
T
urn the bulb holder a quarter of a turn and
e
xtract it.
F
P
ull out the bulb and change it.
To refit, carry out these operations in reverse
o r d e r.
Changing dipped beam headlamp
bulbs
F Remove the protective cover by pulling the t
ab.
F
D
isconnect the bulb connector.
F
S
pread the springs to release the bulb.
F
P
ull the bulb out and change it.
To refit, carry out these operations in reverse
o r d e r.
Amber
coloured
bulbs,
such
as
the
d
irection
indicators,
must
be
replaced
w
ith
bulbs
of
identical
specifications
a
nd
colour.
When
refitting,
close
the
protective
c
over
carefully
to
preserve
the
sealing
o
f
the
headlamp.
Practical information
Page 216 of 450
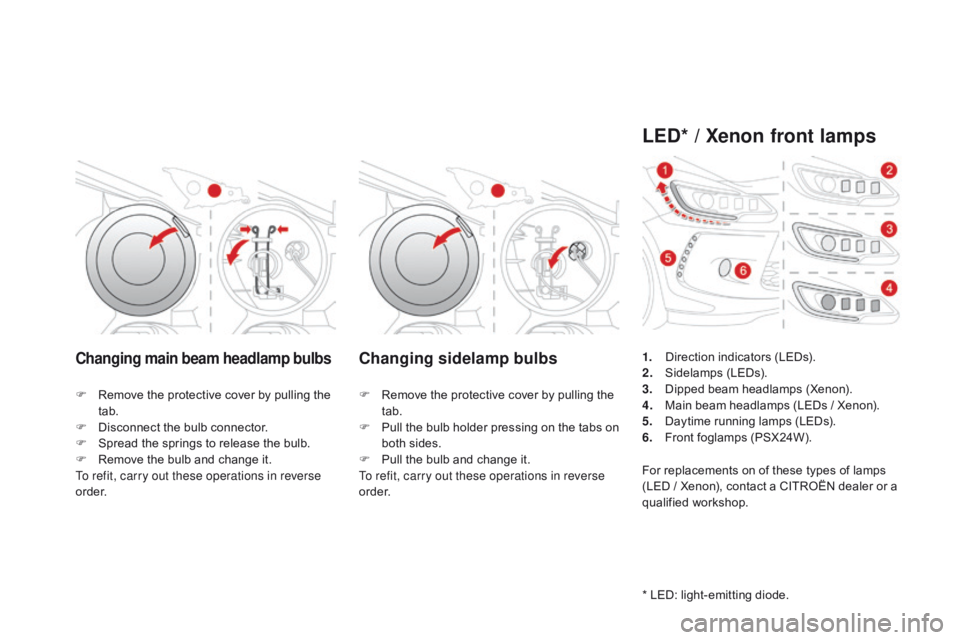
Changing main beam headlamp bulbsChanging sidelamp bulbs
F Remove the protective cover by pulling the t
ab.
F
D
isconnect the bulb connector.
F
S
pread the springs to release the bulb.
F
R
emove the bulb and change it.
To refit, carry out these operations in reverse
o r d e r. F
R emove the protective cover by pulling the t
ab.
F
P
ull the bulb holder pressing on the tabs on
bo
th
s
ides.
F
P
ull the bulb and change it.
To refit, carry out these operations in reverse
o r d e r.
LEd* / Xenon front lamps
* LED: light-emitting diode.
1.
D
irection indicators (LEDs).
2.
S
idelamps
(
LEDs).
3.
D
ipped beam headlamps (Xenon).
4.
M
ain beam headlamps (LEDs / Xenon).
5.
D
aytime running lamps (LEDs).
6.
F
ront foglamps (PSX24W).
For replacements on of these types of lamps
(
LED / Xenon), contact a CITROËN dealer or a
q
ualified
w
orkshop.
Page 217 of 450
215
To obtain a replacement module, contact your CITROËN dealer or a qualified workshop.
I f you experience any difficulty in replacing bulbs, contact your CITROËN dealer or a
q
ualified
w
orkshop.
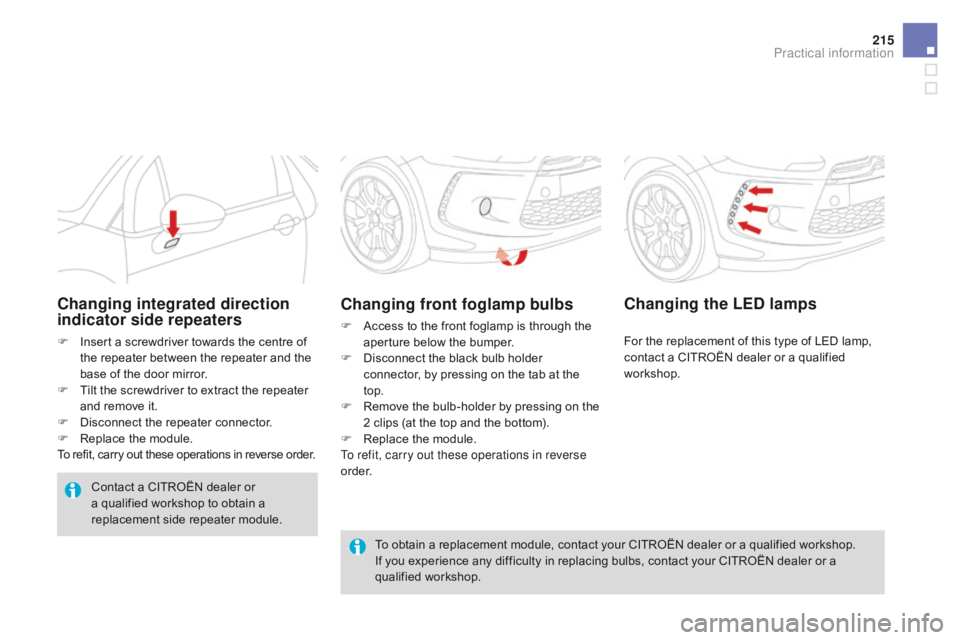
Changing front foglamp bulbs
F Access to the front foglamp is through the a
perture below the bumper.
F
D
isconnect the black bulb holder
c
onnector, by pressing on the tab at the
t
op.
F
R
emove the bulb-holder by pressing on the
2
clips (at the top and the bottom).
F
R
eplace the module.
To refit, carry out these operations in reverse
o r d e r.
Changing integrated direction
indicator side repeaters
F Insert a screwdriver towards the centre of t
he repeater between the repeater and the
b
ase of the door mirror.
F
T
ilt the screwdriver to extract the repeater
a
nd remove it.
F
D
isconnect the repeater connector.
F
R
eplace the module.
To
refit, carry out these operations in reverse order.
Contact
a CITROËN dealer or
a
qualified workshop to obtain a
r
eplacement side repeater module.
Changing the LEd lamps
For the replacement of this type of LED lamp, c
ontact a CITROËN dealer or a qualified
w
orkshop.
Practical information
Page 218 of 450
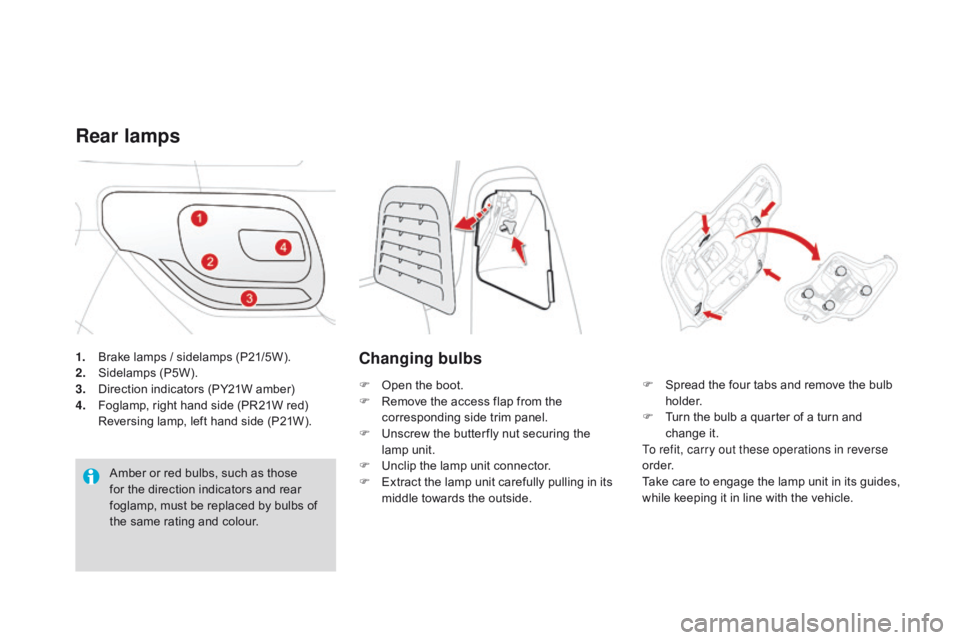
1. Brake lamps / sidelamps (P21/5W).
2. S idelamps ( P5W).
3.
D
irection indicators (PY21W amber)
4.
F
oglamp, right hand side (PR21W red)
R
eversing lamp, left hand side (P21W).
Rear lamps
Amber or red bulbs, such as those for the direction indicators and rear
f
oglamp, must be replaced by bulbs of
t
he same rating and colour.
Changing bulbs
F Open the boot.
F R emove the access flap from the
c
orresponding side trim panel.
F
U
nscrew the butter fly nut securing the
lam
p
u
nit.
F
U
nclip the lamp unit connector.
F
E
xtract the lamp unit carefully pulling in its
m
iddle towards the outside. F
S pread the four tabs and remove the bulb h
o l d e r.
F
T
urn the bulb a quarter of a turn and
c
hange
it
.
To refit, carry out these operations in reverse
o r d e r.
Take
care to engage the lamp unit in its guides,
w
hile keeping it in line with the vehicle.
Page 219 of 450
217
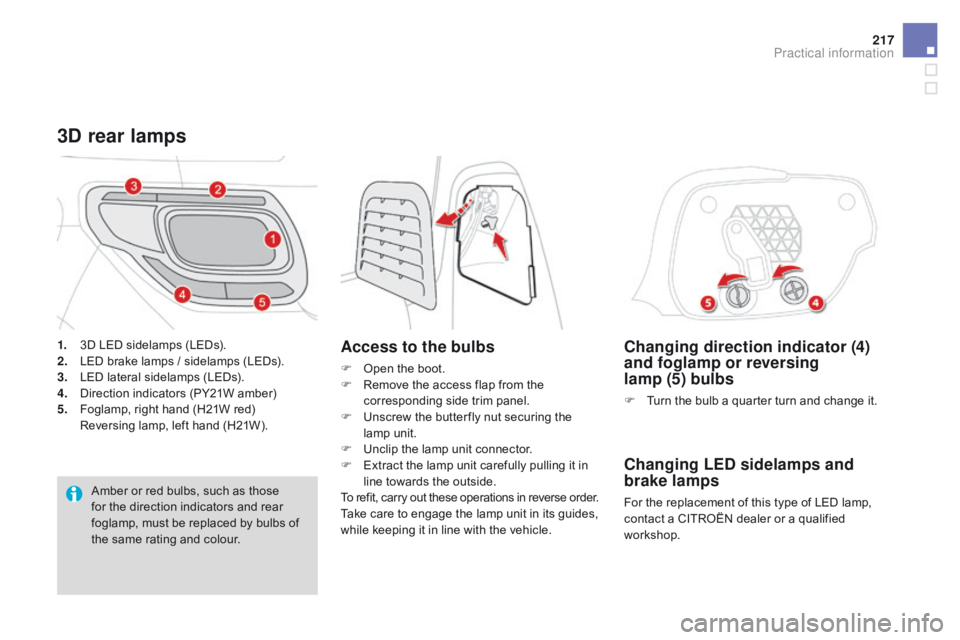
Changing direction indicator (4)
and foglamp or reversing
lamp
(5) bulbs
F Turn the bulb a quarter turn and change it.
Changing LEd sidelamps and
brake lamps
For the replacement of this type of LED lamp, c
ontact a CITROËN dealer or a qualified
w
orkshop.
3d rear lamps
Access to the bulbs
F Open the boot.
F R emove the access flap from the
c
orresponding side trim panel.
F
U
nscrew the butter fly nut securing the
lam
p
u
nit.
F
U
nclip the lamp unit connector.
F
E
xtract the lamp unit carefully pulling it in
l
ine towards the outside.
To
refit, carry out these operations in reverse order.
Take
care to engage the lamp unit in its guides,
w
hile keeping it in line with the vehicle.
1.
3
D
LED
sidelamps
(LEDs).
2. L
ED
brake
lamps
/
sidelamps
(LEDs).
3. L
ED
lateral
sidelamps
(LEDs).
4.
D
irection
indicators
(PY21W
amber)
5.
F
oglamp,
right
hand
(H21W
red)
R
eversing
lamp,
left
hand
(H21W).
Amber
or
red
bulbs,
such
as
those
f
or
the
direction
indicators
and
rear
f
oglamp,
must
be
replaced
by
bulbs
of
t
he
same
rating
and
colour.
Practical information
Page 220 of 450
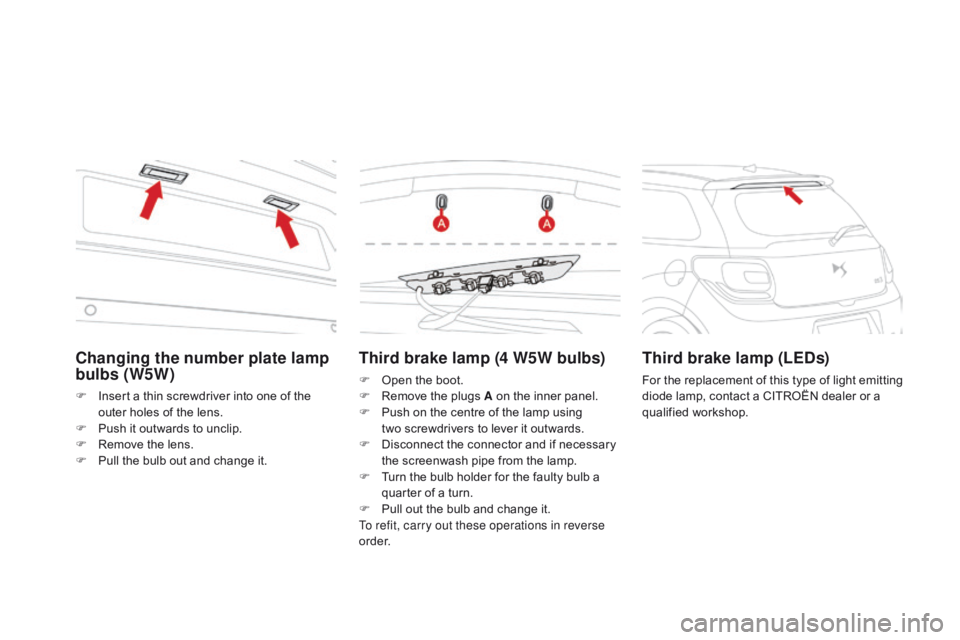
Third brake lamp (4 W5W bulbs)
F Open the boot.
F R emove the plugs A on the inner panel.
F
P
ush on the centre of the lamp using
t
wo screwdrivers to lever it outwards.
F
D
isconnect the connector and if necessary
t
he screenwash pipe from the lamp.
F
T
urn the bulb holder for the faulty bulb a
q
uarter of a turn.
F
P
ull out the bulb and change it.
To refit, carry out these operations in reverse
o r d e r.
Third brake lamp (LEds )
For the replacement of this type of light emitting d
iode lamp, contact a CITROËN dealer or a
q
ualified
w
orkshop.
Changing the number plate lamp
bulbs (W5W)
F Insert a thin screwdriver into one of the o
uter holes of the lens.
F
P
ush it outwards to unclip.
F
R
emove the lens.
F
P
ull the bulb out and change it.