ESP CITROEN DS4 2023 Workshop Manual
[x] Cancel search | Manufacturer: CITROEN, Model Year: 2023, Model line: DS4, Model: CITROEN DS4 2023Pages: 296, PDF Size: 9.91 MB
Page 182 of 296

180
Topping up the engine oil level
F Locate the oil filler cap in the engine compartment of your vehicle.
For more information about petrol or Diesel
engine, refer to the corresponding section.
F
U
nscrew the oil filler cap to access the filler
opening.
F
A
dd oil in small quantities, avoiding any
spills on engine components (risk of fire).
F
W
ait a few minutes before checking the
level again using the dipstick.
F
A
dd more oil if necessary.
F
A
fter checking the level, carefully refit the oil
filler cap and the dipstick in its tube.
After topping up the oil, the ignition-triggered oil
level indicator in the instrument panel does not
provide a valid information during 30 minutes.
Engine oil change
Refer to the manufacturer's service schedule
for inter val details for this operation.
In order to maintain the reliability of the engine
and emission control system, never use
additives in the engine oil.
Brake fluid level
The brake fluid level should be close
to the "MA X" mark. If it is not, check
the brake pad wear.
Changing the coolant
Refer to the manufacturer's service schedule
for details of the inter val for this operation.
Fluid specification
This fluid must conform to the manufacturer's
recommendations.
Power steering fluid level
The fluid level should be close to
the "MA X" mark. Verify this, with the
engine off, by reading the level on
the filler neck.
Coolant level
Check the coolant level regularly.
It is normal to top up the fluid
between two services. To ensure that the reading is correct, your
vehicle must be parked on a level sur face with
the engine cool.
The coolant level should be close to the "MA X"
mark but should never exceed it.
If the level is close to or below the "MIN" mark,
it is essential to top up.
A low coolant level presents a risk of serious
damage to your engine.
When the engine is warm, the temperature of
the coolant is regulated by the fan.
In addition, as the cooling system is pressurised,
wait at least one hour after switching off the
engine before carrying out any work.
To avoid the risk of scalding when you need to
top up in an emergency, place a cloth around
the cap and unscrew the cap by two turns to
allow the pressure to drop.
Once the pressure has dropped, remove the cap
and top up the level.
The cooling fan may star t after
switching off the engine: take care
with articles and clothing that might be
caught by the fan blades.
Fluid specification
The brake fluid must conform to the
manufacturer's recommendations.
07
Practical information
Page 183 of 296

181
Screenwash/headlamp wash
level
To check the level or top up the fluid
on vehicles fitted with headlamp
washers, immobilise the vehicle and
switch off the engine.
F
O
pen the bonnet and secure it with the stay.
F
O
pen the screenwash reservoir filler cap.
F
T
ake and pinch the level gauge to block its
breather.
F
R
emove the gauge completely from the
reser voir to read the level in the transparent
section.
F
T
op up if necessary.
F
R
efit the filler cap to the reser voir and close
the bonnet.
Fluid specifications
For optimum cleaning and to avoid freezing,
this fluid must not be topped up or replaced
with plain water.
In wintry conditions, using an ethyl alcohol or
methanol based fluid is recommended.
Diesel fuel additive level
(Diesel with particle filter)
According to your version of instrument panel,
the additive reser voir low level is indicated by:
Topping up
This additive must be topped up without
delay by a member of the dealer network or a
qualified workshop. -
f
ixed illumination of the
particle filter warning lamp,
accompanied by an audible
signal and a message that the
particle filter additive level is too
low,
or
-
f
ixed illumination of the Ser vice
warning lamp, accompanied
by an audible signal and a
message that the particle filter
additive level is too low.
Checks
Unless otherwise indicated, check these
components in accordance with the
manufacturer's service schedule and according
to your engine. .
Otherwise, have them checked by the dealer
network or a qualified workshop.
12 V battery
The battery does not require any
maintenance.
However, check regularly that the
terminals are correctly tightened
(versions without quick release terminals)
and that the connections are clean.
For more information on the precautions
to take before starting work on the 12 V
battery , refer to the corresponding
section.
Versions equipped with Stop & Start are
fitted with a 12 V lead-acid battery of
specific technology and specification.
Its replacement should be carried out
only in the dealer network or a qualified
workshop.
07
Practical information
Page 184 of 296

182
Air filter and passenger compartment filter
Refer to the manufacturer’s
ser vice schedule for details of the
replacement intervals for these
components.
Depending on the environment (e.g. dusty
atmosphere) and the use of the vehicle (e.g.
city driving), replace them twice as often if
necessary .
A clogged passenger compartment filter may
have an adverse effect on the per formance
of the air conditioning system and generate
undesirable odours.
Oil filter
Change the oil filter each time the
engine oil is changed.
Refer to the manufacturer’s
ser vice schedule for details of
the replacement inter val for this
component.
Particle filter (Diesel)
Depending on the version of the instrument
panel you have, the start of saturation of the
particle filter is indicated by:
Manual gearbox
The gearbox does not require any
maintenance (no oil change).
Automatic gearbox
The gearbox does not require any
maintenance (no oil change).
- fixed illumination of the particle filter warning lamp, accompanied
by an audible signal and a
message that there is a risk of
blockage of the particle filter,
or
-
t
emporary illumination of
the Ser vice warning lamp,
accompanied by an audible
signal and a message that
there is a risk of blockage of the
particle filter. On a new vehicle, the first particle
filter regeneration operations may be
accompanied by a "burning" smell, which
is per fectly normal.
Following prolonged operation of the
vehicle at very low speed or at idle,
you may, in exceptional circumstances,
notice the emission of water vapour at the
exhaust on acceleration. This does not
affect the behaviour of the vehicle or the
environment.
Traffic conditions permitting, regenerate
the filter by driving at a speed of at least
37 mph (60 km/h) until the warning lamp
goes off.
If the warning lamp stays on, this indicates
a low Diesel additive level.
For more information on Checking levels ,
refer to the corresponding section.
07
Practical information
Page 185 of 296

183
Manual parking brake
If excessive travel or a loss of
effectiveness of this system is
noticed, the parking brake must
be checked, even between two
services.
This system must be checked in the dealer
network or by a qualified workshop.
Electric parking brake
This system does not require any
routine servicing. However, in the
event of a problem, have the system
checked in the dealer network or by
a qualified workshop.
For more information on the Electric
parking brake , refer to the corresponding
section.
Only use products recommended by DS
AUTOMOBILES or products of equivalent
quality and specification.
In order to optimise the operation of
components as important as those in
the braking system, DS AUTOMOBILES
selects and offers very specific products.
After washing the vehicle, dampness, or
in wintry conditions, ice can form on the
brake discs and pads: braking efficiency
may be reduced. Make light brake
applications to dry and defrost the brakes.
AdBlue® (BlueHDi
engines)
To respect the environment and ensure
compliance with the Euro 6 standard, without
adversely affecting the performance or
fuel consumption of Diesel engines, DS
AUTOMOBILES has taken the decision to
equip its vehicles with a system that associates
SCR (Selective Catalytic Reduction) with a
Diesel particle filter (DPF) for the treatment of
exhaust gases.
SCR system
Using a liquid called AdBlue® that contains
urea, a catalytic converter turns up to 85% of
the oxides of nitrogen (NOx) into nitrogen and
water, which are harmless to health and the
environment.
Brake pads
Brake wear depends on the style
of driving, particularly in the case
of vehicles used in town, over short
distances. It may be necessary to
have the condition of the brakes
checked, even between vehicle
services.
Unless there is a leak in the circuit, a drop in
the brake fluid level indicates that the brake
pads are worn.
Brake disc/drum wear
For information on checking brake
disc wear, contact the dealer
network or a qualified workshop.
07
Practical information
Page 186 of 296

184
During each scheduled ser vice of your vehicle
in the dealer network or a qualified workshop,
the AdBlue
® tank is refilled in order to allow
normal operation of the SCR system.
If the estimated distance travelled between two
ser vices is greater than around 12,500 miles
(20,000
km), it will be necessary to top up the
AdBlue
®. Once the AdBlue
® tank is empty, a system
r
equired by regulations prevents starting
of the engine.
If the SCR
system is defective, the level of
emissions from your vehicle will no longer
meet the Euro 6 standard: your vehicle
becomes polluting.
In the event of a confirmed fault with the
SCR system, you must go to the dealer
network or a qualified workshop as soon
as possible: after a running distance of
685 miles (1,100 km), a system will be
triggered automatically to prevent engine
starting.
In either case, a range indicator gives you
the distance you can travel before the
vehicle is immobilised.
For more information on the Warning
lamps and the associated alerts, refer to
the corresponding section.
The AdBlue® is contained in a special tank
with a capacity of around 17 litres: its capacity
offers a driving range of around 12,500 miles
(20,000 km) before triggering an alert system
that warns you when you can drive for a further
1,500 miles (2,400 km).
Freezing of the AdBlue
®
AdBlue® freezes at temperatures below
around -11°C.
The SCR system includes a heater for the
AdBlue
® tank, allowing you to continue
driving in very cold conditions.
Topping up with AdBlue®
Filling the AdBlue® tank is an operation
included in every routine ser vice on your
vehicle by the dealer network or a qualified
workshop.
Nevertheless, given the capacity of the tank,
it may be necessary to top up the AdBlue
®
between ser vices, more particularly if an alert
(warning lamps and a message) signals the
requirement.
You can go to a member of the dealer network
or a qualified workshop.
If you envisage topping up yourself, please
read the following recommendations and
warnings carefully.
Precautions for use
AdBlue® is a urea-based solution. This fluid
is non-flammable, colourless and odourless
(stored in a cool place).
In the event of contact with the skin, wash the
affected area with soap and running water. In
the event of contact with the eyes, immediately
rinse the eyes with large amounts of water
or with an eye wash solution for at least
15
minutes. If a burning sensation or irritation
persists, get medical attention.
If swallowed, immediately wash out the mouth
with clean water and then drink plenty of water.
07
Practical information
Page 202 of 296

200
Direction indicators
Quicker flashing of the direction indicator
lamp (left or right) indicates that one of
the bulbs on the corresponding side has
failed.
Model with halogen headlamps (type 1)
F
T
urn the bulb holder a quarter turn and pull
it out.
F
P
ull out the bulb and replace it.
To reassemble, proceed in reverse order. Model with halogen headlamps (type 2) and
model with xenon headlamps
For the replacement of this type of LED lamp,
contact the dealer network or a qualified
workshop.
Amber colour bulbs, such as the direction
indicators, must be replaced by bulbs with
identical colour and specifications.
To refit, close the protective cover very
carefully to guarantee the leak-tightness
of the lamp. F
D
isconnect the connector.
F
S
pread the springs to release the bulb.
F
P
ull the bulb out and change it.
To refit, carry out these operations in reverse
o r d e r.
Dipped beam headlamp bulbs (with
halogen headlamps)
F Remove the protective cover by pulling the tab.
08
In the event of a breakdown
Page 205 of 296

203
Rear lamps
Amber colour bulbs, such as the direction
indicators, must be replaced by bulbs with
identical colour and specifications.
Except for light guides, lamps located on
the tailgate are dummy units. They are
there for aesthetic purposes only.
Brake and reversing lamps and
direction indicators
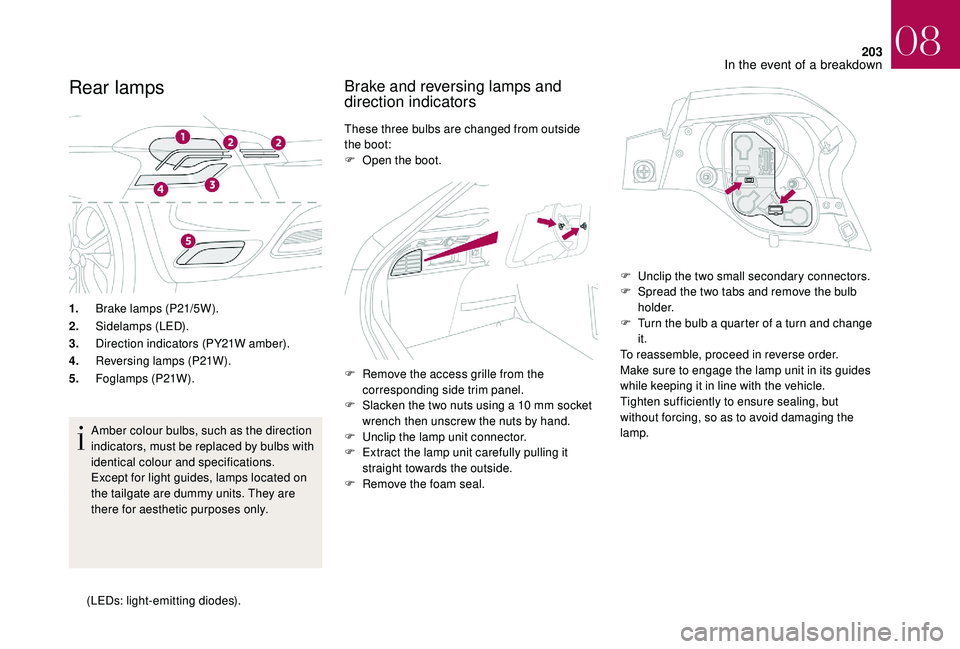
These three bulbs are changed from outside
the boot:
F
O
pen the boot.
1. Brake lamps (P21/5W).
2. Sidelamps (LED).
3. Direction indicators (PY21W amber).
4. Reversing lamps (P21W).
5. Foglamps (P21W).
(
LEDs: light-emitting diodes). F
R
emove the access grille from the
corresponding side trim panel.
F
S
lacken the two nuts using a 10 mm socket
wrench then unscrew the nuts by hand.
F
U
nclip the lamp unit connector.
F
E
xtract the lamp unit carefully pulling it
straight towards the outside.
F
R
emove the foam seal. F
U
nclip the two small secondary connectors.
F
S
pread the two tabs and remove the bulb
h o l d e r.
F
T
urn the bulb a quarter of a turn and change
it.
To reassemble, proceed in reverse order.
Make sure to engage the lamp unit in its guides
while keeping it in line with the vehicle.
Tighten sufficiently to ensure sealing, but
without forcing, so as to avoid damaging the
lamp.
08
In the event of a breakdown
Page 208 of 296

206
GoodFailed
Tw e e z e r s
Installing electrical accessories
Your vehicle's electrical system is
designed to operate with standard or
optional equipment.
Before installing other electrical equipment
or accessories on your vehicle, contact the
dealer network or a qualified workshop.
DS AUTOMOBILES accepts no
responsibility for the cost incurred in
repairing your vehicle or for rectifying
malfunctions resulting from the installation
of accessories not supplied and not
recommended and not installed in
accordance with specifications, in particular
when the combined power consumption of
all of the additional equipment connected
exceeds 10 milliamperes.
Dashboard fuses
Access to the fuses
The fuseboxes are located in the lower
dashboard (left-hand side).
08
In the event of a breakdown
Page 214 of 296

212
Reconnecting the (+) terminal
Do not force the lever as locking will be
impossible if the clamp is not positioned
correctly; start the procedure again.
Following reconnection
If minor problems nevertheless persist
following this operation, contact the dealer
network or a qualified workshop.
By referring to the corresponding section, you
must reset certain systems yourself, such as:
-
o
ne-touch electric windows,
-
t
he date and time,
-
a
udio and navigation system settings.
Versions equipped with Stop & Start are
fitted with a 12 V lead-acid battery of
specific technology and specification.
Its replacement should be carried out
only in the dealer network or a qualified
workshop.
The Stop & Start system may not be
operational during the trip following the
first engine start.
In this case, the system will only be
available again after a continuous
period of immobilisation of the vehicle,
a period which depends on the exterior
temperature and the state of charge of the
battery (up to about 8 hours).
F
Ra
ise the lever A fully.
F
R
efit the open clamp B on the (+) terminal.
F
P
ush the clamp B fully down.
F
L
ower the lever A to lock the clamp B .
After reconnecting the battery, turn on the
ignition and wait 1 minute before starting
the engine, in order to enable the electronic
systems to initialise.Towing the vehicle
Procedure for having your vehicle towed or
for towing another vehicle using a removable
towing eye.
Access to the tools
The towing eye is installed in the boot under
t h e f l o o r.
To access it:
F
o
pen the boot,
F
r
aise the floor,
F
s
ecure it by hooking its cord on the hook on
the rear shelf support,
F
r
emove the towing eye from the holder.
08
In the event of a breakdown
Page 216 of 296

214
Running out of fuel
(Diesel)
On vehicles fitted with Diesel engines, the fuel
system must be primed if you run out of fuel.
For all versions other than BlueHDi, refer to the
corresponding engine compartment view.For more information on Diesel misfuel
prevention , refer to the corresponding
section.
If the engine does not start first time, do
not keep trying but start the procedure
again from the beginning.
BlueHDi engines
F Fill the fuel tank with at least five litres of Diesel.
F
S
witch on the ignition (without starting the
engine).
F
W
ait around 6 seconds and switch off the
ignition.
F
R
epeat the operation 10 times.
F
O
perate the starter to run the engine.
Other HDi engines
(Except BlueHDi version)
F
F
ill the fuel tank with at least five litres of
Diesel.
F
O
pen the bonnet.
F
I
f necessary, unclip the cover to access the
priming pump.
F
O
perate the priming pump repeatedly until
resistance is felt (there may be resistance at
the first press).
F
O
perate the starter to start the engine (if the
engine does not start at the first attempt,
wait around 15 seconds before trying
again).
F
I
f the engine does not start after a few
attempts, operate the priming pump again
then start the engine.
F
P
ut the cover in place and clip it in.
F
C
lose the bonnet again.
08
In the event of a breakdown