lock DATSUN 210 1979 Owner's Manual
[x] Cancel search | Manufacturer: DATSUN, Model Year: 1979, Model line: 210, Model: DATSUN 210 1979Pages: 548, PDF Size: 28.66 MB
Page 50 of 548
2
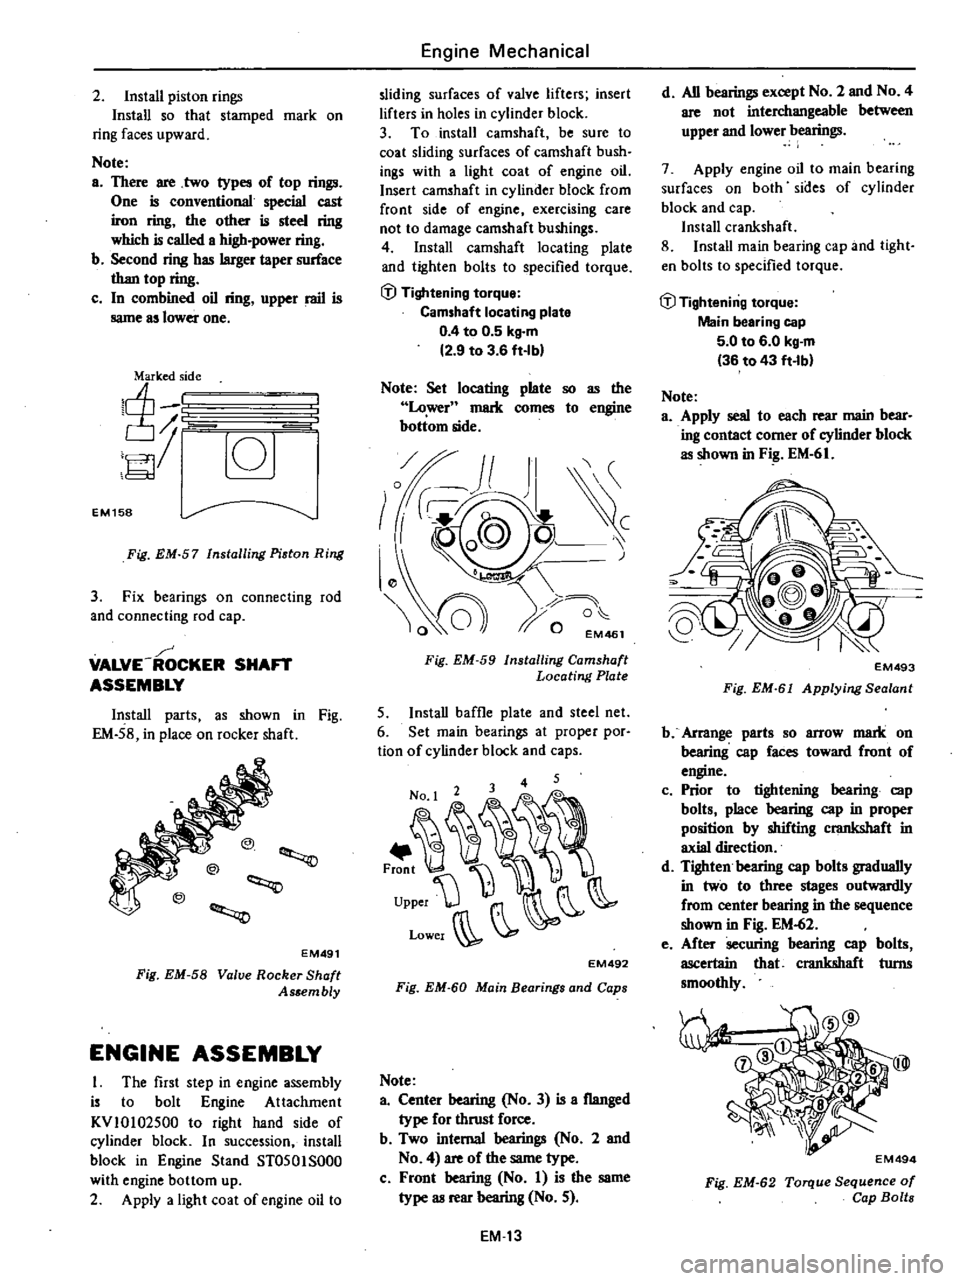
Install
piston
rings
Install
so
that
stamped
mark
on
ring
faces
upward
Note
a
There
are
two
types
of
top
rings
One
is
conventional
special
cast
iron
ring
the
other
is
steel
ring
which
is
called
a
high
power
ring
b
Second
ring
has
larger
taper
surface
than
top
ring
c
In
combined
oil
ring
upper
rail
is
same
as
lower
one
I
lnT
10
EM158
Fig
EM
57
Installing
Piston
Ring
3
Fix
bearings
on
connecting
rod
and
connecting
rod
cap
VALVE
ROCKER
SHAFT
ASSEMBLY
Install
parts
as
shown
in
Fig
EM
58
in
place
on
rocker
shaft
@
EM491
Fig
EM
58
Valve
Rocker
Shaft
As
embly
ENGINE
ASSEMBLY
I
The
first
step
in
engine
assembly
is
to
bolt
Engine
Attachment
KV
10
102500
to
right
hand
side
of
cylinder
block
In
succession
install
block
in
Engine
Stand
ST0501S000
with
engine
bottom
up
2
Apply
a
light
coat
of
engine
oil
to
Engine
Mechanical
sliding
surfaces
of
valve
lifters
insert
lifters
in
holes
in
cylinder
block
3
To
install
camshaft
be
sure
to
coat
sliding
surfaces
of
camshaft
bush
ings
with
a
light
coat
of
engine
oil
Insert
camshaft
in
cylinder
block
from
front
side
of
engine
exercising
care
not
to
damage
camshaft
bushings
4
Install
camshaft
locating
plate
and
tighten
bolts
to
specified
torque
i
l
Tightening
torque
Camshaft
locating
plate
0
4
to
0
5
kg
m
2
9
to
3
6
ft
Ibl
Note
Set
locating
plate
so
as
the
Lower
mark
comes
to
engine
bottom
side
Fig
EM
59
Installing
Camshaft
Locating
Plate
5
Install
baffle
plate
and
steel
net
6
Set
main
bearings
at
proper
por
tion
of
cylinder
block
and
caps
No
1
2
3
0
0
0
0
0
0
I
I
J
upperW
r
Lower
J
EM492
Fig
EM
60
Main
Bearings
and
Caps
Note
a
Center
bearing
No
3
is
a
flanged
type
for
thrust
force
b
Two
internal
bearings
No
2
and
No
4
are
of
the
same
type
c
Front
bearing
No
I
is
the
same
type
as
rear
bearing
No
5
EM
13
d
All
bearings
except
No
2
and
No
4
are
not
interchangeable
between
upper
and
lower
bearings
7
Apply
engine
oil
to
main
bearing
surfaces
on
both
sides
of
cylinder
block
and
cap
Install
crankshaft
8
Install
main
bearing
cap
and
tight
en
bolts
to
specified
torque
lil
Tightening
torque
Main
bearing
cap
5
0
to
6
0
kg
m
36
to
43
ft
lb
Note
a
Apply
seal
to
each
rear
main
bear
ing
contact
comer
of
cylinder
block
as
shown
in
F
EM
61
EM493
Fig
EM
6
Applying
Sealant
b
Arrange
parts
so
arrow
mark
on
bearing
cap
faces
toward
front
of
engine
c
Prior
to
tightening
bearing
cap
bolts
place
bearing
cap
in
proper
position
by
shifting
crankshaft
in
axial
direction
d
Tighten
bearing
cap
bolts
gradually
in
two
to
three
stages
outwardly
from
center
bearing
in
the
sequence
shown
in
Fig
EM
62
e
After
securing
bearing
cap
bolts
ascertain
that
crankshaft
turns
smoothly
@I
EM494
Fig
EM
62
Torque
Sequence
of
Cap
Bolts
Page 52 of 548
m
k
camSM9tJ
down
hole
Key
groove
EM767
Fig
EM
11
Setting
No
I
Piston
atT
D
C
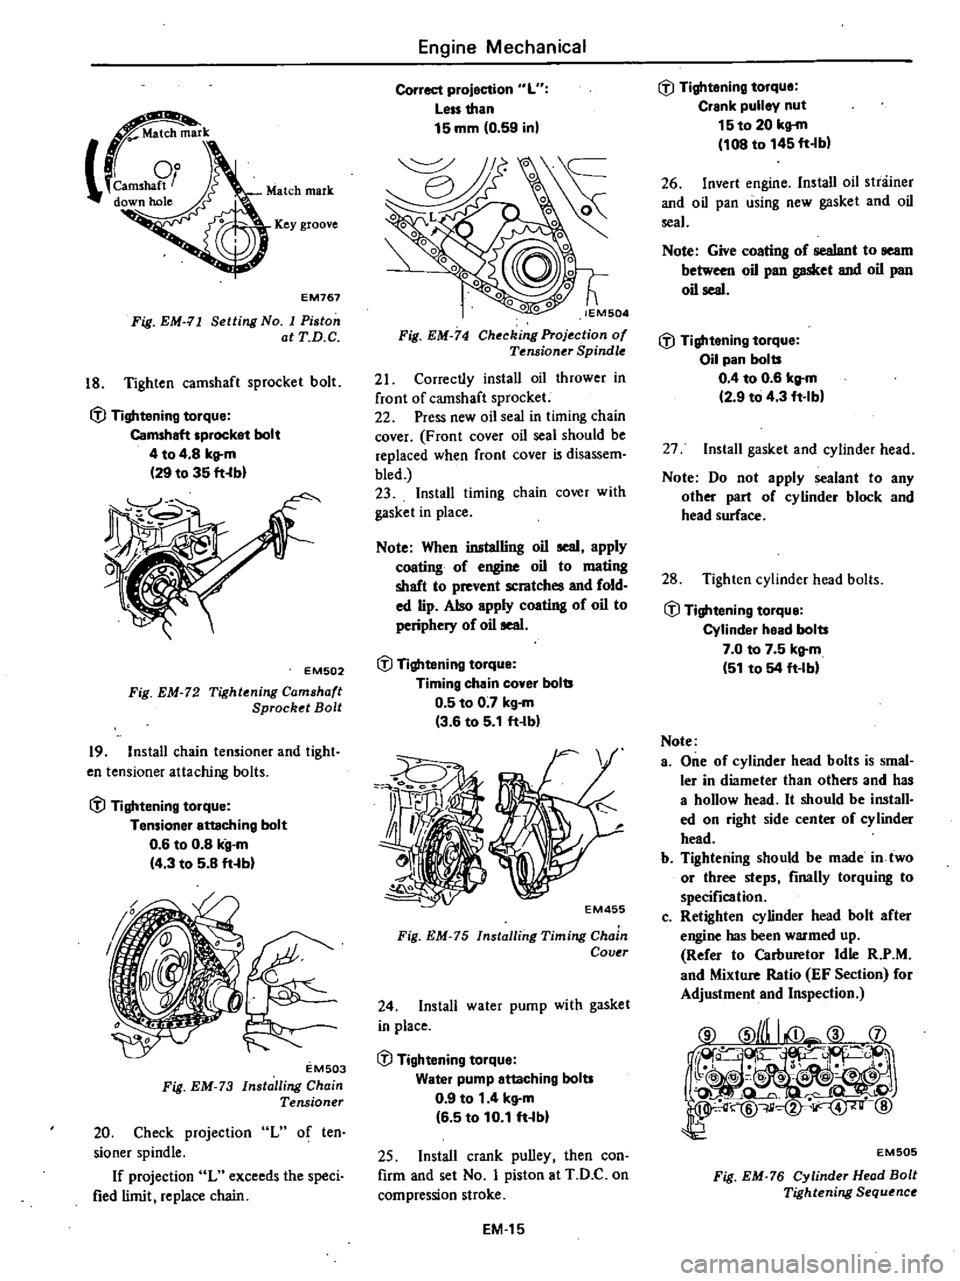
18
Tighten
camshaft
sprocket
bolt
ifl
Tightening
torque
Camshaft
sprocket
bolt
4
to
4
8
kg
m
29
to
35
fHbl
EM502
Fig
EM
72
Tightening
Camshaft
Sprocket
Bolt
19
Install
chain
tensioner
and
tight
en
tensioner
attaching
bolts
ifl
Tightening
torque
Tensioner
enaching
bolt
0
6
to
0
8
kg
m
14
3
to
5
8
ft
b
EM503
Fig
EM
73
Installing
Chain
Tensioner
20
Check
projection
L
of
ten
sioner
spindle
If
projection
L
exceeds
the
speci
fied
limit
replace
chain
Engine
Mechanical
Correct
projection
L
Less
than
15
mm
0
59
inl
lEM504
Fig
EM
74
Checking
Projection
of
Tf
nsioner
Spindle
21
Correctly
install
oil
thrower
in
front
of
camshaft
sprocket
22
Press
new
oil
seal
in
timing
chain
cover
F
ran
t
cover
oil
seal
should
be
replaced
when
front
cover
is
disassem
bled
23
Install
timing
chain
cover
with
gasket
in
place
Note
When
inatalling
oil
seal
apply
coating
of
engine
oil
to
mating
shaft
to
prevent
scratches
and
fold
ed
lip
Also
apply
coating
of
oil
to
periphery
of
oil
seal
ifl
Tightening
torque
Timing
chain
cover
bolts
0
5
to
0
7
kg
m
3
6
to
5
1
ft
Ib
Z5
1
o
j
I
t
f
4
EM455
Fig
EM
75
Installing
Timing
Chain
Covtr
24
Install
water
pump
with
gasket
in
place
ifl
Tightening
torque
Water
pump
attaching
bolts
0
9
to
1
4
kg
m
16
5
to
10
1
ft
bl
25
Install
crank
pulley
then
con
firm
and
set
No
I
piston
at
T
D
C
on
compression
stroke
EM
15
ifl
Tightening
torque
Crank
pulley
nut
15to
20
kg
m
108
to
145
ft
b
26
Invert
engine
Install
oil
stniiner
and
oil
pan
using
new
gasket
and
oil
seal
Note
Give
coating
of
sealant
to
seam
between
oil
pan
gasket
and
oil
pan
oil
seal
ifl
Tightening
torque
Oil
pan
bolts
0
4
to
0
6
kg
m
12
9
to
4
3
ft
lb
27
Install
gasket
and
cylinder
head
Note
Do
not
apply
sealant
to
any
other
part
of
cylinder
block
and
head
surface
28
Tighten
cylinder
head
bolts
ifl
Tightening
torque
Cylinder
head
bolts
7
0
to
7
5
kg
m
51
to
54
ft
IM
Note
a
One
of
cylinder
head
bolts
is
smal
ler
in
diameter
than
others
and
has
a
hollow
head
It
should
be
install
ed
on
right
side
center
of
cylinder
head
b
Tightening
should
be
made
in
two
or
three
steps
finally
torquing
to
specification
c
Retighten
cylinder
head
bolt
after
engine
has
been
warmed
up
Refer
to
Carburetor
Idle
R
P
M
and
Mixture
Ratio
EF
Section
for
Adjustment
and
Inspection
EM505
Fig
EM
76
Cylinder
Head
Bolt
Tightening
Sequence
Page 53 of 548
29
Apply
engine
oiho
both
ends
of
push
rods
and
insert
in
proper
se
quence
30
Apply
engine
oil
to
valve
stem
end
and
rocker
arm
contact
surfaces
Position
rocker
shaft
assembly
on
cyI
inder
head
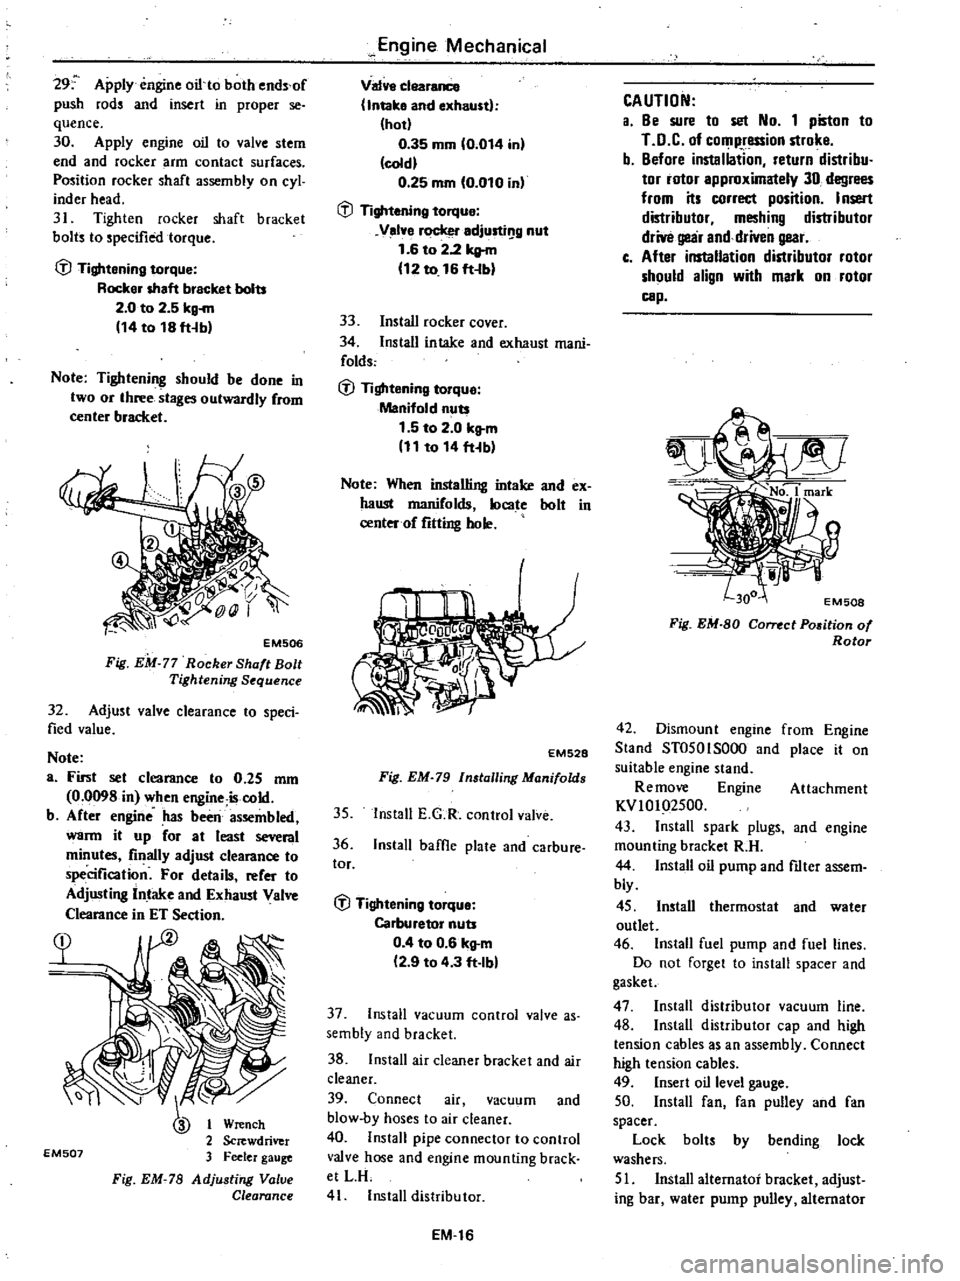
31
Tighten
rocker
shaft
bracket
bolts
to
specified
torque
fJ
Tightening
torque
Rocker
shaft
bracket
bolts
2
0
to
2
5
kg
m
14
to
18
ft
b
Note
Tightening
should
be
done
in
two
or
three
stages
outwardly
from
center
bracket
EM506
Fig
EM
77
Rocker
Shaft
Bolt
Tightening
Sequence
32
Adjust
valve
clearance
to
speci
fied
value
Note
a
First
set
clearance
to
0
25
mm
0
0098
in
when
engine
iscold
b
After
engine
has
been
assembled
warm
it
up
for
at
least
several
minutes
finally
adjust
clearance
to
specification
For
details
refer
to
Adjusting
Intake
and
Exhaust
Valve
Clearance
in
ET
Section
EM507
or
Wrench
2
Screwdriver
3
Feeler
gauge
Fig
EM
78
Adjusting
Value
Clearance
Engine
Mechanical
Valve
clearance
Intake
and
exhaust
hot
0
35
mm
0
014
in
cold
0
25
mm
0
010
in
fJ
Tightening
torque
Velve
rocker
adjusti
g
nut
1
6
to
2
2
kltm
12
to
16
ft
b
33
Install
rocker
cover
34
Install
intake
and
exhaust
mani
folds
fJ
Tightening
torque
Manifold
nuts
1
5
to
2
0
kg
m
11
to
14
fHb
Note
When
installing
intake
and
ex
haust
manifolds
locate
bolt
in
center
of
fitting
hole
EM528
Fig
EM
79
Installing
Manifolds
35
Install
E
G
R
control
valve
36
Install
baffle
plate
and
carbure
tor
fJ
Tightening
torque
Carburetor
nuts
0
4
to
0
6
kg
m
2
9
to
4
3
ft
Ibl
37
Install
vacuum
control
valve
as
sembly
and
bracket
38
Install
air
cleaner
bracket
and
air
cleaner
39
Connect
air
vacuum
and
blow
by
hoses
to
air
cleaner
40
Install
pipe
connector
to
control
valve
hose
and
engine
mounting
brack
etLR
41
Install
distributor
EM
16
CAUTION
a
8e
sure
to
set
No
1
piston
to
LD
C
of
compression
stroke
b
Before
instaliation
return
distribu
tor
rotor
approximately
30
degrees
from
its
correct
position
Insert
distributor
meshing
distributor
drive
gear
and
driven
gear
c
After
installation
distributor
rotor
should
align
with
mark
on
rotor
cap
J
No
1
mark
EM508
Fig
EM
80
Cornct
P05ition
of
Rotor
42
Dismount
engine
from
Engine
Stand
ST0501S000
and
place
it
on
suitable
engine
stand
Re
move
Engine
Attachment
KVlOI
2500
43
Install
spark
plugs
and
engine
mounting
bracket
R
H
44
Install
oil
pump
and
ftIter
assem
bly
45
Install
thermostat
and
water
outlet
46
Install
fuel
pump
and
fuel
lines
Do
not
forget
to
install
spacer
and
gasket
47
Install
distributor
vacuum
line
48
Install
distributor
cap
and
high
tension
cables
as
an
assembly
Connect
high
tension
cables
49
Insert
oil
level
gauge
50
Install
fan
fan
pulley
and
fan
spacer
Lock
bolt
by
bending
lock
washers
51
Install
alternator
bracket
adjust
ing
bar
water
pump
pulley
alternator
Page 63 of 548

CYLINDER
BLocK
t
60
2
36
20
0
79
I
100
CI
94
rJ
L
II
E9
I
Unit
mm
in
EM479
Cylinder
liner
for
service
4
0
0
157
Undersize
4
5
0
177
Undersize
Engine
MechanicliIl
Surface
flatness
Inner
diameter
Cylinder
bore
Out
of
round
X
V
Taper
A
B
Differential
in
inner
diameter
between
cylinders
Piston
to
cylinder
block
clearance
Outside
diameter
80
00
to
80
05
3
1496
to
3
1515
80
50
to
80
55
3
1692
to
3
1712
PISTON
PISTON
RING
AND
PISTON
PIN
Piston
e
e
5
51
co
ED
I
H
EM4S0
Standard
Over
size
0
50
0
0197
1
00
0
0394
EM
26
Standard
Less
than
0
05
0
0020
76
000
to
76
050
2
9921
to
2
994i
Less
than
O
oI5
0
0006
Less
than
O
oI5
0
0006
Less
than
0
05
0
OO20
0
025
to
0
045
0
0010
to
0
0018
Unit
riun
in
Inside
diameter
75
50
to
75
60
2
9724
to
2
9763
Piston
diameter
Unit
mm
in
Wear
limit
0
1
0
0039
0
20
0
0079
0
20
0
0079
Unit
mm
in
75
967
to
76
017
2
9908
to
2
9927
76
467
to
76
517
3
0105
to
3
0124
76
967
to
77
017
3
0301
to
3
0321
Page 75 of 548
OIL
PUMP
The
oil
pump
and
filter
assembly
is
bolted
to
the
right
side
of
the
cylinder
block
and
can
be
removed
with
the
engine
in
pl
c
The
oil
pump
which
is
driven
by
a
gear
on
the
camshaft
has
the
full
flow
element
type
filter
in
stalled
to
the
oil
pump
cover
REMOVAL
I
Place
a
suitable
container
under
oil
pump
2
Remove
three
bolts
attaching
oil
pump
and
filter
assembly
and
with
draw
assembly
3
Separate
oil
filter
from
oil
pump
4
Ciean
off
old
gasket
from
mating
surfaces
i
E
L043
F
EL
2
R
moving
Oil
Pump
Asso
mbly
INSTALLATION
I
Install
oil
filter
to
oil
pump
2
Locate
oil
pump
and
filter
as
sembly
or
cylinder
block
using
a
spacer
and
new
gasket
Secure
with
three
bolts
l
l
Tightening
torque
Oil
pump
securing
bolts
0
9
to
1
4
kg
m
6
5
to
10
1
ft
lbl
3
Check
oil
level
and
add
oil
if
necessary
4
Start
engine
and
check
for
oil
leaks
5
Remove
the
container
Engine
Lubrication
System
DISASSEMBLY
AND
ASSEMBLY
I
Remove
bolt
securing
pump
cover
to
pump
body
Separate
pump
cover
from
pump
body
2
Slide
out
outer
rotor
from
pump
body
3
Remove
oil
pressure
regulator
plug
washer
shim
spring
and
valve
4
Assemble
oil
pump
in
reverse
order
of
disassembly
Note
a
When
placing
oil
pump
in
a
vice
use
extreme
care
not
to
distort
pump
body
and
cover
in
the
jaws
b
Do
not
pull
out
drive
shaft
pin
securing
drive
shaft
and
inner
rotor
Shaft
is
press
fitted
to
rotor
with
the
pin
caulked
EL044
Fig
EL
3
Oil
Pump
l
l
Tightening
torque
Oil
pump
cove
bolt
0
39
to
0
5
2
kltm
2
8
to
3
8
ti
Ib
Regulator
valve
plug
4
0
to
5
0
kltm
29
to
36
ft
bl
INSPECTION
Wash
all
parts
in
cleaning
solvent
and
dry
wiih
compressed
air
I
hispect
pump
body
and
cover
for
cracks
or
excessive
wear
2
Inspect
pump
rotors
for
excessive
wear
3
Check
inner
rotor
shaft
for
looseness
in
pump
body
4
Inspect
regulator
valve
for
wear
or
scoring
5
Check
regulator
spring
to
see
that
it
is
not
worn
on
its
side
or
collapsed
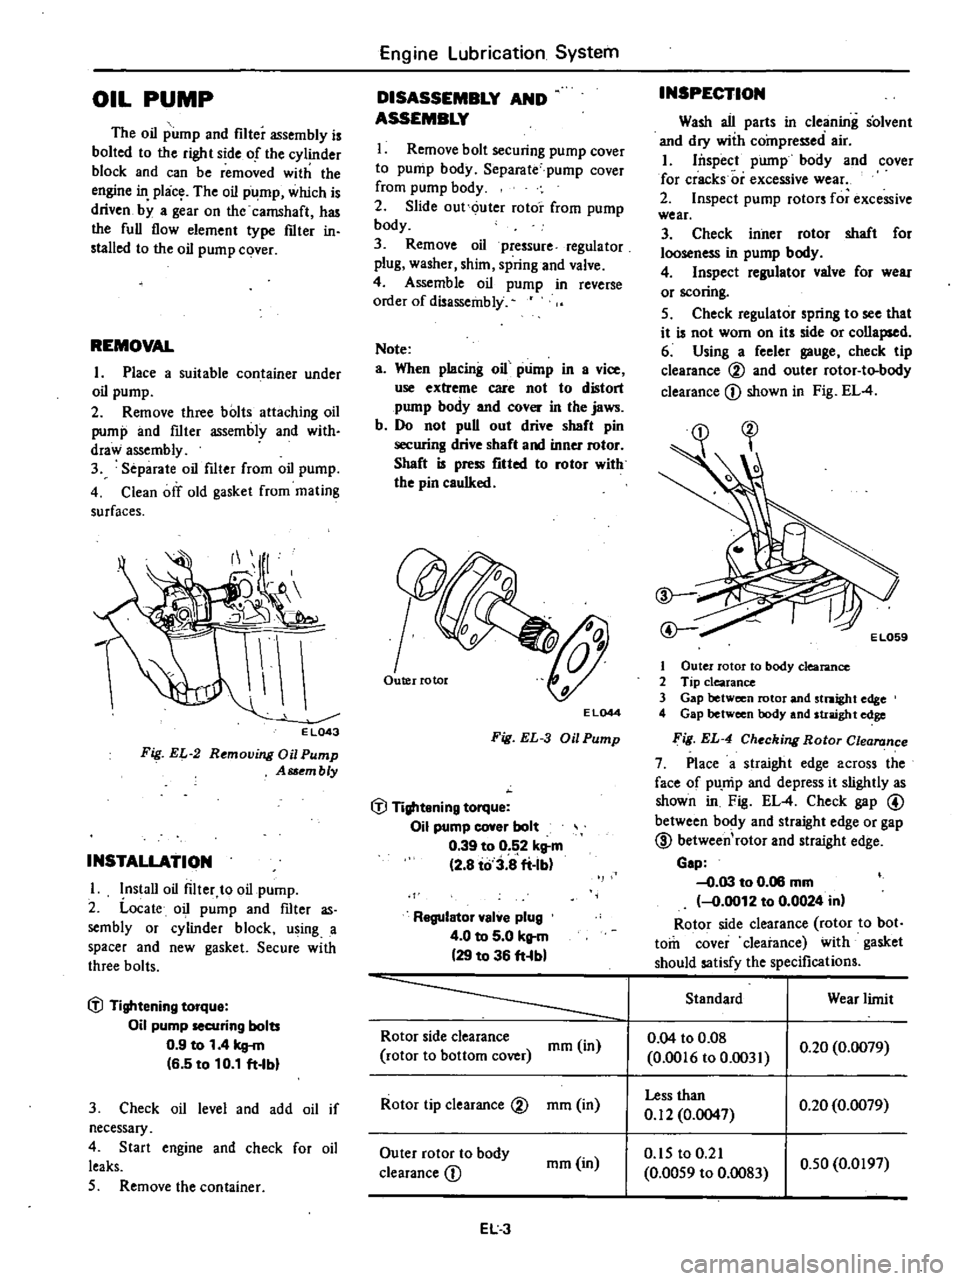
6
Using
a
feeler
gauge
check
tip
clearance
00
and
outer
rotor
to
body
clearance
CD
shown
in
Fig
EL
4
EL059
1
Outer
rotor
to
body
clearance
2
Tip
clearance
3
Gap
between
rotor
and
stnight
edge
4
Gap
between
body
and
straight
edge
ig
EL
4
Checking
Rotor
Clea
nce
7
Place
a
straight
edge
across
the
face
of
pU
mp
and
depress
it
slightly
as
shown
in
Fig
EL
4
Check
gap
@
between
body
and
straight
edge
or
gap
@
between
rotor
and
straight
edge
Gap
0
03
to
0
06
mm
0
0012
to
0
0024
in
Rotor
side
clearance
rotor
to
bot
tom
cover
clearance
with
gasket
should
satisfy
the
specifications
Standard
Wear
limit
Rotor
side
clearance
mm
in
0
04
to
0
08
rotor
to
bottom
cover
0
0016
to
0
031
0
20
0
0079
Rotor
tip
clearance
V
mm
in
Less
than
0
20
0
0079
0
12
0
0047
Outer
rotor
to
body
mm
in
0
15
to
0
21
0
50
0
0197
clearance
CD
0
0059
to
0
083
EL3
Page 80 of 548
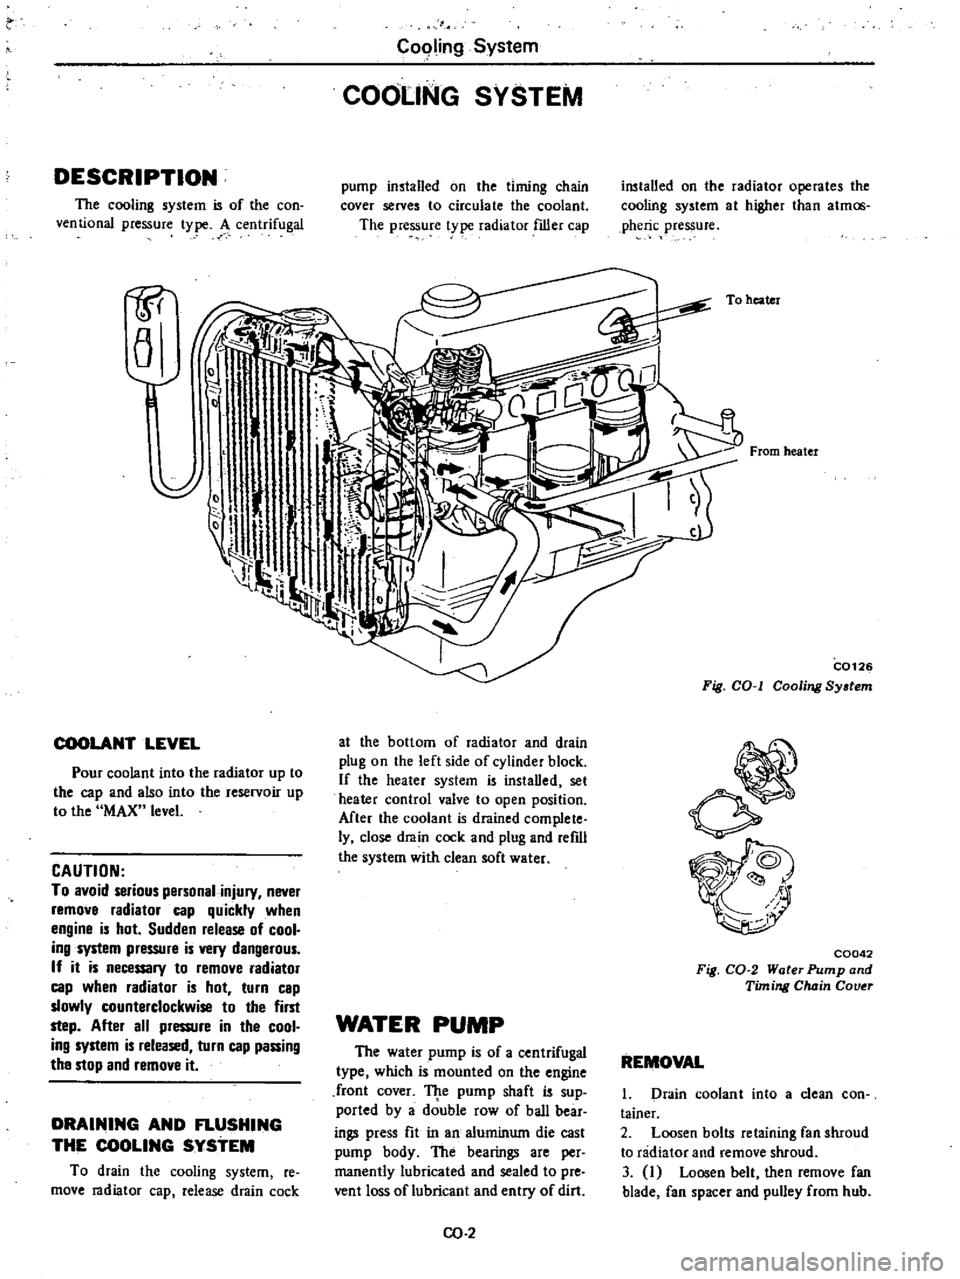
DESCRIPTION
The
cooling
system
is
of
the
con
ventional
pressure
type
A
centrifugal
1P
a
COOLANT
LEVEL
Pour
coolant
into
the
radiator
up
to
the
cap
and
also
into
the
reservoir
up
to
the
MAX
level
CAUTION
To
avoid
serious
personal
injury
never
remove
radiator
cap
quickly
when
engine
is
hot
Sudden
release
of
cool
ing
system
pressure
is
very
dangerous
If
it
is
necessary
to
remove
radiator
cap
when
radiator
is
hot
turn
cap
slowly
counterclockwise
to
the
first
step
After
all
pressure
in
the
cool
ing
system
is
released
turn
cap
passing
the
stop
and
remove
it
DRAINING
AND
FLUSHING
THE
COOLING
SYSTEM
To
drain
the
cooling
system
re
move
radiator
cap
release
drain
cock
C09ling
System
COOLING
SYSTEM
pump
installed
on
the
timing
chain
cover
serves
to
circulate
the
coolant
The
pressure
t
pe
radiator
filler
cap
at
the
bottom
of
radiator
and
drain
plug
on
the
left
side
of
cylinder
block
If
the
heater
system
is
instaDed
set
heater
control
valve
to
open
position
Mter
the
coolant
is
drained
complete
ly
close
drain
cock
and
plug
and
refdl
the
system
with
clean
soft
water
WATER
PUMP
The
water
pump
is
of
a
centrifugal
type
which
is
mounted
on
the
engine
front
cover
TJ
te
pump
shaft
is
sup
ported
by
a
double
row
of
baD
bear
ings
press
fit
in
an
aluminum
die
cast
pump
body
The
bearings
are
per
manently
lubricated
and
sealed
to
pre
vent
loss
of
lubricant
and
entry
of
dirt
CO
2
installed
on
the
radiator
operates
the
cooling
system
at
higher
than
atmos
pheric
pressure
To
heater
From
heater
C0126
Fig
COol
Cooling
System
C0042
Fig
CO
2
Water
Pump
and
Timing
Chain
Couer
REMOVAL
1
Drain
coolant
into
a
clean
con
tainer
2
Loosen
bolts
retaining
fan
shroud
to
radiator
and
remove
shroud
3
I
Loosen
belt
then
remove
fan
blade
fan
spacer
and
pulley
from
hub
Page 85 of 548
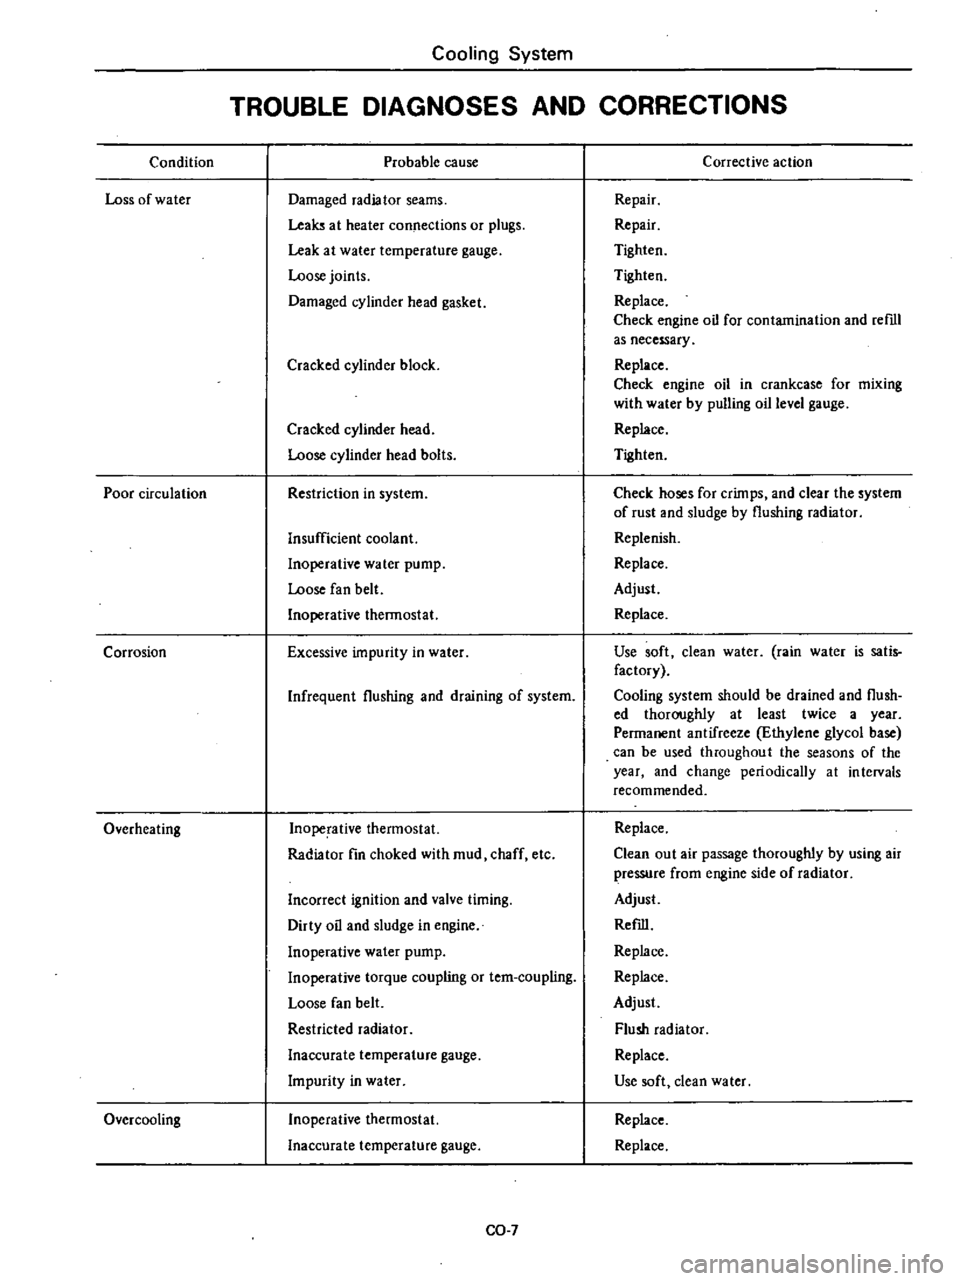
Condition
Loss
of
water
Poor
circulation
Corrosion
Overheating
Over
cooling
Cooling
System
TROUBLE
DIAGNOSES
AND
CORRECTIONS
Probable
cause
Damaged
radiator
seams
Leaks
at
heater
connections
or
plugs
Leak
at
water
temperature
gauge
Loose
joints
Damaged
cylinder
head
gasket
Cracked
cylinder
block
Cracked
cylinder
head
Loose
cylinder
head
bolts
Restriction
in
system
Insufficient
coolant
Inoperative
water
pump
Loose
fan
belt
Inoperative
thermostat
Excessive
impurity
in
water
Infrequent
flushing
and
draining
of
system
Inoperative
thermostat
Radiator
fin
choked
with
mud
chaff
etc
Incorrect
ignition
and
valve
timing
Dirty
oil
and
sludge
in
engine
Inoperative
water
pump
Inoperative
torque
coupling
or
tem
coupling
Loose
fan
belt
Restricted
radiator
Inaccurate
temperature
gauge
Impurity
in
water
Inoperative
thermostat
Inaccurate
temperature
gauge
CO
7
Corrective
action
Repair
Repair
Tighten
Tighten
Replace
Check
engine
oil
for
contamination
and
reml
as
necessary
Replace
Check
engine
oil
in
crankcase
for
mixing
with
water
by
pulling
oil
level
gauge
Replace
Tighten
Check
hoses
for
crimps
and
clear
the
system
of
rust
and
sludge
by
flushing
radiator
Replenish
Replace
Adjust
Replace
Use
soft
clean
water
rain
water
is
satis
factory
Cooling
system
should
be
drained
and
flush
ed
thoroughly
at
least
twice
a
year
Permanent
antifreeze
Ethylene
glycol
base
can
be
used
throughout
the
seasons
of
the
year
and
change
periodically
at
intervals
recommended
Replace
Clean
out
air
passage
thoroughly
by
using
air
pressure
from
engine
side
of
radiator
Adjust
Refill
Replace
Replace
Adjust
Flush
radiator
Replace
Use
soft
dean
water
Replace
Replace
Page 88 of 548
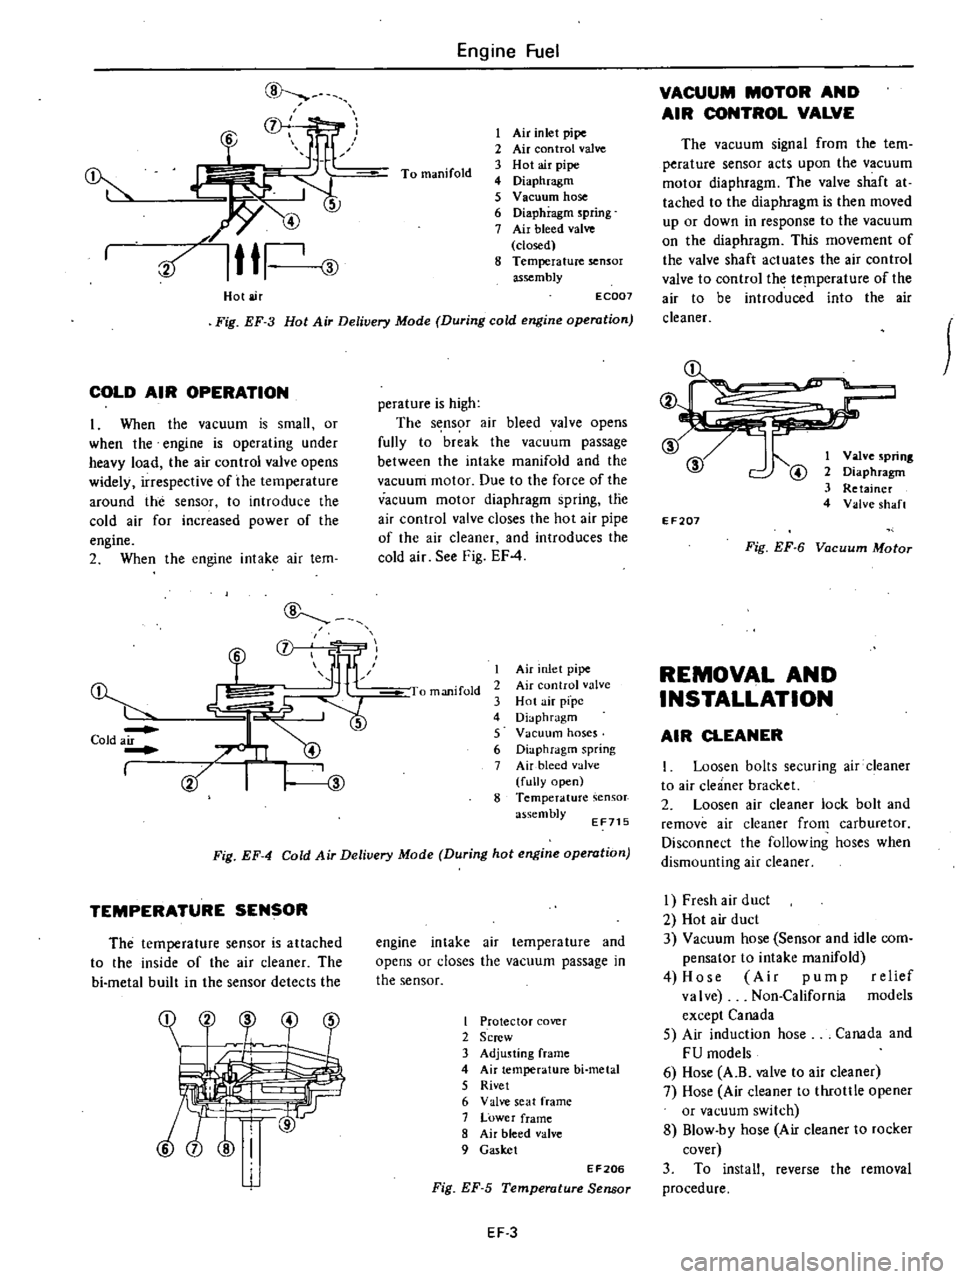
Hot
air
Engine
Fuel
To
manifold
I
Air
inlet
pipe
2
Air
con
trol
valve
3
Hot
air
pipe
4
Diaphragm
5
V
Bellum
hose
6
Diaphragm
spring
7
Air
bleed
valve
closed
8
Temperature
sensor
assembly
Fig
EF
3
Hot
Air
Delivery
Mode
During
cold
engine
operation
EC007
COLD
AIR
OPERATION
1
When
the
vacuum
is
small
or
when
the
engine
is
operating
under
heavy
load
the
air
control
valve
opens
widely
irrespective
of
the
temperature
around
the
sensor
to
introduce
the
cold
air
for
increased
power
of
the
engine
2
When
the
engine
intake
air
tem
Cold
air
I
L
CD
mf
LlF
JII
1
perature
is
high
The
s
ns
r
air
bleed
valve
opens
fully
to
break
the
vacuum
passage
between
the
intake
manifold
and
the
vacuum
motor
Due
to
the
force
of
the
vacuum
motor
diaphragm
spring
tne
air
control
valve
closes
the
hot
air
pipe
of
the
air
cleaner
and
introduces
the
cold
air
See
Fig
EF
4
I
manifold
I
Air
nlet
pipe
2
Air
control
valve
3
Hot
air
pfpc
4
Diaphragm
5
Vacuum
hoses
6
Diaphragm
spring
7
Air
bleed
alve
fully
open
8
Temperature
assembly
EF715
Fig
EF
4
Cold
Air
Deliuery
Mode
During
hot
engine
operation
TEMPERATURE
SENSOR
The
temperature
sensor
is
attached
to
the
inside
of
the
air
cleaner
The
bi
metal
built
in
the
sensor
detects
the
engine
intake
air
temperature
and
opens
or
closes
the
vacuum
passage
in
the
sensor
I
Protector
cover
2
Screw
3
Adjusting
frame
4
Air
temperature
bi
metal
5
Rivet
6
Valve
seat
frame
7
Lower
frame
8
Air
bleed
valve
9
Gasket
EF206
Fig
EF
5
Temperature
Sensor
EF
3
VACUUM
MOTOR
AND
AIR
CONTROL
VALVE
The
vacuum
signal
from
the
tem
perature
sensor
acts
upon
the
vacuum
motor
diaphragm
The
valve
shaft
at
tached
to
the
diaphragm
is
then
moved
up
or
down
in
response
to
the
vacuum
on
the
diaphragm
This
movement
of
the
valve
shaft
actuates
the
air
control
valve
to
control
the
temperature
of
the
air
to
be
introduced
into
the
air
cleaner
@
@
@
I
Valve
spring
2
Diaphragm
3
Retainer
4
Valve
shaft
EF207
Fig
EF
6
Vacuum
Motor
REMOVAL
AND
INSTALLATION
AIR
CLEANER
I
Loosen
bolts
securing
air
cleaner
to
air
cleaner
bracket
2
Loosen
air
cleaner
lock
bolt
and
remove
air
cleaner
from
carburetor
Disconnect
the
following
hoses
when
dismounting
air
cleaner
I
Fresh
air
duct
2
Hot
air
duct
3
Vacuum
hose
Sensor
and
idle
com
pensator
to
intake
manifold
4
Hose
Air
pump
relief
valve
Non
California
models
except
Canada
5
Air
induction
hose
Canada
and
FU
models
6
Hose
A
B
valve
to
air
cleaner
7
Hose
Air
cleaner
to
throttle
opener
or
vacuum
switch
8
Blow
by
hose
Air
cleaner
to
rocker
cover
3
To
install
reverse
the
removal
procedure
Page 99 of 548
DASH
POT
SYSTEM
These
carburetors
are
equipped
with
a
dash
pot
interlocked
with
the
primary
thrott
Ie
valve
through
a
link
mechanism
The
dash
pot
prevents
the
throttle
valve
from
closing
abruptly
thereby
reducing
He
emissions
during
deceleia
tion
or
gear
shifting
In
automatic
transmissi9fi
models
it
also
prevents
engine
stall
resulting
from
quick
application
of
the
brake
or
from
quick
release
of
the
accelerator
pedal
after
it
s
been
tread
upon
slightly
INSPECTION
AND
ADJUSTMENT
CARBURETOR
IDLE
R
P
M
AND
MIXTURE
RATIO
CO
idle
adjustment
with
CO
meter
Refer
to
Carburetor
Idle
rpm
and
Mixture
Ratio
Section
ET
for
check
ing
and
a
justment
CO
idle
adjustment
without
CO
meter
Non
California
models
Refer
to
Carburetor
Idle
rpm
and
Mixture
Ratio
Section
ETl
fot
check
ing
and
adjustment
Idle
limiter
cap
Refer
to
Idle
Limiter
Cap
SeCtio
ET
for
checking
and
adjustment
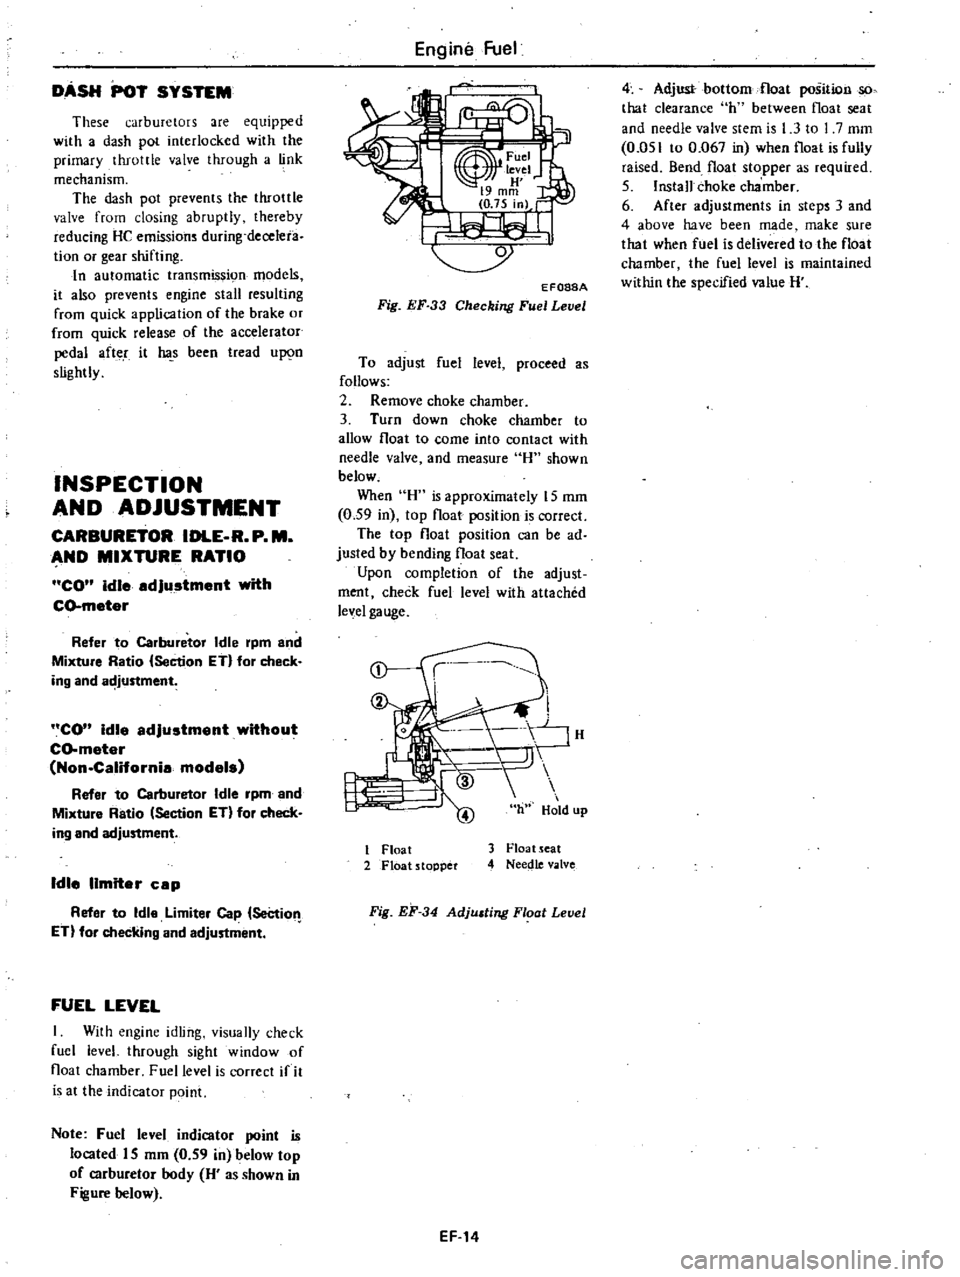
FUEL
LEVEL
I
With
engine
idling
visually
check
fuel
level
through
sight
window
of
float
chamber
Fuel
level
is
correct
if
it
is
at
the
indicator
point
Note
Fuel
level
indicator
point
is
located
IS
mm
0
59
in
below
top
of
carburetor
body
H
as
shown
in
Figure
below
Engine
Fuel
EF088A
Fig
EF
33
Checking
Fuel
Level
To
adjust
fuel
level
proceed
as
follows
2
Remove
choke
chamber
3
Turn
down
choke
chamber
to
allow
float
to
come
into
contact
with
needle
valve
and
measure
H
shown
below
When
H
is
approximately
15
mm
0
59
in
top
float
position
is
correct
The
top
float
position
can
be
ad
justed
by
bending
float
seat
Upon
completion
of
the
adjust
ment
check
fuel
level
with
attached
level
gauge
nhH
J
1
Float
2
Float
stopper
3
Float
seat
4
Needle
valve
Fig
EF
34
Adjusting
Floot
Level
EF
14
4
Adjust
bottom
float
position
so
that
clearance
hl
between
float
seat
and
needle
valve
stem
is
1
3
to
I
7
mm
0
051
to
0
067
in
when
float
is
fully
raised
Bend
float
stopper
as
required
5
Install
choke
chamber
6
After
adjustments
in
steps
3
and
4
above
have
been
made
make
sure
that
when
fuel
is
delivered
to
the
float
chamber
the
fuel
level
is
maintained
within
the
specified
value
H
Page 102 of 548
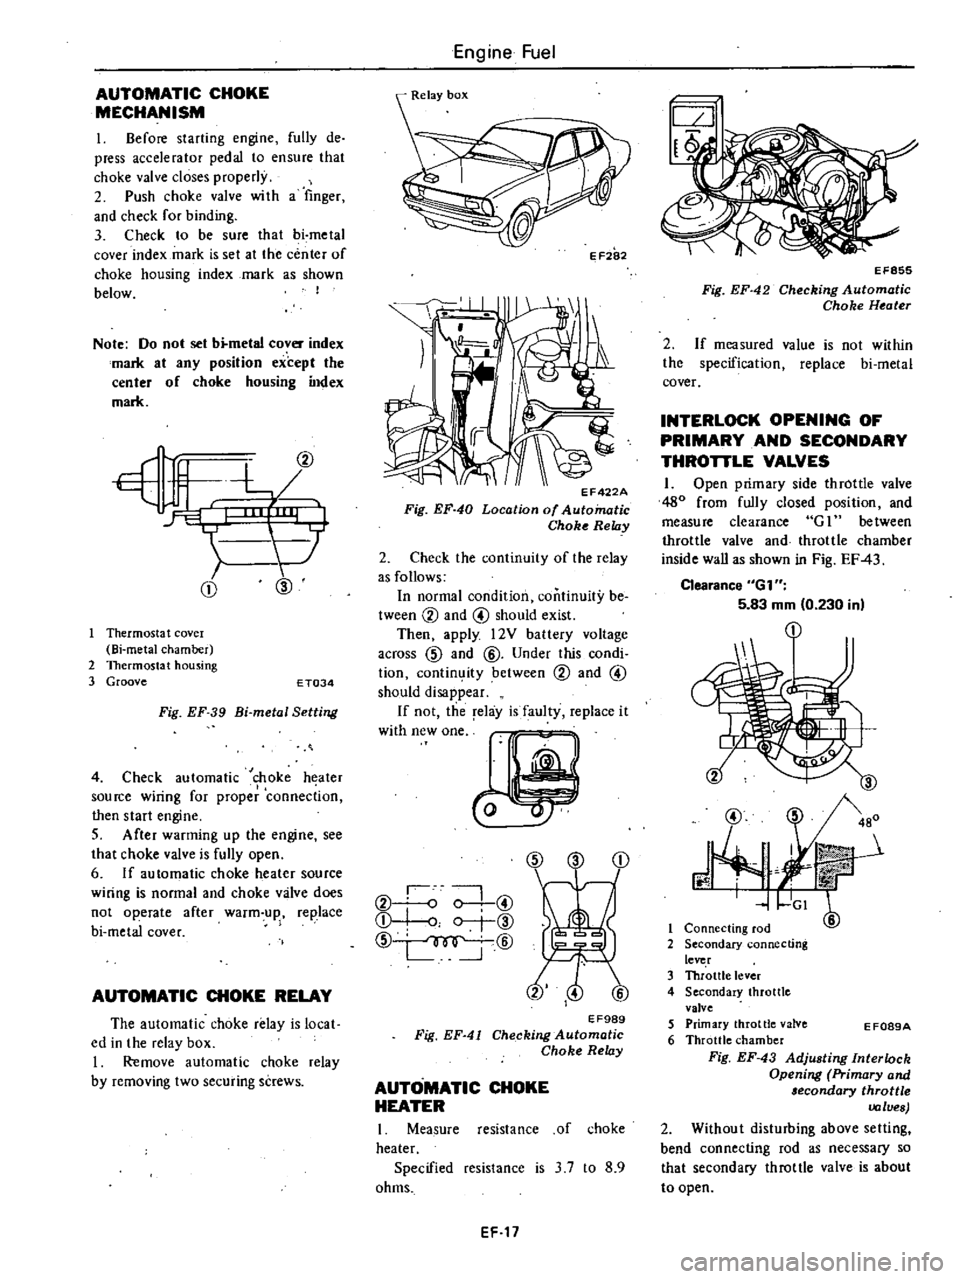
AUTOMATIC
CHOKE
MECHANISM
I
Before
starting
engine
fully
de
press
accelerator
pedal
to
ensure
that
choke
valve
closes
properly
2
Push
choke
valve
wi
th
a
finger
and
check
for
binding
3
Check
to
be
sure
that
bi
metal
cover
index
mark
is
set
at
the
center
of
choke
housing
index
mark
as
shown
below
I
Note
Do
not
set
b
metal
cover
index
mark
at
any
position
except
the
center
of
choke
housing
index
mark
CD
@
Thermosta
t
covel
Bi
metal
chamber
2
Thermostat
housing
3
Groove
E
T034
Fig
EF
39
Bi
metal
Setting
4
Check
automatic
choke
heater
source
wiring
for
proper
connection
then
start
engine
S
After
warming
up
the
engine
see
that
choke
valve
is
fully
open
6
If
automatic
choke
heater
source
wiring
is
normal
and
choke
valve
does
not
operate
after
warm
up
replace
bi
metal
cover
AUTOMATIC
CHOKE
RELAY
The
automatic
choke
relay
is
local
ed
in
the
relay
box
I
Remove
automatic
choke
relay
by
removing
two
securing
screws
Engine
Fuel
II
EF422A
Fig
EF
40
Location
of
Automatic
Choke
Relay
2
Check
the
continuity
of
the
relay
as
follows
In
normal
condition
continuity
be
tween
CV
and
@
should
exist
Then
apply
l2V
battery
voltage
across
CID
and
@
Under
this
condi
tion
contin
ity
between
CV
and
@
should
disappear
If
not
the
relay
is
faulty
replace
it
W
hWO
CID
CD
CV
o
0
@
Q
I
o
r
@
CID
@
EF989
Fig
EF
41
Checking
Automatic
Choke
Relay
AUTOMATIC
CHOKE
HEATER
I
Measure
resistance
of
choke
heater
Specified
resistance
is
3
7
to
8
9
ohms
EF
17
EF855
Fig
EF
42
Checking
Automatic
Choke
Heater
2
If
measured
value
is
not
within
the
specification
replace
bi
metal
cover
INTERLOCK
OPENING
OF
PRIMARY
AND
SECONDARY
THROTTLE
VALVES
1
Open
primary
side
throttle
valve
480
from
fully
closed
position
and
measure
clearance
G
1
between
throttle
valve
and
throttle
chamber
inside
wall
as
shown
in
Fig
EF
43
Clearance
6G1
5
83
mm
0
230
in
@
J
3
480
r
mit
GI
6
1
Connecting
rod
2
Secondary
connecting
lever
3
Throttle
lever
4
Secondary
throttle
valve
5
Primary
throttle
valve
6
Throttle
chamber
Fig
EF
43
Adjusting
Interlock
Opening
Primary
and
lecondary
throttle
values
2
Without
disturbing
above
setting
bend
connecting
rod
as
necessary
so
that
secondary
throttle
valve
is
about
to
open
E
F089A