lock DATSUN 210 1979 Repair Manual
[x] Cancel search | Manufacturer: DATSUN, Model Year: 1979, Model line: 210, Model: DATSUN 210 1979Pages: 548, PDF Size: 28.66 MB
Page 231 of 548
4
Install
stopper
pin
bolt
into
rear
extension
and
tighten
l
J
Tightening
torque
Stopper
pin
bolt
0
5
to
0
8
kg
m
3
6
to
5
8
ft
lb
Be
sure
to
apply
sealant
before
installation
Stopper
pin
bolt
Sealant
TM814
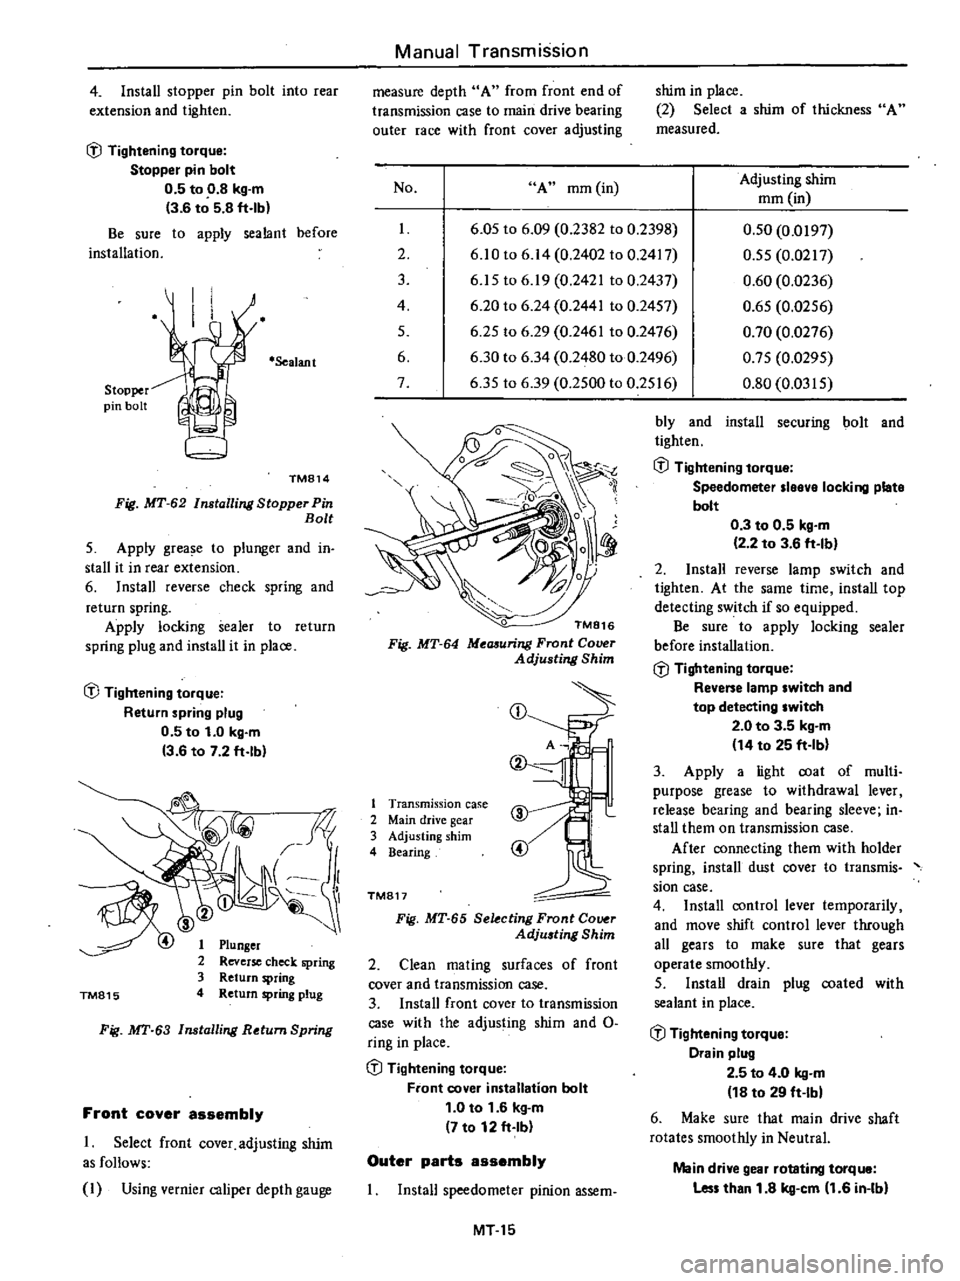
Fig
MT
62
Installing
Stopper
Pin
Bolt
5
Apply
grease
to
plunger
and
in
stall
it
in
rear
extension
6
Install
reverse
check
spring
and
return
spring
Apply
locking
sealer
to
return
spring
plug
and
install
it
in
place
l
J
Tightening
torque
Return
spring
plug
0
5
to
1
0
kg
m
3
6
to
7
2
ft
lb
TM815
Plunger
Reverse
check
spring
Return
spring
Return
spring
plug
Fig
MT
63
Installing
Return
Spring
Front
cover
assembly
1
Select
front
cover
adjusting
shim
as
follows
I
Using
vernier
caliper
depth
gauge
Manual
Transmission
measure
depth
A
from
front
end
of
transmission
case
to
main
drive
bearing
outer
race
with
front
cover
adjusting
No
A
mm
in
I
2
3
4
5
6
7
shim
in
place
2
Select
a
shim
of
thickness
A
measured
Adjusting
shim
mm
in
6
05
to
6
09
0
2382
to
0
2398
6
10
to
6
14
0
2402
to
0
2417
6
15
to
6
19
0
2421
to
0
2437
6
20
to
6
24
0
2441
to
0
2457
6
25
to
6
29
0
2461
to
0
2476
6
30
to
6
34
0
2480
to
0
2496
6
35
to
6
39
0
2500
to
0
2516
0
50
0
0197
0
55
0
0217
0
60
0
0236
0
65
0
0256
0
70
0
0276
0
75
0
0295
0
80
0
0315
TM816
Fig
MT
64
Meaauring
Front
Cover
Adjusting
Shim
CD
1
Transmission
case
2
Main
drive
gear
3
Adjusting
shim
4
Bearing
TM817
Fig
MT
65
Selecting
Front
Co
r
Adju
ting
Shim
2
Clean
mating
surfaces
of
front
cover
and
transmission
case
3
Install
front
cover
to
transmission
case
with
the
adjusting
shim
and
0
ring
in
place
l
J
Tightening
torque
Front
cover
installation
bolt
1
0
to
1
6
kg
m
7
to
12
ft
Ib
Outer
parts
assembly
Install
speedometer
pinion
assem
MT15
bly
and
install
securing
bolt
and
tighten
l
J
Tightening
torque
Speedometer
Ieeve
locking
plate
bolt
0
3
to
0
5
kg
m
2
2
to
3
6
ft
Ib
2
Install
reverse
lamp
switch
and
tighten
At
the
same
time
install
top
detecting
switch
if
so
equipped
Be
sure
to
apply
locking
sealer
before
installation
l
J
Tightening
torque
Revene
lamp
switch
and
top
detecting
switch
2
0
to
3
5
kg
m
14
to
25
ft
Ib
3
Apply
a
light
coat
of
multi
purpose
grease
to
withdrawal
lever
release
bearing
and
bearing
sleeve
in
stall
them
on
transmission
case
After
connecting
them
with
holder
spring
install
dust
cover
to
transmis
sian
case
4
Install
control
lever
temporarily
and
move
shift
control
lever
through
all
gears
to
make
sure
that
gears
operate
smoothly
5
Install
drain
plug
coated
with
sealant
in
place
l
J
Tightening
torque
Drain
plug
2
5
to
4
0
kg
m
18
to
29
ft
Ibl
6
Make
sure
that
main
drive
shaft
rotates
smoothly
in
Neutral
Main
drive
gear
rotating
torque
Les
than
1
8
kg
cm
1
6
in
Ibl
Page 233 of 548
Manual
Transmission
S
R
o
o
D
l
@
@
l
@
l
25
Control
lever
boot
26
Control
pin
bushing
27
Control
arm
pin
28
Control
lever
29
Control
lever
knob
1
2nd
3rd
fork
rod
9
4th
5th
shift
fork
17
Shift
arm
bracket
2
Retaining
pin
10
2nd
3rd
shift
fork
18
Arm
bracket
O
ring
3
Checking
ball
plug
11
Ist
reverse
shift
fork
19
Arm
bracket
plain
washer
4
Check
ball
spring
12
Striking
rod
20
O
ring
5
Check
ball
13
Striking
lever
21
S
lriking
guide
6
ht
reverse
fork
rod
14
Lock
pin
22
Striking
guide
oil
seal
7
Interlock
plunger
15
Striking
pin
23
Expansion
plug
8
4th
5th
fork
rod
16
Shift
arm
24
Control
lever
bushing
Tightening
torque
kg
m
fHb
@
0
9
to
1
2
6
5
to
8
7
@
8
2
to
to
O
59
to
72
TM229A
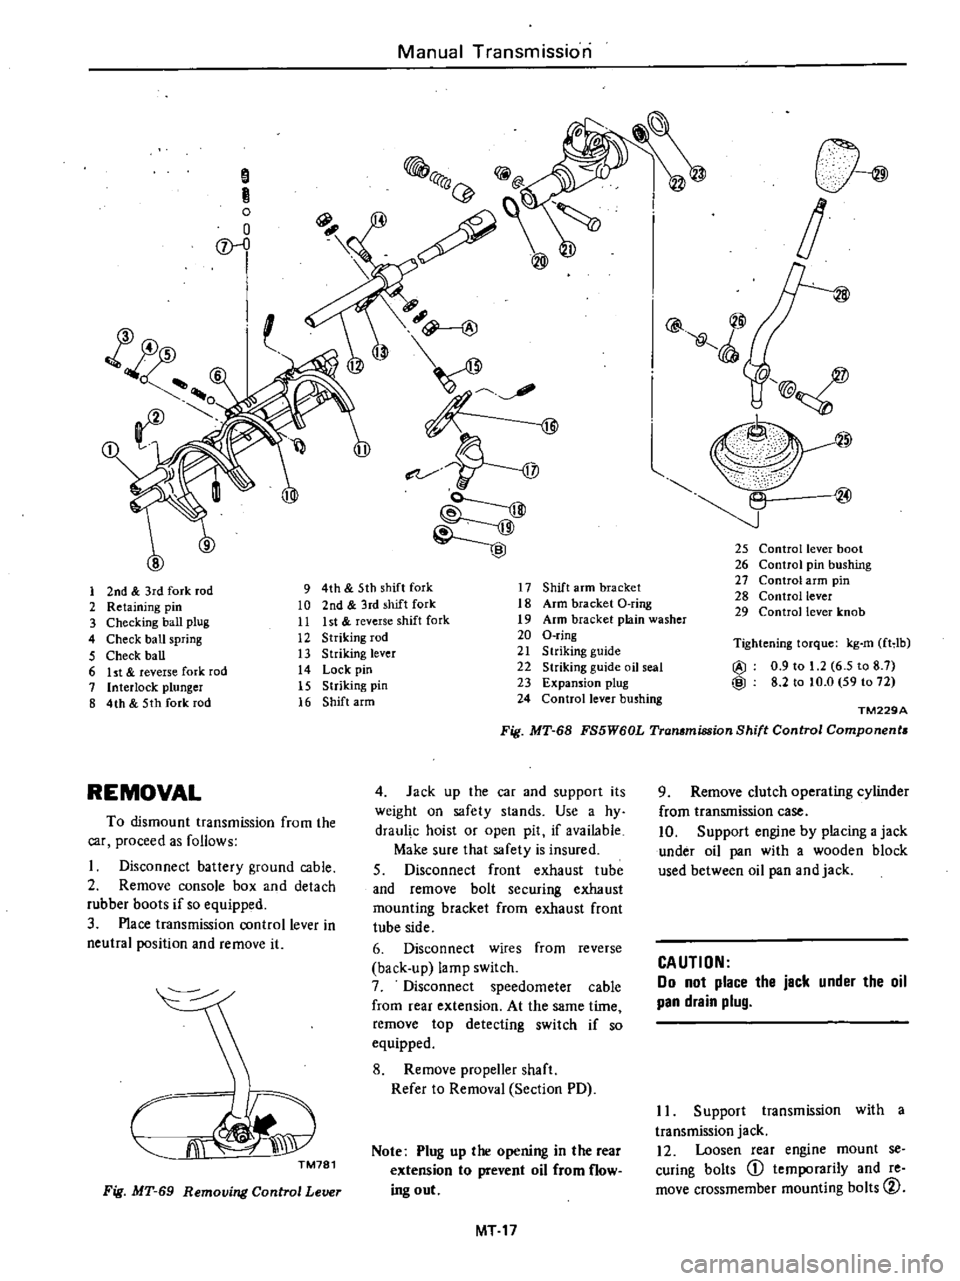
Fig
MT
68
FS5W60L
Transmission
Shift
Control
Components
REMOVAL
4
Jack
up
the
car
and
supporl
its
weight
on
safety
slands
Use
a
hy
draul
c
hoist
or
open
pit
if
available
Make
sure
that
safety
is
insured
S
Disconnect
front
exhaust
tube
and
remove
bolt
securing
exhaust
mounting
bracket
from
exhaust
front
tube
side
6
Disconnect
wires
from
reverse
back
up
lamp
switch
7
Disconnect
speedometer
cable
from
rear
extension
At
the
same
time
remove
top
detecting
switch
if
so
equipped
8
Remove
propeller
shaft
Refer
to
Removal
Section
PD
To
dismount
transmission
from
the
car
proceed
as
follows
Disconnect
battery
ground
cable
2
Remove
console
box
and
detach
rubber
boots
if
so
equipped
3
Place
transmission
control
lever
in
neutral
position
and
remove
it
CJi
J
TM781
Note
Plug
up
the
opening
in
the
rear
extension
to
prevent
oil
from
flow
ing
out
Fig
MT
69
Removing
Control
Lever
MT
17
9
Remove
clutch
operating
cylinder
from
transmission
case
10
Support
engine
by
placing
a
jack
under
oil
pan
with
a
wooden
block
used
between
oil
pan
and
jack
CAUTION
Do
not
place
the
jack
under
the
oil
pan
drain
plug
II
Support
transmission
with
a
transmission
jack
12
Loosen
rear
engine
mount
se
curing
bolts
CD
temporarily
and
re
move
crossmember
mounting
bolts
CV
Page 235 of 548
DISASSEMBLY
TRANSMISSION
CASE
DISASSEMBLY
1
Prior
to
disassembling
transmis
sion
thoroughly
wipe
off
dirt
and
grease
from
it
2
Drain
oil
thoroughly
3
Remove
dust
cover
from
trans
mission
case
Remove
release
bearing
and
with
drawallever
4
Remove
reverse
lamp
switch
and
top
detecting
switch
if
so
equipped
5
Remove
speedometer
pinion
as
sembly
6
Remove
nut
and
stopper
pin
bolt
from
rear
end
of
rear
extension
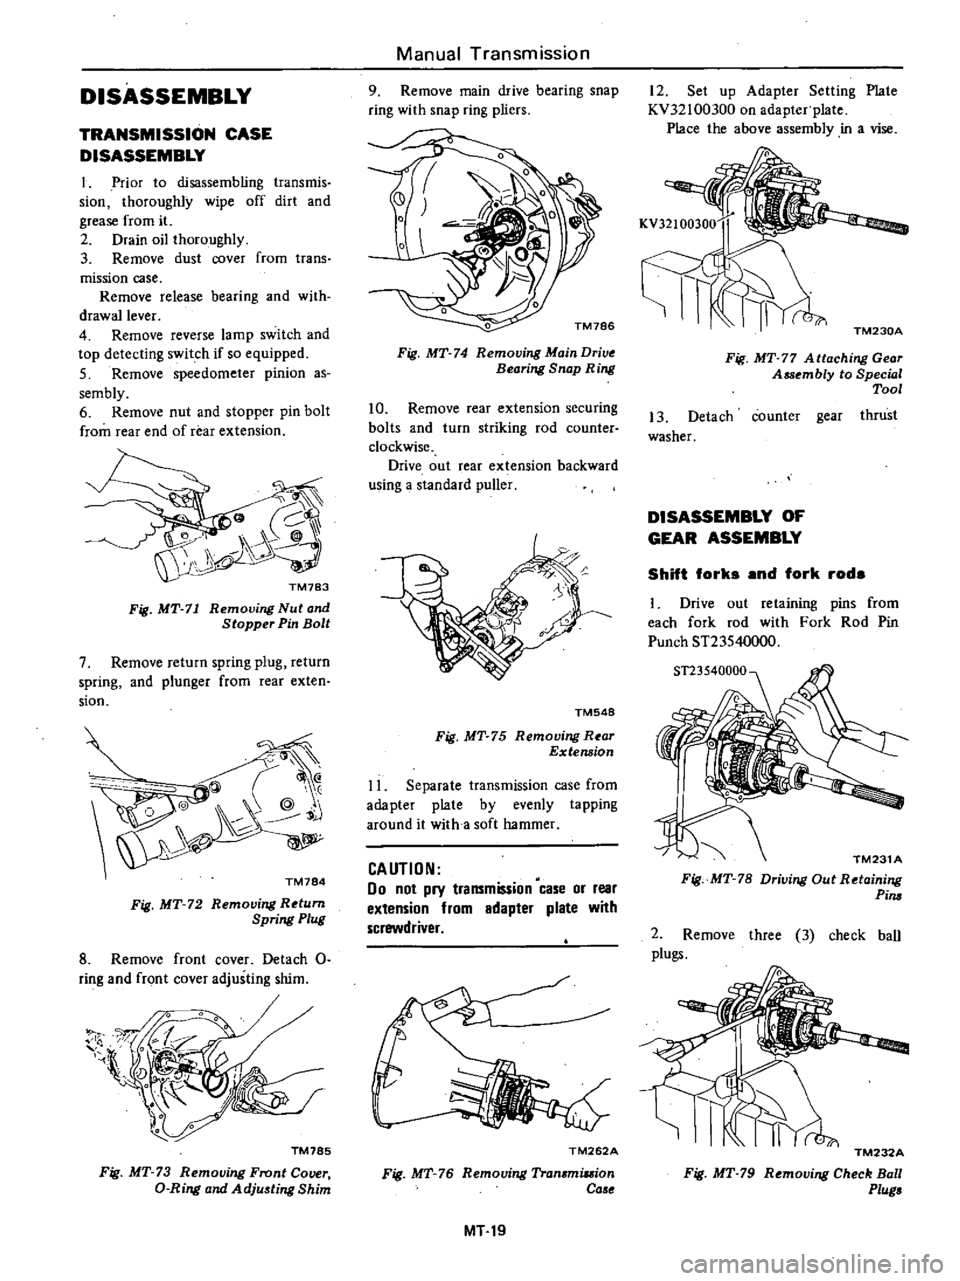
Fig
MT
71
Removing
Nut
and
Stopper
Pin
Bolt
7
Remove
return
spring
plug
return
spring
and
plunger
from
rear
exten
sion
@
@
Q
@
j
TM784
Fig
MT
72
Removing
Return
Spring
Plug
8
Remove
front
cover
Detach
0
ring
and
front
cover
adjusting
shim
1l
l
TM785
Fig
MT
73
Removing
Front
Cover
D
Ring
and
Adju
ting
Shim
Manual
Transmission
9
Remove
main
drive
bearing
snap
ring
with
snap
ring
pliers
Fig
MT
74
Removing
Main
Drive
Bearing
Snap
Ring
10
Remove
rear
extension
securing
bolts
and
turn
striking
rod
counter
clockwise
Drive
out
rear
extension
backward
using
a
standard
puller
TM548
Fig
MT
75
Removing
R
ar
Extension
11
Separate
transmission
case
from
adapter
plate
by
evenly
tapping
around
it
with
a
soft
hammer
CAUTION
00
not
pry
transmission
case
or
rear
extension
from
adapter
plate
with
screwdriver
TM262A
Fig
MT
76
Removing
Tran
miuion
Ca
e
MT19
12
Set
up
Adapter
Setting
Plate
KV32100300
on
adapter
plate
Place
the
above
assembly
in
a
vise
TM230A
Fig
MT
77
A
ttaching
Gear
Assembly
to
Special
Tool
13
Detach
counter
gear
thrust
washer
DISASSEMBLY
OF
GEAR
ASSEMBLY
Shift
forks
and
fork
rods
1
Drive
out
retaining
pins
from
each
fork
rod
with
Fork
Rod
Pin
Punch
ST23540000
TM231
A
Fig
MT
78
Driving
Out
Retaining
Pim
2
Remove
three
3
check
ball
plugs
TM232A
Fig
MT
79
Removing
Check
Ball
Plug
Page 236 of 548
3
Drive
out
fork
rods
from
adapter
plate
by
lightly
tapping
on
the
front
end
Detach
shift
forks
Note
a
Be
careful
not
to
lose
three
3
check
balls
and
two
2
interlock
plungers
b
Each
gear
and
shaft
can
be
de
tached
from
ar1apter
plate
without
removing
each
fork
rod
CD
@
1
Check
ball
p1
8
2
Fork
rod
Reverse
Ist
3
Interlock
plu
er
4
Fork
rod
2nd
3rd
5
Fork
rod
4Ih
5th
6
Check
ball
TM793
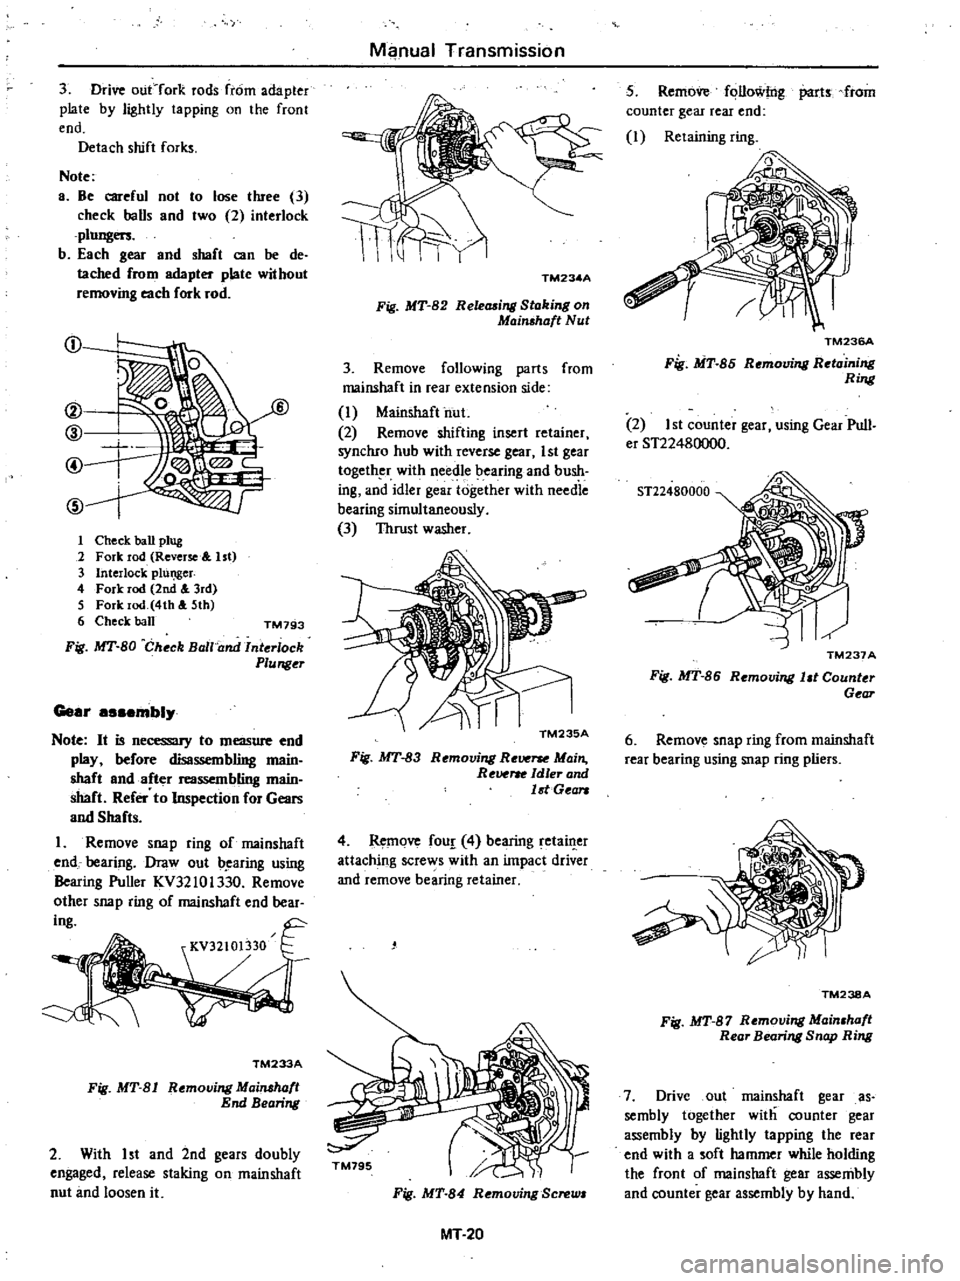
Fig
MT
BO
Check
Ball
nd
Interlock
Plunger
Gear
a
embl
Note
It
is
necessary
to
measure
end
play
before
disassembling
main
shaft
and
after
reassembling
main
shaft
Refer
to
Inspection
for
Gears
and
Shafts
1
Remove
snap
ring
of
rnainshaft
end
bearing
Draw
out
b
aring
using
Bearing
Puller
KV32
10
1330
Remove
olher
sna
p
ring
of
rnainshaft
end
bear
ing
TM233A
Fig
MT
BI
Removing
Mainshaft
End
Bearing
2
With
1st
and
2nd
gears
doubly
engaged
release
staking
on
main
shaft
nut
and
loosen
it
Manual
Transmission
TM234A
Fig
MT
B2
Releaaing
Staking
on
Mainshaft
Nut
3
Remove
following
parts
from
mainshaft
in
rear
extension
side
I
Mainshaft
hut
2
Remove
shifting
insert
retainer
synchro
hub
with
reverse
gear
1st
gear
togeth
r
with
needle
bearing
and
bush
ing
and
idler
gear
together
with
needie
bearing
simultaneously
3
Thrust
washer
Fig
MT
83
Removing
Reverw
Main
Revere
Idler
and
1st
Gea
4
Remove
four
4
bearing
retai
er
attaching
screws
with
an
impact
driver
and
remove
bearing
retainer
Fig
MT
B4
Removing
Screw
MT
20
5
Remove
folloWIng
parts
from
counter
gear
rear
end
I
Retaining
ring
TM236A
Fig
ltiT
85
Removing
Retaining
Ring
2
1st
counter
gear
using
Gear
Pull
er
ST22480000
ST22480000
TM237A
Fig
MT
86
Remouing
l
t
Counter
Gear
6
Remove
snap
ring
from
mainshaft
rear
bearing
using
snap
ring
pliers
TM238A
Fig
MT
B7
Removing
Main
haft
Rear
Bearing
Snap
Ring
7
Drive
out
rnainshaft
gear
as
sembly
together
with
counter
gear
assembly
by
lightly
tapping
the
rear
end
with
a
sofl
hammer
while
holding
the
front
of
rnainshaft
gear
assembly
and
counter
gear
assembly
by
hand
Page 238 of 548
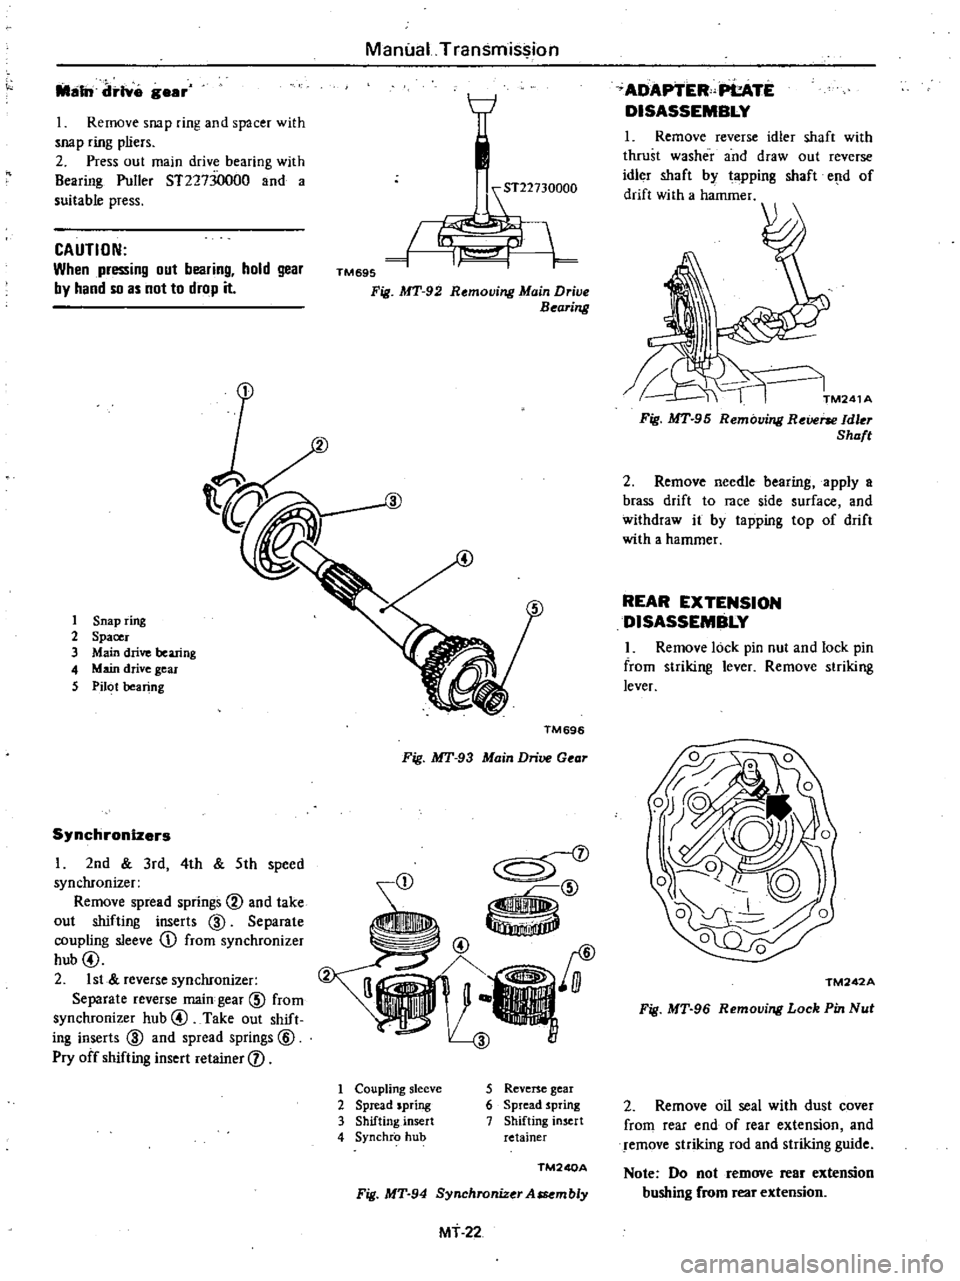
liillim
drIYe
geer
1
Remove
snap
ring
and
spacer
with
snap
ring
pliers
2
Press
out
main
drive
bearing
with
Bearing
Puller
ST227
iOoOO
and
a
suitable
press
CAUTION
When
pressing
out
bearing
hold
gear
by
hand
so
as
not
to
drop
it
Manual
Transmis
ion
T
ooo
I
TM695
J
j
r
Fig
MT
92
Removing
Main
Drive
Bearing
1
Snap
ring
2
Spacer
3
Main
drive
bearing
4
Main
drive
gear
5
PiI
t
bearing
Synchronizers
I
2nd
3rd
4th
5th
speed
synchronizer
Remove
spread
springs
and
take
out
shifting
inserts
ID
Separate
coupling
sleeve
j
from
synchronizer
hub@
2
Ist
reverse
synchronizer
Separate
reverse
main
gear
00
from
synchronizer
hub
@
Take
out
shift
ing
inserts
ID
and
spread
springs
@
Pry
off
shifting
insert
retainer
j
Fig
MT
93
Main
Drive
Gear
TM
696
1
Coupling
sleeve
2
Spread
spring
3
Shifting
insert
4
Synchro
hub
800
@
r@
7
c
19
5
Reverse
gear
6
Spread
spring
7
Shifting
insert
retainer
TM240A
Fig
MT
94
Synchronizer
Assembly
MT
22
ADAPTER
PeATE
DISASSEMBLY
1
Remove
reverse
idler
shaft
with
thrust
washer
and
draw
out
reverse
idler
shaft
by
tapping
shaft
e
ld
of
drift
with
a
hammer
TM241A
Fig
MT
95
Removing
Reverse
Idler
Shaft
2
Remove
needle
bearing
apply
a
brass
drift
to
race
side
surface
and
withdraw
it
by
tapping
top
of
drift
with
a
hammer
REAR
EXTENSION
DISASSEMBLY
I
Remove
lock
pin
nut
and
lock
pin
from
striking
lever
Remove
striking
lever
TM242A
Fig
MT
96
Removing
Lock
Pin
Nut
2
Remove
oil
seal
with
dust
cover
from
rear
end
of
rear
extension
and
remove
striking
rod
and
striking
guide
Note
Do
not
remove
rear
extension
bushing
from
rear
extension
Page 239 of 548
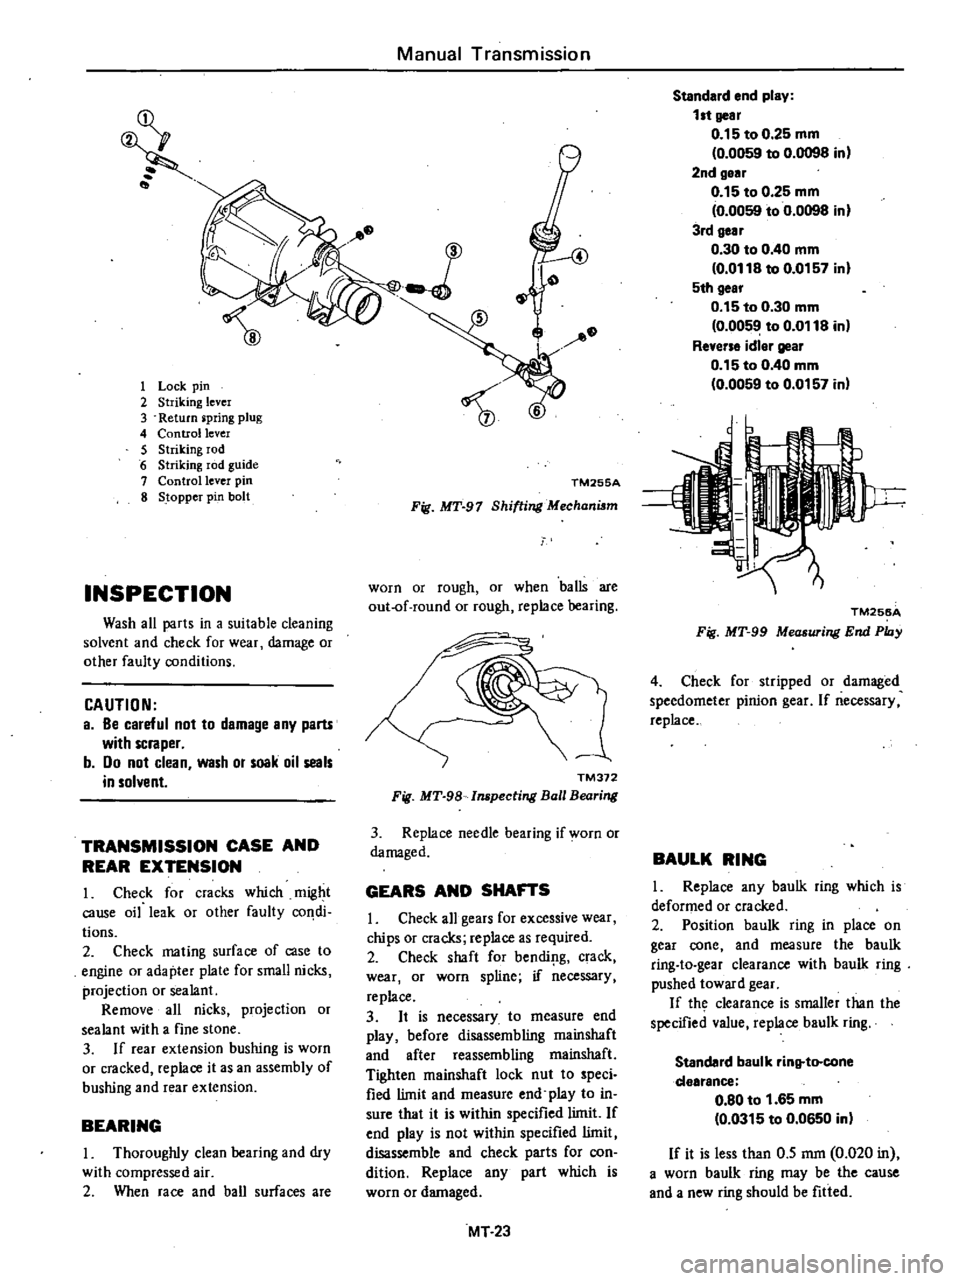
1
Lock
pin
2
Striking
lever
3
Return
pring
plug
4
Control
lever
5
Striking
rod
6
Striking
rod
guide
7
Control
lever
pin
8
Stopper
pin
bolt
INSPECTION
Wash
all
parts
in
a
suitable
cleaning
solvent
and
check
for
wear
damage
or
other
faulty
conditions
CAUTION
a
Be
careful
not
to
damage
any
parts
with
scraper
b
Do
not
clean
wash
or
soak
oil
seals
in
solvent
TRANSMISSION
CASE
AND
REAR
EXTENSION
1
Check
for
cracks
which
might
cause
oil
leak
or
other
faulty
condi
tions
2
Check
mating
surface
of
case
to
engine
or
adapter
plate
for
small
nicks
projection
or
sealant
Remove
all
nicks
projection
or
sealant
with
a
fine
stone
3
If
rear
extension
bushing
is
worn
or
cracked
replace
it
as
an
assembly
of
bushing
and
rear
extension
BEARING
I
Thoroughly
clean
bearing
and
dry
with
compressed
air
2
When
race
and
ball
surfaces
are
Manual
Transmission
1
TM255A
Fig
MT
97
Shifting
Mechanism
worn
or
rough
or
when
balls
are
out
of
round
or
rough
replace
bearing
TM372
Fig
MT
98
Inspecting
Ball
Bearing
3
Replace
needle
bearing
if
worn
or
damaged
GEARS
AND
SHAFTS
I
Check
all
gears
for
excessive
wear
chips
or
cracks
replace
as
required
2
Check
shaft
for
bendillg
crack
wear
or
worn
spline
if
necessary
replace
3
It
is
necessary
to
measure
end
play
before
disassembling
mainshaft
and
after
reassembling
mainshaft
Tighten
mainshaft
lock
nut
to
speci
fied
limit
and
measure
end
play
to
in
sure
that
it
is
within
specified
limit
If
end
play
is
not
within
specified
limit
disassemble
and
check
parts
for
con
dition
Replace
any
part
which
is
worn
or
damaged
MT
23
Standard
end
play
1
t
gear
0
15
to
0
25
mm
0
0059
to
0
0098
in
2nd
gear
0
15
to
0
25
mm
0
0059
to
0
0098
in
3rd
gear
0
30
to
0
40
mm
0
0118
to
0
0157
in
5th
gear
0
15
to
0
30
mm
0
0059
to
0
0118
in
Reverse
idler
gear
0
15
to
0
40
mm
0
0059
to
0
0157
in
TM256A
Fig
MT
99
Measuring
End
Phly
4
Check
for
stripped
or
damaged
speedometer
pinion
gear
If
necessary
replace
BAULK
RING
I
Replace
any
baulk
ring
which
is
deformed
or
cracked
2
Position
baulk
ring
in
place
on
gear
cone
and
measure
the
baulk
ring
to
gear
clearance
with
baulk
ring
pushed
toward
gear
If
th
clearance
is
smaller
than
the
specified
value
replace
baulk
ring
Standard
baulk
rinltto
cone
dearance
0
80
to
1
65
mm
0
0315
to
0
0650
in
If
it
is
less
than
0
5
mm
0
020
in
a
worn
baulk
ring
may
be
the
cause
and
a
new
ring
should
be
fitted
Page 240 of 548
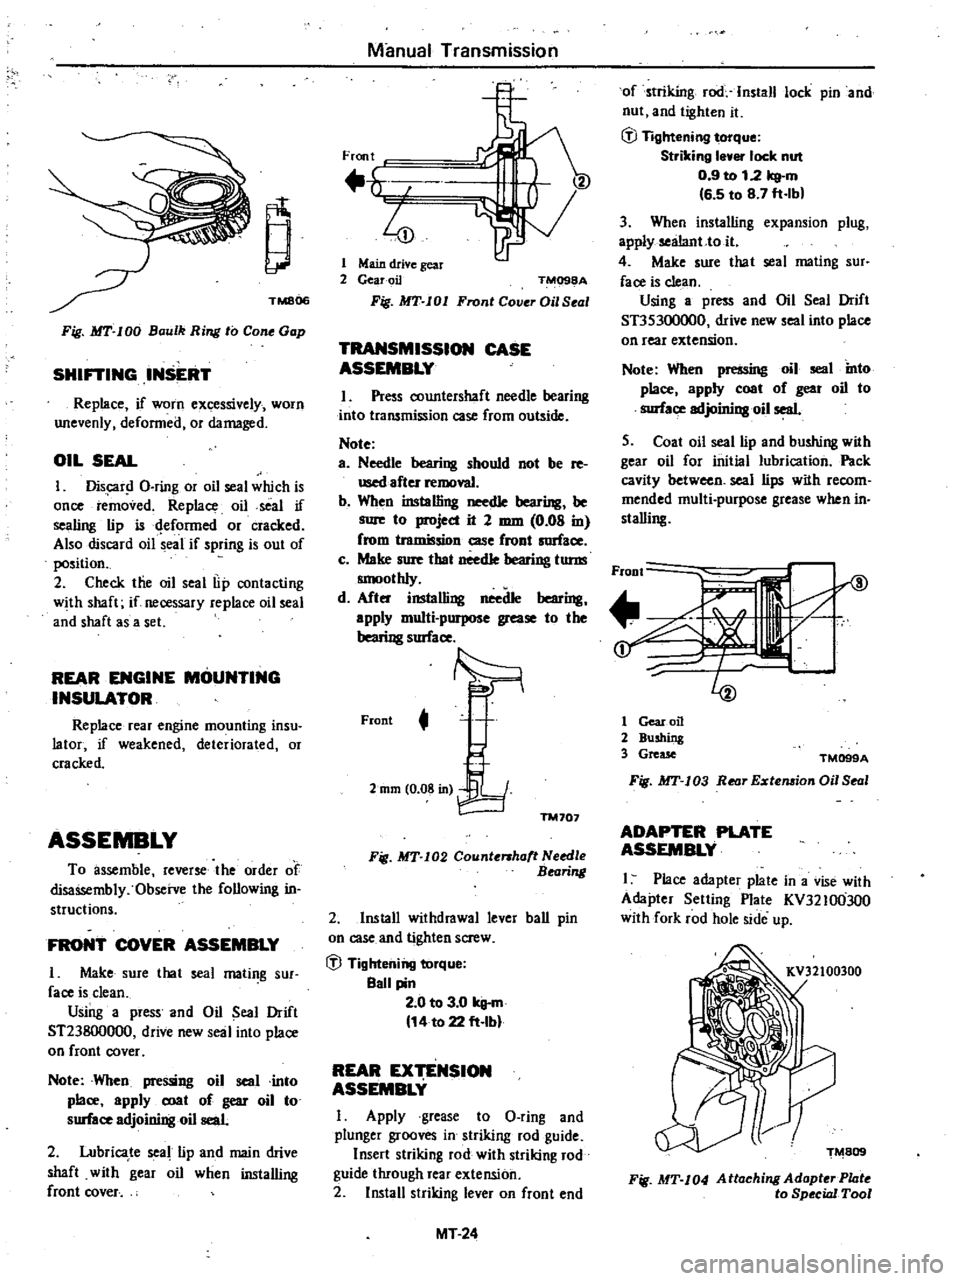
it
TMS06
Fig
MT
100
Baulk
Ring
to
Con
Gap
SHiniNG
IIUERT
Replace
if
WOrn
excessively
worn
unevenly
defonned
or
damaged
OIL
SEAL
I
Dis
r
l
O
ring
or
oil
seal
which
is
once
removed
Replace
oil
seal
if
sealing
lip
is
qefonned
or
cracked
Also
discard
oil
seal
if
spring
is
out
of
position
2
Check
tlie
oil
seal
lip
contacting
with
shaft
if
necessary
replace
oil
seal
and
shaft
as
a
set
REAR
ENGINE
MOUNTING
INSULATOR
Replace
rear
engine
mounting
insu
lator
if
weakened
deteriorated
or
cracked
ASSEMBLY
To
assemble
reverse
the
order
of
disassembly
Observe
the
following
in
structions
FRONT
COYER
ASSEMBLY
I
Make
sure
that
seal
mating
sur
face
is
clean
Using
a
press
and
Oil
Seal
Drift
ST23800000
drive
new
seal
into
place
on
front
cover
Nole
When
pressing
oil
seal
into
place
apply
coat
of
gear
oil
to
surface
adjoining
oil
seat
2
Lubrica
te
seal
lip
and
main
drive
shaft
with
gear
oil
when
installing
front
cover
Manual
Transmission
Front
h
I
4
1
Main
drive
gear
2
GearoiJ
TM098A
Fig
MT
101
Front
Cover
Oil
S
al
TRANSMISSION
CASE
ASSEMBLY
I
Press
countershaft
needle
bearing
into
transmission
case
from
outside
Note
a
Needle
bearing
should
not
be
re
used
after
removal
b
When
inslalling
needle
bearing
be
sure
to
project
it
2
mm
0
08
in
from
tramission
case
front
mace
c
Make
sure
that
needle
bearing
torm
smoothly
d
After
instal6ng
needle
bearing
apply
multi
purpose
grease
to
the
bearing
smace
Front
t
2mm
0
08
in
TM707
Fig
MT
I02
Count
haft
N
edle
Bearing
2
Install
withdrawal
lever
ball
pin
on
case
and
tighten
screw
ifl
Tightening
torque
Sail
pin
2
0
to
3
0
kg
m
14
to
22
ft
Ibl
REAR
EXTENSION
ASSEMBLY
I
Apply
grease
to
O
ring
and
plunger
grooves
in
striking
rod
guide
Insert
striking
rod
with
striking
rod
guide
through
rear
extension
2
Install
striking
lever
on
front
end
MT
24
of
striking
rod
Install
lock
pin
and
nut
and
tighten
it
ifl
Tightening
torque
Striking
I
er
lock
nut
0
9
to
12
kg
m
6
5
to
8
7
ft
lbl
3
When
installing
expansion
plug
apply
sealant
to
it
4
Make
sure
that
seal
mating
sur
face
is
clean
Using
a
press
and
Oil
Seal
Drift
ST35300000
drive
new
seal
into
place
on
rear
extension
Note
When
pressing
oil
seal
into
place
apply
coat
of
geat
oil
to
mace
adjoining
oil
seal
5
Coat
oil
seal
lip
and
bushing
with
gear
oil
for
initial
lubrication
Pack
cavity
between
seal
lips
with
recom
mended
multi
purpose
grease
when
in
slalling
FroDt
I
t
Cc
if
i
I
L
1
Gear
oil
2
Bushing
3
Grease
TM099A
Fig
MT
I03
Rear
Eztemion
Oil
Seal
ADAPTER
PLATE
ASSEMBLY
I
Place
adapter
plate
in
a
vise
with
Adapter
Setting
Plate
KV32100JOO
with
fork
rod
hole
side
up
Fig
MT
104
Attaching
AdopterPhlte
to
Special
Tool
Page 244 of 548

J
xplanation
of
convet
ted
torque
Mainshaft
nut
should
be
tightened
to
10
to
11
kg
m
72
to
80
ft
Ib
torque
with
the
aid
of
Wrench
ST22520000
When
doing
w
the
amount
of
torque
to
be
read
on
wrench
needle
should
be
modified
according
to
the
following
formula
L
C
kg
m
10
x
L
O
I
to
11
L
x
L
O
I
or
C
ft
Ib
n
x
L
O
33
to
L
80
x
L
0
33
Where
C
Value
read
on
the
torque
wrench
kg
m
ft
Ib
L
Effective
length
of
torque
wrench
m
ft
ST22520000
Torque
wrench
r
Lm
ft
0
1
m
0
3
ft
TM587
Fig
MT
124
Setting
Wrench
Example
When
a
0
4
m
Iong
torque
wrench
is
used
the
C
in
Fig
MT
123
will
be
8
0
to
8
8
kg
m
58
to
64
ft
Ib
12
Measure
gear
end
play
Make
sure
that
they
are
held
within
the
specified
values
For
details
refer
to
Page
MT
23
for
Inspection
13
Fit
1
0
IDm
0
039
in
thick
snap
ring
10
the
front
side
of
main
shaft
end
bearing
14
Install
mainshaft
end
bearing
using
Bearing
Drift
ST22350000
Fit
thick
snap
ring
to
the
rear
side
of
bearing
to
eliminate
end
play
Manual
Transmission
Available
Sllap
ring
No
Thickness
IDm
in
1
1
0
0
039
2
1
2
0
047
on
LST22350000
TM250A
Fig
MT
125
In
talling
Main
haft
End
Bearing
Shift
forks
and
fork
rods
1
Insert
1st
reverse
fork
rod
into
its
shift
fork
and
adapter
plate
2
With
1st
reverse
fork
rod
set
at
Neutral
insert
interlock
plunger
into
adapter
plate
3
Insert
2nd
3rd
fork
rod
into
adapter
plate
2nd
3rd
and
4th
5th
shift
forks
4
With
2nd
3rd
fork
rod
set
at
Neutral
insert
interlock
plunger
into
adapter
plate
5
Insert
4th
5th
fork
rod
into
adapter
plate
and
its
s
Uft
fork
6
Secureshift
forks
and
fork
rOd
s
with
new
retaining
pins
Note
a
Be
sure
to
install
interlock
plunger
when
installing
any
adjacent
fork
rods
to
adapter
plate
Properly
align
the
groove
in
assem
bleMork
rod
with
inle
rlQck
plung
er
See
Fig
MT
SO
b
Be
su
to
align
4th
5th
shift
fork
with
the
groove
in
their
coupling
sleeve
befo
instalting
c
Also
align
2nd
3rd
shift
fork
with
their
coupling
sleeve
properly
be
fore
instalting
7
Install
check
balls
and
check
ball
springs
Applying
locking
sealer
to
check
ball
plug
and
install
in
place
Align
center
notch
in
each
fork
rod
with
check
ball
Note
a
Check
ball
plug
for
1st
reverse
fork
rod
is
longer
than
those
for
2nd
3rd
fork
rod
and
4th
5th
fork
rod
b
To
insure
that
interlock
plunger
i
installed
properly
slide
2nd
3rd
fork
rnd
andoperate
the
other
fork
rod
Make
sure
thaI
gear
except
20d
or
3rd
gear
doe
not
mesh
8
Apply
gear
oil
to
all
sliding
sur
faces
and
check
to
see
that
shift
rods
operate
correctly
and
gears
engage
smoothly
L
1
u
Revene
TM251A
Fig
MT
126
In
talling
Shift
Forks
and
Fork
Roth
MT
28
Page 245 of 548
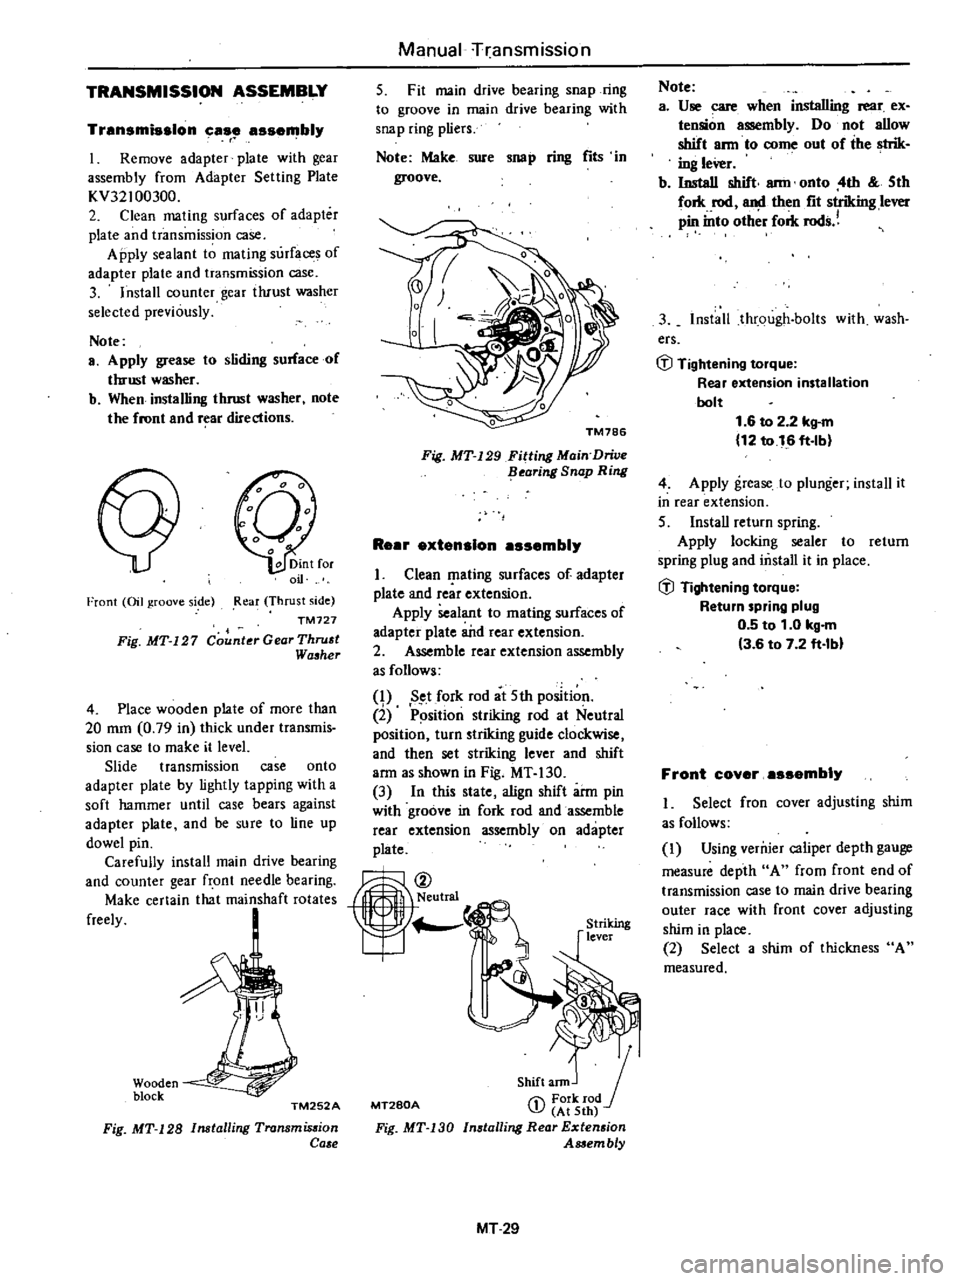
TRANSMISSION
ASSEMBLY
Transmission
case
assembly
r
I
Remove
adapter
plate
with
gear
assembly
from
Adapter
Setting
Plate
KV32100300
2
Clean
mating
surfaces
of
adapter
plate
and
transmission
case
Apply
sealant
to
mating
surfaces
of
adapter
plate
and
transmission
case
3
Install
counter
gear
tluust
washer
selected
previously
Note
a
Apply
grease
to
sliding
surface
of
thrust
washer
b
When
installing
thrust
washer
note
the
front
and
r
ar
directions
Front
Oil
groove
side
Rear
Thrust
side
TM727
Fig
MT
127
Counter
Gear
Thru
t
Wa
her
4
Place
wooden
plate
of
more
than
20
mm
0
79
in
thick
under
transmis
sion
case
to
make
it
level
Slide
transmission
case
onto
adapter
plate
by
lightly
tapping
with
a
soft
hammer
until
case
bears
against
adapter
plate
and
be
sure
to
line
up
dowel
pin
Carefully
install
main
drive
bearing
and
counter
gear
front
needle
bearing
Make
certain
that
mainshaft
rotates
freely
Wooden
block
TM252A
Fig
MT
128
Installing
Transmis
ion
Ca
e
Manual
rransmission
5
Fit
main
drive
bearing
snap
ring
to
groove
in
main
drive
bearing
with
snap
ring
pliers
Note
Make
sure
sno
p
ring
fits
in
groove
Fig
MT
129
Fitting
Main
Drive
flearing
Snap
Ring
ReBr
extension
assembly
I
Clean
I
lating
surfaces
of
adapter
plate
and
rcar
extension
Apply
sealant
to
mating
surfaces
of
adapter
plate
a
itd
rear
extension
2
Assemble
rear
extension
assembly
as
follows
q
Set
fork
rod
at
5th
position
2
P
sition
striking
rod
at
Neutral
position
turn
striking
guide
clockwise
and
then
set
striking
lever
and
shift
arm
as
shown
in
Fig
MT
130
3
In
this
state
align
shift
arm
pin
with
groove
in
fork
rod
and
assemble
rear
extension
assembly
on
adapter
plate
MT280A
Shift
ann
J
1
Fork
rod
J
At
5th
Installing
Rear
Extension
Assembly
Fig
MT
130
MT29
Note
a
Use
care
when
installing
rear
ex
tension
assembly
Do
not
allow
shift
ann
to
come
out
of
the
strik
ing
leVer
b
Install
shift
ann
onto
4th
5th
fork
rod
and
then
fit
striking
lever
pin
into
oth
r
fork
rods
3
Install
through
bolts
with
wash
ers
GJ
Tightening
torque
Rear
extension
installation
bolt
1
6
to
2
2
kg
m
12
to
16
ft
lb
4
Apply
grease
to
plunger
install
it
in
rear
extension
5
InstaU
return
spring
Apply
locking
sealer
to
return
spring
plug
and
mstall
it
in
place
GJ
Tightening
torque
Return
spring
plug
0
5
to
1
0
kg
m
3
6
to
7
2
ft
lbl
Front
coyer
assembly
I
Select
fron
cover
adjusting
shim
as
follows
I
Using
verruer
caliper
depth
gauge
measure
depth
A
from
front
end
of
transmission
case
to
main
drive
bearing
outer
race
with
front
cover
adjusting
shim
in
place
2
Select
a
shim
of
thickness
A
measured
Page 246 of 548

No
A
mm
in
Manual
Ttansniissio
n
Adjusting
shim
mm
in
0
50
0
0197
0
55
0
0217
0
60
0
0236
0
6
0
9756
0
70
0
0276
0
75
0
0295
0
80
0
0315
I
2
3
4
5
6
7
6
05
to
6
09
0
2382
to
0
2398
6
10to
6
14
0
2402
to
0
2417
6
15
to
6
19
0
2421
to
0
2437
6
20
to
6
2
4
9
1
41
t
19
2457
6
25
to
6
29
0
2461
to
0
2476
6
30
to
6
34
0
2480
to
0
2496
6
35
to
6
39
0
2500
to
0
2516
TM816
Fig
MT
131
MetuUring
Front
CoV
r
Adju
ting
Shim
1
Transmission
case
2
Main
drive
gear
3
Adjusting
shim
4
Bearing
TM817
Fig
MT
132
Selecting
Front
CoV
r
Adju
ti1l8
shim
2
Clean
maling
surfaces
of
front
cover
and
transmission
case
3
Install
front
cover
to
transmission
case
with
the
adjUsting
shim
and
0
ring
in
place
@
Tight
ning
torque
Front
co
erinstallation
bolt
1
0
to
1
6
kg
m
7
to
12
ft
Ib
Outer
parts
assembly
I
Install
speedometer
pinion
assem
bly
and
install
securing
bolt
and
tighten
@
Tightening
torque
Speedometer
sl
locking
plate
bolt
0
3
to
0
5
kg
m
2
2
to
3
6
ft
lb
2
Install
reverse
lamp
switch
and
tighten
At
the
same
time
install
top
detecting
switch
if
so
equipped
Be
sure
to
apply
locking
sealer
before
installation
MT30
@
Ti
ltening
torque
Rewene
lamp
switch
and
top
detecting
switch
2
0
to
3
5
kg
m
14
to
25
fHb
3
Apply
a
light
coat
of
multi
purpose
grease
to
withdrawal
lever
release
bearing
ahd
bearing
sleeve
in
stall
them
on
transmission
case
After
connecting
them
with
holder
spring
install
dust
cover
to
transmis
sion
case
4
Install
control
lever
temporarily
and
move
shift
coritrol
lever
through
all
gears
to
make
sure
that
gears
op
rate
smoothly
5
InstaU
draiiI
plug
coated
with
sealant
in
place
@
Tightening
torque
Drain
plug
2
5
to
4
0
kg
m
18
to
29
fHb
6
Make
sure
that
main
drive
shaft
rotates
smoothly
in
Neutral
v
Jin
drive
gear
routing
torque
less
than
1
8
leg
em
1
6
in
Ib