wheel bolts DATSUN 210 1979 Owner's Manual
[x] Cancel search | Manufacturer: DATSUN, Model Year: 1979, Model line: 210, Model: DATSUN 210 1979Pages: 548, PDF Size: 28.66 MB
Page 372 of 548
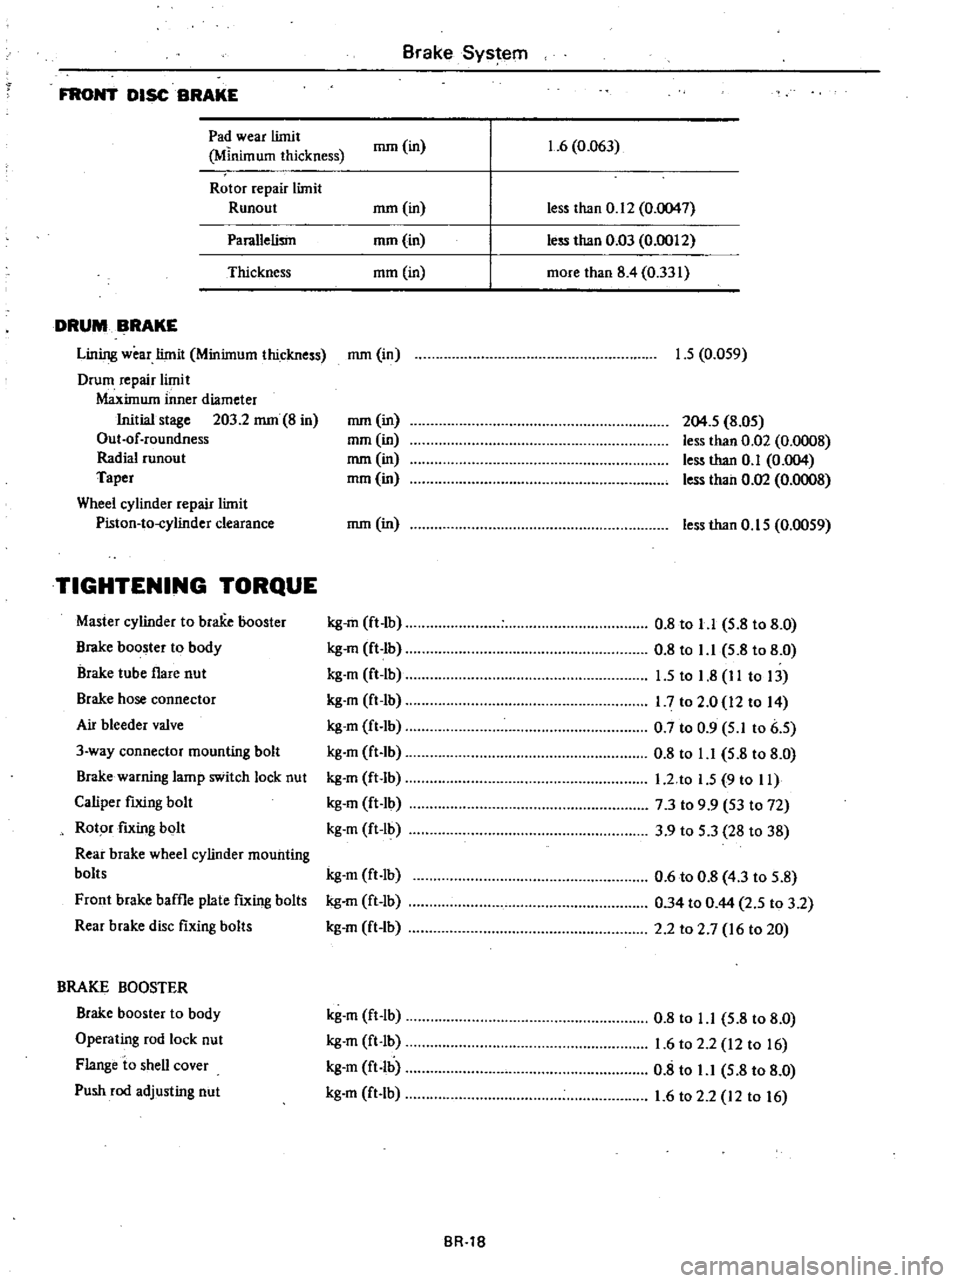
FRONT
DISC
BRAKE
Pad
wear
limit
Minim
urn
thickness
Rotor
repair
limit
Runout
Parallelism
Thickness
DRUM
BRAKE
Lining
wear
limit
Minimum
thickness
Drum
repair
limit
Maximum
inner
diameter
Initial
stage
203
2
nun
8
in
Out
of
roundness
Radial
cunout
Taper
Wheel
cylinder
repair
limit
Piston
to
cylinder
clearance
TIGHTENING
TORQUE
Master
cylinder
to
brake
booster
Brake
booster
to
body
Brake
tube
flare
nut
Brake
hose
connector
Air
bleeder
valve
3
way
connector
mounting
bolt
Brake
warning
lamp
switch
lock
nut
Caliper
fixing
bolt
Rotor
fixing
bolt
Rear
brake
wheel
cylinder
mounting
bolts
Front
brake
baffle
plate
fixing
bolts
Rear
brake
disc
fixing
bolts
BRAKE
BOOSTER
Brake
booster
to
body
Operating
rod
lock
nut
Flange
io
shell
cover
Push
rod
adjusting
nut
nun
in
nun
in
nun
in
mm
in
nun
in
nun
in
mm
in
nun
in
mm
in
nun
in
kg
m
ft
lb
kg
m
ft
lb
kg
m
ft
Ib
kg
m
ft
lb
kg
m
ft
Ib
kg
m
ft
lb
kg
m
ft
Ib
kg
m
ft
lb
kg
m
ft
Ib
kg
m
ft
lb
kg
m
ft
Ib
kg
m
ft
Ib
kg
m
ft
lb
kg
m
ft
lb
kg
m
ft
lb
kg
m
ft
lb
Brake
System
BR
1B
1
6
0
063
less
than
0
12
0
0047
less
than
0
03
0
0012
more
than
8
4
0
331
1
5
0
059
204
5
8
05
less
than
0
02
0
0008
less
than
0
1
0
004
less
than
0
02
0
0008
less
than
0
15
0
0059
0
8
to
1
1
5
8
to
8
0
0
8
to
1
1
5
8
to
8
0
1
5
to
1
8
II
to
13
1
7
to
2
0
12
to
14
0
7
to
0
9
5
1
to
6
5
0
8
to
1
1
5
8
to
8
0
l
2
to
1
5
9
to
II
7
3
to
9
9
53
to
72
3
9
to
5
3
28
to
38
0
6
to
0
8
4
3
to
5
8
0
34
to
0
44
2
5
to
3
2
2
2
to
2
7
16
to
20
0
8
to
1
1
5
8
to
8
0
1
6
to
2
2
12
to
16
0
8
to
1
1
5
8
to
8
0
1
6
to
2
2
12
to
16
Page 374 of 548
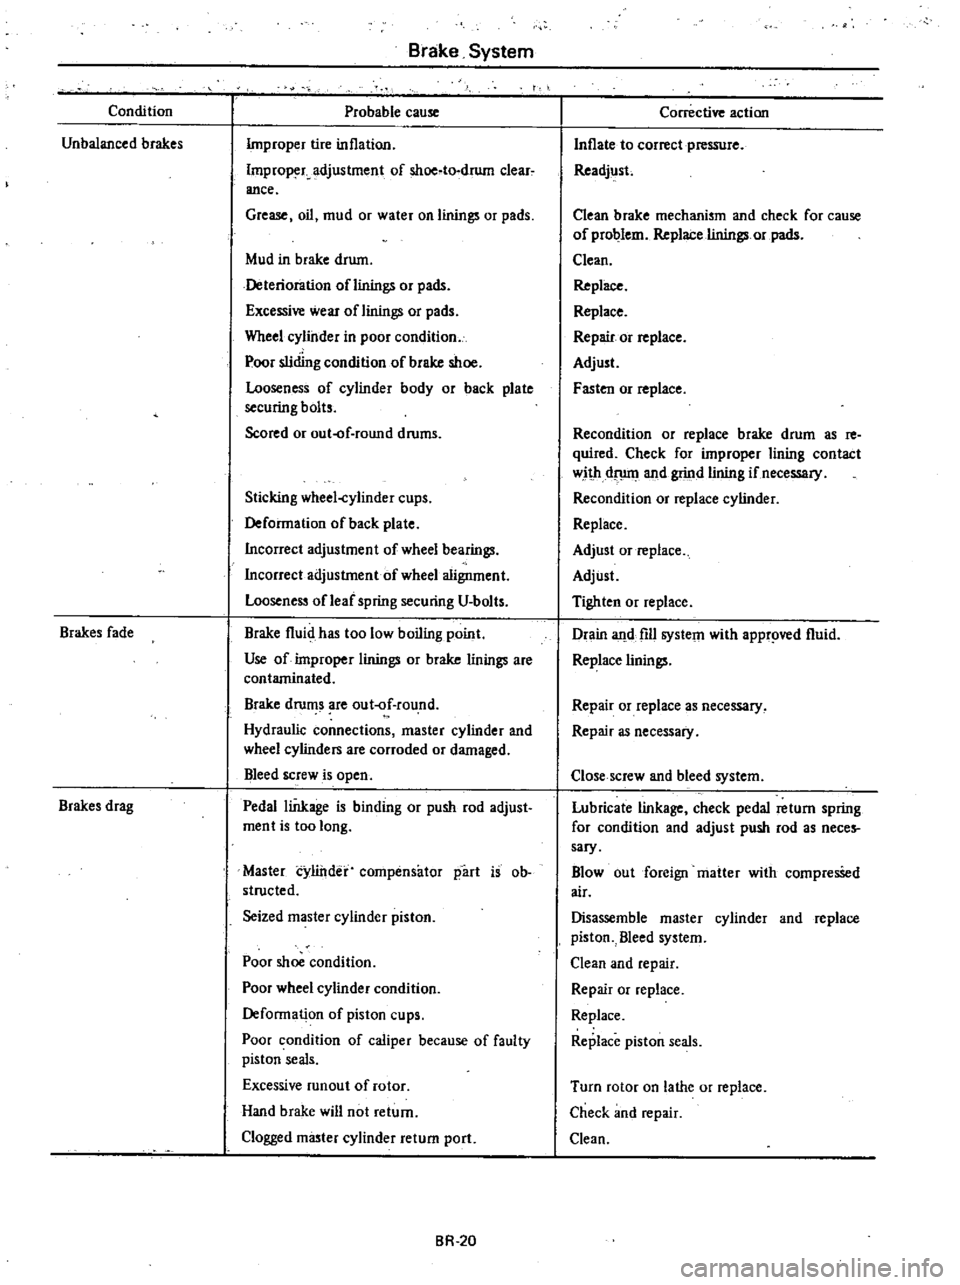
Condition
Unbalanced
brakes
Brakes
fade
Brakes
drag
Brake
System
Probable
cause
Improper
tire
inflation
Improp
r
adjustment
of
shoe
to
drum
clear
ance
Grease
oil
mud
or
water
on
linings
or
pads
Mud
in
brake
drum
Deterioration
oflinings
or
pads
Excessi
wear
of
linings
or
pads
Wheel
cylinder
in
poor
condition
Poor
sliding
condition
of
brake
shoe
Looseness
of
cylinder
body
or
back
plate
securing
bolts
Scored
or
out
f
round
drums
Sticking
wheel
cylinder
cups
Deformation
of
back
plate
Incorrect
adjustment
of
wheel
bearings
Incorrect
adjustment
of
wheel
aligoment
Looseness
of
leaf
spring
securing
U
bolts
Brake
fluid
has
too
low
boiling
point
Use
of
improper
linings
or
brake
linings
are
contaminated
Brake
drums
are
out
f
round
Hydraulic
connections
master
cylinder
and
wheel
cylinders
are
corroded
or
damaged
Bleed
screw
is
open
Pedal
linkage
is
binding
or
push
rod
adjust
ment
is
too
long
Master
cylinder
compensator
part
is
ob
structed
Seized
master
cylinder
piston
Poor
shoe
condition
Poor
wheel
cylinder
condition
Deformation
of
piston
cups
Poor
condition
of
caliper
because
of
faulty
piston
seals
Excessive
runaut
of
rotor
Hand
brake
will
not
return
Clogged
m
ter
cylinder
return
port
BR
20
Corrective
action
Inflate
to
correct
pressure
Readjust
Clean
brake
mechanism
and
check
for
cause
of
problem
Replace
linings
or
pads
Clean
Replace
Replace
Repair
or
replace
Adjust
F
ten
or
replace
Recondition
or
replace
brake
drum
as
re
quired
Check
for
improper
lining
contact
with
dflllll
and
grind
lining
if
necessary
Recondition
or
replace
cylinder
Replace
Adjust
or
replace
Adjust
Tighten
or
replace
Drain
and
fill
system
with
appr
d
fluid
Replace
linings
Repair
or
replace
as
necessary
Repair
as
necessary
Close
screw
and
bleed
system
Lubricate
linkage
check
pedal
return
spring
for
condition
and
adjust
push
rod
as
neces
sary
Blowout
foreign
matter
with
compresSed
air
Disassemble
master
cylinder
and
replace
piston
Bleed
system
Clean
and
repair
Repair
or
replace
Replace
Replace
piston
seals
Turn
rotor
on
lathe
or
replace
Check
and
repair
Clean
Page 375 of 548
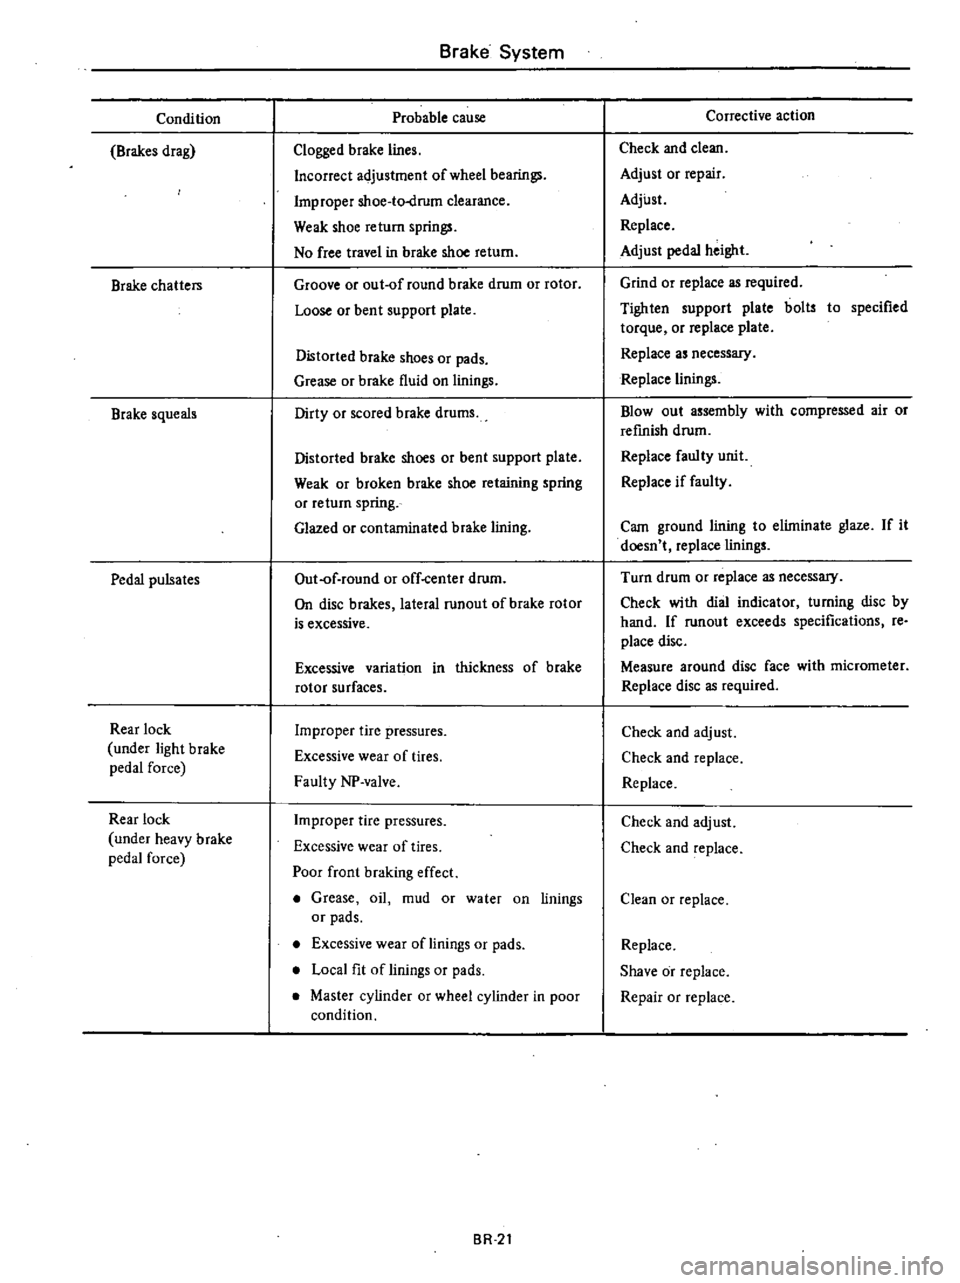
Condition
Brakes
drag
Brake
chatters
Brake
squeals
Pedal
pulsates
Rear
lock
under
light
brake
pedal
force
Rear
lock
under
heavy
brake
pedal
force
Brake
System
Probable
cause
Clogged
brake
lines
Incorrect
adjustment
of
wheel
bearings
Improper
shoe
to
drum
clearance
Weak
shoe
return
springs
No
free
travel
in
brake
shoe
return
Groove
or
out
of
round
brake
drum
or
rotor
Loose
or
bent
support
plate
Distorted
brake
shoes
or
pads
Grease
or
brake
fluid
on
linings
Dirty
or
scored
brake
drums
Distorted
brake
shoes
or
bent
support
plate
Weak
or
broken
brake
shoe
retaining
spring
or
return
spring
Glazed
or
contaminated
brake
lining
Out
of
round
or
off
center
drum
On
disc
brakes
lateral
runout
of
brake
rotor
is
excessive
Excessive
variation
in
thickness
of
brake
rotor
surfaces
Improper
tire
pressures
Excessive
wear
of
tires
Faulty
NP
valve
Improper
tire
pressures
Excessive
wear
of
tires
Poor
front
braking
effect
Grease
oil
mud
or
water
on
linings
or
pads
Excessive
wear
of
linings
or
pads
Local
fit
of
linings
or
pads
Master
cylinder
or
wheel
cylinder
in
poor
condition
BR
2t
Corrective
action
Check
and
clean
Adjust
or
repair
Adjust
Replace
Adjust
pedal
height
Grind
or
replace
as
required
Tighten
support
plate
bolts
to
specified
torque
or
replace
plate
Replace
as
necessary
Replace
linings
Blowout
assembly
with
compressed
air
or
refinish
drum
Replace
faulty
unit
Replace
if
faulty
Cam
ground
lining
to
elilninate
glaze
If
it
doesn
t
replace
linings
Turn
drum
or
replace
as
necessary
Check
with
dial
indicator
turning
disc
by
hand
If
runout
exceeds
specifications
re
place
disc
Measure
around
disc
face
with
micrometer
Replace
disc
as
required
Check
and
adjust
Check
and
replace
Replace
Check
and
adjust
Check
and
replace
Clean
or
replace
Replace
Shave
or
replace
Repair
or
replace
Page 385 of 548
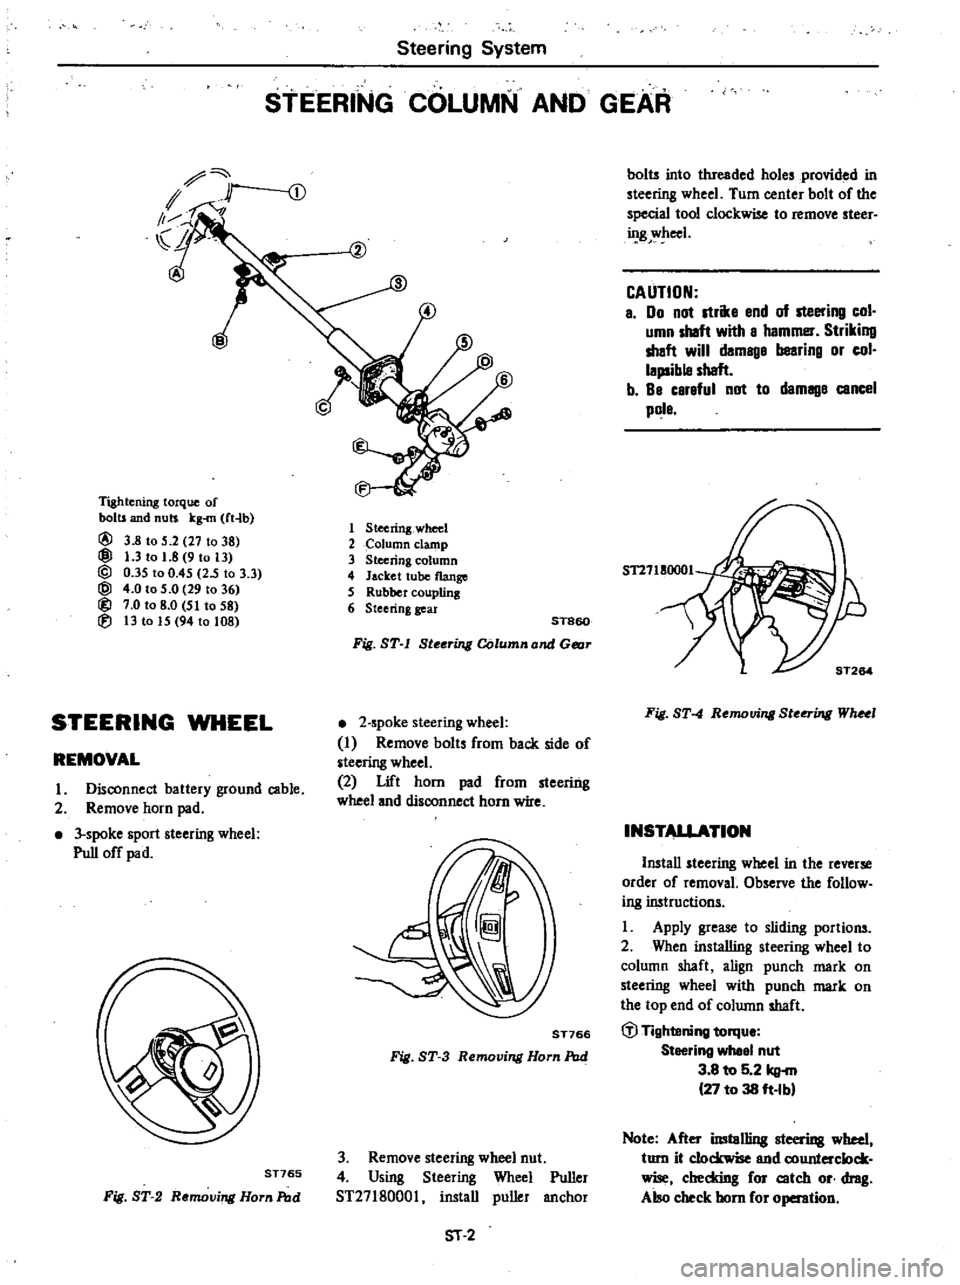
Steering
System
STEERING
COLUMN
AND
GEAR
Tightening
torque
of
bolts
and
nuts
kg
rn
ft4b
@
3
8
to
5
2
27
to
38
@
1
3
to
1
8
9
to
13
@
0
35
to
0
45
25
to
3
3
@
4
0
to
5
0
29
to
36
@
7
0
to
8
0
51
to
58
lEi
13
to
15
94
to
108
1
Steering
wheel
2
olumn
clamp
3
Steering
column
4
Jacket
tube
flange
S
RUbbercoupling
6
Steering
gear
ST860
Fig
ST
l
Steering
Column
and
Gear
STEERING
WHEEL
2
spoke
steering
wheel
I
Remove
bolts
from
back
side
of
steering
wheel
2
Lift
horn
pad
from
steering
wheel
and
disconnect
horn
wire
REMOVAL
I
Disconnect
battery
ground
cable
2
Remove
horn
pad
3
spoke
sport
steering
wheel
Pull
off
pad
ST766
Fig
ST
3
Removing
Horn
Pod
ST765
Fig
ST
2
Removing
Horn
Pod
3
Remove
steering
wheel
nut
4
Using
Steering
Wheel
Puller
ST2718000l
install
puller
anchor
51
2
bolts
into
threaded
holes
provided
in
steering
wheel
Turn
center
bolt
of
the
special
tool
clockwise
to
remove
steer
ing
wheel
CAUTION
a
00
not
strike
end
of
steering
col
umn
shaft
with
a
hammer
Striking
shaft
will
damage
bearing
or
col
lapsible
shaft
b
Be
careful
not
to
damage
cancel
pole
Fig
ST
4
Removing
Ste
ing
WhHl
INSTALLATION
Install
steering
wheel
in
the
reverse
order
of
removal
Observe
the
follow
ing
instructions
Apply
grease
to
sliding
portions
2
When
installing
steering
wheel
to
column
shaft
align
punch
mark
on
steering
wheel
with
punch
mark
on
the
top
end
of
column
shaft
til
Tightening
torqu
Steering
whee
nut
3
8
to
5
2
kg
27
to
38
ft
Ibl
Note
After
imtol1ing
steering
wheel
turn
it
clockwise
end
counterclock
wise
cheddng
for
catch
or
drag
Also
check
horn
for
operation
Page 387 of 548
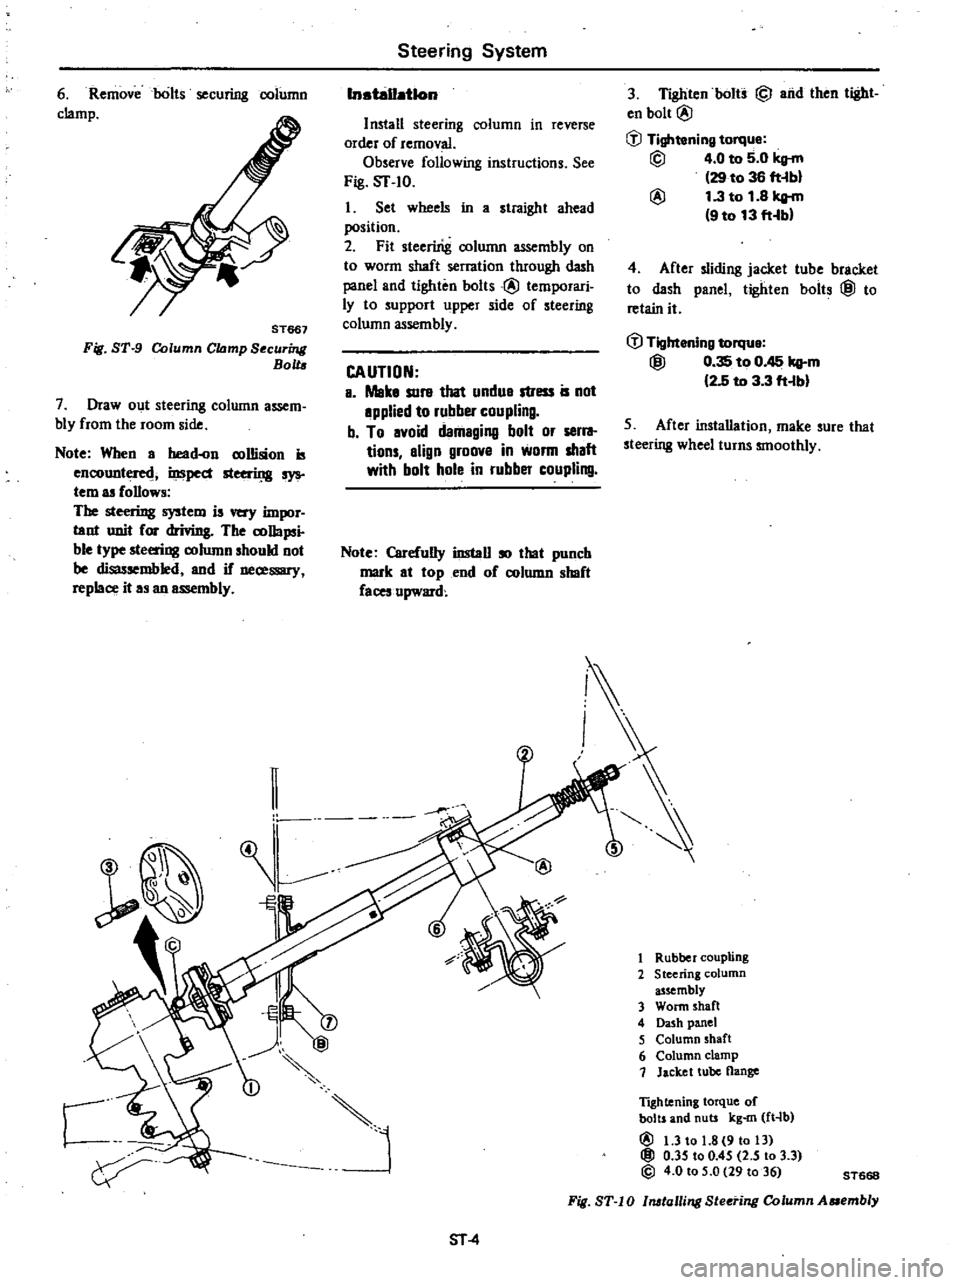
6
Removeoolts
securing
oolumn
clamp
ST661
Fig
ST
9
Column
CIDmp
Securing
BoU
7
Draw
out
steering
column
assem
bly
from
the
room
side
Note
When
a
head
n
rollision
is
encountere
inspect
steeriJ
tg
sys
tem
as
allow
The
steering
system
is
very
impor
lant
unit
or
driving
The
oollapsi
ble
type
steering
column
hould
not
be
disassembled
snd
if
necessary
replace
it
a
an
assembly
Steering
System
InstaU
tlon
Iostall
steering
column
in
reverse
order
of
removal
Observe
following
instructions
See
Fig
ST
IO
I
Set
wheels
in
a
straight
ahead
position
2
Fit
steeririg
column
assembly
on
to
worm
shaft
serration
through
dash
panel
and
tighti
bolts@
temporari
ly
to
support
upper
side
of
steering
column
assembly
CAUTION
a
Mata
sure
that
undue
stress
is
not
epplied
to
ruhber
coupling
b
To
evoid
damaging
bolt
or
serra
tions
align
groove
in
worm
shaft
with
bolt
hole
in
rubber
coupling
Note
Carefully
install
so
that
punch
mark
at
top
end
o
column
slmft
acesupwardc
C
VH
3
Tighten
bolts
@
rid
then
tight
en
bolt
@
liJ
Tightening
torque
@
4
0
to
5
0
kg
m
29
to
36
ft
lb
@
1
3
to
1
8
kg
m
9
to
13
ft
lbl
4
After
sliding
jacket
tube
bracket
to
dash
panel
tighten
bolt
@
to
retain
it
liJ
Tightening
torqu
@
0
35
to
0
45
kg
m
2
5
to
3
3
ft
lbl
5
After
installation
make
sure
that
steering
wheel
turns
smoothly
5
1
Rubber
coupling
2
Steering
column
8ncmbly
3
Worm
shaft
4
Dash
panel
5
Column
shaft
6
Column
clamp
1
Jacltct
tube
flange
Tightening
torque
of
bolts
and
nuts
kg
m
ft
lb
@
1
3
to
1
8
9
to
13
@
0
35
to
0
45
2
5
to
3
3
@
4
0
to
5
0
29
to
36
ST668
Fig
ST
IO
1
alling
Sleering
Column
Aaembly
ST
4
Page 393 of 548
REMOVAL
I
Jack
up
the
front
of
car
and
support
it
on
the
safety
stands
2
Remove
cotter
pins
and
nuts
fastening
side
rod
ball
studs
to
knuckle
arms
3
To
detach
side
rod
ball
studs
from
knuckle
arms
iJuert
Steering
BaII
Joint
Remover
HT72520000
between
them
and
separate
them
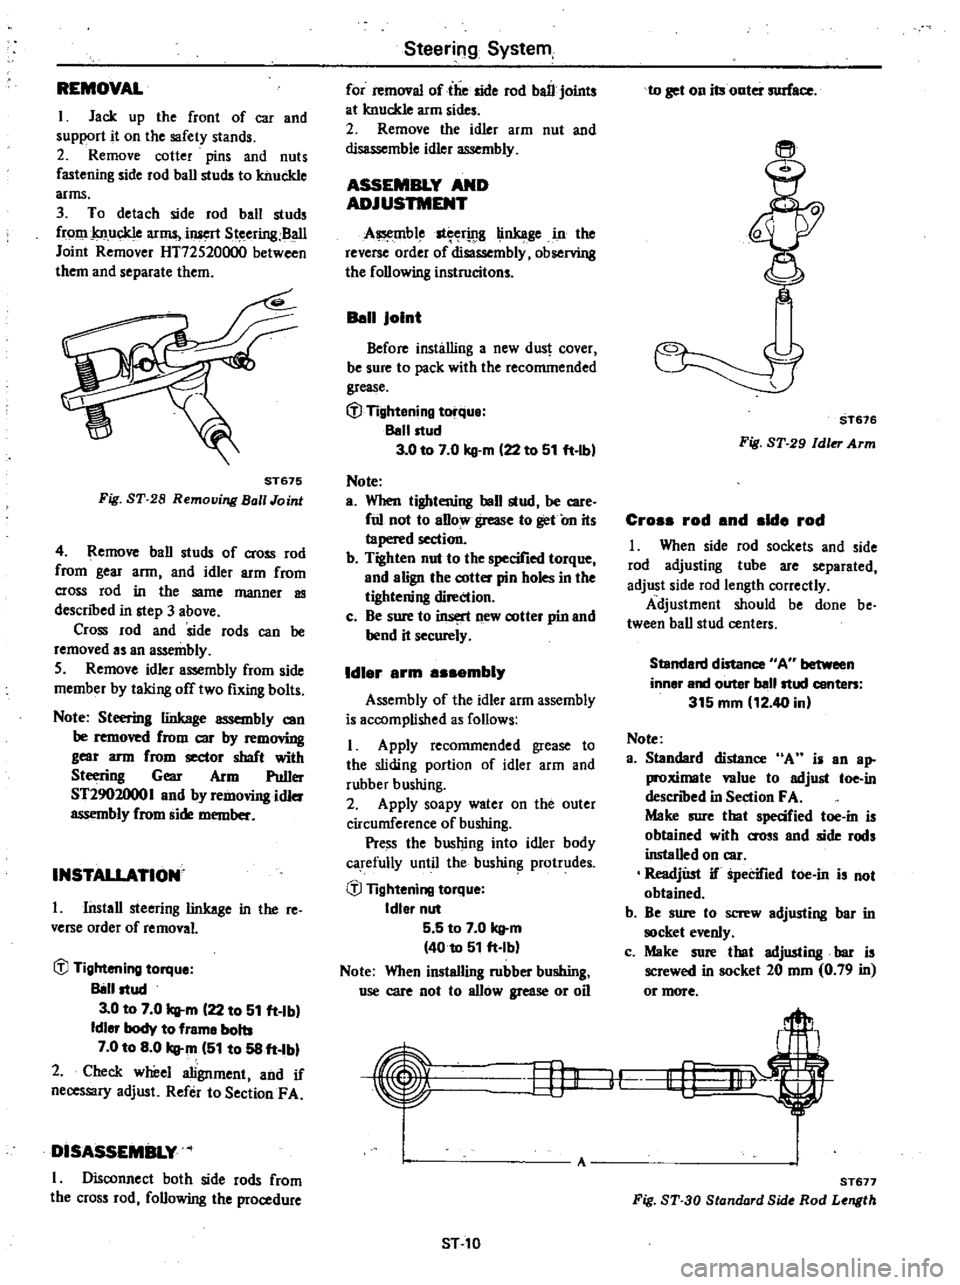
ST675
Fig
ST
28
Remouing
Ball
Joint
4
Remove
ball
studs
of
cross
rod
from
gear
arm
and
idler
arm
from
cross
rod
in
the
same
manner
as
descnbed
in
step
3
above
Cross
rod
and
side
rods
can
be
removed
as
an
assembly
5
Remove
idler
assembly
from
side
member
by
taking
off
two
fixing
bolts
Note
Steering
linkage
assembly
can
be
removed
from
CIC
by
rem
mng
gear
arm
from
sector
shaft
with
Steering
Gear
Arm
Puller
ST2902000
I
and
by
removing
idler
assembly
from
side
member
INSTAllATION
I
Install
steering
linkage
in
the
re
verse
order
of
removal
iJJ
Tightening
torque
Il8l1ltud
3
0
to
7
0
q
m
122
to
51
ft
Ibl
Idler
body
to
frame
bolts
7
0
to
8
0
q
m
151
to
58
ft
Ibl
2
Check
wheel
alignment
and
if
necessary
adjust
Refer
to
SectionF
A
DISASSEMBLY
I
Disconnect
both
side
rods
from
the
cross
rod
following
the
procedure
Steering
System
for
removal
of
the
side
rod
ball
joints
at
knuckle
arm
sides
2
Remove
the
idler
arm
nut
and
disassemble
idler
assembly
ASSEMBLY
AND
ADJUSTMENT
A
mble
st
rwg
linkage
in
the
reverse
order
of
disassembly
observing
the
following
instrucitons
Ban
Joint
Before
installing
a
new
dus
cover
be
sure
to
pack
with
the
recommended
grease
t
J
Tightening
torque
Ballltud
3
0
to
7
0
kg
m
122
to
51
ft
lbl
Note
a
When
tightening
ball
stud
be
care
ful
not
to
aBow
grease
to
get
On
its
tapered
section
b
Tighten
nut
to
the
specified
torque
and
align
the
cotter
pin
holes
in
the
tightening
direction
c
Be
sure
to
insert
new
cotter
pin
and
bend
it
securely
Idl
r
rm
mbl
Assembly
of
the
idler
arm
assembly
is
accomplished
as
follows
I
Apply
recommended
grease
to
the
sliding
portion
of
idler
arm
and
rubber
bushing
2
Apply
soapy
water
on
the
outer
circumference
of
bushing
Pre
ss
the
bushing
into
idler
body
carefully
until
the
bushin
protrudes
iJJ
Tightening
torque
Idler
nut
5
5
to
7
0
q
m
4010
51
ft
Ib
Note
When
installing
rubber
bushing
use
care
not
to
allow
grease
or
oil
Hj1
ST
10
to
get
on
its
onter
surface
ST676
Fig
ST
29
Idler
Arm
Cro
rod
nd
Id
rod
I
When
side
rod
sockets
and
side
rod
adjusting
tube
are
separated
adjust
side
rod
length
correctly
Adjustment
should
be
done
be
tween
ball
stud
centers
Standard
distance
AU
between
inner
and
outer
ballltud
conte
315
mm
12
40
in
Note
a
Standard
distance
A
i
an
ap
proximale
value
to
adjust
toe
in
descnbed
in
Section
FA
Maire
sure
tbat
specified
toe
in
is
obtained
with
O
OSs
and
side
rods
installed
on
car
ReadjUst
if
Specified
toe
in
is
not
obtained
b
Be
sure
to
screw
adjusting
bar
in
clret
evenly
c
Make
sure
that
adjusting
bar
is
screwed
in
socket
20
mm
0
79
in
or
more
I
lf
A
ST
77
Fig
ST
30
Standard
Side
Rod
Length
Page 396 of 548
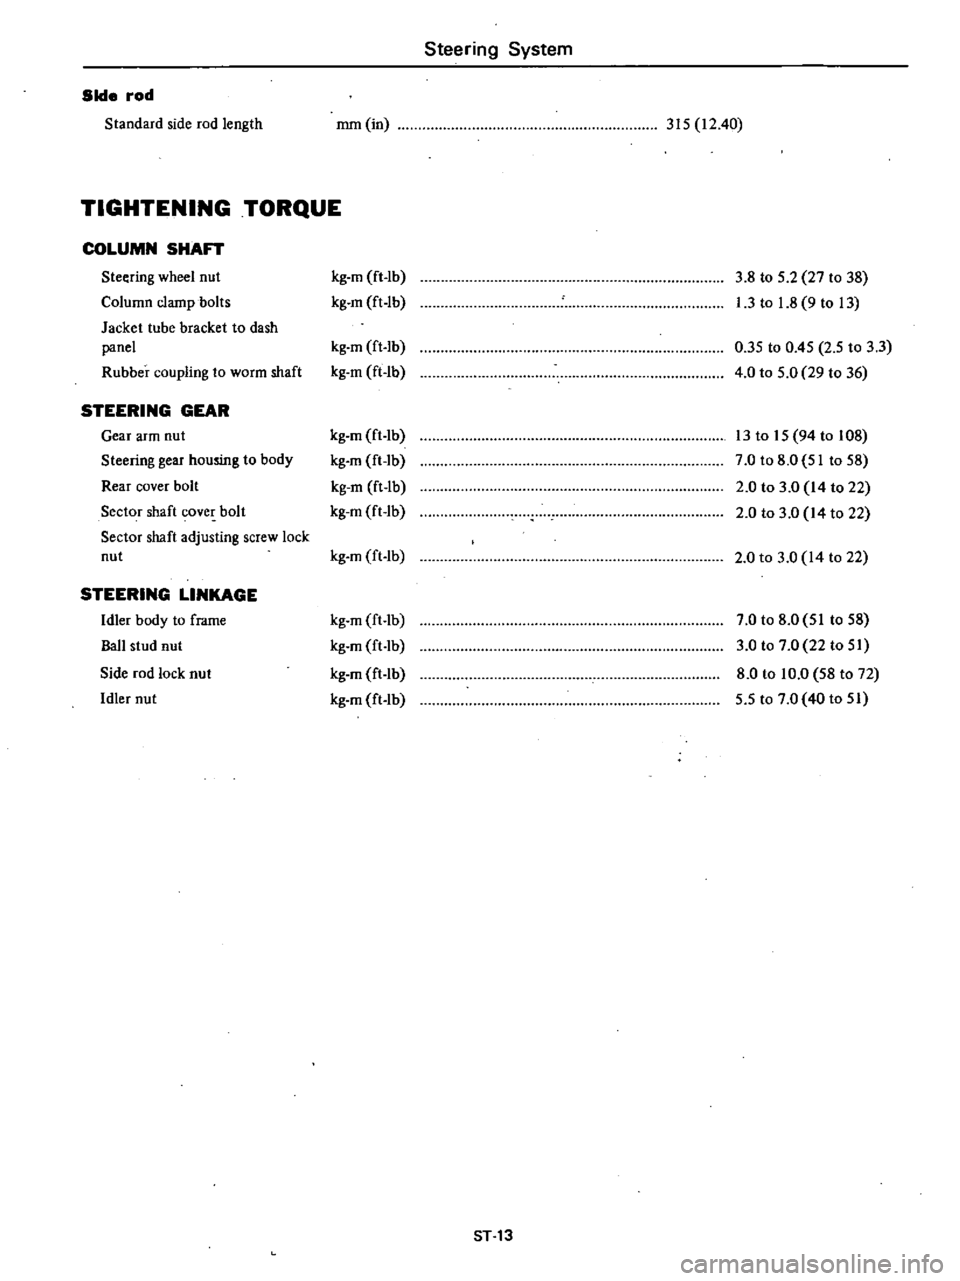
Steering
System
Side
rod
Standard
side
rod
length
mm
in
315
12
40
TIGHTENING
TORQUE
COLUMN
SHAFT
Steering
wheel
nut
kg
m
ft
lb
3
8
to
5
2
27
to
38
Column
clamp
bolts
kg
m
ft
lb
I
3
to
1
8
9
to
13
Jacket
tube
bracket
to
dash
panel
kg
m
ft
lb
0
35
to
0
45
2
5
to
3
3
Rubber
coupling
to
worm
shaft
kg
m
ft
lb
4
0
to
5
0
29
to
36
STEERING
GEAR
Gear
arm
nut
kg
m
ft
lb
13
to
15
94
to
108
Steering
gear
housing
to
body
kg
m
ft
lb
7
0
to
8
0
51
to
58
Rear
cover
bolt
kg
m
ft
lb
2
0
to
3
0
14
to
22
Sector
shaft
cover
bolt
kg
m
ft
lb
2
0
to
3
0
14
to
22
Sector
shaft
adjusting
screw
lock
nut
kg
m
ft
lb
2
0
to
3
0
14
to
22
STEERING
LINKAGE
Idler
body
to
frame
kg
m
ft
lb
7
0
to
8
0
51
to
58
Ball
stud
nut
kg
m
ft
lb
3
0
to
7
0
22
to
51
Side
rod
lock
nut
kg
m
ft
lb
8
0
to
10
0
58
to
72
Idler
nut
kg
m
ft
lb
5
5
to
7
0
40
to
51
ST
13
Page 419 of 548

Body
2
Length
of
shock
absorber
Front
shock
absorber
I
164
6
46
q
j
0
I
0
0
67
2
64
Rear
shock
absorber
G
riA
l
yll
L
J
J
Unit
mm
in
3
Checking
shock
absorber
I
Place
car
in
front
of
a
wall
Apply
hand
brake
and
place
wheel
chocks
securely
2
Place
a
jack
between
wall
and
extend
jack
approximately
20
mm
0
79
in
The
bumper
should
move
approxilnately
50
mm
I
97
in
back
ward
through
shock
absorber
opera
tion
See
Fig
BF
IO
Note
Use
a
jack
with
y
of
more
than
600
kg
I
3231b
94
3
70
rL
I
i
r
T
l
f
L
W
67
2
64
1
8F742B
Fig
BF
9
Length
of
Shock
Absorber
3
Make
sure
bumper
returns
to
its
original
position
when
jack
is
re
tracted
Note
When
replacing
shock
absorb
ers
make
Sure
they
are
of
the
same
type
and
rating
and
manufactured
by
the
same
maker
4
For
rear
bumper
utilize
the
same
procedures
as
described
for
front
bumper
f
BF7438
1
Front
bumper
2
Jack
3
Wheel
chock
Fig
BF
10
Checking
Shock
Abaorber
Function
BF
8
FRONT
BUMPER
REMOVAL
AND
INSTALLATION
1
Loosen
bolts
attaching
front
bumper
to
shock
absorbers
and
re
move
bumper
See
Fig
BF
5
2
Loosen
bolts
attaching
shock
ab
sorbers
to
radia
tor
core
support
and
side
members
and
remove
shock
absorbers
3
Install
shock
absorbers
and
front
bumper
in
reverse
order
of
removal
and
adjust
bumper
height
as
shown
in
Fig
BF
7
fj
Tightening
torque
Front
bumper
Bumper
to
shock
absorber
attaching
bolt
6
0
to
8
0
kg
m
43
to
58
ft
Ib
Shock
absorber
to
body
attaching
bolt
and
nut
front
0
93
to
1
2
kg
m
6
7
to
B
7
ft
Ibl
attaching
bolt
and
nut
sida
1
9
to
2
5
kg
m
14
to
18
ft
b
REAR
BUMPER
REMOVAL
AND
INSTALLATION
1
Loosen
bolts
attaching
rear
bumper
to
shock
absorbers
and
re
move
rear
bumper
See
Fig
BF
6
2
Loosen
bolts
and
nuts
attaching
shock
absorbers
to
side
members
and
remove
shock
absorbers
3
Install
shock
absorbers
an
rear
bumper
in
reverse
order
of
removal
and
adjust
rear
bumper
height
as
shown
in
Fig
BF
B
fj
Tightening
torque
Rear
bumper
Bumper
to
shock
absorber
attaching
bolt
rear
6
0
to
8
0
kg
m
43
to
58
ft
b
Shock
absorber
to
body
attaching
bolt
and
nut
rear
0
93
to
1
2
kg
m
6
7
to
8
7
ft
b
attaching
bolt
and
nut
side
6
0
to
BoO
kg
m
43
to
58
ft
b