manual transmission DATSUN 210 1979 Service Manual
[x] Cancel search | Manufacturer: DATSUN, Model Year: 1979, Model line: 210, Model: DATSUN 210 1979Pages: 548, PDF Size: 28.66 MB
Page 3 of 548
DATSUN
210
SERVICE
MANUAL
Model
8310
Series
T
OfOUoW
lTY
INISSAN
N
OIlCOIIO
NISSAN
MOTOR
CO
LTD
17
1
Ginza
6
Chome
Chuo
ku
Tokyo
104
Japan
QUICK
REFERENCE
INDEX
GENERAL
INFORMATION
GI
ENGINE
TUNE
UP
ET
ENGINE
MECHANICAL
EM
ENGINE
LUBRICATION
SYSTEM
EL
COOLING
SYSTEM
CO
ENGI
NE
FUEL
EF
EMISSION
CONTROL
SYSTEM
EC
ENGINE
ELECTRICAL
SYSTEM
EE
ENGINE
REMOVAL
INSTALLATION
ER
CLUTCH
CL
lMr
MANUAL
TRANSMISSION
MT
AUTOMATIC
TRANSMISSION
AT
H
PROPELLER
SHAFT
OIFFERENTlAL
CARRIER
PO
FRONT
AXLE
FRONT
SUSPENSION
FA
10
REAR
AXLE
REAR
SUSPENSION
RA
BRAKE
SYSTEM
BR
WHEEL
A
NO
TI
RE
WT
0
STEERING
SYSTEM
ST
ENGINE
CONTROL
FUEL
EXHAUST
SYSTEMS
FE
BOOY
BF
BOOY
ELECTRICAL
SYSTEM
BE
AIR
CONOITIONING
AC
Page 5 of 548
DATSUN
210
Model
8310
Series
SECTIONGI
GENERAL
INFORMATION
CONTENTS
MODEL
VARIATION
IDENTIFICATION
NUMBERS
CAR
IDENTIFICATION
PLATE
CAR
SERIAL
NUMBER
IDENTIFICATION
NUMBER
PLATE
ENGINE
SERIAL
NUMBER
COLOR
CODE
NUMBER
LABEL
M
V
S
S
CERTIFICATION
LABEL
EMISSION
CONTROL
INFORMATION
LABE
L
MANUAL
TRf
NSMISSION
NUMBER
AUTOMATIC
TRANSMISSION
NUMBER
APPROXIMATE
REFILL
CAPACITIES
GI
2
GI
3
GI
3
GI
3
GI
4
GI
4
GI
4
GI
4
GI
4
GI
4
GI
4
GI
5
RECOMMENDED
FuEL
RECOMMENDED
LUBRICANTS
RECOf
lMENDED
LUBRICANTS
RECOMMENDED
SAE
VISCOSITY
NUMBER
LUBRICATION
CHART
MAINTENANCE
SCHEDULE
LIFTING
POINTS
AND
TOWING
PANTOGRAPH
JACK
GARAGE
JA
CK
AND
SAFETY
STAND
TOWING
TIE
DOWN
SPECIAL
TOOLS
j
GI
5
GI
5
GI
5
GI
5
GI
6
Gill
j
9
GI
9
GI
eGI
9
p
G
I
O
Page 6 of 548
f
Destination
u
s
A
t
f
l
c
J
r
If
i
i
c
1J
ll
d
Canada
I
C
f
Sedan
Hatchba
k
Wagon
Sedan
HatChback
Wagon
Sedan
Hatchback
Wagon
Class
4
door
2
do
or
I
4
door
2
door
4
door
2
door
General
Inform
ation
MODEL
VARIATION
Model
Engine
I
HL8310V
I
HLB310AV
IHLB3IOR
S
V
I
HLB310RFV
I
i
I
HLB310RAV
I
KHLB310V
I
KHLB310FV
J
I
KHLB310AV
I
WHLB310V
I
WHLB310FY
WPLB310AV
HLB310U
I
HLB310AU
I
HLB3IOR
S
lL
IHLB310RFU
I
HLB310RAU
AI4
I
KHLB310U
I
KHLB310FU
O
I
KHLB310AU
I
WHLB3
WU
g
WHLB310FU
E
WPLB310AU
HLB310N
HLB310AN
c
HLB310R
S
N
HLB310RF
I
HLB3IOR
S
AN
KHLB310N
KHLB310FN
KHLB310AN
WHL83
ION
WHLB310FN
WHLB310AN
Note
In
this
manual
FU
model
refers
to
KHLB310FU
GI
2
I
I
I
Transmission
AI4
F4W60L
I
3N7lB
I
F4W60L
I
FS5W60L
I
3N71B
I
F4W60L
J
FS5W60L
I
3N71B
I
F4W60L
FS5W60L
3N71B
I
F4W60L
I
3N71
B
I
4
Y
6Q
I
FS5W60L
J
I
3N7IBr
I
F4W60L
I
FS5W60L
3N71B
F4W60L
FS5W60L
3N7IB
F4W60L
3N71B
F4W60L
FS5W60L
3N71B
F4W60L
FS5W60L
I
3N71B
I
F4W60L
I
FS5W60L
I
3N7lB
AI5
AI5
AI4
Differential
carrier
Model
Gear
ratio
Hl50A
H150
Hl50A
Hl50
HI50A
H150
Hl50A
Hl50
HI50A
Hl50
UOA
Hl50
Hl50A
HI50
HI50A
HI50
HI50A
HI50
H150A
HI50
HI50A
Hl50
Hl50A
Hl50
3
700
3
889
3
700
3
889
3
700
3
889
3
700
3
889
3
700
3
889
3
700
I
3
889
3
700
3
889
3
700
3
889
3
700
3
889
3
700
3
889
3
700
3
889
3
700
3
889
Page 7 of 548
The
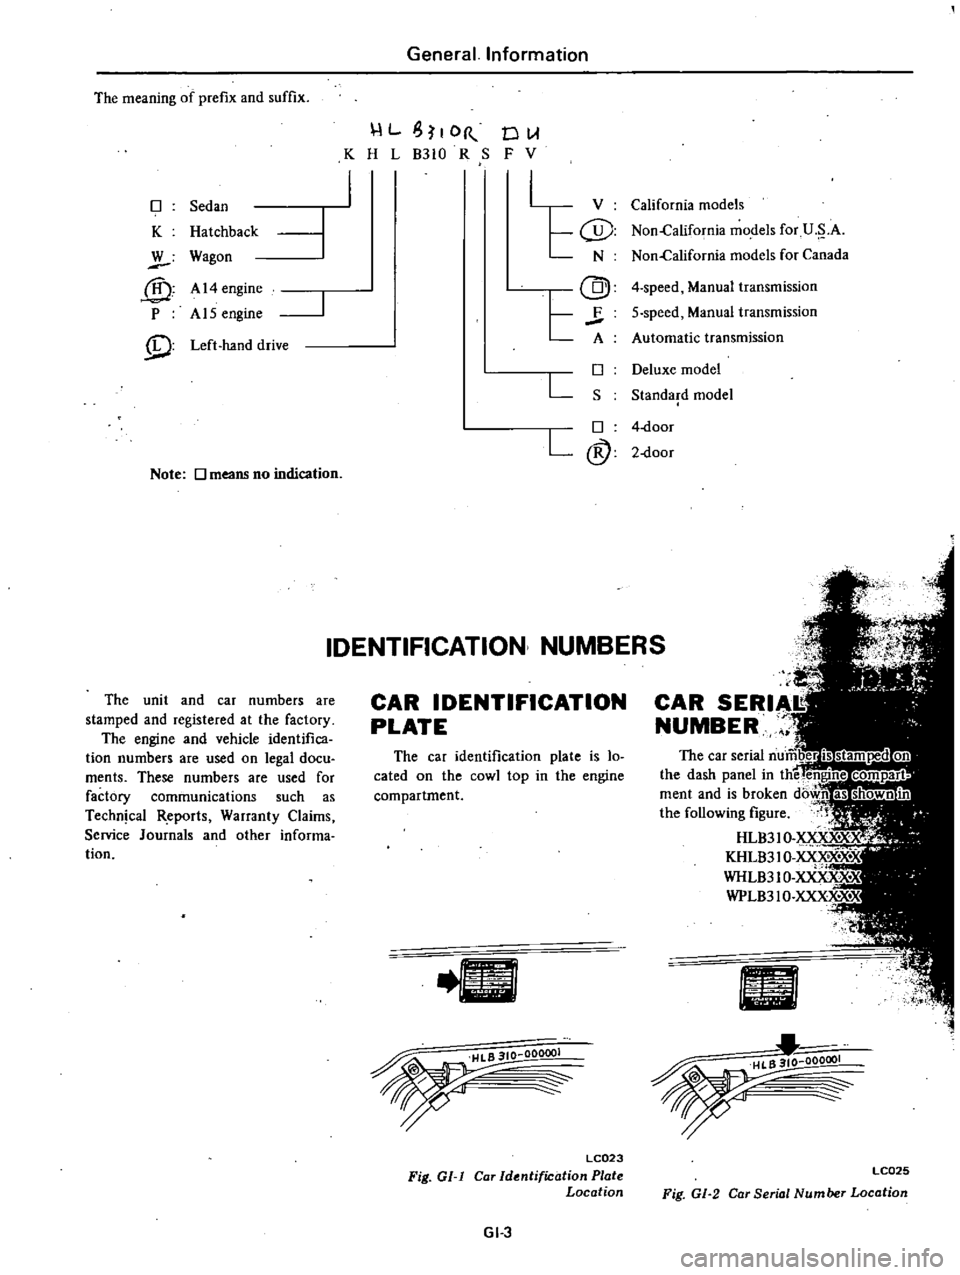
meaning
of
prefix
and
suffix
0
Sedan
K
Hatchback
W
Wagon
@
A
14
engine
p
A
15
engine
iD
Left
hand
drive
Note
0
means
no
indication
General
Information
l
L
I
OR
K
H
L
B310
R
S
DlA
F
v
California
models
Non
California
models
for
U
A
Non
California
models
for
Canada
4
speed
Manual
transmission
5
speed
Manual
transmission
Automatic
transmission
L
0
Deluxe
model
S
Standard
model
0
4
door
L@
2
door
CAR
IDENTIFICATION
PLATE
The
car
identification
plate
is
lo
cated
on
the
cowl
top
in
the
engine
compartment
v
r
LCQ23
Fig
Gl
l
Car
Identification
Plate
Location
GI
3
IDENTIFICATION
NUMBERS
L
v
G
N
@J
F
A
CAR
SERIAl
NUMBER
HL
I
A
rp
The
unit
and
car
numbers
are
stamped
and
registered
at
the
factory
The
engine
and
vehicle
identifica
tion
numbers
are
used
on
legal
dacu
ments
These
numbers
are
used
for
factory
communications
such
as
Techn
cal
R
eports
Warranty
Claims
Service
Journals
and
other
informa
tiOD
LC025
Fig
GI
2
Car
Serial
Number
Location
Page 8 of 548
r
IDENY
iFICAYiON
NUMBER
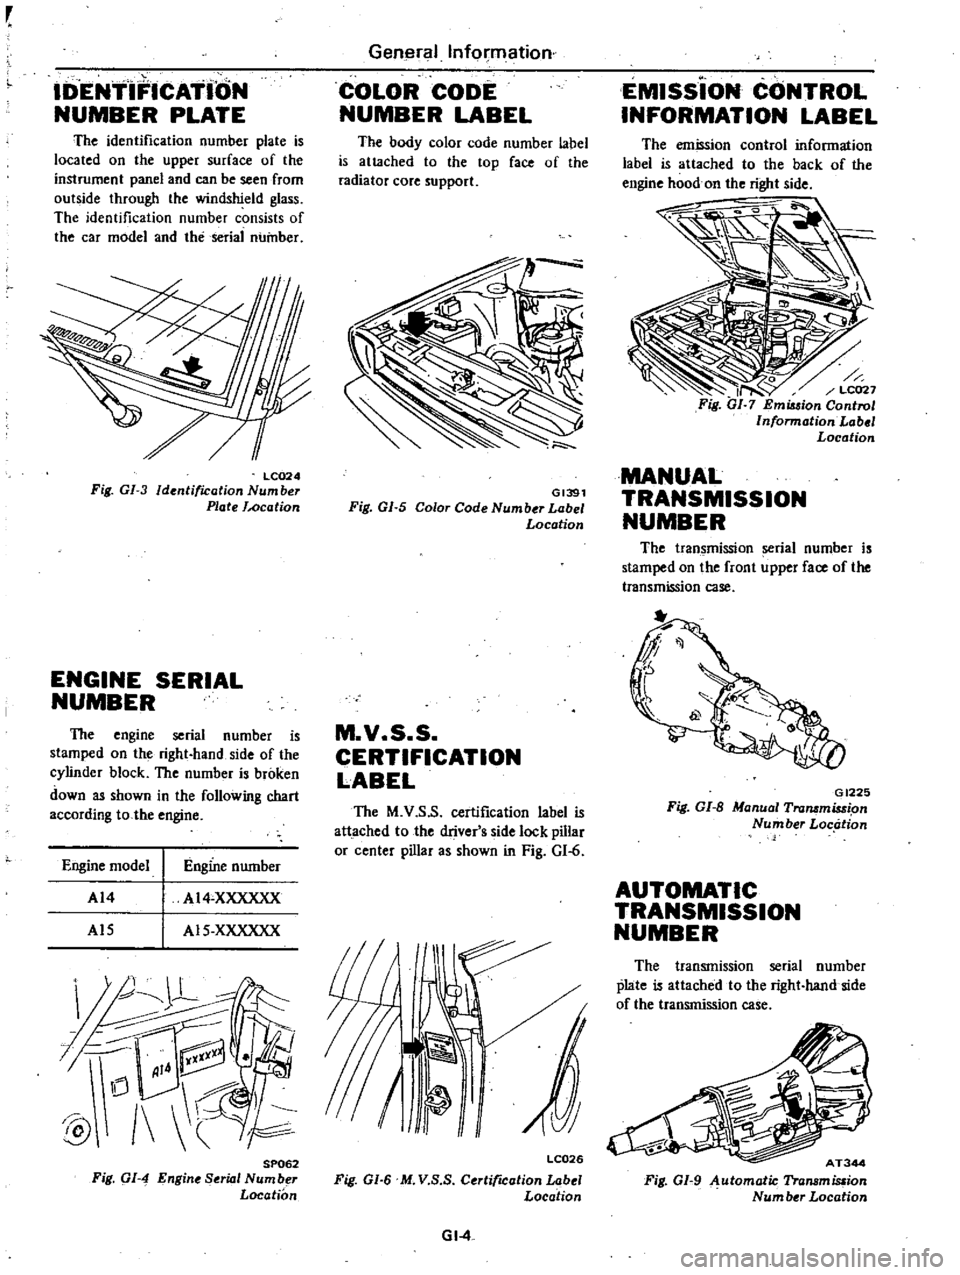
PLATE
The
identification
number
plate
is
located
on
the
upper
surface
of
the
instrument
panel
and
can
be
seen
from
outside
through
the
windshield
glass
The
identification
number
consists
of
the
car
model
and
the
serial
number
LC024
Fig
GI
3
Identification
Number
Plate
JAJcation
ENGINE
SERIAL
NUMBER
The
engine
serial
number
is
stamped
on
the
right
hand
side
of
the
cylinder
block
The
number
is
broken
down
as
shown
in
the
following
chart
according
tothe
engine
Engine
model
Engine
number
AI4
AIS
AI4
XXXXXX
AIS
XXXXXX
J
lL
@
1
C
SP062
Fig
C
1
4
Engine
Serial
Numbf
Location
General
Information
COLOR
CODt
NUMBER
LABEL
The
body
color
code
number
label
is
attached
to
the
top
face
of
the
radiator
core
support
GI391
Fig
GI
5
Color
Code
Number
Label
Location
M
V
5
S
CERTIFICATION
LABEL
The
M
V
S
S
certification
label
is
attached
to
the
driver
s
side
lock
pillar
or
center
pillar
as
shown
in
Fig
GI
6
s
I
p
LC026
Fig
GI
6
M
V
S
S
Certification
Label
Location
GI
4
EMISSION
CONTROL
INFORMATION
LABEL
The
emission
control
information
label
is
attached
to
the
back
of
the
engine
hood
on
the
right
side
MANUAL
TRANSMISSION
NUMBER
The
transmission
rial
number
is
stamped
on
the
front
upper
face
of
the
transmission
case
GI225
Fig
GI
B
Manual
Transmission
Number
Loc
zti
on
AUTOMATIC
TRANSMISSION
NUMBER
The
transmission
serial
number
plate
is
attached
to
the
right
hand
side
of
the
transmission
case
AT344
Fig
Gl
9
Automatic
Transmission
Num
ber
Location
Page 16 of 548
f
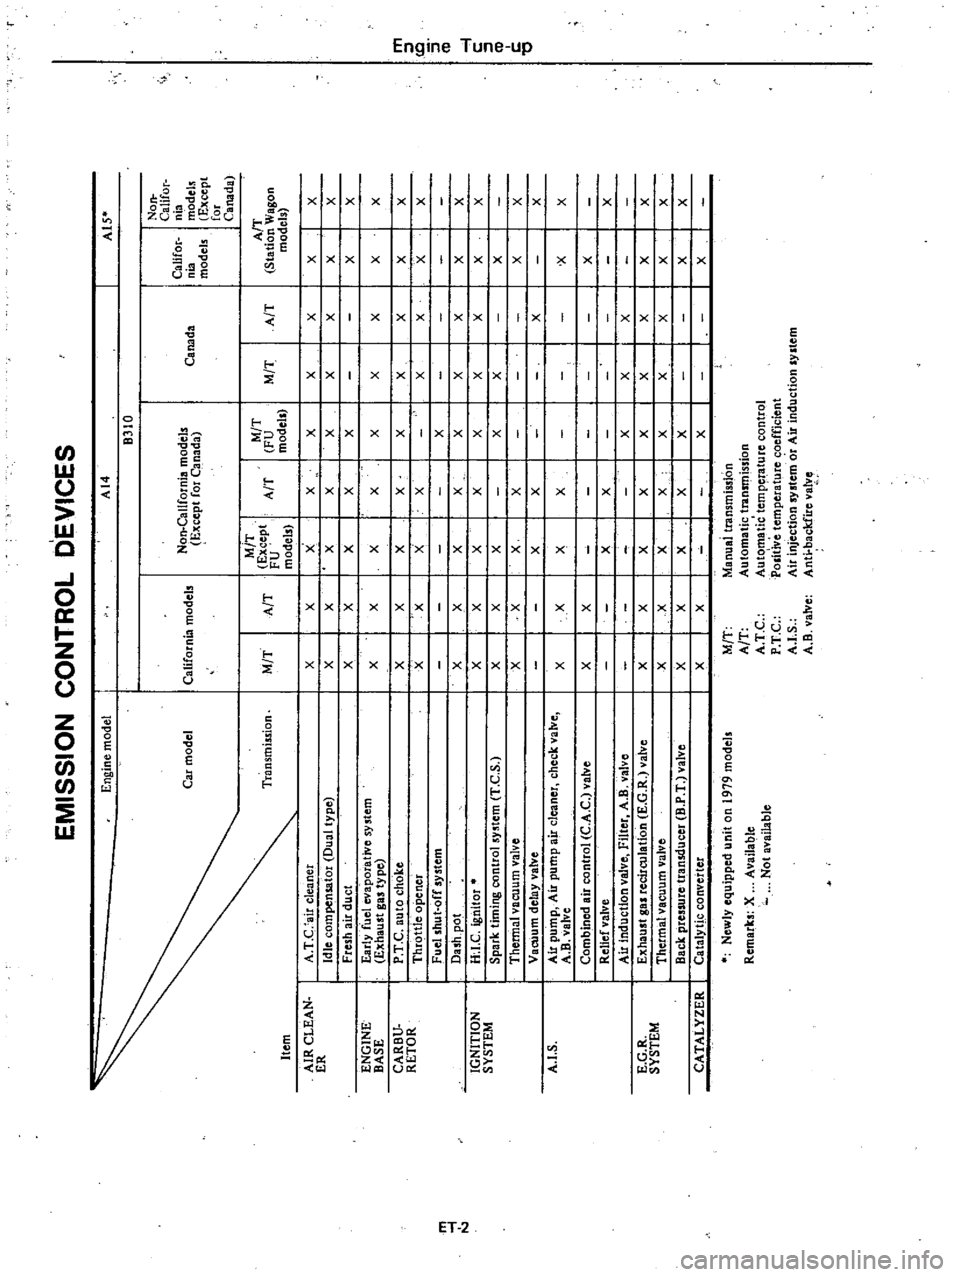
EMISSION
CONTROL
DEVICES
En
ine
model
I
AI4
I
A1S
B310
Non
CaliCor
Non
California
models
Califor
nia
Car
model
California
models
E
cept
for
C
nada
Canada
nia
modeb
models
Except
for
Canada
M
T
M
T
A
T
Ti
ansmiuion
M
T
A
T
Except
A
T
FU
M
T
A
T
Station
Wagon
FU
models
models
models
AIR
CLEAN
I
A
T
C
air
cleaner
I
X
I
X
X
I
X
I
X
I
X
I
X
I
X
X
ER
Idle
compensator
Dual
type
X
I
X
X
I
X
I
X
I
X
I
X
I
X
X
Fresh
air
duct
X
I
X
X
I
X
I
X
I
I
I
X
X
ENGINE
I
Early
fuel
evaporative
system
X
I
X
X
xl
X
I
X
I
X
I
X
X
BASE
Exhaust
gas
type
CARBV
I
P
T
C
auto
choke
X
I
X
X
X
I
X
I
X
I
X
I
X
X
m
RETOR
I
l
Thr
ttle
opener
X
X
X
X
I
I
X
I
X
I
X
X
Q
I
Fuel
shut
off
system
I
X
I
I
I
3
m
ll
i
Dash
po
t
X
X
X
X
I
X
I
X
I
X
I
X
X
N
l
IGNITION
I
H
I
C
ignitor
X
X
X
X
I
X
I
X
I
X
I
X
X
c
SYSTEM
Spark
timing
contra
system
T
e
S
X
X
X
I
I
I
I
l
X
X
I
X
ll
Thermal
vacuum
valve
X
X
X
I
X
I
I
I
I
X
X
c
Vacuum
delay
valve
X
I
X
I
I
I
X
I
0
X
A
I
S
I
Air
pump
Air
pump
air
cleaner
check
valve
I
X
X
I
X
I
X
I
I
I
I
x
X
A
B
valve
Combined
air
control
C
A
C
valve
I
X
X
I
I
I
I
I
I
X
Relief
valve
I
I
X
I
X
I
I
I
I
X
Air
induction
valve
Filter
A
B
valve
I
I
I
I
X
I
X
I
X
E
G
R
I
Exhaust
gas
recirculation
E
G
R
valve
I
X
I
X
I
X
I
X
I
X
I
X
I
X
I
X
X
SYSTEM
Thetmalvacuum
valve
I
X
I
X
I
X
I
X
I
X
I
X
I
X
I
X
X
Back
pressure
transducer
B
P
T
valve
I
X
I
X
I
X
I
X
I
X
I
I
I
X
X
CATALYZER
I
CatalytJc
converter
I
X
I
X
I
I
I
X
I
I
I
X
Newly
equipped
unit
on
1979
models
M
T
Manual
transmission
Remarks
X
Available
A
T
Automatic
transmission
Not
available
A
T
C
Aute
matic
tempeJ
ature
control
P
T
C
POlitive
temperature
coefficient
A
I
S
Air
injection
system
or
Air
induction
system
A
B
valve
Anti
backfire
valve
Page 19 of 548
sion
pressure
chances
are
that
piston
rings
are
worn
or
damaged
2
If
pressure
stays
low
the
likeli
hood
is
that
valve
is
sticking
or
seating
Engine
Tune
up
improperly
3
If
cylinder
compression
in
any
two
adjacent
cylinders
is
low
and
if
adding
oil
does
not
help
the
compres
sion
there
is
leakage
past
the
gasketed
surface
Oil
and
water
in
combustion
cham
bers
can
result
from
this
problem
IGNITION
AND
FUEL
SYSTEM
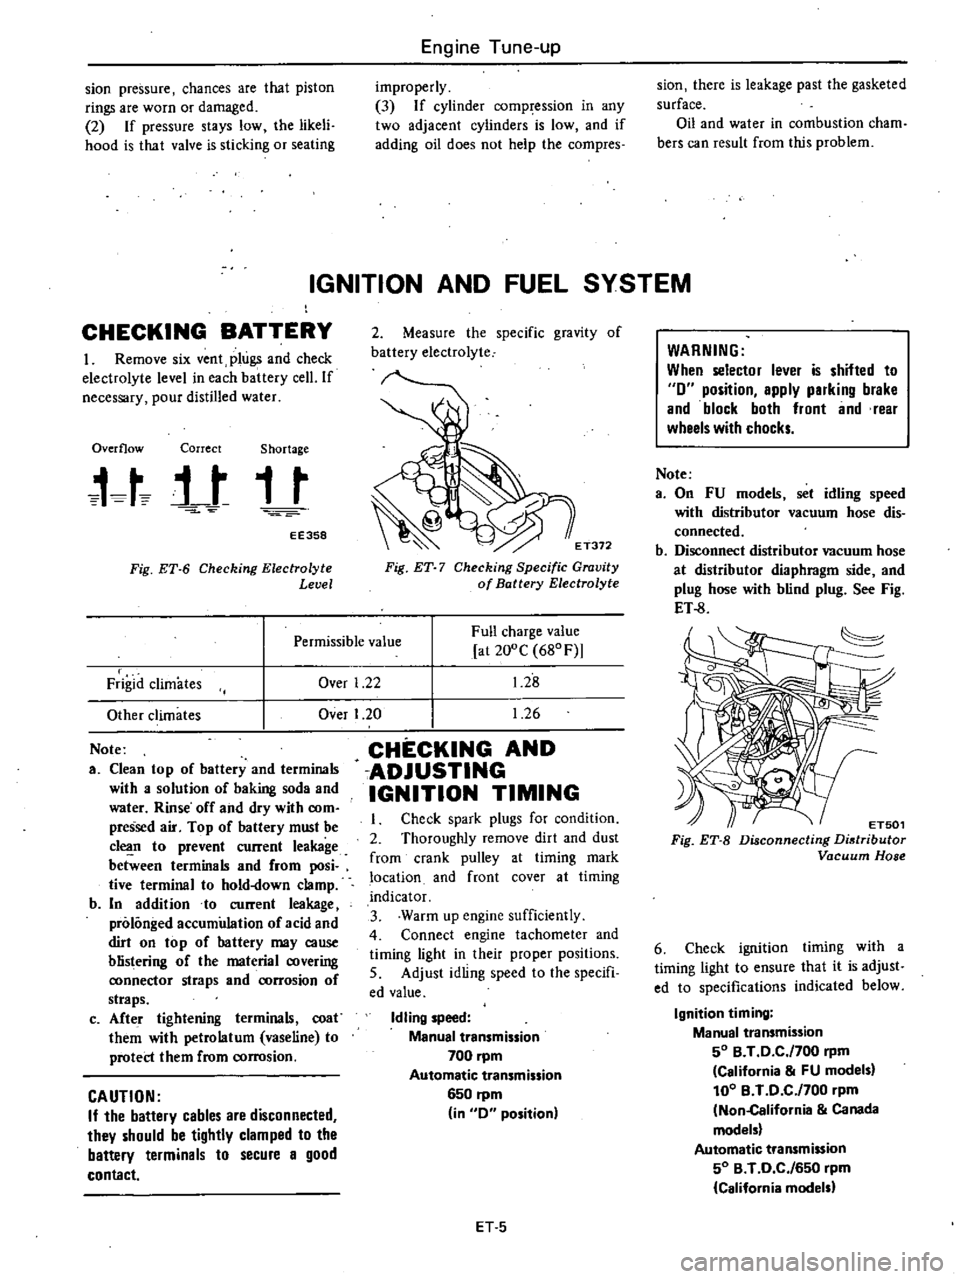
CHECKING
BATTERY
I
Remove
six
vent
plugs
and
check
electrolyte
level
in
each
battery
cell
If
necessary
pour
distilled
water
Overflow
Correct
Shortage
t
t
j
t
t
t
EE358
Fig
ET
6
Checking
Electrolyte
Level
2
Measure
the
specific
gravity
of
battery
electrolyte
E
T372
Fig
ET
7
Checking
Specific
Gravity
of
Battery
Electrolyte
Over
1
22
Full
charge
value
at
200C
680F
1
28
1
26
Permissible
value
Frigid
climates
Other
climates
Note
a
Clean
top
of
battery
and
terminals
with
a
solution
of
baking
soda
and
water
Rinse
off
and
dry
with
com
pressed
air
Top
of
battery
must
be
c1
n
to
prevent
current
leakage
between
terminals
and
from
posi
tive
terminal
to
hold
down
clamp
b
In
addition
to
current
leakage
prolonged
accumulation
of
acid
and
dirt
on
top
of
hattery
may
cause
blistering
of
the
material
covering
ronnector
straps
and
rorrosion
of
straps
c
Afte
r
tightening
terminals
coat
them
with
petrolatum
vaseline
to
protect
them
from
corrosion
CAUTION
If
the
battery
cables
are
disconnected
they
should
be
tightly
clamped
to
the
battery
terminals
to
secure
a
good
contact
Over
I
20
CHECKING
AND
ADJUSTING
IGNITION
TIMING
Check
spark
plugs
for
condition
2
Thoroughly
remove
dirt
and
dust
from
crank
pulley
at
timing
mark
location
and
front
cover
at
timing
indicator
3
Warm
up
engine
sufficiently
4
Connect
engine
tachometer
and
timing
light
in
their
proper
positions
5
Adjust
idling
speed
to
the
specifi
ed
value
Idling
speed
Manual
transmission
700
pm
Automatic
transmission
6S0
rpm
in
0
position
ET
S
WARNING
When
selector
lever
is
shifted
to
0
position
apply
parking
brake
and
block
both
front
and
rear
wheels
with
chocks
Note
a
On
FU
models
set
idling
speed
with
distributor
vacuum
hose
dis
connected
b
Disconnect
distributor
vacuum
hose
at
distributor
diaphragm
side
and
plug
hose
with
blind
plug
See
Fig
ET
8
ET501
Fig
ET
B
Disconnecting
Distributor
Vacuum
Hose
6
Check
ignition
timing
with
a
timing
light
to
ensure
that
it
is
adjust
ed
to
specifications
indicated
below
Ignition
timing
Manual
transmission
SO
B
T
0
C
f700
rpm
California
FU
models
100
B
T
0
C
f700
pm
Non
California
Canada
models
Automatic
transmission
SO
B
T
0
C
f6S0
rpm
California
models
Page 21 of 548
CHECKING
AND
ADJUSTING
CARBURETOR
IDLE
RPM
AND
MIXTURE
RATIO
WARNING
a
0
n
a
utomatic
transmission
models
checks
should
be
per
formed
with
the
lever
shifted
to
the
0
position
Be
sure
to
engage
parking
brake
and
to
lock
both
front
and
rear
wheels
with
wheel
chocks
b
Oepress
brake
pedal
while
ac
celerating
the
engine
to
prevent
forward
surge
of
car
c
After
idle
adjustment
has
been
made
shift
the
lever
to
the
N
or
P
positfon
and
remove
wheel
chocks
CAUTION
00
not
attempt
to
screw
the
idle
adjusting
screw
down
completely
00
ing
so
could
cause
damage
to
tip
which
in
turn
will
tend
to
cause
malfunctions
Note
a
When
measuring
CO
percentage
in
sert
probe
into
tail
pipe
more
than
40
cm
15
7
in
b
In
thee
case
of
air
conditioner
e
quipped
models
the
idle
adjust
ment
should
be
carried
out
while
the
air
conditioner
is
OFF
c
When
making
idle
adjustment
do
not
removt
air
cleaner
CO
Idle
adJustment
with
CO
meter
Idle
mixture
adjustment
requires
the
use
of
a
CO
meter
especially
for
California
models
When
preparing
to
adjust
idle
mixture
it
is
essential
to
have
the
meter
thoroughly
warmed
up
and
calibrated
1
Check
carburetor
pipes
for
proper
connection
2
Warm
up
engine
until
water
tern
perature
indicator
points
to
the
middle
of
gauge
The
procedure
to
warm
up
J
Engine
Tune
up
engine
is
not
specifically
recom
mended
Either
driving
car
or
operat
ing
engine
at
no
load
will
be
good
3
Make
sure
that
water
temperature
indicator
points
to
the
middle
Further
keep
engine
running
at
about
2
000
rpm
for
about
5
minutes
without
applying
load
to
engine
in
order
to
stabilize
engine
condition
Engine
hood
should
be
open
4
Run
engine
for
about
10
minutes
at
idling
speed
During
this
10
minutes
proceed
as
described
in
steps
5
to
9
below
5
I
Disconnect
air
hose
from
air
check
valve
and
install
cap
on
air
check
valve
Except
Canada
and
FU
models
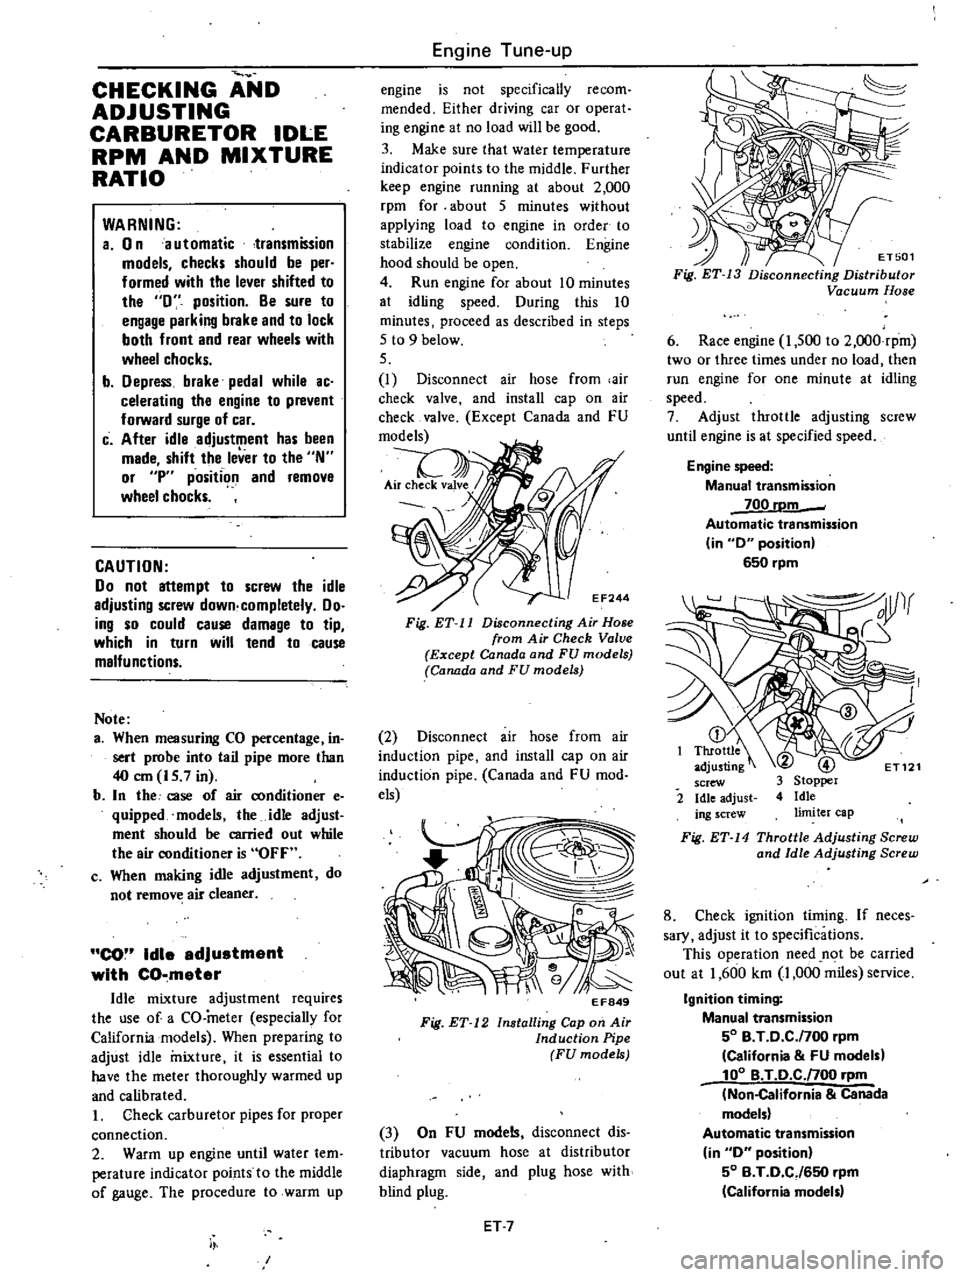
EF244
Fig
ET
11
Disconnecting
Air
Hose
from
Air
Check
Valve
Except
Canada
and
FU
models
Canada
and
FU
models
2
Disconnect
air
hose
from
air
induction
pipe
and
install
cap
on
air
induction
pipe
Canada
and
FU
mod
els
EF849
Fig
ET
12
Installing
Cap
on
Air
Induction
Pipe
FU
models
3
On
FU
models
disconnect
dis
tributor
vacuum
hose
at
distributor
diaphragm
side
and
plug
hose
with
blind
plug
ET
7
ET501
Fig
ET
13
Disconnecting
Distributor
Vacuum
Hose
6
Race
engine
I
500
to
2
OOO
rpm
two
or
three
times
under
no
load
then
run
engine
for
one
minute
at
idling
speed
7
Adjust
throttle
adjusting
screw
until
engine
is
at
specified
speed
Engine
speed
Manual
transmission
700
rDm
Automatic
transmission
in
0
position
650
rpm
2
Fig
ET
14
Throttle
Adjusting
Screw
and
Idle
Adjusting
Screw
8
Check
ignition
timing
If
neces
sary
adjust
it
to
specifications
This
operation
need
n
t
be
carried
out
at
1
600
km
1
000
miles
service
Ignition
timing
Manual
transmission
50
B
T
0
C
f700
rpm
California
FU
models
100
B
T
O
C
noo
rpm
Non
California
Canada
models
Automatic
transmission
in
0
position
50
B
T
0
CJ650
rpm
California
model
Page 22 of 548
SO
B
T
D
C
650
rpm
Non
California
models
except
Canada
100
B
T
0
C
650
rpm
Canada
models
Note
On
FU
models
ignition
timing
t
under
a
con4ition
where
distnoutor
vacuum
hose
is
discon
nected
9
On
FU
models
proceed
as
fol
lows
I
Remove
blind
plug
from
dis
tributor
vacuum
hose
and
connect
hose
to
distributor
diaphragm
EC370A
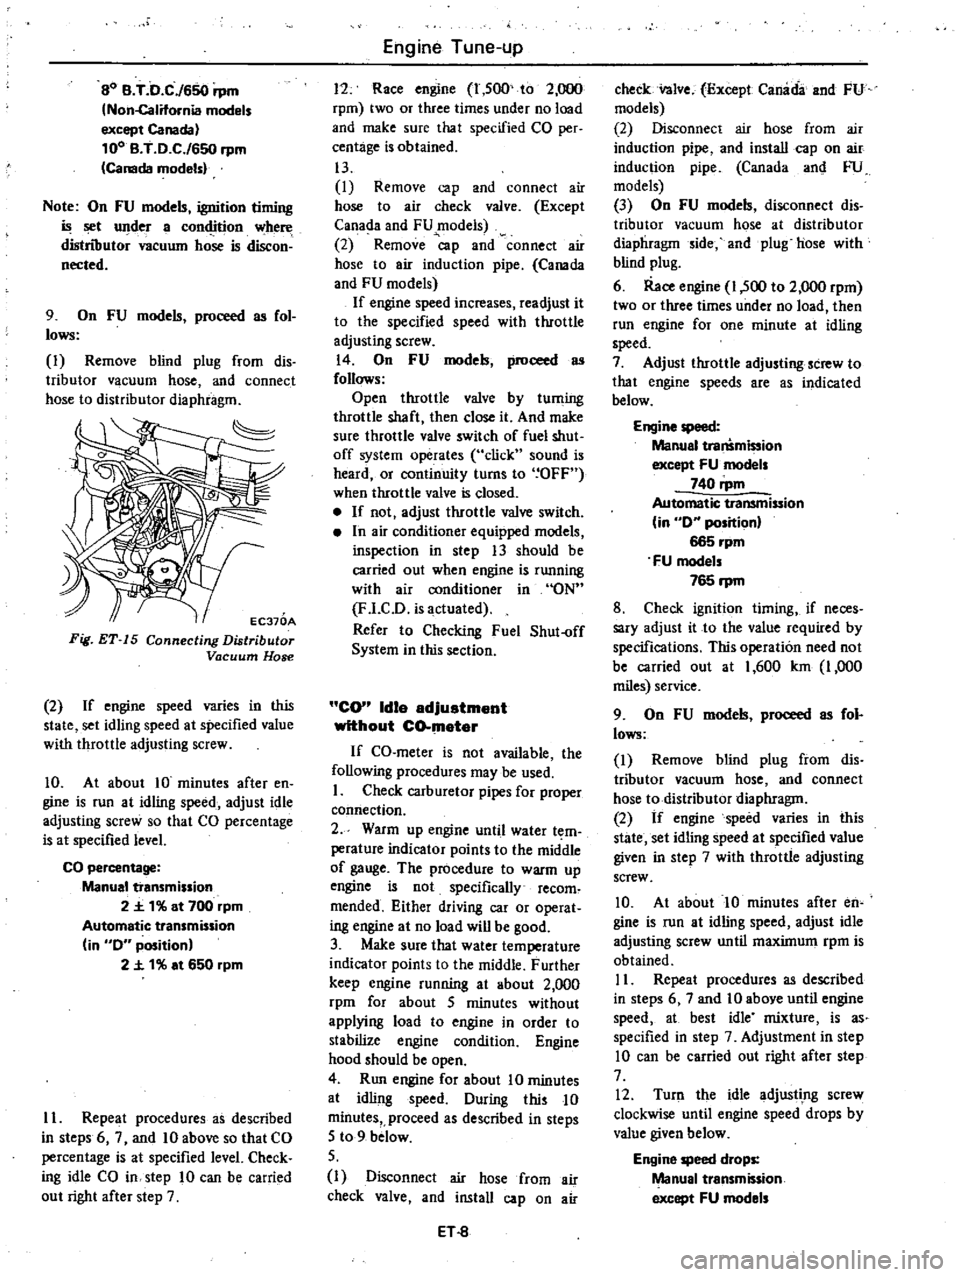
Fig
ET
15
Connecting
Distributor
Vacuum
Hose
2
If
engine
speed
varies
in
this
state
set
idling
speed
at
specified
value
with
throttle
adjusting
screw
10
At
about
10
minutes
after
en
gine
is
run
at
idling
speed
adjust
idle
adjusting
screw
so
that
CO
percentage
is
at
specified
level
CO
percentage
Manual
transmission
2
t
1
at
700
rpm
Automatic
transmission
in
0
position
2
t
1
at
650
rpm
II
Repeat
procedures
as
described
in
steps
6
7
and
10
above
so
that
CO
percentage
is
at
specified
level
Check
ing
idle
CO
in
step
10
can
be
carried
out
right
after
step
7
Engine
Tune
up
11
Race
engine
1
500
to
2
000
rpm
two
or
three
times
under
no
load
and
make
sure
that
specified
CO
per
centage
is
obtained
13
I
Remove
cap
and
connect
air
hose
to
air
check
valve
Except
Canada
and
FU
models
2
Remove
p
and
connect
air
hose
to
air
induction
pipe
Canada
and
FU
models
If
engine
speed
increases
readjust
it
to
the
specified
speed
with
throttle
adjusting
screw
14
On
FU
models
proceed
as
follows
Open
throttle
valve
by
tuming
throttle
shaft
then
close
it
And
make
sure
throttle
valve
switch
of
fuel
shut
off
system
operates
click
sound
is
heard
or
continuity
turns
to
OFF
when
throttle
valve
is
closed
If
not
adjust
throttle
valve
switch
In
air
conditioner
equipped
models
inspection
in
step
13
should
be
carried
out
when
engine
is
running
with
air
conditioner
in
ON
F
l
CD
is
actuated
Refer
to
Checking
Fuel
Shut
off
System
in
this
section
CO
Idle
adjuatment
without
CO
mater
If
CO
meter
is
not
available
the
following
procedures
may
be
used
I
Check
carburetor
pipes
for
proper
comiection
2
Warm
up
engine
until
water
t
m
perature
indicator
points
to
the
middle
of
gauge
The
procedure
to
warm
up
engine
is
not
specifically
recom
mended
Either
driving
car
or
operat
ing
engine
at
no
load
will
be
good
3
Make
sure
that
water
temperature
indicator
points
to
the
middle
Further
keep
engine
running
at
about
2
000
rpm
for
about
5
minutes
without
applying
load
to
engine
in
order
to
stabilize
engine
condition
Engine
hood
should
be
open
4
Run
engine
for
about
10
minutes
at
idling
speed
During
this
10
minutes
proceed
as
described
in
steps
5
to
9
below
5
I
Disconnect
air
hose
from
air
check
valve
and
install
cap
on
air
ET
8
check
nlve
Except
Canada
and
FU
models
2
Disconnect
air
hose
from
air
induction
pipe
and
install
cap
on
air
induction
pipe
Canada
an
FU
models
3
On
FU
models
disconnect
dis
tributor
vacuum
hose
at
distributor
diaphragm
ide
and
plug
hose
with
blind
plug
6
Race
engine
1
500
to
2
000
rpm
two
or
three
times
under
no
load
then
run
engine
for
one
minute
at
idling
speed
7
Adjust
throttle
adjusting
screw
to
that
engine
speeds
are
as
indicated
below
Engine
speed
Manual
tra
mi
ion
except
FU
models
740
rpm
Automatic
transmission
in
0
position
665
rpm
FU
models
765
rpm
8
Check
ignition
timing
if
neces
sary
adjust
it
to
the
value
required
by
specifications
This
operation
need
not
be
carried
out
at
1
600
km
1
000
miles
service
9
On
FU
models
proceed
as
fol
lows
I
Remove
blind
plug
from
dis
tributor
vacuum
hose
and
connect
hose
to
distributor
diaphragm
2
If
engine
speed
varies
in
this
state
set
idling
speed
at
specified
value
given
in
step
7
with
throttle
adjusting
screw
10
At
about
10
minutes
after
en
gine
is
run
at
idling
speed
adjust
idle
adjusting
screw
until
maximum
rpm
is
obtained
II
Repeat
procedures
as
described
in
steps
6
7
and
10
above
until
engine
speed
at
best
idle
mixture
is
as
specified
in
step
7
Adjustment
in
step
10
can
be
carried
out
right
after
step
7
12
Turn
the
idle
adjustIng
screw
clockwise
until
engine
speed
drops
by
value
given
below
Engine
speed
drops
Manual
transmission
except
FU
models
Page 29 of 548
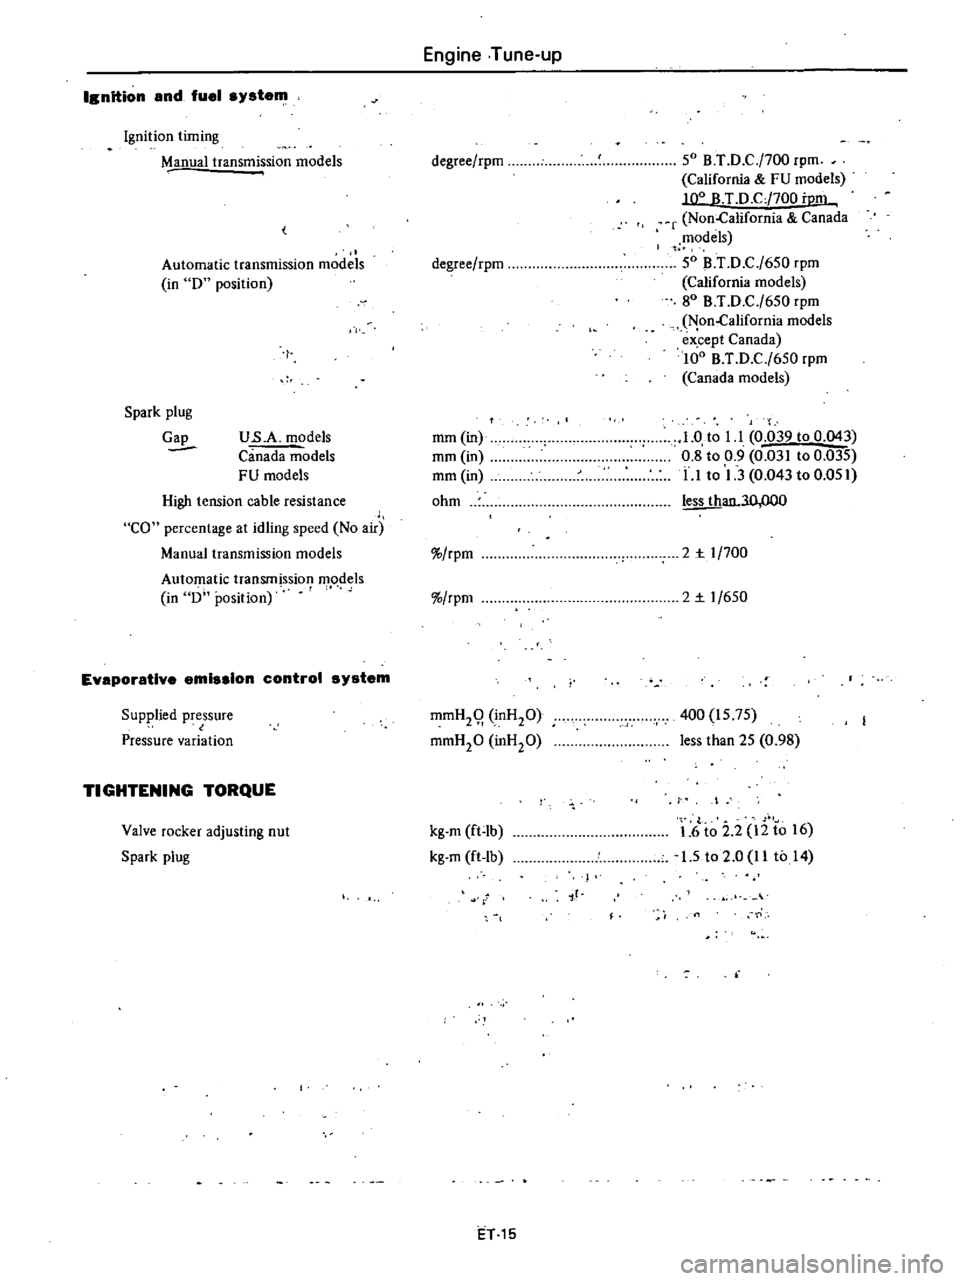
IBnition
and
fuel
system
Ignition
timing
Manual
transmission
models
Automatic
transmission
models
in
D
position
1
Spark
plug
Gap
U
s
A
models
Canada
models
FU
models
High
tension
cable
resistance
CO
percentage
at
idling
speed
No
air
Manual
transmission
models
Automatic
transmission
models
f
in
D
position
Evaporatlv
emission
control
system
Supplied
pressure
l
Pressure
variation
TIGHTENING
TORQUE
Valve
rocker
adjusting
nut
Spark
plug
Engine
Tune
up
degree
rpm
degree
rpm
mm
in
mm
in
mm
in
ohm
rpm
rpm
mmH29
inH20
mmH20
inHP
kg
m
ft
lb
kg
m
ft
lb
ET1S
SO
B
T
D
C
j700
rpm
California
FU
models
T
D
CJ700
i
m
r
Non
California
Canada
models
SO
B
T
D
C
j6S0
rpm
California
models
80
B
T
D
C
j6S0
rpm
Non
California
models
ex
cept
Canada
100
B
T
D
C
j6S0
rpm
Canada
models
1
0
to
l
l
0
039
to
0
043
0
8
to
0
9
0
031
to
0
035
LI
to
1
3
0
043
to
O
OSI
an
3O
OOO
2
r
1
700
2
r
1
6S0
400
IS
7S
less
than
2S
0
98
I
f
r
1
6
to
2
2
12
to
16
1
5
to
2
0
11
to
14
jf
0