lock DATSUN B110 1973 Service Repair Manual
[x] Cancel search | Manufacturer: DATSUN, Model Year: 1973, Model line: B110, Model: DATSUN B110 1973Pages: 513, PDF Size: 28.74 MB
Page 342 of 513
ENGINE
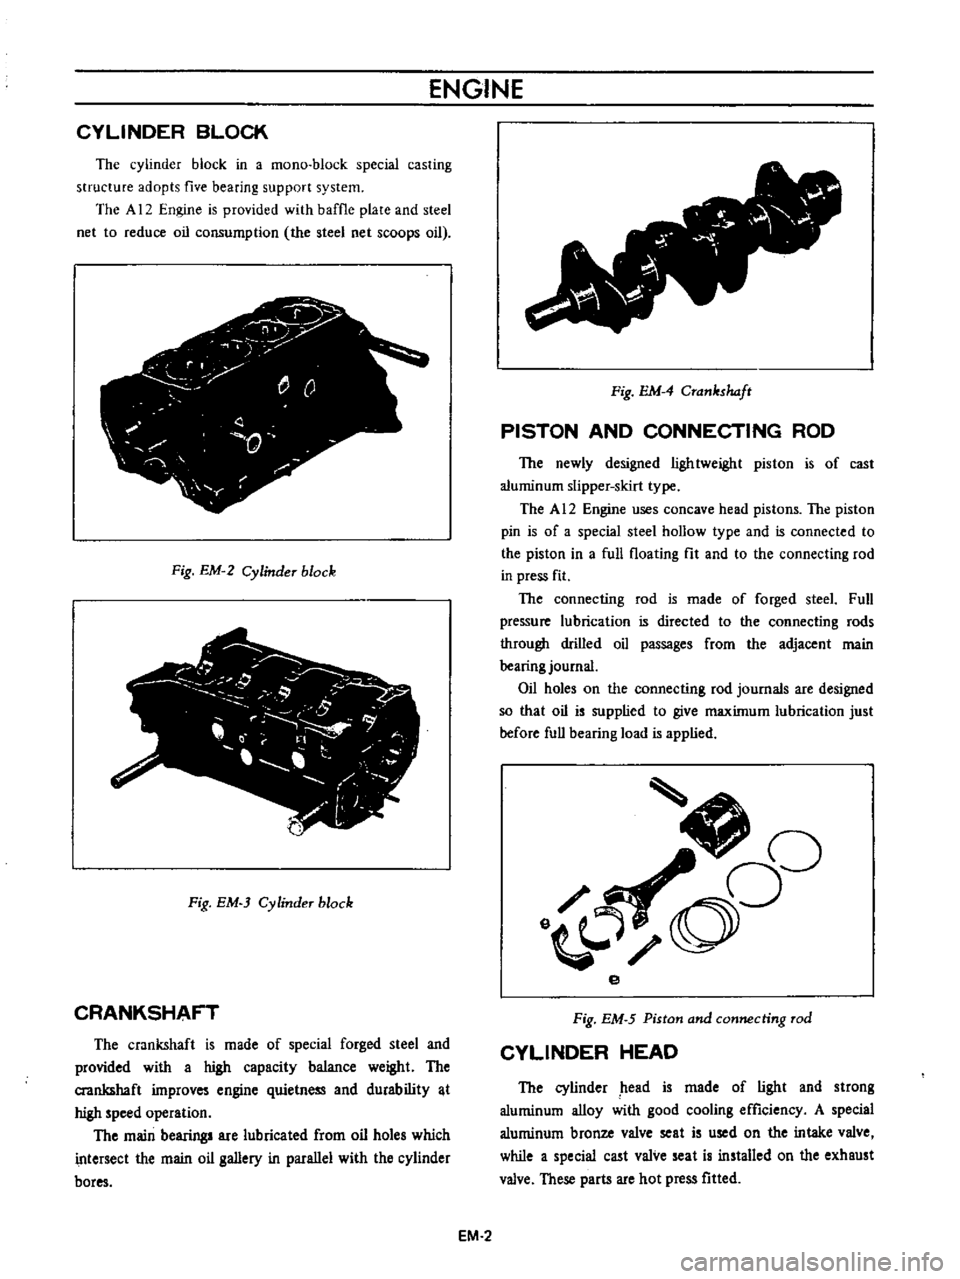
CYLINDER
BLOCK
The
cylinder
block
in
a
mono
block
special
casting
structure
adopts
five
bearing
support
system
The
A
12
Engine
is
provided
with
baffle
plate
and
steel
net
to
reduce
oil
consumption
the
steel
net
scoops
oil
j
y
r
0
Q
0
T
Fig
EM
2
Cylinder
block
Fig
EM
3
Cylinder
block
CRANKSHAFT
The
crankshaft
is
made
of
special
forged
steel
and
provided
with
a
high
capacity
balance
weight
The
crankshaft
improves
engine
quietness
and
durability
t
high
speed
operation
The
main
bearing
are
lubricated
from
oil
holes
which
intersect
the
main
oil
gallery
in
parallel
with
the
cylinder
bores
v
Fig
EM
4
Crankshaft
PISTON
AND
CONNECTING
ROD
The
newly
designed
lightweight
piston
is
of
cast
aluminum
slipper
skirt
type
The
A
12
Engine
uses
concave
head
pistons
The
piston
pin
is
of
a
special
steel
hollow
type
and
is
connected
to
the
piston
in
a
full
floating
fit
and
to
the
connecting
rod
in
press
fit
The
connecting
rod
is
made
of
forged
steeL
Full
pressure
lubrication
is
directed
to
the
connecting
rods
through
drilled
oil
passages
from
the
adjacent
main
bearing
journal
Oil
holes
on
the
connecting
rod
journals
are
designed
so
that
oil
is
supplied
to
give
maximum
lubrication
just
before
full
bearing
load
is
applied
J
oO
o
e
Fig
EM
5
Piston
and
connecting
rod
CYLINDER
HEAD
The
cylinder
head
is
made
of
light
and
strong
aluminum
alloy
with
good
cooling
efficiency
A
special
aluminum
bronze
valve
seat
is
used
on
the
intake
valve
while
a
special
cast
valve
seat
is
installed
on
the
exhaust
valve
These
parts
are
hot
press
fitted
EM
2
Page 343 of 513
ENGINE
MECHANICAL
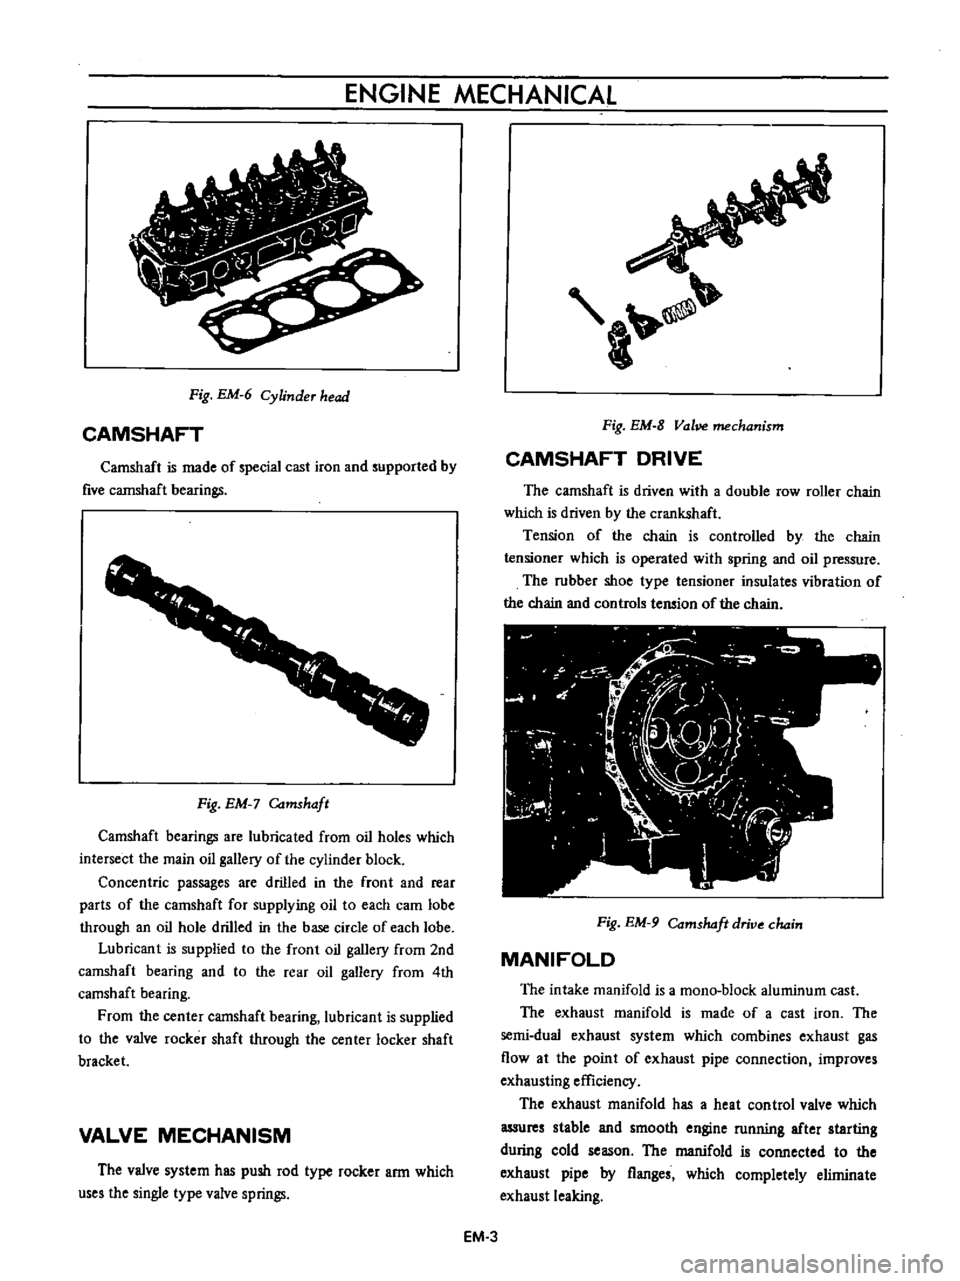
Fig
EM
6
Cylinder
head
CAMSHAFT
Camshaft
is
made
of
special
cast
iron
and
supported
by
five
cannshaft
bearings
1
1
f
r
f
r
I
Fig
EM
Camshaft
Camshaft
bearings
are
lubricated
from
oil
holes
which
intersect
the
main
oil
gallery
of
the
cylinder
block
Concentric
passages
are
drilled
in
the
front
and
rear
parts
of
the
camshaft
for
supplying
oil
to
each
cam
lobe
through
an
oil
hole
drilled
in
the
base
circle
of
each
lobe
Lubricant
is
supplied
to
the
front
oil
gallery
from
2nd
camshaft
bearing
and
to
the
rear
oil
gallery
from
4th
camshaft
bearing
From
the
center
camshaft
bearing
lubricant
is
supplied
to
the
valve
rocker
shaft
through
the
center
locker
shaft
bracket
VALVE
MECHANISM
The
valve
system
has
push
rod
type
rocker
arm
which
uses
the
single
type
valve
springs
a
Fig
EM
8
Vol
mechanism
CAMSHAFT
DRIVE
The
camshaft
is
driven
with
a
double
row
roller
chain
which
is
driven
by
the
crankshaft
Tension
of
the
chain
is
controlled
by
the
chain
tensioner
which
is
operated
with
spring
and
oil
pressure
The
rubber
shoe
type
tensioner
insulates
vibration
of
the
chain
and
controls
tension
of
the
chain
Fig
EM
9
Comshdft
drive
chain
MANIFOLD
The
intake
manifold
is
a
mono
block
aluminum
cast
The
exhaust
manifold
is
made
of
a
cast
iron
The
semi
dual
exhaust
system
which
combines
exhaust
gas
flow
at
the
point
of
exhaust
pipe
connection
improves
exhausting
efficiency
The
exhaust
manifold
has
a
heat
control
valve
which
assures
stable
and
smooth
engine
running
after
starting
during
cold
season
The
manifold
is
connected
to
the
exhaust
pipe
by
flanges
which
completely
eliminate
exhaust
leaking
EM
3
Page 344 of 513
ENGINE
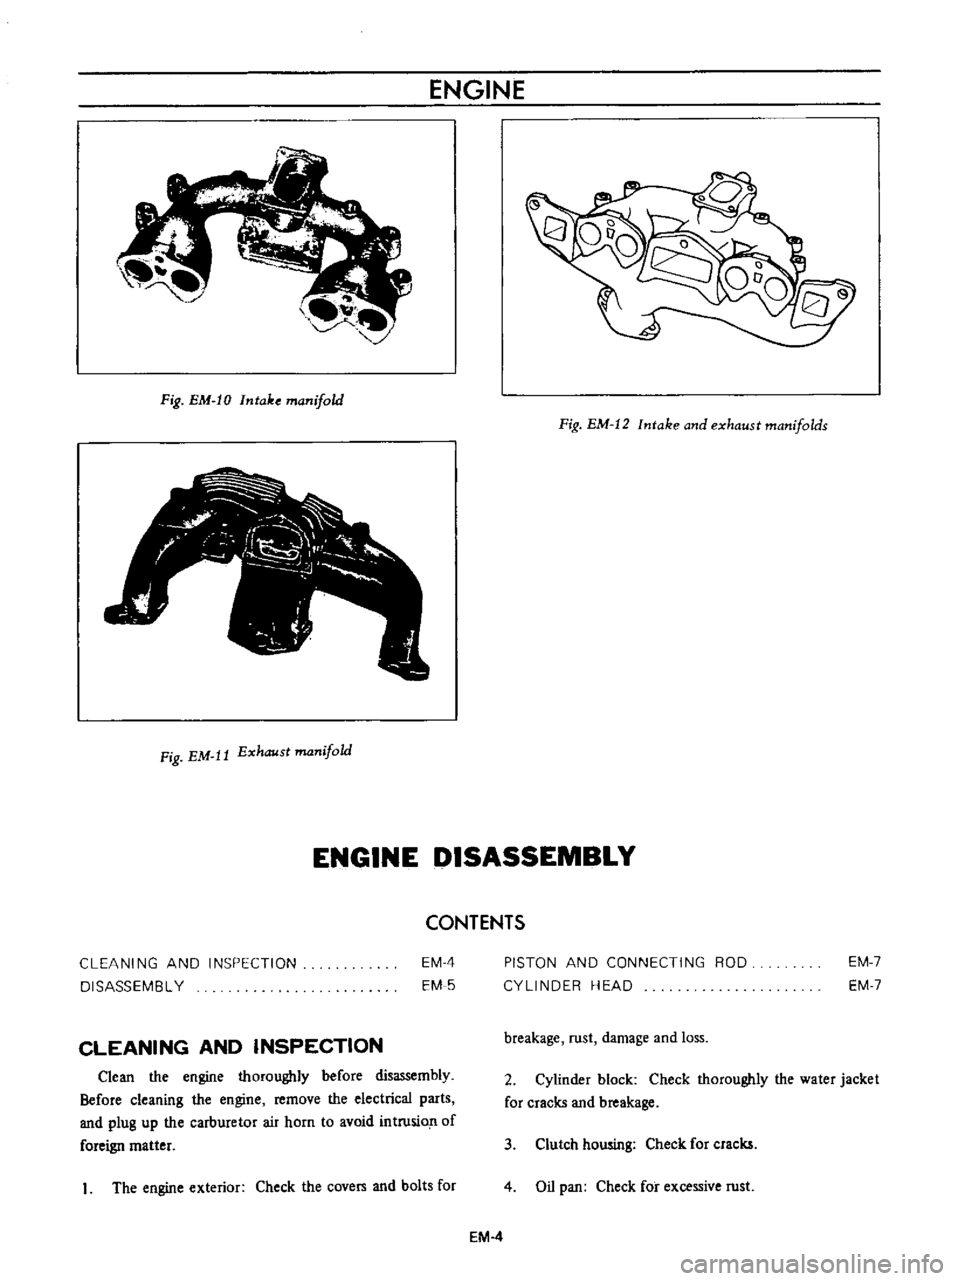
Fig
EM
IO
Intake
manifold
Fig
EM
12
Intake
and
exhaust
manifolds
Fig
EM
It
Exhaust
manifold
ENGINE
DISASSEMBLY
CONTENTS
CLEANING
AND
INSPECTION
DISASSEMBL
Y
EM
4
EM
5
PISTON
AND
CONNECTING
ROD
CYLINDER
HEAD
EM
7
EM
7
CLEANING
AND
INSPECTION
breakage
rust
damage
and
loss
Clean
the
engine
thoroughly
before
disassembly
Before
cleaning
the
engine
remove
the
electrical
parts
and
plug
up
the
carburetor
air
horn
to
avoid
intrusio
n
of
foreign
matter
2
Cylinder
block
Check
thoroughly
the
water
jacket
for
cracks
and
breakage
3
Clutch
howing
Check
for
cracks
1
The
engine
exterior
Check
the
covers
and
bolts
for
4
Oil
pan
Check
for
excessive
rust
EM
4
Page 348 of 513
ENGINE
J
I
r
I
I
J
fj
7
L
j
8
if
d1
I
ilfi
3
c
7
I
t
j
v
1
Ji
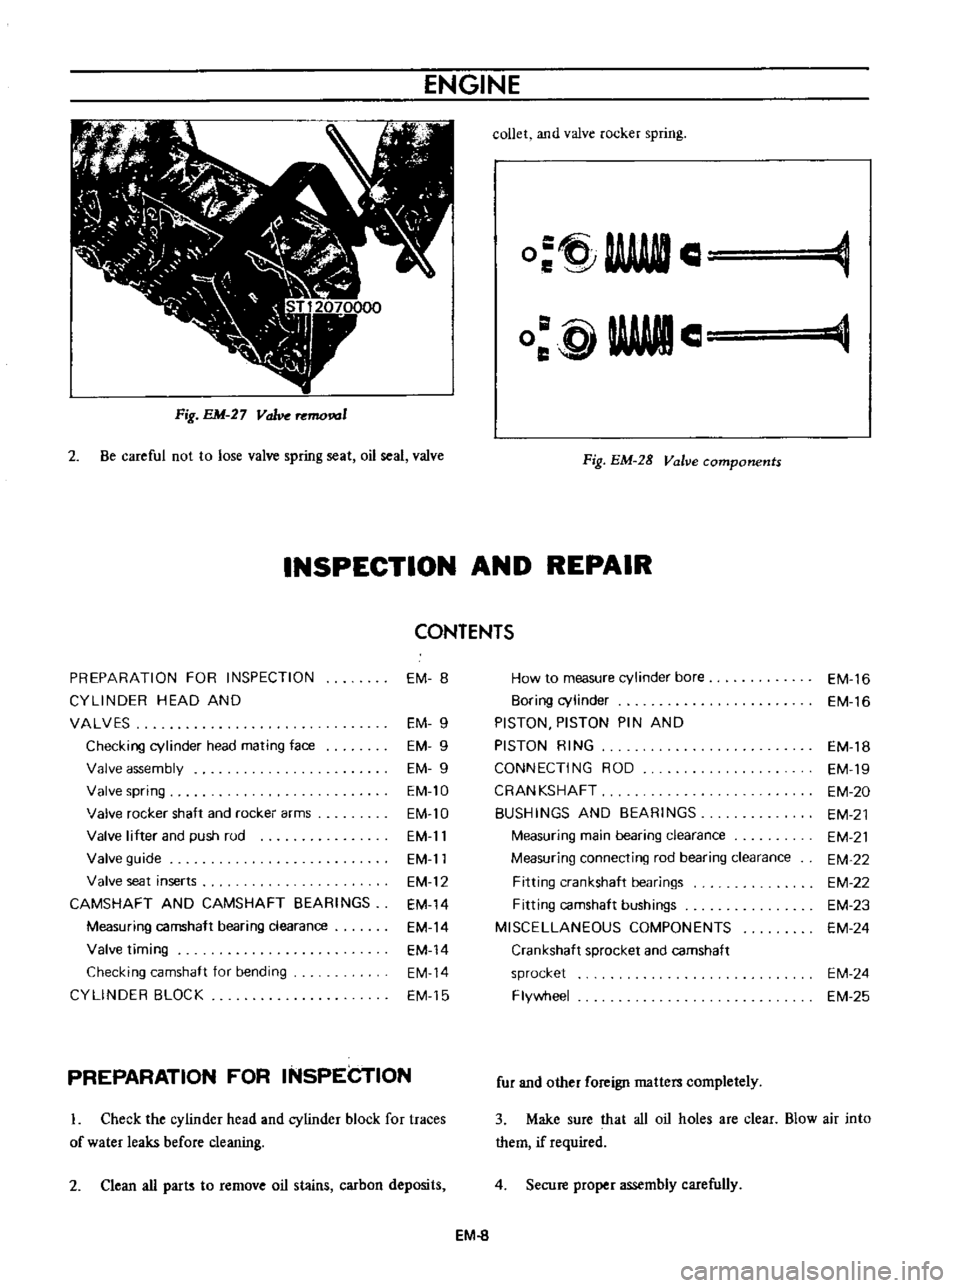
Fig
EM
27
Valve
mo
1
2
Be
careful
not
to
lose
valve
spring
seat
oil
seal
valve
collet
and
valve
rocker
spring
O
tj
AAAftIl
C
e
WWII
o
glAWle
Fig
EM
28
Valve
components
INSPECTION
AND
REPAIR
CONTENTS
PREPARATION
FOR
INSPECTION
EM
8
How
to
measure
cylinder
bore
EM
16
CYLlNOER
HEAD
AND
80ring
cylinder
EM
16
VALVES
EM
9
PISTON
PISTON
PIN
AND
Checking
cylinder
head
mating
face
EM
9
PISTON
RING
EM
18
Valve
assembly
EM
9
CONNECTING
ROD
EM
19
Valve
spring
EM
10
CRANKSHAFT
EM
20
Valve
rocker
shaft
and
rockei
arms
EM
lO
BUSHINGS
AND
BEARINGS
EM
21
Valve
lifter
and
push
rud
EM
11
Measuring
main
bearing
clearance
EM
21
Valve
guide
EM
11
Measuring
connecting
rod
bearing
clearance
EM
22
Valve
seat
inserts
EM
12
Fitting
crankshaft
bearings
EM
22
CAMSHAFT
AND
CAMSHAFT
BEARINGS
EM
14
Fitting
camshaft
bushings
EM
23
Measuring
camshaft
bearing
clearance
EM
14
MISCELLANEOUS
COMPONENTS
EM
24
Valve
timing
EM
14
Crankshaft
sprocket
and
camshaft
Checking
camshaft
for
bending
EM
14
sprocket
EM
24
CYLlNOER
BLOCK
EM
15
Flywheel
EM
25
PREPARATION
FOR
INSPECTION
L
Check
the
cylinder
head
and
cylinder
block
for
traces
of
water
leaks
before
cleaning
2
Clean
all
parts
to
remove
oil
stains
carbon
deposits
fur
and
other
foreign
matters
completely
3
Make
sure
that
all
oil
holes
are
clear
Blow
air
into
them
if
required
4
Secure
proper
assembly
carefully
EM
8
Page 349 of 513
ENGINE
MECHANICAL
CYLINDER
HEAD
AND
VALVES
Checking
cylinder
head
mating
face
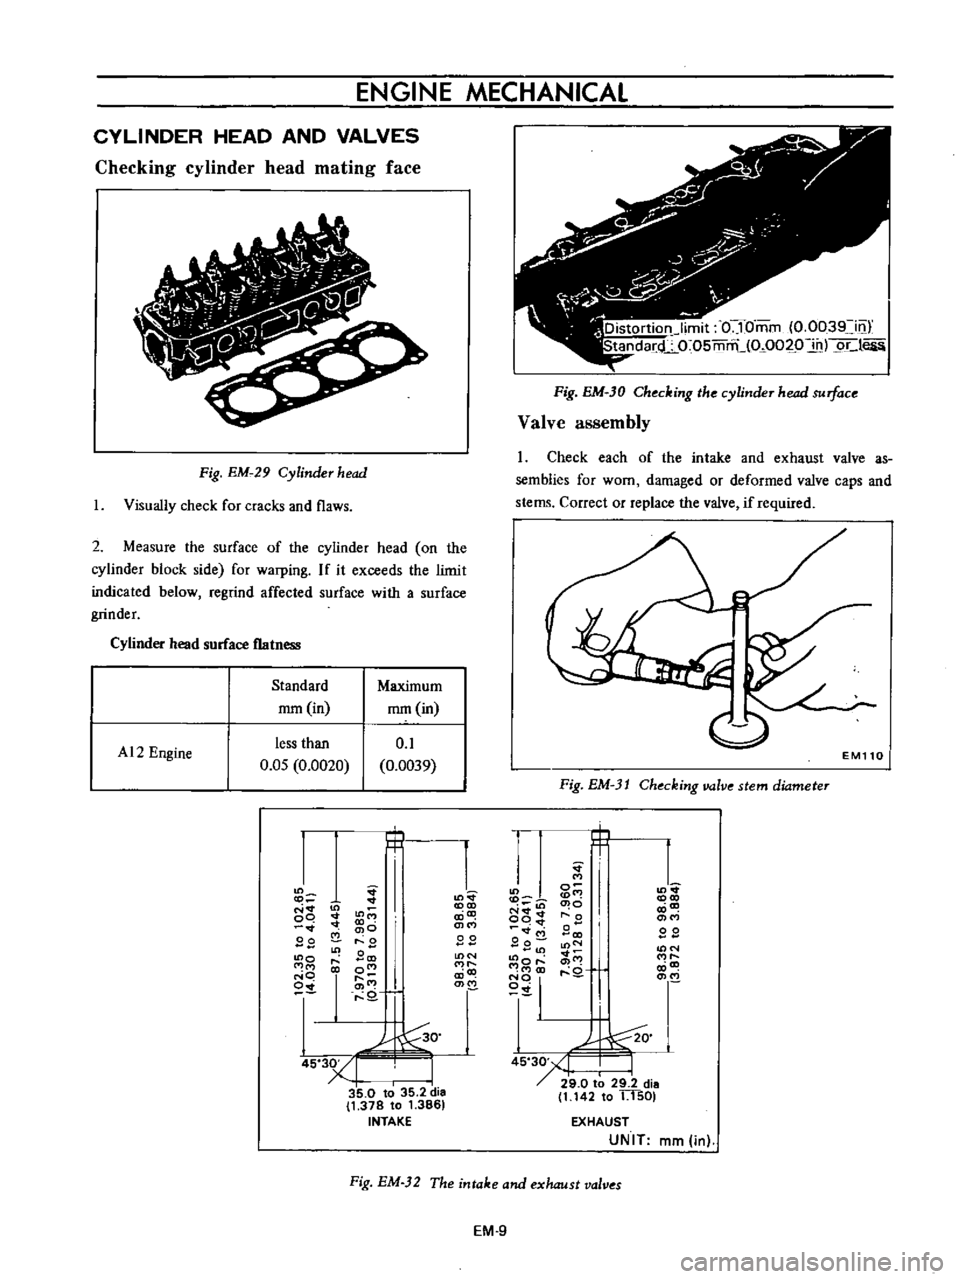
Fig
EMc29
Cylinder
head
I
Visually
check
for
cracks
and
flaws
2
Measure
the
surface
of
the
cylinder
head
on
the
cylinder
block
side
for
warping
If
it
exceeds
the
limit
indicated
below
regrind
affected
surface
with
a
surface
grinder
Cylinder
head
surface
flatness
Standard
Maximum
rom
in
mm
in
AI2
Engine
less
than
0
1
O
OS
0
0020
0
0039
t
C
in
00
co
0
00
2
0
Sco
co
0
0
i
Q
coco
a
ilt
BE
mIX
2
00
5
3YI
I
35
0
to
35
2
dia
1
378
to
1
3861
INTAKE
Fig
EM
30
Checking
the
cylinder
head
surface
Valve
a88embly
I
Check
each
of
the
intake
and
exhaust
valve
asc
semblies
for
wom
damaged
or
deformed
valve
caps
and
stems
Correct
or
replace
the
valve
if
required
l
EM110
Fig
EM
31
Chuking
valve
stem
diameter
t
L
coco
CO
co
BE
Ln
oq
q
od
M
2
g
tOo
18co1
O
c
0
DO
o
0
0
co
o
CO
co
J00
45
30
1
I
I
2
9
0
t
29
2
dia
1
142
to
1
l501
EXHAUST
UNIT
mm
in
Fig
EM
32
The
intake
and
exhaust
valves
EM
9
Page 351 of 513
ENGINE
MECHANICAL
Valve
lifter
and
push
rod
L
Check
the
valve
lifter
for
wear
seizure
and
bevel
edge
contact
and
repair
or
replace
as
required
2
Measure
clearance
between
the
lifter
hole
on
the
cylinder
block
and
valve
lifter
and
replace
the
valve
lifter
when
clearance
exceeds
the
limit
Standard
rom
in
Maximum
rom
in
Valve
lifter
lifter
hole
clearance
0
02
to
0
05
0
0008
to
0
0020
0
15
0
0059
3
Check
the
push
rod
for
bending
and
damage
and
repair
or
replace
as
required
Valve
guide
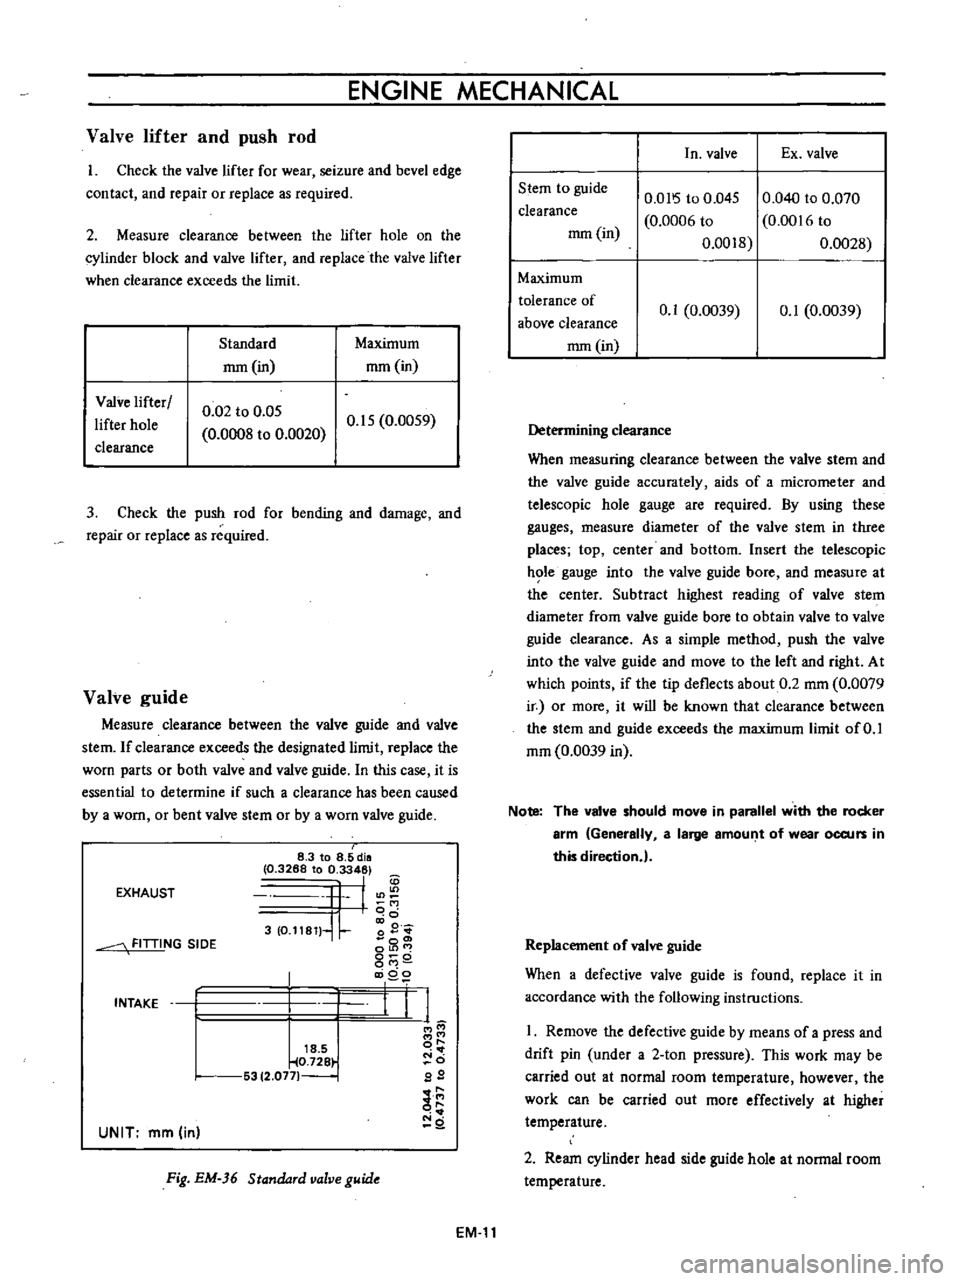
Measure
clearance
between
the
valve
guide
and
valve
stem
If
clearance
exceeds
the
designated
limit
replace
the
worn
parts
or
both
valve
and
valve
guide
In
this
case
it
is
essential
to
determine
if
such
a
clearance
has
been
caused
by
a
worn
or
bent
valve
stem
or
by
a
worn
valve
guide
EXHAUST
8
3
to
8
5
dill
03266
to
T
3
10
11S11
I
FITTING
SIDE
iD
o
0
co
0
o
c
o
LOt
0
0
0
a
9
ll
l
INTAKE
1S
5
o
O
726
5312
0771
iO
0
N
0
00
E
2
UNIT
mm
in
Fig
EM
J6
Standard
valve
guide
In
valve
Ex
valve
Stem
to
guide
clearance
rom
in
0
Dl
5
to
0
045
0
0006
to
0
0018
0
040
to
0
070
0
0016
to
0
0028
Maximum
tolerance
of
above
clearance
rom
in
o
I
0
0039
0
1
0
0039
Determining
clearance
When
measuring
clearance
between
the
valve
stem
and
the
valve
guide
accurately
aids
of
a
micrometer
and
telescopic
hole
gauge
are
required
By
using
these
gauges
measure
diameter
of
the
valve
stem
in
three
places
top
center
and
bottom
Insert
the
telescopic
h
le
gauge
into
the
valve
guide
bore
and
measure
at
the
center
Subtract
highest
reading
of
valve
stem
diameter
from
valve
guide
bore
to
obtain
valve
to
valve
guide
clearance
As
a
simple
method
push
the
valve
into
the
valve
guide
and
move
to
the
left
and
right
At
which
points
if
the
tip
deflects
about
0
2
mm
0
0079
ir
or
more
it
will
be
known
that
clearance
between
the
stem
and
guide
exceeds
the
maximum
limit
of
0
1
mm
0
0039
in
Note
The
valve
should
move
in
parallel
with
the
rocker
arm
Generally
a
large
amoul
t
of
wear
occurs
in
this
direction
l
Replacement
of
valve
guide
When
a
defective
valve
guide
is
found
replace
it
in
accordance
with
the
following
instructions
I
Remove
the
defective
guide
by
means
of
a
press
and
drift
pin
under
a
2
ton
pressure
This
work
may
be
carried
out
at
normal
room
temperature
however
the
work
can
be
carried
out
more
effectively
at
higher
temperature
2
Ream
cylinder
head
side
guide
hole
at
nonnal
room
temperature
EM
l1
Page 354 of 513
ENGINE
CAMSHAFT
AND
CAMSHAFT
BEARING
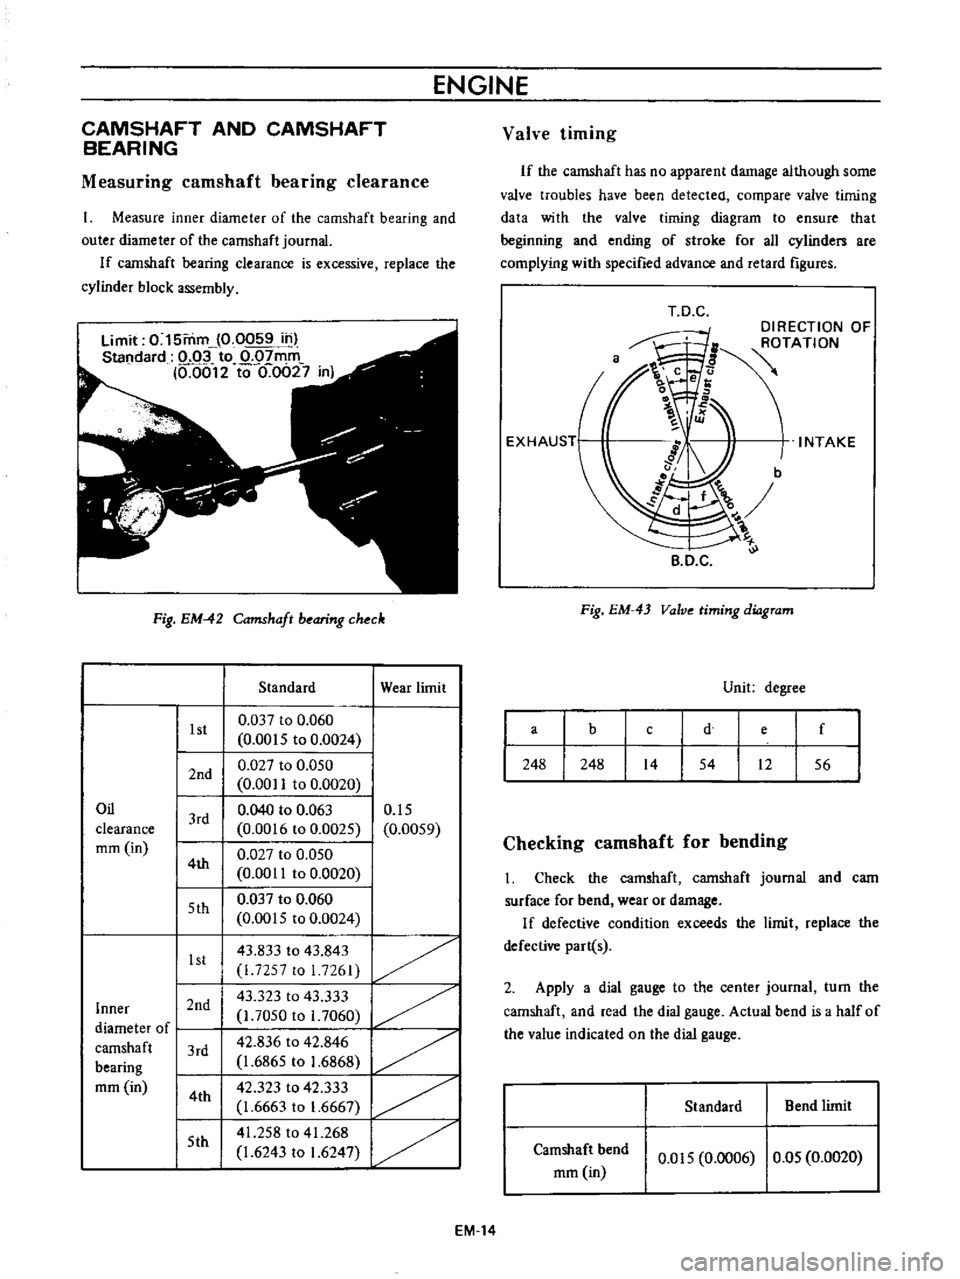
Measuring
camshaft
bearing
clearance
Measure
inner
diameter
of
the
camshaft
bearing
and
outer
diameter
of
the
camshaft
journaL
If
camshaft
bearing
clearance
is
excessive
replace
the
cylinder
block
assembly
Limit
0
15mm
0
0059
in
Standard
o
oi
to
0
07mm
M012
to
0
0627
in
Fig
EM
42
Camshaft
bearing
check
1st
2nd
Oil
clearance
mm
in
3rd
4th
5th
1st
Inner
I
2nd
I
diameter
of
I
I
camshaft
3rd
bearing
mm
in
14th
I
15th
I
Standard
0
037
to
0
060
0
0015
to
0
0024
0
027
to
0
050
0
00
to
0
0020
0
040
to
0
063
0
0016
to
0
0025
0
027
to
0
050
0
0011
to
0
0020
0
037
to
0
060
0
0015
to
0
0024
43
833
to
43
843
i
7257
to
I
7261
43
323
to
43
333
l
7050
to
1
7060
42
836
to
42
846
1
6865
to
1
6868
42
323
to
42
333
1
6663
to
1
6667
41
258
to
41
268
1
6243
to
1
6247
Wear
limit
0
15
0
0059
1
1
1
1
Valve
timing
If
the
camshaft
has
no
apparent
damage
although
some
valve
troubles
have
been
detected
compare
valve
timing
data
with
the
valve
timing
diagram
to
ensure
that
beginning
and
ending
of
stroke
for
all
cylinden
are
complying
with
specified
advance
and
retard
figures
T
D
C
DIRECTION
OF
ROTATION
INTAKE
B
D
C
Fig
EM
43
Valve
timing
diagram
Unit
degree
a
b
e
f
d
c
248
248
14
54
12
56
Checking
camshaft
for
bending
Check
the
camshaft
camshaft
journal
and
cam
surface
for
bend
wear
or
damage
If
defective
condition
exceeds
the
limit
replace
the
defective
part
s
2
Apply
a
dial
gauge
to
the
center
journal
turn
the
camshaft
and
read
the
dial
gauge
Actual
bend
is
a
half
of
the
value
indicated
on
the
dial
gauge
Standard
Bend
limit
Camshaft
bend
mm
in
0
015
0
0006
0
05
0
0020
EM
14
Page 355 of 513
ENGINE
MECHANICAL
Bendin9
limit
0
05mm
0
0020
in
Standard
0
of5mm
0
0006
in
or
less
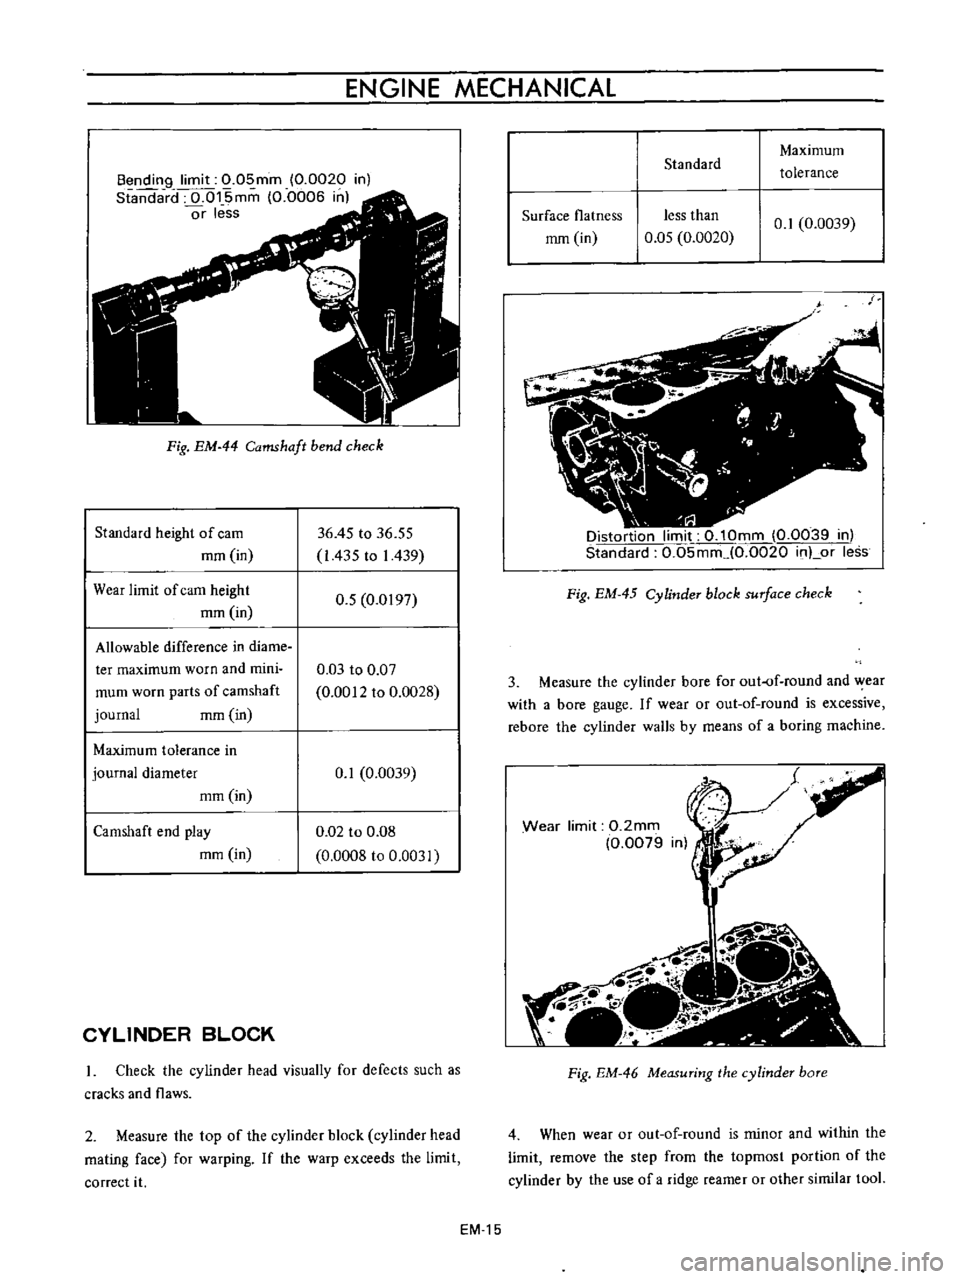
Fig
EM
44
Camshaft
bend
check
Standard
height
of
cam
mm
in
36
45
to
36
55
I
435
to
I
439
Wear
limit
of
cam
height
mm
in
0
5
0
0197
Allowable
difference
in
diame
ter
maximum
worn
and
mini
mum
worn
parts
of
camshaft
journal
mm
in
0
03
to
0
07
0
0012
to
0
0028
Maximum
tolerance
in
journal
diameter
mm
in
0
1
0
0039
Camshaft
end
play
mm
in
0
02
to
0
08
0
0008
to
0
0031
CYLINDER
BLOCK
Check
the
cylinder
head
visually
for
defects
such
as
cracks
and
flaws
2
Measure
the
top
of
the
cylinder
block
cylinder
head
mating
face
for
warping
If
the
warp
exceeds
the
limit
correct
it
EM
15
Standard
Maximum
tolerance
Surface
flatness
less
than
mm
in
0
05
0
0020
0
1
0
0039
Distortion
limit
0
10mm
0
0039
in
Standard
0
05mm
0
0020
inLor
less
Fig
EM
45
Cylinder
block
surface
check
3
Measure
the
cylinder
bore
for
out
of
round
and
wear
with
a
bore
gauge
If
wear
or
out
of
round
is
excessive
rebore
the
cylinder
walls
by
means
of
a
boring
machine
Wear
limit
0
2mm
0
0079
Fig
EM
46
Measuring
the
cylinder
bore
4
When
wear
or
out
of
round
is
minor
and
within
the
limit
remove
the
step
from
the
topmost
portion
of
the
cylinder
by
the
use
of
a
ridge
reamer
or
other
similar
tooL
Page 357 of 513
ENGINE
MECHANICAL
5
M
co
El
co
I
ED
I
UNIT
mm
in
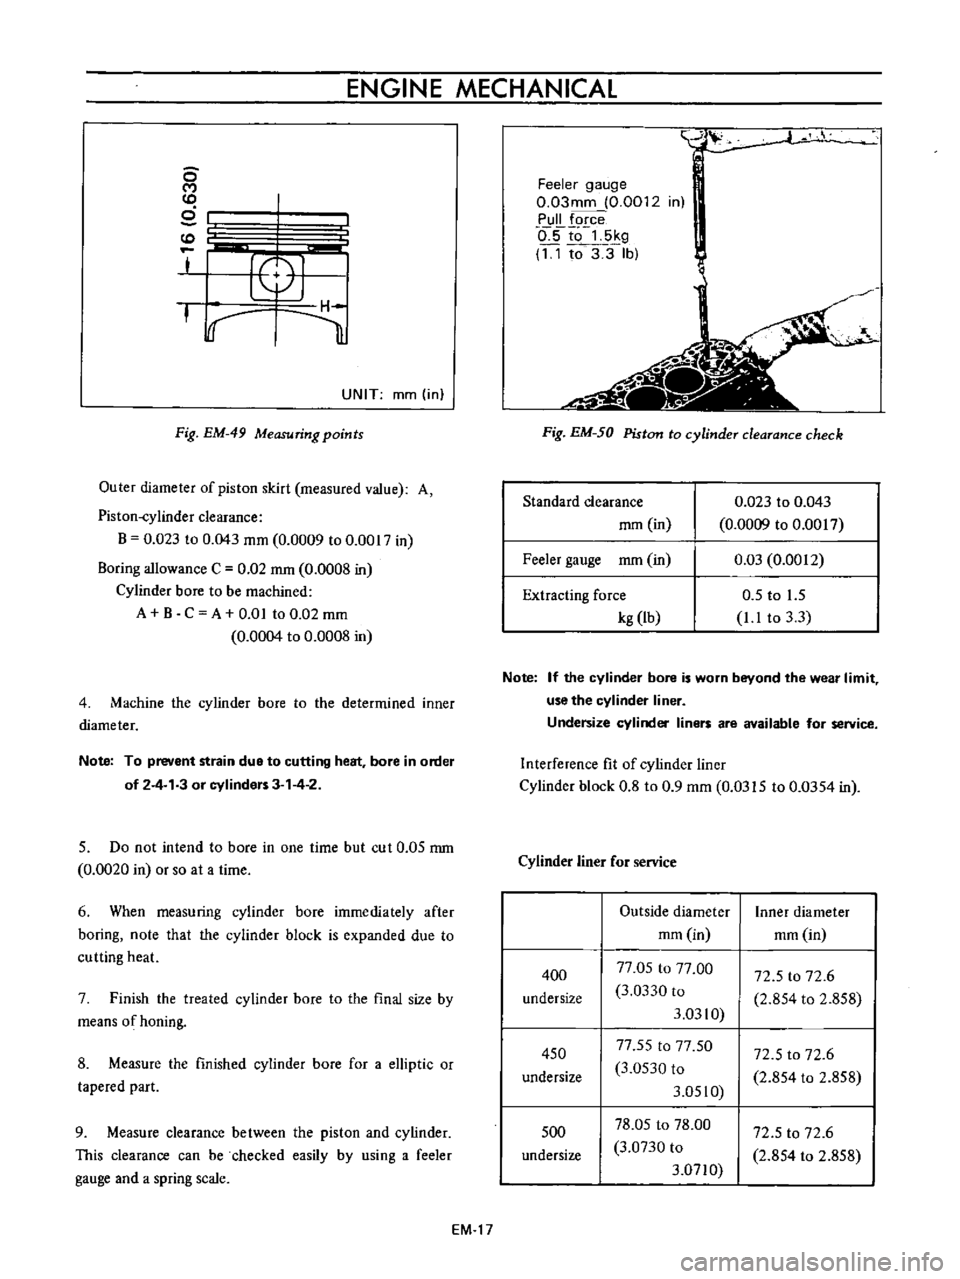
Fig
EM
49
Measuring
points
Outer
diameter
of
piston
skirt
measured
value
A
Piston
eylinder
clearance
B
0
023
to
0
043
mm
0
0009
to
0
0017
in
Boring
allowance
C
0
02
rom
0
0008
in
Cylinder
bore
to
be
machined
A
B
C
A
om
to
0
02
mm
0
0004
to
0
0008
in
4
Machine
the
cylinder
bore
to
the
determined
inner
diameter
Note
To
prevent
strain
due
to
cutting
heat
bore
in
order
of
2
4
3
or
cylinders
3
4
2
5
Do
not
intend
to
bore
in
one
time
but
cut
0
05
rom
0
0020
in
or
so
at
a
time
6
When
measuring
cylinder
bore
immediately
after
boring
note
that
the
cylinder
block
is
expanded
due
to
cutting
heat
7
Finish
the
treated
cylinder
bore
to
the
final
size
by
means
of
honing
8
Measure
the
finished
cylinder
bore
for
a
elliptic
or
tapered
part
9
Measure
clearance
between
the
piston
and
cylinder
This
clearance
can
be
checked
easily
by
using
a
feeler
gauge
and
a
spring
scale
EM
17
Feeler
gauge
0
03mm
0
0012
in
Pull
force
o
5to
5kg
11
to3
3
lb
i
Fig
EM
50
Piston
to
cylinder
clearance
check
Standard
clearance
rom
in
0
023
to
0
043
0
0009
to
0
0017
0
03
0
0012
Feeler
gauge
mm
in
Extracting
force
kg
Ib
0
5
to
1
5
1
1
to
3
3
Note
If
the
cylinder
bore
is
worn
beyond
the
wear
limit
use
the
cylinder
liner
Undersize
cylinder
liners
are
available
for
service
Interference
fit
of
cylinder
liner
Cylinder
block
0
8
to
0
9
mm
0
0315
to
0
0354
in
Cylinder
liner
for
service
400
undersize
Outside
diameter
mm
in
77
05
to
77
00
3
0330
to
3
0310
77
55
to
77
50
3
0530
to
3
0510
78
05
to
78
00
3
0730
to
3
0710
72
5
to
72
6
2
854
to
2
858
Inner
diameter
mm
in
72
5
to
72
6
2
854
to
2
858
450
undersize
72
5
to
72
6
2
854
to
2
858
500
undersize
Page 361 of 513
ENGINE
MECHANICAL
Standard
Maximum
Crankshaft
bend
mm
in
0
05
0
0020
0
015
0
0006
Note
When
measuring
bend
use
a
dial
gauge
Bend
value
is
a
half
of
the
reading
obtained
when
the
crankshaft
is
turned
once
with
the
dial
gauge
applied
to
its
center
journal
3
After
regrinding
the
crankshaft
fmish
it
to
the
necessary
size
indicated
in
the
lists
on
pages
EM
25
by
using
an
adequate
undersize
bearing
according
to
the
extent
of
required
repair
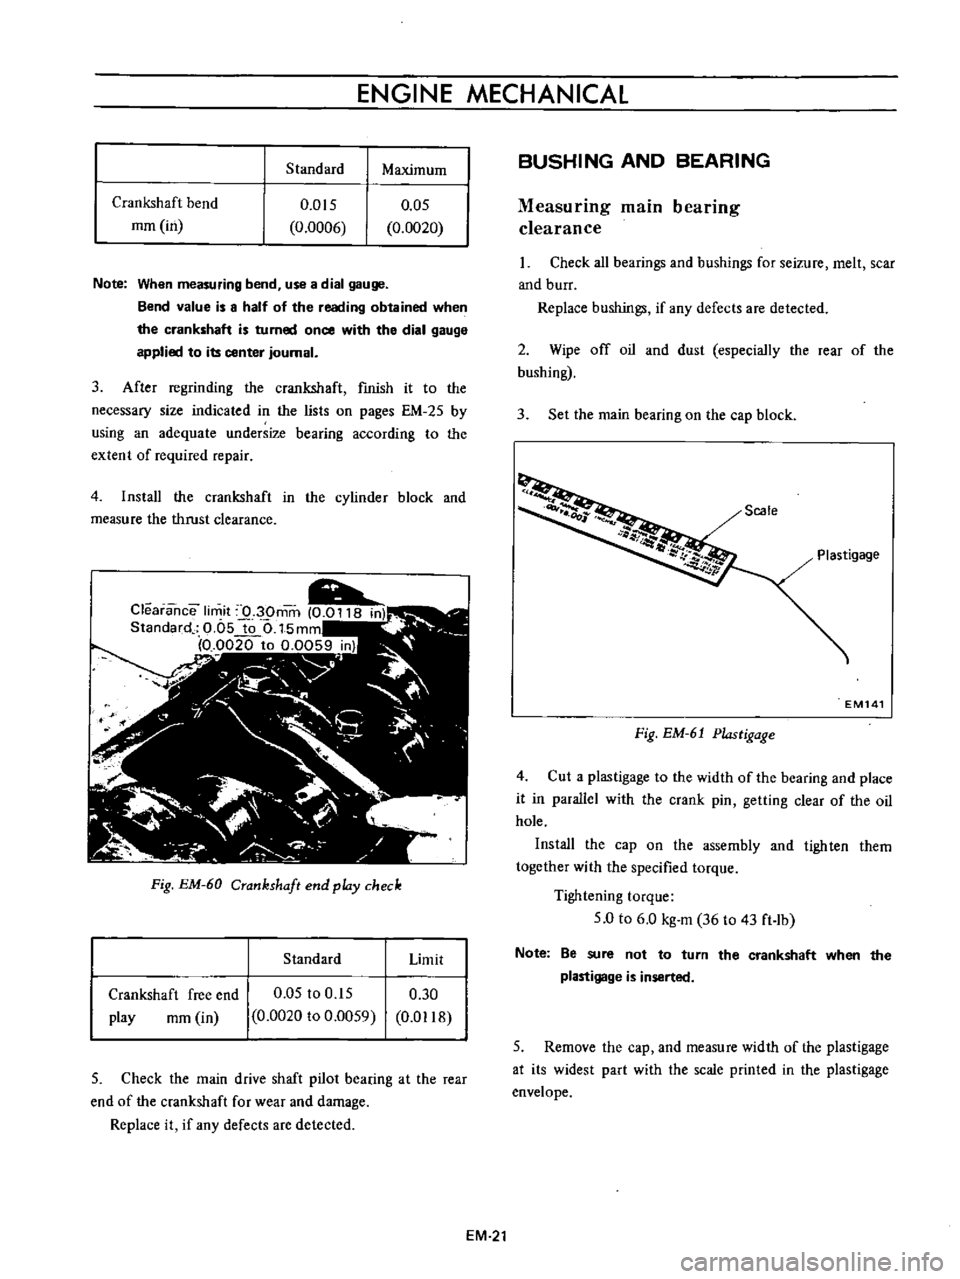
4
Install
the
crankshaft
in
the
cylinder
block
and
measure
the
thrust
clearance
Fig
EM
60
Crankshaft
end
pldy
check
Standard
Limit
Crankshaft
free
end
play
rom
in
0
05
to
0
15
0
0020
to
0
0059
0
30
0
D118
5
Check
the
main
drive
shaft
pilot
bearing
at
the
rear
end
of
the
crankshaft
for
wear
and
damage
Replace
it
if
any
defects
are
detected
BUSHING
AND
BEARING
Measuring
main
bearing
clearance
Check
all
bearings
and
bushings
for
seizure
melt
scar
and
burr
Replace
bushings
if
any
defects
are
detected
2
Wipe
off
oil
and
dust
especially
the
rear
of
the
bushing
3
Set
the
main
bearing
on
the
cap
block
Scale
Plastigage
EM141
Fig
EM
61
Plastigage
4
Cut
a
plastigage
to
the
width
of
the
bearing
and
place
it
in
parallel
with
the
crank
pin
getting
clear
of
the
oil
hole
Install
the
cap
on
the
assembly
and
tighten
them
together
with
the
specified
torque
Tightening
torque
5
0
to
6
0
kg
m
36
to
43
ft
lb
Note
Be
sure
not
to
turn
the
crankshaft
when
the
plastigage
is
inserted
5
Remove
the
cap
and
measure
width
of
the
plastigage
at
its
widest
part
with
the
scale
printed
in
the
plastigage
envelope
EM
21