torque DATSUN B110 1973 Service Repair Manual
[x] Cancel search | Manufacturer: DATSUN, Model Year: 1973, Model line: B110, Model: DATSUN B110 1973Pages: 513, PDF Size: 28.74 MB
Page 430 of 513
ENGINE
Characteristic
curve
i
8
s
l00
0
OJ
m
v
1
2
1
0
tc
0
8
E
u
6
E
o
4
0
2
L
c
0
00
J
300
Current
IAI
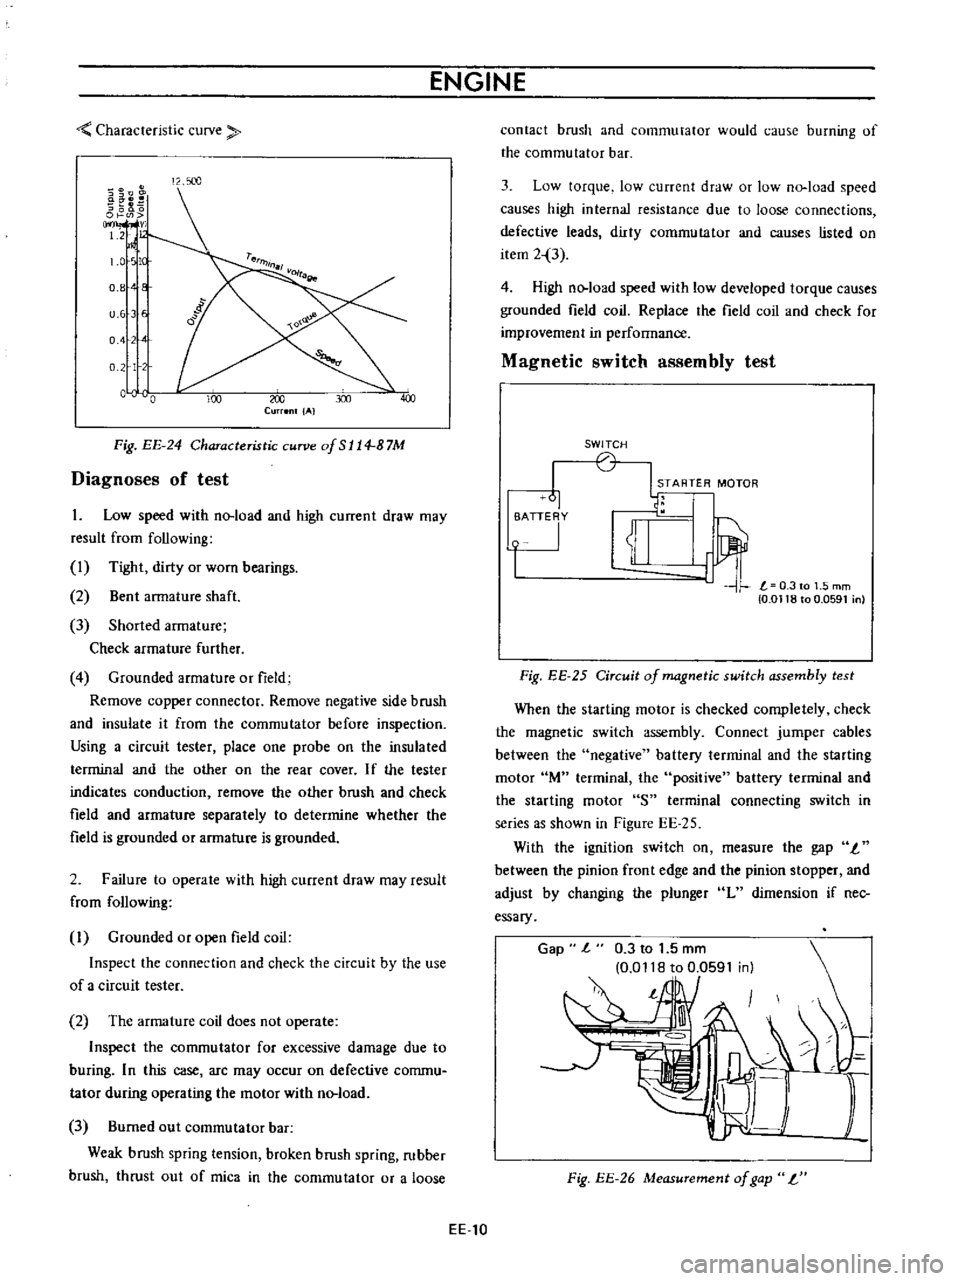
Fig
EE
24
Characteristic
curve
of
S
114
B
7M
Diagnoses
of
test
1
Low
speed
with
no
load
and
high
current
draw
may
result
from
following
1
Tight
dirty
or
worn
bearings
2
Bent
armature
shaft
3
Shorted
armature
Check
armature
further
4
Grounded
armature
or
field
Remove
copper
connector
Remove
negative
side
brush
and
insulate
it
from
the
commutator
before
inspection
Using
a
circuit
tester
place
one
probe
on
the
insulated
terminal
and
the
other
on
the
rear
cover
If
the
tester
indicates
conduction
remove
the
other
brush
and
check
field
and
armature
separately
to
determine
whether
the
field
is
grounded
or
armature
is
grounded
2
Failure
to
operate
with
high
current
draw
may
result
from
following
I
Grounded
or
open
field
coil
Inspect
the
connection
and
check
the
circuit
by
the
use
of
a
circuit
tester
2
The
armature
coil
does
not
operate
Inspect
the
commutator
for
excessive
damage
due
to
buring
In
this
case
arc
may
occur
on
defective
commu
tator
during
operating
the
motor
with
no
load
3
Burned
out
commutator
bar
Weak
brush
spring
tension
broken
brush
spring
rubber
brush
thrust
out
of
mica
in
the
commutator
or
a
loose
EE
10
contact
brush
and
commutator
would
cause
burning
of
the
commutator
bar
3
Low
torque
low
current
draw
or
low
no
load
speed
causes
high
internal
resistance
due
to
loose
connections
defective
leads
dirty
commutator
and
causes
listed
on
item
2
3
4
High
no
load
speed
with
low
developed
torque
causes
grounded
field
coil
Replace
the
field
coil
and
check
for
improvement
in
performance
Magnetic
switch
assembly
test
SWITCH
STARTER
MOTOR
61
1u
i
T
0
0118
to
0
0591
n
Fig
EE
25
Circuit
of
magnetic
switch
assembly
test
When
the
starting
motor
is
checked
completely
check
the
magnetic
switch
assembly
Connect
jumper
cables
between
the
negative
battery
terminal
and
the
starting
motor
lM
terminal
the
positive
battery
terminal
and
the
starting
motor
S
terminal
connecting
switch
in
series
as
shown
in
Figure
EE
25
With
the
ignition
switch
on
measure
the
gap
I
between
the
pinion
front
edge
and
the
pinion
stopper
and
adjust
by
changing
the
plunger
L
dimension
if
nec
essary
Gap
l
0
3
to
1
5
mm
0
0118
to
0
0591
in
l
Fig
EE
26
Measurement
of
gap
L
Page 431 of 513
ENGINE
ElECTRICAL
SYSTEM
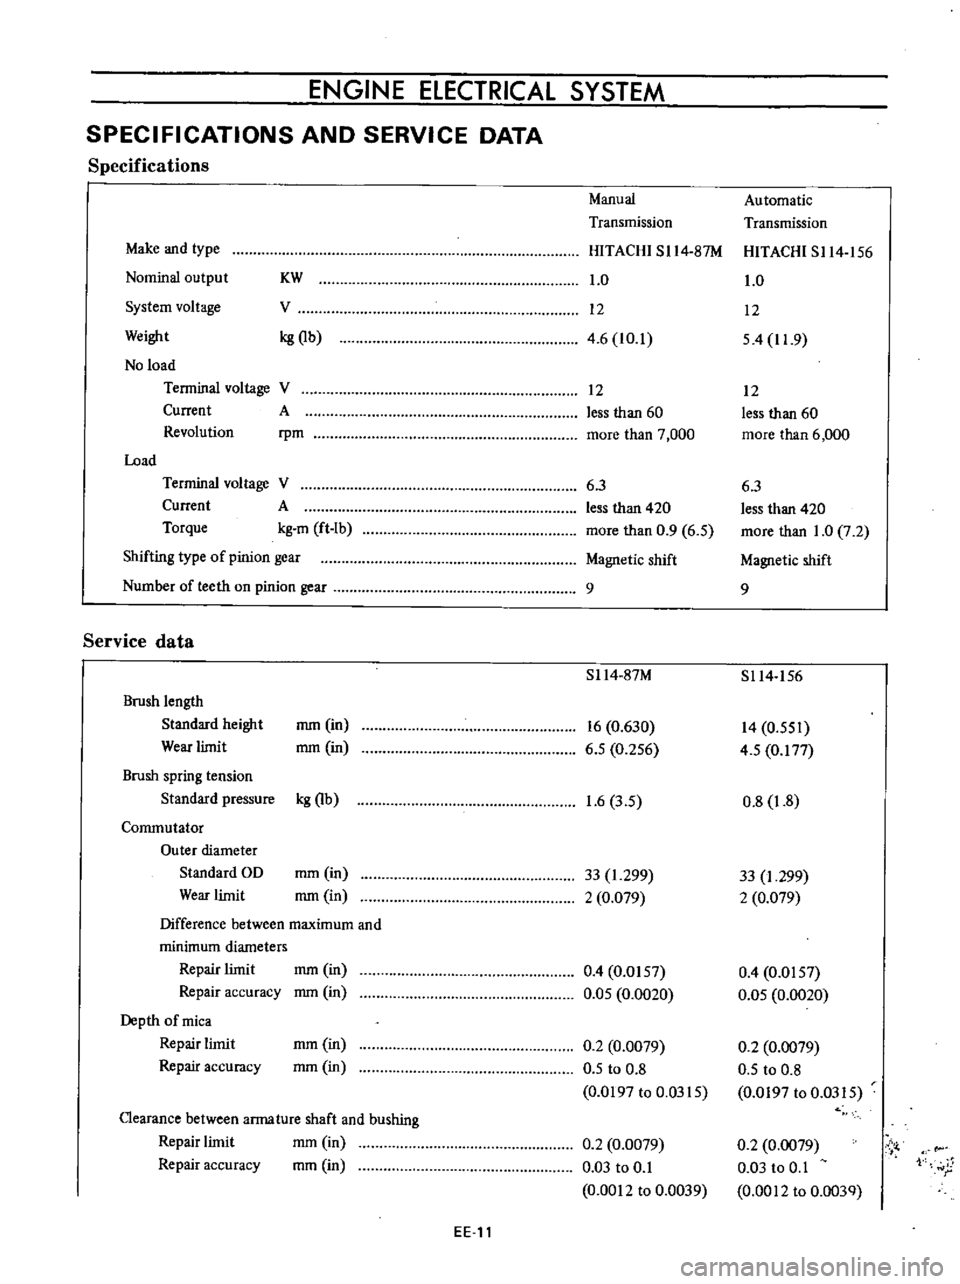
SPECIFICATIONS
AND
SERVICE
DATA
Specifications
Manual
Automatic
Transmission
Transmission
Make
and
type
HITACHI
SI14
87M
HITACHI
S114
156
Nominal
output
KW
1
0
1
0
System
voltage
V
12
12
Weight
kg
Qb
4
6
10
1
54
11
9
No
load
Terminal
voltage
V
12
12
Current
A
less
than
60
less
than
60
Revolution
rpm
more
than
7
000
more
than
6
000
Load
Terminal
voltage
V
6
3
6
3
Current
A
less
than
420
less
than
420
Torque
kg
m
ft
Ib
more
than
0
9
6
5
more
than
1
0
7
2
Shifting
type
of
pinion
gear
Magnetic
shift
Magnetic
shift
Number
of
teeth
on
pinion
gear
9
9
Service
data
S114
87M
S114
156
Brush
length
Standard
height
mm
in
16
0
630
14
0
551
Wear
limit
mm
in
6
5
0
256
4
5
0
177
Brush
spring
tension
Standard
pressure
kg
Qb
1
6
3
5
0
8
1
8
Commutator
Outer
diameter
Standard
OD
mm
in
33
1
299
33
I
299
Wear
limit
mm
in
2
0
079
2
0
079
Difference
between
maximum
and
minimum
diameters
Repair
limit
mm
in
0
4
0
0157
0
4
0
0157
Repair
accuracy
mm
in
0
05
0
0020
0
05
0
0020
Depth
of
mica
Repair
limit
mm
in
0
2
0
0079
0
2
0
0079
Repair
accuracy
mm
in
0
5
to
0
8
0
5
to
0
8
0
0197
to
0
0315
0
0197
to
0
0315
Clearance
between
arma
ture
shaft
and
bushing
mm
in
Repair
limit
0
2
0
0079
0
2
0
0079
Vi
Repair
accuracy
mm
in
0
03
to
0
1
0
03
to
0
1
1
r
0
0012
to
0
0039
0
0012
to
0
003Q
EE
11
Page 441 of 513
ENGINE
ElECTRICAL
SYSTEM
EE127
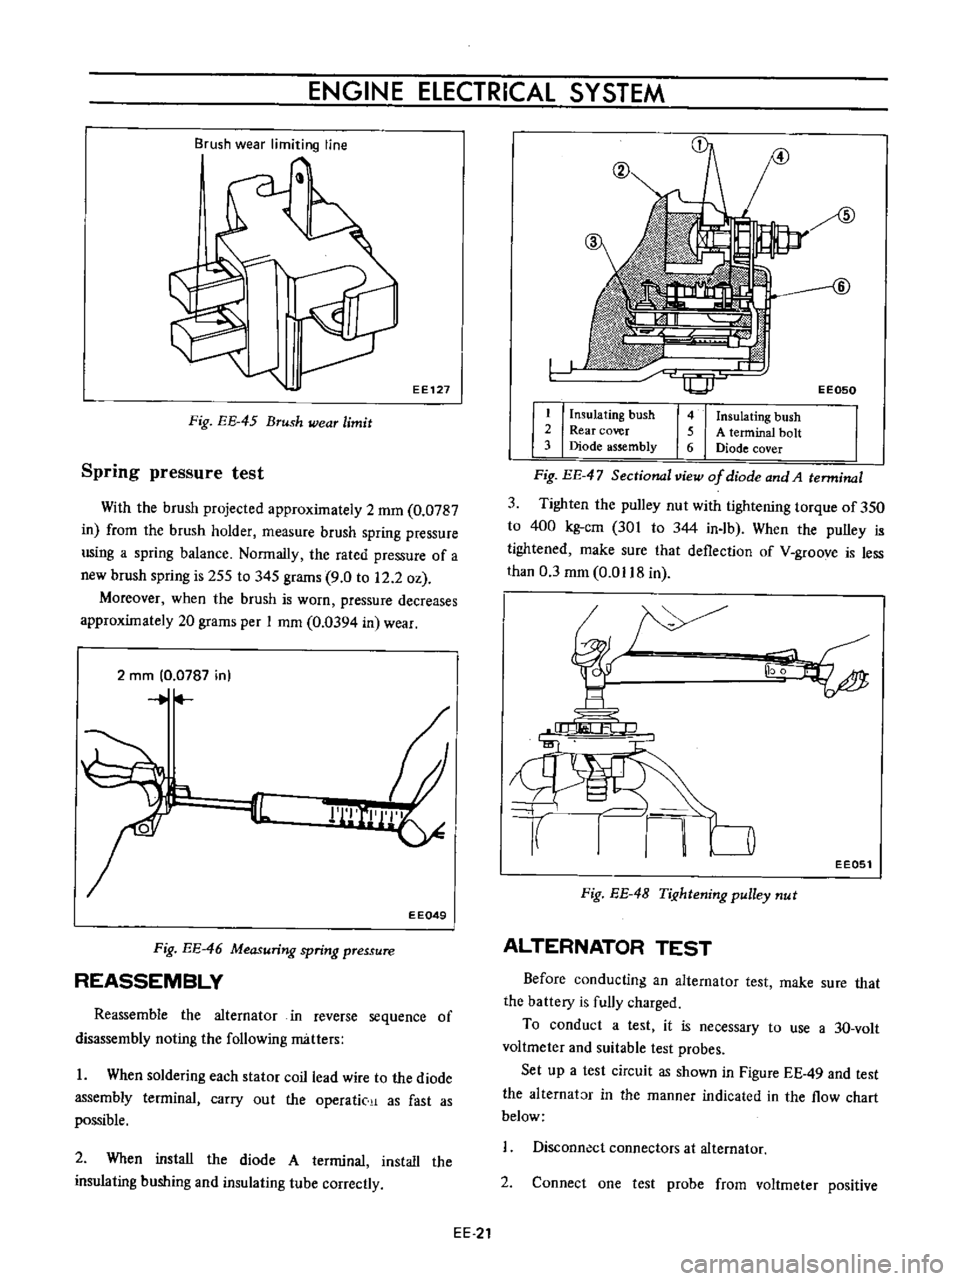
Fig
EE
45
Brush
wear
limit
Spring
pressure
test
With
the
brush
projected
approximately
2
mm
0
0787
in
from
the
brush
holder
measure
brush
spring
pressure
using
a
spring
balance
Normally
the
rated
pressure
of
a
new
brush
spring
is
255
to
345
grams
9
0
to
12
2
oz
Moreover
when
the
brush
is
worn
pressure
decreases
approximately
20
grams
per
I
mm
0
0394
in
wear
2
rnm
0
0787
in
r
II
EEQ49
Fig
EE
46
Measuring
spring
pressure
REASSEMBLY
Reassemble
the
alternator
in
reverse
sequence
of
disassembly
noting
the
following
matters
I
When
soldering
each
stator
coil
lead
wire
to
the
diode
assembly
terminal
carry
out
the
operatic
as
fast
as
possible
2
When
install
the
diode
A
terminal
install
the
insulating
bushing
and
insulating
tube
correctly
EE
21
EE050
I
Insulating
bush
2
Rear
cover
3
Diode
assembly
4
Insulating
bush
5
A
terminal
bolt
6
Diode
cover
Fig
EE
47
Sectional
view
of
diode
and
A
terminal
3
Tighten
the
pulley
nut
with
tightening
torque
of
350
to
400
kg
cm
301
to
344
in
Ib
When
the
pulley
is
tightened
make
sure
that
deflection
of
V
groove
is
less
than
0
3
mm
0
0118
in
EE051
Fig
EE
4B
TiJ
htening
pulley
nut
ALTERNATOR
TEST
Before
conducting
an
alternator
test
make
sure
that
the
battery
is
fully
charged
To
conduct
a
test
it
is
necessary
to
use
a
3D
volt
voltmeter
and
suitable
test
probes
Set
up
a
test
circuit
as
shown
in
Figure
EE
49
and
test
the
alternator
in
the
manner
indicated
in
the
flow
chart
below
Disconn
ct
connectors
at
alternator
2
Connect
one
test
probe
from
voltmeter
positive
Page 458 of 513
ENGINE
Overheating
Normal
Carbon
fould
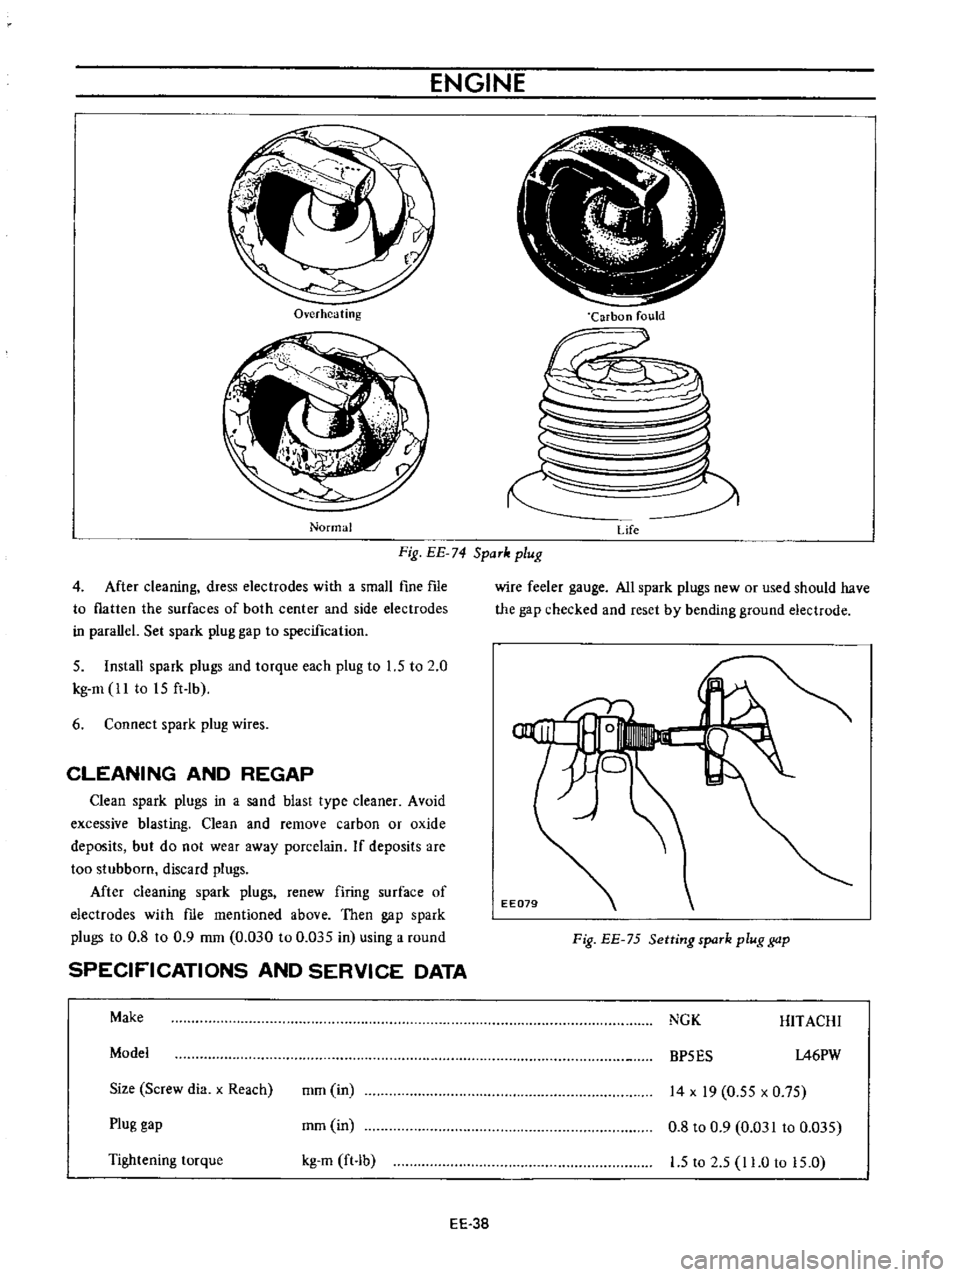
Fig
EE
74
SpaTk
plug
Life
4
After
cleaning
dress
electrodes
with
a
small
fine
fIle
to
flatten
the
surfaces
of
both
center
and
side
electrodes
in
parallel
Set
spark
plug
gap
to
specification
5
Install
spark
plugs
and
torque
each
plug
to
1
5
to
2
0
kg
m
ll
to
15
ft
lb
6
Connect
spark
plug
wires
CLEANING
AND
REGAP
Clean
spark
plugs
in
a
sand
blast
type
cleaner
Avoid
excessive
blasting
Clean
and
remove
carbon
or
oxide
deposits
but
do
not
wear
away
porcelain
If
deposits
are
too
stubborn
discard
plugs
Mter
cleaning
spark
plugs
renew
firing
surface
of
electrodes
with
me
mentioned
above
Then
gap
spark
plugs
to
0
8
to
0
9
mm
0
030
to
0
035
in
using
a
round
SPECIFICATIONS
AND
SERVICE
DATA
Make
Model
Size
Screw
dia
x
Reach
mm
in
Plug
gap
mm
in
Tightening
torque
kg
m
ft
b
EE
38
wire
feeler
gauge
All
spark
plugs
new
or
used
should
have
the
gap
checked
and
reset
by
bending
ground
electrode
Fig
EE
75
Setting
spaTk
plug
gap
NGK
HITACHI
BP5ES
1A6PW
14
x
19
0
55
x
0
75
0
8
to
0
9
0
031
to
0
035
1
5
to
2
5
11
0
to
15
0
Page 465 of 513
CHASSIS
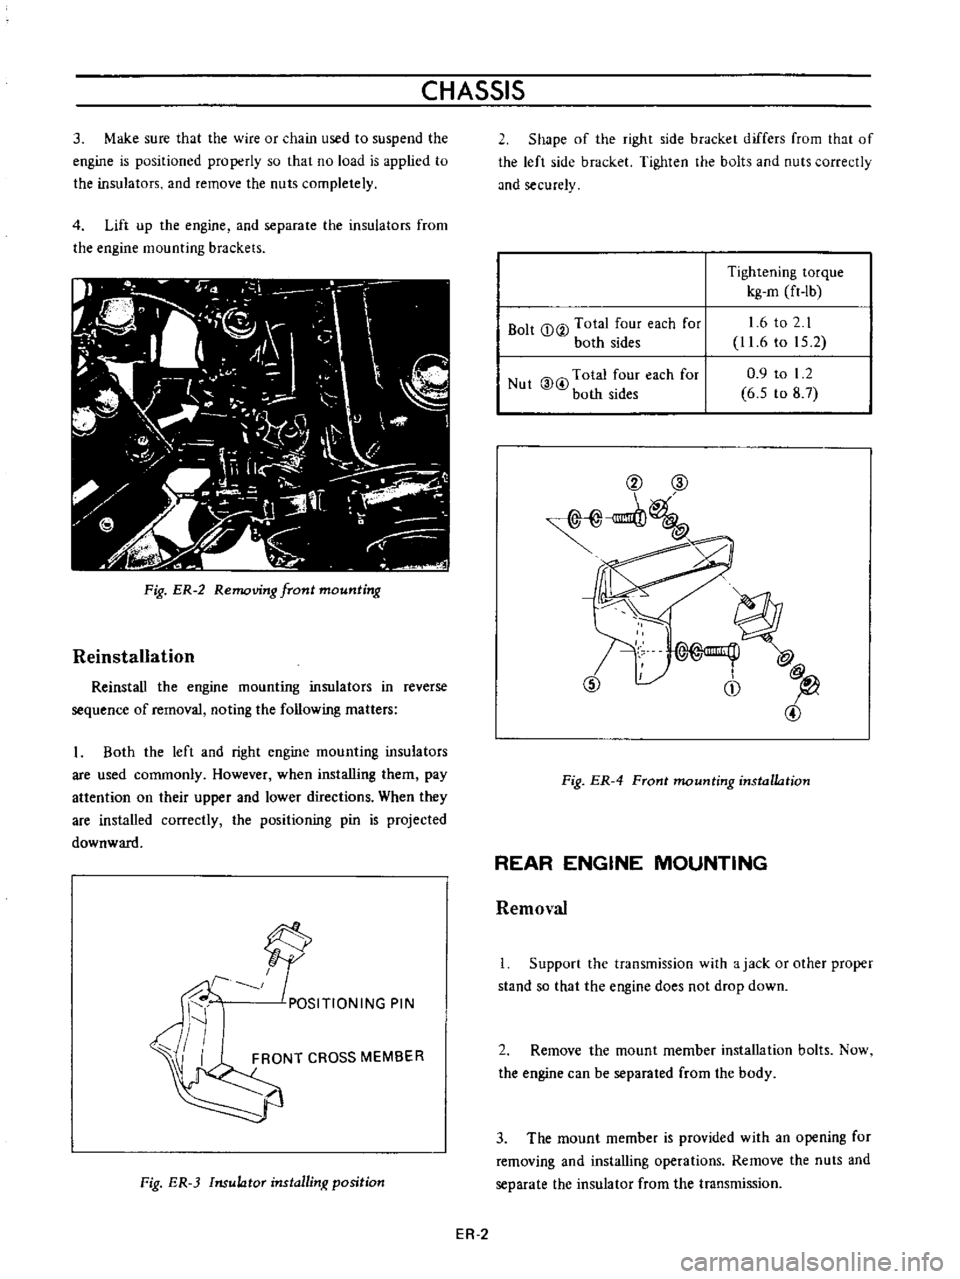
3
Make
sure
that
the
wire
or
chain
used
to
suspend
the
engine
is
positioned
properly
so
that
no
load
is
applied
to
the
insulators
and
remove
the
nuts
completely
4
Lift
up
the
engine
and
separate
the
insulators
from
the
engine
mounting
brackets
l
J
o
II
f
T
io
I
t
i
1
A
t
t
I
21
u
I
1
Qj
1
It
I
j
fi
I
I
lt
y
Ii
Fig
ER
2
Removing
front
mounting
Reinstallation
Reinstall
the
engine
mounting
insulators
in
reverse
sequence
of
removal
noting
the
following
matters
Both
the
left
and
right
engine
mounting
insulators
are
used
commonly
However
when
installing
them
pay
attention
on
their
upper
and
lower
directions
When
they
are
installed
correctly
the
positioning
pin
is
projected
downward
f
9
POSITIONING
PIN
I
FRONT
CROSS
MEMBER
Fig
ER
3
Insulator
installinx
position
2
Shape
of
the
right
side
bracket
differs
from
that
of
the
left
side
bracket
Tighten
the
bolts
and
nuts
correctly
md
securely
Bolt
CD
V
Total
four
each
for
both
sides
Tightening
torque
kg
m
ft
Ib
1
6
to
2
1
11
6
to
15
2
0
9
to
I
2
6
5
to
8
7
Nut
@
i
Total
four
each
for
both
sides
@
CID
1
@
CD
l
Fig
ER
4
Front
mounting
installation
REAR
ENGINE
MOUNTING
Removal
Support
the
transmission
with
ajack
or
other
proper
stand
so
that
the
engine
does
not
drop
down
2
Remove
the
mount
member
installation
bolts
Now
the
engine
can
be
separated
from
the
body
3
The
mount
member
is
provided
with
an
opening
for
removing
and
installing
operations
Remove
the
nuts
and
separate
the
insulator
from
the
transmission
ER
2
Page 466 of 513
ENGINE
REMOVAL
INSTAllATION
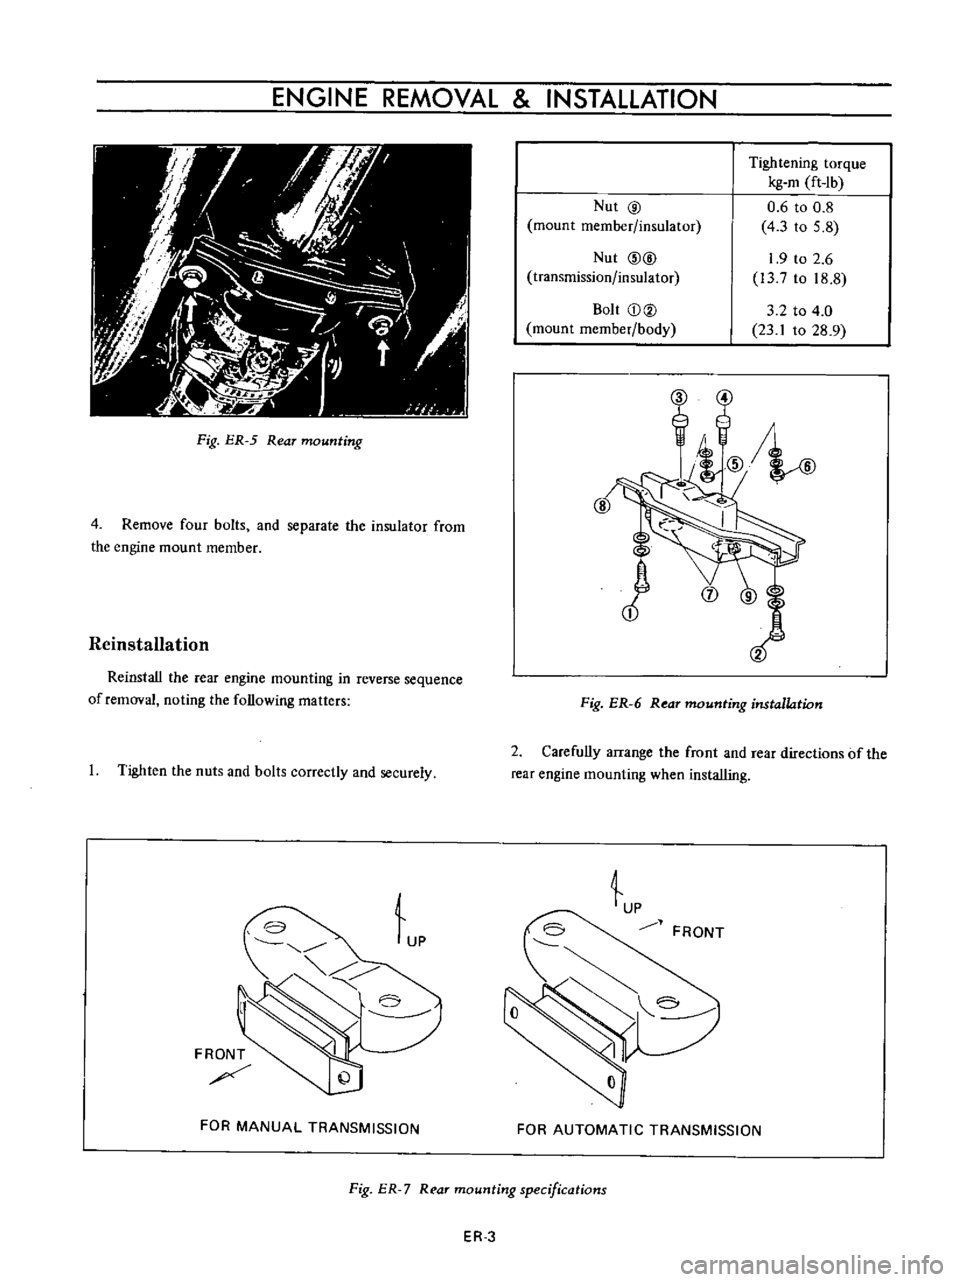
Fig
ER
5
Rear
mounting
4
Remove
four
bolts
and
separate
the
insulator
from
the
engine
mount
member
Reinstallation
Reinstall
the
rear
engine
mounting
in
reverse
sequence
of
removal
noting
the
following
matters
I
Tighten
the
nuts
and
bolts
correctly
and
securely
Lp
FRONT
FOR
MANUAL
TRANSMISSION
Nut
@
mount
member
insulator
Nut
@@
transmission
insulator
Bolt
CD@
mount
member
body
Tightening
torque
kg
m
ft
Ib
0
6
to
0
8
4
3
to
5
8
1
9
to
2
6
l3
to
18
8
3
2
to
4
0
23
1
to
28
9
Fig
ER
6
Rear
mounting
installation
2
Carefully
arrange
the
front
and
rear
directions
of
the
rear
engine
mounting
when
installing
tp
FRONT
FOR
AUTOMATIC
TRANSMISSION
Fig
ER
7
R
ar
mounting
specifications
ER
3
Page 483 of 513
CLUTCH
Operating
cylinder
clutch
Operating
cylinder
diameter
T
Ilhtening
torque
19
05
mm
0
750
in
Clutch
assembly
securing
bolt
1
5
to
2
2
kg
m
10
8
to
15
9
ft
Ib
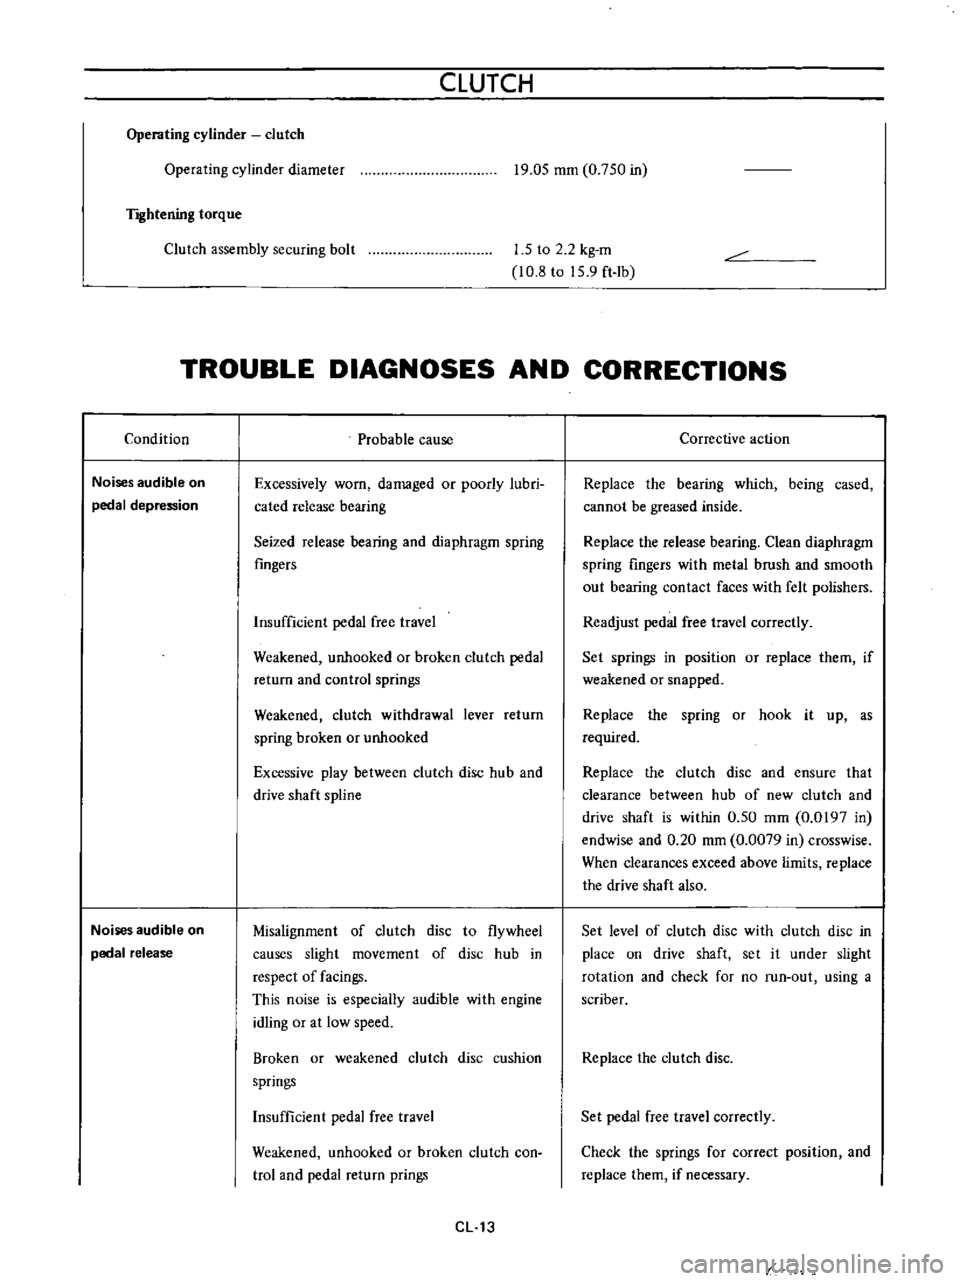
TROUBLE
DIAGNOSES
AND
CORRECTIONS
Condition
Noises
audible
on
pedal
depression
Noises
audible
on
pedal
release
Probable
cause
Excessively
worn
damaged
or
poorly
lubri
cated
release
bearing
Seized
release
bearing
and
diaphragm
spring
fingers
Insufficient
pedal
free
travel
Weakened
unhooked
or
broken
clutch
pedal
return
and
control
springs
Weakened
clutch
withdrawal
lever
return
spring
broken
or
unhooked
Excessive
play
between
clutch
disc
hub
and
drive
shaft
spline
Misalignment
of
clutch
disc
to
flywheel
causes
slight
movement
of
disc
hub
in
respect
of
facings
This
noise
is
especially
audible
with
engine
idling
or
at
low
speed
Broken
or
weakened
clutch
disc
cushion
springs
Insufficient
pedal
free
travel
Weakened
unhooked
or
broken
clutch
con
trol
and
pedal
return
prings
CL
13
Corrective
action
Replace
the
bearing
which
being
cased
cannot
be
greased
inside
Replace
the
release
bearing
Clean
diaphragm
spring
fingers
with
metal
brush
and
smooth
out
bearing
contact
faces
with
felt
polishers
Readjust
pedal
free
travel
correctly
Set
springs
in
position
or
replace
them
if
weakened
or
snapped
Replace
the
spring
or
hook
it
up
as
required
Replace
the
clutch
disc
and
ensure
that
clearance
between
hub
of
new
clutch
and
drive
shaft
is
within
0
50
mm
0
0197
in
endwise
and
0
20
mm
0
0079
in
crosswise
When
clearances
exceed
above
limits
replace
the
drive
shaft
also
Set
level
of
clutch
disc
with
clutch
disc
in
place
on
drive
shaft
set
it
under
slight
rotation
and
check
for
no
run
out
using
a
scriber
Replace
the
clutch
disc
Set
pedal
free
travel
correctly
Check
the
springs
for
correct
position
and
replace
them
if
necessary
Page 507 of 513
CHASSIS
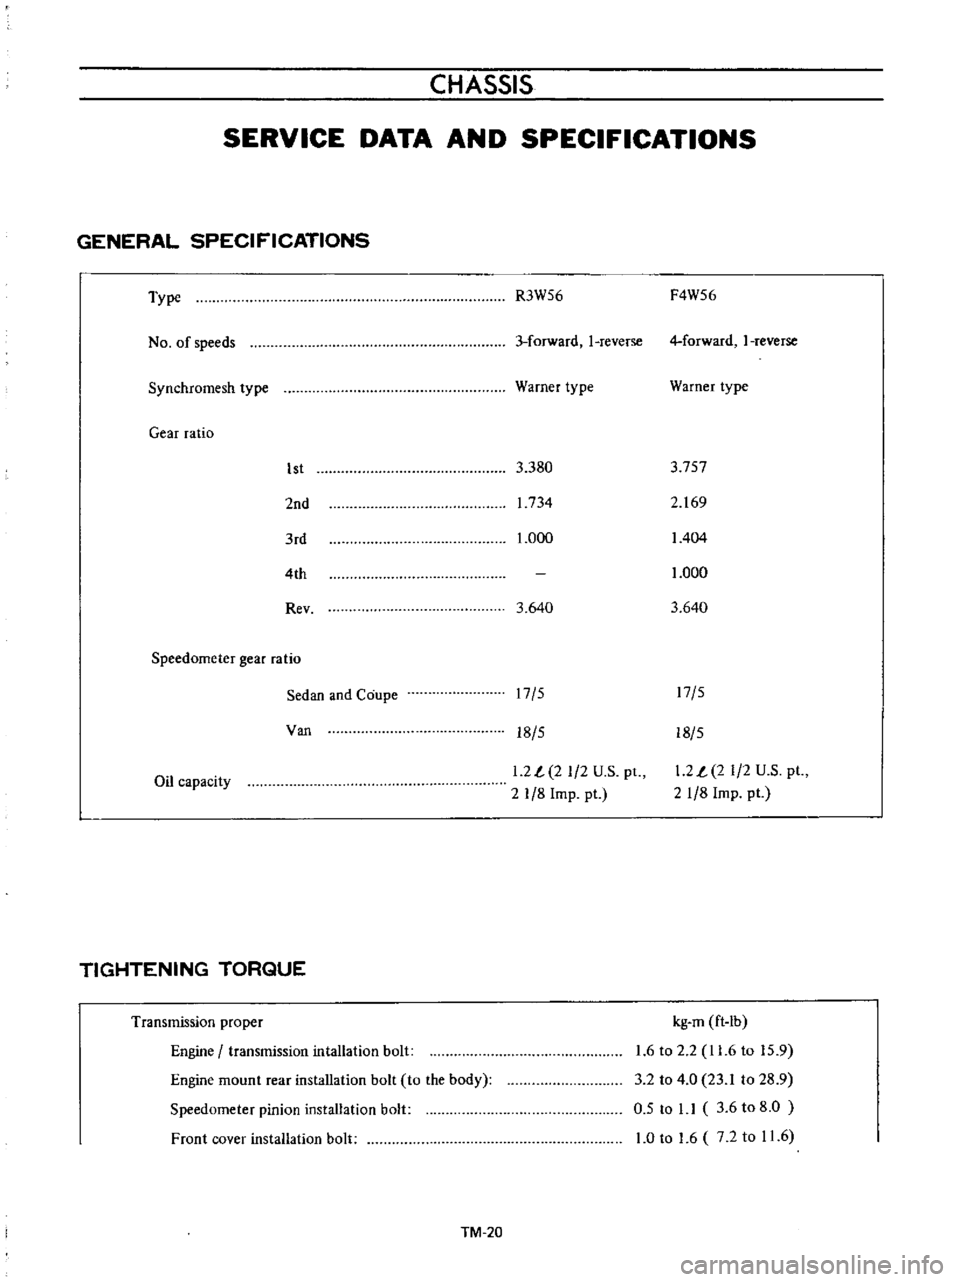
SERVICE
DATA
AND
SPECIFICATIONS
GENERAL
SPECIFICATIONS
Type
No
of
speeds
Synchromesh
type
Gear
ratio
1st
2nd
3rd
4th
Rev
Speedometer
gear
ratio
Sedan
and
Coupe
Van
Oil
capacity
TIGHTENING
TORQUE
Transmission
proper
Engine
transmission
intallation
bolt
Engine
mount
rear
installation
bolt
to
the
body
Speedometer
pinion
installation
bolt
Front
cover
installation
bolt
TM
20
R3W56
F4W56
3
forward
I
reverse
4
forward
I
reverse
Warner
type
Warner
type
3
380
3
757
1734
2
169
1
000
1404
1
000
3
640
3
640
17
5
17
5
18
5
18
5
1
2
L
2
1
2
U
S
pt
2
1
8
Imp
pt
1
2
L
2
1
2
U
S
pt
21
8
Imp
pt
kg
m
ft
Ib
1
6
to
2
2
11
6
to
15
9
3
2
to
4
0
23
1
to
28
9
0
5
to
1
1
3
6
to
8
0
1
0
to
1
6
7
2
to
11
6