DATSUN B110 1973 Service Repair Manual
Manufacturer: DATSUN, Model Year: 1973,
Model line: B110,
Model: DATSUN B110 1973
Pages: 513, PDF Size: 28.74 MB
DATSUN B110 1973 Service Repair Manual
B110 1973
DATSUN
DATSUN
https://www.carmanualsonline.info/img/56/56904/w960_56904-0.png
DATSUN B110 1973 Service Repair Manual
Trending: odometer, checking oil, air suspension, oil pressure, tow bar, change wheel, differential
Page 181 of 513
CHASSIS
Description
The
accelerator
linkage
is
lightv
eighL
and
onstfuction
is
such
that
the
linkage
operates
smoothly
and
is
unaffected
bv
engine
vibration
Adjustment
Play
of
accelerator
wire
I
Install
the
pedal
arm
side
securely
with
a
spring
clamp
2
Set
the
dash
board
side
Quter
case
stationarily
with
a
cap
nut
Do
not
set
the
carburetor
side
adjusting
unit
stationarily
3
Pull
up
the
carburetor
side
socket
toward
P
direction
up
to
such
an
extent
that
the
throttle
lever
is
about
to
move
pull
down
the
socket
I
to
1
5
mm
0
0394
to
0
0590
in
frorn
that
position
toward
Q
direction
and
set
the
socket
stationarily
with
a
clamp
THROTTLE
LEVER
Q
I
I
I
Clamp
I
2
I
Sockel
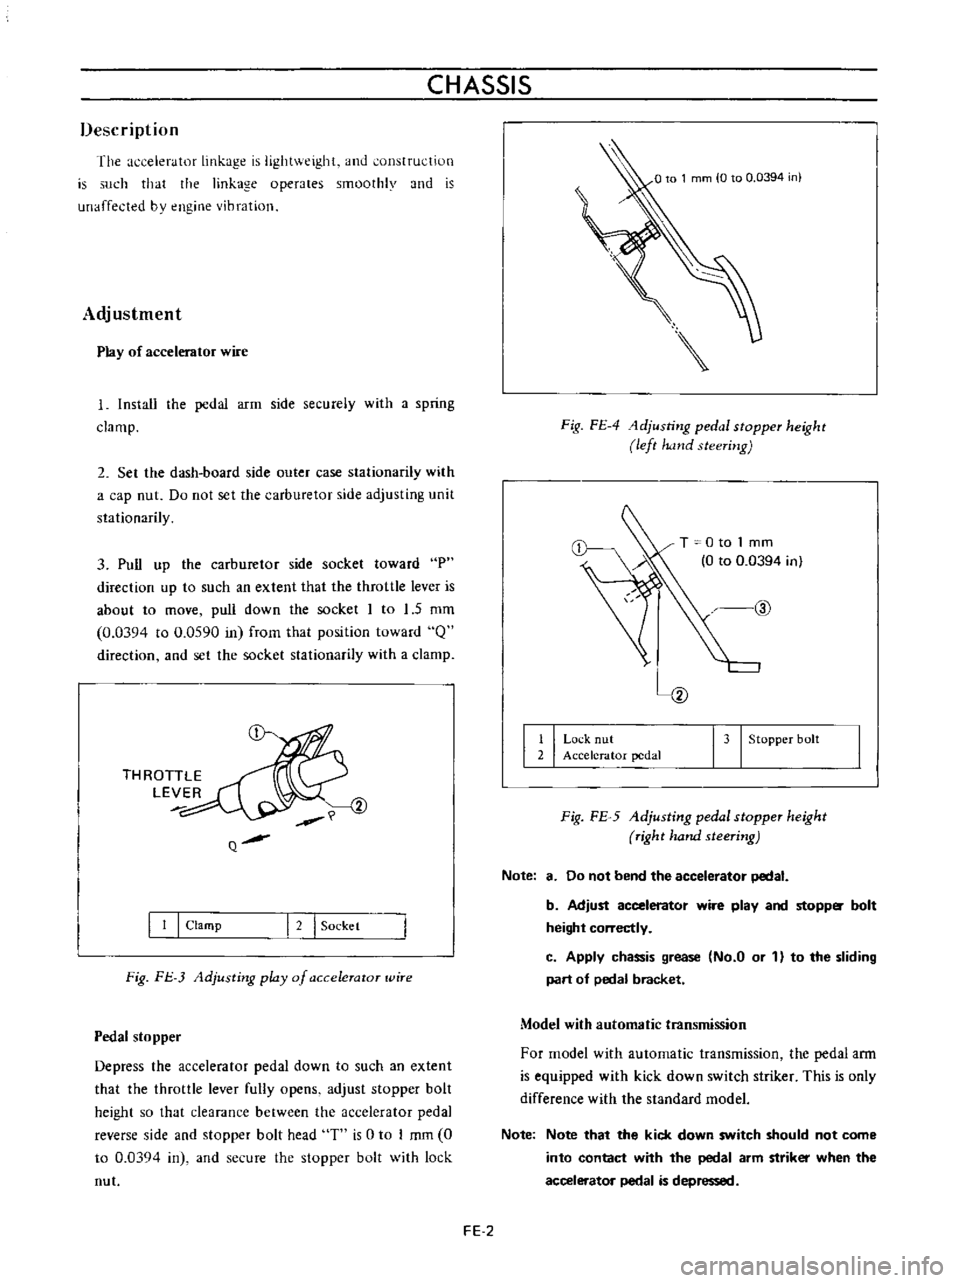
Fig
FJ
3
Adjusting
play
of
a
ccelerator
wire
Pedal
stopper
Depress
the
accelerator
pedal
down
to
such
an
extent
that
the
throttle
lever
fully
opens
adjust
stopper
bolt
height
so
that
clearance
between
the
accelerator
pedal
reverse
side
and
stopper
bolt
head
T
is
0
to
I
mm
0
to
0
03Q4
in
and
secure
the
stopper
bolt
with
lock
nut
Fig
FE
4
1djusting
pedal
stopper
height
left
hand
steering
T
0
to
1
mm
0
to
0
0394
in
@
I
I
Lo
k
nut
2
Accelerator
pedal
I
3
I
Stopper
bolt
Fig
FE
5
Adjusting
pedal
stopper
height
right
hand
steering
Note
8
Do
not
bend
the
accelerator
pedal
b
Adjust
accelerator
wire
play
and
stopp
bolt
height
correctly
c
Apply
chassis
grease
No
a
or
1
to
the
sliding
part
of
pedal
bracket
Model
with
automatic
transmission
For
model
with
automatic
transmission
the
pedal
ann
is
equipped
with
kick
down
switch
striker
This
is
only
difference
with
the
standard
model
Note
Note
that
the
kick
down
switch
should
not
come
into
contact
with
the
pedal
arm
striker
when
the
accelerator
pedal
is
depressed
FE
2
Page 182 of 513
ENGINE
CONTROL
FUEL
EXHAUST
SYSTEM
R
H
drive
L
H
drive
KICK
DOWN
SWITCH
STRIKER
Pedal
free
play
mrn
in
2
0
0787
2
0
0787
Pedal
stroke
mm
in
48
1
890
50
1
969
Pedal
depressing
force
when
fully
open
3
8
8
4
3
3
7
3
kg
lb
Fig
FE
6
FUEL
AND
EXHAUST
PIPING
CONTENTS
EXHAUST
PIPE
AND
MUF
LER
Description
Precautions
for
removal
and
installation
FE
3
FE
4
FUEL
TANK
AND
PIPINGS
Description
Replacement
I
nspection
and
repair
FE
4
FE
4
FE
5
FE
S
FE
4
EXHAUST
PIPE
AND
MUFFLER
i
@
@
@
Fig
FE
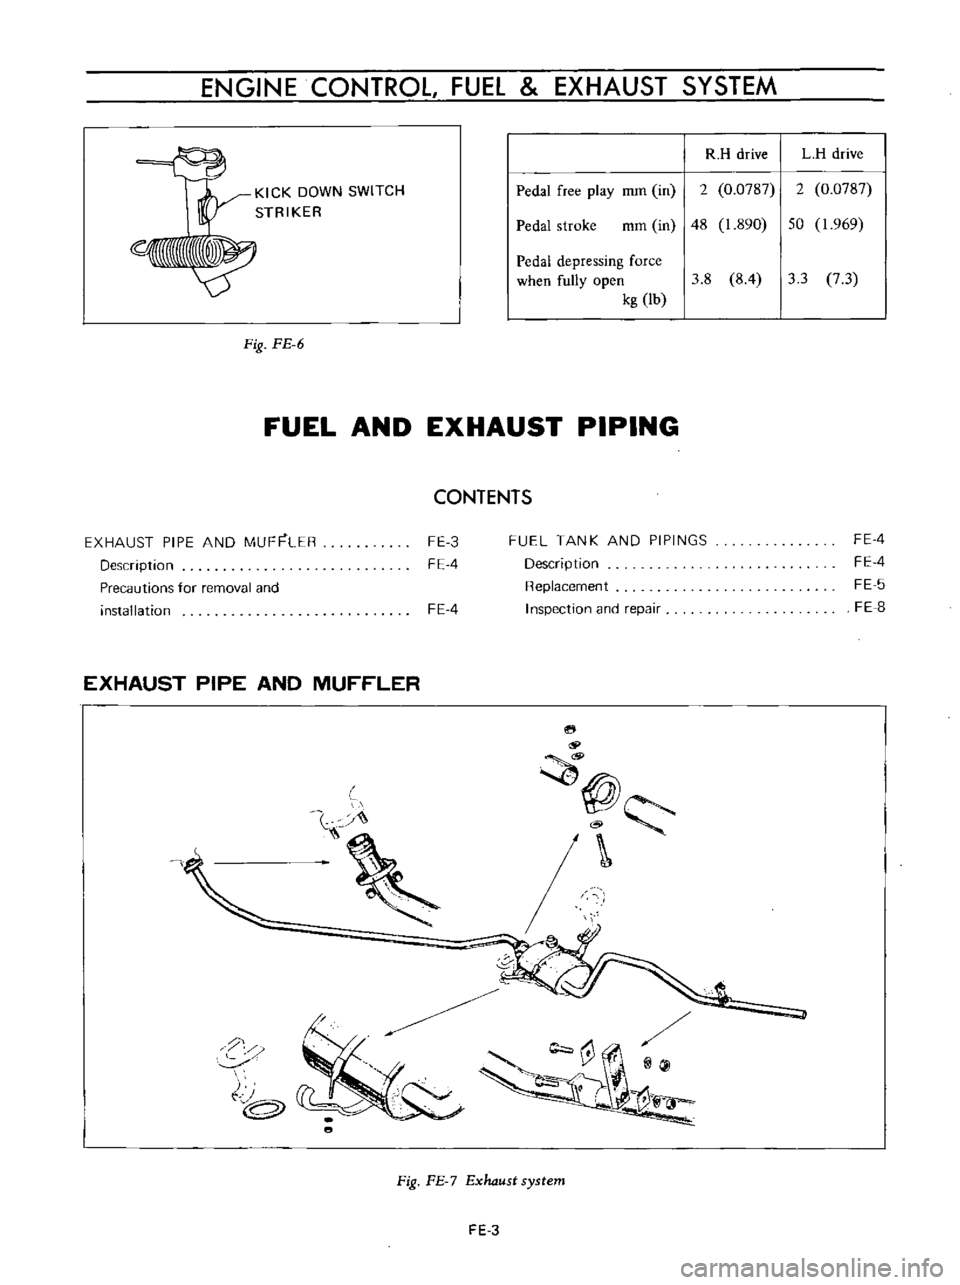
Exhaust
system
FE
3
Page 183 of 513
CHASSIS
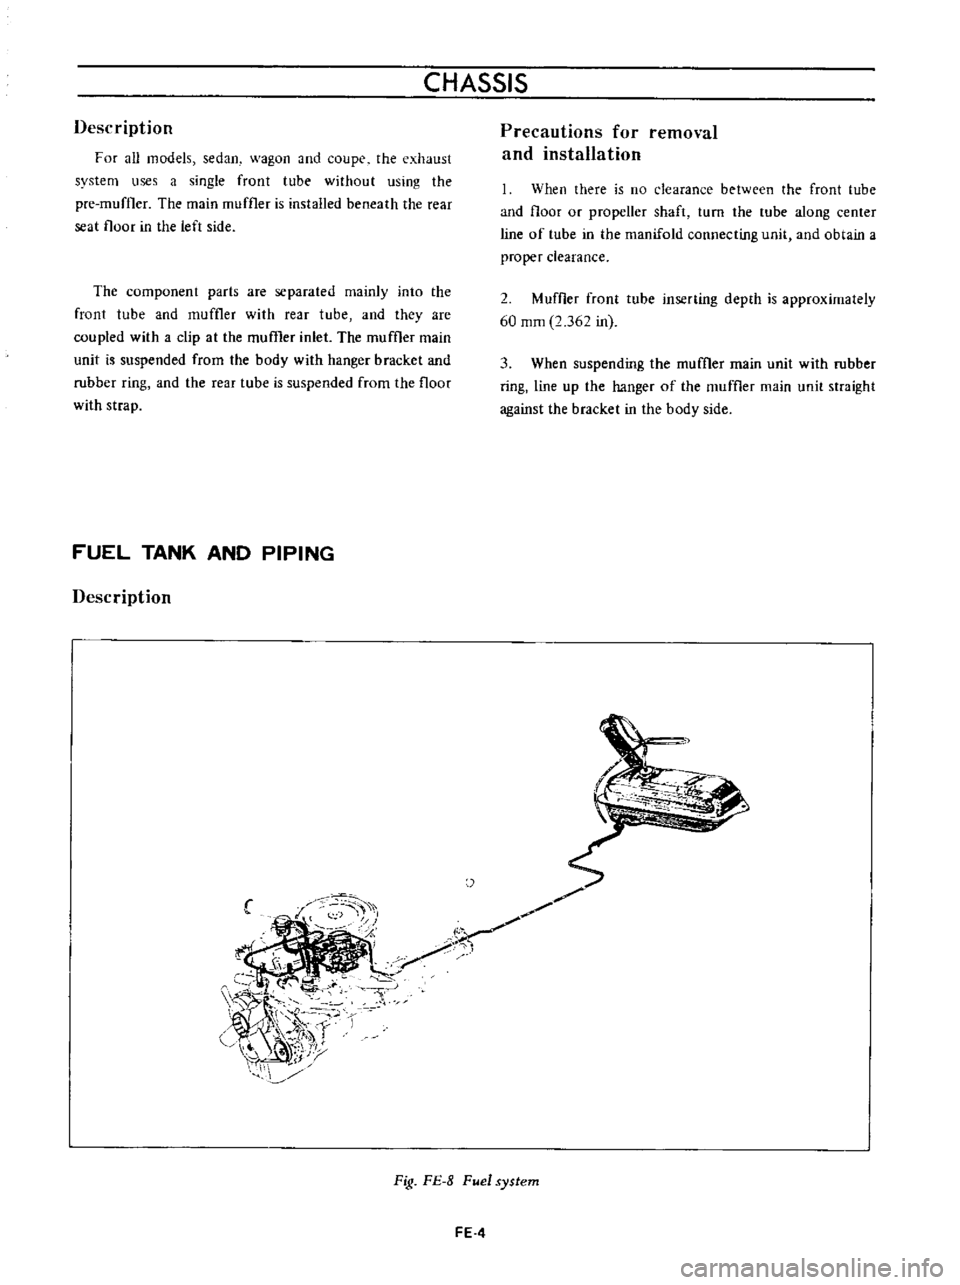
Description
F
Of
aU
models
sedan
wagon
and
coupe
the
exhaust
system
uses
a
single
front
tube
without
using
the
pre
muffler
The
main
muffler
is
installed
beneath
the
rear
seat
floor
in
the
left
side
The
component
parts
are
separated
mainly
into
the
front
tube
and
muffler
with
rear
tube
and
they
are
coupled
with
a
dip
at
the
muffler
inlet
The
rnuffler
main
unit
is
suspended
from
the
body
with
hanger
bracket
and
rubber
ring
and
the
rear
tube
is
suspended
from
the
floor
with
strap
FUEL
TANK
AND
PIPING
Description
Precautions
for
removal
and
installation
When
there
is
no
clearance
between
the
front
tube
and
floor
or
propeller
shaft
turn
the
tube
along
center
line
of
tube
in
the
manifold
connecting
unil
and
obtain
a
proper
clearance
2
Muffler
front
tube
inserting
depth
is
approximately
60
mm
2
362
in
3
When
suspending
the
muffler
rnain
unit
with
rubber
ring
line
up
the
hanger
of
the
muffler
main
unit
straight
against
the
bracket
in
the
body
side
OJ
f
r
ii
7
0
i
i
c
5t
r
t5j
n
jJ
I
L
Fig
FE
8
Fuel
system
FE
4
Page 184 of 513
ENGINE
CONTROL
FUEL
EXHAUST
SYSTEM
For
all
models
fuel
tank
capacity
has
been
increased
in
response
to
the
increased
engine
output
Location
and
mounting
strength
are
improved
for
improvement
of
safety
Sedan
40
l
101
2
US
gal
8
3
4
Imp
gal
Van
38
l
10
US
gal
8
3
8
Imp
gal
Coupe
38
l
10
US
gal
8
3
8
Imp
gal
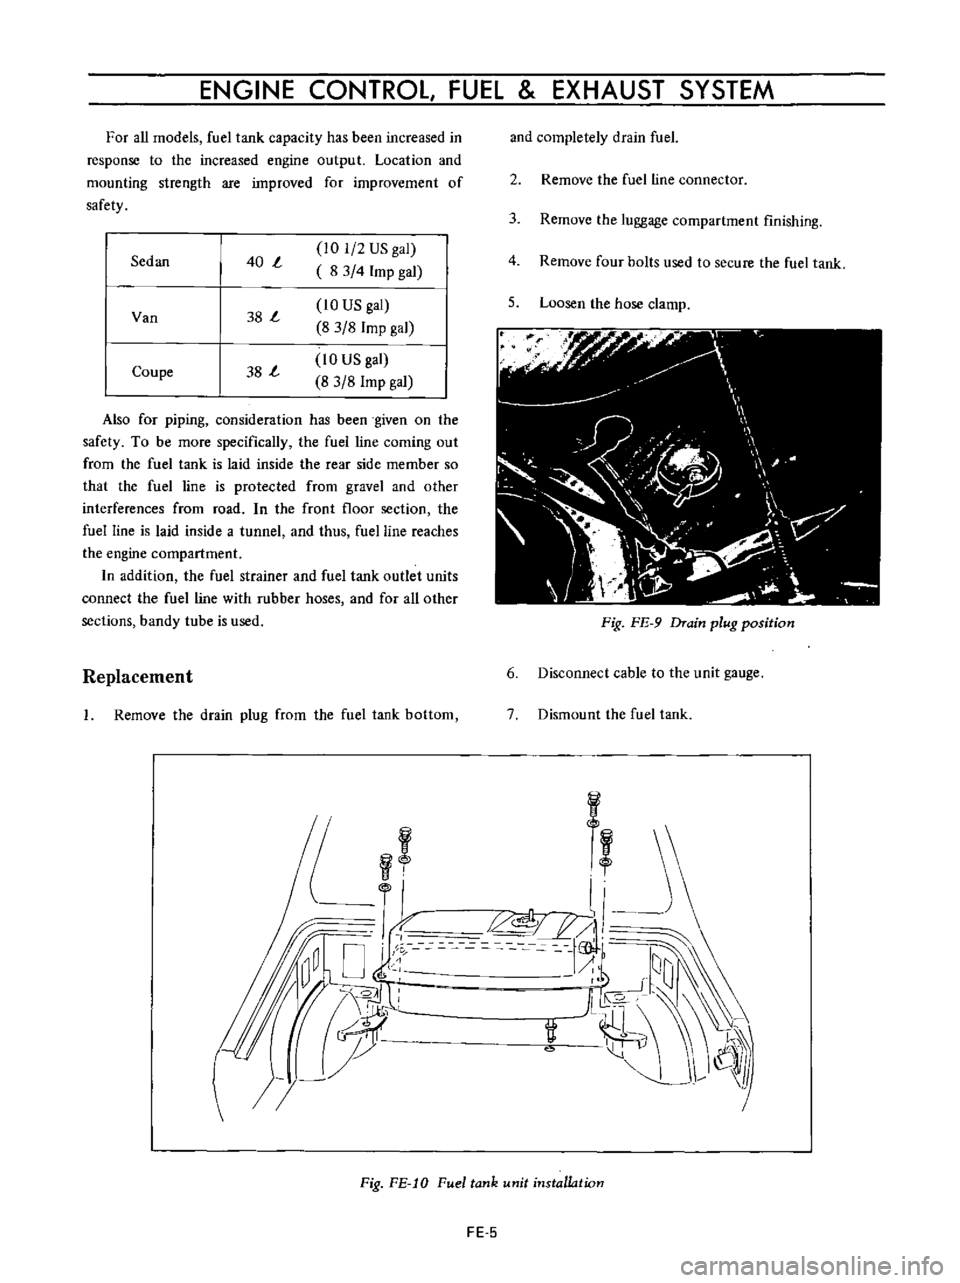
and
completely
drain
fuel
2
Remove
the
fuel
line
connector
3
Remove
the
luggage
compartment
finishing
4
Remove
four
bolts
used
to
secure
the
fuel
tank
5
Loosen
the
hose
clamp
f
r
II
J
y
I
0
I
V
Ii
i
iJb
Also
for
piping
consideration
has
been
given
on
the
safety
To
be
more
specifically
the
fuel
line
coming
out
from
the
fuel
tank
is
laid
inside
the
rear
side
member
so
that
the
fuel
line
is
protected
from
gravel
and
other
interferences
from
road
In
the
front
floor
section
the
fuel
line
is
laid
inside
a
tunnel
and
thus
fuel
line
reaches
the
engine
compartment
In
addition
the
fuel
strainer
and
fuel
tank
outlet
units
connect
the
fuel
line
with
rubber
hoses
and
for
aU
other
sections
bandy
tube
is
used
Fig
FE
9
Drain
plug
position
Replacement
Remove
the
drain
plug
from
the
fuel
tank
bottom
6
Disconnect
cable
to
the
unit
gauge
7
Dismount
the
fuel
tank
f
I
Y
L
ll
C
jjhrr
@
Fig
FE
10
Fuel
tank
14nit
installation
FE
5
Page 185 of 513
CHASSIS
I
I
AIR
VENTILATION
TUBE
I
l
i
f
I
REtTHER
TUBE
1110
l
1
j
7
7
I
ji
lf
ff
h
j
Ij
I
1
L
J
1
I
FILL
HO
l
Fig
FE
11
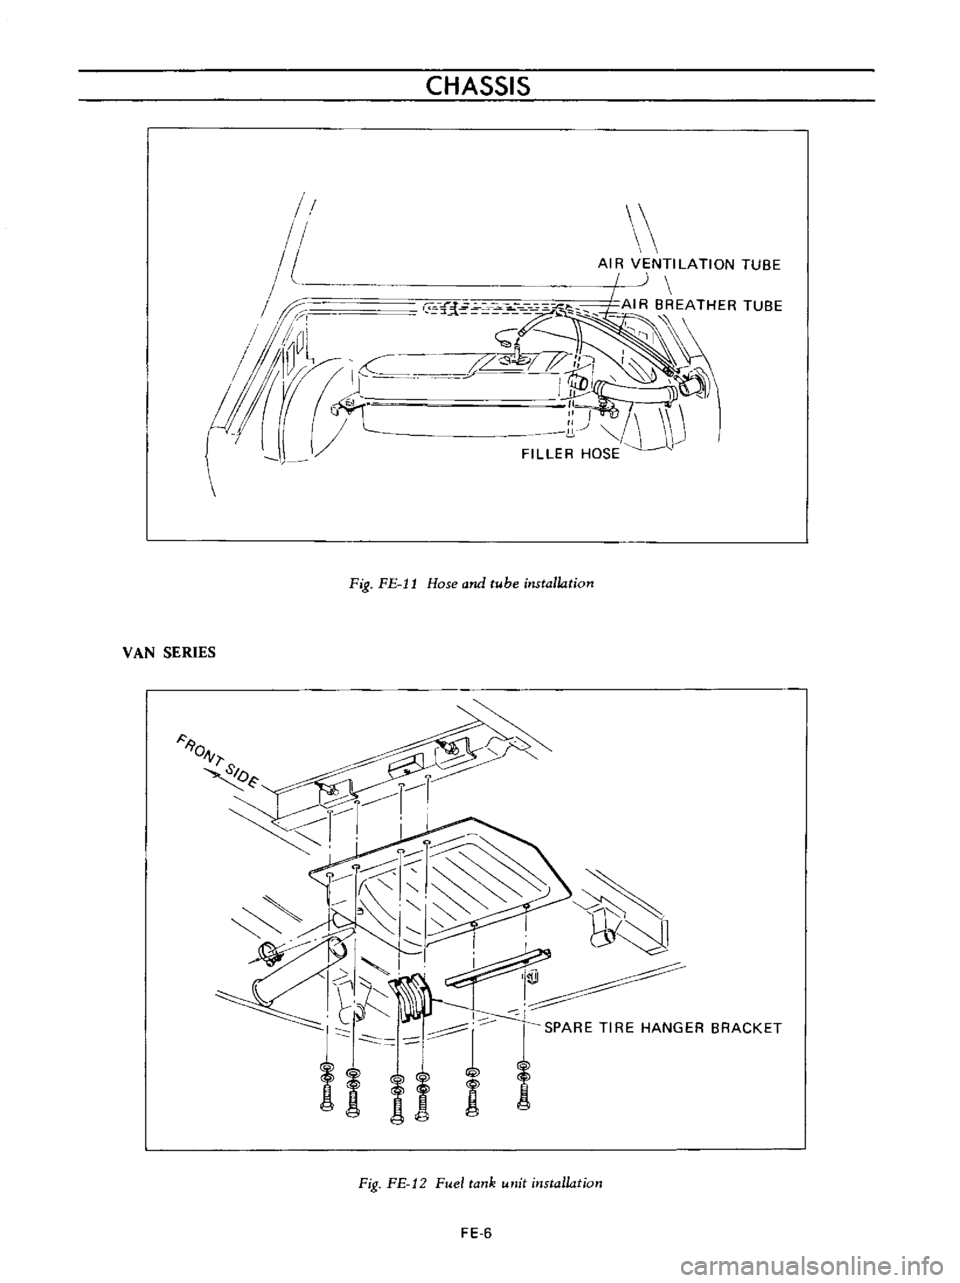
Hose
and
tube
installation
VAN
SERIES
90
1
SID
o
I
I
I
I
n
2
G
l
1
I
rl
b
IJ
I
if
I
f
f
f
Aun
AO
Fig
FE
12
Fuel
tank
unit
installation
FE
6
Page 186 of 513
COUPE
ENGINE
CONTROL
FUEL
EXHAUST
SYSTEM
SEE
ARROW
A
Fig
FE
13
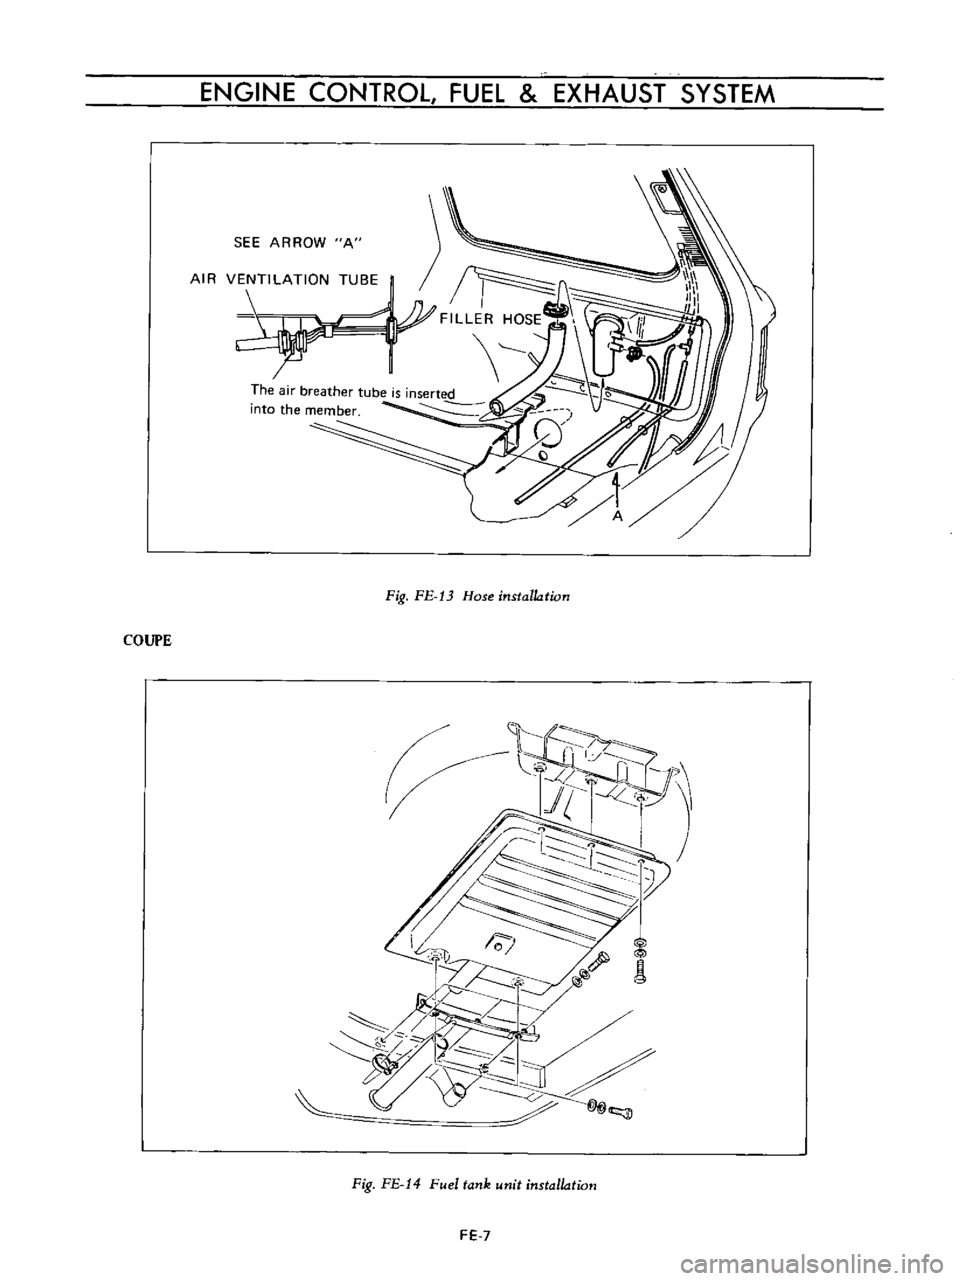
Hose
installation
Fig
FE
14
Fuel
tank
unit
installation
FE
7
Page 187 of 513
CHASSIS
II
IJ
II
t
Ii
A1
SEE
ARROW
A
r
r
I
7JJ
TI
r
i
FI
LLER
HOSE
AIR
VENTILATION
TUBE
Fig
FE
15
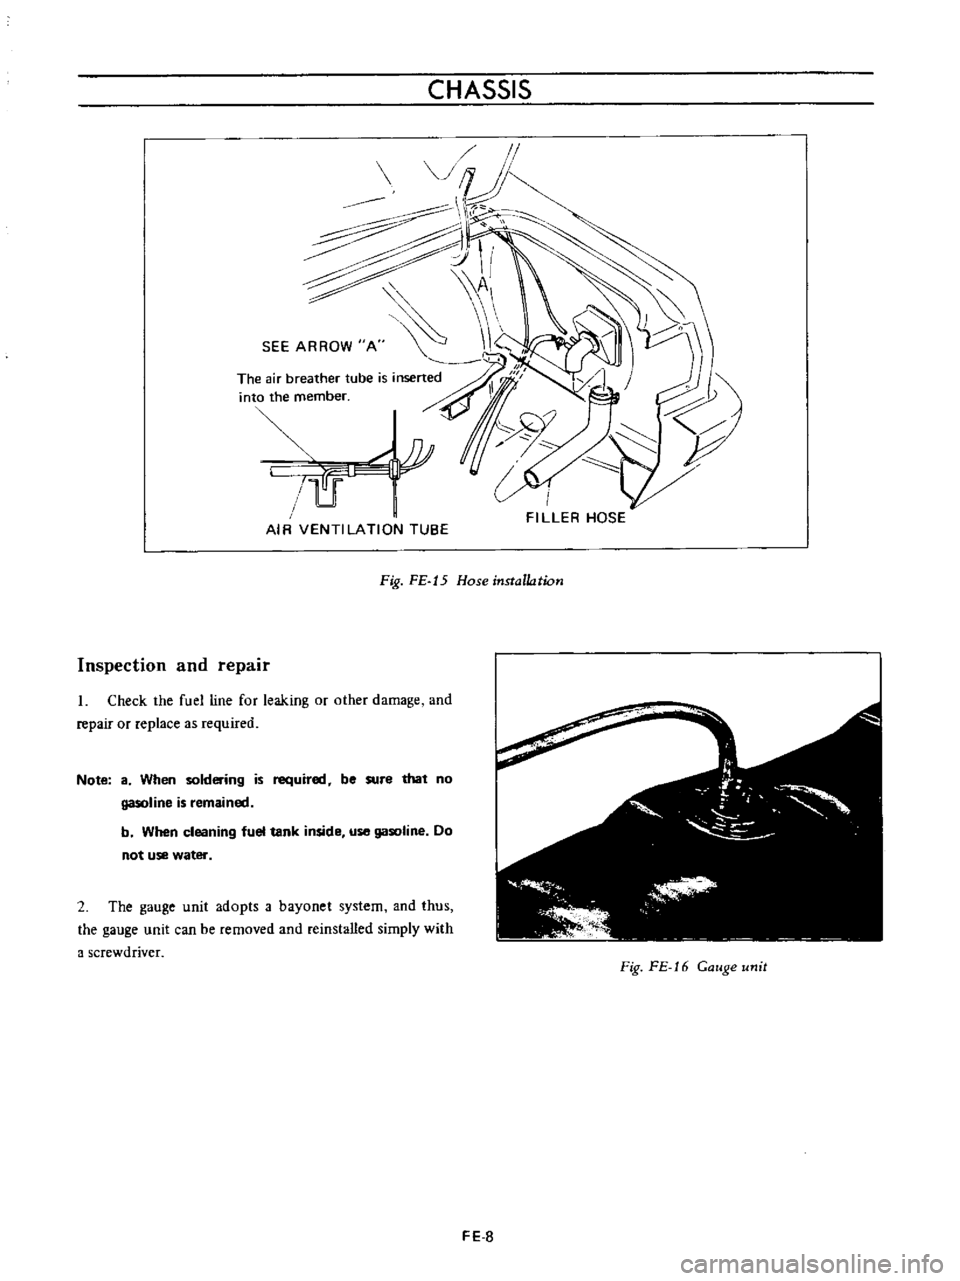
Hose
installation
Inspection
and
repair
I
Check
the
fuel
line
for
leaking
or
other
damage
and
repair
or
replace
as
required
Note
8
When
soldering
is
required
be
sure
that
no
gasoline
is
remained
b
When
cleaning
fuel
tank
inside
use
gasoline
Do
not
use
water
2
The
gauge
unit
adopts
a
bayonet
system
and
thus
the
gauge
unit
can
be
removed
and
reinstalled
simply
with
a
screwdriver
Fig
FE
16
Gauge
unit
FE
S
Page 188 of 513
DATE
ENGINE
CONTROL
FUEL
EXHAUST
SYSTEM
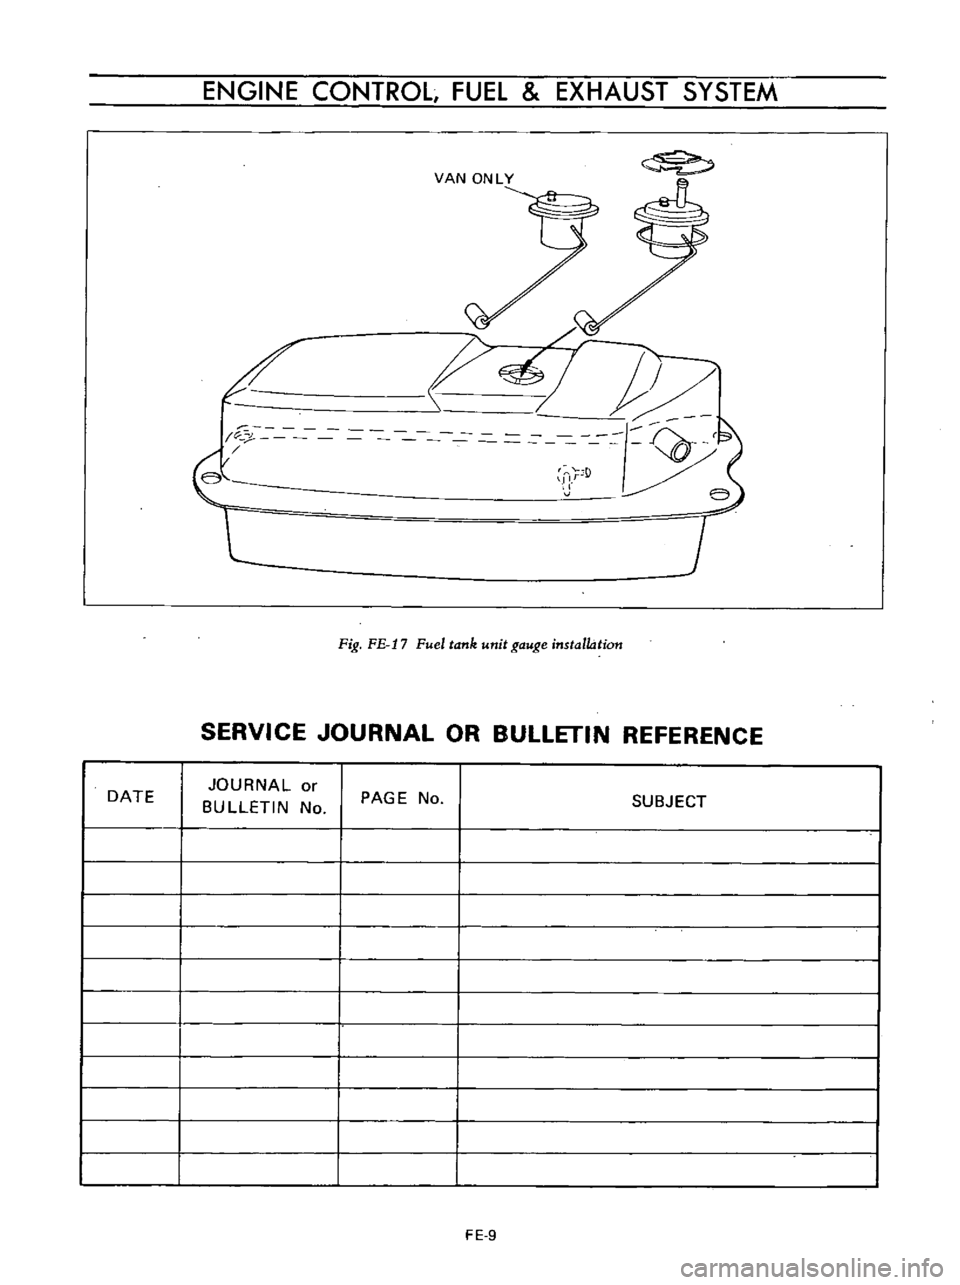
VAN
ONLY
r
j
f
Qo
I
e
nr
e
Fig
FE
17
Fuel
tank
unit
gauge
installation
SERVICE
JOURNAL
OR
BULLETIN
REFERENCE
JOURNAL
or
BULLETIN
No
PAGE
No
SUBJECT
FE
9
Page 189 of 513
DATE
CHASSIS
SERVICE
JOURNAL
OR
BUllETIN
REFERENCE
JOURNAL
or
BULLETIN
No
PAGE
No
SUBJECT
FE
10
Page 190 of 513
SERVI
oE
NuA
r
DATSUN
1200
MODEL
B
1
10
SERIES
I
NISSAN
I
NISSAN
MOTOR
CO
LTD
TOKYO
JAPAN
SECTION
BF
BODY
GENERAL
DESCRIPTION
UNDERBODY
ALIGNMENT
HOOD
FRONT
FENDER
AND
FRONT
END
TRUNK
LID
AND
REAR
BUMPER
DOORS
WINDSHIELD
AND
REAR
WINDOW
VENTILATOR
SEAT
INSTRUMENT
PANEL
ROOM
TRIM
BF
1
BF
9
BF
14
BF
17
BF
19
BF
24
BF
31
BF
37
BF38
BF
42
BF
43
Trending: service reset, stop start, jump cable, height adjustment, battery replacement, parking brake, charging

