DATSUN B110 1973 Service Repair Manual
Manufacturer: DATSUN, Model Year: 1973, Model line: B110, Model: DATSUN B110 1973Pages: 513, PDF Size: 28.74 MB
Page 211 of 513
BODY
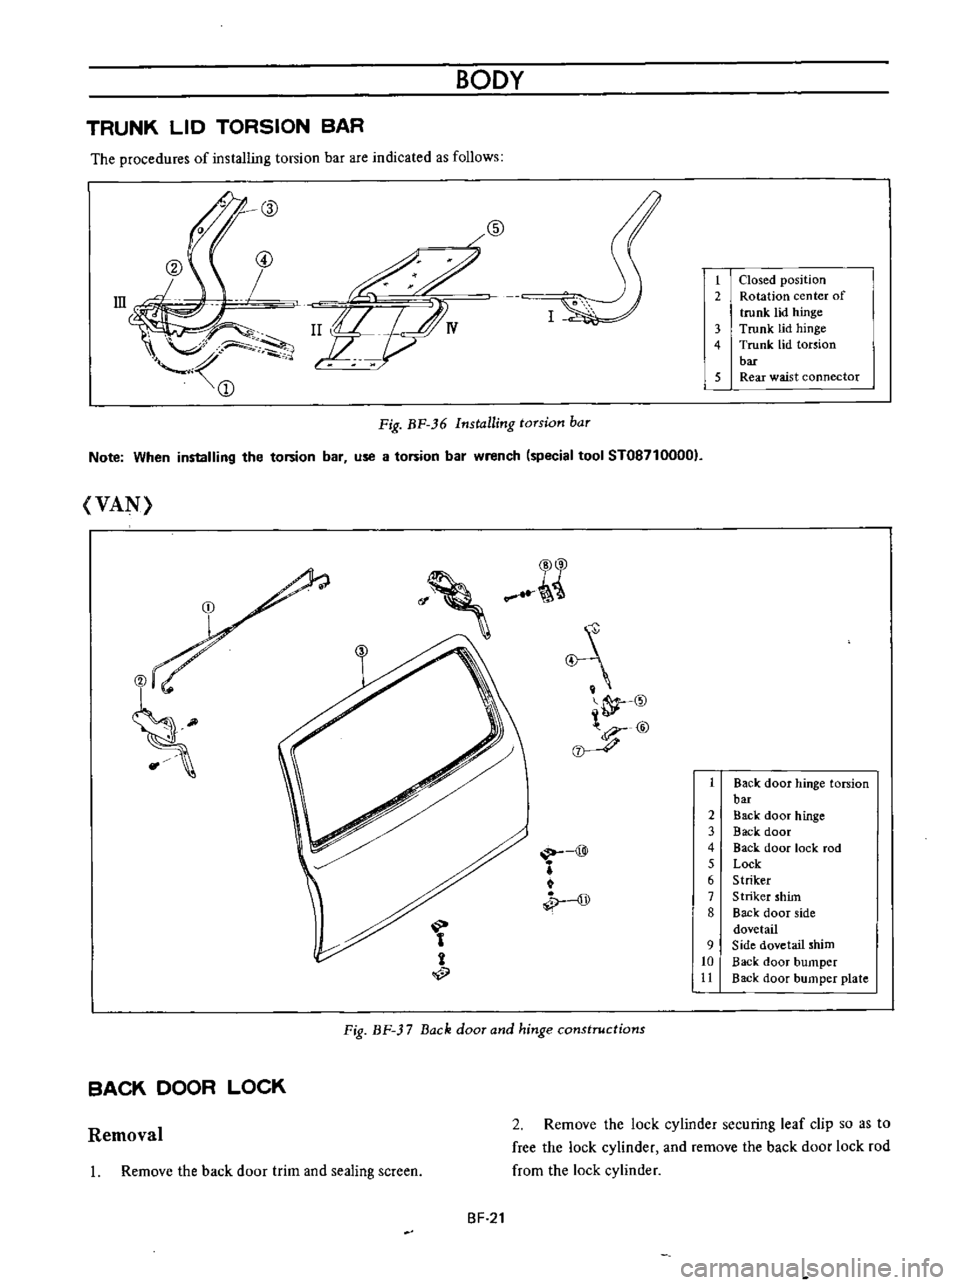
TRUNK
LID
TORSION
BAR
The
procedures
of
installing
torsion
bar
are
indicated
as
follows
ill
ID
f
Jw
V
@
@
Fig
BF
36
Installing
torsion
bar
1
Closed
position
2
Rotation
center
of
trunk
lid
hinge
3
Trunk
lid
hinge
4
Trunk
lid
torsion
bar
5
Rear
waist
connector
Note
When
installing
the
to
ion
bar
use
to
ion
bar
wrench
special
tool
ST087100001
VAN
t
9
@
i
Fig
BF
37
Back
door
and
hinge
constructions
BACK
DOOR
LOCK
1
Back
door
hinge
torsion
bar
2
Back
door
hinge
3
Back
door
4
Back
door
lock
rod
5
Lock
6
Striker
7
Striker
shim
8
Back
door
side
dovetail
9
Side
dovetail
shim
10
Back
door
bumper
11
Back
door
bumper
plate
Removal
2
Remove
the
lock
cylinder
securing
leaf
clip
so
as
to
free
the
lock
cylinder
and
remove
the
back
door
lock
rod
from
the
lock
cylinder
I
Remove
the
back
door
trim
and
sealing
screen
BF
21
Page 212 of 513
I
1
I
Back
door
lock
rod
I
2
I
Lock
cylinder
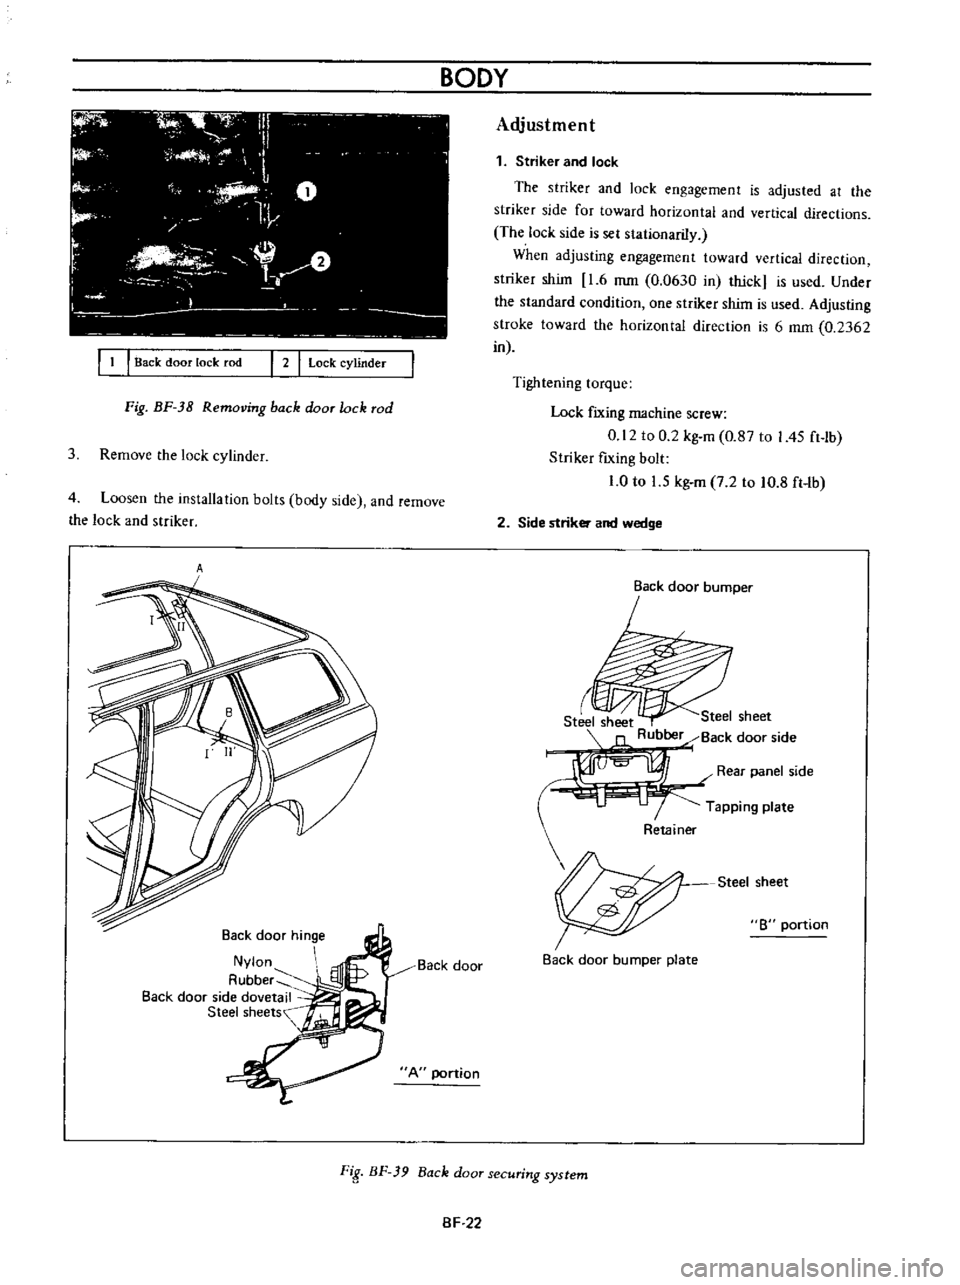
Fig
BF
38
Removing
back
door
lock
rod
3
Remove
the
lock
cylinder
4
Loosen
the
installation
bolts
body
side
and
remove
the
lock
and
striker
A
Back
door
hinge
Nylon
A
ubber
Back
door
side
dovetail
Steel
sheets
Back
door
A
portion
BODY
Adjustment
1
Striker
and
lock
The
striker
and
lock
engagement
is
adjusted
at
the
striker
side
for
toward
horizontal
and
vertical
directions
The
lock
side
is
sel
stationariIy
When
adjusting
engagement
toward
vertical
direction
striker
shim
1
6
mm
0
0630
in
thick
is
used
Under
the
standard
condition
one
striker
shim
is
used
Adjusting
stroke
toward
the
horizontal
direction
is
6
mm
0
2362
in
Tightening
torque
Lock
fIXing
machine
screw
0
12
to
0
2
kg
m
0
87
to
I
45
ft
lb
Striker
fIxing
bolt
1
0
to
1
5
kg
m
7
2
to
10
8
ft
Ib
2
Side
striker
and
wedge
Back
door
bumper
r
Steel
sheet
Steel
sheet
Rubber
Back
door
side
I
Rear
panel
side
Tapping
plate
Steel
sheet
8
portion
Back
door
bumper
plate
FiS
BF
39
Back
door
securing
system
SF
22
Page 213 of 513
n
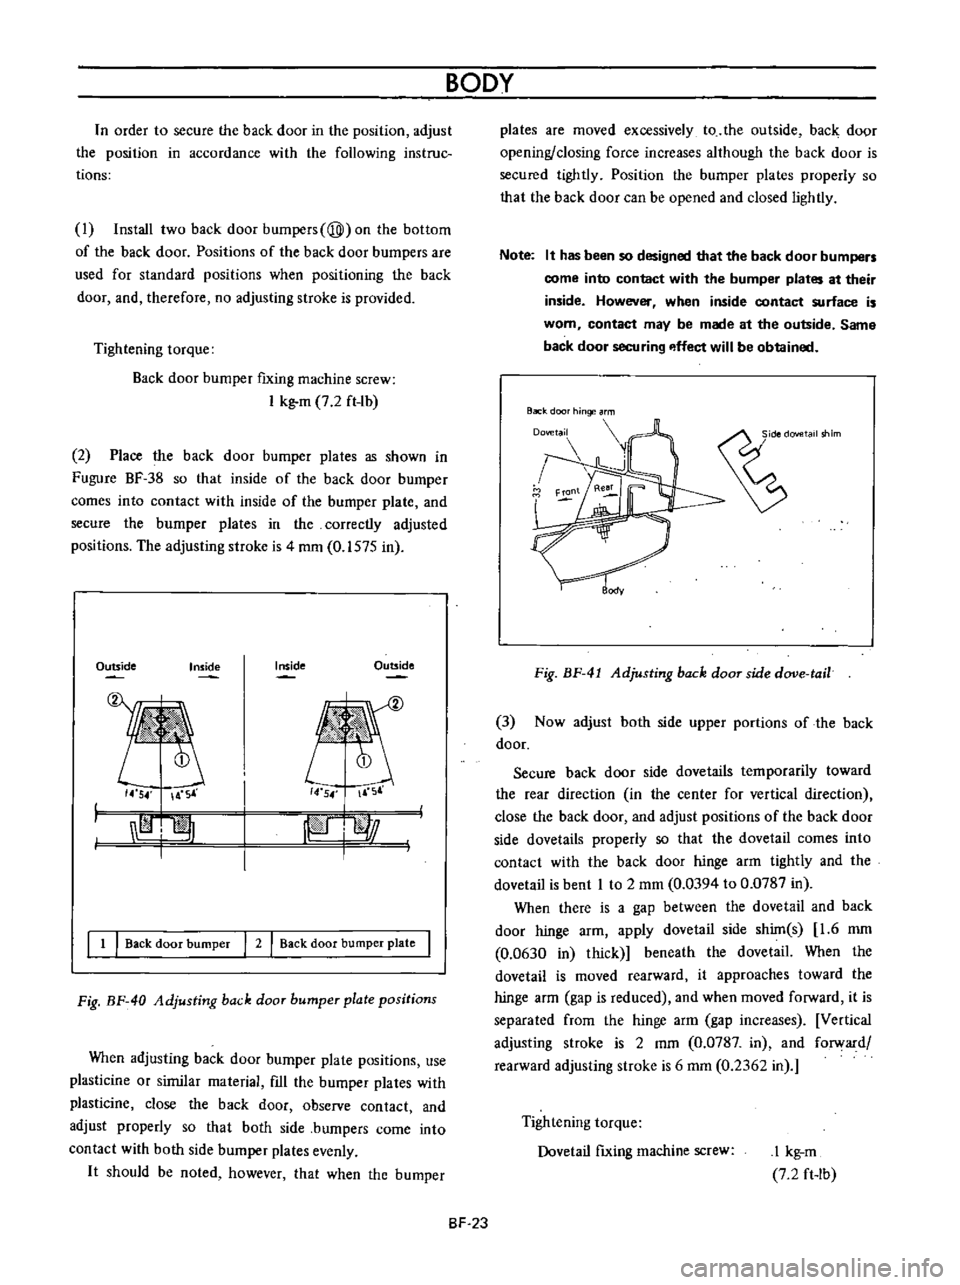
order
to
secure
the
back
door
in
the
position
adjust
the
position
in
accordance
with
the
following
instruc
tions
I
Install
two
back
door
bumpers
@
on
the
bottom
of
the
back
door
Positions
of
the
back
door
bumpers
are
used
for
standard
positions
when
positioning
the
back
door
and
therefore
no
adjusting
stroke
is
provided
Tightening
torque
Back
door
bumper
fixing
machine
screw
I
kg
m
7
2
ft
lb
2
Place
the
back
door
bumper
plates
as
shown
in
Fugure
BF
38
so
that
inside
of
the
back
door
bumper
comes
into
contact
with
inside
of
the
bumper
plate
and
secure
the
bumper
plates
in
the
correctly
adjusted
positions
The
adjusting
stroke
is
4
mm
0
1575
in
Outside
Inside
Outside
Inside
14
54
A
S
14
54
F
r
I
I
jpiJ
l
l
j
I
1
I
Back
door
bumper
I
2
I
Back
door
bumper
plate
I
Fig
BF
40
Adjusting
back
door
bumper
plate
positions
When
adjusting
back
door
burnper
plate
positions
use
plasticine
or
sirnilar
material
fIll
the
bumper
plates
with
plasticine
close
the
back
door
observe
contact
and
adjust
properly
so
that
both
side
bumpers
come
into
contact
with
both
side
bumper
plates
evenly
It
should
be
noted
however
that
when
the
bumper
BODY
BF
23
plates
are
moved
excessively
to
the
outside
back
door
opening
closing
force
increases
although
the
back
door
is
secured
tightly
Position
the
bumper
plates
properly
so
that
the
back
door
can
be
opened
and
closed
lightly
Note
It
has
been
so
designed
that
the
back
door
bumpers
come
into
contact
with
the
bumper
plates
at
their
inside
However
when
inside
contact
surface
is
worn
contact
may
be
made
at
the
outside
Same
back
door
securing
p
ffect
will
be
obtained
Back
door
hinge
rm
Fig
BF
41
Adjusting
back
door
side
dove
tail
3
Now
adjust
both
side
upper
portions
of
the
back
door
Secure
back
door
side
dovetails
temporarily
toward
the
rear
direction
in
the
center
for
vertical
direction
close
the
back
door
and
adjust
positions
of
the
back
door
side
dovetails
properly
so
that
the
dovetail
comes
into
contact
with
the
back
door
hinge
arm
tightly
and
the
dovetail
is
bent
I
to
2
mm
0
0394
to
0
0787
in
When
there
is
a
gap
between
the
dovetail
and
back
door
hinge
arm
apply
dovetail
side
shim
s
1
6
mm
0
0630
in
thick
beneath
the
dovetail
When
the
dovetail
is
moved
rearward
it
approaches
toward
the
hinge
arm
gap
is
reduced
and
when
moved
forward
it
is
separated
from
the
hinge
arrn
gap
increases
Vertical
adjusting
stroke
is
2
mm
0
0787
in
and
forward
rearward
adjusting
stroke
is
6
mm
0
2362
in
Tightening
torque
Dovetail
fIxing
machine
screw
I
kg
m
7
2
ft
Ib
Page 214 of 513
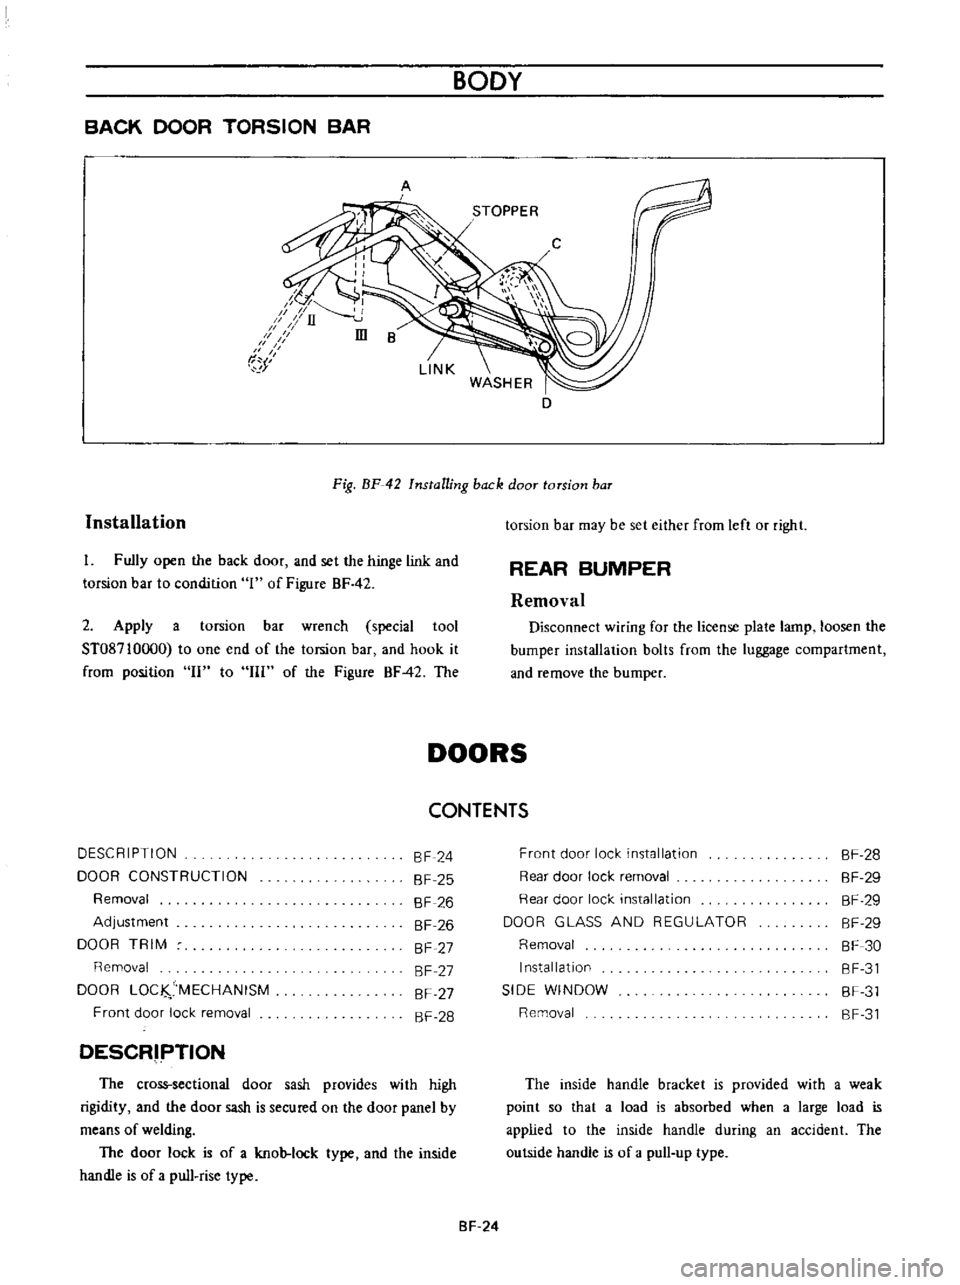
BACK
DOOR
TORSION
BAR
BODY
A
D
Installation
Fig
BF
42
Installing
back
door
torsion
baT
I
Fully
open
the
back
door
and
set
the
hinge
link
and
torsion
bar
to
condition
1
of
Figure
BF
42
2
Apply
a
torsion
bar
wrench
special
tool
ST08710oo0
to
one
end
of
the
torsion
bar
and
hook
it
from
position
II
to
III
of
the
Figure
BF42
The
torsion
bar
may
be
set
either
from
left
or
right
REAR
BUMPER
Removal
Disconnect
wiring
for
the
license
plate
lamp
loosen
the
bumper
installation
bolts
from
the
luggage
compartment
and
remove
the
bumper
DOORS
CONTENTS
DESCRIPTION
DOOR
CONSTRUCTION
Removal
Adjustment
DOOR
TRIM
Removal
DOOR
LOC
MECHANISM
Front
door
lock
removal
SF
24
SF
25
SF
26
SF
26
SF
27
SF
27
SF
27
SF
28
DESCRIPTION
The
cross
sectional
door
sash
provides
with
high
rigidity
and
the
door
sash
is
secured
on
the
door
panel
by
means
of
welding
The
door
lock
is
of
a
knob
lock
type
and
the
inside
handle
is
of
a
pull
rise
type
Front
door
lock
installation
Rear
door
lock
removal
Rear
door
lock
installation
DOOR
GLASS
AND
REGULATOR
Removal
Installation
SIDE
WINDOW
Removal
SF
28
SF
29
SF
29
SF
29
SF
30
SF
31
SF
31
SF
31
The
inside
handle
bracket
is
provided
with
a
weak
point
so
that
a
load
is
absorbed
when
a
large
load
is
applied
to
the
inside
handle
during
an
accident
The
outside
handle
is
of
a
pull
up
type
SF
24
Page 215 of 513
BODY
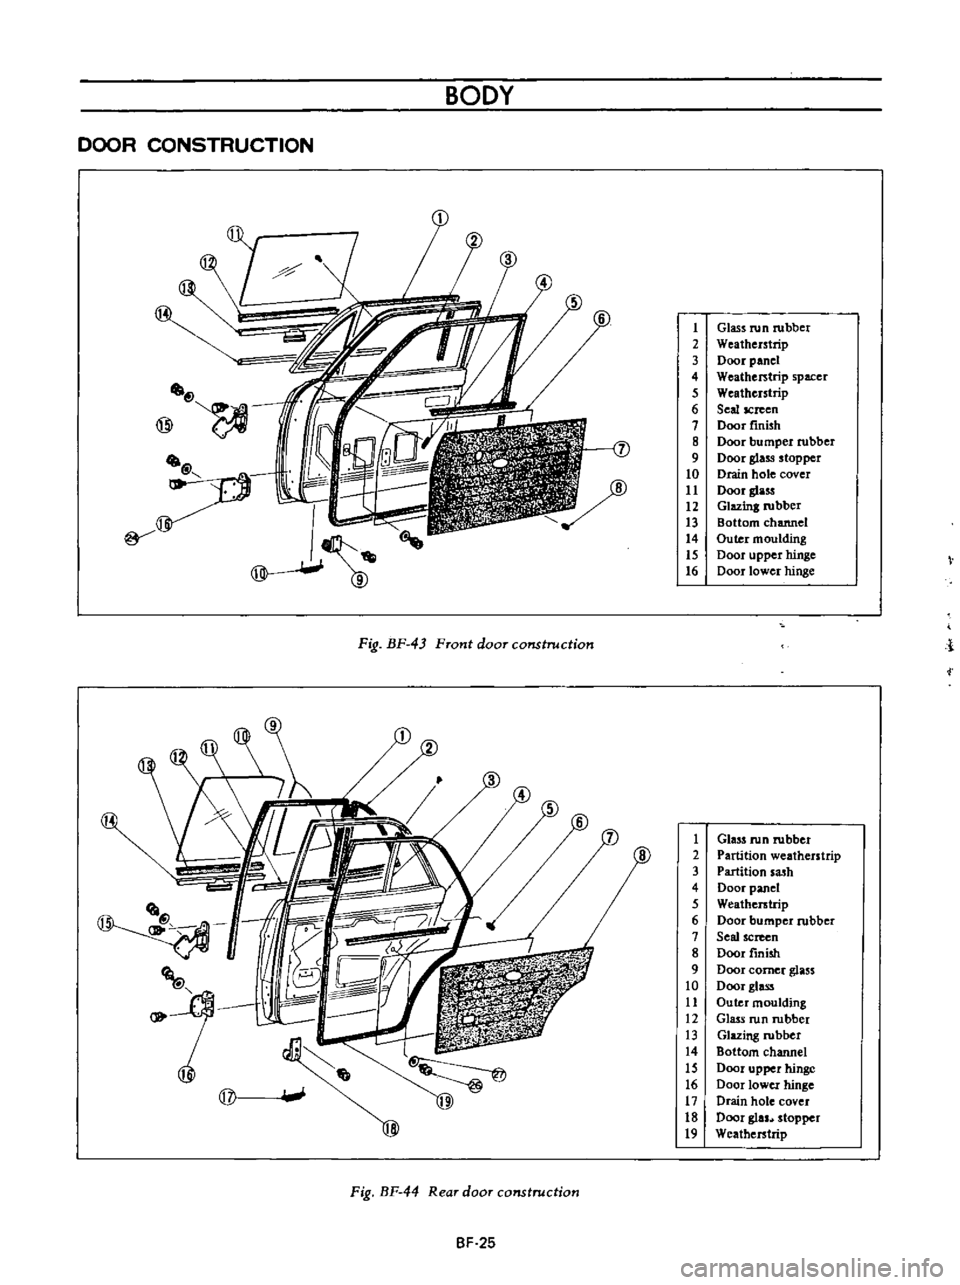
DOOR
CONSTRUCTION
II
J
Fig
BF
43
Front
door
construction
t
1
QT
Fig
BF
44
Rear
door
construction
BF
25
1
Glass
run
robber
2
Weatherstrip
3
Door
panel
4
Weatherstrip
spacer
5
Weatherstrip
6
Seal
screen
7
Door
finish
8
Door
bumper
rubber
9
Door
glass
stopper
10
Drain
hole
cover
11
Doorglass
12
Glazing
robber
13
Bottom
channel
14
Outer
moulding
15
Door
upper
hinge
16
Door
lower
hinge
j
1
Glass
run
rubber
2
Partition
weatherstrip
3
Partition
sa
h
4
Door
panel
5
Weatherstrip
6
Door
bumper
rubber
7
Seal
screen
8
Door
finish
9
Door
comer
glass
10
Door
glass
11
Outer
moulding
12
Glass
run
rubber
13
Glazing
rubber
14
Bottom
channel
15
Door
upper
hinge
16
Door
lower
hinge
17
Drain
hole
cover
18
Door
gin
stopper
19
Weatherstrip
Page 216 of 513
Removal
I
t
is
recommended
that
the
door
be
removed
from
the
body
with
the
door
hinges
attached
on
the
door
although
the
door
may
be
removed
from
the
body
with
or
without
the
hinges
attached
on
the
door
Front
door
Remove
the
package
tray
2
Remove
the
door
hinge
service
hole
cover
from
the
dash
side
trim
3
With
the
door
fully
opened
support
the
door
by
applying
a
stand
or
jack
beneath
the
door
so
that
the
door
does
not
drop
off
Note
Apply
a
piece
of
rag
between
the
door
and
stand
so
that
the
door
panel
is
protected
from
damaging
4
Remove
the
door
hinge
installation
bolts
at
the
body
side
by
the
use
of
a
box
wrench
and
remove
the
door
from
the
body
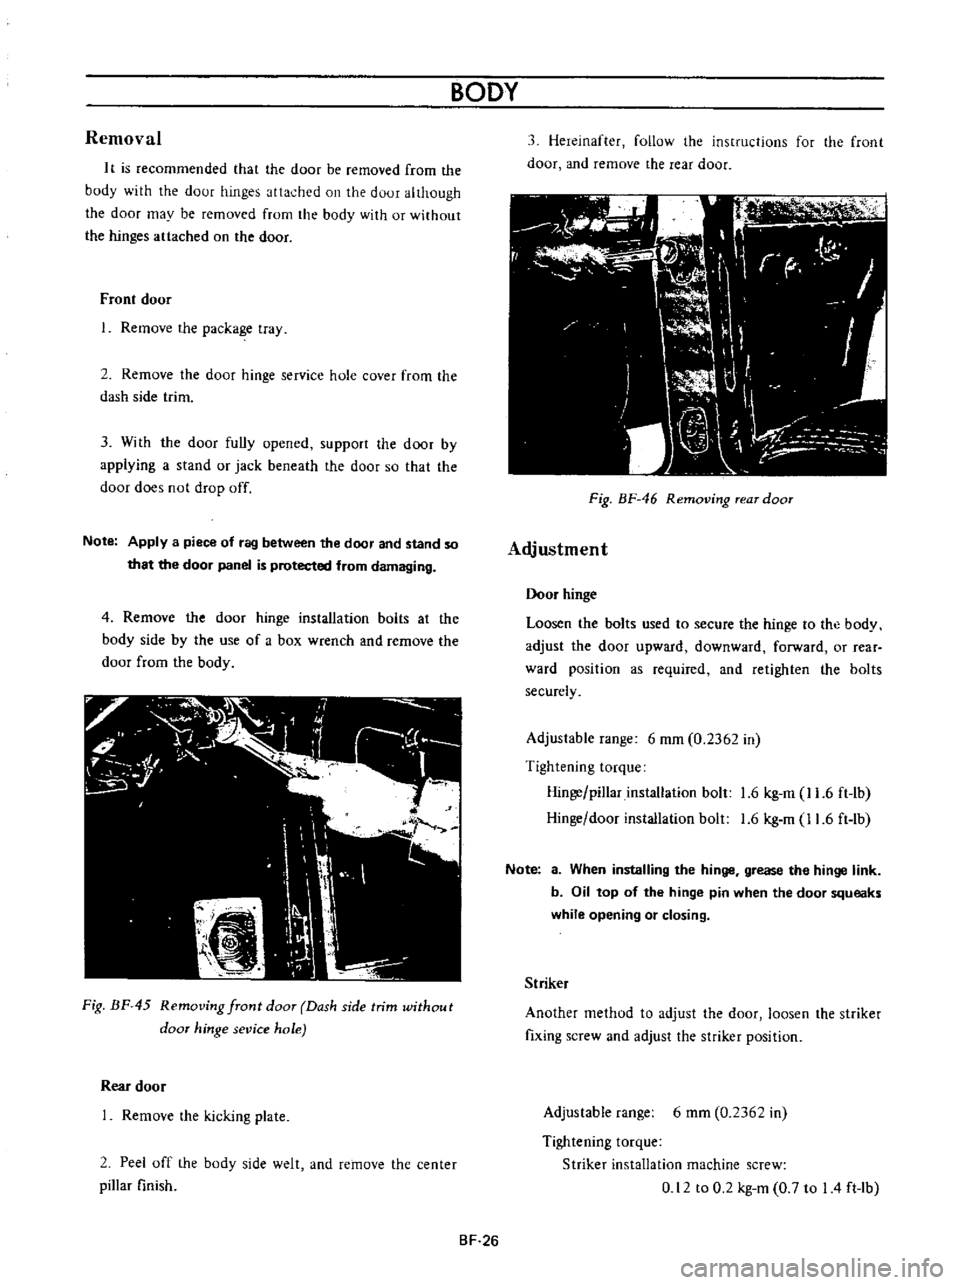
Fig
BF
45
Removing
front
door
Dash
side
trim
without
door
hinge
sevice
hole
Rear
door
Remove
the
kicking
plate
2
Peel
off
the
body
side
welt
and
remove
the
center
pillar
finish
BODY
3
Hereinafter
follow
the
instructions
for
the
front
door
and
remove
the
rear
door
11
I
fl
C
I
r
r
I
W
I
r
I
I
dl
J
Ik
I
h
I
l
i
J
n
Fig
BF
46
Removing
rear
door
Adjustment
Door
hinge
Loosen
the
bolts
used
to
secure
the
hinge
to
the
body
adjust
the
door
upward
downward
forward
or
rear
ward
position
as
required
and
retighten
the
bolts
securely
Adjustable
range
6
mm
0
2362
in
Tightening
torque
Hinge
pillar
installation
bolt
1
6
kg
m
11
6
ft
lb
Hinge
door
installation
bolt
1
6
kg
m
11
6
ft
lb
Note
a
When
installing
the
hinge
grease
the
hinge
link
b
Oil
top
of
the
hinge
pin
when
the
door
squeaks
while
opening
or
closing
Striker
Another
method
to
adjust
the
door
loosen
the
striker
fixing
screw
and
adjust
the
striker
position
Adjustable
range
6
mm
0
2362
in
Tightening
torque
Striker
installation
machine
screw
0
12
to
0
2
kg
m
0
7
to
I
4
ft
lb
BF
26
Page 217 of 513
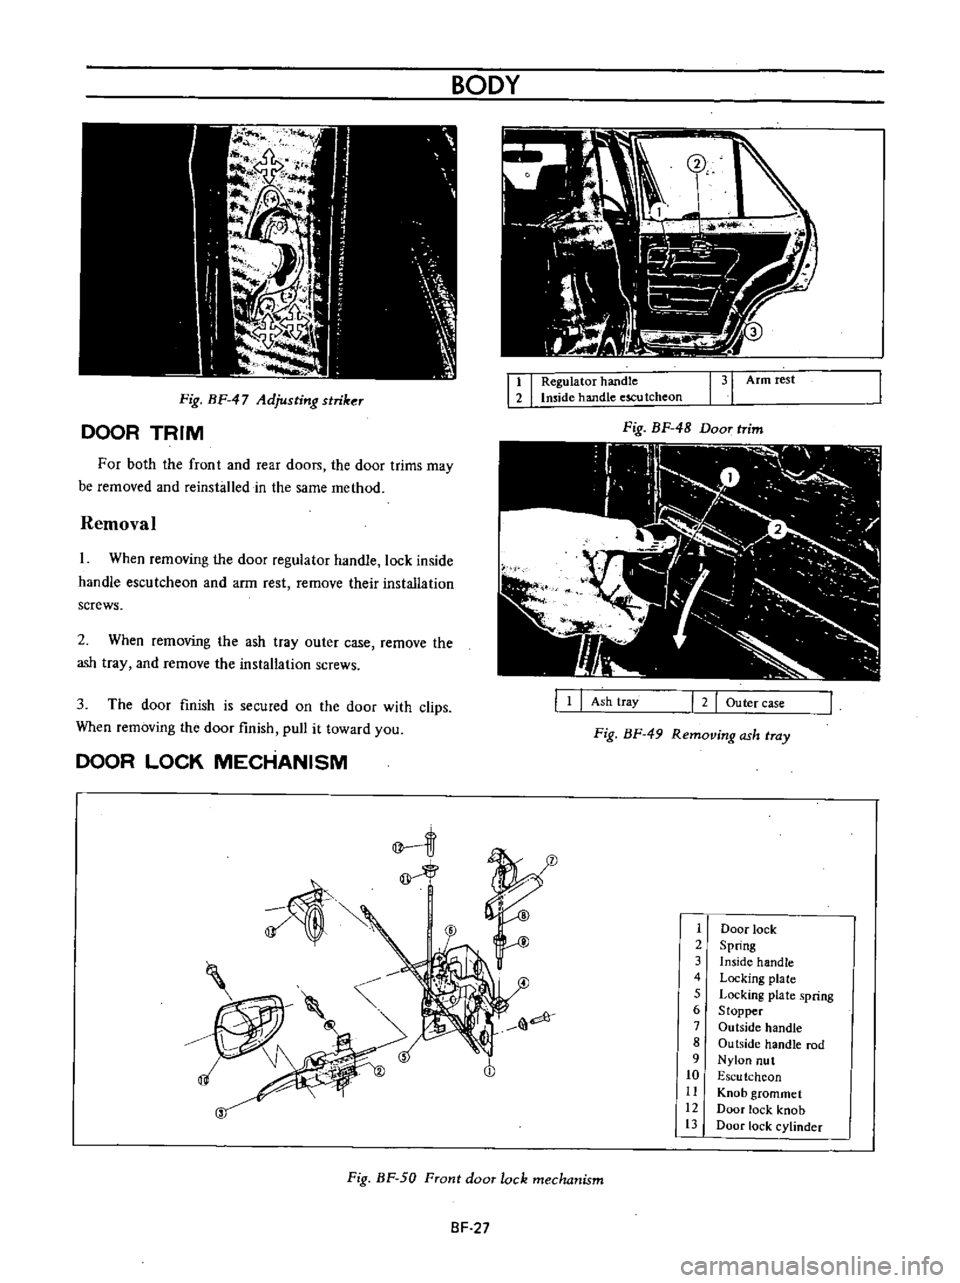
Fig
BF
47
Adjusting
striker
DOOR
TRIM
For
both
the
front
and
rear
doon
the
door
trims
may
be
removed
and
reinsbJled
in
the
same
method
Removal
I
When
removing
the
door
regulator
handle
lock
inside
handle
escutcheon
and
arm
rest
remove
their
installation
screws
2
When
removing
the
ash
tray
outer
case
remove
the
ash
tray
and
remove
the
installation
screws
3
The
door
finish
is
secured
on
the
door
with
clips
When
removing
the
door
finish
pull
it
toward
you
DOOR
LOCK
MECHANISM
BODY
I
I
Regulator
handle
Imide
handle
escu
tcheon
131
Armrest
Fig
BF
48
Door
trim
III
I
2
Outer
case
Ash
tray
Fig
BF
49
Removing
ash
tray
1
1
Door
lock
2
Spring
3
Inside
handle
4
Locking
plate
5
Locking
plate
spring
6
Stopper
7
Outside
handle
8
Ou
tside
handle
rod
9
Nylon
nut
10
Escu
tchcon
11
Knob
grommet
12
Door
lock
knob
13
Door
lock
cylinder
Fig
BF
50
Front
door
lock
mechanism
SF
27
Page 218 of 513
IT
f
r
J
e
@
@
BODY
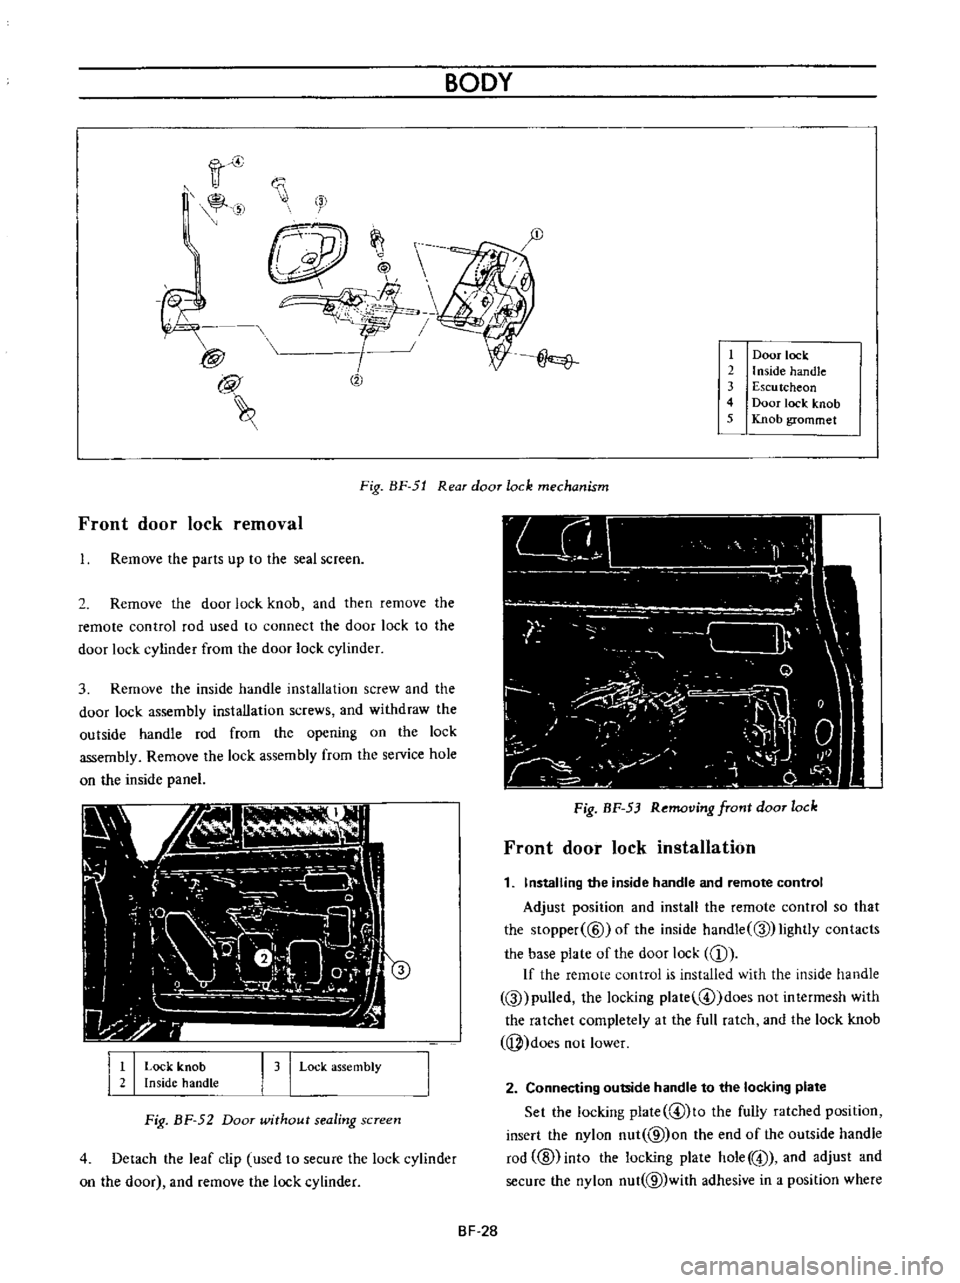
Door
lock
2
I
nside
handle
3
Escu
tcheon
4
Door
lock
knob
5
Knob
grommet
Front
door
lock
removal
Fig
BF
51
Rear
door
lock
mechanism
Remove
the
parts
up
to
the
seal
screen
2
Remove
the
door
lock
knob
and
then
remove
the
remote
control
rod
used
to
connect
the
door
lock
to
the
door
lock
cylinder
from
the
door
lock
cylinder
3
Remove
the
inside
handle
installation
screw
and
the
door
lock
assembly
installation
screws
and
withdraw
the
outside
handle
rod
from
the
opening
on
the
lock
assembly
Remove
the
lock
assembly
from
the
service
hole
on
the
inside
panel
I
I
Lock
knob
Inside
handLe
I
3
I
Lock
assembly
Fig
BF
52
Door
wUhout
sealing
screen
4
Detach
the
leaf
clip
used
to
secure
the
lock
cylinder
on
the
door
and
remove
the
lock
cylinder
Fig
BF
53
Removing
front
door
lock
Front
door
lock
installation
1
Installing
the
inside
handle
and
remote
control
Adjust
position
and
install
the
remote
control
so
that
the
Slopper
@
ofthe
inside
handle
Q
lightly
contacts
the
base
plate
of
the
door
lock
CD
If
the
remote
control
is
installed
with
the
inside
handle
Q
pulled
the
locking
plate
@
doesnotintermesh
with
the
ratchet
completely
at
the
full
ratch
and
the
lock
knob
j
does
not
lower
2
Connecting
outside
handle
to
the
locking
plate
Set
the
locking
plate
@lto
the
fully
ratched
position
insert
the
nylon
nut
@
on
the
end
of
the
outside
handle
rod
ID
into
the
locking
plate
hole
@
and
adjust
and
secure
the
nylon
nut
@
with
adhesive
in
a
position
where
BF
28
Page 219 of 513
the
outside
handle
rod
@
is
provided
with
2
to
3
mm
0
0787
to
0
1181
in
play
in
the
stroke
If
the
nylon
nut
@
is
positioned
too
low
the
locking
plate
@
is
depressed
at
the
full
ratch
the
locking
plate
does
not
intermesh
with
the
ratchet
completely
and
the
knob
cannot
be
locked
If
play
in
stroke
of
the
outside
handle
rod
@
is
excessive
may
be
unlocked
up
to
5
mm
0
1967
in
stroke
of
the
outside
handle
will
be
insufficient
If
the
nylon
nut
is
loosened
the
above
described
trouble
occurs
Be
sure
to
secure
the
nut
completely
by
means
of
adhesive
Check
the
springs
@
and
@
for
rust
and
replace
as
required
Tightening
torque
Door
lock
installation
screw
0
12
to
0
2
kg
m
0
9
to
I
4
ft
lb
Door
lock
remote
control
installation
screw
0
12
to
0
2
kg
m
0
9
to
14
ft
lb
Outside
handle
installation
nut
0
2
to
0
3
kg
m
1
4
to
2
2
ft
Ib
Rear
door
lock
removal
1
Remove
the
parts
up
to
the
seal
screen
2
Raise
the
door
glass
to
the
top
and
remove
the
door
DOOR
GLASS
AND
REGULATOR
i
v
BODY
lock
knob
3
Remove
the
bell
crank
installation
screw
Hereinafter
the
instructions
for
removal
of
the
front
door
lock
apply
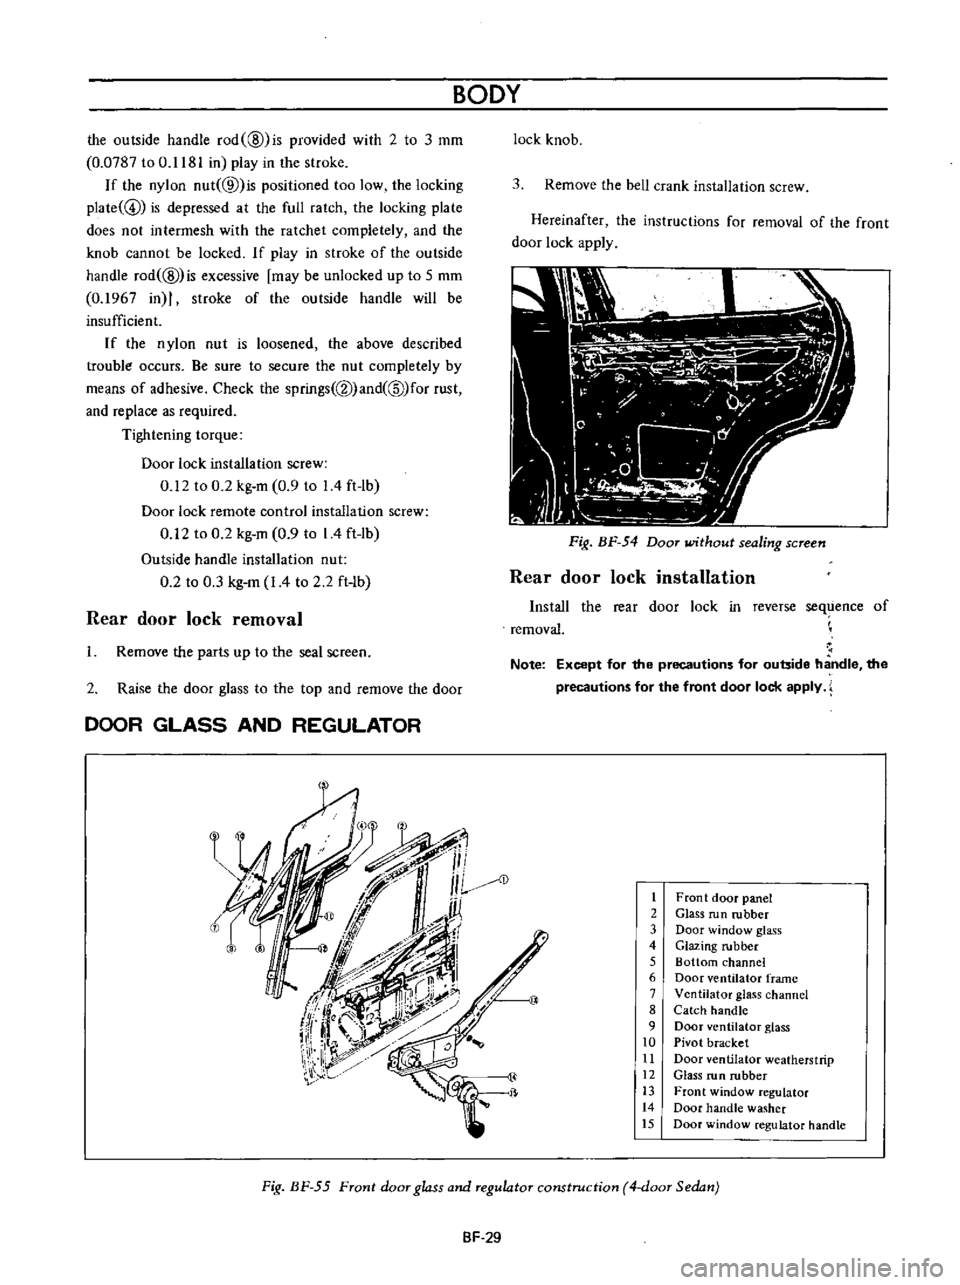
Fig
BF
54
Door
without
sealing
screen
Rear
door
lock
installation
Install
the
rear
door
lock
in
reverse
sequence
of
removal
Note
Except
for
the
precautions
for
outside
handle
the
precautions
for
the
front
door
lock
apply
AD
1
Front
door
panel
2
Glass
run
rubber
3
Door
window
glass
4
Glazing
rubber
5
Bottom
channel
6
Door
ventilator
frame
7
Ventilator
glass
channel
8
Catch
handle
9
Door
ventilator
glass
10
Pivot
bracket
11
Door
ventilator
weatherstrip
12
Glass
run
rubber
13
Front
window
regulator
14
Door
handle
washer
15
Door
window
regulator
handle
Fig
BF
55
Front
door
glass
and
regulator
construction
4
door
Sedan
SF
29
Page 220 of 513
BODY
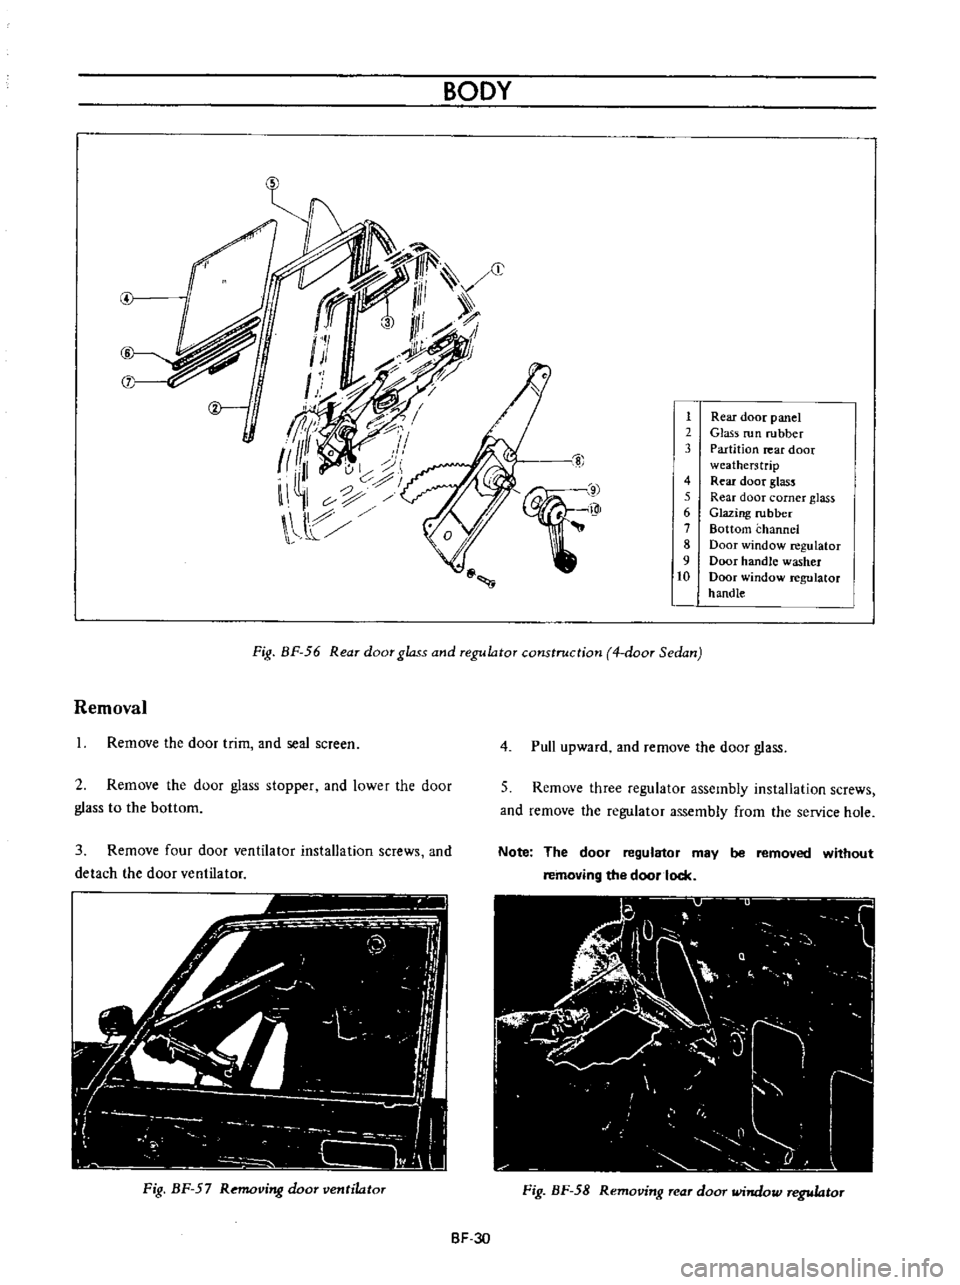
i
1
Rear
door
panel
2
Glass
run
rubber
3
Partition
rear
door
weatherstrip
4
Rear
door
glass
5
Rear
door
corner
glass
6
Glazing
rubber
7
Bottom
channel
8
Door
window
regulator
9
Door
handle
washer
10
Door
window
regulator
handle
91
W
10
Fig
BF
56
Rear
door
glass
and
regulator
construction
4
door
Sedan
Removal
Remove
the
door
trim
and
seal
screen
2
Rernove
the
door
glass
stopper
and
lower
the
door
glass
to
the
bottorn
3
Remove
four
door
ventilator
installation
screws
and
detach
the
door
ventilator
Fig
BF
57
Removing
door
ventilator
4
Pull
upward
and
remove
the
door
glass
5
Remove
three
regulator
assembly
installation
screws
and
remove
the
regulator
assembly
from
the
service
hole
Note
The
door
regulator
may
be
removed
without
removing
the
door
lock
Fig
BF
58
Removing
rear
door
window
regulator
BF
30