ESP DATSUN B110 1973 Service User Guide
[x] Cancel search | Manufacturer: DATSUN, Model Year: 1973, Model line: B110, Model: DATSUN B110 1973Pages: 513, PDF Size: 28.74 MB
Page 58 of 513
Judgement
in
measurmg
line
pressure
I
Low
idling
line
pressures
in
the
ranges
D
2
loR
and
P
It
can
be
artributed
to
trouble
in
the
pressure
supply
system
or
too
low
output
of
power
caused
by
1
A
worn
oil
pump
2
An
oil
pressure
leakage
in
the
oil
pump
valve
body
or
case
3
A
sticking
regulator
valve
2
Low
idling
line
pressures
in
cer
tain
ranges
only
It
is
caused
pressumabIy
by
an
oil
leakage
in
the
devices
or
circuits
con
nected
to
the
relevant
ranges
1
When
there
is
an
oil
leakage
in
the
rear
clutch
and
governor
the
line
pressures
in
D
2
and
I
are
low
but
the
pressure
is
normal
in
R
2
When
an
oil
leakage
occurs
in
the
low
and
reverse
brake
circuit
the
line
pressures
in
R
and
p
are
low
but
the
pressure
is
normal
in
0
2
and
I
3
High
idling
line
pressures
It
is
presumed
to
be
caused
by
an
increased
vacuum
throttle
pressure
owing
to
a
leakage
in
the
vacuum
tube
or
diaphragm
or
by
an
increased
line
pressure
due
to
a
sticking
regulator
CHASSIS
valve
Vacuum
leakage
is
checked
by
di
reetly
measuring
the
negative
pressure
after
removing
the
vacuum
pipe
A
puncture
of
the
vacuum
dia
phragm
can
be
easily
ascertained
because
the
torque
converter
oil
is
absorbed
into
the
engine
and
the
exhaust
pipe
blows
up
the
white
smoke
4
Checking
items
when
the
line
pressure
is
increasing
In
trJs
checking
the
line
pressure
should
be
measured
with
vacuums
of
450
mmHg
and
0
mmHg
in
accordance
with
the
stall
test
procedure
test
procedure
1
If
the
line
pressures
do
not
increase
despite
the
vacuum
decrease
check
whether
the
vacuum
rod
is
incorporated
2
If
the
line
pressures
do
not
meet
the
standard
it
is
caused
mostly
by
a
sticking
pressure
regulating
valve
pres
sure
regulating
valve
plug
or
amptifier
TROUBLE
SHOOTING
CHART
Inspecting
items
1
Inspection
with
automatic
trans
mission
on
vehicle
J
AT
54
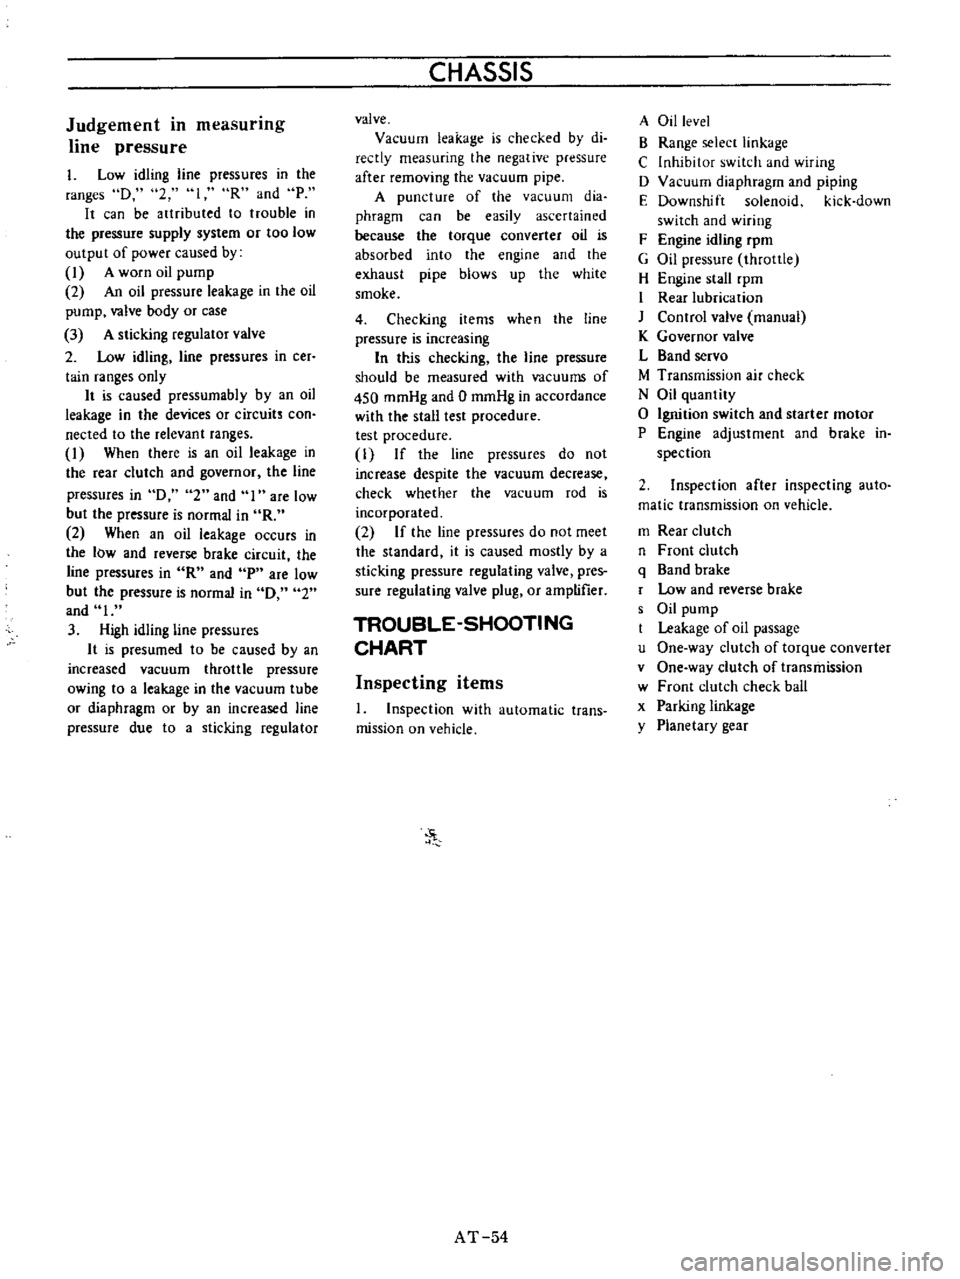
A
Oil
level
B
Range
selecr
linkage
C
Inhibitor
switch
and
wiring
D
Vacuum
diaphragm
and
piping
E
Downshift
solenoid
kick
down
switch
and
wiring
F
Engine
idling
rpm
G
Oil
pressure
throttle
H
Engine
stall
rpm
I
Rear
lubrication
J
Control
valve
manual
K
Governor
valve
L
Band
servo
M
Transmission
air
check
N
Oil
quantity
o
Ignition
switch
and
starter
motor
P
Engine
adjustment
and
brake
in
spection
2
Inspection
after
inspecting
auto
matic
transmission
on
vehicle
m
Rear
clutch
n
Front
clutch
q
Band
brake
r
Low
and
reverse
brake
s
Oil
pump
Leakage
of
oil
passage
u
One
way
clutch
of
torque
converter
v
One
way
clutch
of
transmission
w
Front
clutch
check
ball
x
Parking
linkage
y
Planetary
gear
Page 80 of 513
PROPELLER
SHAFT
DIFFERENTIAL
CARRIER
C
DMark
Unit
mm
in
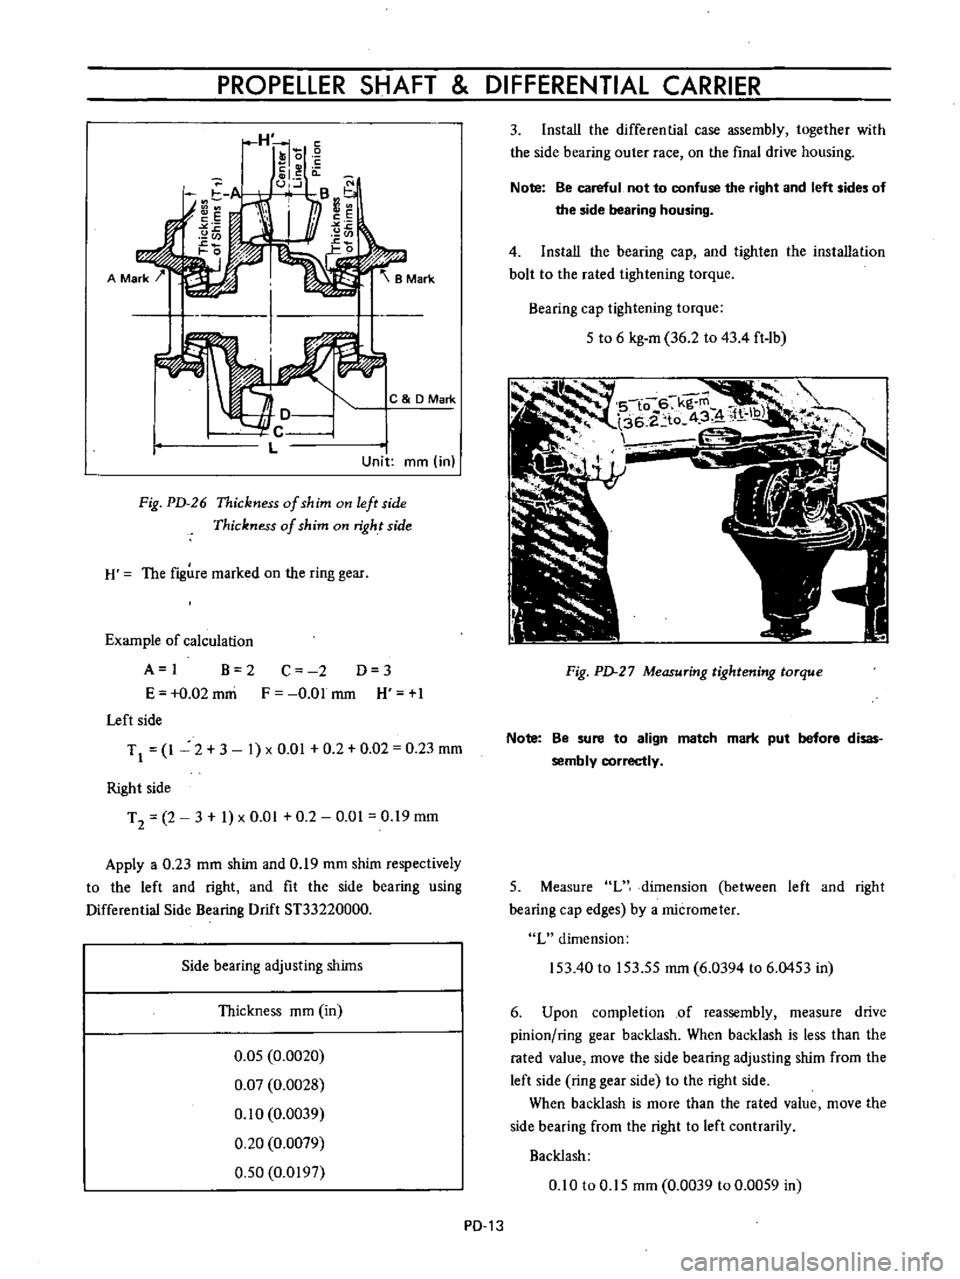
Fig
PD
26
Thickness
of
shim
on
left
side
Thickness
of
shim
on
right
side
H
The
figure
marked
on
the
ring
gear
Example
of
calculation
A
I
B
2
E
0
02
mni
Left
side
C
2
D
3
F
O
Olmm
H
1
TJ
1
2
3
1
xO
01
0
2
0
02
0
23
mm
Right
side
T
2
2
3
1
x
0
01
0
2
0
01
0
19
mm
Apply
a
0
23
mm
shim
and
0
19
mm
shim
respectively
to
the
left
and
right
and
fit
the
side
bearing
using
Differential
Side
Bearing
Drift
ST33220000
Side
bearing
adjusting
shims
Thickness
mm
in
0
05
0
0020
0
07
0
0028
0
10
0
0039
0
20
0
0079
0
50
0
0197
PD
13
3
Install
the
differential
case
assembly
together
with
the
side
bearing
outer
race
on
the
final
drive
housing
Note
Be
careful
not
to
confuse
the
right
and
left
sides
of
the
side
bearing
housing
4
Install
the
bearing
cap
and
tighten
the
installation
bolt
to
the
rated
tightening
torque
Bearing
cap
tightening
torque
5
to
6
kg
m
36
2
to
43
4
ft
1b
Fig
PD
27
Measuring
tightening
torque
Note
Be
sure
to
align
match
mark
put
before
disas
sembly
correctly
5
Measure
L
dimension
between
left
and
right
bearing
cap
edges
by
a
micrometer
L
dimension
153
40
to
153
55
mm
6
0394
to
6
0453
in
6
Upon
completion
of
reassembly
measure
drive
pinion
ring
gear
backlash
When
backlash
is
less
than
the
rated
value
move
the
side
bearing
adjusting
shim
from
the
left
side
ring
gear
side
to
the
right
side
When
backlash
is
more
than
the
rated
value
move
the
side
bearing
from
the
right
to
left
contrarily
Backlash
0
10
to
0
15
mm
0
0039
to
0
0059
in
Page 100 of 513
CHASSIS
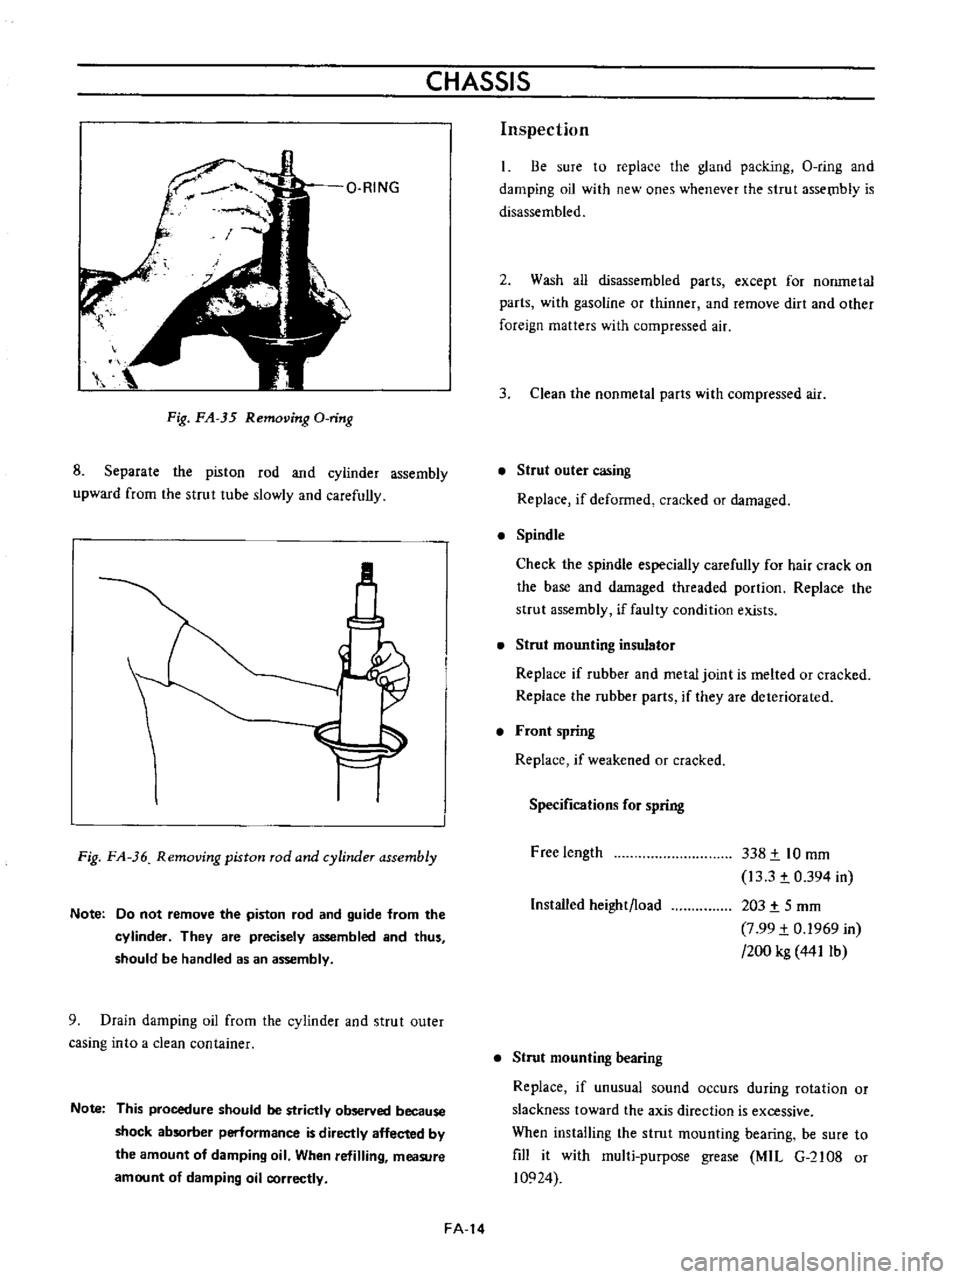
Fig
FA
35
Removing
O
ring
8
Separate
the
piston
rod
and
cyiinder
assembly
upward
from
the
strut
tube
slowly
and
carefully
M
Fig
FA
36
Removing
piston
rod
and
cylinder
assembly
Note
Do
not
remove
the
piston
rod
and
guide
from
the
cylinder
They
are
precisely
assembled
and
thus
should
be
handled
as
an
assembly
9
Drain
damping
oil
from
the
cylinder
and
strut
outer
casing
into
a
clean
container
Note
This
procedure
should
be
strictly
observed
because
shock
absorber
perlormance
is
directly
affected
by
the
amount
of
damping
oil
When
refilling
measure
amount
of
damping
oil
correctly
FA
14
Inspection
Be
sure
to
replace
the
gland
packing
O
ring
and
damping
oil
with
new
ones
whenever
the
strut
assetnb1y
is
disassembled
2
Wash
all
disassembled
parts
except
for
nonmetal
parts
with
gasoline
or
thinner
and
remove
dirt
and
other
foreign
matters
with
compressed
air
3
Clean
the
nonmetal
parts
with
compressed
air
Strut
outer
casing
Replace
if
deformed
cracked
or
damaged
Spindle
Check
the
spindle
especially
carefully
for
hair
crack
on
the
base
and
damaged
threaded
portion
Replace
the
strut
assembly
if
faulty
condition
exists
Strut
mounting
insulator
Replace
if
rubber
and
metal
joint
is
melted
or
cracked
Replace
the
rubber
parts
if
they
are
deteriorated
Front
spring
Replace
if
weakened
or
cracked
Specifications
for
spring
Free
length
338
t
10
mm
13
3
t
0
394
in
203
t
5
mm
7
99
t
0
1969
in
200
kg
441Ib
Installed
height
load
Strut
mounting
bearing
Replace
if
unusual
sound
occurs
during
rotation
or
slackness
toward
the
axis
direction
is
excessive
When
installing
the
strut
mounting
bearing
be
sure
to
fill
it
with
mul1i
purpose
grease
MIL
G
2108
or
10924
Page 111 of 513
FRONT
AXLE
FRONT
SUSPENSION
joint
Transverse
link
mounting
bolt
Tension
rod
Transverse
link
side
Body
side
Stabilizer
bar
Connecting
rod
and
transverse
link
installation
nut
Connecting
rod
and
stabilizer
bar
installation
nut
Stabilizer
bar
and
body
installation
bolt
2
2
to
3
0
15
9
to
21
7
4
0
to
5
0
28
9
to
36
2
2
2
to
3
0
15
9
to
217
5
5
to
6
5
39
7
to
47
0
0
9
to
1
2
6
5
to
8
7
0
9
to
1
2
6
5
to
8
7
0
9
to
1
2
6
5
to
8
7
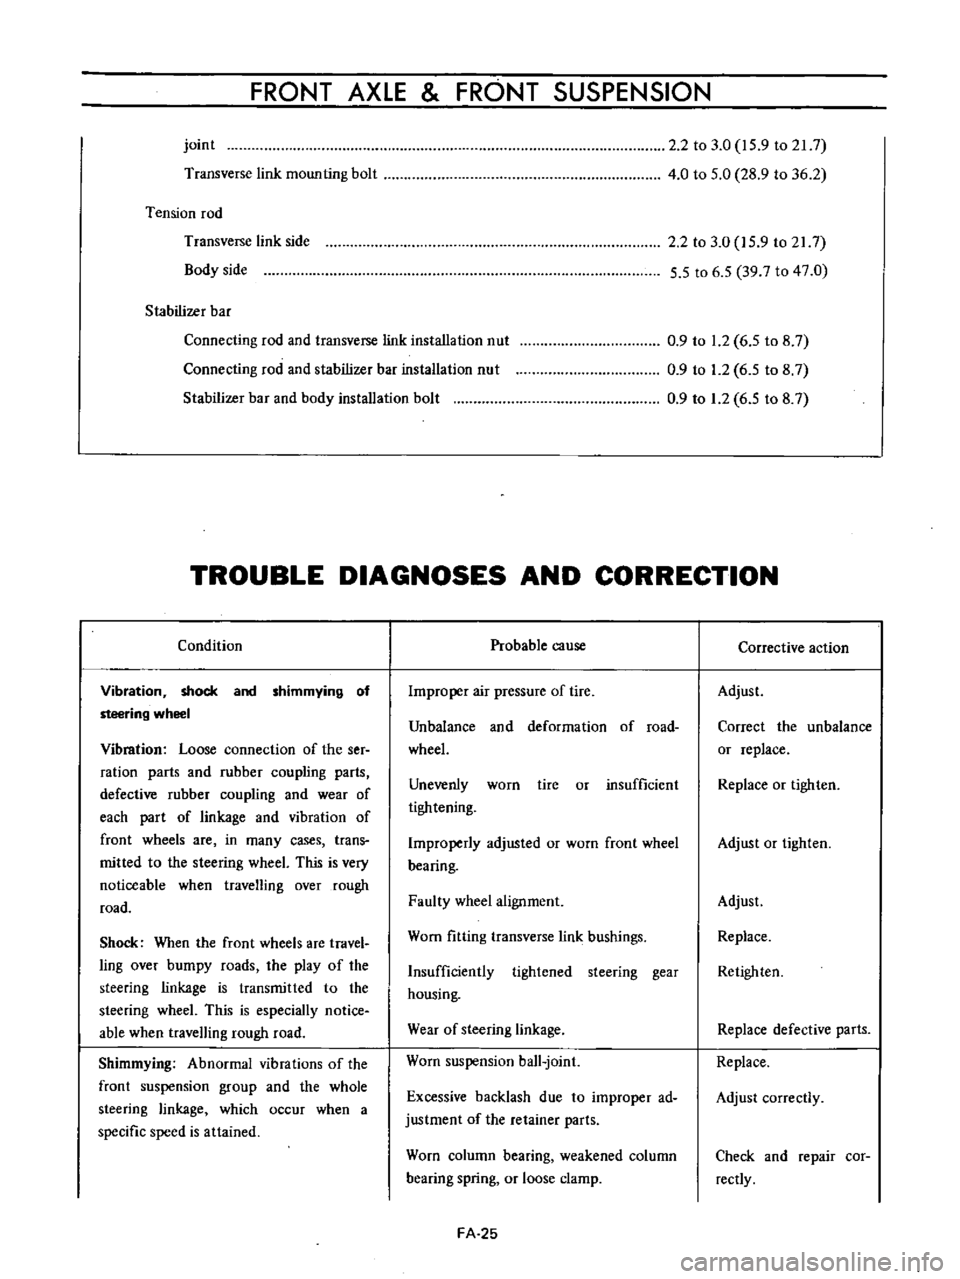
TROUBLE
DIAGNOSES
AND
CORRECTION
Condition
Vibration
shock
and
shimmying
of
steering
wheel
Vibmtion
Loose
connection
of
the
ser
ration
parts
and
rubber
coupling
parts
defective
rubber
coupling
and
wear
of
each
part
of
linkage
and
vibration
of
front
wheels
are
in
many
cases
trans
mitted
to
the
steering
wheeL
This
is
very
noticeable
when
travelling
over
rough
road
Shock
When
the
front
wheels
are
travel
ling
over
bumpy
roads
the
play
of
the
steering
linkage
is
transmitted
to
the
steering
wheeL
This
is
especially
notice
able
when
travelling
rough
road
Shimmying
Abnormal
vibrations
of
the
front
suspension
group
and
the
whole
steering
linkage
which
occur
when
a
specific
speed
is
attained
Probable
cause
Improper
air
pressure
of
tire
Unbalance
and
deformation
of
road
wheeL
Unevenly
worn
tire
or
insufficient
tightening
Improperly
adjusted
or
worn
front
wheel
bearing
Faulty
wheel
alignment
Worn
fitting
transverse
link
bushings
Insufficiently
tightened
steering
gear
housing
Wear
of
steering
linkage
Worn
suspension
ball
joint
Excessive
backlash
due
to
improper
ad
justment
of
the
retainer
parts
Worn
column
bearing
weakened
column
bearing
spring
or
loose
clamp
FA
25
Corrective
action
Adjust
Correct
the
unbalance
or
replace
Replace
or
tighten
Adjust
or
tighten
Adjust
Replace
Retighten
Replace
defective
parts
Replace
Adjust
correctly
Check
and
repair
cor
rectly
Page 157 of 513
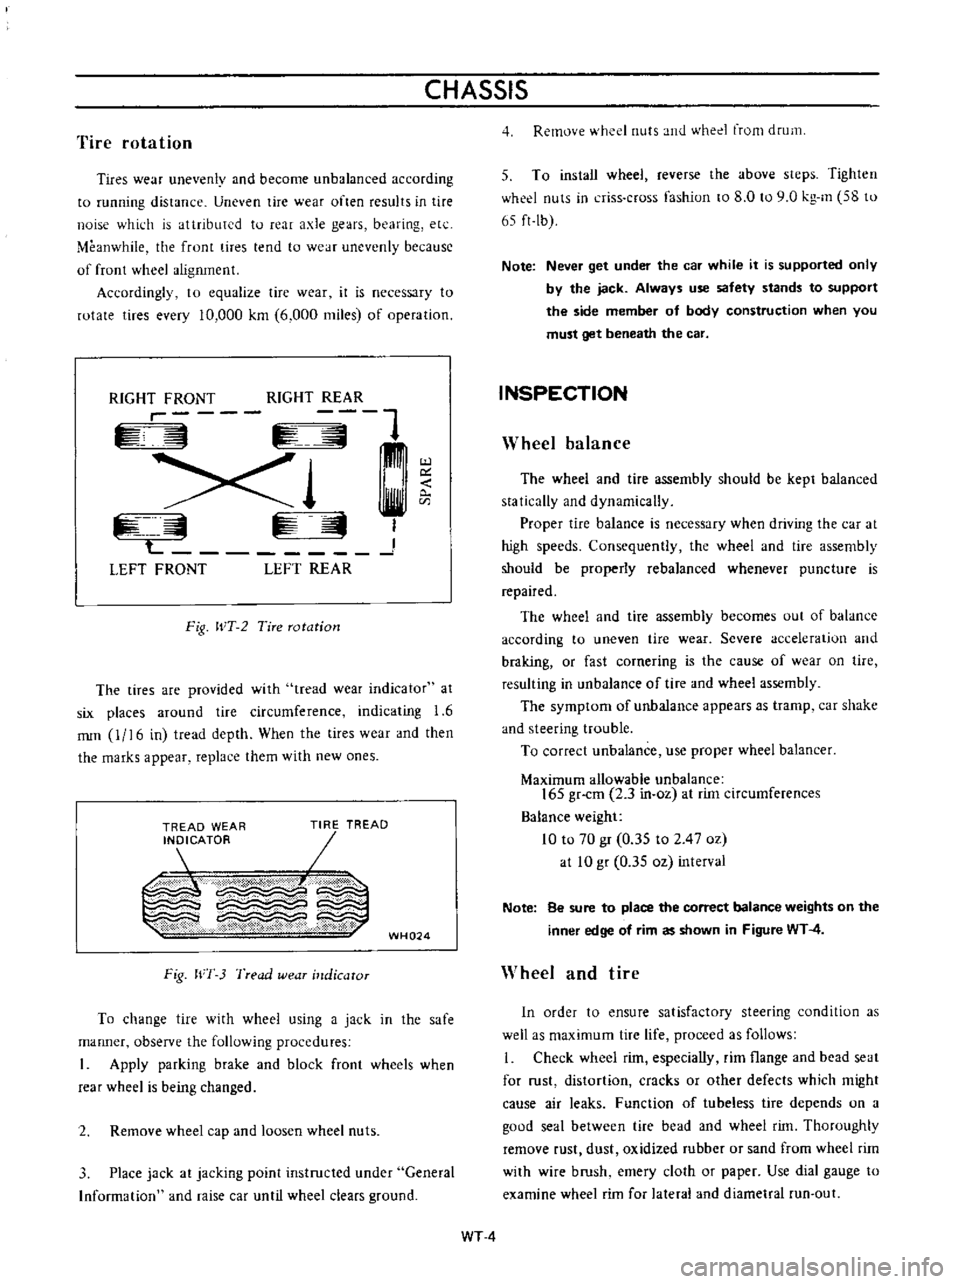
CHASSIS
Tire
rotation
Tires
wear
unevenly
and
become
unbalanced
according
to
running
distance
Uneven
tire
wear
often
results
in
tire
noise
whkh
is
attributed
to
rear
axle
gears
bearing
ell
Meanwhile
the
front
tires
tend
to
wear
unevenly
because
of
front
wheel
alignment
Accordingly
to
equalize
tire
wear
it
is
necessary
to
rotate
tires
every
10
000
km
6
000
miles
of
operation
RIGHT
FRONT
RIGHT
REAR
r
1
Xl
L
J
LEFT
FRONT
LEFT
REAR
Fig
WT
2
Tire
rotation
The
tires
are
provided
with
tread
wear
indicator
at
six
places
around
tire
circumference
indicating
1
6
nun
0
16
in
tread
depth
When
the
tires
wear
and
then
the
marks
a
ppear
replace
them
with
new
ones
TREAD
WEAR
INDICATOR
7
TREAD
m
Y
X
W
X
v
w
WH024
Fig
WI
3
Tread
wear
illdicator
To
change
tire
with
wheel
using
a
jack
in
the
safe
manner
observe
the
following
procedures
I
Apply
parking
brake
and
block
front
wheels
when
rear
wheel
is
being
changed
2
Remove
wheel
cap
and
loosen
wheel
nuts
3
Place
jack
at
jacking
point
instructed
under
General
Information
and
raise
car
until
wheel
clears
ground
4
Remove
wheel
nuts
and
whed
from
drum
5
To
install
wheel
reverse
the
above
steps
Tighten
whed
nuts
in
criss
cross
fashion
to
8
0
to
9
0
kg
m
58
to
65
ft
lb
Note
Never
get
under
the
car
while
it
is
supported
only
by
the
jack
Always
use
safety
stands
to
support
the
side
member
of
body
construction
when
you
must
get
beneath
the
car
INSPECTION
Wheel
balance
The
wheel
and
tire
assembly
should
be
kept
balanced
statically
and
dynamically
Proper
tire
balance
is
necessary
when
driving
the
car
at
high
speeds
Consequently
the
wheel
and
tire
assembly
should
be
properly
rebalanced
whenever
puncture
is
repaired
The
wheel
and
tire
assembly
becomes
out
of
balance
according
to
uneven
tire
wear
Severe
acceleration
and
braking
or
fast
cornering
is
the
cause
of
wear
on
tire
resulting
in
unbalance
of
tire
and
wheel
assembly
The
symptom
of
unbalance
appears
as
tramp
car
shake
and
steering
trouble
To
correct
unbalance
use
proper
wheel
balancer
Maximum
allowable
unbalance
165
gr
cm
2
3
in
ol
at
rim
circumferences
Balance
weight
10
to
70
gr
0
35
to
2
47
Ol
at
10
gr
0
35
Ol
interval
Note
Be
sure
to
place
the
correct
balance
weights
on
the
inner
edge
of
rim
as
shown
in
Figure
WT
4
Wheel
and
tire
In
order
to
ensure
satisfactory
steering
condition
as
well
as
maximum
tire
life
proceed
as
follows
I
Check
wheel
rim
especially
rim
flange
and
bead
seat
for
rust
distortion
cracks
or
other
defects
which
might
cause
air
leaks
Function
of
tubeless
tire
depends
on
a
good
seal
between
tire
bead
and
wheel
rim
Thoroughly
remove
rust
dust
oxidized
rubber
or
sand
from
wheel
rim
with
wire
brush
emery
cloth
or
paper
Use
dial
gauge
to
examine
wheel
rim
for
lateral
and
diametral
run
out
WT
4
Page 161 of 513
STEERING
DESCRIPTION
The
steering
system
consists
of
recirculating
ball
type
gear
box
and
parallelogram
linkage
These
systems
give
good
response
light
handling
and
utmost
durability
Moreover
the
steering
linkage
is
equipped
with
a
torsion
rubber
system
idler
arm
which
absorbs
shock
from
the
wheel
Check
the
lubricant
of
gear
box
every
10
000
km
6
000
miles
and
replenish
recommended
oil
as
required
The
steering
linkage
should
be
greased
up
with
wheel
bearing
grease
every
50
000
km
30
000
miles
All
necessary
service
procedures
for
the
steering
lock
system
are
described
in
the
BODY
ELECTRICAL
SECTION
of
this
manual
and
therefore
no
instruction
is
given
here
STEERING
CONTENTS
REMOVAL
DISASSEMBL
Y
Ball
nut
assembly
ST
2
ST
3
ST
4
INSPECTION
AND
REPAIR
ASSEMBL
Y
AND
ADJUSTMENT
INSTALLATION
ST
4
ST
5
ST
7
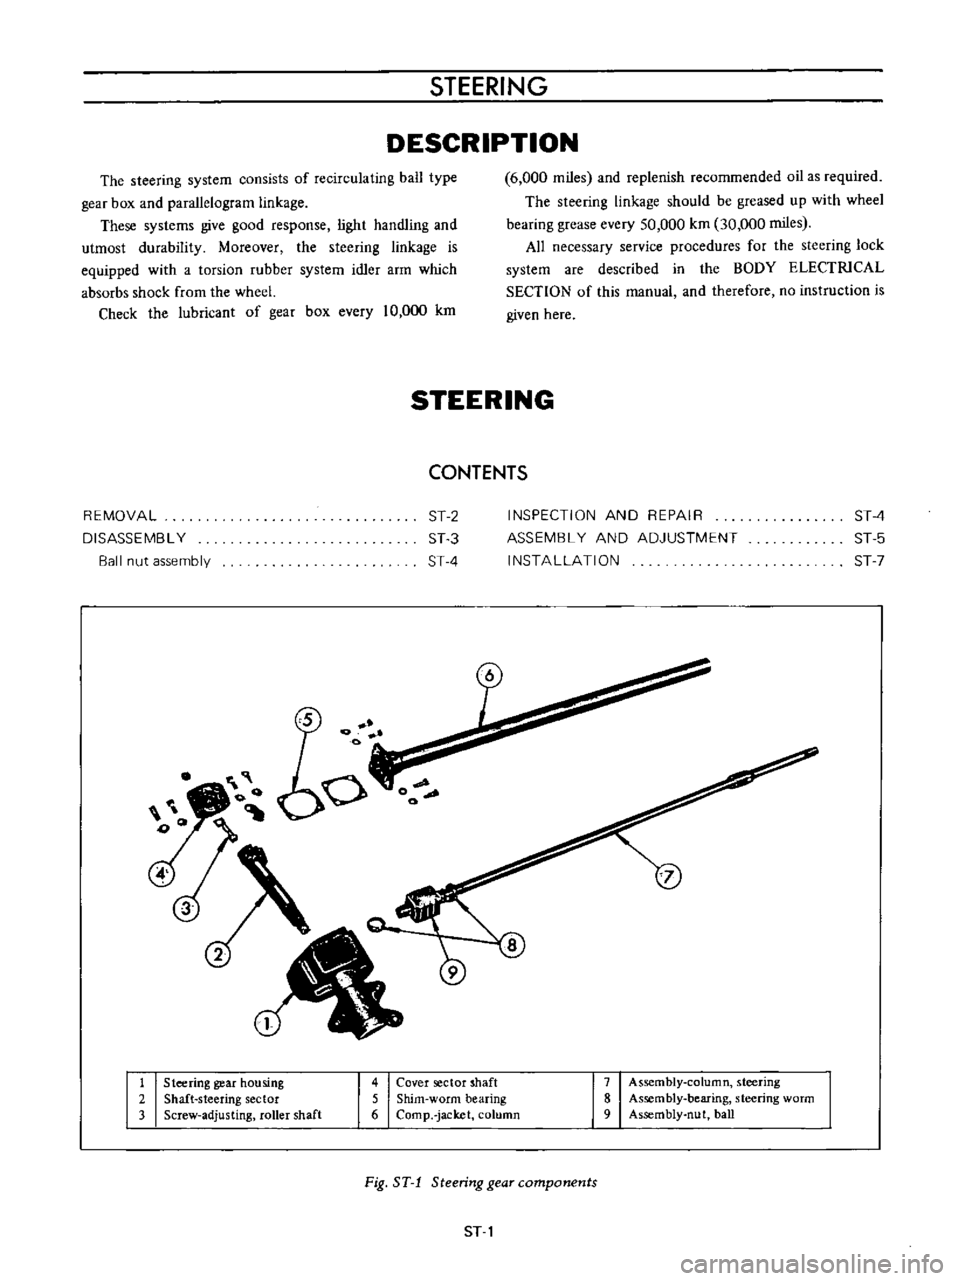
1
Steering
gear
housing
2
Shaft
steering
sector
3
Screw
adjusting
roller
shaft
4
Cover
sector
shaft
5
Shim
worm
bearing
6
Comp
jacket
column
7
Assembly
column
steering
8
Assembly
bearing
steering
worm
9
Assembly
nut
ball
Fig
ST
1
Steering
gear
components
ST
1
Page 168 of 513
CHASSIS
I
l
I
I
2
fa
r
o
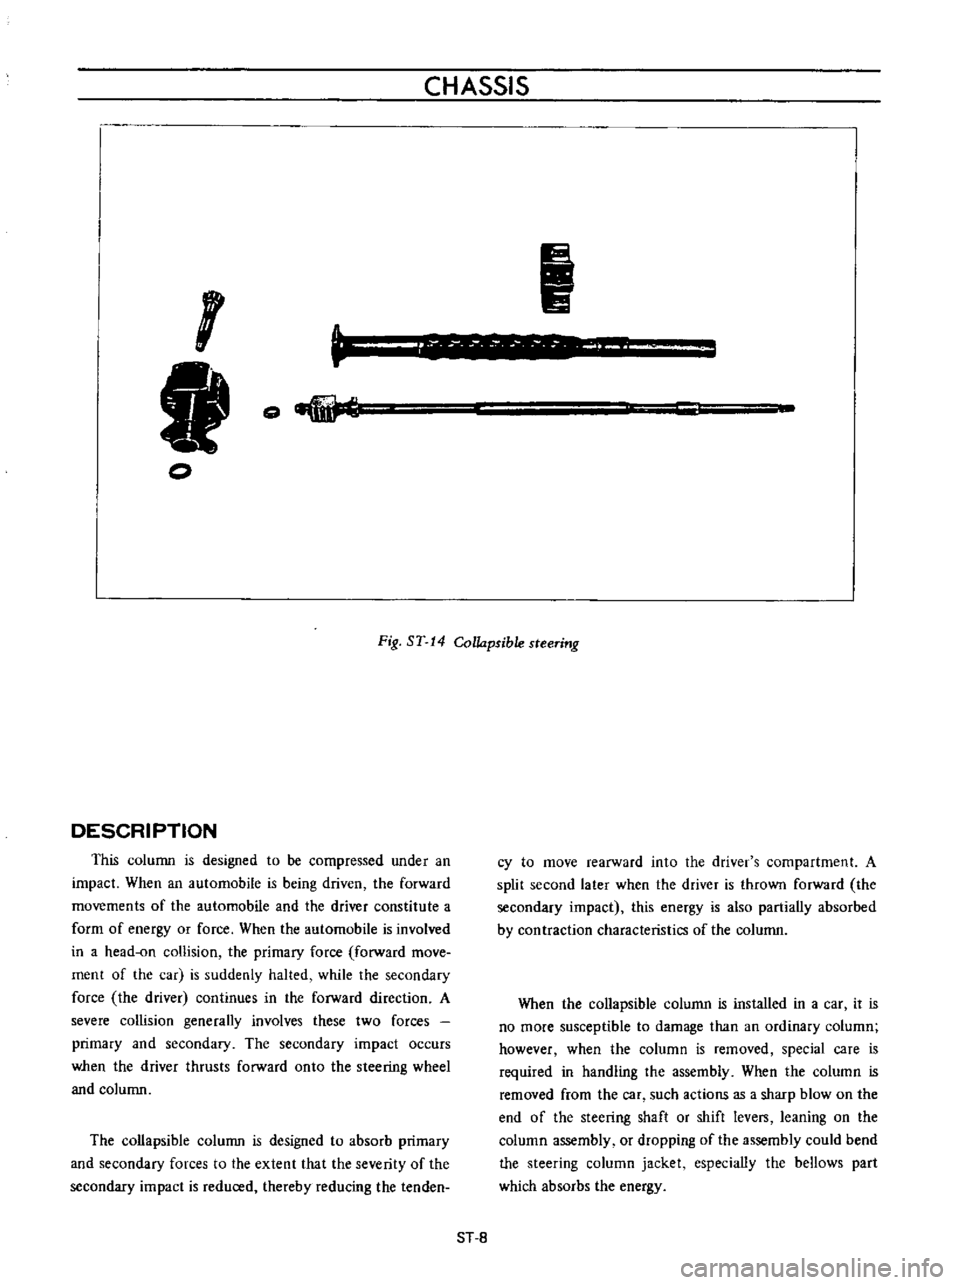
Fig
ST
14
Collapsible
steering
DESCRIPTION
This
column
is
designed
to
be
compressed
under
an
impact
When
an
automobile
is
being
driven
the
forward
movements
of
the
automobile
and
the
driver
constitute
a
form
of
energy
or
force
When
the
automobile
is
involved
in
a
head
on
collision
the
primary
force
forward
move
ment
of
the
car
is
suddenly
halted
while
the
secondary
force
the
driver
continues
in
the
forward
direction
A
severe
collision
generally
involves
these
two
forces
primary
and
secondary
The
secondary
impact
occurs
when
the
driver
thrusts
forward
onto
the
steering
wheel
and
column
The
collapsible
column
is
designed
to
absorb
primary
and
secondary
forces
to
the
extent
that
the
severity
of
the
secondary
impact
is
reduced
thereby
reducing
the
tenden
cy
to
move
rearward
into
the
driver
s
compartment
A
split
second
later
when
the
driver
is
thrown
forward
the
secondary
impact
this
energy
is
also
partially
absorbed
by
contraction
characteristics
of
the
column
When
the
collapsible
column
is
installed
in
a
car
it
is
no
more
susceptible
to
damage
than
an
ordinary
column
however
when
the
column
is
removed
special
care
is
required
in
handling
the
assembly
When
the
column
is
removed
from
the
car
such
actions
as
a
sharp
blow
on
the
end
of
the
steering
shaft
or
shift
levers
leaning
on
the
column
assembly
or
dropping
of
the
assembly
could
bend
the
steering
column
jacket
especially
the
bellows
part
which
absorbs
the
energy
ST
8
Page 170 of 513
CHASSIS
The
construction
of
the
steering
column
is
as
such
that
the
lower
shaft
is
fitted
into
the
upper
tube
when
a
compressing
force
is
applied
to
the
lower
shaft
r
I
1
V
f
7
Steering
torque
is
transmitted
by
the
lower
shaft
and
upper
tube
The
lower
shaft
adopts
a
special
shape
a
circle
with
two
straight
cut
edges
and
the
upper
tube
interior
is
tightly
fitted
against
the
lower
shaft
exterior
toward
the
entire
area
In
addition
four
plastic
pins
completely
eliminate
gap
between
the
lower
shaft
exterior
and
upper
tube
interior
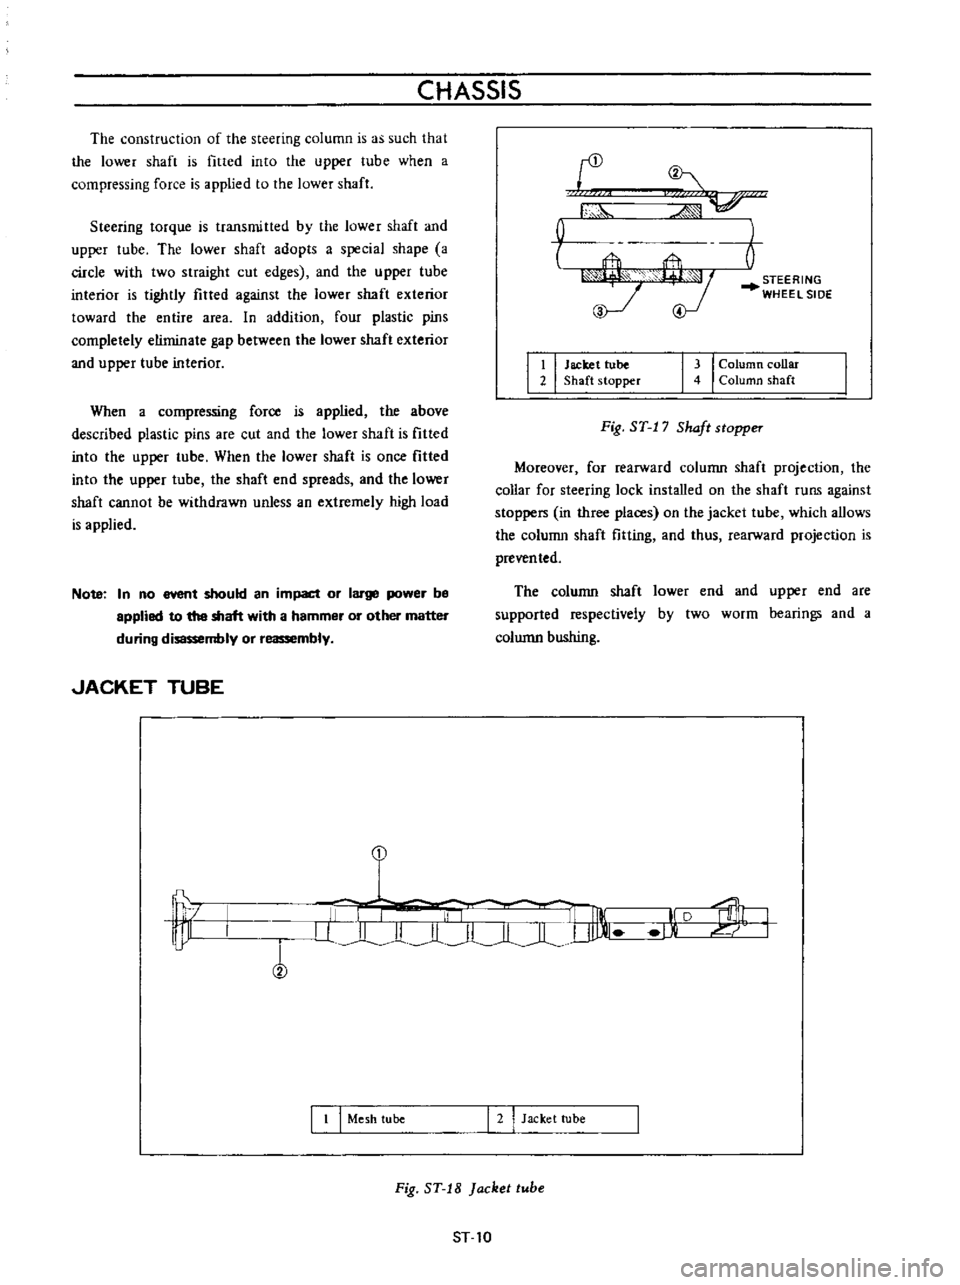
I
I
Jacket
lube
2
Shaft
stopper
I
3
I
Column
coUar
4
Column
shaft
When
a
compressing
force
is
applied
the
above
described
plastic
pins
are
cut
and
the
lower
shaft
is
fitted
into
the
upper
tube
When
the
lower
shaft
is
once
fitted
into
the
upper
tube
the
shaft
end
spreads
and
the
lower
shaft
cannot
be
withdrawn
unless
an
extremely
high
load
is
applied
Fig
ST
1
7
Shaft
stopper
Moreover
for
rearward
column
shaft
projection
the
collar
for
steering
lock
installed
on
the
shaft
runs
against
stoppers
in
three
places
on
the
jacket
tube
which
allows
the
column
shaft
fitting
and
thus
reaIWard
projection
is
prevented
Note
In
no
event
should
an
impact
or
large
power
be
applied
to
the
shaft
with
a
hammer
or
other
matter
during
disassembly
or
reassembly
The
column
shaft
lower
end
and
upper
end
are
supported
respectively
by
two
worm
hearings
and
a
colwnn
bushing
JACKET
TUBE
w
1
U
II
I
II
I
r
liJl
I
I
D
I
1
1
Mesh
tube
I
2
Jacket
tube
Fig
ST
18
Jacket
tube
ST
10
Page 176 of 513
CHASSIS
The
following
tightening
torque
of
nuts
shall
be
adopted
Ball
stud
nut
3
0
to
5
0
kg
m
21
7
to
36
2
ft
lb
Gear
arm
nut
14
kg
m
101
ft
lb
Idler
arm
nut
57
to
6
3
kg
m
41
2
to
45
6
ft
lb
2
Assembly
of
the
idler
assembly
is
accomplished
as
follows
I
Apply
soap
water
on
the
outer
circumference
of
bushing
Press
the
bushing
into
the
idler
arm
carefully
until
the
bushing
protrudes
equally
at
the
both
sides
2
Fit
idler
arm
body
in
the
rubber
bushing
Keep
the
idler
arm
center
line
in
parallel
with
the
chassis
center
line
INSTALLATION
Installation
can
be
accomplished
in
the
reverse
order
of
removal
Pay
attention
to
the
following
points
Set
the
length
of
both
side
rods
to
296
8
mm
11
69
in
It
should
be
done
between
the
ball
stud
centers
2
Check
wheel
alignment
and
if
necessary
adjust
it
ACCIDENT
COLLISION
When
accident
collision
occurs
unfortunately
and
the
vehicle
especially
its
front
unit
is
damaged
conduct
inspection
in
accordance
with
the
following
instruction
Inspect
the
steering
system
particularly
carefully
because
it
is
a
very
important
unit
for
driving
I
Check
both
side
steering
angles
for
correct
balance
2
With
the
tires
positioned
at
neutral
steering
wheel
bar
for
correct
position
check
the
l
3
Operate
the
steering
system
and
check
it
for
sliding
noise
4
Check
the
operation
for
smoothness
l
5
Check
the
side
rod
and
cross
rod
for
bending
6
Check
the
gear
arm
for
crack
7
Check
the
gear
housing
tiglltening
bolt
for
slackness
and
installation
boss
for
crack
8
Check
the
sector
shaft
serration
for
twisting
9
Check
the
sector
gear
for
crack
10
Check
the
ball
screw
for
pitting
II
Check
the
column
shaft
for
bending
crack
and
sliding
scar
12
Check
the
jacket
tube
for
bending
13
Check
the
steering
post
clamp
for
existance
of
column
offset
14
Check
the
side
member
gear
housing
installation
unit
for
deformation
IS
Check
the
portion
of
the
steering
post
bracket
installed
on
the
steering
post
clamp
for
correct
installation
AD
JUSTMENT
I
Toe
in
The
procedure
of
toe
in
adjustment
is
outlined
in
section
FRONT
AXLE
AND
FRONT
SUSPENSION
2
Steering
angle
Under
the
specified
load
4
passengers
adjust
the
stopper
bolt
of
the
knuckle
arm
so
that
the
inner
wheel
has
an
angle
of
430
Note
Specified
steering
angle
of
wheel
is
430
for
inner
wheel
and
36005
for
outer
wheel
ST
16
Page 184 of 513
ENGINE
CONTROL
FUEL
EXHAUST
SYSTEM
For
all
models
fuel
tank
capacity
has
been
increased
in
response
to
the
increased
engine
output
Location
and
mounting
strength
are
improved
for
improvement
of
safety
Sedan
40
l
101
2
US
gal
8
3
4
Imp
gal
Van
38
l
10
US
gal
8
3
8
Imp
gal
Coupe
38
l
10
US
gal
8
3
8
Imp
gal
and
completely
drain
fuel
2
Remove
the
fuel
line
connector
3
Remove
the
luggage
compartment
finishing
4
Remove
four
bolts
used
to
secure
the
fuel
tank
5
Loosen
the
hose
clamp
f
r
II
J
y
I
0
I
V
Ii
i
iJb
Also
for
piping
consideration
has
been
given
on
the
safety
To
be
more
specifically
the
fuel
line
coming
out
from
the
fuel
tank
is
laid
inside
the
rear
side
member
so
that
the
fuel
line
is
protected
from
gravel
and
other
interferences
from
road
In
the
front
floor
section
the
fuel
line
is
laid
inside
a
tunnel
and
thus
fuel
line
reaches
the
engine
compartment
In
addition
the
fuel
strainer
and
fuel
tank
outlet
units
connect
the
fuel
line
with
rubber
hoses
and
for
aU
other
sections
bandy
tube
is
used
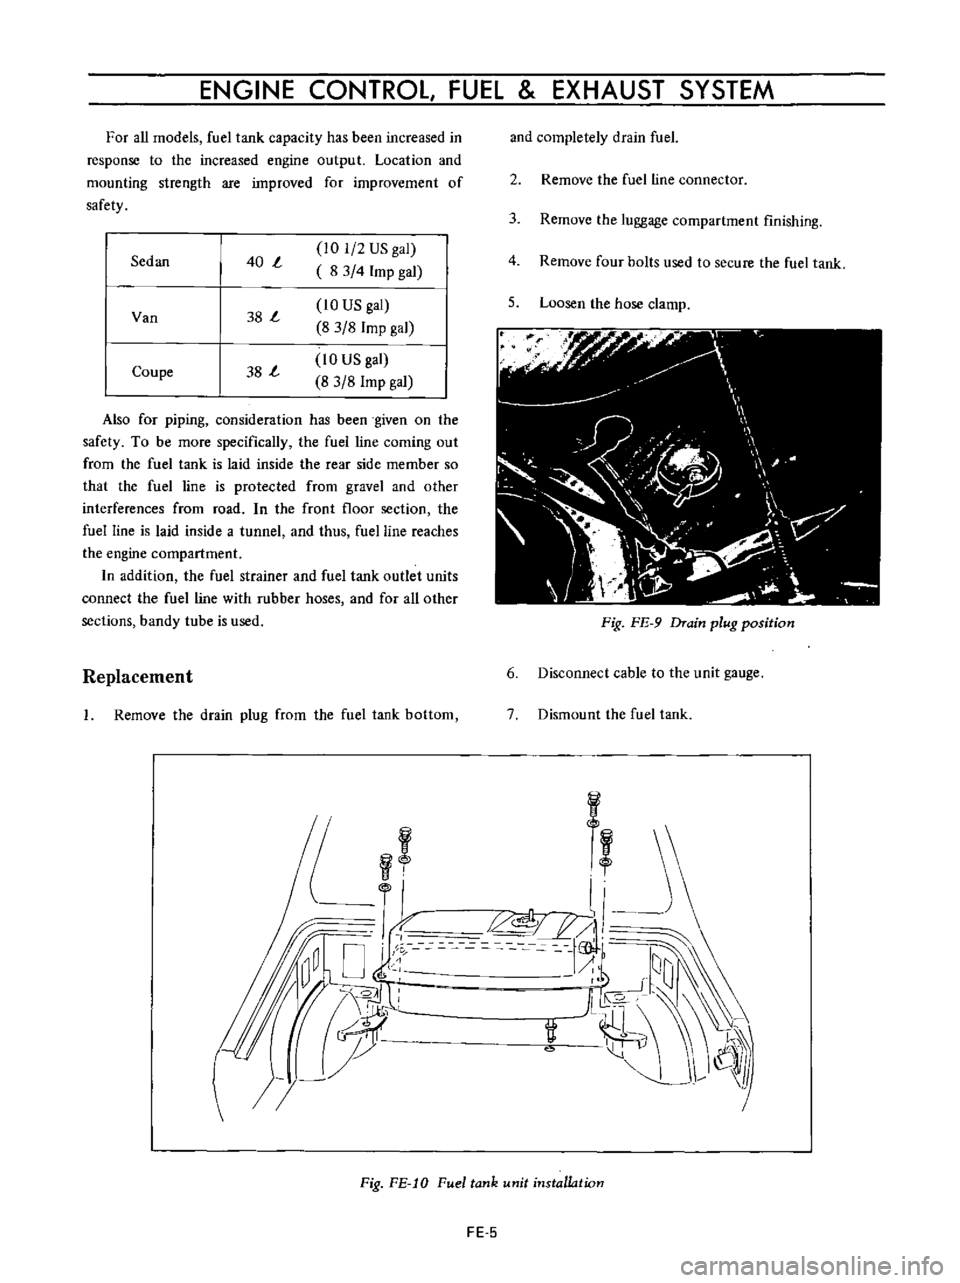
Fig
FE
9
Drain
plug
position
Replacement
Remove
the
drain
plug
from
the
fuel
tank
bottom
6
Disconnect
cable
to
the
unit
gauge
7
Dismount
the
fuel
tank
f
I
Y
L
ll
C
jjhrr
@
Fig
FE
10
Fuel
tank
14nit
installation
FE
5