air condition DATSUN PICK-UP 1977 Service Manual
[x] Cancel search | Manufacturer: DATSUN, Model Year: 1977, Model line: PICK-UP, Model: DATSUN PICK-UP 1977Pages: 537, PDF Size: 35.48 MB
Page 511 of 537
Air
Conditioning
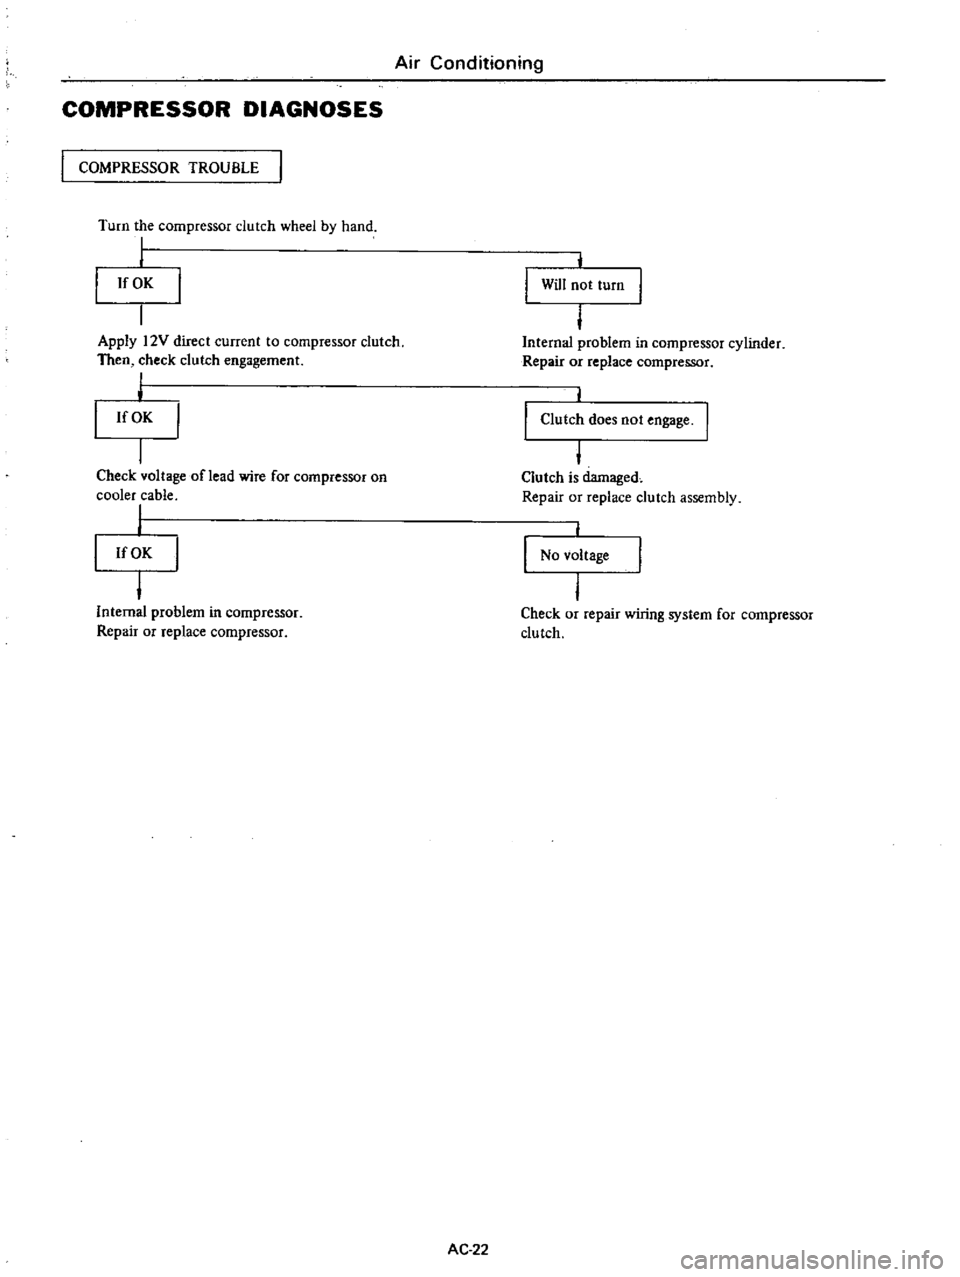
COMPRESSOR
DIAGNOSES
I
COMPRESSOR
TROUBLE
Turn
the
compressor
dutch
wheel
by
hand
I
I
If
OK
j
Will
not
turn
Apply
12V
direct
current
to
compressor
clutch
Then
check
clutch
engagement
I
j
If
OK
I
Internal
problem
in
compressor
cylinder
Repair
or
replace
compressor
Check
voltage
oflead
wire
for
compressor
on
cooler
cable
I
I
If
OK
I
Clutch
does
not
engage
I
Clutch
is
damaged
Repair
or
replace
dutch
assembly
No
voltage
I
Internal
problem
in
compressor
Repair
or
replace
compressor
Check
or
repair
wiring
system
for
compressor
clutch
AC
22
Page 512 of 537
Air
Conditioning
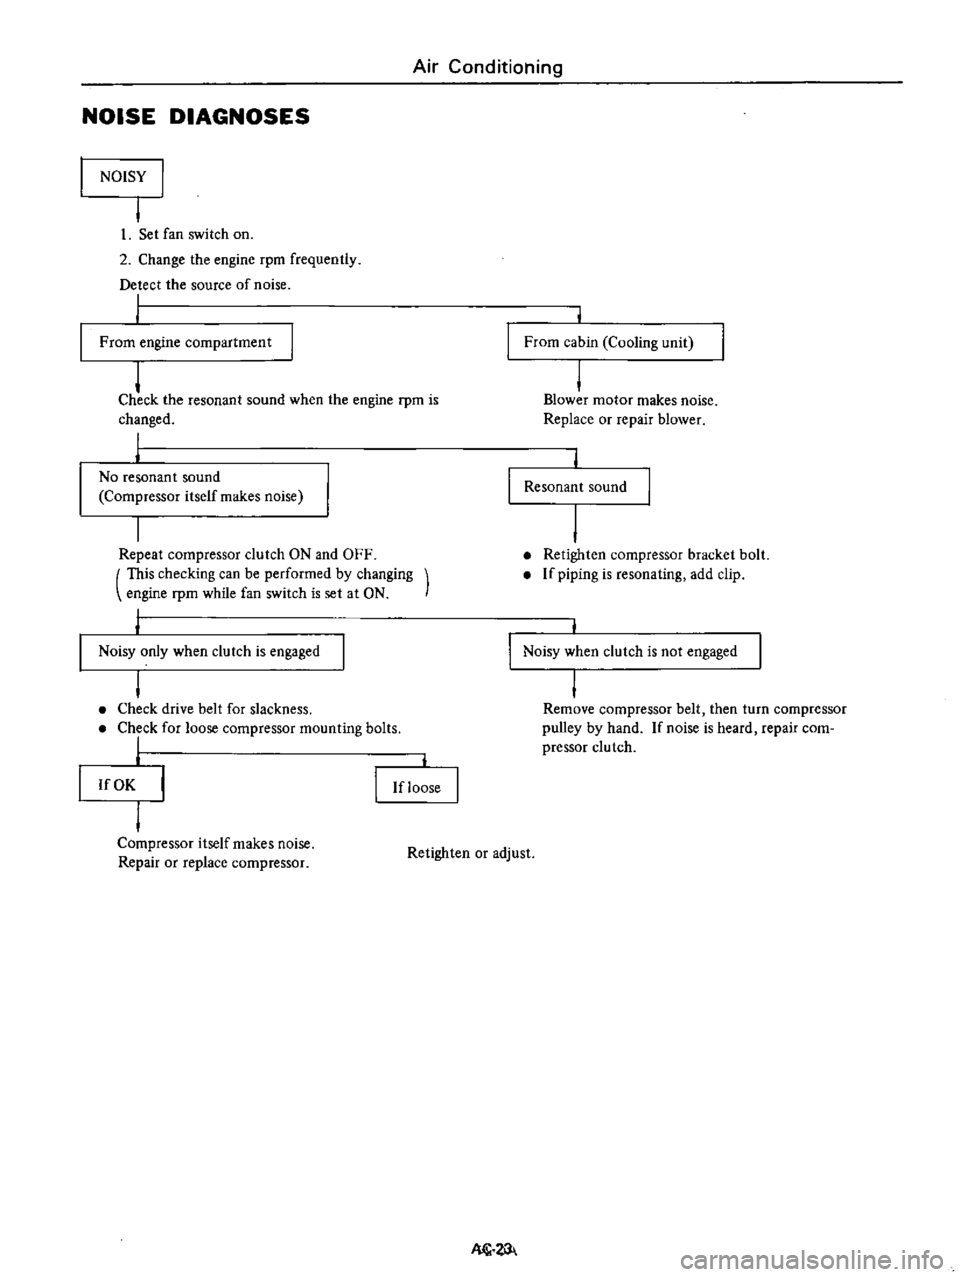
NOISE
DIAGNOSES
NOISY
I
I
I
Set
fan
switch
on
2
Change
the
engine
rpm
frequently
Detect
the
source
of
noise
I
From
engine
compartment
From
cabin
Cooling
unit
j
Check
the
resonant
sound
when
the
engine
rpm
is
changed
I
I
No
resonant
sound
Compressor
itself
makes
noise
j
Blower
motor
makes
noise
Replace
or
repair
blower
Resonant
sound
Repeat
compressor
clutch
ON
and
OFF
This
checking
can
be
performed
by
changing
engine
rpm
while
fan
switch
is
set
at
ON
Retighten
compressor
bracket
bolt
If
piping
is
resonating
add
clip
Noisy
only
when
clutch
is
engaged
Noisy
when
clutch
is
not
engaged
I
Check
drive
belt
for
slackness
Check
for
loose
compressor
mounting
bolts
I
I
Remove
compressor
belt
then
turn
compressor
pulley
by
hand
If
noise
is
heard
repair
com
pressor
clutch
If
OK
If
loose
Compressor
itself
makes
noise
Repair
or
replace
compressor
Retighten
or
adjust
Nl1
Page 513 of 537

Air
Conditioning
BLOWER
MOTOR
DIAGNOSES
Blower
motor
inoperative
Check
fuse
In
fuse
block
15A
W
Single
fuse
15A
at
cooling
unit
I
j
If
OK
Check
the
continuity
and
fitting
of
fan
switch
I
I
If
OK
I
I
Connect
fan
switch
to
wiring
harness
2
Turn
the
ignition
switch
ON
IG
3
Set
fan
switch
at
ON
1
2
or
3
position
Check
the
voltage
for
blower
motor
Blue
lead
wire
is
poweI
source
Blue
wire
with
white
stripe
is
for
grounding
I
I
Voltage
I
I
Check
the
continuity
and
fitting
of
resistance
on
cooling
unit
I
I
If
OK
If
damaged
I
I
Replace
blower
motor
Replace
resistance
AC
24
mown
fuse
Replace
fuse
j
If
damaged
I
I
Replace
fan
switch
No
voltage
Replace
main
relay
Page 514 of 537

Air
Conditioning
REMOVAL
AND
INSTALLATION
COMPRESSOR
REMOVAL
INSTALLATION
IDLER
PULLEY
FAN
BELT
TENSION
ADJUSTMENT
REMOVAL
AND
INSTALLATION
INSPECTION
COOLING
UNIT
REMOVAL
AND
INSTALLATION
DISASSEMBLY
AND
ASSEMBLY
INSPECTION
RECEIVER
DRYER
AND
PIPING
COMPRESSOR
REMOVAL
I
Remove
battery
2
Disconnect
compressor
lead
wire
at
connector
3
Loosen
idler
pulley
lock
nut
then
adjusting
bolt
Remove
compressor
drive
belt
from
compressor
pulley
AC477
Fig
AC
28
Removing
drive
belt
4
Discharge
system
Refer
to
Dis
charging
System
under
General
Service
section
CONTENTS
AC
25
AC25
AC26
AC
27
AC
27
AC27
AC
27
AC27
AC
27
AC
2B
AC
29
AC
29
REMOVAL
AND
INSTALLATION
INSPECTION
WIRING
HARNESS
AND
COMPONENTS
WIRING
DIAGRAM
MAINTENANCE
MAIN
RELAY
COMPRESSOR
RELAY
FAN
SWITCH
RESISTOR
FOR
FAN
SWITCH
THERMO
SWITCH
F
I
C
D
SOLENOID
VALVE
AC29
AC29
AC30
AC30
AC31
AC31
AC31
AC31
AC32
AC32
AC
32
5
Remove
flexible
hose
fixing
plate
and
disconnect
low
and
high
pressure
flexible
hoses
from
compressor
Notes
a
Use
two
wrenches
when
disconnect
ing
pipe
joints
b
Plug
flexible
hose
and
compressor
joint
openings
immediately
after
disconnection
to
prevent
entry
of
dust
moisture
laden
air
etc
Fig
AC
29
Disconnecting
ftexible
hoses
from
compressor
6
Remove
bolts
securing
fuel
tube
to
compressor
attachment
AC
25
Y
1
L
AC744
7
Remove
four
bolts
securing
com
pressor
to
its
bracket
Compressor
and
attachment
can
now
be
detached
as
an
assembly
Notes
a
There
are
a
total
of
four
bolts
two
on
upper
side
of
bracket
and
two
on
lower
side
of
compreSsor
Loosen
upper
bolts
and
remove
lower
bolts
When
removing
upper
bolts
securely
hold
compressor
with
one
hand
b
When
installing
temporarily
tighten
upper
bolts
then
tighten
lower
bolts
Page 515 of 537
2
R
C7
c
L
PJJ
I
8
INSTALLATION
a
c
J
l
i
rp
To
install
compressor
reverse
the
order
of
removal
Observe
the
follow
ing
nhlJo
e
trorf
1001
vom
R
i
n3
Wheliqli
liiAniitg
fiil
l
in
pt
l
witlil
tiiel
sam
efuouiitITof
b11
1fasitlult
used
previously
v
d
rnl
2
Oil
capacity
new
compressor
O
910
1
owt
llllt
blj
f
H
w
s
013
5
rlT
s
0
111
boc
19
bB1rllo
bi2
qqll
no
e
l
bffik
kuanM
mpdi
x
of
Jli
oln
L
il
m
1IlffiiOrb
fler
ot
oldm
F
n
Cheo
f
undeF
r
n
al
1
aQ
r1tIU
Jt
t31
HClJI1
t
JIVU
i
rlUI
1o
ifm
ft
q
t
VI
31U
S
ltlod
bnM
UfO
l
W
kldf
CJiJi
ti
WIf
nl
L
llil
g
ncn
d
oressor
M
et
illpuntinl
botts
if
l9Wul
fb
i
l
fI
I
l
1Ttio
l
qqlJ
necessary
re
Ighten
I
d
210
Air
Conditioning
Tightening
torque
Flexible
hose
to
compressor
dl
t
kg
J
l
IQ
1
Tf
es
oriti
ra
Lbolts
IbP
fo
o15g
m
J
r
f6i
o
20
i
il
f
J
rt
I
r
aGket
engine
Dons
1
1
0
1
1
3
16
5
l11fd
1l
V
f
42
3
3U
llif
Yl
I
u
y
j
3
D
not
remove
IJgs
orflexibie
1i6
e
before
ready
for
immediate
use
4l
di
Wheniiinstallingccomptess
i
turn
it
serWfiPtiffies
SlOt
5
When
connecting
flexible
hose
to
9mPr
ssor
apD
v
a
coat
of
Hfresh
JU
UI
l1Il
t
2
JIUU
uOHltl
r
fl
compressor
0
1
to
fs
aHn
lurfaces
of
1n
1l11
JJ
J
f
PJU
Ht
UlUJ
jJ
joints
AC
26
5
1
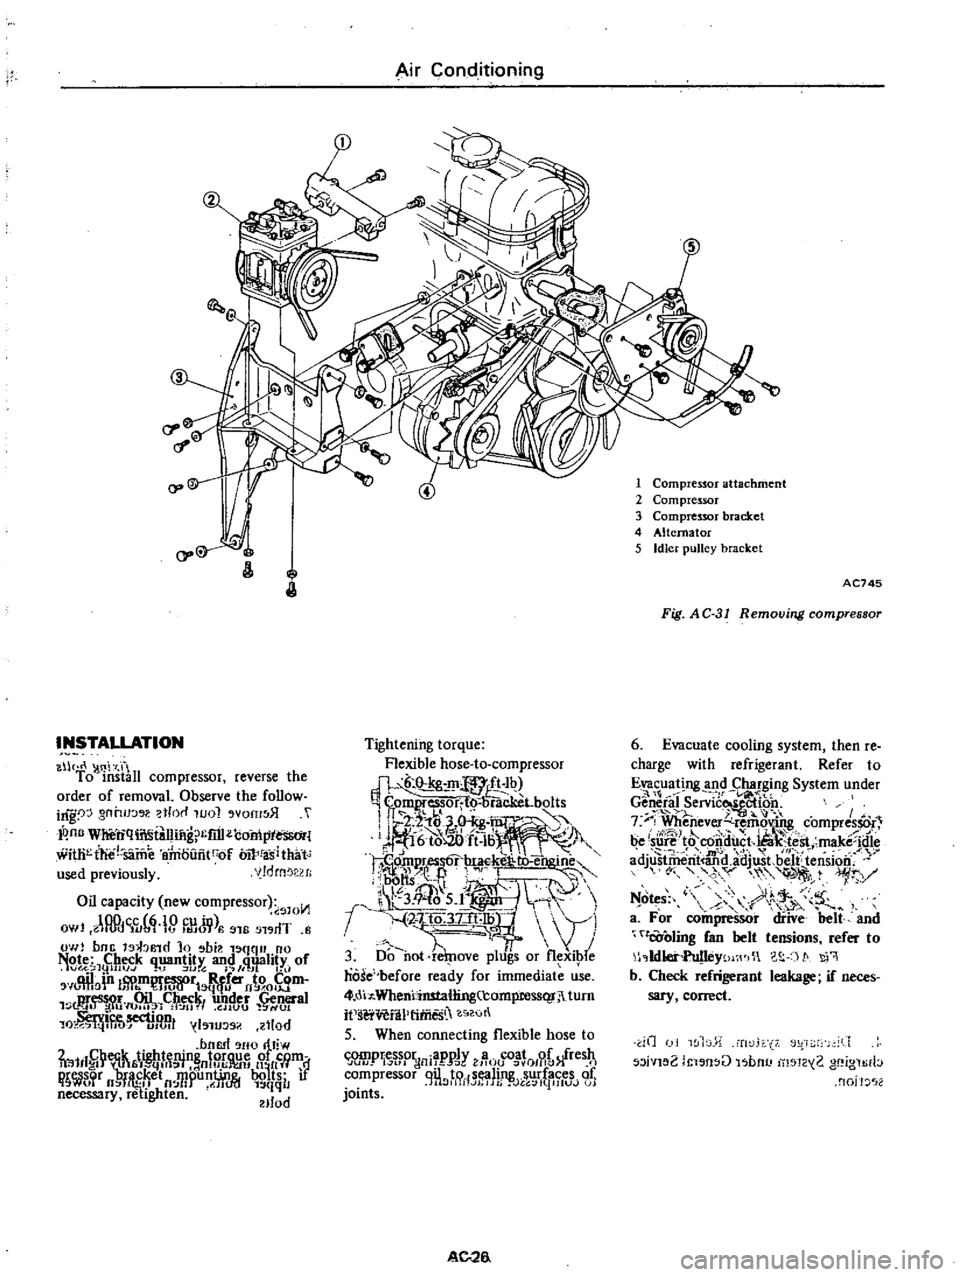
Compressor
attachment
2
Compressor
3
Compressor
bracket
4
AHernator
5
Idler
pulley
bracket
AC745
Fig
AC
31
Removing
compressor
6
Evacuate
cooling
system
then
re
charge
with
refrigerant
Refer
to
Evacuating
and
Charging
System
under
l
r
Gen
efal
Servic
ectioo
f
iI
t
7
F
Whenever
remoV
J
compres
r
be
su
J
t8
C6itiu
t
Ua
t
st
make
idie
mV
i
1rJ
adjustril
rit
and
adjwt
beJf
tension
yv
1
r
Y
N
o
s
9
r
h
v
a
For
compressor
diive
belt
and
tOoling
fan
belt
tensions
refer
to
1
Ildlet
Yt
j
WI
c
S
t
q
b
Cheok
refrigerant
leakage
if
neces
sary
correct
dO
I
wl
Tw
l
rt
f
r2
iVl
2
i
l
n
U
l
bnu
1
1Z
2
gf
ign
rb
nojJ
2
Page 516 of 537
IDLER
PULLEY
FAN
BELT
TENSION
ADJUSTMENT
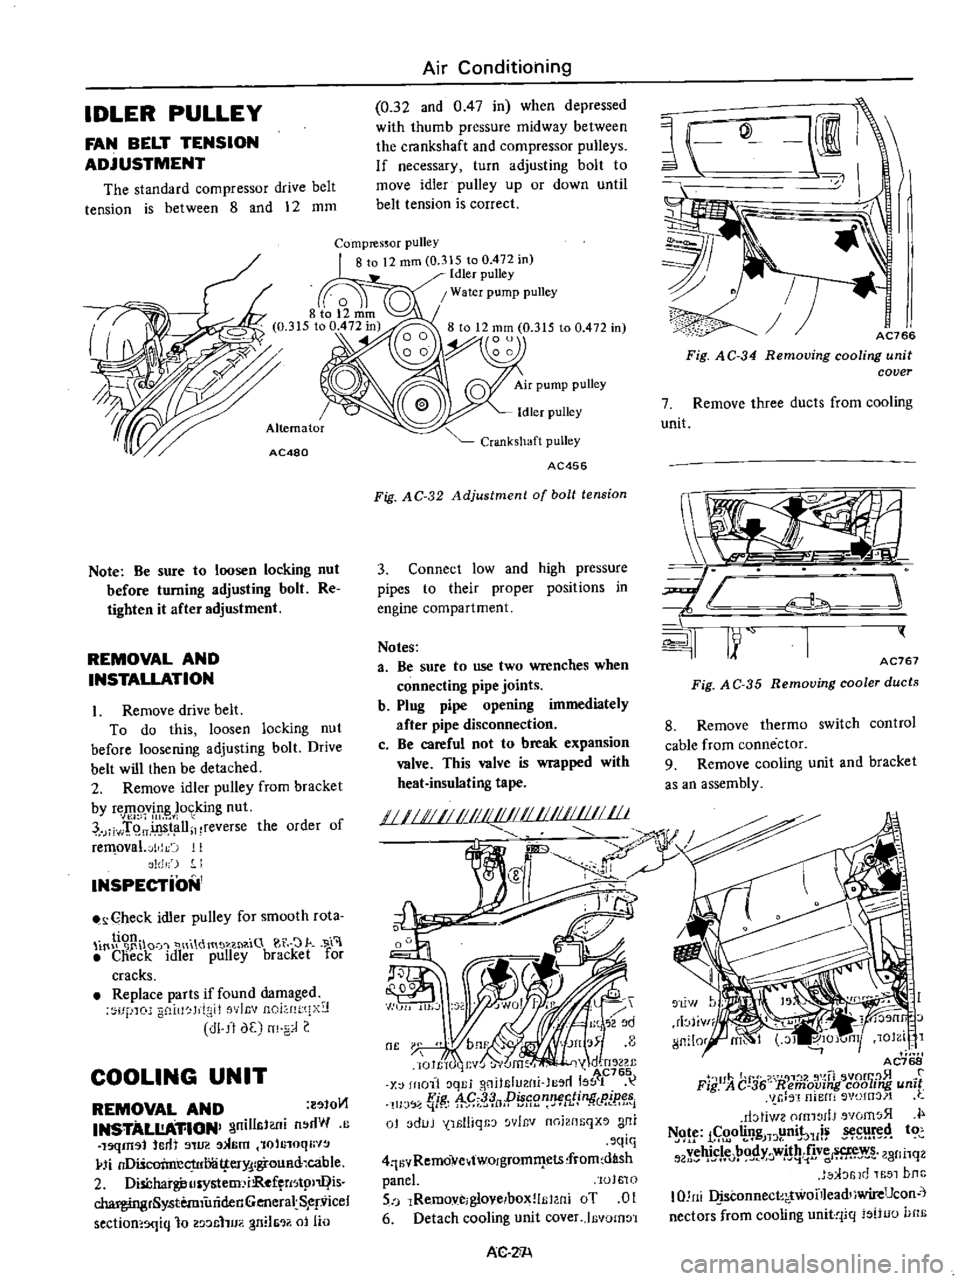
The
standard
compressor
drive
belt
tension
is
between
8
and
12
mm
AC480
Note
Be
sure
to
loosen
locking
nut
before
turning
adjusting
bolt
Re
tighten
it
after
adjustment
REMOVAL
AND
INSTALLATION
Remove
drive
belt
To
do
this
loosen
locking
nut
before
loosening
adjusting
bolt
Drive
belt
will
then
be
detached
2
Remove
idler
pulley
from
bracket
by
r
J1e
vM
or
king
nut
jiwT
9ff
t
llil
reverse
the
order
of
rerr
oval
jldJ
1
t
Jldr
J
I
INSPECTiON
Oheck
idler
pulley
for
smooth
rota
tion
G
0
llfHt
H
Y
d
H
u
t
1
W
n
l
ot
Jrk
H
l
Check
i
ler
pulley
bracket
for
cracks
Replace
arts
iffound
damaged
c
f
lOJ
gD
IlI
J
l
gtt
flvlnv
nOj
IH
q
g
cll
dE
m
J
COOLING
UNIT
REMOVAL
AND
oM1
INSTALl
A
1lIONI
gnillslUli
n
dW
C
19qm91
crft
llU2
3
6rn
f01
Gl0ql
pj
nDiScoimecprlY
i
ferY
lgroUR
hable
2
Disbhargiou
y
tem
iRefrflsll
Qis
chargingrSystemiillidenGeneral
S
ervicel
sectiom5qiq
10
2
9
fl
1U
n
1Ii
2
oj
liD
Air
Conditioning
0
32
and
0
47
in
when
depressed
with
thumb
pressure
midway
between
the
crankshaft
and
compressor
pulleys
If
necessary
turn
adjusting
bolt
to
move
idler
pulley
up
or
down
until
belt
tension
is
correct
Idler
pulley
Crankshaft
pulley
AC456
Fig
AC
32
Adjustment
of
bolt
tension
3
Connect
low
and
high
pressure
pipes
to
their
proper
positions
in
engine
compartment
Notes
3
Be
sure
to
use
two
wrenches
when
connecting
pipe
joints
b
Plug
pipe
opening
immediately
after
pipe
disconnection
c
Be
careful
not
to
break
expansion
valve
This
valve
is
wrapped
with
heat
insulating
tape
0
J
JWu
J
1
2
ld
m
bm
Ufl
J51
8
I
1
lEldgJ
v
Jwm
j
y
d
n
l2u
1
C765
X
fIlO
1i
qJ
j
gnjlcfu2fIJ
lc
rf
1551
1UJ
flip
1h
tqnPfffi2n
Wfi
i
V1c
ip
j
at
3duJ
lsIliqr
J
wlr
v
n
irWfiqX
ani
qiq
4q
v
Remo
e
tworgromll
ets
from
dash
panel
lots
n
5
lRemove
glovelbox
lBl
n1
oT
0
6
Detach
cooling
unit
cover
Icyom
n
AC
ZA
AC766
Fig
AC
34
Removing
cooling
unit
cover
7
Remove
three
ducts
from
cooling
unit
i
j
l
I
11
AC767
Fig
A
C
35
Removing
cooler
ducts
8
Remove
thermo
switch
control
cable
from
conne
ctor
9
Remove
cooling
unit
and
bracket
as
an
assembly
J
t
AC768
F
lIJAh
Cr
P
3
6
R
1
7
fi
vorr
l
l51
r
Ig
emo
vmg
coo
mg
um
r
n
I1iBITJ
0HJ
Jl
t
rbtivl2
Ofm
IIfj
wom
51
f
H
f
L
ol
IJgjjJpn
1I
SH
tc
vehicle
bn
y
with
five
rews
q
2tl
G
i
O
r
Jv
a8f1l1
J
a
I
ld
1
51
b
nc
IOJni
QisconnecEf
twonleadliwif
eUcon
1
nectars
from
cooling
unitqiq
s
iuo
UHf
Page 517 of 537
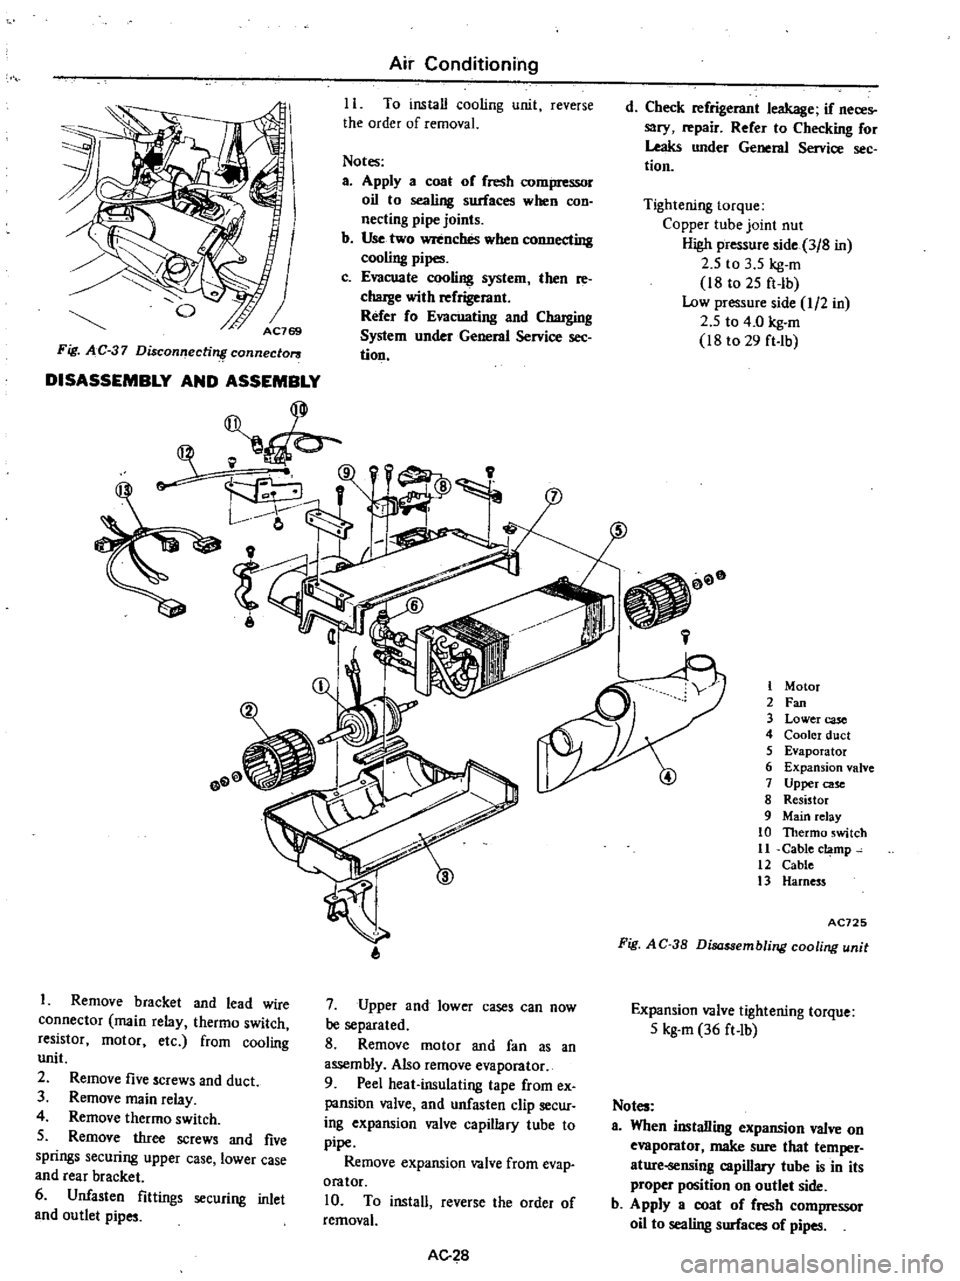
I
o
Fig
AC
37
Disconnectirt
connector
3
DISASSEMBLY
AND
ASSEMBLY
I
Remove
bracket
and
lead
wire
connector
main
relay
thermo
switch
resistor
motor
etc
from
cooling
unit
2
Remove
five
screws
and
duct
3
Remove
main
relay
4
Remove
thermo
switch
5
Remove
three
screws
and
five
springs
securing
upper
case
lower
case
and
rear
bracket
6
Unfasten
fittings
securing
inlet
and
outlet
pipes
Air
Conditioning
11
To
install
cooling
unit
reverse
the
order
of
removal
Notes
a
Apply
a
coat
of
fresh
compressor
oil
to
sealing
surfaces
when
COD
necting
pipe
joints
b
Use
two
wrenches
when
connecting
cooling
pipes
c
Evacuate
cooling
system
then
re
chaJge
with
refrigerant
Refer
fo
Evacuating
and
Charging
System
under
General
Service
see
tion
9
7
Upper
and
lower
cases
can
now
be
separated
8
Remove
motor
and
fan
as
an
assembly
Also
remove
evaporator
9
Peel
heat
insulating
tape
from
ex
pansion
valve
and
unfasten
clip
secur
ing
expansion
valve
capillary
tube
to
pipe
Remove
expansion
valve
from
evap
orator
10
To
install
reverse
the
order
of
removal
AG
28
d
Check
refrigerant
leakage
if
neces
sary
repair
Refer
to
Checking
for
Leaks
under
General
Service
sec
tion
Tightening
torque
Copper
tube
joint
nut
High
pressure
side
3
8
in
2
5
to
3
5
kg
m
18
to
25
ft
lb
Low
pressure
side
I
2
in
2
5
to
4
0
kg
m
18
to
29
ft
lb
00
L
1
Motor
2
Fan
3
Lower
case
4
Cooler
duct
5
Evaporator
6
Expansion
valve
7
Upper
case
8
Resistor
9
Main
relay
10
Thermo
switch
11
Cable
c
mp
12
Cable
3
Harness
AC725
Fig
A
C
38
Disassembling
cooling
unit
Expansion
valve
tightening
torque
5
kg
m
36
ft
Ib
Notes
a
When
installing
expansion
valve
on
evaporator
make
sure
that
temper
ature
oensing
capillary
tube
is
in
its
proper
position
on
outlet
side
b
Apply
a
coat
of
fresh
compressor
oil
to
sealing
surfaces
of
pipes
Page 518 of 537
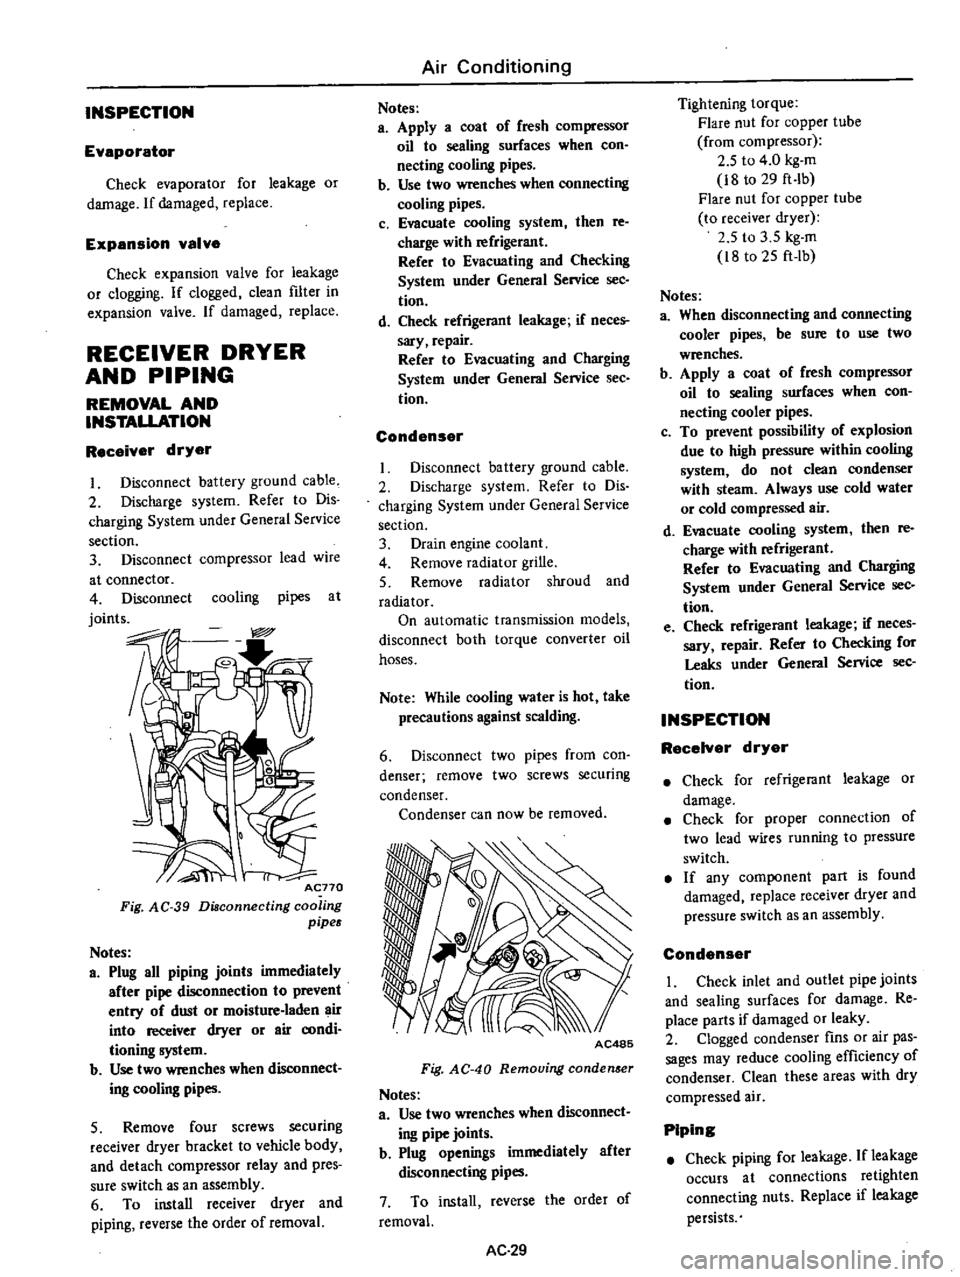
INSPECTION
Evaporator
Check
evaporator
for
leakage
or
damage
If
damaged
replace
Expansion
valve
Check
expansion
valve
for
leakage
or
clogging
If
clogged
clean
filter
in
expansion
valve
If
damaged
replace
RECEIVER
DRYER
AND
PIPING
REMOVAL
AND
INSTAUATION
Receiver
dryer
I
Disconnect
battery
ground
cable
2
Discharge
system
Refer
to
Dis
charging
System
under
General
Service
section
3
Disconnect
compressor
lead
wire
at
connector
4
Disconnect
cooling
pipes
at
joints
Acno
Fig
AC
39
Diaconnecting
coo
ing
pipes
Notes
a
Plug
all
piping
joints
immediately
after
pipe
disconnection
to
prevent
entry
of
dust
or
moisture
laden
air
into
receiver
dryer
or
air
aJOdi
tioning
system
b
Use
two
wrenches
when
dIsconnect
ing
cooling
pipes
5
Remove
four
screws
securing
receiver
dryer
bracket
to
vehicle
body
and
detach
compressor
relay
and
pres
sure
switch
as
an
assembly
6
To
install
receiver
dryer
and
piping
reverse
the
order
of
removal
Air
Conditioning
Notes
a
Apply
a
coat
of
fresh
compressor
oil
to
sealing
surfaces
when
con
necting
cooling
pipes
b
Use
two
wrenches
when
connecting
cooling
pipes
c
Evacuate
cooling
system
then
re
charge
with
refrigerant
Refer
to
Evacuating
and
Checking
System
under
General
Service
sec
tion
d
Check
refrigerant
leakage
if
neces
sary
repair
Refer
to
Evacuating
and
Charging
System
under
General
Service
See
tion
Condenser
Disconnect
battery
ground
cable
2
Discharge
system
Refer
to
Dis
charging
System
under
General
Service
section
3
Drain
engine
coolant
4
Remove
radiator
grille
5
Remove
radiator
shroud
and
radiator
On
automatic
transmission
models
disconnect
both
torque
converter
oil
hoses
Note
While
cooling
water
is
hot
take
precautions
against
scalding
6
Disconnect
two
pipes
from
con
denser
remove
two
screws
securing
condenser
Condenser
can
now
be
removed
AC485
Fig
AC
40
Removing
conden
er
Notes
a
Use
two
wrenches
when
disconnect
ing
pipe
joints
b
Plug
openings
immediately
after
disconnecting
pipes
7
To
install
reverse
the
order
of
removal
AC
29
Tightening
torque
Flare
nut
for
copper
tube
from
compressor
2
5
to
4
0
kg
m
i8
to
29
ft
Ib
Flare
nut
for
copper
tube
to
receiver
dryer
2
5
to
3
5
kg
m
i8
to
25
ft
lb
Notes
a
When
disconnecting
and
connecting
cooler
pipes
be
sure
to
use
two
wrenches
b
Apply
a
coat
of
fresh
compressor
oil
to
sealing
surfaces
when
con
necting
cooler
pipes
c
To
prevent
possibility
of
explosion
due
to
high
pressure
within
cooling
system
do
not
clean
condenser
with
steam
Always
use
cold
water
or
cold
compressed
air
d
Evacuate
cooling
system
then
re
charge
with
refrigerant
Refer
to
Evacuating
and
Charging
System
under
General
Service
sec
tion
e
Check
refrigerant
leakage
if
neces
sary
repair
Refer
to
Checking
for
Leaks
under
General
Service
sec
tion
INSPECTION
RecelYer
dryer
Check
for
refrigerant
leakage
or
damage
Check
for
proper
connection
of
two
lead
wires
running
to
pressure
switch
If
any
component
part
is
found
damaged
replace
receiver
dryer
and
pressure
switch
as
an
assembly
Condenser
I
Check
inlet
and
outlet
pipe
joints
and
sealing
surfaces
for
damage
Re
place
parts
if
damaged
or
leaky
2
Clogged
condenser
fins
or
air
pas
sages
may
reduce
cooling
efficiency
of
condenser
Clean
these
areas
with
dry
compressed
air
Piping
Check
piping
for
leakage
If
leakage
occurs
at
connections
retighten
connecting
nuts
Replace
if
leakage
persists
Page 519 of 537

Ll1
1t
W
l
THERMO
SWITCH
I
I
Air
Conditioning
WIRING
HARNESS
AND
COMPONENTS
WIRING
DIAGRAM
BW
c
J
ii
1
l
BW
La
GL
FROM
LIGHT
SWITCH
CJ
Id
lW
f
8
L
rRl
@
W
I
FUSE
15A
1
J
D
CJ
B
B
o
J
I
B
y
i
jqt
0
noc
I
no
vi
1
J
mcl
y
yldru
ao
11
jblr
J
H
WJ1
q
2f
br
r
t
lH
iot
f1
tH
o
hm
I
l
i
I
1
rf
l
t
f
r
dt
ll
II
h
J
IiJ
l
I
d
hi
s
n
Jq
DDj
G
w
TG
r
i
i
It
U
JI1
GH
Jdf
J
t
ggo
J
10
lHohfth
gniJuo
lUb
Jl
VUlt
l0
H
2
1
19
i
tl
b
wt
IO
t
l
lo
J
I
l
l
to
tJ
b
YR
lStO
Y1
1
t
J
I
FUSE
I
II
nlWI
I
bn
f
w
1
U
QI
llnio
fiq
ni
I
tsH
W
tflt
fli
htTin
lnl
O
J
11
IJ
i
Ji
fjI
i
i
11
i
ltll
ii
A
jll
I
I
I
gm
J
lIno
tl
Jl
JIIgiJ
l
1I0U
mflu
J
l
tllU
lJU
8
f
r
j
d
j
J
l1
Jlt
d
HInO
IG
to
l
VFJ
r1
rjJ
1
J
h
nI
0
i
IEvUID
l
il
1
i2
1
MN
k
B
gg
liii
gg
1
B
J
Ii
i
ELECTRIC
FUEL
PUMP
@
ILLUMINATION
CONTROL
RHEOSTAT
COLOR
CODE
B
Black
BW
Black
with
white
stripe
L
Blue
LW
Blue
with
white
stripe
LR
Blue
with
red
stripe
W
White
tll
G
GreeMnQ
r
iC
O
1
r
J
l
GL
Green
with
blue
stripe
R
L
Red
ith
blue
stripe
201011
lIt
J
m
I
W
tfli
I
o
lUll
IJ
Ub
OW
If
U
d
l
Q
I
ni
IGNITION
SWITCH
WIJIJJOO
W
l
Iuul
vomo
C
held
l
Jlb
vi
ia
1
1
tnd
15
W
le
llt
J
l
nq
LnJ
J
I
1
luil
mpHO
ibGt
L
D
lb
tldmoGl
nG
III
rbliw7
tHO
b
b
1
AC727
ns
1
j
fJ
l
YI
l
mtl
m
0
I
lfi
IO
fI
l
jg
h5
4
MjVj
IJC
p
i
W
i
1q
Page 520 of 537
MAINTENANCE
Replace
any
wiring
harness
which
is
cracked
deteriorated
or
poorly
in
sulated
Always
replace
wire
with
those
of
the
same
diameter
Do
not
use
wire
of
smaller
diameter
Where
necessary
securely
retain
wire
harnesses
with
clips
or
tapes
so
that
they
will
not
be
frayed
or
worn
by
vibration
Notes
a
Repair
or
replace
any
electrical
part
which
is
questionable
or
likely
to
cause
a
short
circuit
When
disconnecting
battery
cables
always
disconnect
ground
cable
be
fore
positive
cable
Clean
battery
and
terminals
before
connecting
cables
then
connect
positive
cable
and
ground
cable
in
that
order
Apply
a
coat
of
grease
to
terminals
to
prevent
rust
formation
b
Do
not
attempt
to
conduct
a
con
tinuity
test
with
a
screwdriver
or
service
tools
always
use
test
lead
wires
c
Do
not
ground
terminals
when
circuits
are
open
or
unloaded
always
use
a
test
lamp
12V
3W
or
circuit
tester
as
a
load
MAIN
RELAY
Removal
and
Installation
The
main
relay
is
attached
to
the
cooling
unit
I
Disconnect
battery
ground
cable
2
Disconnect
main
relay
lead
wires
at
connector
3
Remove
cooling
unit
assembly
Refer
to
Removal
and
Installation
under
Cooling
Unit
4
Remove
the
screw
securing
main
relay
to
cooling
unit
and
detach
main
relay
5
To
install
main
relay
reverse
the
order
of
removal
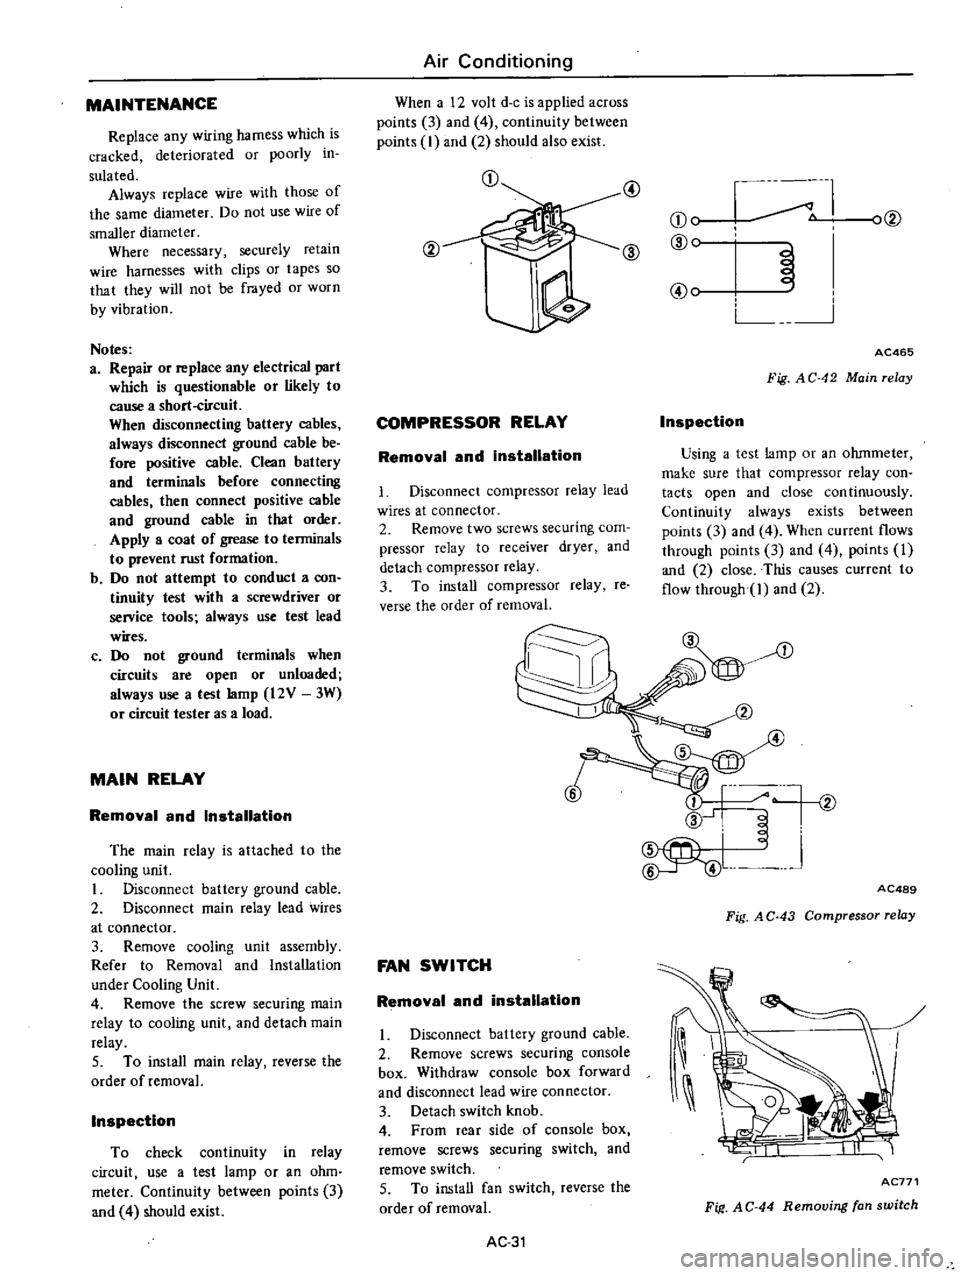
Inspection
To
check
continuity
in
relay
circuit
use
a
test
lamp
or
an
ohm
meter
Continuity
between
points
3
and
4
should
exist
Air
Conditioning
When
a
12
volt
d
c
is
applied
across
points
3
and
4
continuity
between
points
I
and
2
should
also
exist
CD
00
COMPRESSOR
RELAY
Removal
and
installation
Disconnect
compressor
relay
lead
wires
at
connector
2
Remove
two
screws
securing
com
pressor
relay
to
receiver
dryer
and
detach
compressor
relay
3
To
install
compressor
relay
reo
verse
the
order
of
removal
@
I
ul
CDe
JOO
ID
IDe
@e
L
AC465
Fig
AC
42
Main
relay
Inspection
Using
a
test
lamp
or
an
ohmmeter
make
sure
that
compressor
relay
con
tacts
open
and
close
con
tinuously
Continuity
always
exists
between
points
3
and
4
When
current
flows
through
points
3
and
4
points
1
and
2
close
This
causes
current
to
flow
through
1
and
2
FAN
SWITCH
Removal
and
installation
1
Disconnect
battery
ground
cable
2
Remove
screws
securing
console
box
Withdraw
console
box
forward
and
disconnect
lead
wire
connector
3
Detach
switch
knob
4
From
rear
side
of
console
box
remove
screws
securing
switch
and
remove
switch
5
To
install
fan
switch
reverse
the
order
of
removal
AC
31
i
t
v
J
AC489
Fig
A
C
43
Compressor
relay
AC771
Fif
AC
44
Removing
fan
switch