length DATSUN PICK-UP 1977 User Guide
[x] Cancel search | Manufacturer: DATSUN, Model Year: 1977, Model line: PICK-UP, Model: DATSUN PICK-UP 1977Pages: 537, PDF Size: 35.48 MB
Page 200 of 537
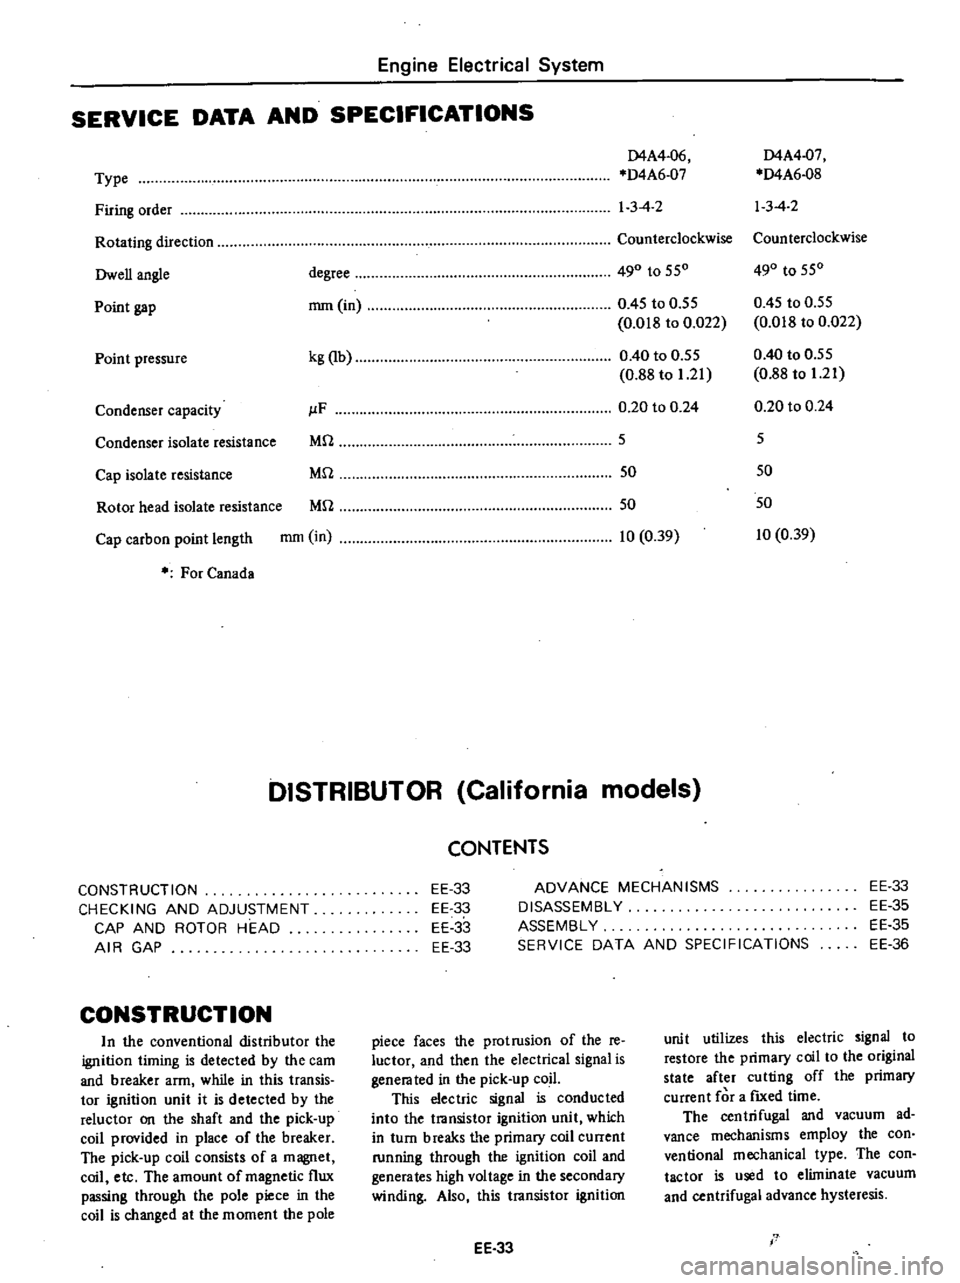
Engine
Electrical
System
SERVICE
DATA
AND
SPECIFICATIONS
D4A4
06
D4A4
07
Type
D4A6
07
D4A6
08
Firing
order
1
3
4
2
13
4
2
Rotating
direction
Counterclockwise
Counterclockwise
Owen
angle
degree
490
to
550
490
to
550
Point
gap
mm
in
0
45
to
0
55
0
45
to
0
55
0
018
to
0
022
0
018
to
0
022
Point
pressure
kg
lb
0
40
to
0
55
0
40
to
0
55
0
88
to
1
21
0
88
to
1
21
Condenser
capacity
JlF
0
20
to
0
24
0
20
to
0
24
Condenser
isolate
resistance
Mrl
5
5
Cap
isolate
resistance
Mrl
50
50
Rotor
head
isolate
resistance
Mrl
50
50
Cap
carbon
point
length
mm
in
10
0
39
10
0
39
For
Canada
DISTRIBUTOR
California
models
CONSTRUCTION
CHECKING
AND
ADJUSTMENT
CAP
AND
ROTOR
HEAD
AIR
GAP
CONSTRUCTION
In
the
conventional
distributor
the
ignition
liming
is
detected
by
the
cam
and
breaker
arm
while
in
this
transis
tor
ignition
unit
it
is
detected
by
the
reluctor
on
the
shaft
and
the
pick
up
coil
provided
in
place
of
the
breaker
The
pick
up
coil
consists
of
a
magnet
coil
etc
The
amount
of
magnetic
flux
passing
through
the
pole
piece
in
the
coil
is
changed
at
the
moment
the
pole
CONTENTS
EE
33
EE
33
EE
33
EE
33
ADVANCE
MECHANISMS
DISASSEMBLY
ASSEMBLY
SERVICE
DATA
AND
SPECIFICATIONS
EE
33
EE
35
EE
35
EE
36
piece
faces
the
protrusion
of
the
re
luctor
and
then
the
electrical
signal
is
genera
ted
in
the
pick
up
coil
This
electric
signal
is
conducted
into
the
transistor
ignition
unit
which
in
turn
breaks
tI
e
primary
coil
current
running
through
the
ignition
coil
and
generates
high
voltage
in
the
secondary
winding
Also
this
transistor
ignition
EE
33
unit
utilizes
this
electric
signal
to
restore
the
primary
coil
to
the
original
state
after
cutting
off
the
primary
current
for
a
fIXed
time
The
centrifugal
and
vacuum
ad
vance
mechanisms
employ
the
con
ventional
mechanical
type
The
con
tactor
is
used
to
eliminate
vacuum
and
centrifugal
advance
hysteresis
I
Page 203 of 537
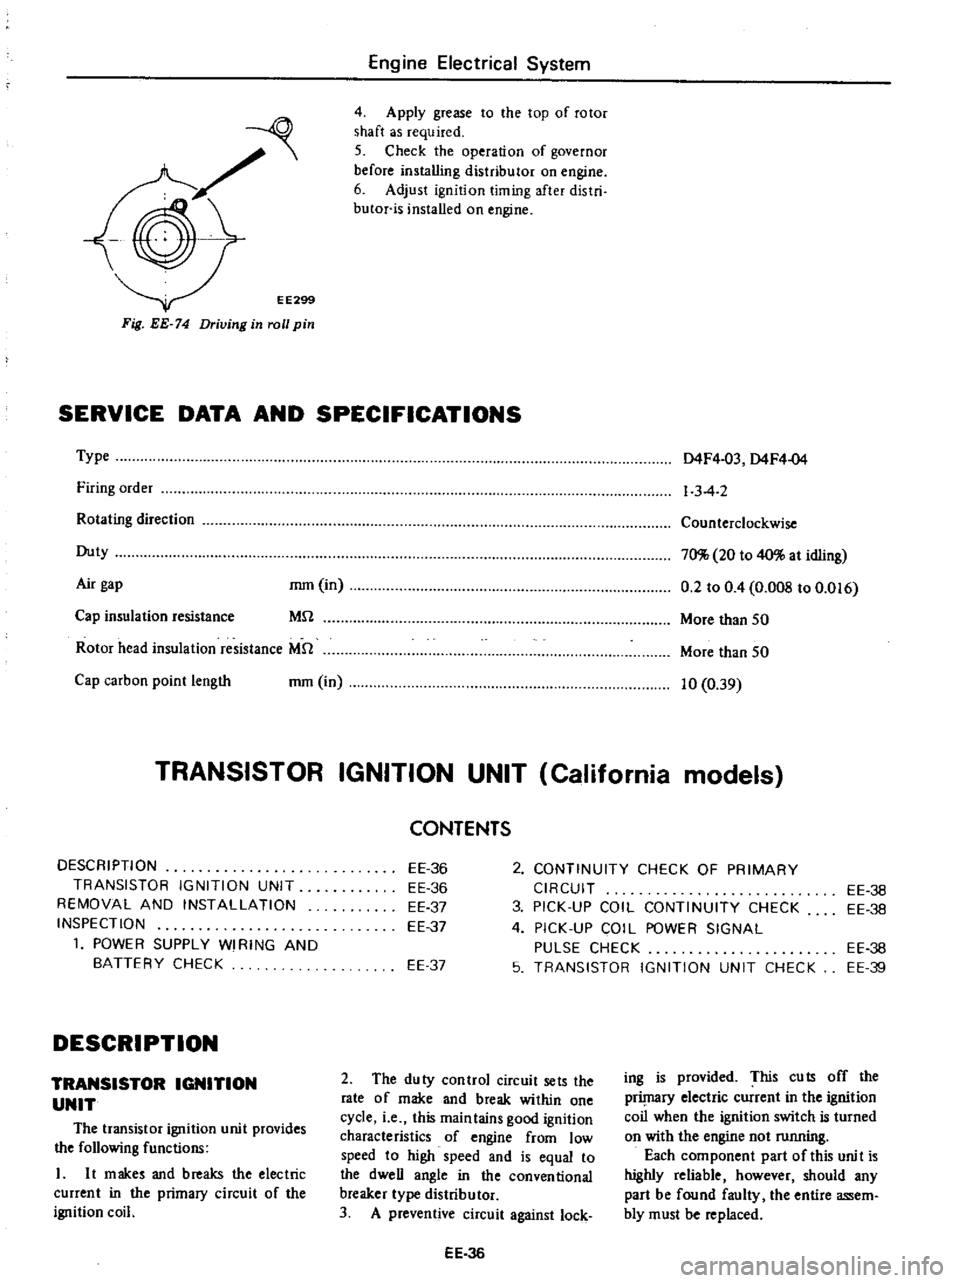
EE299
Fig
EE
74
Driving
in
roll
pin
Engine
Electrical
System
4
Apply
grease
to
the
top
of
rotor
shaft
as
required
5
Check
the
operation
of
governor
before
installing
distributor
on
engine
6
Adjust
ignition
timing
after
distri
butor
is
installed
on
engine
SERVICE
DATA
AND
SPECIFICATIONS
Type
Firing
order
Rotating
direction
Duty
Air
gap
mm
in
MU
Cap
insulation
resistance
Rotor
head
insulation
resistance
MU
Cap
carbon
point
length
mm
in
D4F4
03
D4F4
04
1
3
4
2
Counterclockwise
70
20
to
40
at
idling
0
2
to
0
4
O
OOS
to
0
016
More
than
50
More
than
50
10
0
39
TRANSISTOR
IGNITION
UNIT
California
models
DESCRIPTION
TRANSISTOR
IGNITION
UNIT
REMOVAL
AND
INSTALLATION
INSPECTION
1
POWER
SUPPLY
WI
RING
AND
BATTERY
CHECK
DESCRIPTION
TRANSISTOR
IGNITION
UNIT
The
transistor
ignition
unit
provides
the
following
functions
L
It
makes
and
breaks
the
electric
current
in
the
primacy
circuit
of
the
ignition
coil
2
CONTINUITY
CHECK
OF
PRIMARY
CIRCUIT
3
PICK
UP
COIL
CONTINUITY
CHECK
4
PICK
UP
COIL
POWER
SIGNAL
PULSE
CHECK
5
TRANSISTOR
IGNITION
UNIT
CHECK
CONTENTS
EE
36
EE
36
EE
37
EE
37
EE
37
2
The
duty
control
circuit
sets
the
rate
of
make
and
break
within
one
cycle
i
e
this
maintains
good
ignition
characteristics
of
engine
from
low
speed
to
high
speed
and
is
equal
to
the
dweU
angle
in
the
conventional
breaker
type
distributor
3
A
preventive
circuit
against
lock
EE
36
EE
36
EE
38
EE
38
EE
39
ing
is
provided
This
cuts
off
the
prilnaCY
electric
current
in
the
ignition
coil
when
the
ignition
switch
is
turned
on
with
the
engine
not
running
Each
component
part
of
this
unit
is
highly
reliable
however
should
any
part
be
found
faulty
the
entire
assem
bly
must
be
replaced
Page 216 of 537
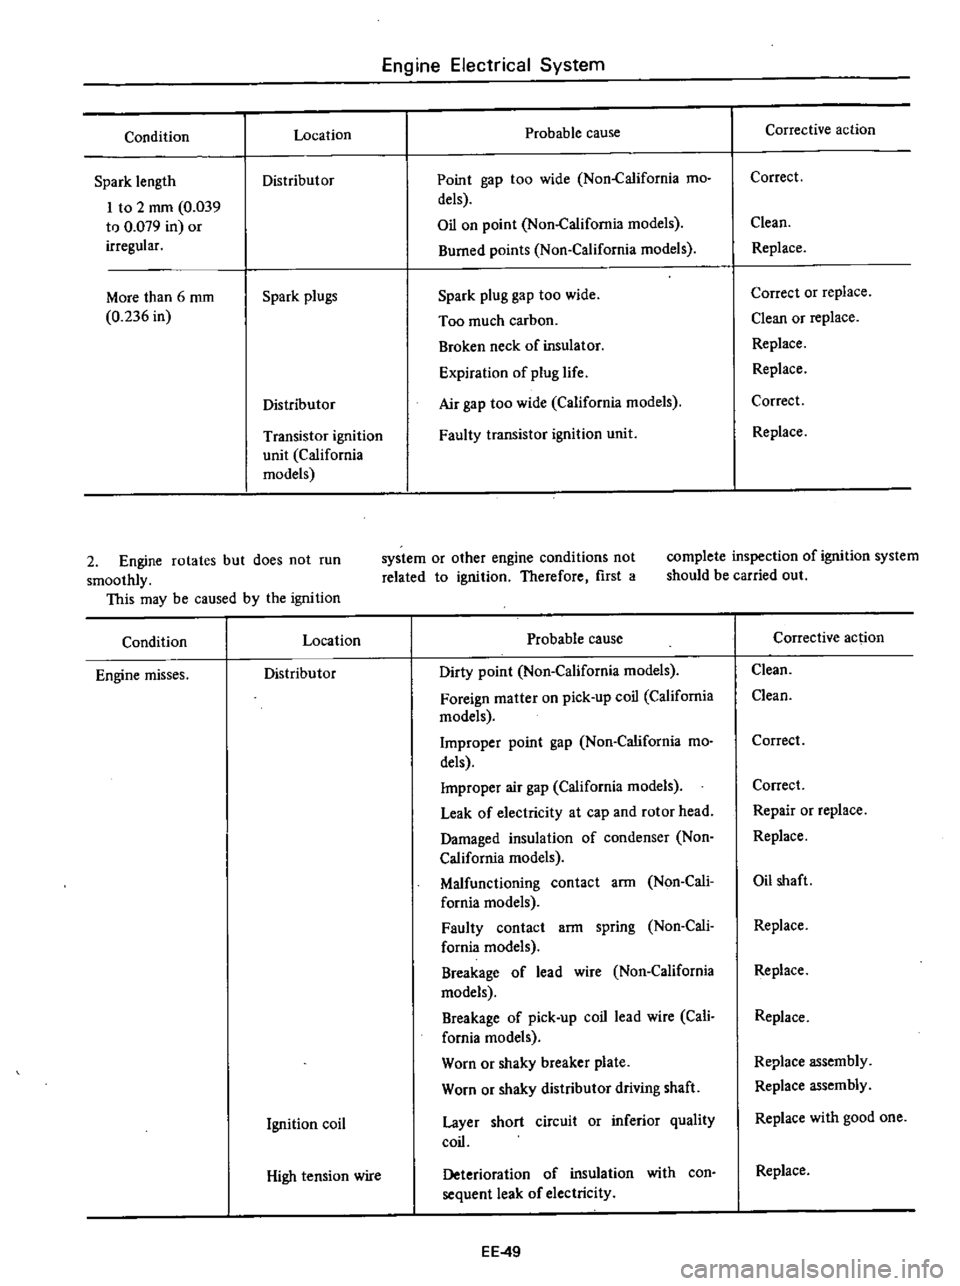
Condition
Spark
length
I
to
2
rnm
0
039
to
0
079
in
Of
irregular
More
than
6
rnm
0
236
in
Engine
Electrical
System
Location
Probable
cause
Distributor
Point
gap
too
wide
Non
California
mo
dels
Oil
on
point
Non
California
models
Burned
points
Non
California
models
Spark
plugs
Spark
plug
gap
too
wide
Too
much
carbon
Broken
neck
of
insulator
Expiration
of
plug
life
Air
gap
too
wide
California
models
Distributor
Transistor
ignition
unit
California
models
Faulty
transistor
ignition
unit
Corrective
action
Correct
Clean
Replace
Correct
or
replace
Clean
or
replace
Replace
Replace
Correct
Replace
2
Engine
rotates
but
does
not
run
smoothly
This
may
be
caused
by
the
ignition
system
or
other
engine
condi
Hons
not
related
to
ignition
Therefore
first
a
complete
inspection
of
ignition
system
should
be
carried
out
Condition
Engine
misses
Location
Probable
cause
Distributor
Dirty
point
Non
California
models
Foreign
mattef
on
pick
up
coil
California
models
Improper
point
gap
Non
California
mo
dels
Impropef
air
gap
California
models
Leak
of
electricity
at
cap
and
rotor
head
Damaged
insulation
of
condenser
Non
California
models
Malfunctioning
contact
arm
Non
Cali
fornia
models
Faulty
contact
arm
spring
Non
Cali
fornia
models
Breakage
of
lead
wire
Non
California
models
Breakage
of
pick
up
coil
lead
wire
Cali
fornia
models
Worn
or
shaky
breaker
plate
Worn
or
shaky
distributor
driving
shaft
Layer
short
circuit
or
inferior
quality
coil
Ignition
coil
High
tension
wire
Deterioration
of
insulation
with
con
sequent
leak
of
electricity
EE
49
Corrective
ac
ion
Clean
Clean
Correct
Correct
Repair
or
replace
Replace
Oil
shaft
Replace
Replace
Replace
Replace
assembly
Replace
assembly
Replace
with
good
one
Replace
Page 228 of 537
CLUTCH
CYLINDER
MASTER
Removal
and
installation
Removal
I
Remove
clcvis
pin
at
push
rod
2
Disconnect
clutch
tube
from
master
cylinder
and
drain
clutch
fluid
3
Remove
bolts
securing
master
Disassembly
and
assembly
CLUTCH
cylinder
to
the
vehicle
and
dismount
master
cylinder
Note
Remove
dust
cover
from
master
cylinder
body
on
the
side
of
driv
er
s
seat
Installation
To
install
reverse
the
order
of
removal
Closely
observe
the
following
instructions
1
Adjust
pedal
height
by
changing
pedal
stopper
length
Disassembly
1
Remove
dust
cover
and
remove
stopper
ring
from
body
2
Remove
push
rod
and
piston
as
sembly
3
Take
off
piston
cups
4
Remove
spiing
seat
from
piston
and
take
off
supply
valve
if
necessary
See
Figure
CL
19
Note
Discard
piston
cup
supply
valve
and
spring
seat
after
removal
Assembly
To
assemble
reverse
the
order
of
disassembly
Closely
observe
the
fol
lowing
instructions
I
Dip
piston
cup
in
brake
fluid
before
installing
Make
sure
that
it
is
correctly
faced
in
position
2
Apply
a
coating
of
brake
fluid
to
cylinder
and
piston
when
assembling
3
Press
piston
into
spring
seat
when
assembling
CL
7
2
Bleed
air
out
of
hydraulic
system
Tightening
torque
Master
cylinder
to
dash
panel
0
8
to
1
2
kg
m
5
8
to
8
7
ft
lb
Clutch
tube
connector
Flare
nut
1
5
to
1
8
kg
m
II
to
13
ft
lb
3
Using
Flare
Nut
Torque
Wrench
GG94310000
tighten
each
connector
to
the
specified
torque
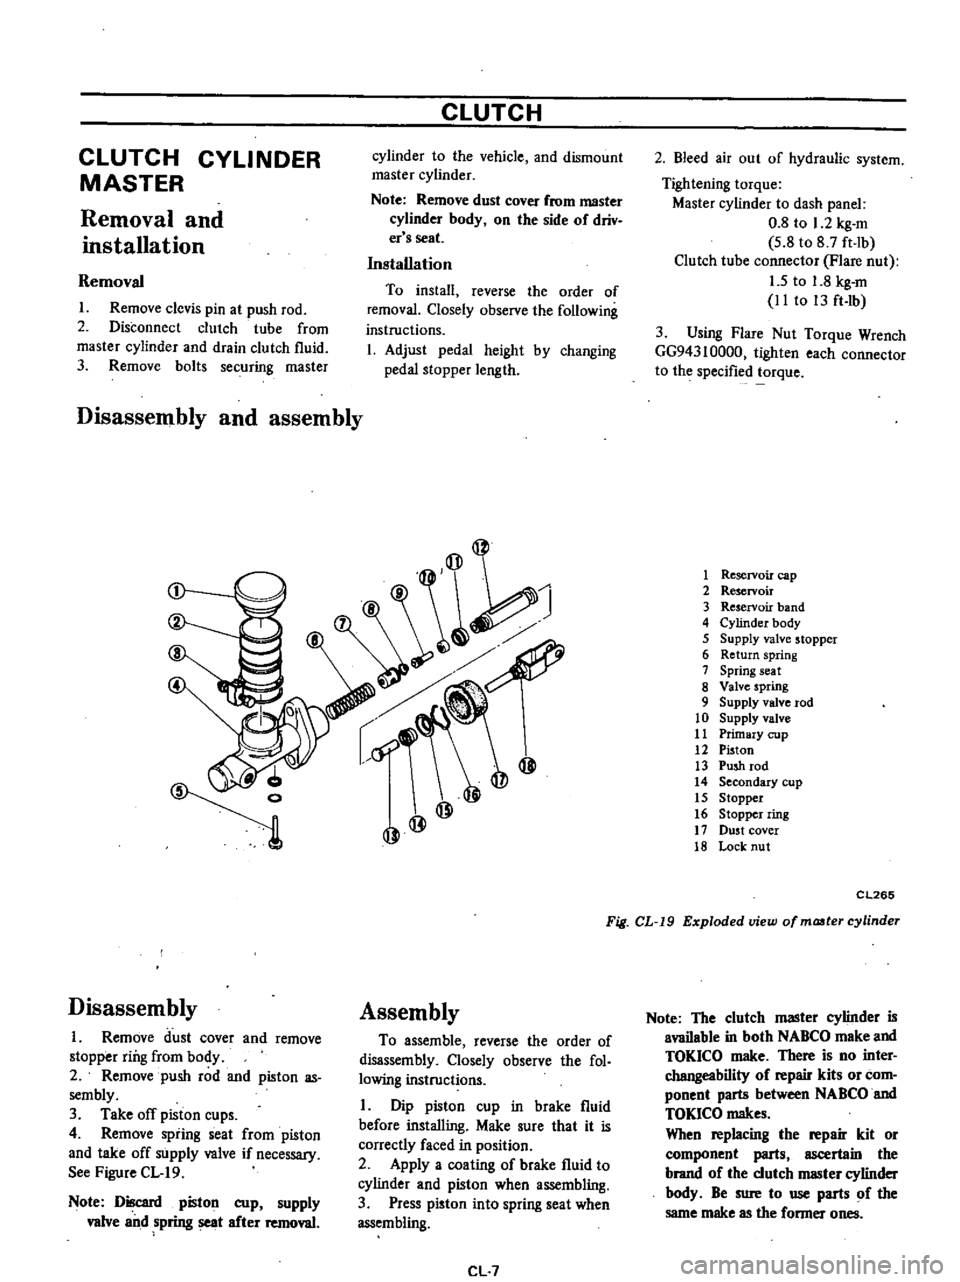
1
Reservoir
cap
2
Reservoir
3
Reservoir
band
4
Cylinder
body
5
Supply
valve
stopper
6
Return
spring
7
Spring
seat
8
Valve
spring
9
Supply
valve
rod
10
Supply
valve
11
Primary
cup
12
Piston
13
Push
rod
14
Secondary
cup
15
Stopper
16
Stopper
ring
17
DU5t
cover
18
Lock
nut
CL265
Fig
CL
19
Exploded
view
of
maater
cylinder
Note
The
clutch
master
cylinder
is
available
in
both
NABCO
make
and
TOKICO
make
There
is
no
inter
changeability
of
repair
kits
or
com
ponent
parts
between
NABCO
and
TOKlCO
makes
When
replacing
the
repair
kit
or
component
parts
ascertain
the
brand
of
the
clutch
IIIBSter
cylinder
body
Be
sure
to
use
parts
of
the
same
make
as
the
former
ones
Page 245 of 537
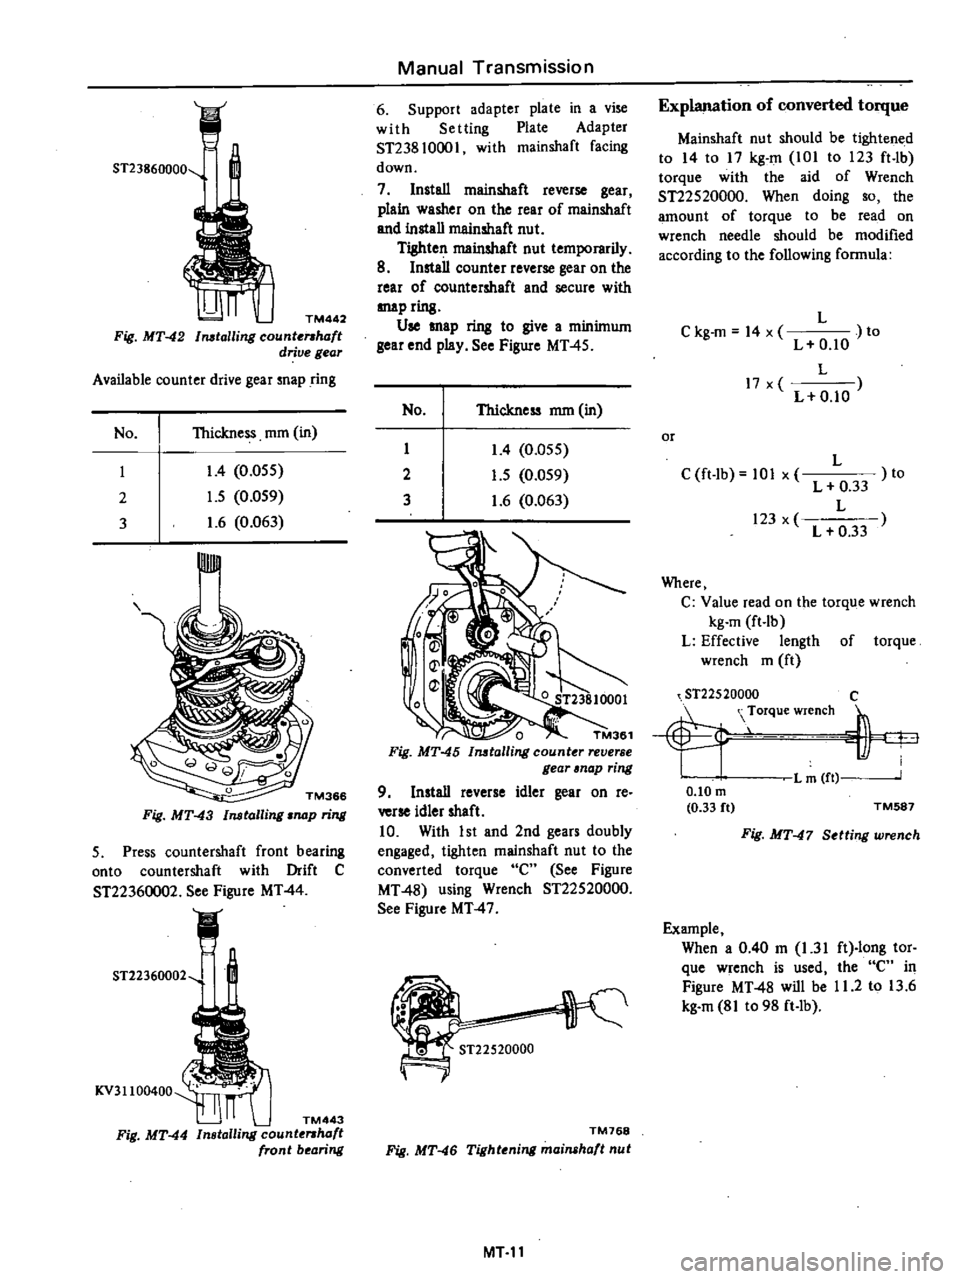
ST23860000
TM442
Fig
MT
42
l
talling
counte
haft
drive
gear
Available
counter
drive
gear
map
ring
No
Thickness
mm
in
I
2
3
1
4
0
055
1
5
0
059
1
6
0
063
II
TM366
Fig
MT
43
Installing
nap
ring
5
Press
countershaft
front
bearing
onto
countershaft
with
Drift
C
ST22360002
See
Figure
MT
44
ST22360002
KV3
II
00400
TM443
Fig
MT
44
Installing
counte
haft
front
bearing
Manual
Transmission
6
Support
adapter
plate
in
a
vise
with
Setting
Plate
Adapter
ST238
10001
with
mainshaft
facing
down
7
Install
mainshaft
reverse
gear
plain
washer
on
the
rear
of
mainshaft
and
install
mainshaft
nut
Tighten
mainshaft
nut
temporarily
8
Install
counter
reverse
gear
on
the
rear
of
countershaft
and
secure
with
map
ring
Use
snap
ring
to
give
a
minimum
gear
end
play
See
Figure
MT
45
No
Thickness
mm
in
I
2
3
1
4
0
055
1
5
0
059
1
6
0
063
o
TM361
Fig
MT
45
Imtalling
counter
reverse
gear
nap
ring
9
Install
reverse
idler
gear
on
re
verse
idler
shaft
10
With
1st
and
2nd
gears
doubly
engaged
tighten
mainshaft
nut
to
the
converted
torque
Cn
See
Figure
MT
48
using
Wrench
ST22520000
See
Figure
MT
4
7
ST22520000
TM768
Fig
MT
46
Tightening
mainshaft
nut
MTll
Explanation
of
converted
torque
Mainshaft
nut
should
be
tightened
to
14
to
17
kg
m
101
to
123
ft
lb
torque
with
the
aid
of
Wrench
ST22520000
When
doing
so
the
amount
of
torque
to
be
read
on
wrench
needle
should
be
modified
according
to
the
following
formula
L
C
kg
m
14
x
to
L
O
lO
L
17
x
L
0
10
or
L
C
ft
lb
101
x
L
0
33
to
L
123
x
L
0
33
Where
C
Value
read
on
the
torque
wrench
kg
m
ft
lb
L
Effective
length
of
torque
wrench
m
ft
ST22520000
Torque
wrench
Lm
ft
c
h
I
O
IOm
0
33
ft
TM587
Fig
MT
47
Setting
wrench
Example
When
a
0
40
m
1
31
ft
long
tor
que
wrench
is
used
the
Cn
in
Figure
MT
48
will
be
11
2
to
13
6
kg
m
81
to
98
ft
lb
Page 246 of 537
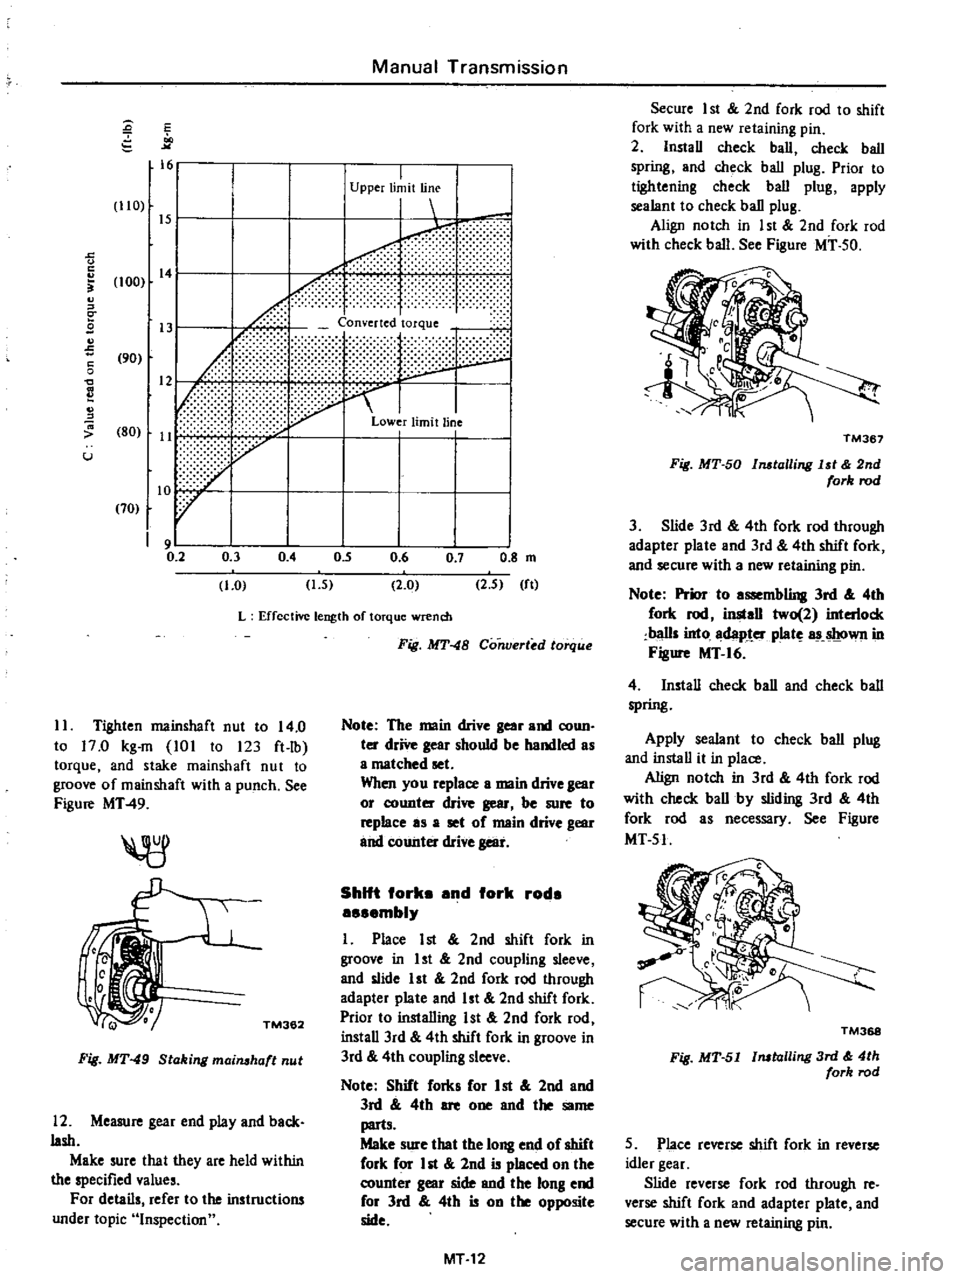
I
Upper
limit
line
I
r
6
1
f
fdl
13
Converted
torque
90
I
Lower
limit
line
80
11
70
10
V
S
s
15
110
15
c
u
c
c
9
S
c
o
C
U
100
14
9
0
2
0
3
1
0
0
4
Manual
Transmission
0
5
0
6
2
0
0
7
0
8
m
2
5
It
1
5
L
Effective
length
of
torque
wrench
Fig
MT
48
CO
1Vert
d
torque
11
Tighten
mainshaft
nut
to
14
0
to
17
0
kg
m
101
to
123
ft
lb
torque
and
stake
mainshaft
nut
to
groove
of
main
shaft
with
a
punch
See
Figure
MT49
TM362
Fig
MT
49
Staking
mai
haft
nut
12
Measure
gear
end
play
and
back
lash
Make
sure
that
they
are
held
within
the
specified
values
For
details
refer
to
the
instructions
under
topic
Inspection
Note
The
main
drive
gear
and
coun
ter
driVe
gear
should
be
handled
as
a
matched
set
When
you
replace
a
main
drive
gear
or
counter
drive
gear
be
sure
to
replace
as
a
set
of
main
drive
gear
and
counter
drive
gear
ShUt
fork
nd
fork
rod
mbly
I
Place
1st
2nd
shift
fork
in
groove
in
1st
2nd
coupling
sleeve
and
slide
1st
2nd
fork
rod
through
adapter
plate
and
1st
2nd
shift
fork
Prior
to
installing
1st
2nd
fork
rod
install
3rd
4th
shift
fork
in
groove
in
3rd
4th
coupling
sleeve
Note
Shift
forks
for
1st
2nd
and
3rd
4th
are
one
and
the
same
parts
Make
sure
that
the
long
end
of
shift
fork
for
lot
2nd
is
placed
on
the
counter
gear
side
and
the
long
end
for
3rd
4th
is
on
the
e
side
MT12
Secure
1st
2nd
fork
rod
to
shift
fork
with
a
new
retaining
pin
2
Install
check
ball
check
ball
spring
and
check
ball
plug
Prior
to
tightening
check
ball
plug
apply
sealant
to
check
ball
plug
Align
notch
in
1st
2nd
fork
rod
with
check
ball
See
Figure
MT
50
TM367
Fig
MT
50
l
talling
1st
2nd
fork
rod
3
Slide
3rd
4th
fork
rod
through
adapter
plate
and
3rd
4th
shift
fork
and
secure
with
a
new
retaining
pin
Note
Prior
to
a
mbling
3rd
4th
fork
rod
install
two
2
interlock
balls
into
dap
er
plat
own
in
Figure
MT
16
4
Install
check
ball
and
check
ball
spring
Apply
sealant
to
check
ball
plug
and
install
it
in
place
Align
notch
in
3rd
4th
fork
rod
with
check
ball
by
sliding
3rd
4th
fork
rod
as
necessary
See
Figure
MT51
TM368
Fig
MT
51
Installing
3rd
4th
fork
rod
5
Place
reverse
shift
fork
in
reverse
idler
gear
Slide
reverse
fork
rod
through
re
verse
shift
fork
and
adapter
plate
and
secure
with
a
new
retaining
pin
Page 304 of 537
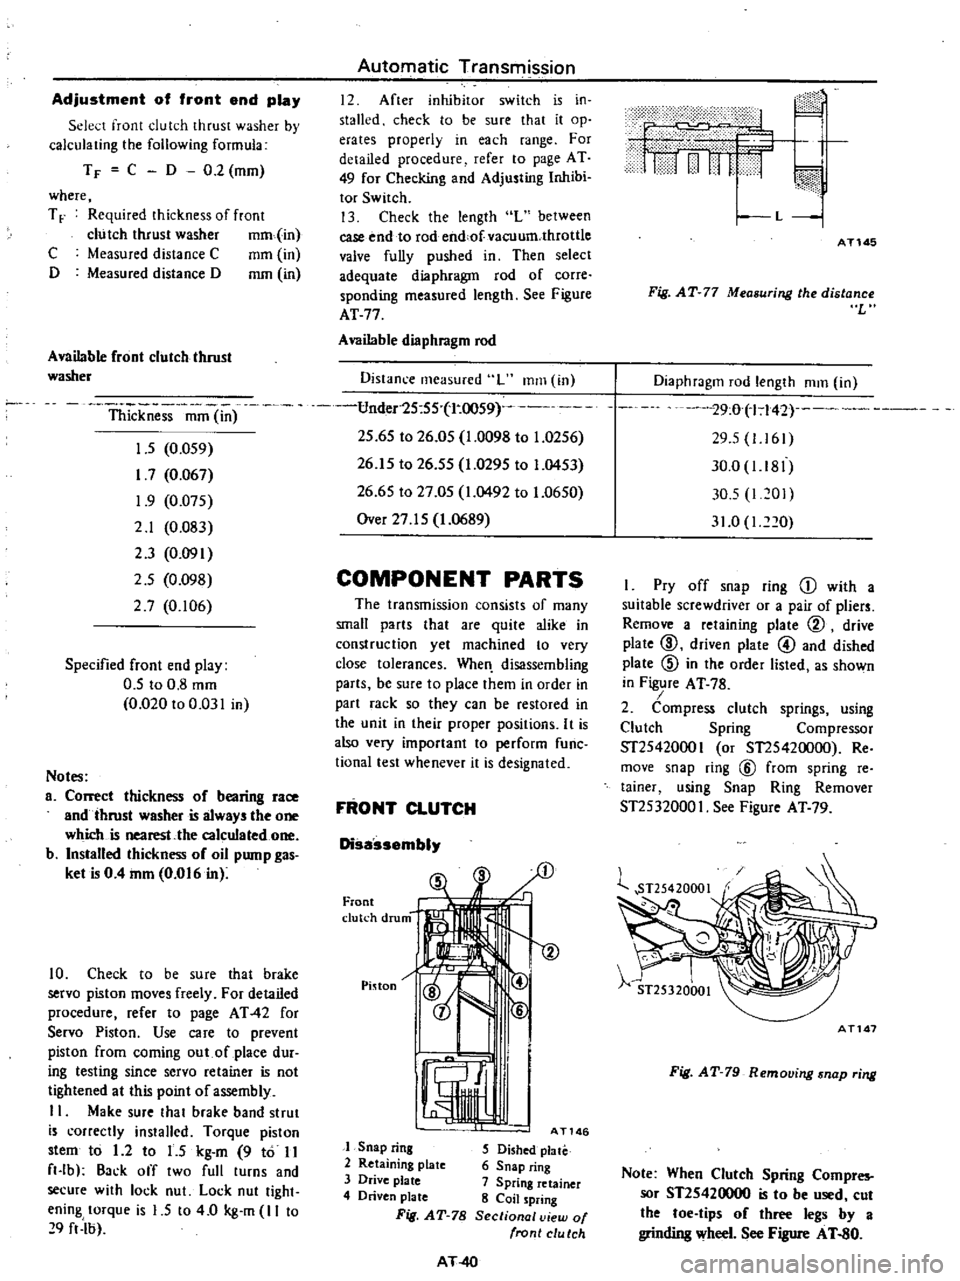
Adjustment
of
front
end
play
Sele
t
front
dutch
thrust
washer
by
calculating
the
following
formula
T
F
C
D
0
2
mm
where
T
F
Required
thickness
of
front
clutch
thrust
washer
mm
in
C
Measured
distance
C
mm
in
D
Measured
distance
D
mm
in
Available
front
clutch
thrust
washer
Thickness
mm
in
1
5
0
059
I
7
0
067
1
9
0
075
2
1
0
083
2
3
0
091
2
5
0
098
27
0
106
Specified
front
end
play
0
5
to
0
8
mm
0
020
to
0
031
in
Notes
a
Correct
thickness
of
bearing
race
and
thrust
washer
is
always
the
one
which
is
nearest
the
calculated
one
b
Installed
thickness
of
oil
pump
gas
ket
is
0
4
mm
0
016
in
10
Check
to
be
sure
that
brake
servo
piston
moves
freely
For
detailed
ptocedure
refer
to
page
AT
42
for
Servo
Piston
Use
care
to
prevent
piston
from
coming
out
of
place
dUI
ing
testing
since
servo
retainer
is
not
tightened
at
this
point
of
assembly
II
Make
sure
that
brake
band
strut
is
correctly
installcd
Torque
piston
stem
to
1
2
to
1
5
kg
m
9
to
11
f1
lb
Back
off
two
full
lurns
and
secure
with
lock
nut
Lock
nut
tight
ening
torque
is
1
5
to
4
0
kg
m
II
to
9
f1
lb
Automatic
Transmission
12
After
inhibitor
switch
is
in
stalled
check
to
be
sure
that
it
op
erates
properly
in
each
range
For
detailed
procedure
refer
to
page
AT
49
for
Checl
ing
and
Adjusting
Inhibi
tor
Switch
13
Check
the
length
L
between
case
end
to
rod
end
ofvacuum
throllle
valve
fully
pushed
in
Then
select
adequate
diaphragm
rod
of
corre
sponding
measured
length
See
Figure
AT
77
Available
diaphragm
rod
Distanl
e
measured
L
ITIm
in
Under25
55
l
OO59
25
65
to
26
05
1
0098
to
1
0256
26
15
to
26
55
1
0295
to
1
0453
26
65
to
27
05
1
0492
to
1
0650
Over
27
15
1
0689
COMPONENT
PARTS
The
transmission
cons
sts
of
many
small
parts
that
are
quite
alike
in
construction
yet
machined
to
very
close
tolerances
When
disassembling
parts
be
sure
to
place
them
in
order
in
part
rack
so
they
can
be
restored
in
the
unit
in
their
proper
positions
It
is
also
very
important
to
perform
func
tianal
test
whenever
it
is
designated
FRONT
CLUTCH
Disassembly
Front
clutch
drum
I
Pinon
lcz
t
AT146
1
Snap
ring
2
Retaining
plate
3
Drive
plate
4
Driven
plate
Fit
AT
78
S
Dished
plate
6
Snap
ring
7
Spring
retainer
8
Coil
spring
Sectional
view
of
front
clu
tch
AT
40
i
i
n
H
I
I
ni
c
A
i
iif
L
1
AT145
Fig
AT
77
Measuring
the
distance
L
Diaphragm
rod
length
mm
in
29
00
142
u
29
5
1161
30
0
1
81
30
5
1201
31
0
I
O
I
Pry
off
snap
ring
D
with
a
suitable
screwdriver
or
a
pair
of
pliers
Remove
a
retaining
plate
@
drive
plate
CID
driven
plate
@
and
dished
plate
@
in
the
order
listed
as
shown
in
Figure
AT
78
I
2
Compress
clutch
springs
using
Clutch
Spring
Compressor
ST25420001
or
51
25420000
Re
move
snap
ring
@
from
spring
re
tainer
using
Snap
Ring
Remover
ST2532000
I
See
Figure
AT
79
AT147
Fig
AT
79
Removing
snap
ring
Note
When
Clutch
Spring
Compres
sor
ST25420000
is
to
be
used
cut
the
toe
tips
of
three
legs
by
a
grinding
wheel
See
Figure
AT
80
Page 310 of 537
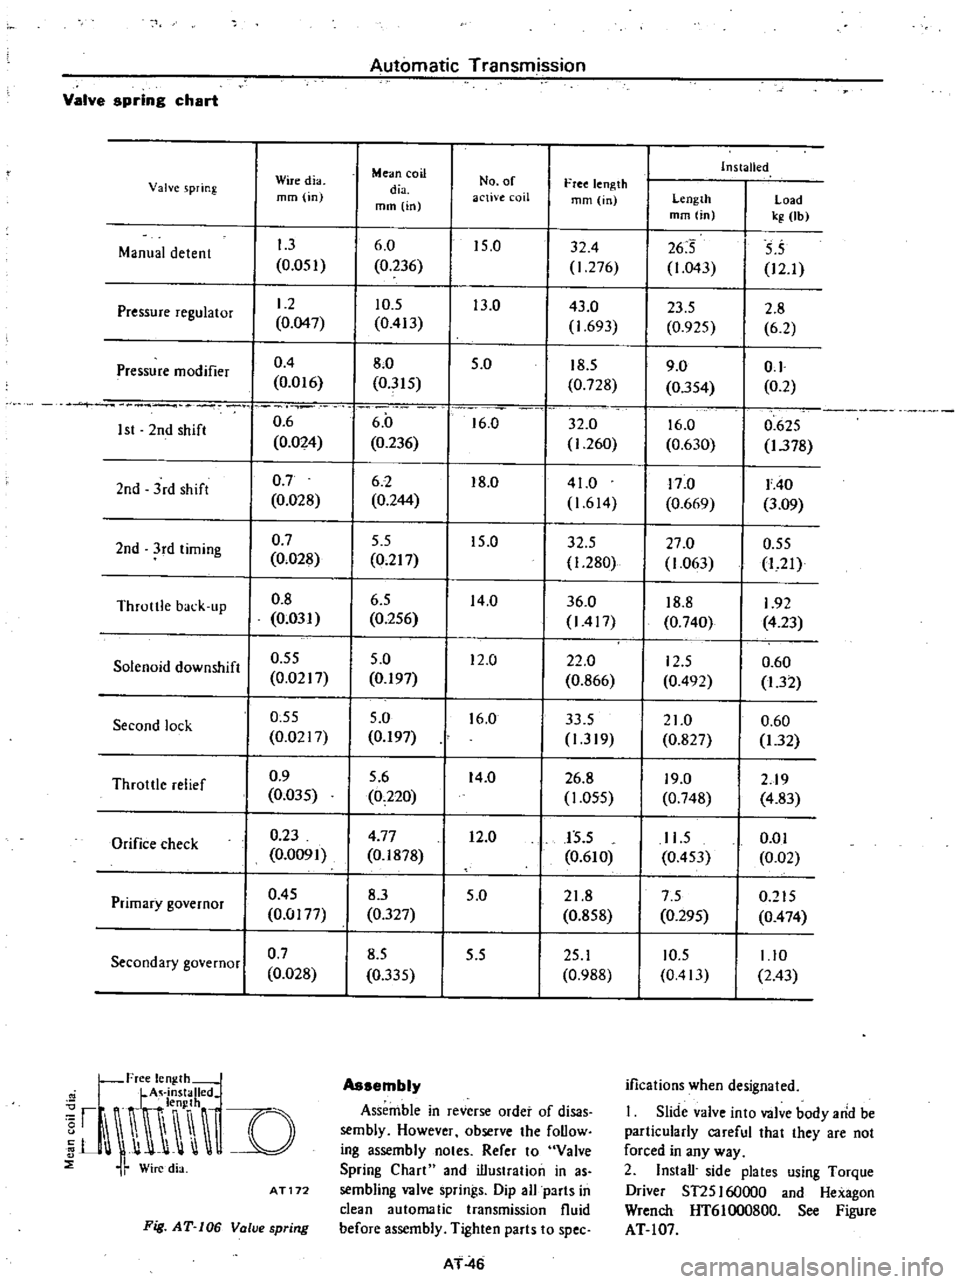
Automatic
Transmission
Valve
spring
chart
Mean
coil
Installed
Valve
spring
Wiredia
dia
No
of
free
length
mm
in
mm
in
active
coil
mm
in
Length
Load
mm
in
kg
lb
Manual
detent
1
3
6
0
15
0
32
4
26
5
5
5
0
051
0
236
1
276
1
043
12
1
Pressure
regulator
1
2
10
5
13
0
43
0
23
5
2
8
0
047
0
413
1
693
0
925
6
2
Pressure
modifier
0
4
8
0
5
0
18
5
9
0
0
1
0
016
0
315
0
728
0
354
0
2
1st
2nd
shift
0
6
6
0
6
0
32
0
16
0
0
625
0
024
0
236
1
260
0
630
1
378
2nd
3rd
shifl
0
7
6
2
8
0
41
0
17
0
1
40
0
028
0
244
1
614
0
669
3
09
2nd
3rd
timing
0
7
5
5
15
0
32
5
27
0
0
55
0
028
0
217
1
280
1
063
1
21
Throule
back
lIP
0
8
6
5
14
0
36
0
18
8
1
92
0
031
0
256
1417
0
740
4
23
Solenoid
downshift
0
55
5
0
12
0
22
0
12
5
0
60
0
0217
0
197
0
866
0
492
1
32
Second
lock
0
55
5
0
16
0
33
5
21
0
0
60
0
0217
0
197
1
319
0
827
1
32
Throule
relief
0
9
5
6
14
0
26
8
19
0
2
9
0
035
0
220
1
055
0
748
4
83
Orifice
check
0
23
4
77
12
0
J5
5
11
5
0
01
0
0091
0
1878
0
610
0
453
0
02
Primary
governor
0
45
8
3
5
0
21
8
7
5
0
215
0
0177
0
327
0
858
0
295
0
474
Secondary
governor
0
7
8
5
5
5
25
1
10
5
I
10
0
028
0
335
0
988
0
413
2
43
Free
lenglhm
A
installed
f
n
ri
DO
n
i
Wire
dia
AT172
Assembly
Assemble
in
reverse
order
of
disas
sembly
However
observe
the
follow
ing
assembly
noles
Refer
to
Valve
Spring
Chart
and
illustralion
in
as
sembling
valve
springs
Dip
all
parts
in
clean
automatic
transmission
fluid
before
assembly
Tighten
parts
to
spec
ifications
when
designated
I
Slide
valve
into
valve
body
arid
be
particularly
careful
that
they
are
not
forced
in
any
way
2
Install
side
plates
using
Torque
Driver
ST25160000
and
Hexagon
Wrench
HT6
I
000800
See
Figure
AT
l
07
Fig
AT
106
Value
spring
AT
46
Page 338 of 537
PROPELLER
SHAFT
DIFFERENTIAL
CARRIER
Ex
2
N
O
68mm
H
3
D
I
S
2
T
N
H
0
S
x
0
01
2
18
0
68
3
1
2
x
Om
2
18
0
68
3
1
2
x
0
01
2
18
0
68
2
x
0
01
2
18
0
68
0
02
N8
0
68
0
02
2
18
i
88
mm
The
correct
washer
is
2
88
mm
thick
Ex
3
N
0
70mm
H
O
0
0
S
O
T
N
H
0
S
x
0
01
2
18
0
70
0
0
0
x
0
01
2
18
0
70
0
x
0
01
2
18
0
70
0
2
18
0
70
2
18
2
88
mm
The
correct
washer
is
2
88
mm
thick
Note
If
lues
signifying
H
D
and
S
are
not
given
regard
them
as
zero
and
n
C
r
e
After
assembly
check
to
see
that
tooth
contact
is
correct
If
not
readjust
For
the
tooth
contact
pattern
see
page
PJ
12
for
Contact
Pattern
Drive
pinion
adjusting
washer
Thickness
mm
in
2
58
0
1016
2
61
0
1028
2
64
0
1039
2
67
0
1051
2
70
0
1063
2
73
0
107S
2
76
0
1087
2
79
0
1098
2
82
0
1110
2
85
OJ
122
2
88
OJ
134
2
91
0
1146
2
94
0
1IS8
2
97
0
1169
3
00
0
1181
3
03
0
1
193
3
06
0
1205
3
09
0
1217
3
12
0
1228
3
IS
0
1240
3
18
0
I2S2
S
Fit
determined
drive
pinion
ad
justing
washer
in
drive
pinion
and
preSs
fit
rear
bearing
inner
race
in
it
using
Base
ST30901000
ADJUSTMENT
OF
DRIVE
PINIONPI
IELOAD
AdjUst
the
preload
of
drive
pinion
with
spacer
and
washer
between
front
and
rear
bearing
inner
races
This
procedure
has
nothing
to
do
with
thickness
of
drive
pinion
adjust
ing
washer
This
adjustment
must
be
carried
out
without
oil
seal
inserted
I
Lubricate
pinion
front
and
rear
bearings
Install
drive
pinion
in
gear
carrier
Be
sure
that
spacer
t
washer
front
bearing
inner
race
Companion
flange
and
flat
washer
are
fitted
on
pinion
Tighten
nut
to
specified
torque
and
confum
preload
Tightening
torque
14
0
to
17
0
kg
m
101
to
123
ft
lb
PD
l0
Note
Replace
bearing
washer
and
spacer
with
thicker
ones
if
pinion
cannot
be
turned
by
hand
while
it
is
heing
tightened
2
Measure
pinion
bearing
prelo
d
using
Preload
Gauge
ST3I
27S000
and
select
washer
and
spacer
that
will
provide
required
preload
Preload
without
oil
seal
10
0
to
13
0
kg
cm
8
7
to
II
in
lb
At
companion
flange
bolt
hole
2
9
to
3
7
kg
6
4
to8
2Ib
Note
Preload
of
old
bearing
is
the
same
value
as
that
of
a
new
bearing
Fig
PD
19
Measuring
pinion
preload
Pinion
bearing
adjusting
spacer
Length
mOl
in
S4
50
2
14S7
S4
80
2
IS7S
SS
IO
2
1693
5S
40
2
1811
SS
70
2
1929
S6
00
2
2047
Page 344 of 537
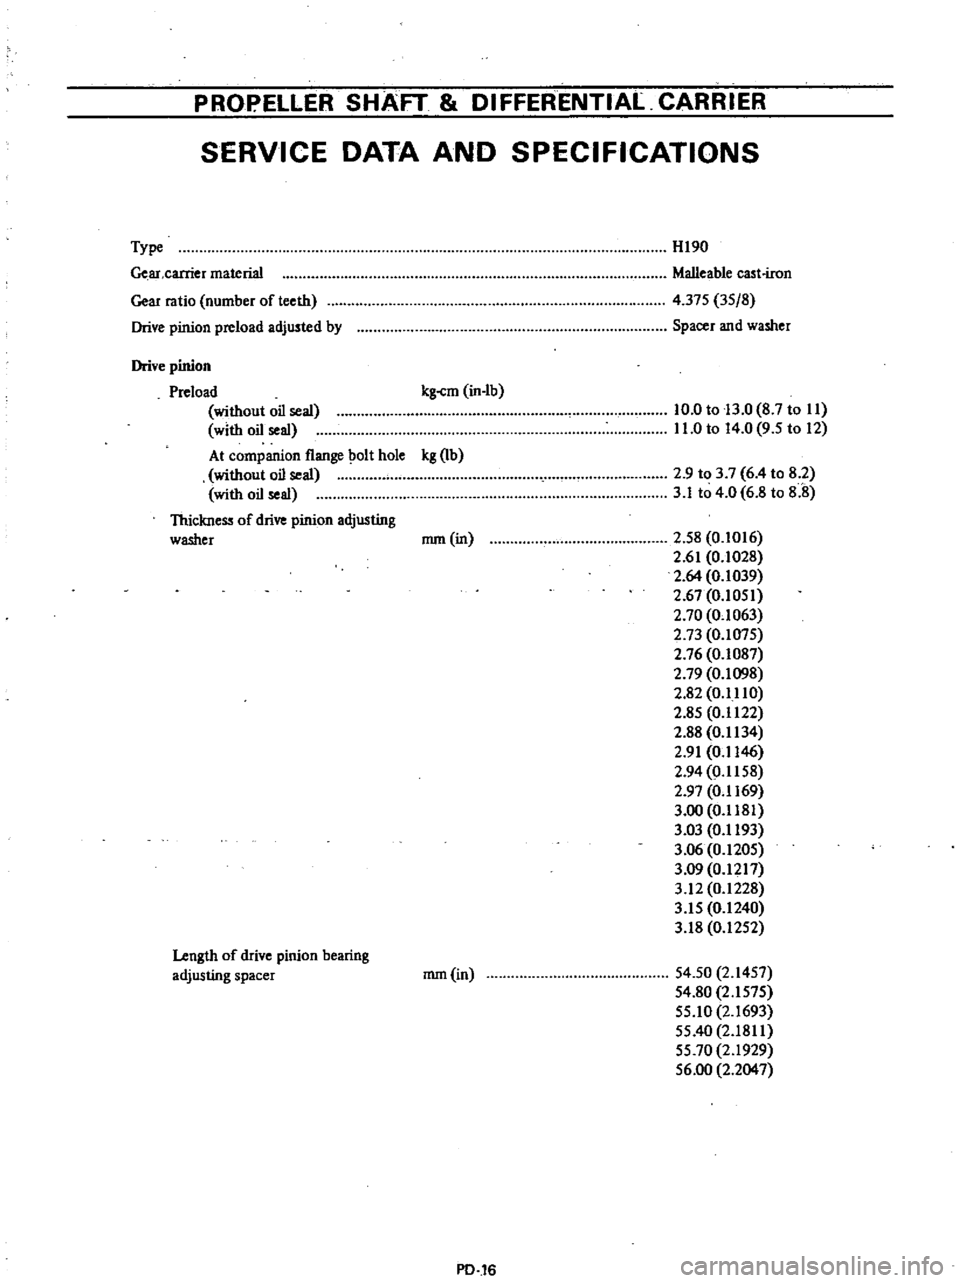
PROPELLER
SHAFT
DIFFERENTIAL
CARRIER
SERVICE
DATA
AND
SPECIFICATIONS
Type
Ge
ar
carrier
material
Gear
ratio
number
of
teeth
Drive
pinion
preload
adjusted
by
HI90
Malleable
cast
iron
4
375
3S
8
Spacer
and
washer
Drive
pinion
Preload
kg
cm
in
Ib
without
oil
seal
with
oil
seal
At
companion
flange
olt
hole
kg
Ib
without
oil
seal
with
oil
seal
Thickness
of
drive
pinion
adjusting
washer
nun
in
10
0
to
13
0
8
7
to
II
11
0
to
14
0
9
5
to
12
2
9
to
3
7
6
4
to
8
2
3
1
to
4
0
6
8
to
8
8
2
S8
0
1016
2
61
0
1028
2
64
0
1039
2
67
0
IOSI
2
70
0
1063
2
73
O
I07S
2
76
0
1087
2
79
0
1098
2
82
0
1110
2
8S
0
1122
2
88
0
1134
2
91
0
1146
2
94
0
1158
2
97
0
1169
3
00
0
1181
3
03
0
1193
3
06
0
120S
3
09
0
1217
3
12
0
1228
3
IS
0
1240
3
18
0
12S2
Length
of
drive
pinion
bearing
adjusting
spacer
nun
in
S4
50
2
14S7
54
80
2
IS7S
SS
IO
2
1693
SS
40
2
1811
SS
70
2
1929
S6
00
2
2047
PD
16