relay DATSUN PICK-UP 1977 User Guide
[x] Cancel search | Manufacturer: DATSUN, Model Year: 1977, Model line: PICK-UP, Model: DATSUN PICK-UP 1977Pages: 537, PDF Size: 35.48 MB
Page 187 of 537

DESCRIPTION
MEASUREMENT
OF
REGULATOR
VOLTAGE
ADJUSTMENT
VOLTAGE
REGULATOR
DESCRIPTION
The
regulator
consists
basically
of
a
voltage
regulator
and
a
charge
relay
The
voltage
regulator
has
two
sets
of
contact
points
a
lower
set
and
an
upper
set
to
control
alternator
volt
age
An
armature
plate
placed
between
the
two
sets
of
contacts
moves
upward
or
downward
or
vibrates
The
lower
contacts
when
closed
complete
the
jCV
ID@
@
GJ
I
@
@
@
Engine
Electrical
System
REGULATOR
CONTENTS
EE
20
CHARGING
RELAY
SERVICE
DATA
AND
SPECIFICATIONS
TROUBLE
DIAGNOSES
AND
CORRECTIONS
Including
alternatorl
EE
25
EE
23
EE
24
EE
20
EE
23
EE
23
field
circuit
direct
to
ground
and
the
upper
contacts
when
closed
complete
the
field
circuit
to
ground
through
a
resistance
field
coil
and
produce
alternator
output
The
charge
relay
i
similar
in
construction
to
the
voltage
regulator
When
the
upper
contacts
are
closed
charge
warning
lamp
goes
on
v
1
Charge
relay
2
Voltage
regulator
EE285
Fig
EE
46
View
of
removing
cover
As
regards
the
construction
the
voltage
regulator
is
very
similar
to
the
charge
relay
as
shown
in
Figure
EE47
@
r
J
CD
@
@
@
Q
@
ID@
ID@
J
t
L
T
@
r
b
r
CD
L
@
j
1
g
f
@
@
EEJ97
J
I1Jlccting
spring
2
Y
kt
g
p
3
Armaturc
4
Core
go
5
Low
Sllccd
lnlacl
h
Point
ap
7
High
speed
conlat
t
8
Contact
c
9
3111111
0
118
ill
di
10
41l1I11W
157in
c1ia
few
II
Cuil
12
lock
nut
J3
Adjllslin
screw
14
Adjll
sting
sprin
15
Yoke
9
Adjusting
screw
10
Lock
nut
11
Coil
12
4mm
0
157
in
dia
screw
13
3mm
0
118
in
dla
crew
14
Contact
iet
15
Voltage
cgulatm
contact
a
Cnl1
Tlll
tion
f
lltagl
l
j
llIOltllT
I
Point
gilp
2
Charge
relay
contllct
3
Core
gap
4
ArlllatlJre
5
Connecting
sprin
6
Yoke
gap
7
Yoh
B
Adjusting
pring
b
Construction
of
charge
relay
Fig
EE
47
Structural
vi
w
EE
20
Page 190 of 537
ADJUSTMENT
VOLTAGE
REGULATOR
When
regulating
voltage
as
meas
ured
above
deviates
from
rated
value
adjust
regulator
in
accordance
with
the
following
instructions
I
Inspect
contact
surface
and
if
rough
lightly
polish
with
fine
emery
paper
1
500
or
600
2
Measure
each
gap
and
adjust
if
necessary
Adjust
core
gap
and
point
gap
in
that
order
No
adjustment
is
required
for
yoke
gap
3
Adjusting
core
gap
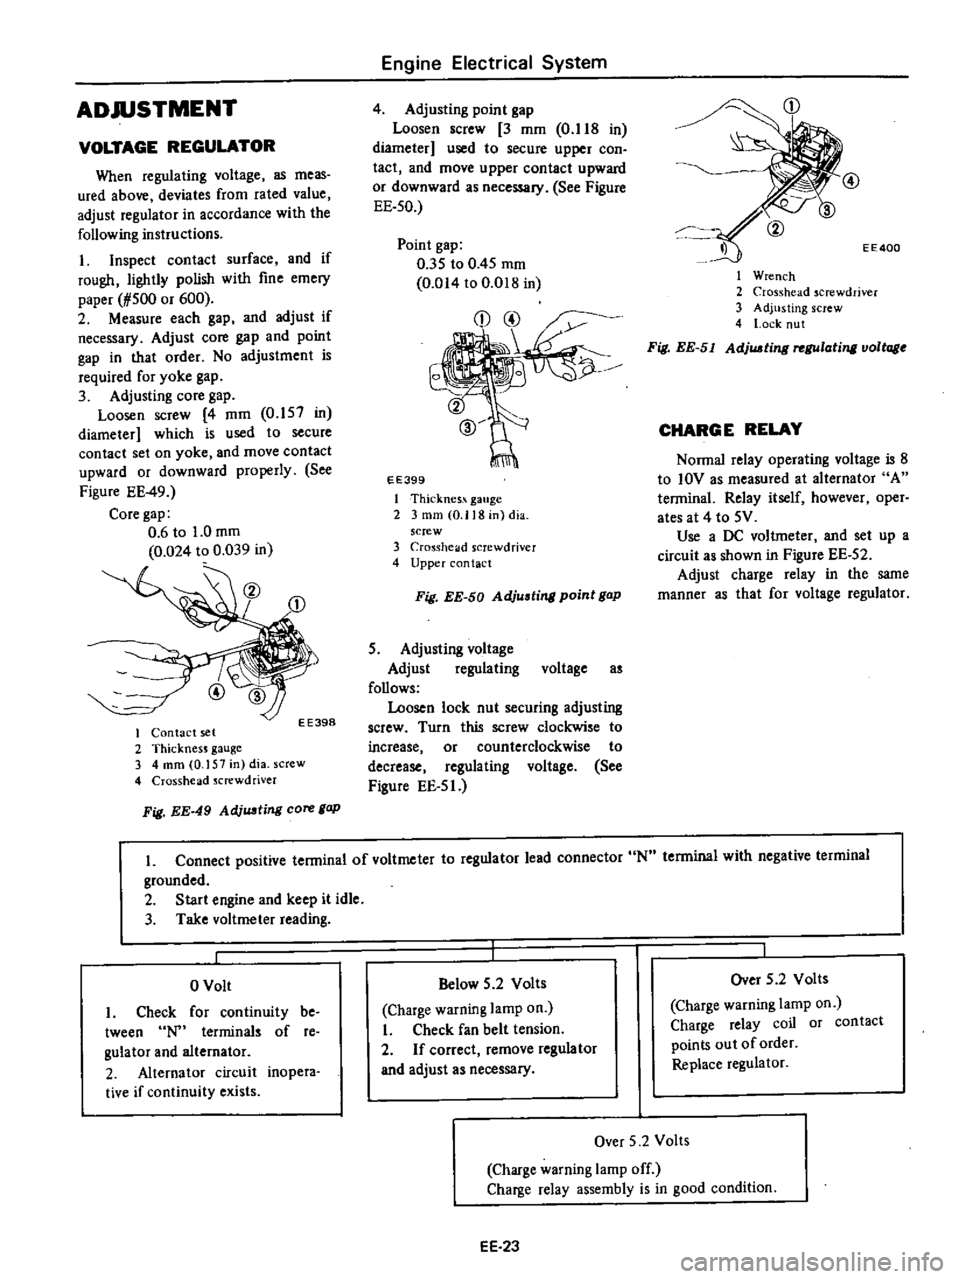
Loosen
screw
4
mm
0
157
in
diameter
which
is
used
to
secure
contact
set
on
yoke
and
move
contact
upward
or
downward
properly
See
Figure
EE
49
Core
gap
0
6
to
1
0
mm
0
024
to
0
039
in
EE398
I
Contact
set
2
ThicknesJ
gauge
3
4
mm
0
157
in
dia
screw
4
Crosshead
Jcrewdriver
Fig
EE
49
AdjUJJting
core
gap
Engine
Electrical
System
4
Adjusting
point
gap
Loosen
screw
3
mm
O
lIS
in
diameter
used
to
secure
upper
con
tact
and
move
upper
contact
upward
or
downward
as
necessary
See
Figure
EE
50
Point
gap
035
to
0
45
mm
0
014
to
O
D1S
in
EE399
I
Thicknes
gauge
2
3
mm
0
118
in
dia
screw
3
Cro
Sshelld
screwdriver
4
Upper
contact
Fig
EE
50
Adjusting
point
gap
5
Adjusting
voltage
Adjust
regulating
voltage
as
follows
Loosen
lock
nut
securing
adjusting
screw
Turn
this
screw
clockwise
to
increase
or
counterclockwise
to
decrease
regulating
voltage
See
Figure
EE
5
J
CD
EE400
I
Wrench
2
Crosshead
screwdriver
3
Adjusting
screw
4
l
ock
nut
Fig
EE
51
AdjUJJting
rel
Ulating
voltage
CHARGE
RELAY
Nonna
relay
operating
voltage
is
S
to
IOV
as
measured
at
alternator
A
tenninal
Relay
itself
however
oper
ates
at
4
to
5V
Use
a
DC
voltmeter
and
set
up
a
circuit
as
shown
in
Figure
EE
52
Adjust
charge
relay
in
the
same
manner
as
that
for
voltage
regulator
L
Connect
positive
tenninal
of
voltmeter
to
regulator
lead
connector
N
tenninal
with
negative
terminal
grounded
2
Start
engine
and
keep
it
idle
3
Take
voltmeter
reading
o
Volt
I
Check
for
continuity
be
tween
terminals
of
re
gulator
and
alternator
2
Alternator
circuit
inopera
tive
if
continuity
exists
Below
5
2
Volts
Charge
warning
lamp
on
I
Check
fan
belt
tension
2
If
correct
remove
regulator
and
adjust
as
necessary
Over
5
2
Volts
Charge
warning
lamp
on
Charge
relay
coil
or
contact
points
out
of
order
Replace
regulator
Over
5
2
Volts
Charge
warning
lamp
off
Charge
relay
assembly
is
in
good
condition
EE
23
Page 407 of 537
STEERING
SYSTEM
STEERING
CONTENTS
DESCRIPTION
STEERING
GEAR
Remo
al
and
installation
Disassembly
and
assembly
ST
2
ST
3
ST
3
ST
4
Inspection
and
repair
STEERING
LINKAGE
Removal
and
installation
Inspection
and
repair
ST
5
ST
6
ST
6
ST
7
DESCRIPTION
The
other
end
of
the
cross
rod
is
linked
to
the
idler
arm
connecting
with
the
side
member
located
on
the
opposite
side
of
the
steering
gear
The
two
side
rods
serve
to
connect
the
steering
gear
arm
and
idler
arm
to
the
both
knuckle
arms
right
and
left
hand
sides
With
this
construction
even
if
the
left
andlor
right
wheel
moves
vertical
The
steering
gear
used
on
this
model
series
vehicles
is
e
same
re
circulating
type
This
steering
gear
is
designed
especially
for
easy
operation
and
high
durability
The
steering
linkage
is
of
a
relay
design
of
which
gear
arm
is
connected
to
one
end
of
the
adjustable
cross
rod
ly
and
independently
steering
can
be
safely
maintained
Steering
wheel
rotation
is
converted
to
gear
arm
motion
in
proportion
to
the
gear
ratio
by
the
steering
gear
The
gear
arm
motion
operates
the
side
rod
on
the
same
side
At
the
same
time
the
idler
arm
is
moved
through
the
cross
rod
and
the
opposite
side
rod
is
also
moved
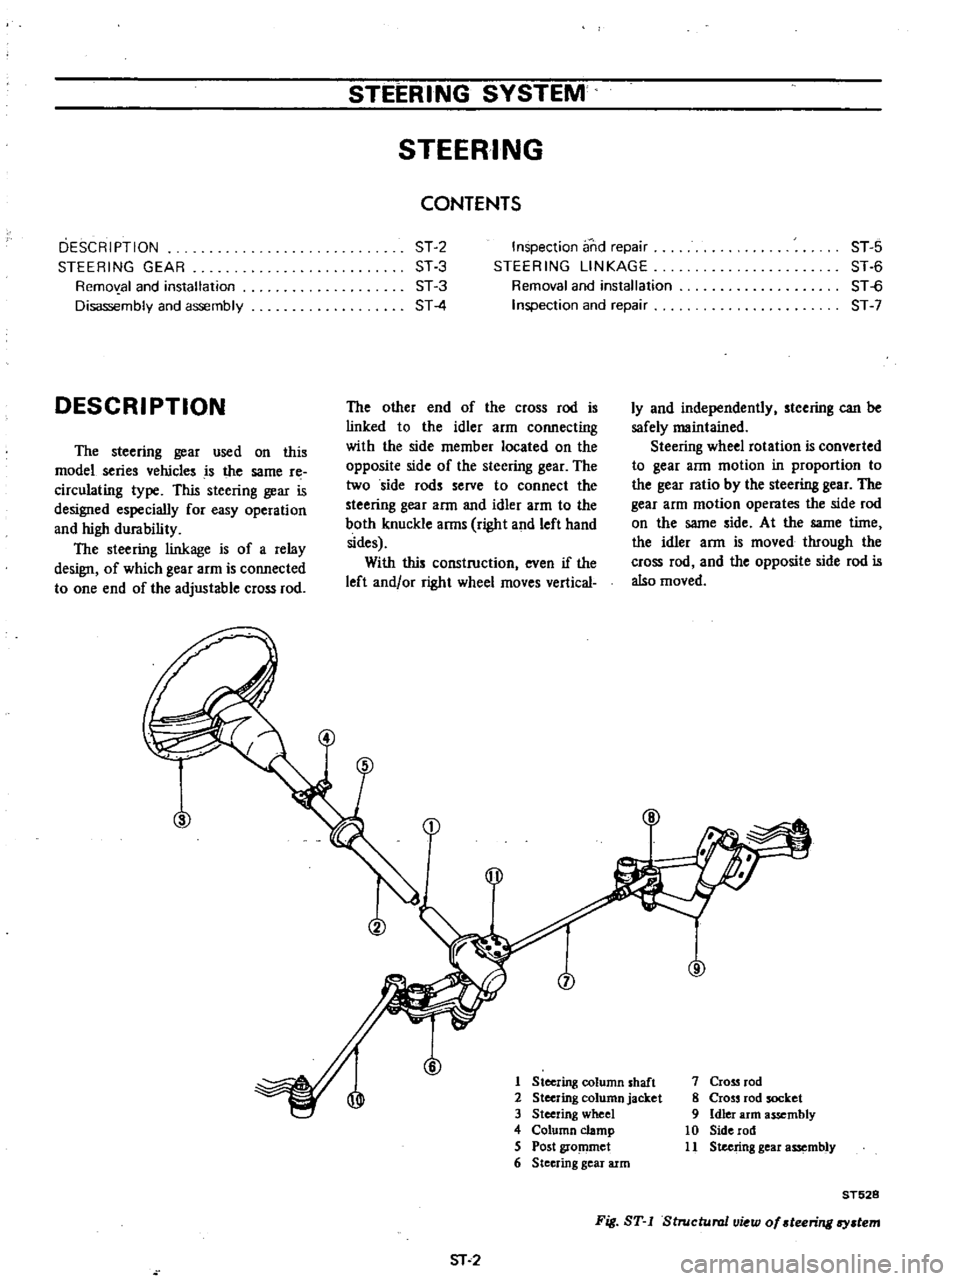
1
Steering
column
shaft
2
Steering
column
jacket
3
Steering
wheel
4
Column
clamp
S
Post
gro
llmet
6
Steering
gear
arm
sr
2
7
Cross
rod
8
Cross
rod
socket
9
Idler
arm
assembly
10
Side
rod
11
Steering
gear
assembly
ST528
Fig
ST
I
Structural
u
w
of
teeriTl
l
tem
Page 457 of 537

Body
Electrical
System
BULB
SPECIFICATIONS
Item
Wattage
Candlepower
Headlamp
Inner
Outer
37
5W
37
5
S0W
Front
combination
lamp
Turn
signal
and
parking
lamp
23
8W
32
3C
Side
marker
lamp
Front
Rear
8W
4C
8W
4C
Rear
combination
lamp
Turn
signal
lamp
A
B
Tail
lamp
B
C
Stop
lamp
A
B
Back
up
lamp
D
A
23W
32C
B
23j8W
32j3C
C
8W
4C
D
23W
32C
7
SW
6C
License
plate
lamp
Engine
compartment
lamp
6W
Room
lamp
5W
Combination
meter
illurnina
tion
17W
iC
x3
Knob
illumination
lamp
3
4W
2C
Heater
control
illumination
lamp
3
4W
2C
TROUBLEDIAGNOSE
AND
CORRECTIONS
HEADLAMP
Condition
Headlarnps
do
not
light
for
both
high
and
low
beams
High
beam
cannot
be
switched
to
low
beam
or
vice
versa
Probable
cause
Burnt
fuse
Loose
connection
or
open
circuit
Faulty
lighting
switch
Faulty
dimmer
switch
Faulty
light
relay
No
ground
Faulty
dimmer
switch
Faulty
light
relay
BE12
Bulb
SAE
trade
number
4001
4002
1034
67
67
1073
1034
67
1073
89
161
158
158
Corrective
action
Correct
cause
and
replace
fuse
Check
wiring
and
or
repair
connection
Conduct
continuity
test
and
replace
if
neces
sary
Check
light
relay
for
proper
operation
and
replace
if
necessary
Clean
and
tighten
ground
terminal
Conduct
continuity
test
and
replace
if
neces
sary
Check
light
relay
for
proper
operation
and
replace
if
necessary
Page 460 of 537

Body
Electrical
System
Circuit
diagram
of
combination
meter
system
BATTERY
r
G
0
J
J
Z2
lIa
I
LlJ
I
Z
J
Z
a
z
J
z
Z
i
g
o
a
I
LlJ
I
ll
B
S
M
D
LIGHT
i
i
RELAY
i2i
mm
S
FROM
J
e
AMP
l1
l1
J
J
00
LlJLlJ
z
z
B
COO
CUT
n
SOLENOID
i
OIL
f
PRESSURE
SWITCH
THERMAL
a
TRANSMITTER
I
FUSIBLE
r
LINK
IGNITION
SWITCH
0
1
lOA
I
g
KG
lOA
r
I
15A
t
15A
i
7
5a
z
u
a
a
I
04LlJ
l1
J
o
02
u
3
FUEL
TANK
J
VOLTAGE
REGULATOR
HAND
BRAKE
SWITCH
J
Jon
0
j
Z
a
l
I
I
I
l
ll
Z
ll
Z
LlJ
LlJ
J
a
J
a
I
I
I
I
1
1
Zza
a
00
a
a
LlJLlJ
ll
ll
a
a
HAZARD
FLASHER
UNIT
L
J
HAZAR
D
SWITCH
I
OFF
ONI
l
I
I
I
2
I
I
3
I
14
61
I
5
6
16
9
I
76
I
FLASHER
UNIT
CJ
TO
LIGHT
IOFF
RELAY
B
l
TERMINAL
I
I
I
LIGHT
SWITCH
21
X
X
BEB57
A
Fig
BE
22
Circuit
diagram
of
combination
meter
ayatt
m
TURN
SIGNAL
SWITCH
I
L
RI
lFLA
I
IR
R
I
IR
L
I
IF
R
u
I
IF
L
u
I
FROM
L1GHT
RELAY
DIMMER
SWITCH
BE
15
Page 462 of 537
Fuse
M
Body
Electrical
System
YR
Meter
voltage
regulator
Water
temperature
gauge
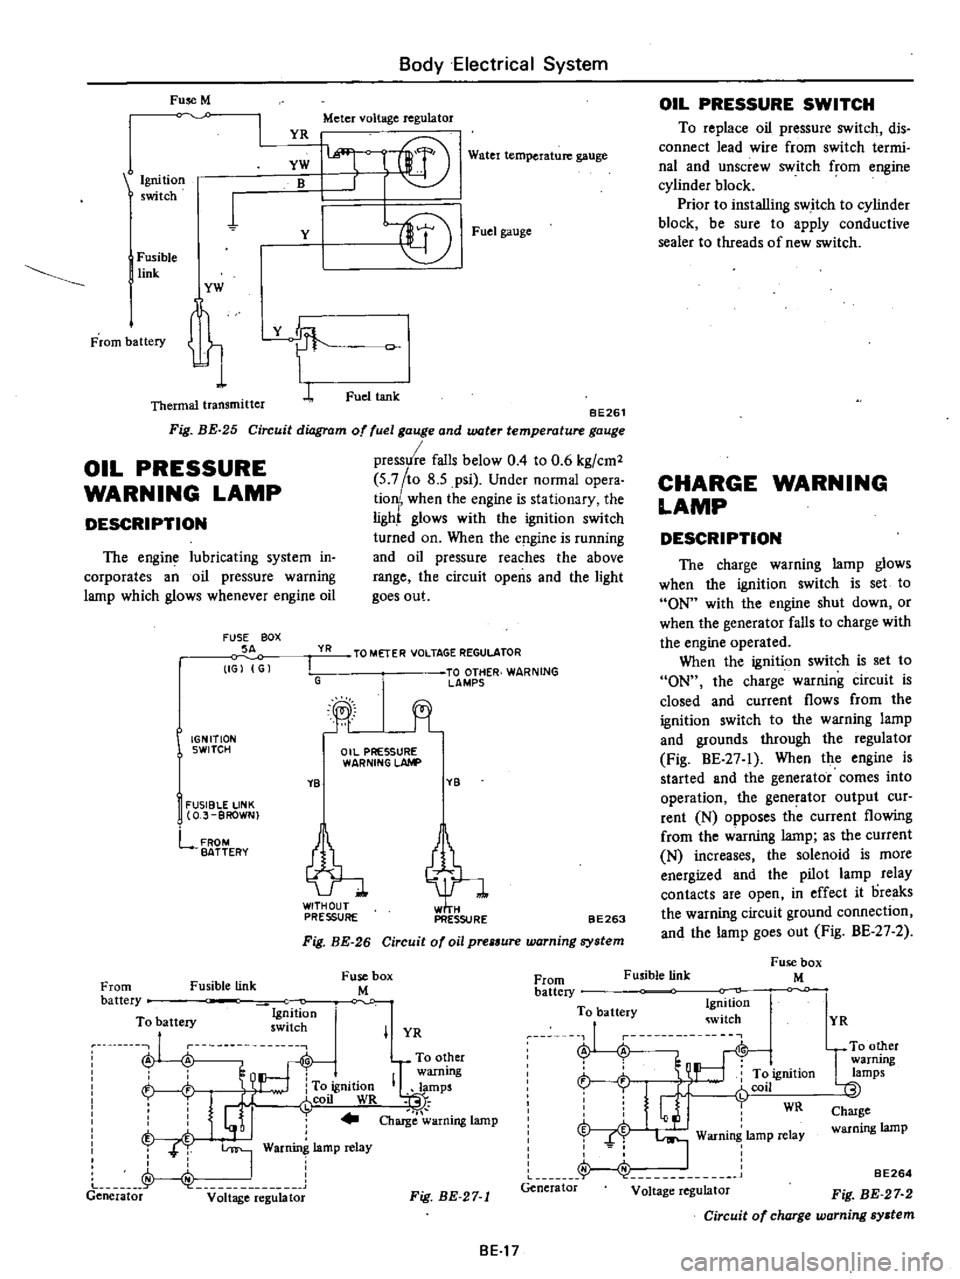
BE261
Circuit
diagram
of
fuel
gauge
and
water
temperature
gauge
pressure
falls
below
0
4
to
0
6
kg
cm2
5
7
to
8
5
psi
Under
normal
opera
tion
when
the
engine
is
stationary
the
ligh
glows
with
the
ignition
switch
turned
on
When
the
e
gine
is
running
and
oil
pressure
reaches
the
above
range
the
circuit
opens
and
the
light
goes
out
Ignition
switch
YW
B
1
Y
I
Fusible
link
YW
t
Thermal
transmitter
L
Fig
BE
25
OIL
PRESSURE
WARNING
LAMP
DESCRIPTION
The
engine
lubricating
system
in
corporates
an
oil
pressure
warning
lamp
which
glows
whenever
engine
oil
FUSE
BOX
SA
IGJ
G
YR
I
G
IGNITION
SWITCH
YB
I
FUSIBLE
LINK
O
J
BROWN
lffi
l
f
r@
Fuel
gauge
Fuel
tank
TO
METER
VOLTAGE
REGULATOR
TO
OTHER
WARNING
lAMPS
jt
Oil
PRESSURE
WARNING
LAhlP
YB
tl
PRESSURE
PRESSURE
FROM
BATTERY
BE263
Fig
BE
26
Circuit
of
oil
prelSure
warning
system
Fusible
link
Fuse
box
M
OIL
PRESSURE
SWITCH
To
replace
oil
pressure
switch
dis
connect
lead
wire
from
switch
termi
nal
and
unscrew
switch
from
engine
cylinder
block
Prior
to
installing
switch
to
cylinder
block
be
sure
to
apply
conductive
sealer
to
threads
of
new
switch
CHARGE
WARNING
LAMP
DESCRIPTION
The
charge
warning
lamp
glows
when
the
ignition
switch
is
set
to
ON
with
the
engine
shut
down
or
when
the
generator
falls
to
charge
with
the
engine
operated
When
the
ignition
switch
is
set
to
ON
the
charge
warning
circuit
is
closed
and
current
flows
from
the
ignition
switch
to
the
warning
lamp
and
grounds
through
the
regulator
Fig
BE
27
1
When
the
engine
is
started
and
the
generator
comes
into
operation
the
generator
output
cur
rent
N
opposes
th
current
flowing
from
the
warning
lamp
as
the
current
N
increases
the
solenoid
is
more
energized
and
the
pilot
lamp
relay
contacts
are
open
in
effect
it
oreaks
the
warning
circuit
ground
connection
and
the
lamp
goes
out
Fig
BE
27
2
Fusible
link
Fuse
box
M
From
battery
To
battery
Ig
ition
ru
nu
swllch
A
A
To
other
warning
h
To
ignition
IQlamps
i
J
r
coil
WR
t
I
j
Charge
warning
lamp
T
T
I
War
lamp
relay
J
I
Generator
v
it
ge
e
g
bt
From
battery
To
battery
Ignition
witch
J
i
L
r
t
ft
ignition
r
Glj
fCOil
WR
f
I
Warning
lamp
relay
Generator
Voltage
regulator
I
YR
Fig
BE
27
1
BE17
YR
UTO
other
warrung
lamps
Charge
warning
lamp
BE264
Fig
BE
27
2
Circuit
of
charge
warning
system
Page 466 of 537
Body
Electrical
System
ELECTRICAL
ACCESSORIES
CONTENTS
HORN
DESCRIPTION
REMOVAL
AND
INSTALLATION
IGNITION
SWITCH
REMOVAL
AND
INSTALLATION
INSPECTION
WINDSHIELD
WIPER
AND
WASHER
REMOVAL
AND
INSTALLATION
INSPECTION
RADIO
REMOVAL
AND
INSTALLATION
ADJUSTMENT
CLOCK
REMOVAL
I
NST
ALLA
TION
HEATER
DESCRIPTION
AIRFLOW
HEATER
UNIT
ASSEMBLY
BE
21
BE
21
BE
21
8E
n
BE
22
BE
22
BE
23
BE
23
BE
23
BE
25
BE
25
BE
25
BE
25
BE
25
BE
26
BE
26
BE
26
BE
28
BE
29
HORN
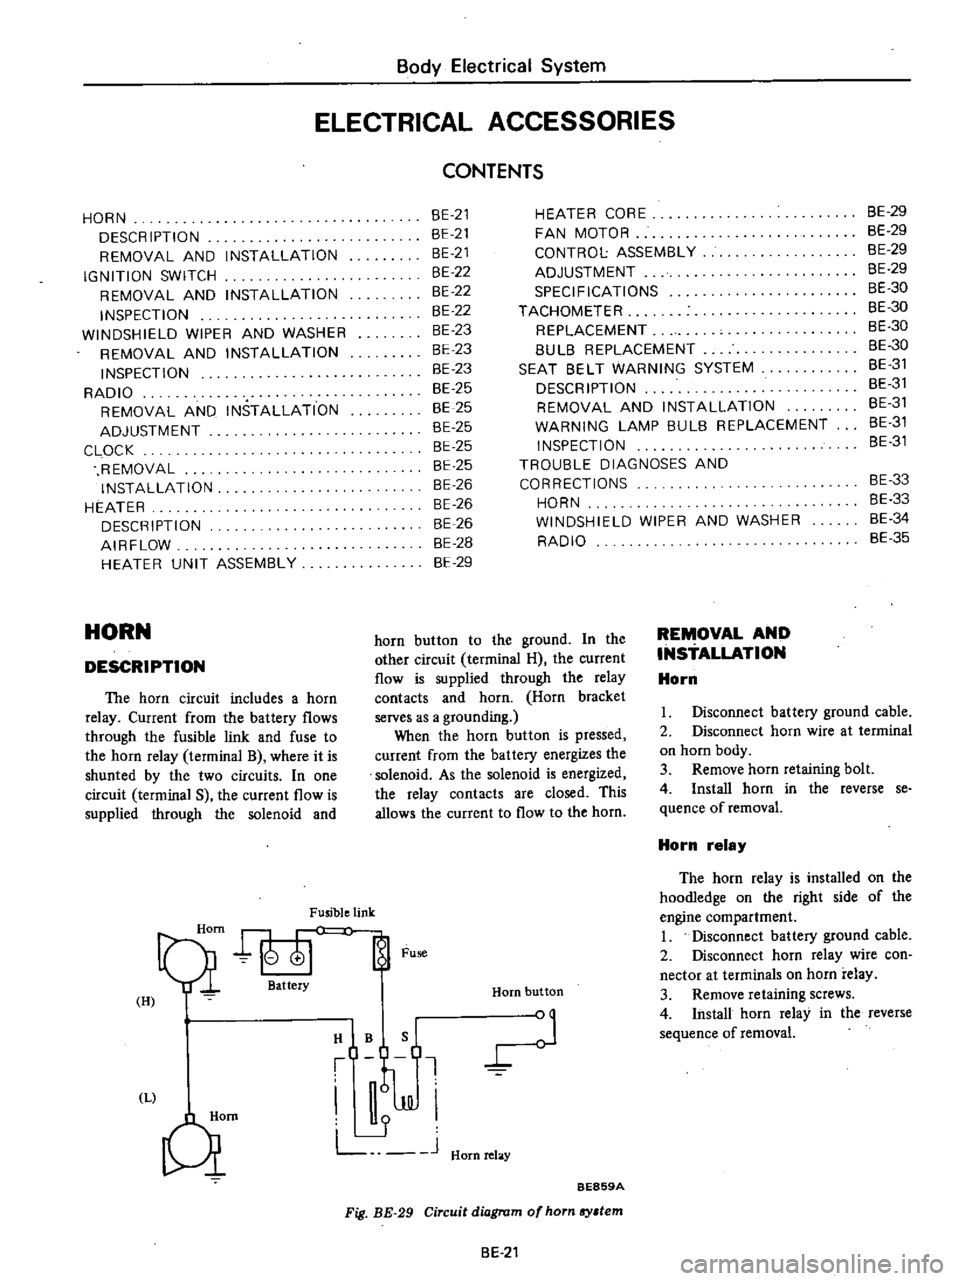
DESCRIPTION
The
horn
circuit
includes
a
horn
relay
Current
from
the
battery
flows
through
the
fusible
link
and
fuse
to
the
horn
relay
terminal
B
where
it
is
shunted
by
the
two
circuits
In
one
circuit
terminal
S
the
current
flow
is
supplied
through
the
solenoid
and
Fusible
link
Qi
att
Fu
H
I
HIBQ
t
J
JJI
L
J
Hornrelay
Qm
HEATER
CORE
FAN
MOTOR
CONTROL
ASSEMBLY
ADJUSTMENT
SPECIFICATIONS
TACHOMETER
REPLACEMENT
8UL8
REPLACEMENT
SEAT
8ELT
WARNING
SYSTEM
DESCRIPTION
REMOVAL
AND
INSTALLATION
WARNING
LAMP
BULB
REPLACEMENT
INSPECTION
TROUBLE
DIAGNOSES
AND
CORRECTIONS
HORN
WINDSHIELD
WIPER
AND
WASHER
RADIO
Horn
button
BE859A
Fig
BE
29
Circuit
diagram
of
horn
sy
tem
horn
button
to
the
ground
In
the
other
circuit
terminal
H
the
current
flow
is
supplied
through
the
relay
contacts
and
horn
Horn
bracket
serves
as
a
grounding
When
the
horn
button
is
pressed
current
from
the
battery
energizes
the
solenoid
As
the
solenoid
is
energized
the
relay
contacts
are
closed
This
allows
the
current
to
flow
to
the
horn
BE
21
REMOVAL
AND
INSTALLATION
Horn
8E
29
BE
29
BE
29
8E
29
BE
30
BE
30
BE
30
8E
30
8E
31
BE
31
BE
31
8E
31
8E
31
BE
33
8E
33
8E
34
BE
35
I
Disconnect
battery
ground
cable
2
Disconnect
horn
wire
at
terminal
on
horn
body
3
Remove
horn
retaining
bolt
4
Install
horn
in
the
reverse
se
quence
of
removal
Horn
relay
The
horn
relay
is
installed
on
the
hoodIedge
on
the
right
side
of
the
engine
compartment
I
Disconnect
battery
ground
cable
2
Disconnect
horn
relay
wire
con
nector
at
terminals
on
horn
relay
3
Remove
retaining
screws
4
Install
horn
relay
in
the
reverse
sequence
of
removal
Page 467 of 537
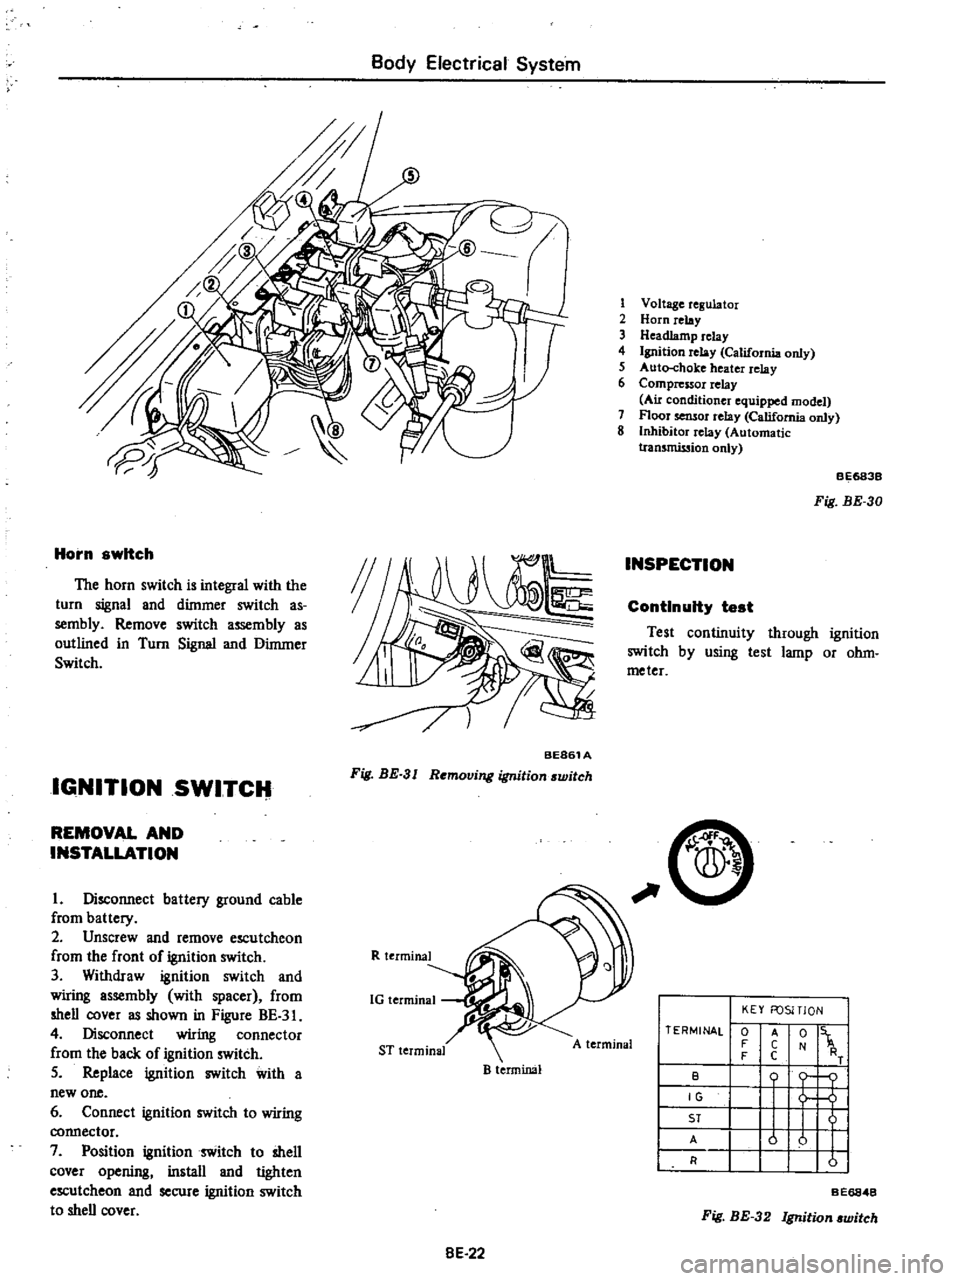
Body
Electrical
System
Horn
switch
The
horn
switch
is
integral
with
the
turn
signal
and
dimmer
switch
as
sembly
Remove
switch
assembly
as
outlined
in
Turn
Signal
and
Dimmer
Switch
IGNITION
SWITCH
BE861A
Fig
BE
3
I
Removing
ignition
switch
REMOVAL
AND
INSTALLATION
I
Disconnect
battery
ground
cable
from
battery
2
Unscrew
and
remove
escutcheon
from
the
front
of
ignition
switch
3
Withdraw
ignition
switch
and
wiring
assembly
with
spacer
from
shell
cover
as
shown
in
Figure
BE
3
4
Disconnect
wiring
connector
from
the
back
of
ignition
switch
5
Replace
ignition
switch
with
a
new
one
6
Connect
ignition
switch
to
wiring
connector
7
Position
ignition
switch
to
shell
cover
opening
install
and
tighten
escutcheon
and
secure
ignition
switch
to
shell
cover
R
terminal
1G
terminal
ST
terminal
B
terminal
8E
22
1
Voltage
regulator
2
Horn
relay
3
Headlamp
relay
4
Ignition
relay
California
only
5
Auto
choke
heater
relay
6
Compressor
relay
Au
conditioner
equipped
model
7
Floor
sensor
relay
California
only
8
Inhibitor
relay
Automatic
tran5mission
only
INSPECTION
BE683B
Fig
BE
30
ContInuity
test
Test
continuity
through
ignition
switch
by
using
test
lamp
or
ohm
meter
C
A
terminal
TERMINAL
0
F
F
B
IG
ST
A
R
KEY
FOSITlON
t
1
o
j
u
u
I
I
A
C
C
Fig
BE
32
Ignition
witch
BE6848
Page 477 of 537
Body
Electrical
System
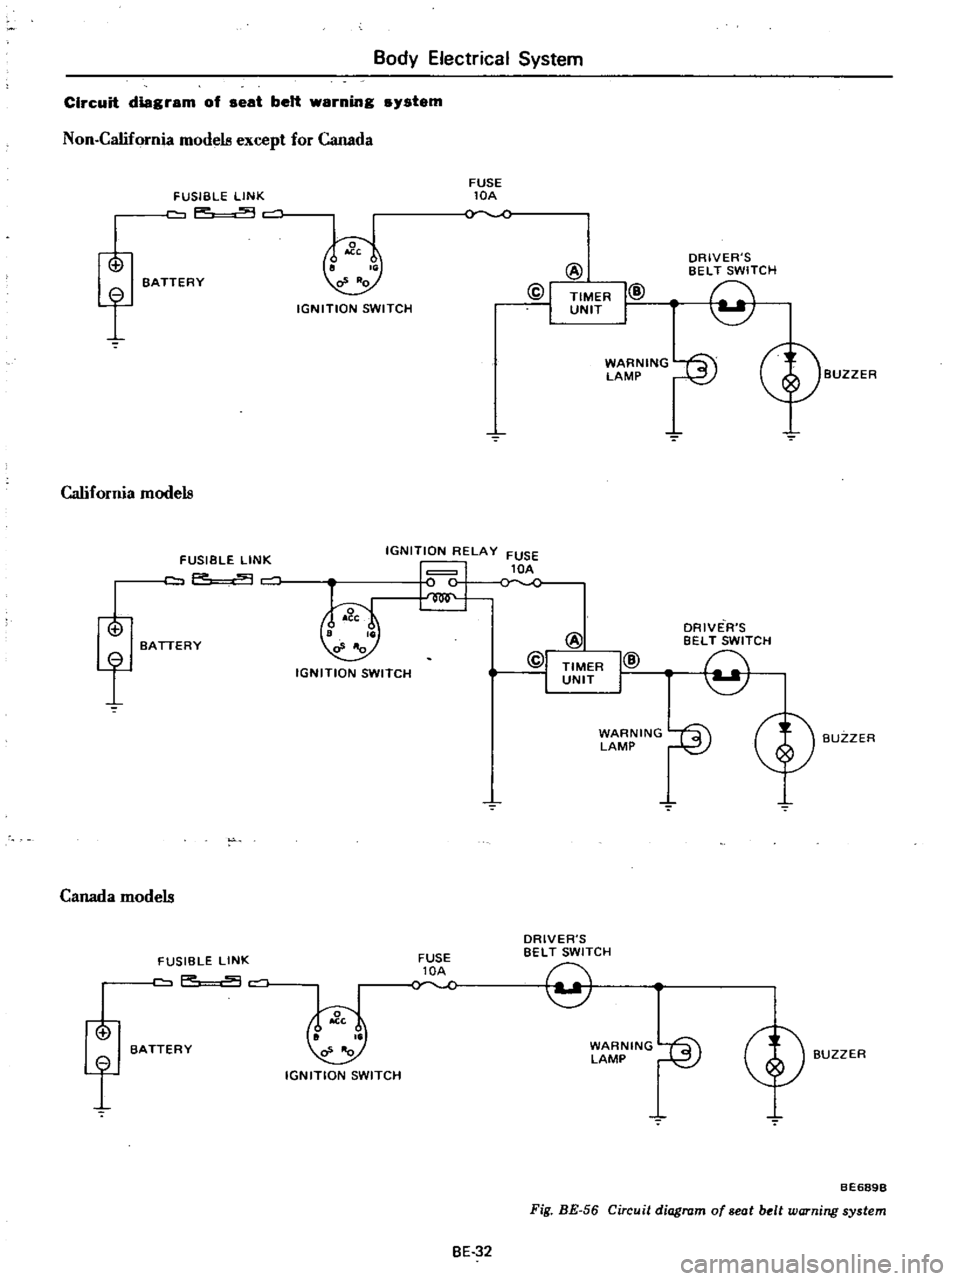
Circuit
diagram
of
seat
belt
warning
system
Non
California
modela
except
for
Canada
f
FUSIBLE
LINK
p
c
o
BATTERY
California
modela
f
Canada
modela
o
f
FUSIBLE
LINK
F
9
BATTERY
FUSIBLE
LINK
aP
c
BATTERY
IGNITION
SWITCH
FUSE
lOA
@
@I
TIMER
UNIT
I@
I
WARNING
fS
LAMP
l
2
IGNITION
RELAY
FUSE
1
lC
1
lOA
IGNITION
SWITCH
N
IGN
ITION
SWITCH
FUSE
lOA
BE
32
DRIVER
S
BELT
SWITCH
9
ORIVE
R
S
BELT
SWITCH
9
WARNING
r
i
LAMP
I
2
J
DRIVER
S
BELT
SWITCH
9
WARNING
fS
LAMP
I
2
J
Cf
BUZZER
BUZZER
BUZZER
BE689B
Fig
BE
56
Circuit
diagram
of
seat
belt
warning
system
Page 478 of 537

Body
Electrical
System
TROUBLE
DIAGNOSES
AND
CORRECTIONS
HORN
Condition
Horn
does
not
operate
Horn
sounds
continuously
Reduced
volume
and
or
tone
quality
Probable
cause
Discharged
battery
Measure
specific
gravity
of
electrolyte
Burnt
fuse
Faulty
horn
button
contact
Horn
sounds
when
horn
relay
terminal
s
is
grounded
Inoperative
horn
relay
Horn
sounds
when
B
and
H
horn
relay
tenninals
are
connected
with
a
test
lead
Damaged
horn
or
loose
horn
terminal
con
nection
Short
circuited
horn
button
and
or
horn
button
lead
wire
When
light
green
lead
wire
is
disconnected
from
horn
relay
terminal
s
horn
stops
to
sound
Inoperative
horn
relay
Loose
or
poor
connector
contact
Fuse
relay
horn
and
or
horn
button
Damaged
horn
BE
33
Corrective
action
Recharge
or
replace
battery
Correct
cause
and
replace
fuse
Repair
horn
button
Replace
horn
relay
Correct
horn
te
inal
onnection
or
replace
horn
Repair
horn
button
or
its
wiring
Replace
horn
relay
Repair
Replace