stop start DATSUN PICK-UP 1977 User Guide
[x] Cancel search | Manufacturer: DATSUN, Model Year: 1977, Model line: PICK-UP, Model: DATSUN PICK-UP 1977Pages: 537, PDF Size: 35.48 MB
Page 177 of 537

No
load
test
Connect
starting
motor
in
series
with
specified
12
volts
battery
and
an
ammeter
capable
of
indicating
1
000
amperes
Starter
motor
Diagnoses
of
test
1
Low
speed
with
no
load
and
high
current
draw
may
result
from
the
following
1
Tight
dirty
or
worn
bearings
2
Bent
armature
shaft
or
loosened
field
probe
3
Shorted
armature
Check
armature
further
4
A
grounded
armature
or
field
a
Remove
input
tenninal
b
Raise
two
negative
side
brushes
from
commutator
c
Using
a
circuit
tester
place
one
probe
onto
input
tenninal
and
the
other
onto
yoke
d
I
f
tester
indicates
continuity
raise
the
other
two
brushes
and
check
field
and
armature
separately
to
determine
whether
field
or
armature
is
grounded
2
F
allure
to
operate
with
high
current
draw
may
be
caused
by
the
Engine
Electrical
System
Specified
current
draw
and
revolu
tion
in
these
test
are
shown
in
Specifications
Switch
6
Battery
Et
Voltmeter
Ammeter
Ee026
Fig
EE
20
No
load
l
ting
following
I
A
grounded
or
open
field
coil
Inspect
the
connection
and
trace
circuit
with
a
circuit
tester
2
Armature
coil
does
not
operate
Inspect
commutator
for
excessive
burning
In
this
case
arc
may
occur
on
damaged
commutator
when
motor
is
operated
with
no
load
3
Burned
out
commutator
bar
Weak
brush
spring
tension
broken
brush
spring
rubber
bush
thrust
out
of
mica
in
commu
tat
or
or
a
loose
contact
between
biush
and
com
mutator
would
cause
commutator
bar
to
burn
3
Low
current
draw
and
low
no
load
speed
would
cause
high
internal
resistance
due
to
loose
con
nections
damaged
leads
dirty
corn
mutator
and
causes
listed
on
item
2
3
EE10
MAGNETIC
SWITCH
ASSEMBLY
TEST
Switch
o
Fv
IB
I
I
D
Battery
Starter
motor
EE351
FiN
EE
21
Circuit
ofmagndic
awitch
assembly
ted
If
the
starting
motor
check
is
OK
check
magnetic
switch
as
sembly
Connect
cables
between
negative
battery
tenninal
and
start
ing
motor
M
terminal
positive
battery
terminal
and
starting
motor
S
terminal
connecting
a
switch
in
series
as
shown
in
Figure
EE
21
With
the
switch
on
push
pinion
back
to
remove
all
slack
and
measure
the
clearance
l
between
pinion
front
edge
and
pinion
stopper
The
clearance
should
be
held
within
0
3
to
1
5
mm
0
012
to
0
059
in
If
neces
sary
adjust
it
by
changing
or
adding
adjusting
washer
s
Adjusting
washers
are
available
in
to
two
different
sizes
0
5
mm
0
020
in
and
O
S
mm
0
031
in
0
3
to
I
S
rom
0
012
to
0
059
in
l
EE029
Fig
EE
22
MeO
uring
clearance
t
Page 178 of 537

Engine
Electrical
System
SERVICE
DATA
AND
SPECIFICATIONS
Type
System
voltage
No
load
Terminal
voltage
Current
Revolution
v
V
A
rpm
Brush
length
Outer
diameter
of
commutator
mm
in
mm
in
Brush
spring
tension
kg
Ib
Clearance
between
bearing
metal
and
armature
shaft
mm
in
Clearance
L
between
pinion
front
edge
and
pinion
stopper
mm
in
TROUBLE
DIAGNOSES
AND
CORRECTIONS
Condition
Starting
motor
will
not
operate
Noisy
starting
motor
Starting
motor
cranks
slowly
Probable
cause
Discharged
battery
Damaged
solenoid
switch
Loose
connections
of
terminal
Damaged
brushes
Starti
g
motor
inoperative
Loose
securing
bolt
Worn
pinion
gear
Poor
lubrication
Worn
commutator
Worn
brushes
Discharged
battery
Loose
connection
of
terminal
Worn
brushes
Locked
brushes
EE
ll
Manual
transmission
Automatic
transmission
Optional
for
manual
transmission
SII4
ISOB
S114
170B
12
12
Less
than
60
More
than
7
000
More
than
6
000
More
than
39
1
54
More
than
12
0
47
1
4
to
I
S
3
1
to
4
0
Less
than
0
2
O
OOS
0
3
to
1
5
0
012
to
0
059
Corrective
action
Charge
or
replace
battery
Repair
or
replace
solenoid
switch
Clean
and
tighten
terminal
Replace
brushes
Remove
starting
motor
and
make
test
Tighten
Replace
Add
oil
Replace
Replace
Charge
Clean
and
tighten
Replace
Inspect
brush
spring
tension
or
repair
brush
holder
Page 231 of 537
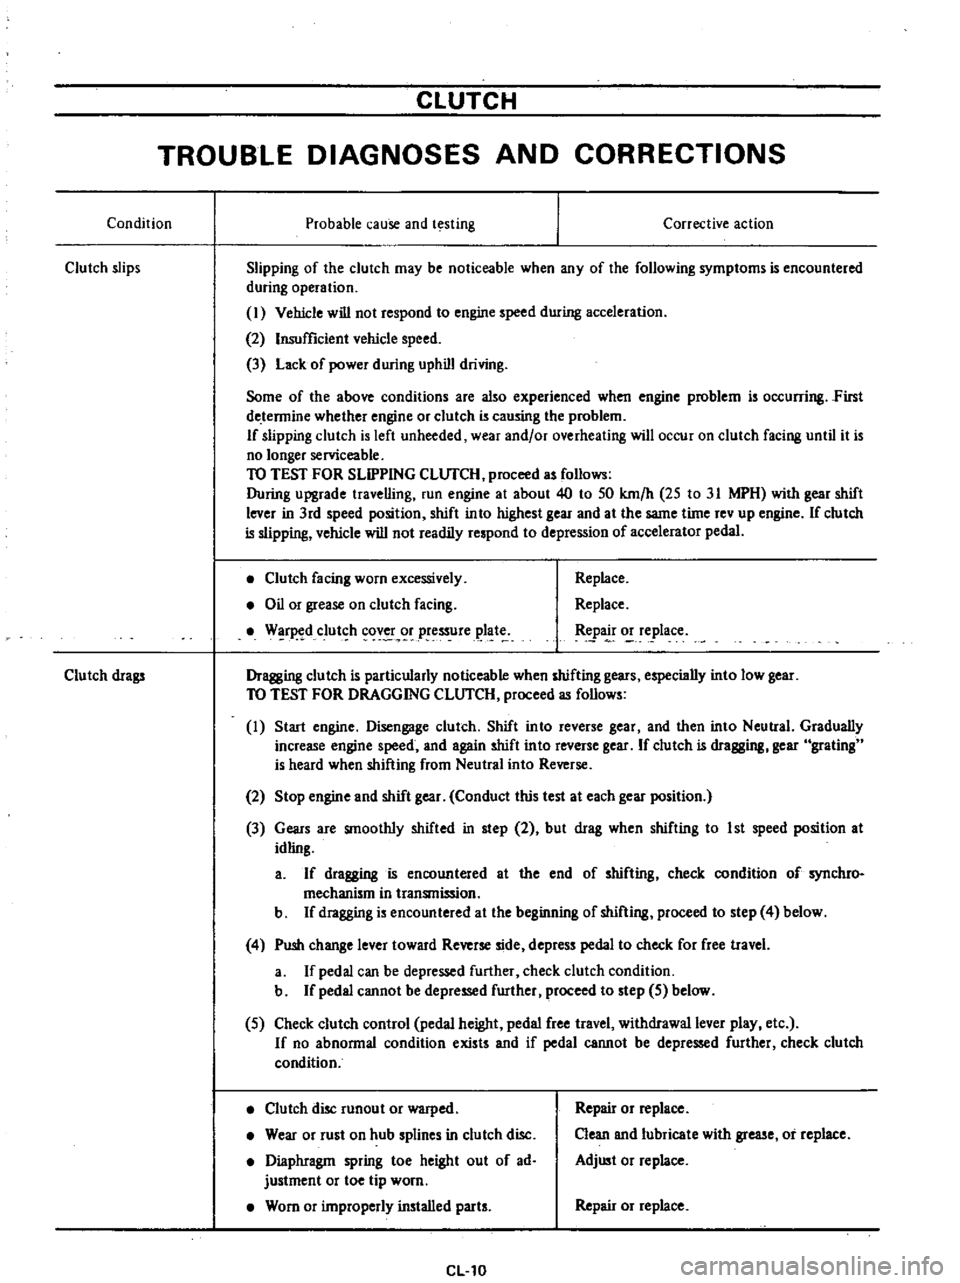
CLUTCH
TROUBLE
DIAGNOSES
AND
CORRECTIONS
Condition
Probable
cause
and
testing
Clutch
slips
Corrective
action
Slipping
of
the
clutch
may
be
noticeable
when
any
of
the
following
symptoms
is
encountered
during
operation
I
Vehicle
will
not
respond
to
engine
speed
during
acceleration
2
Insufficient
vehicle
speed
3
Lack
of
power
during
uphill
driving
Some
of
the
above
conditions
are
also
experienced
when
engine
problem
is
oc
urring
First
de
tennine
whether
engine
or
clutch
is
causing
the
problem
If
slipping
clutch
is
left
unheeded
wear
and
or
overheating
will
occur
on
clutch
facing
until
it
is
no
longer
serviceable
TO
TEST
FOR
SLIPPING
CLlJfCH
proceed
as
follows
During
upgrade
travelling
run
engine
at
about
40
to
50
km
h
25
to
31
MPH
with
gear
shift
lever
in
3rd
speed
position
shift
into
highest
gear
and
at
the
same
time
rev
up
engine
If
clutch
is
slipping
vehicle
will
not
readily
respond
to
depression
of
accelerator
pedal
Clutch
facing
worn
excessively
Oil
or
grease
on
clutch
facing
W
r
d
clut
h
cov
r
pressure
plat
Replace
Replace
tpa
o
e
lace
Dragging
clutch
is
particularly
noticeable
when
shifting
gears
especially
into
low
gear
TO
TEST
FOR
DRAGGING
CLlJfCH
proceed
as
follows
I
Start
engine
Disengage
clutch
Shift
into
reverse
gear
and
then
into
Neutral
Gradually
increase
engine
speed
and
again
shift
into
reverse
gear
If
clutch
is
dragging
gear
grating
is
heard
when
shifting
from
Neutral
into
Reverse
Clutch
drags
2
Stop
engine
and
shift
gear
Conduct
this
test
at
each
gear
position
3
Gears
are
smoothly
shifted
in
step
2
but
drag
when
shifting
to
1st
speed
position
at
idling
a
If
dragging
is
encountered
at
the
end
of
shifting
check
condition
of
synchro
mechanism
in
transmission
b
If
dragging
is
encountered
at
the
beginning
of
shifting
proceed
to
step
4
below
4
Push
change
lever
toward
Reverse
side
depress
pedal
to
check
for
free
travel
a
If
pedal
can
be
depressed
further
check
clutch
condition
b
If
pedal
cannot
be
depressed
further
proceed
to
step
5
below
5
Check
clutch
control
pedal
height
pedal
free
travel
withdrawal
lever
play
etc
If
no
abnonnal
condition
exists
and
if
pedal
cannot
be
depressed
further
check
clutch
condition
Clutch
disc
runout
or
warped
Wear
or
rust
on
hub
splines
in
clutch
disc
Diaphragm
spring
toe
height
out
of
ad
justment
or
toe
tip
worn
Worn
or
improperly
installed
parts
CL10
Repair
or
replace
Clean
and
lubricate
with
grease
or
replace
Adjust
or
replace
Repair
or
replace
Page 238 of 537
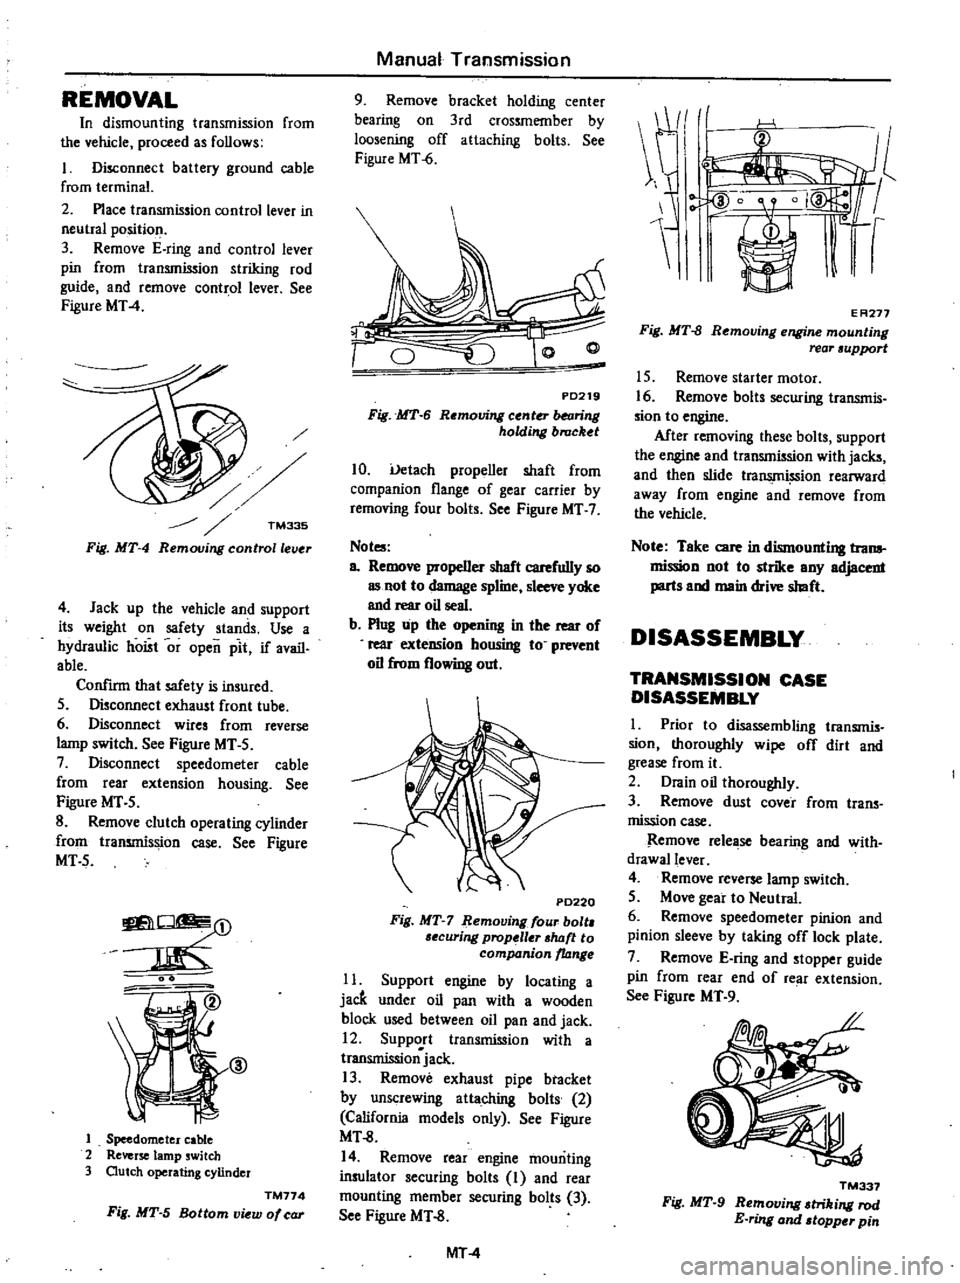
REMOVAL
In
dismounting
transmission
from
the
vehicle
proceed
as
follows
I
Disconnect
battery
ground
cable
from
terminal
2
Place
transmission
control
lever
in
neutIal
position
3
Remove
E
ring
and
control
lever
pin
from
transmission
striking
rod
guide
and
remove
control
lever
See
Figure
MT
4
TM335
Fig
MT
4
Remouing
controllelJ
r
4
Jack
up
the
vehicle
and
support
its
weight
on
safety
stands
Use
a
hydraulic
hoist
or
open
pit
if
avail
able
Confirm
that
safety
is
insured
5
Disconnect
exhaust
front
tube
6
Disconnect
wires
from
reverse
lamp
switch
See
Figure
MT
5
7
Disconnect
speedometer
cable
from
rear
extension
housing
See
Figure
MT
5
8
Remove
clutch
operating
cylinder
from
transmission
case
See
Figure
MT5
O
m
J
@
1
Speedometer
cable
2
Reverse
lamp
switch
3
Outch
operating
cylinder
TM774
Fig
MT
5
Bottom
view
of
car
Manual
Transmission
9
Remove
bracket
holding
center
bearing
on
3rd
crossmember
by
loosening
off
attaching
bolts
See
Figure
MT
6
PD219
Fig
MT
6
Removing
center
balring
holding
brucket
10
Uetach
propeller
shaft
from
companion
flange
of
gear
carrier
by
removing
four
bolts
See
Figure
MT
7
Not
a
Remove
propeller
shaft
carefully
so
as
not
to
damage
spline
sleeve
yoke
and
rear
oil
seal
b
Plug
up
the
opening
in
the
rear
of
rear
exteDSion
housing
to
prevent
oil
from
flowing
out
P0220
Fig
MT
7
Remouing
four
bolt
6ecuring
prop
ller
shtJft
to
companion
ltJnge
11
Support
engine
by
locating
a
jacft
under
oil
pan
with
a
wooden
block
used
between
oil
pan
and
jack
12
Support
transmission
with
a
transmissionjack
13
Remove
exhaust
pipe
btacket
by
unscrewing
attaching
bolts
2
California
models
only
See
Figure
MT
8
14
Remove
rear
engine
mounting
insulator
securing
bolts
I
and
rear
mounting
member
securing
bolts
3
See
Figure
MT
8
MT
4
E
A277
Fig
MT
8
Removing
engine
mounting
rear
support
15
Remove
starter
motor
16
Remove
bolt
securing
transmis
sion
to
engine
After
removing
these
bolts
support
the
engine
and
transmission
with
jacks
and
then
slide
tra
ion
rearward
away
from
engine
and
remove
from
the
vehicle
Note
Take
care
in
dismounting
trona
mission
not
to
strike
any
adjacent
parts
and
main
drive
shaft
DISASSEMBLY
TRANSMISSION
CASE
DISASSEMBLY
I
Prior
to
disassembling
transmis
sion
thoroughly
wipe
off
dirt
and
grease
from
it
2
Drain
oil
thoroughly
3
Remove
dust
cover
from
trans
mission
case
Remove
release
bearing
and
with
drawallever
4
Remove
reverse
lamp
switch
5
Move
gear
to
Neutral
6
Remove
speedometer
pinion
and
pinion
sleeve
by
taking
off
lock
plate
7
Remove
E
ring
and
stopper
guide
pin
from
rear
end
of
re
ll
extension
See
Figure
MT
9
TM337
Fig
MT
9
Removing
triking
rod
E
ring
and
topper
pin
Page 265 of 537
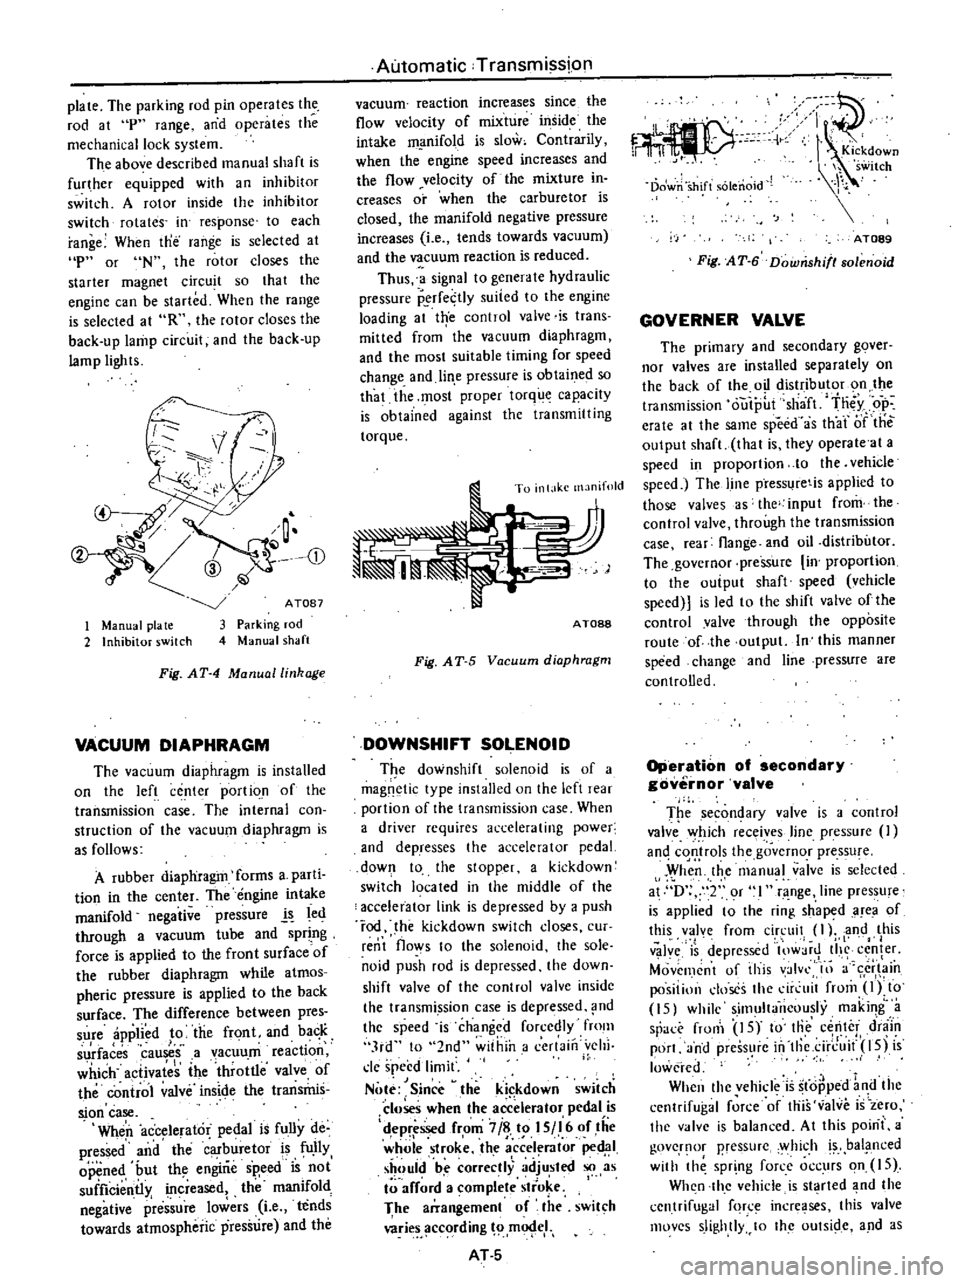
plate
The
parking
rod
pin
operates
the
rod
at
p
range
and
operates
the
mechanical
lock
system
The
above
described
manual
shaft
is
further
equipped
with
an
inhibitor
switch
A
rotor
inside
the
inhibitor
switch
rotates
in
response
to
each
range
When
tne
range
is
selected
at
p
or
N
the
rotor
closes
the
starter
magnet
circuit
so
that
the
engine
can
be
started
When
the
range
is
selected
at
R
the
rolor
closes
the
back
up
lamp
circuit
and
the
back
up
lamp
lights
CD
1
Manual
pia
te
2
Inhibitor
switch
ATOB7
Parking
rod
Manual
shaft
Fig
AT
4
Manual
linkage
VACUUM
DIAPHRAGM
The
vacuum
diaphragm
is
installed
on
the
left
center
portio
n
of
the
transmission
case
The
internal
con
struction
of
the
vacuum
diaphragm
is
as
follows
A
rubber
diaphragm
forms
a
parti
tion
in
the
center
The
engine
intake
manifold
negative
pressure
l
led
through
a
vacuum
tube
and
spring
force
is
applied
to
the
front
surfaceof
the
rubber
diaphragm
while
atmos
pheric
pressure
is
applied
to
the
back
surface
The
difference
between
pres
sure
applied
to
the
front
and
ba
K
I
surfaces
causes
a
vacuum
reactIOn
which
activates
the
throttle
valve
of
the
control
valve
inside
the
transrhis
sion
case
Wheri
accelerator
pedal
is
fully
de
pressed
and
the
buretor
is
fU
IIy
opened
but
th
engirie
sp
eed
is
not
suificientl
increased
the
manifold
negative
plre
sure
lowers
Le
tends
towards
atmospheric
pressure
and
the
Automatic
Transmission
vacuum
reaction
increases
since
the
flow
velocity
of
mixture
inside
the
intake
m
mifold
is
slow
Contrarily
when
the
engine
speed
increases
and
the
flow
velocity
of
the
mixture
in
creases
or
when
the
carburetor
is
closed
the
manifold
negative
pressure
increases
Le
tends
towards
vacuum
and
the
vacuum
reaction
is
reduced
Thus
a
signal
to
genera
Ie
hydraulic
pressure
P
rfe
tly
suited
to
the
engine
loading
at
trye
control
valve
is
trans
mitted
from
the
vacuum
diaphragm
and
the
most
suitable
timing
for
speed
change
and
lin
e
pressure
is
obtaine
so
that
the
most
proper
torque
capacity
is
obtained
against
the
transmitting
torque
To
inl
lkc
manifold
AT088
Fig
AT
5
Vacuum
diaphragm
DOWNSHIFT
SOLENOID
T
e
downshift
solenoid
is
of
a
magnetic
type
installed
on
the
left
re
r
portion
of
the
transmission
case
When
a
driver
requires
accelerating
power
and
dePresses
the
accelerator
pedal
down
to
the
stopper
a
kickdown
switch
19ca
ted
in
the
middle
of
the
accelerator
link
is
depressed
by
a
push
rod
he
kickdown
switch
doses
cur
rent
flows
to
the
solenoid
the
sole
noid
push
rod
is
depressed
the
down
shift
valve
of
the
control
valvc
insidc
the
transmi
ssion
case
is
depressed
nd
the
speed
is
changed
forcedly
fmm
3rd
to
2nd
within
a
cerlaill
vehi
cle
speed
limit
Note
Since
theki
kdown
switch
closes
when
the
accelerator
pedal
is
d
epr
ssed
from
7
i
t
I
S
I
6
of
tiie
whole
stroke
the
a
ccel
rator
ped
1
should
be
correctly
adjusted
so
as
arf
rd
a
omplete
stro
e
I
The
arrangement
of
the
swit
h
wries
ccording
m
eI
AT
S
c
C
r
11
I
Kickdown
h
switch
Dowri
shift
solenoid
AT089
Fig
AT
6
Downshifl80lenoid
GOVERNER
VALVE
The
primary
and
secondary
gover
nor
valves
are
installed
separately
on
the
back
of
the
oil
distributor
on
the
transmission
outp
t
sha
ft
tn
y
op
erate
al
the
same
speed
as
th
ar
iJf
tile
output
shaft
thai
is
they
operate
at
a
speed
in
proportion
10
the
vehicle
speed
The
line
press
retis
applied
to
those
valves
s
the
input
from
the
control
valve
through
the
transmission
case
rear
flange
and
oil
distributor
The
governor
pressure
in
proportion
to
the
ouiput
shaft
speed
vehicle
speed
is
led
to
the
shift
valve
ofthe
control
valve
through
the
opposite
route
of
the
output
In
this
manner
speed
change
and
line
pressure
are
controlled
Operation
of
secondary
governor
valve
T
e
secon
ary
valve
is
a
contro
valve
Y
hich
receives
line
pressure
an
cqQ
rols
the
governor
pressu
e
When
the
manual
valve
is
selected
at
D
2
or
l
range
line
pressure
is
applied
t
the
ri
g
sh
aped
area
of
this
valve
from
circuit
I
l
and
this
I
v
Jy
is
depressed
lOW
jr
tI
c
fer
Movemcnt
of
this
valvl
III
a
cr
in
positillll
doses
the
dr
uit
from
Olto
15
while
simultaneously
making
a
sr
rronl
IS
to
Iii
center
d
niin
port
and
press
re
in
tllc
ci
rJ
it
l5j
is
lowered
When
thc
vehicle
is
stopped
1
d
the
cenlrifugal
force
of
this
valve
is
zero
the
v
lve
is
balanced
At
this
poini
a
govcr
lOr
pressurc
y
hich
bal
i1
nced
with
th
spr
ng
force
occurs
on
IS
Wh
n
thc
vehicle
is
st
rted
nd
the
centrifugal
fqr
incre
ses
this
valve
movcs
slightly
10
Ihc
oUlSide
and
as
Page 389 of 537
f
BR317
Fig
BR
23
Gre
ing
point
4
Tightening
torque
Wheel
cylinder
J
S
to
1
8
kg
m
II
to
13ft
Ib
Connector
bolt
1
9
to
2
5
kg
m
14
to
18
ft
Ib
Brake
tube
1
5
to
1
8
kg
m
II
to
13
ft
Ib
Air
bleeder
0
7
to
0
9
kg
m
S
to
7
ft
Ib
Brake
disc
5
4
to
6
4
kg
m
39
to
46
ft
Ib
S
Adjust
brake
shoe
clearance
and
bleed
brake
system
Upon
completion
of
the
above
adjustments
make
sure
that
brake
operates
correctly
and
no
brake
fluid
leaks
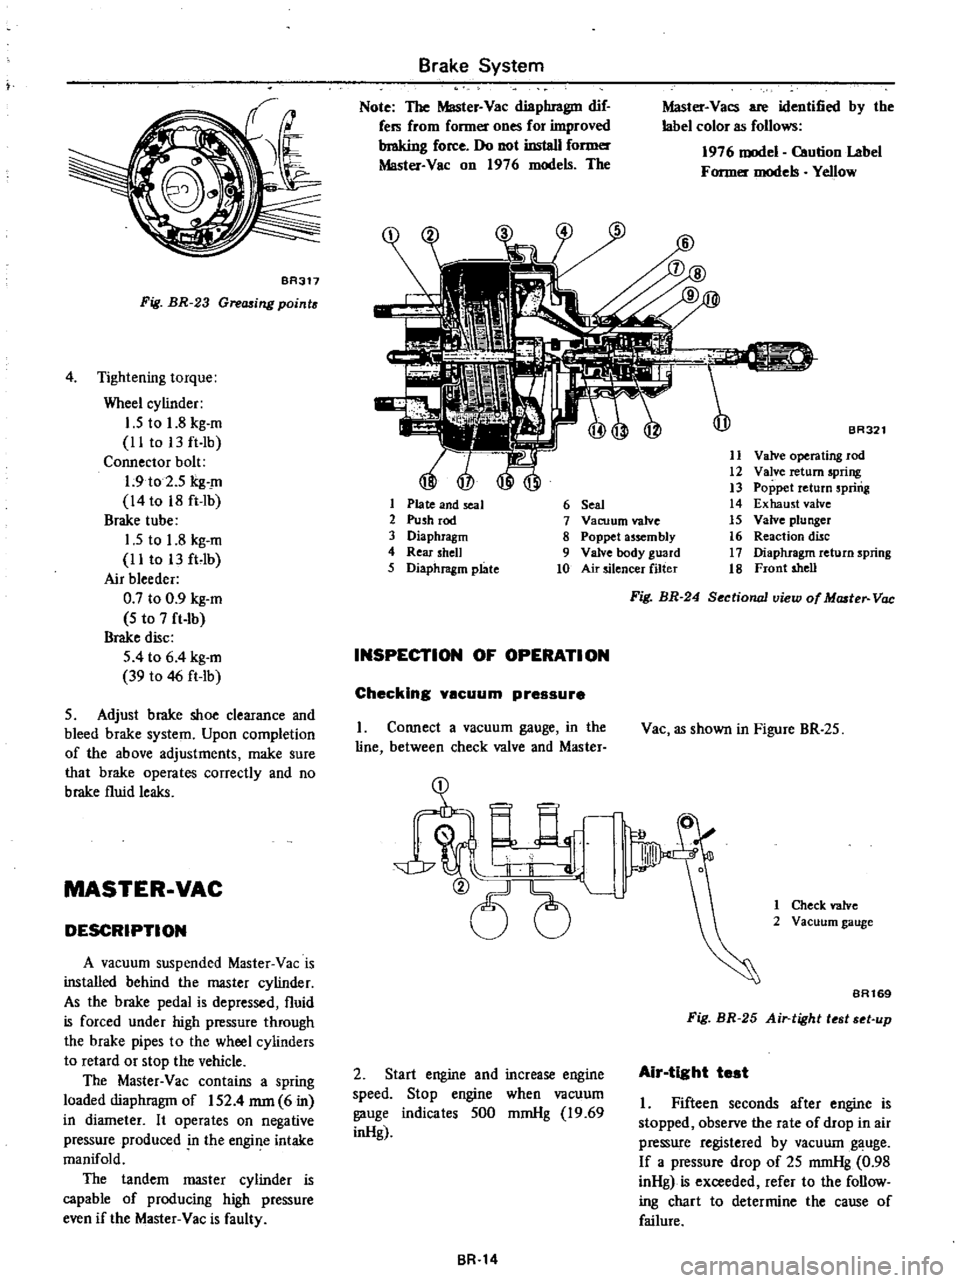
MASTER
VAC
DESCRIPTION
A
vacuum
suspended
Master
Vac
is
installed
behind
the
master
cylinder
As
the
brake
pedal
is
depressed
fluid
is
forced
under
high
pressure
through
the
brake
pipes
to
the
wheel
cylinders
to
retard
or
stop
the
vehicle
The
Master
Vac
contains
a
spring
loaded
diaphragm
of
IS2
4
mm
6
in
in
diameter
It
operates
on
negative
pressure
produced
n
the
engine
intake
manifold
The
tandem
master
cylinder
is
capable
of
producing
high
pressure
even
if
the
Master
Vac
is
faulty
Brake
System
Note
The
Master
Vac
diaphragm
dif
fers
from
fonner
ones
for
improved
braking
force
Do
not
install
fonner
Master
Vac
on
1976
models
The
1
Plate
and
seal
2
Push
rod
3
Diaphragm
4
Rear
shell
5
Diaphragm
plate
Master
Vacs
are
identified
by
the
label
color
as
follows
1976
model
Caution
Label
Former
models
YeJlow
BR321
11
Valve
operating
rod
12
Valve
return
spring
13
Poppet
return
spring
14
Exhaust
valve
15
Valve
plunger
16
Reaction
disc
17
Diaphragm
return
spring
18
Front
shell
6
Seal
7
Vacuum
valve
8
Poppet
assembly
9
Valve
body
guard
10
Air
silencer
filter
INSPECTION
OF
OPERATION
Checking
yscuum
pressure
I
Connect
a
vacuum
gauge
in
the
line
between
check
valve
and
Master
2
Start
engine
and
increase
engine
speed
Stop
engine
when
vacuum
gauge
indicates
SOO
mmHg
19
69
inHg
BR
14
Fig
BR
24
Sectionall1iew
of
Master
Vac
Vac
as
shown
in
Figure
BR
25
1
Check
valve
2
Vacuum
gauge
BA169
Fig
BR
25
Air
tight
t
t
t
up
Air
tight
test
I
Fifteen
seconds
after
engine
is
stopped
observe
the
rate
of
drop
in
air
pressure
registered
by
vacuum
gauge
If
a
pressure
drop
of
25
mmHg
0
98
inHg
is
exceeded
refer
to
the
follow
ing
chart
to
determine
the
cause
of
failure
Page 390 of 537
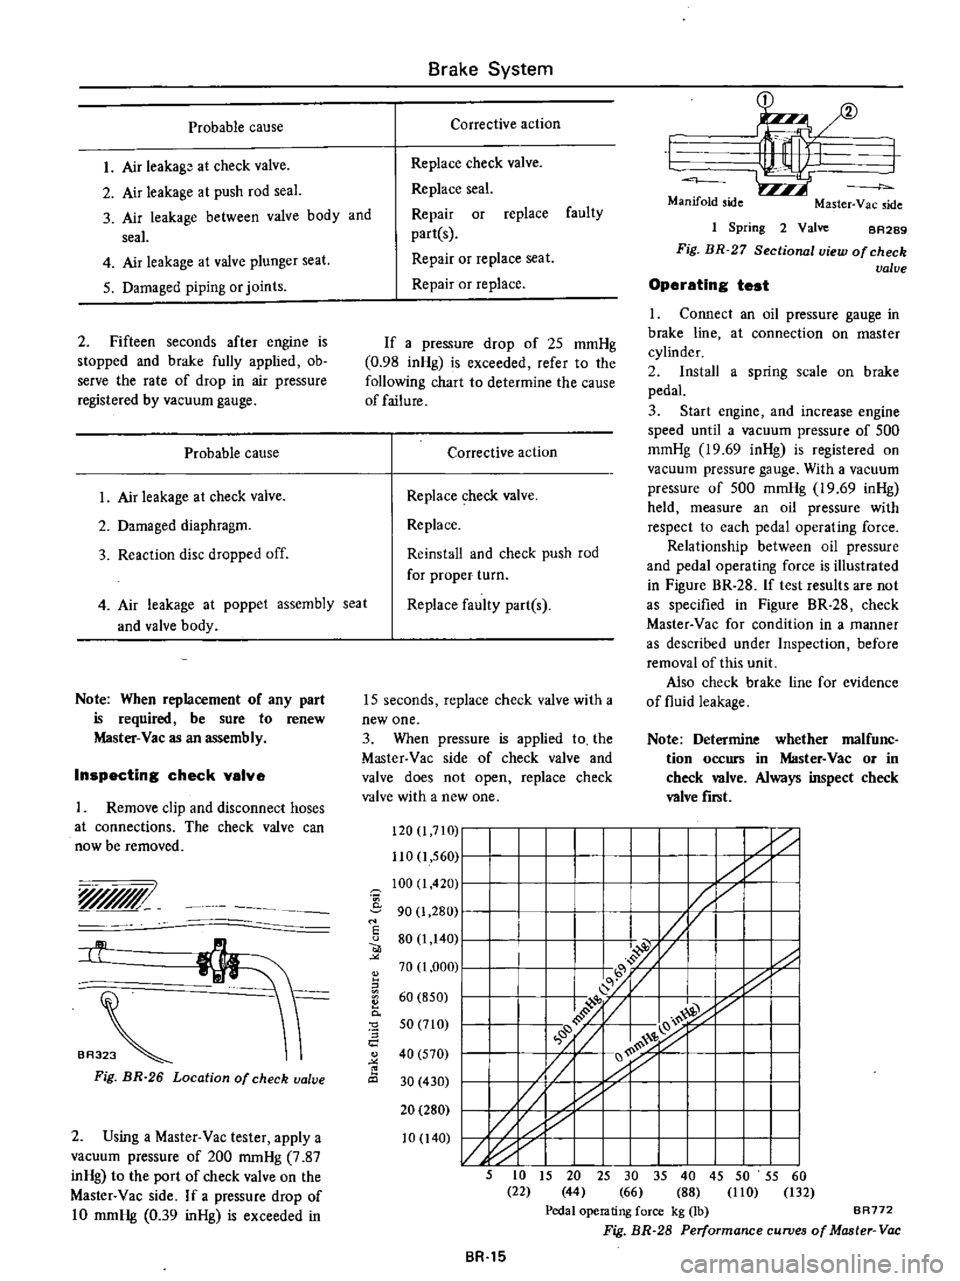
Probable
cause
I
Air
leakago
at
check
valve
2
Air
leakage
a
t
push
rod
seal
3
Air
leakage
between
valve
body
and
seal
4
Air
leakage
at
valve
plunger
seat
5
Damaged
piping
or
joints
2
Fifteen
seconds
after
engine
is
stopped
and
brake
fully
applied
ob
serve
the
rate
of
drop
in
air
pressure
registered
by
vacuum
gauge
Probable
cause
1
Air
leakage
at
check
valve
2
Damaged
diaphragm
3
Reaction
disc
dropped
off
4
Air
leakage
at
and
valve
body
poppet
assembly
seat
Note
When
replacement
of
any
part
is
required
be
sure
to
renew
Master
Vac
as
an
assembly
Inspecting
check
valve
Remove
clip
and
disconnect
hoses
at
connections
The
check
valve
can
now
be
removed
yr
BA3
Fig
BR
26
Location
of
check
valve
2
Using
a
Master
Vac
tester
apply
a
vacuum
pressure
of
200
mmHg
7
87
inHg
to
the
port
of
check
valve
on
the
Master
Vac
side
If
a
pressure
drop
of
10
mmHg
0
39
inHg
is
exceeded
in
1
I
I
17
I
f
I
I
I
Z
I
I
y1
I
I
I
7
I
I
I
I
I
I
I
I
I
I
y1
II
I
I
I
I
I
I
I
L
I
L
5
to
15
20
25
30
35
40
45
50
55
60
22
44
66
88
110
132
Pedal
operating
force
kg
lb
BR772
Fig
BR
28
Performance
curves
of
Master
Vac
Brake
System
Corrective
action
Replace
check
valve
Replace
seal
Repair
or
replace
faulty
partes
Repair
or
replace
seat
Repair
or
replace
If
a
pressure
drop
of
25
mmHg
0
98
inHg
is
exceeded
refer
to
the
following
chart
to
determine
the
cause
of
failure
Corrective
action
Replace
check
valve
Replace
Reinstall
and
check
push
rod
for
proper
turn
Replace
faulty
part
s
15
seconds
replace
check
valve
with
a
new
one
3
When
pressure
is
applied
to
the
Master
Vac
side
of
check
valve
and
valve
does
not
open
replace
check
valve
with
a
new
one
120
I
7IG
110
1
560
100
I
420
i
90
1
280
I
u
80
1
140
70
1
000
II
60
850
0
0
5
a
50
710
40
570
30
430
20
280
10
140
BR
15
1
I
Manifold
side
Master
Yac
side
1
Spring
2
Valve
BA289
Fig
BR
27
Sectional
view
of
check
valve
Operating
test
1
Connect
an
oil
pressure
gauge
in
brake
line
at
connection
on
master
cylinder
2
Install
a
spring
scale
on
brake
pedal
3
Start
engine
and
increase
engine
speed
until
a
vacuum
pressure
of
500
mmHg
19
69
inHg
is
registered
on
vacuum
pressure
gauge
With
a
vacuum
pressure
of
500
mmHg
19
69
inHg
held
measure
an
oil
pressure
with
respect
to
each
pedal
operating
force
Relationship
between
oil
pressure
and
pedal
operating
force
is
illustrated
in
Figure
BR
28
If
test
results
are
not
as
specified
in
Figure
BR
28
check
Master
Vac
for
condition
in
a
manner
as
described
under
Inspection
before
removal
of
this
unit
Also
check
brake
line
for
evidence
of
fluid
leakage
Note
Determine
whether
malfunc
tion
occurs
in
Master
Vac
or
in
check
valve
Always
inspect
check
valve
fiTlit
Page 480 of 537
Body
Electrical
System
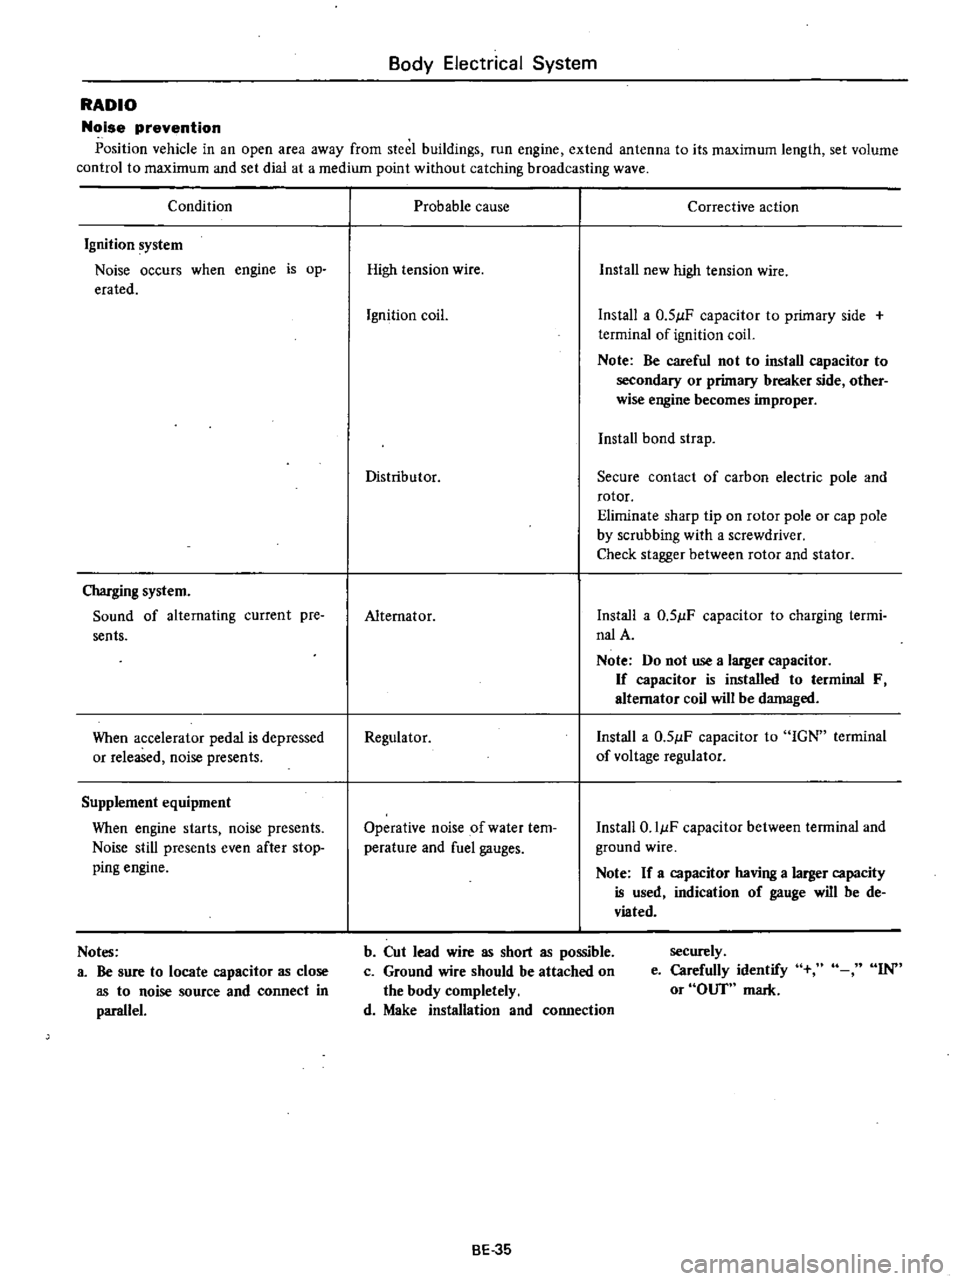
RADIO
Noise
prevention
Position
vehicle
in
an
open
area
away
from
steel
buildings
run
engine
extend
antenna
to
its
maximum
length
set
volume
control
to
maximum
and
set
dial
at
a
medium
point
without
catching
broadcasting
wave
Condition
Ignition
system
Noise
occurs
when
engine
is
op
erated
Charging
system
Sound
of
alternating
current
pre
sents
When
accelerator
pedal
is
depressed
or
released
noise
presents
Supplement
equipment
When
engine
starts
noise
presents
Noise
still
presents
even
after
stop
ping
engine
Notes
a
Be
sure
to
locate
capacitor
as
close
as
to
noise
source
and
connect
in
parallel
Probable
cause
Corrective
action
High
tension
wire
Install
new
high
tension
wire
Ignition
coil
Install
a
0
51lF
capacitor
to
primary
side
terminal
of
ignition
coil
Note
Be
careful
not
to
install
capacitor
to
secondary
or
primary
breaker
side
other
wise
engine
becomes
improper
Install
bond
strap
Distributor
Secure
contact
of
carbon
electric
pole
and
rotor
Eliminate
sharp
tip
on
rotor
pole
or
cap
pole
by
scrubbing
with
a
screwdriver
Check
stagger
between
rotor
and
stator
Alternator
Install
a
0
51lF
capacitor
to
charging
termi
nalA
Note
Do
not
use
a
larger
capacitor
If
capacitor
is
installed
to
terminal
F
alternator
coil
will
be
damaged
Regulator
Install
a
0
51lF
capacitor
to
IGN
terminal
of
voltage
regulator
Operative
noise
of
water
tem
perature
and
fuel
gauges
Install
O
IIlF
capacitor
between
terminal
and
ground
wire
Note
If
a
capacitor
having
a
larger
capacity
is
used
indication
of
gauge
will
be
de
viated
b
Cut
lead
wire
as
short
as
possible
c
Ground
wire
should
be
attached
on
the
body
completely
d
Make
installation
and
connection
securely
e
Carefully
identify
or
OUT
mark
IN
BE
35
Page 501 of 537

DISCHARGING
SYSTEM
The
pressurized
refrigerant
gas
Ul
side
system
must
be
discharged
to
a
pressure
approaching
atmospheric
pressure
prior
to
evacuating
refrigerant
inside
system
This
operation
should
be
made
to
permit
safe
re
oval
when
replacing
system
components
I
Close
high
and
low
pressure
valves
of
manifold
gauge
fully
2
Connect
two
charging
hoses
of
manifold
gauge
to
their
respective
service
valves
3
Open
both
manifold
gauge
valves
slightly
and
slowly
discharge
refriger
ant
from
system
See
Figure
AC
17
Note
Do
not
allow
refrigerant
to
rush
out
Otherwise
compressor
oil
will
be
discharged
along
with
re
frigerant
AC735
Fig
AC
17
Discharging
system
Caution
Protect
fingers
with
cloth
against
frostbite
by
refrigerant
when
connecting
the
charging
hose
to
the
service
valve
or
disconnecting
it
therefrom
Air
Conditioning
EVACUATING
SYSTEM
1
Connect
high
and
low
pressure
charging
hoses
of
manifold
gauge
to
their
respective
service
valves
of
sys
tern
and
d
ischarge
refrigerant
from
system
Refer
to
Discharge
System
2
When
refrigerant
has
been
dis
charged
to
a
pressure
approaching
at
mospheric
pressure
connect
center
charging
hose
to
a
vacuum
pump
3
Close
both
valves
of
manifold
gauge
fully
Then
start
vacuum
pump
4
Open
low
pressure
valve
and
suck
old
refrigerant
from
ystem
See
Figure
AC
18
S
When
low
pressure
gauge
reading
has
reached
to
approximately
500
mm
Hg
20
in
Hg
slowly
open
high
pressure
valve
See
Figure
AC
19
6
When
pressure
inside
system
has
dropped
to
710
mm
Hg
28
in
Hg
fully
close
both
of
valves
of
manifold
gauge
and
stop
vacuum
pump
Let
stand
it
for
5
to
10
minutes
in
this
state
and
confirm
that
the
reading
does
not
rise
Notes
a
The
low
pressure
gauge
reads
lower
by
2S
mm
Hg
I
in
Hg
per
a
300
m
1
000
ft
elevation
Perform
evacu
ation
according
to
the
following
table
Elevation
m
ft
Vacuum
of
system
mm
Hg
in
Hg
0
0
300
I
000
600
2
000
900
3
000
710
28
68S
27
660
26
635
25
Note
Values
show
readings
of
the
low
pressure
gauge
AC
12
b
The
rate
of
ascension
of
the
low
pressure
gauge
should
be
less
than
2S
mm
Hg
I
in
Hg
in
five
min
utes
If
the
pressure
rises
or
the
specified
negative
pressure
can
not
be
obtained
there
is
a
leak
in
the
system
In
this
case
immediately
charge
system
with
refrigerant
and
repair
the
leak
de
scribed
in
the
following
I
Confirm
that
both
valves
of
manifold
gauge
are
fully
closed
and
then
disconnect
center
charging
hose
from
vacuum
pump
2
Connect
center
hose
to
can
tap
in
place
of
vacuum
pump
Attach
refrigerant
can
to
can
tap
and
pass
refrigerant
to
manifold
gauge
3
Loosen
the
connection
of
center
fitting
of
manifold
gauge
to
purge
air
from
center
hose
4
Open
low
pressure
valve
of
mani
fold
gauge
and
charge
refrigerant
into
system
After
one
can
about
0
4
kg
I
Ib
of
refrigerant
has
been
charged
into
system
close
low
pressure
valve
5
Check
for
refrigerant
leakage
with
a
leak
detector
Repair
any
leak
ages
found
Refer
to
Checking
for
Leaks
and
Refrigerant
Leaks
6
Confirm
that
both
valves
of
manifold
gauge
are
fully
closed
and
then
change
center
charging
hose
from
can
tap
to
vacuum
pump
7
Open
high
and
low
pressure
valves
and
operate
vacuum
pump
to
suck
refrigerant
from
system
When
the
pressure
in
system
has
dropped
to
710
mm
Hg
28
in
Hg
fully
close
both
valves
of
manifold
gauge
7
The
above
operation
completes
evacuation
of
system
Next
charge
refrigerant
Refer
to
Charging
Refrig
erant
Page 505 of 537
3
Piping
Flared
section
of
high
pressure
and
low
pressure
flexible
hose
Pipe
connections
rvice
valve
4
Evaporator
housing
Jnlet
and
outlet
pipe
connections
Expansionvalve
ELECTRIC
LEAK
DETECTOR
for
the
operational
procedures
refer
to
the
instructions
furnished
with
each
electric
leak
detector
Amount
of
refrigerant
Air
Conditioning
REFRIGERANT
LEVEL
CHECK
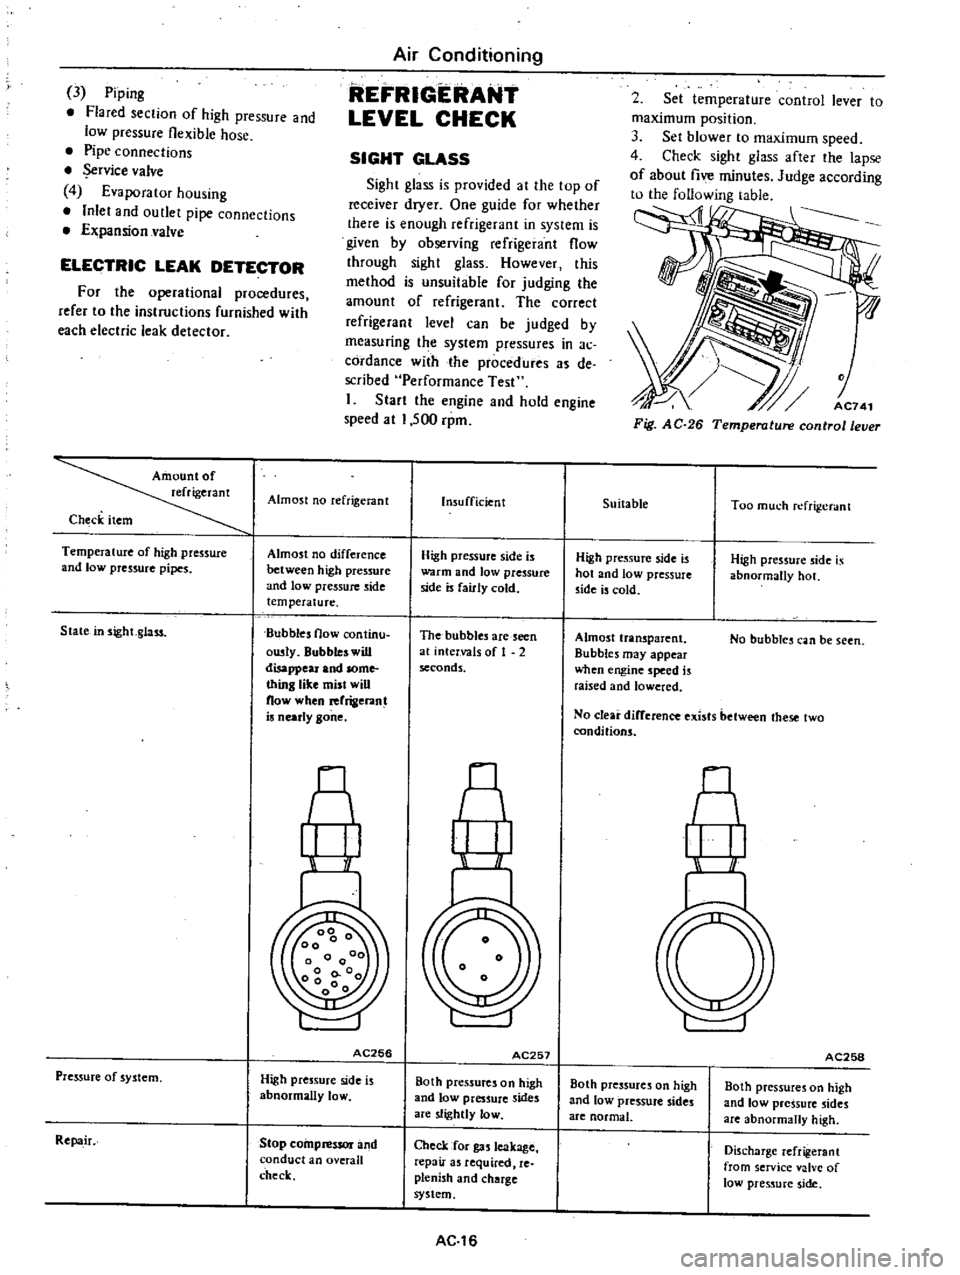
SIGHT
GLASS
Sight
glass
is
provided
at
the
top
of
receiver
dryer
One
guide
for
whether
there
is
enough
refrigerant
in
system
is
given
by
observing
refrigerant
flow
through
sight
glass
However
this
method
is
unsuitable
for
judging
the
amount
of
refrigerant
The
correct
refrigerant
level
can
be
judged
by
measuring
t
e
system
pressures
in
ac
cordance
with
the
procedures
de
scribed
Performance
Test
I
Start
the
engine
and
hold
engine
speed
at
1
500
rpm
Almost
no
reftigerant
Check
item
Temperature
of
high
pressure
and
low
pressure
pipes
Almost
no
difference
between
high
pressure
and
low
pressure
side
temperature
Bubbles
flow
continu
ousty
Bubbles
will
disappeu
a
nd
some
thing
like
mist
will
now
when
rerrigeran
is
nearly
gone
State
insightglass
A
I
I
AC256
Pressure
of
system
High
pressure
side
is
abnormally
loW
Repa
ir
Stop
compressor
and
conduct
an
overall
check
Insufficient
High
pressure
side
is
warOl
and
low
pressure
side
is
fairly
cold
The
bubbles
are
seen
at
intervals
of
1
2
seconds
A
r
I
AC257
Both
pressures
on
high
and
low
preS
ure
sides
are
slightly
low
Check
for
gas
leakage
repair
as
required
re
plenish
and
charge
system
AC
16
2
Set
temperature
control
lever
to
maximum
position
3
Set
blower
to
maximum
speed
4
Check
sight
gla
after
the
lapse
of
about
five
minutes
Judge
according
to
the
following
table
AC741
Fig
AC
26
Temperature
control
lever
Suitable
Too
much
refri
crant
High
pressure
side
is
hot
and
low
pressure
side
is
cold
High
pressure
side
is
abnormally
hot
Almost
transparent
Bubbles
may
appear
when
engine
speed
is
raised
and
lowered
No
bubbles
can
be
seen
No
clear
difference
exists
between
these
two
conditions
M
II
I
AC258
Both
pressures
on
high
and
low
pressure
sides
are
normal
Both
pressures
on
high
and
low
pressure
sides
are
abnormally
high
Discharge
reft
gerant
from
service
valve
of
10
11
pressure
side