engine DATSUN PICK-UP 1977 Service Manual
[x] Cancel search | Manufacturer: DATSUN, Model Year: 1977, Model line: PICK-UP, Model: DATSUN PICK-UP 1977Pages: 537, PDF Size: 35.48 MB
Page 321 of 537

Automatic
Transmission
TROUBLE
SHOOTING
GUIDE
FOR
3N71B
AUTOMATIC
TRANSMISSION
Order
Test
item
Checking
Oil
level
gauge
2
Downshift
solenoid
3
Manuallinkage
L
4
Inhibitor
switch
5
Engine
idling
rpm
6
Vacuum
pressure
of
vacuum
pipe
7
Operation
in
each
range
8
Creep
of
vehicle
Stall
test
I
Oil
pressure
before
tesling
1
2
Stall
test
3
Oil
pressure
after
testing
Road
test
Slow
acceleration
I
st
2nd
2nd
3rd
2
Quick
acceleration
lst
2nd
2nd
3rd
3
Kick
down
operation
3rd
2nd
or
2nd
1st
Procedure
Check
gauge
for
oil
level
and
leakage
before
and
after
each
test
Check
for
sound
of
operating
solenoid
when
depressing
accelerator
pedal
fully
with
ignition
key
ON
Check
by
shifting
into
P
lR
IN
D
2
and
I
ranges
with
selector
lever
Check
whether
starter
operates
in
N
and
p
ranges
only
and
whether
reverse
lamp
operates
in
R
range
only
Check
whelher
idling
rpm
meet
standard
Check
whether
vacuum
pressure
is
more
than
450
mmHg
in
idling
and
whether
it
decreases
with
increasing
rpm
Check
whether
transmission
engages
positively
by
shifting
N
0
N
2
N
l
I
and
N
R
range
while
idling
with
brake
applied
Check
whether
there
is
any
creep
in
D
2
R
ranges
and
Measure
line
pressures
in
D
2
I
and
R
range
while
idling
Measure
engine
rpm
and
line
pressure
in
D
2
I
and
R
ranges
during
full
throttle
operati
n
Notes
a
Temperature
of
torque
converter
oil
used
in
test
should
be
from
600
to
1000C
1400
to
2120F
i
e
sufficiently
warmed
up
but
not
overheated
b
To
cool
oil
between
each
stall
test
for
D
2
I
and
R
ranges
idle
engine
i
e
rpm
at
about
1
200
rpm
for
more
than
1
minute
in
P
range
Measurement
time
must
not
be
more
than
5
seconds
Same
as
item
I
Check
vehide
speeds
and
engine
cpm
in
shifting
up
Ist
2nd
range
and
2nd
Jo3rd
range
while
running
with
lever
in
D
range
and
engine
vacuum
pressure
of
about
200
I11I1lHg
Same
as
item
1
above
except
with
engine
vacuum
pressure
of
0
mmHg
i
e
in
position
just
before
kickdown
Check
whether
the
kickdown
operates
and
measure
the
time
delays
while
running
at
30
40
50
60
70
km
h
18
25
30
37
43
MPH
in
D3
range
AT
57
Page 322 of 537
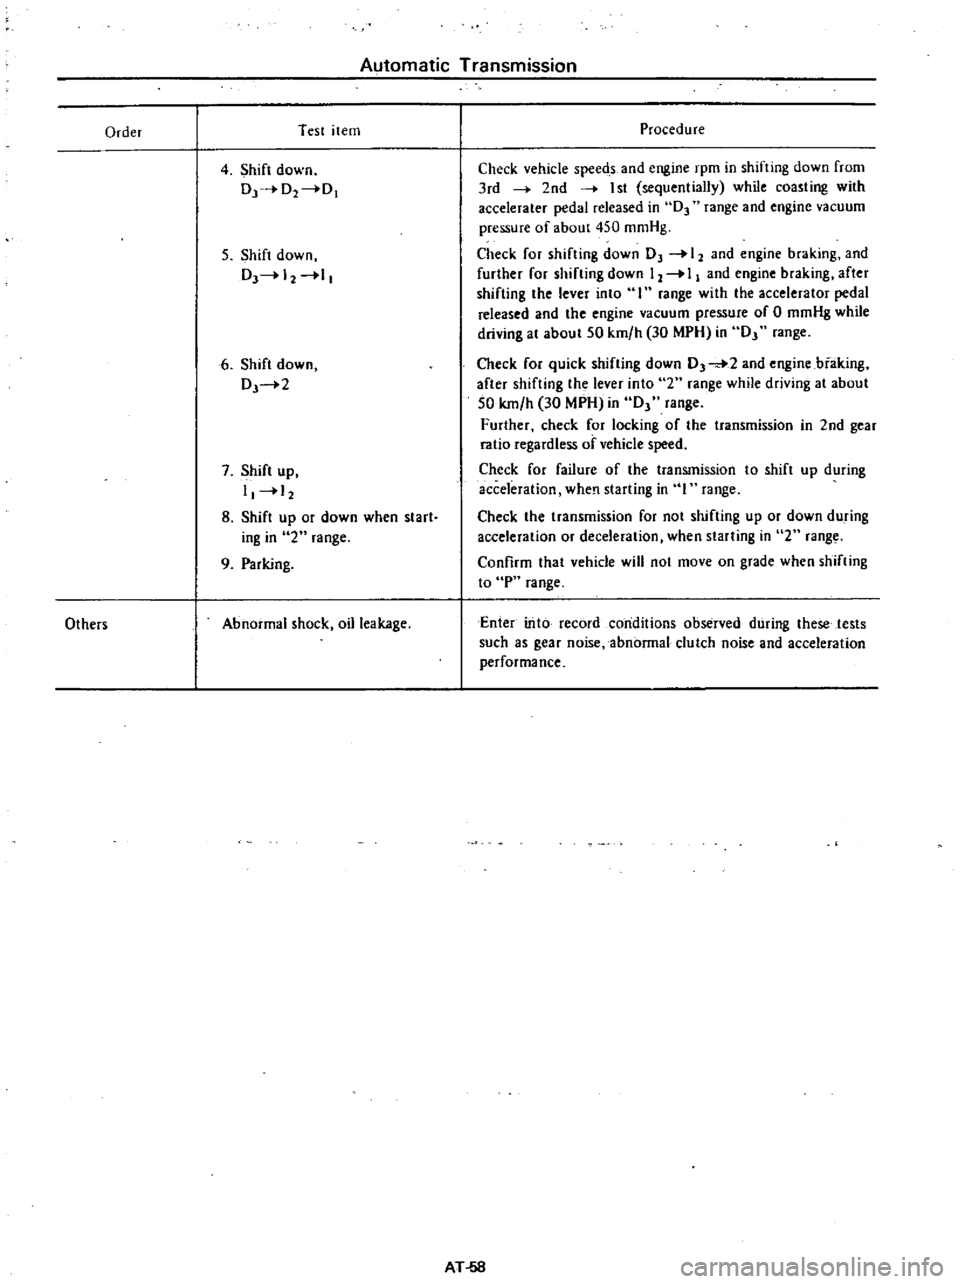
Automatic
Transmission
Order
Test
item
4
Shift
down
Dr
O2
0
5
Shift
down
DJ
12
1
6
Shift
down
DJ
2
7
Shift
up
I
12
8
Shift
up
or
down
when
start
iog
in
2
range
9
Parking
Others
Abnormal
shock
oil
leakage
Procedure
Check
vehicle
speeds
and
engine
rpm
in
shifting
down
from
3rd
2nd
I
st
sequentially
while
coasting
with
accelerater
pedal
released
in
D3
range
and
engine
vacuum
pressure
of
about
450
mmHg
Check
for
shifting
down
OJ
12
and
engine
braking
and
further
for
shifting
down
12
I
and
engine
braking
after
shifting
the
lever
into
I
range
with
the
accelerator
pedal
released
and
the
engine
vacuum
pressure
of
0
mmHg
while
driving
at
about
50
km
h
30
MPH
in
OJ
range
Check
for
quick
shifting
down
0
2
and
engine
biaking
after
shifting
the
lever
into
2
range
while
driving
at
about
50
km
h
30
MPH
in
OJ
range
Further
check
for
locking
of
the
transmission
in
2nd
gear
ratio
regardless
of
vehicle
speed
Check
for
failure
of
the
transmission
to
shift
up
during
acceleration
when
starting
in
I
range
Check
the
transmission
for
not
shifting
up
or
down
during
acceleration
or
deceleration
when
starting
in
2
rang
Confirm
that
vehicle
will
not
move
on
grade
when
shifting
to
P
range
Enter
into
record
conditions
observed
during
these
tests
such
as
gear
noise
abnormal
clutch
noise
and
acceleration
performance
AT
58
Page 323 of 537
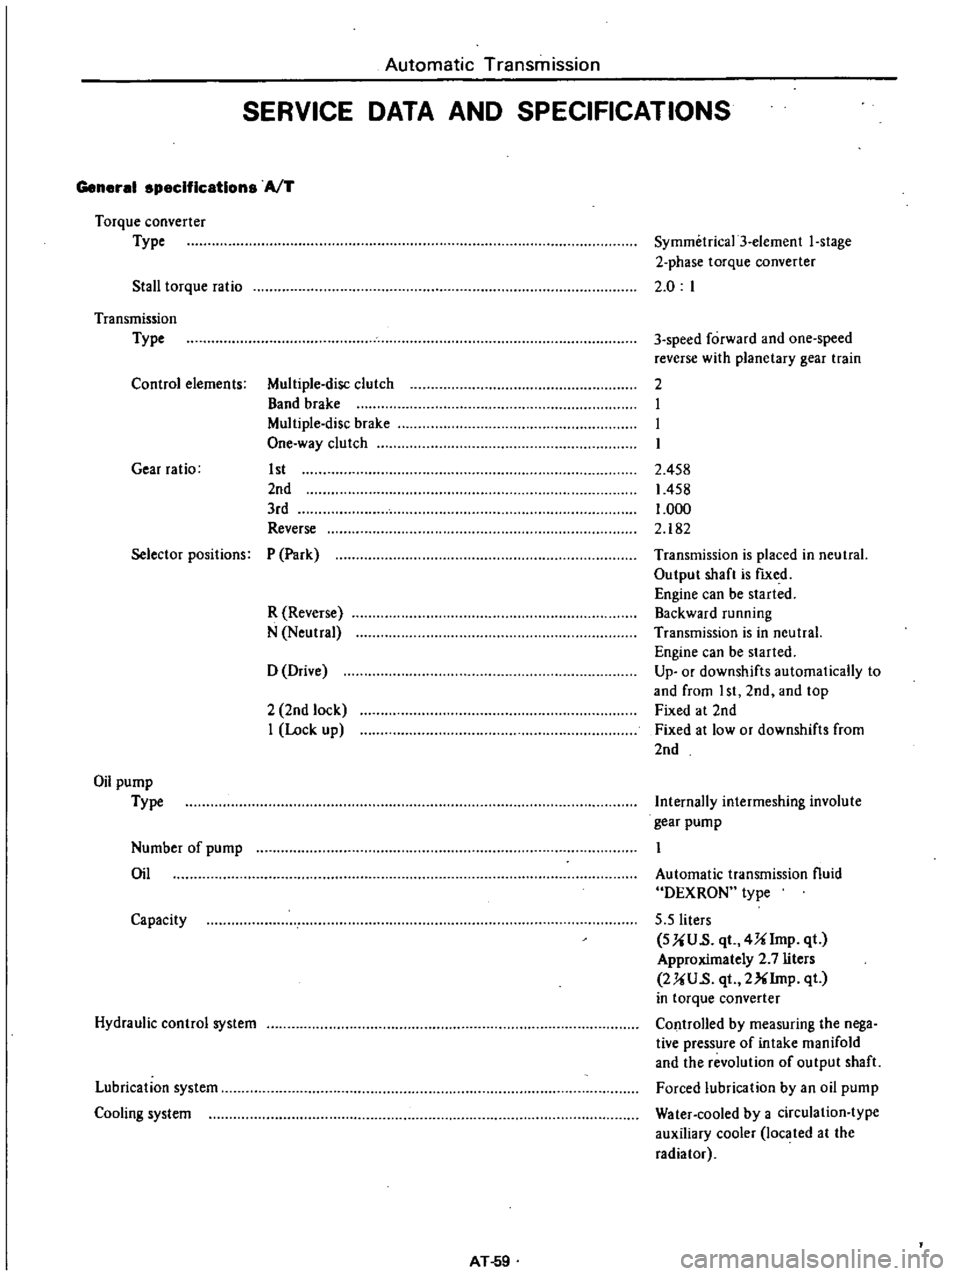
Automatic
Transmission
SERVICE
DATA
AND
SPECIFICATIONS
General
specifications
AfT
Torque
converter
Type
Stall
torque
ratio
Symmetrica13
element
I
stage
2
phase
torque
converter
2
0
I
Transmission
Type
Control
elements
Multiple
disc
clutch
Band
brake
Multiple
disc
brake
One
way
clutch
Gear
ratio
1st
2nd
3rd
Reverse
3
speed
forward
and
one
speed
reverse
with
planetary
gear
train
2
I
I
I
2
458
1458
1
000
2
182
Selector
positions
P
Park
R
Reverse
N
Neutral
Transmission
is
placed
in
neutral
Output
shaft
is
fIXed
Engine
can
be
started
Backward
running
Transmission
is
in
neutral
Engine
can
be
started
Up
or
downshifts
automatically
to
and
from
I
st
2nd
and
top
Fixed
at
2nd
Fixed
at
low
or
downshifts
from
2nd
o
Drive
2
2nd
lock
I
Lock
up
Oil
pump
Type
Internally
intermeshing
involute
gear
pump
Number
of
pump
Oil
Automatic
transmission
fluid
DEXRON
type
5
5
liters
SUU
s
qt
4Ulmp
qt
Approximately
2
7
liters
2UU
s
qt
2XIrnp
qt
in
torque
converter
Controlled
by
measuring
the
nega
tive
pressure
of
intake
manifold
and
the
revolution
of
output
shaft
Forced
lubrication
by
an
oil
pump
Water
cooled
by
a
circulation
type
auxiliary
cooler
located
at
the
radiator
Capacity
Hydraulic
control
system
Lubrication
system
Cooling
system
AT
59
Page 325 of 537
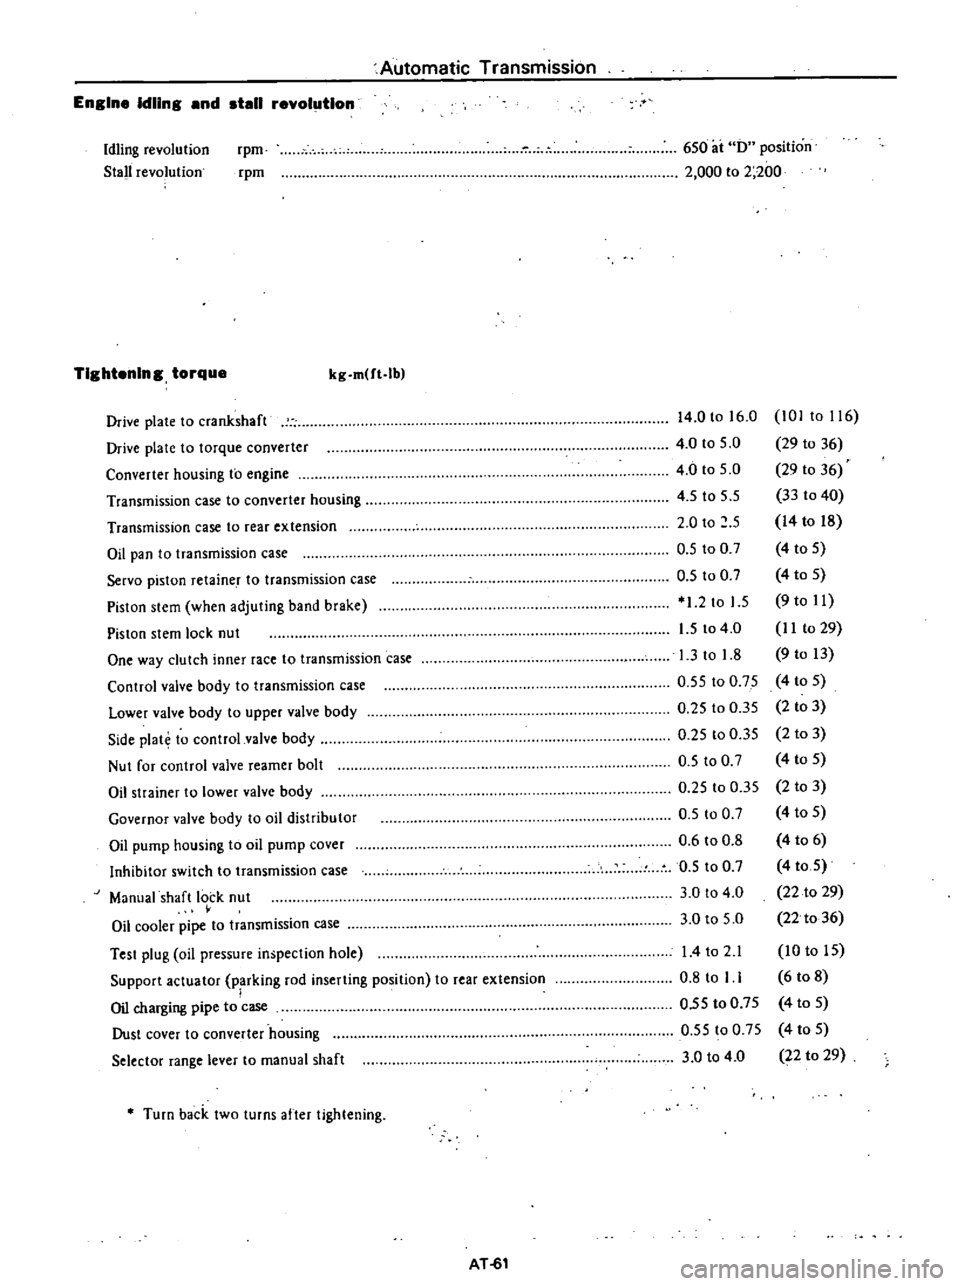
Automatic
Transmission
Engine
Idling
and
stall
revolution
Idling
revolution
Stall
revolution
rpm
rpm
6S0
ai
0
position
2
000
to
2
200
TIghtening
torque
kg
m
ft
lb
Drive
plate
to
crankshaft
Drive
plate
to
torque
converter
Converter
housing
to
engine
Transmission
case
to
converter
housing
Transmission
case
to
rear
extension
Oil
pan
to
transmission
case
Servo
piston
retaine
T
to
transmission
case
Pislon
slem
when
adjuting
band
brake
Piston
stem
lock
nut
One
way
clutch
inner
race
to
transmission
case
Control
valve
body
to
transmission
case
Lower
valve
body
to
upper
valve
body
Side
plat
to
control
valve
body
Nut
for
control
valve
reamer
bolt
Oil
strainer
to
lower
valve
body
Governor
valve
body
to
oil
distribu
tor
Oil
pump
housing
to
oil
pump
cover
Inhibitor
switch
to
transmission
case
Manual
shaft
lock
nut
Oil
cooler
pipe
to
transmission
case
Test
plug
oil
pressure
inspection
hole
Support
actuator
parking
rod
inserting
position
to
rear
extension
I
Oil
charging
pipe
to
case
Dust
cover
to
converter
housing
Selector
range
lever
to
manual
shaft
14
0
to
16
0
101
to
116
4
0
to
5
0
29
to
36
4
0
to
S
O
29
10
36
4
S
to
5
5
33
to
40
2
0
to
S
14
to
18
O
S
to
0
7
4
to
S
O
S
to
0
7
4
to
S
1
2
to
1
5
9
to
11
1
5
to
4
0
I
I
to
29
1
3
to
1
8
9
to
13
0
5S
to
0
75
4
to
S
0
25
to
O
3S
2
to
3
0
25
to
0
35
2
to
3
O
S
to
0
7
4
to
S
0
25
to
0
35
2
to
3
D
S
100
7
4
to
5
0
6
to
0
8
4
to
6
0
5
to
0
7
4
toS
3
0
to
4
0
22
to
29
3
0
to
S
O
22
to
36
I
4to
2
1
10
to
IS
0
8
to
I
1
6
to
8
O
5S
to
0
7S
4
to
S
O
5S
to
0
75
4
to
S
3
0
to
4
0
22
to
29
Turn
back
two
turns
after
tightening
AT
61
Page 342 of 537
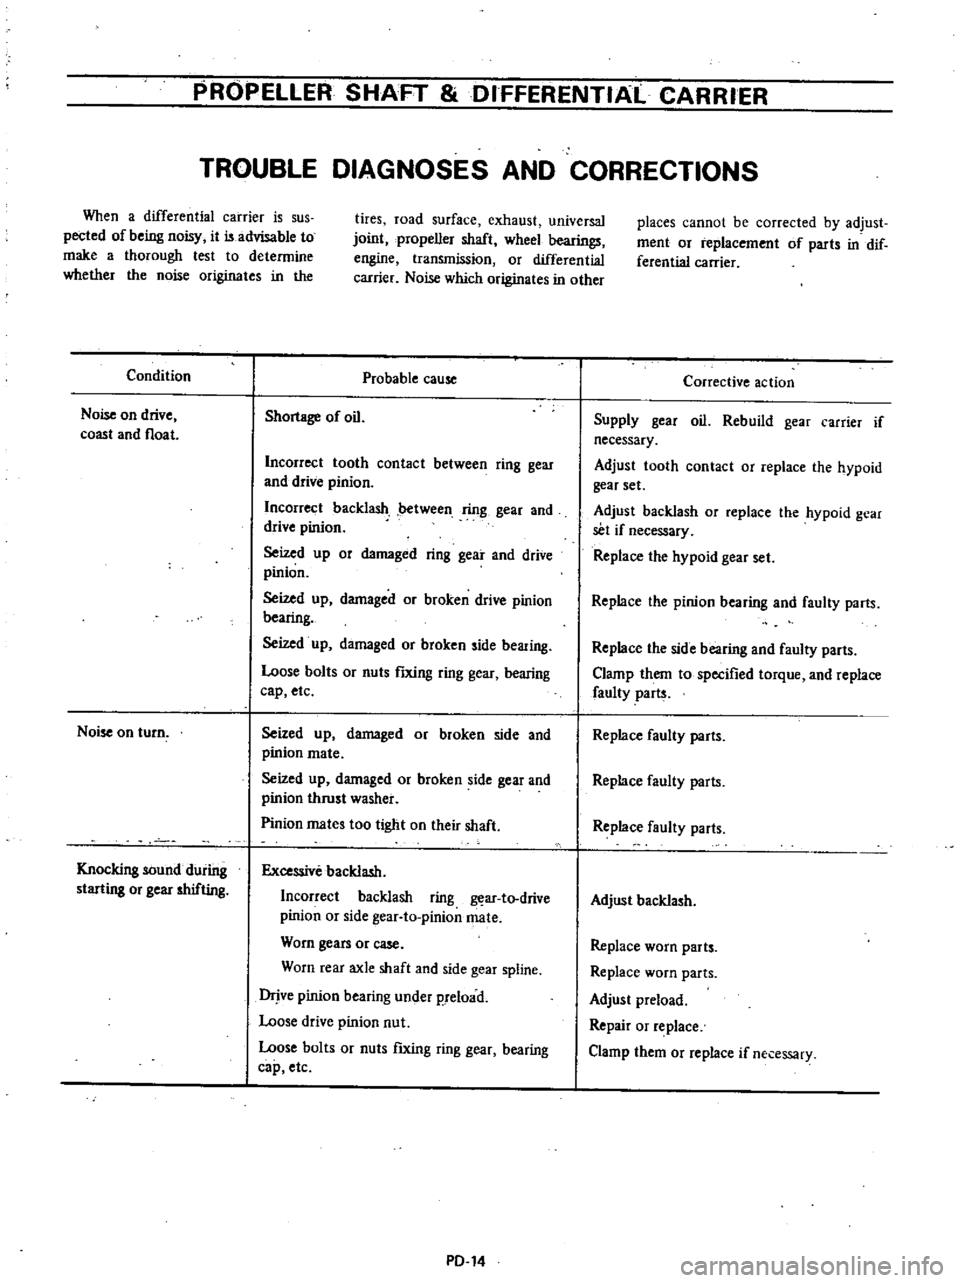
PROPELLER
SHAFT
DIFFERENTIAl
CARRIER
TROUBLE
DIAGNOSES
AND
CORRECTIONS
When
a
differential
carrier
is
sus
pected
of
being
noisy
it
is
advisable
to
make
a
thorough
lest
to
determine
whether
the
noise
originates
in
the
Condition
Noise
on
drive
coast
and
float
Noise
on
turn
Knocking
sound
during
starting
or
gear
shifting
tires
road
surface
exhaust
universal
joint
propeller
shaft
wheel
bearings
engine
transmission
or
differential
carrier
Noise
which
originates
in
other
Probable
cause
Shortage
of
oil
Incorrect
tooth
contact
between
ring
gear
and
drive
pinion
Incorrect
backlash
between
ring
gear
and
drive
pinion
Seized
up
or
damaged
ring
gear
and
drive
pinion
Seized
up
damaged
or
broken
drive
pinion
bearing
Seized
up
damaged
or
broken
side
bearing
Loose
bolts
or
nuts
fIXing
ring
gear
bearing
cap
etc
Seized
up
damaged
or
broken
side
and
pinion
mate
Seized
up
damaged
or
broken
side
gear
and
pinion
thrust
washer
Pinion
mates
too
tight
on
their
shaft
Excessive
backlash
Incorrect
backlash
ring
ar
to
drive
pinion
or
side
gear
to
pinionmate
Worn
gears
or
case
Worn
rear
axle
shaft
and
side
gear
spline
Drjve
pinion
bearing
under
p
reload
Loose
drive
pinion
nut
Loose
bolts
or
nuts
ftxing
ring
gear
bearing
cap
etc
PD
14
places
cannot
be
corrected
by
adjust
ment
or
replacement
of
parts
in
dif
ferential
carrier
Corrective
action
Supply
gear
oil
Rebuild
gear
carrier
if
necessary
Adjust
tooth
contact
or
replace
the
hypoid
gear
set
Adjust
backlash
or
replace
the
hypoid
gear
set
if
necessary
Replace
the
hypoid
gear
set
Replace
the
pinion
bearing
and
faulty
parts
Replace
the
side
bearing
and
faulty
parts
Clamp
them
to
specified
torque
and
replace
faulty
parts
Replace
faulty
parts
Replace
faulty
parts
Replace
faulty
parts
Adjust
backlash
Replace
worn
parts
Replace
worn
parts
Adjust
preload
Repair
or
replace
Clamp
them
or
replace
if
necessary
Page 360 of 537

Note
When
installing
fulcrum
pin
insert
it
from
rearward
of
vehicle
12
Install
tension
rod
shock
ab
sorber
I
stabilizer
torsion
bar
spring
and
knuckle
arm
referring
to
the
related
paragraphs
13
Install
brake
disc
to
knuckle
spindle
and
torque
securing
bolt
to
4
2
to
5
0
kg
m
30
to
36
ft
Ib
14
Install
wheel
and
brake
drum
as
an
assembly
and
torque
knuckle
spin
dle
nut
to
8
0
to
9
0
kg
m
58
to
65
ft
Ib
DISASSEMBLY
AND
ASSEMBLY
Upper
link
I
Detach
upper
link
spindle
from
upper
links
and
remove
clamp
dust
cover
and
dust
seal
Secure
upper
link
in
a
vise
and
loosen
screw
bushing
Assemble
link
spindle
in
reverse
sequence
to
disassembling
noting
the
following
instructions
2
Torque
screw
bushing
on
upper
link
to
3S
to
55
kg
m
253
to
398
ft
Ib
Install
new
dust
seal
and
dust
cover
and
secure
them
with
clamp
3
Coat
grease
to
screw
bushing
in
side
and
the
thread
portion
of
upper
link
spindle
liberally
Screw
front
and
rear
links
to
upper
link
spindle
in
the
same
length
so
as
to
obtain
the
speci
fied
figures
as
shown
in
Figure
FA
23
Unit
mm
in
I
44
6
1
156
FA2
Upper
link
and
upper
link
spindle
Fig
FA
23
Front
Axle
Front
Suspension
4
Make
sure
to
operate
upper
link
spindle
smoothly
after
installation
5
Replace
filler
plug
with
grease
nipple
and
pack
grease
until
grease
comes
out
from
dust
cover
Reinstall
f1ller
plug
Lower
link
When
installing
torque
arm
on
lower
link
tighten
it
to
the
following
specifications
Serration
boss
1
8
to
2
6
kg
m
13
to
19
ft
Ib
Arm
head
2
7
to
3
7
kg
m
20
to
27
ft
tb
INSPECTION
Upper
link
spindle
fulcrum
pin
and
screw
bushing
Apply
screw
bushing
to
upper
link
spindle
or
fulcrum
pin
and
measure
axial
end
play
between
them
When
the
end
play
exceeds
0
35
mm
0
0138
in
replace
upper
link
spindle
or
fulcrum
pin
together
with
screw
bushings
Condition
Vehicle
empty
no
payload
Vehicle
loaded
Notes
a
Vehicle
empty
no
payload
consists
of
the
following
conditions
I
Full
tank
of
gasoline
radiator
f1lled
and
engine
oil
level
full
2
Spare
tire
wheel
jack
and
jack
handle
in
design
position
b
Vehicle
loaded
consists
of
the
fol
lowing
conditions
For
all
models
2
persons
and
SIlO
leg
I
103lb
payload
FA
Check
the
screw
of
upper
link
spindle
fulcrum
pin
and
screw
bush
ing
and
repair
or
replace
if
necessary
Note
Discard
dust
cover
and
dust
seal
when
disassembled
ADJUSTMENT
VEHICLE
POSTURE
Vehicle
posture
may
be
incorrect
due
to
weakened
spring
or
other
faulty
condition
The
following
procedures
are
necessary
when
adjustment
is
Ie
quired
That
is
the
vehicle
posture
can
be
adjusted
by
obtaining
only
the
speci
fied
H
dimension
changing
the
length
of
anchor
bolt
I
Raise
front
of
vehicle
on
stands
2
Adjust
H
dimension
with
turn
ing
nut
adjusting
anchor
bolt
H
dimension
changes
approximately
3
5
mm
0
J38
in
vertically
when
adjust
nut
is
turned
one
complete
turn
3
To
make
the
best
vehicle
posture
H
dimension
must
be
in
the
follow
ing
range
H
dimension
mOl
in
All
models
79
to
84
3
11
to
3
31
54
5
2
15
o
i
Fig
FA
24
FA242
Dimension
for
standard
vehicle
postl4re
Page 374 of 537
Rear
Axle
Rear
Suspension
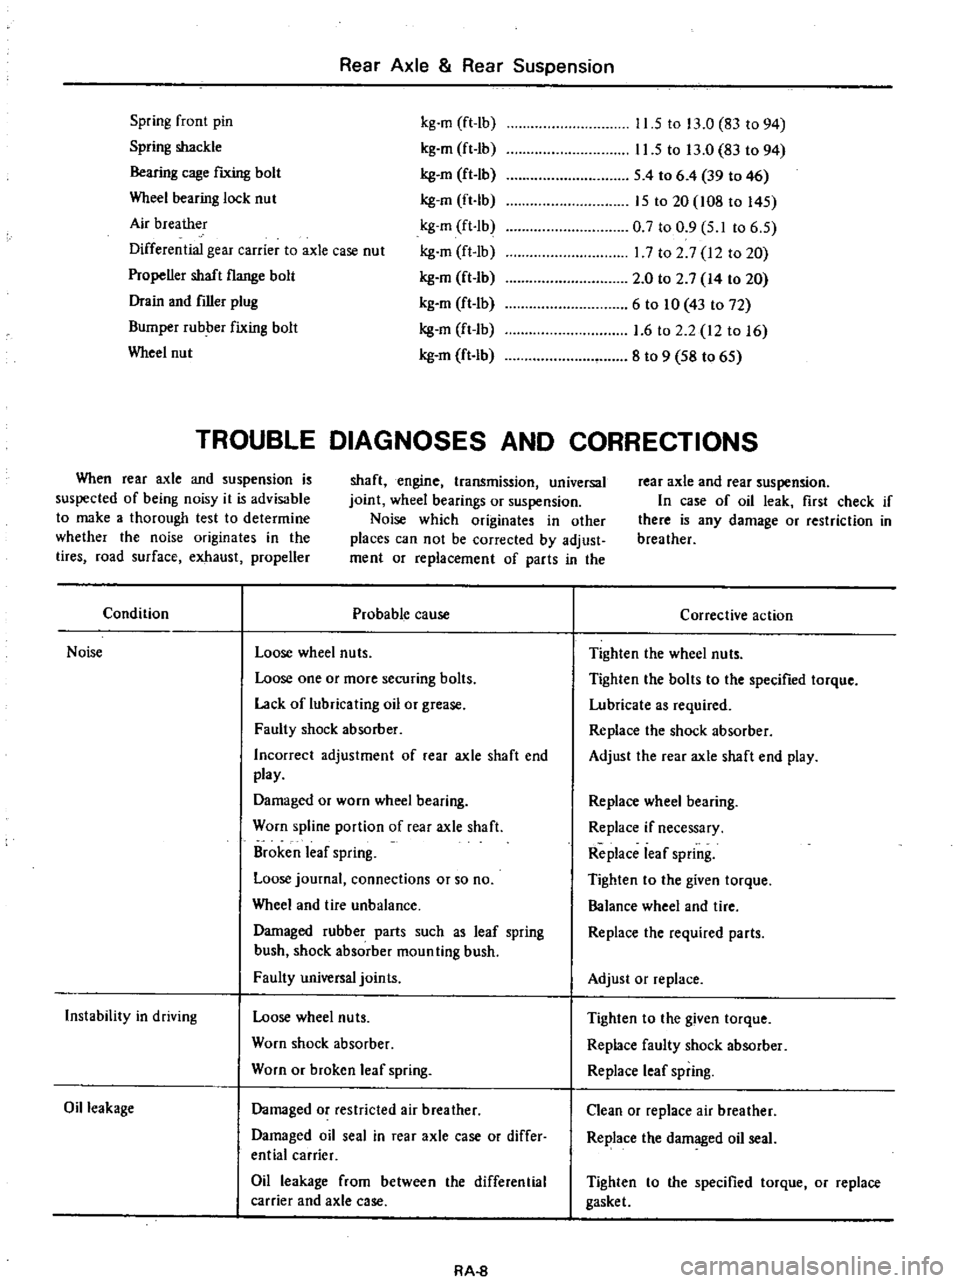
Spring
front
pin
Spring
shackle
Bearing
cage
fIXing
bolt
Wheel
bearing
lock
nut
Air
breather
Differential
gear
carrier
to
axle
case
nut
Propeller
shaft
flange
bolt
Drain
and
filler
plug
Bumper
rubber
fixing
bolt
Wheel
nut
kg
m
ft
lb
kg
m
ft
Ib
kg
en
ft
lb
kg
m
ft
Ib
kg
m
ft
Ib
kg
m
ft
Ib
kg
en
ft
Ib
kg
m
ft
Ib
kg
m
ft
Ib
kg
m
ft
lb
11
5
to
13
0
83
to
94
11
5
to
13
0
83
to
94
S
4
to
6
4
39
to
46
IS
to
20
108
to
l4S
0
7
to
0
9
S
I
to
6
S
17
to
2
7
12
to
20
2
0
to
2
7
14
to
20
6
to
10
43
to
72
1
6
to
2
2
12
to
16
8
to
9
S8
to
6S
TROUBLE
DIAGNOSES
AND
CORRECTIONS
When
rear
axle
and
suspension
is
suspected
of
being
noisy
it
is
advisable
to
make
a
thorough
test
to
determine
whether
the
noise
originates
in
the
tires
road
surface
exhaust
propeller
shaft
engine
transmission
universal
joint
wheel
bearings
or
suspension
Noise
which
originates
in
other
places
can
not
be
corrected
by
adjust
ment
or
replacement
of
parts
in
the
rear
axle
and
rear
suspension
In
case
of
oil
leak
first
check
if
there
is
any
damage
or
restriction
in
breather
Condition
Probable
cause
Noise
Loose
wheel
nuts
Loose
one
or
more
securing
bolts
Lack
of
lubricating
oil
or
grease
Faulty
shock
absorber
Incorrect
adjustment
of
rear
axle
shaft
end
play
Damaged
or
worn
wheel
bearing
Worn
spline
portion
of
rear
axle
shaft
Broken
leaf
spring
Loose
journal
connections
or
so
no
Wheel
and
tire
unbalance
Damaged
rubber
parts
such
as
leaf
spring
bush
shock
absorber
moun
ting
bush
Faulty
universal
joints
Instability
in
driving
Loose
wheel
nuts
Worn
shock
absorber
Worn
or
broken
leaf
spring
Oil
leakage
Damaged
or
restricted
air
breather
Damaged
oil
seal
in
rear
axle
case
or
differ
ential
carrier
Oil
leakage
from
between
the
differential
carrier
and
axle
case
RA
8
Corrective
action
Tighten
the
wheel
nuts
Tighten
the
bolts
to
the
specified
torque
Lubricate
as
required
Replace
the
shock
absorber
Adjust
the
rear
axle
shaft
end
play
Replace
wheel
bearing
Replace
if
necessary
Replace
leaf
spring
Tighten
to
the
given
torque
Balance
wheel
and
tire
Replace
the
required
parts
Adjust
or
replace
Tighten
to
the
given
torque
Replace
faulty
shock
absorber
Replace
leaf
spring
Clean
or
replace
air
breather
Replace
the
damaged
oil
seal
Tighten
to
the
specified
torque
or
replace
gasket
Page 389 of 537
f
BR317
Fig
BR
23
Gre
ing
point
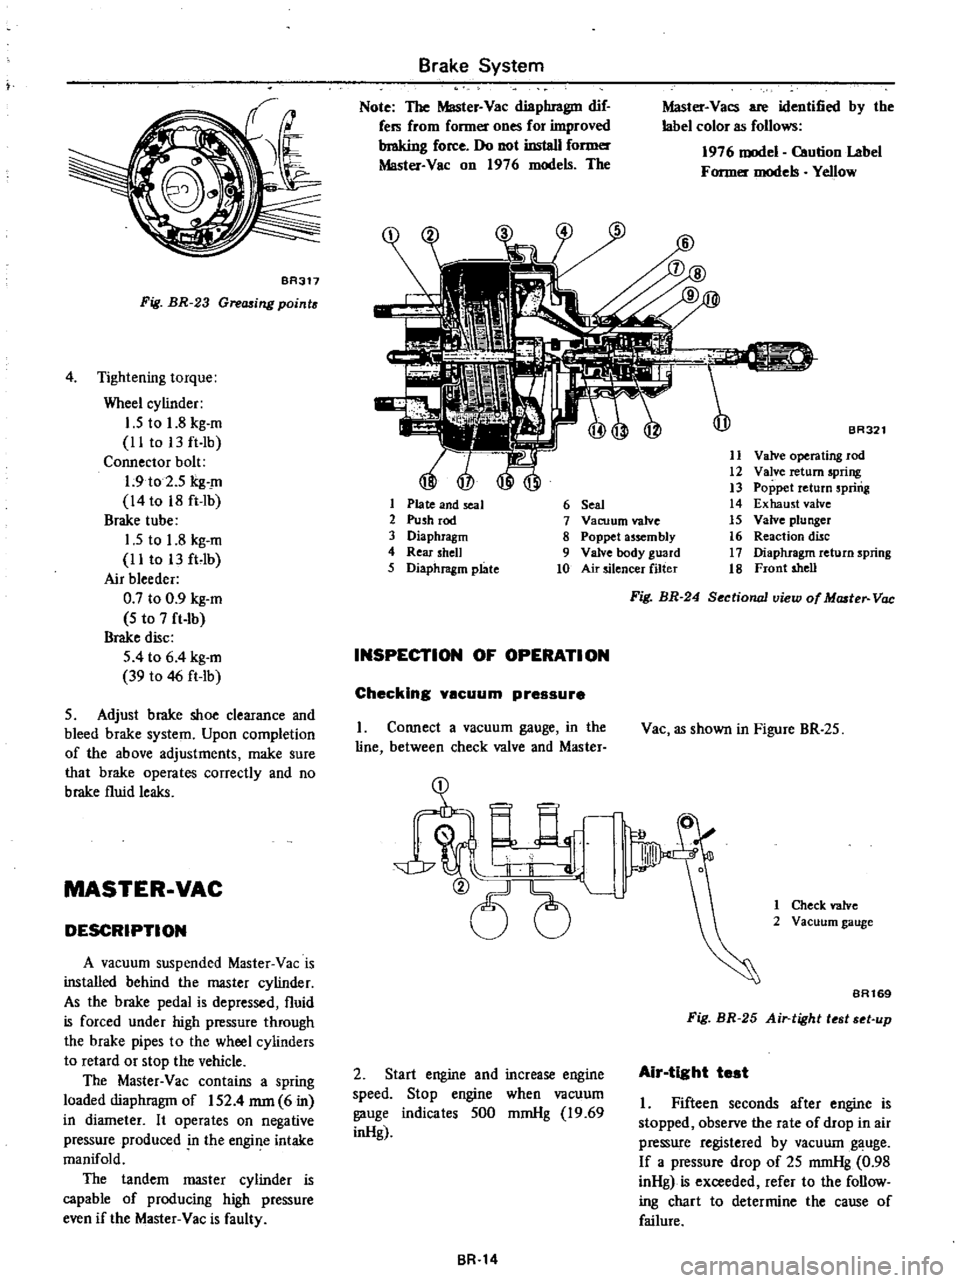
4
Tightening
torque
Wheel
cylinder
J
S
to
1
8
kg
m
II
to
13ft
Ib
Connector
bolt
1
9
to
2
5
kg
m
14
to
18
ft
Ib
Brake
tube
1
5
to
1
8
kg
m
II
to
13
ft
Ib
Air
bleeder
0
7
to
0
9
kg
m
S
to
7
ft
Ib
Brake
disc
5
4
to
6
4
kg
m
39
to
46
ft
Ib
S
Adjust
brake
shoe
clearance
and
bleed
brake
system
Upon
completion
of
the
above
adjustments
make
sure
that
brake
operates
correctly
and
no
brake
fluid
leaks
MASTER
VAC
DESCRIPTION
A
vacuum
suspended
Master
Vac
is
installed
behind
the
master
cylinder
As
the
brake
pedal
is
depressed
fluid
is
forced
under
high
pressure
through
the
brake
pipes
to
the
wheel
cylinders
to
retard
or
stop
the
vehicle
The
Master
Vac
contains
a
spring
loaded
diaphragm
of
IS2
4
mm
6
in
in
diameter
It
operates
on
negative
pressure
produced
n
the
engine
intake
manifold
The
tandem
master
cylinder
is
capable
of
producing
high
pressure
even
if
the
Master
Vac
is
faulty
Brake
System
Note
The
Master
Vac
diaphragm
dif
fers
from
fonner
ones
for
improved
braking
force
Do
not
install
fonner
Master
Vac
on
1976
models
The
1
Plate
and
seal
2
Push
rod
3
Diaphragm
4
Rear
shell
5
Diaphragm
plate
Master
Vacs
are
identified
by
the
label
color
as
follows
1976
model
Caution
Label
Former
models
YeJlow
BR321
11
Valve
operating
rod
12
Valve
return
spring
13
Poppet
return
spring
14
Exhaust
valve
15
Valve
plunger
16
Reaction
disc
17
Diaphragm
return
spring
18
Front
shell
6
Seal
7
Vacuum
valve
8
Poppet
assembly
9
Valve
body
guard
10
Air
silencer
filter
INSPECTION
OF
OPERATION
Checking
yscuum
pressure
I
Connect
a
vacuum
gauge
in
the
line
between
check
valve
and
Master
2
Start
engine
and
increase
engine
speed
Stop
engine
when
vacuum
gauge
indicates
SOO
mmHg
19
69
inHg
BR
14
Fig
BR
24
Sectionall1iew
of
Master
Vac
Vac
as
shown
in
Figure
BR
25
1
Check
valve
2
Vacuum
gauge
BA169
Fig
BR
25
Air
tight
t
t
t
up
Air
tight
test
I
Fifteen
seconds
after
engine
is
stopped
observe
the
rate
of
drop
in
air
pressure
registered
by
vacuum
gauge
If
a
pressure
drop
of
25
mmHg
0
98
inHg
is
exceeded
refer
to
the
follow
ing
chart
to
determine
the
cause
of
failure
Page 390 of 537
Probable
cause
I
Air
leakago
at
check
valve
2
Air
leakage
a
t
push
rod
seal
3
Air
leakage
between
valve
body
and
seal
4
Air
leakage
at
valve
plunger
seat
5
Damaged
piping
or
joints
2
Fifteen
seconds
after
engine
is
stopped
and
brake
fully
applied
ob
serve
the
rate
of
drop
in
air
pressure
registered
by
vacuum
gauge
Probable
cause
1
Air
leakage
at
check
valve
2
Damaged
diaphragm
3
Reaction
disc
dropped
off
4
Air
leakage
at
and
valve
body
poppet
assembly
seat
Note
When
replacement
of
any
part
is
required
be
sure
to
renew
Master
Vac
as
an
assembly
Inspecting
check
valve
Remove
clip
and
disconnect
hoses
at
connections
The
check
valve
can
now
be
removed
yr
BA3
Fig
BR
26
Location
of
check
valve
2
Using
a
Master
Vac
tester
apply
a
vacuum
pressure
of
200
mmHg
7
87
inHg
to
the
port
of
check
valve
on
the
Master
Vac
side
If
a
pressure
drop
of
10
mmHg
0
39
inHg
is
exceeded
in
1
I
I
17
I
f
I
I
I
Z
I
I
y1
I
I
I
7
I
I
I
I
I
I
I
I
I
I
y1
II
I
I
I
I
I
I
I
L
I
L
5
to
15
20
25
30
35
40
45
50
55
60
22
44
66
88
110
132
Pedal
operating
force
kg
lb
BR772
Fig
BR
28
Performance
curves
of
Master
Vac
Brake
System
Corrective
action
Replace
check
valve
Replace
seal
Repair
or
replace
faulty
partes
Repair
or
replace
seat
Repair
or
replace
If
a
pressure
drop
of
25
mmHg
0
98
inHg
is
exceeded
refer
to
the
following
chart
to
determine
the
cause
of
failure
Corrective
action
Replace
check
valve
Replace
Reinstall
and
check
push
rod
for
proper
turn
Replace
faulty
part
s
15
seconds
replace
check
valve
with
a
new
one
3
When
pressure
is
applied
to
the
Master
Vac
side
of
check
valve
and
valve
does
not
open
replace
check
valve
with
a
new
one
120
I
7IG
110
1
560
100
I
420
i
90
1
280
I
u
80
1
140
70
1
000
II
60
850
0
0
5
a
50
710
40
570
30
430
20
280
10
140
BR
15
1
I
Manifold
side
Master
Yac
side
1
Spring
2
Valve
BA289
Fig
BR
27
Sectional
view
of
check
valve
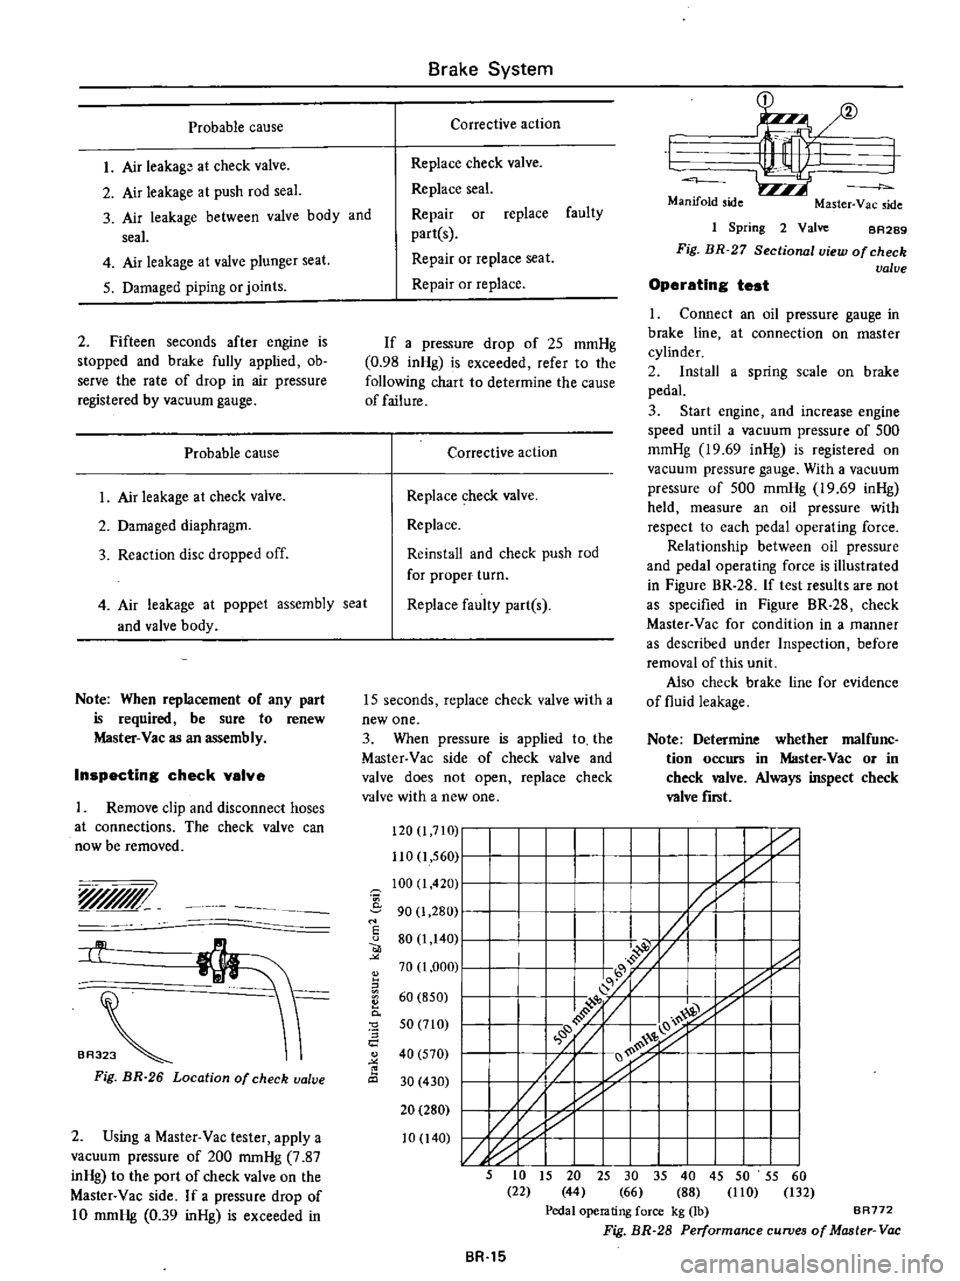
Operating
test
1
Connect
an
oil
pressure
gauge
in
brake
line
at
connection
on
master
cylinder
2
Install
a
spring
scale
on
brake
pedal
3
Start
engine
and
increase
engine
speed
until
a
vacuum
pressure
of
500
mmHg
19
69
inHg
is
registered
on
vacuum
pressure
gauge
With
a
vacuum
pressure
of
500
mmHg
19
69
inHg
held
measure
an
oil
pressure
with
respect
to
each
pedal
operating
force
Relationship
between
oil
pressure
and
pedal
operating
force
is
illustrated
in
Figure
BR
28
If
test
results
are
not
as
specified
in
Figure
BR
28
check
Master
Vac
for
condition
in
a
manner
as
described
under
Inspection
before
removal
of
this
unit
Also
check
brake
line
for
evidence
of
fluid
leakage
Note
Determine
whether
malfunc
tion
occurs
in
Master
Vac
or
in
check
valve
Always
inspect
check
valve
fiTlit
Page 409 of 537
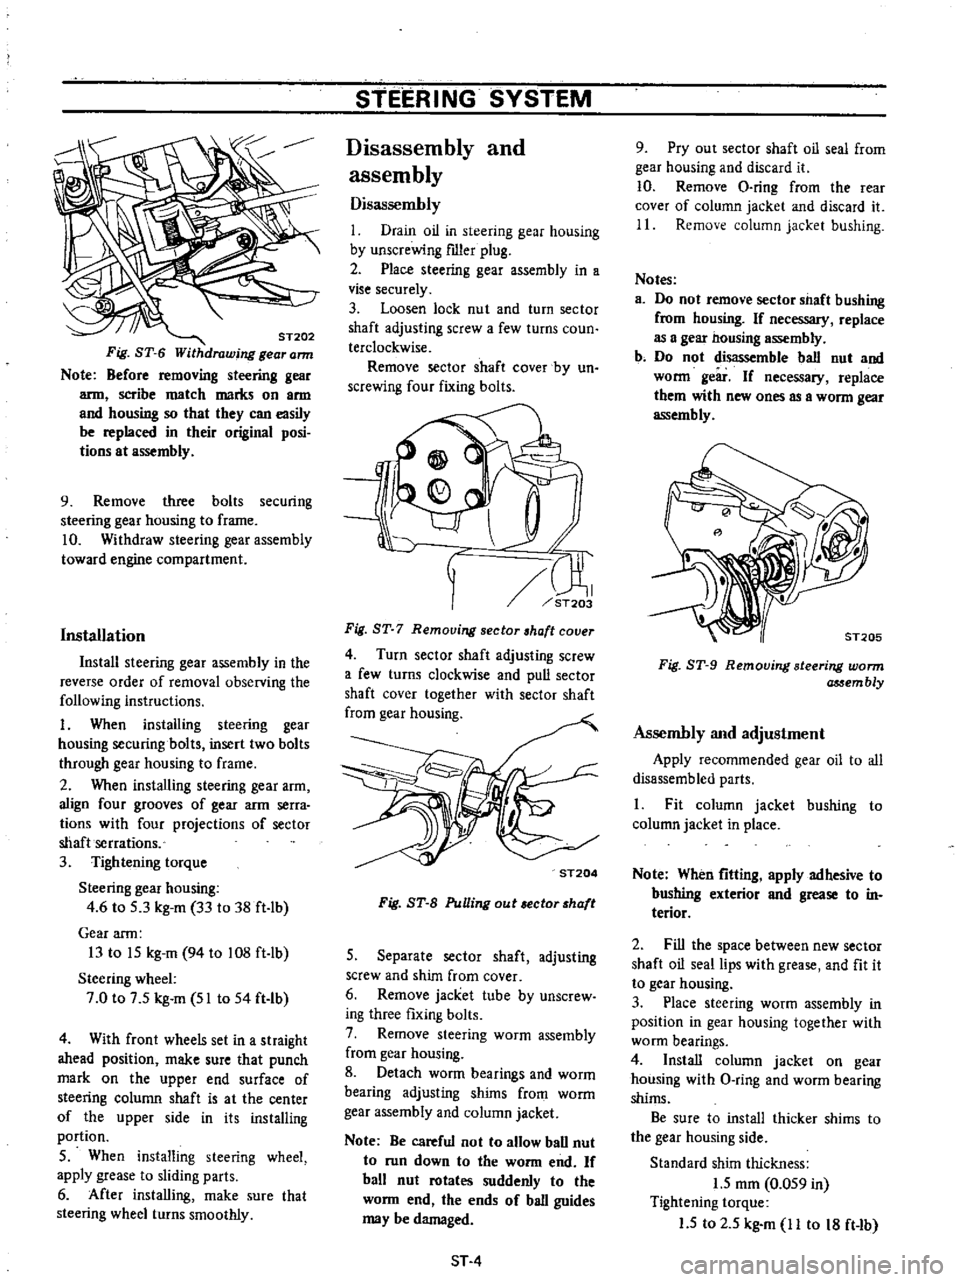
ST202
Fig
ST
6
Withdrawing
gear
ann
Note
Before
removing
steering
gear
arm
scribe
match
marks
on
arm
and
housing
so
that
they
can
easily
be
replaced
in
their
original
posi
tions
at
assembly
9
Remove
three
bolts
securing
steering
gear
housing
to
frame
10
Withdraw
steering
gear
assembly
toward
engine
compartment
Installation
Install
steering
gear
assembly
in
the
reverse
order
of
removal
observing
the
following
instructions
I
When
installing
steering
gear
housing
securing
bolts
insert
two
bolts
through
gear
housing
to
frame
2
When
installing
steering
gear
arm
align
four
grooves
of
gear
arm
serra
tions
with
four
projections
of
sector
shaft
serrations
3
Tightening
torque
Steering
gear
housing
4
6
to
S
3
kg
m
33
to
38
ft
lb
Gear
arm
13
to
IS
kg
m
94
to
108
ft
lb
Steering
wheel
7
0
to
7
S
kg
m
51
to
54
ft
Ib
4
With
front
wheels
set
in
a
straight
ahead
position
make
sure
that
punch
mark
on
the
upper
end
surface
of
steering
column
shaft
is
at
the
center
of
the
upper
side
in
its
installing
portion
S
When
installing
steering
wheel
apply
grease
to
sliding
parts
6
After
installing
make
sure
that
steering
wheel
turns
smoothly
STEERING
SYSTEM
Disassembly
and
assembly
Disassembly
I
Drain
oil
in
steering
gear
housing
by
unscrewing
fIller
plug
2
Place
steering
gear
assembly
in
a
vise
securely
3
Loosen
lock
nut
and
turn
sector
shaft
adjusting
screw
a
few
turns
coun
terclockwise
Remove
sector
shaft
cover
by
un
screwing
four
fixing
bolts
rn
ST203
Fig
ST
7
Remouing
sector
haft
couer
4
Turn
sector
shaft
adjusting
screw
a
few
turns
clockwise
and
pull
sector
shaft
cover
together
with
sector
shaft
from
gear
housing
ST204
Fig
ST
B
PuUing
out
ector
haft
S
Separate
sector
shaft
adjusting
screw
and
shim
from
cover
6
Remove
jacket
tube
by
unscrew
ing
three
fixing
bolts
7
Remove
steering
worm
assembly
from
gear
housing
8
Detach
worm
bearings
and
worm
bearing
adjusting
shims
from
worm
gear
assembly
and
column
jacket
Note
Be
careful
not
to
allow
ball
nut
to
run
down
to
the
worm
end
If
ball
nut
rotates
suddenly
to
the
worm
end
the
ends
of
ball
guides
may
be
damaged
ST
4
9
Pry
out
sector
shaft
oil
seal
from
gear
housing
and
discard
it
10
Remove
O
ring
from
the
rear
cover
of
column
jacket
and
discard
it
11
Remove
column
jacket
bushing
Notes
a
Do
not
remove
sector
shaft
bushing
from
housing
If
necessary
replace
as
a
gea2
nousing
assembly
b
Do
not
disassemble
ball
nut
and
worm
geir
If
necessary
replace
them
with
new
ones
as
a
worm
gear
assembly
Fig
ST
9
Removing
steering
worm
assem
bly
Assembly
and
adjustment
Apply
recommended
gear
oil
to
all
disassembled
parts
1
Fit
column
jacket
bushing
to
column
jacket
in
place
Note
When
fitting
apply
adhesive
to
bushing
exterior
and
grease
to
in
terior
2
Fill
the
space
between
new
sector
shaft
oil
seal
lips
with
grease
and
fit
it
to
gear
housing
3
Place
steering
worm
assembly
in
position
in
gear
housing
together
with
worm
bearings
4
Install
column
jacket
on
gear
housing
with
O
ring
and
worm
bearing
shims
Be
sure
to
install
thicker
shims
to
the
gear
housing
side
Standard
shim
thickness
1
5
mOl
0
OS9
in
Tightening
torque
1
5
to
2
S
kg
m
11
to
18
ft
Ib