check DATSUN PICK-UP 1977 Service Manual
[x] Cancel search | Manufacturer: DATSUN, Model Year: 1977, Model line: PICK-UP, Model: DATSUN PICK-UP 1977Pages: 537, PDF Size: 35.48 MB
Page 521 of 537
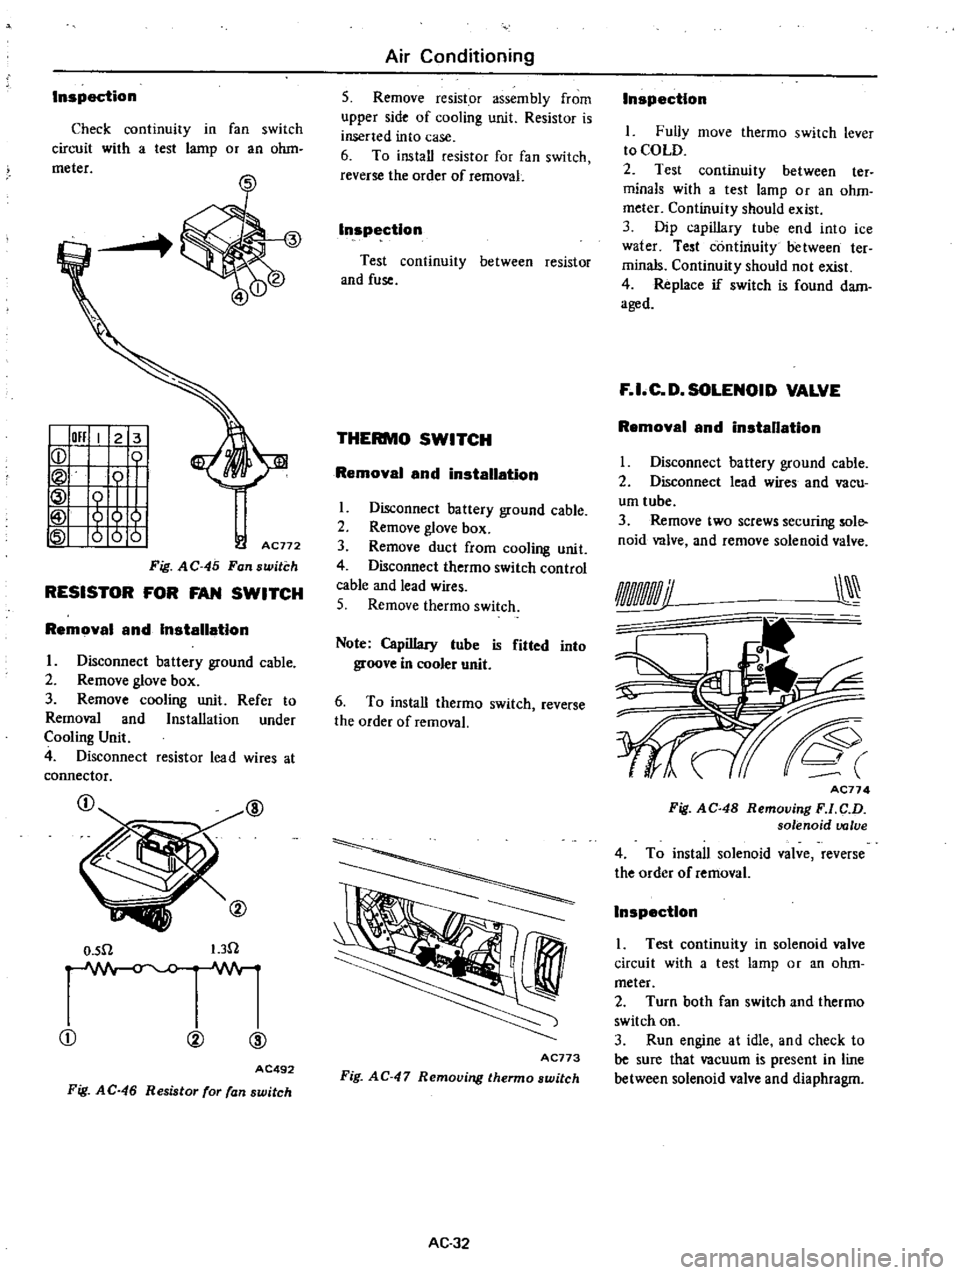
Inspection
Check
continuiry
in
fan
switch
circuit
with
a
test
lamp
or
an
ohm
meter
I
011
I
2
3
ICD
Tt
tt
AC772
Fig
AC
45
Fan
switch
RESISTOR
FOR
FAN
SWITCH
Removal
and
Installation
I
Disconnect
battery
ground
cable
2
Remove
glove
box
3
Remove
cooling
unit
Refer
to
Removal
and
Installation
under
Cooling
Unit
4
Disconnect
resistor
lead
wires
at
connector
@
O
sn
I
3n
CD
00
@
AC492
Fig
AC
46
Resistor
for
fan
switch
Air
Conditioning
5
Remove
resistor
assembly
from
upper
side
of
cooling
unit
Resistor
is
inserted
into
case
6
To
install
res
istor
for
fan
switch
reverse
the
order
of
removaL
Inspection
Test
continuity
between
resistor
and
fuse
THERMO
SWITCH
Removal
and
installation
1
Disconnect
battery
ground
cable
2
Remove
glove
box
3
Remove
duct
from
cooling
unit
4
Disconnect
thermo
switch
control
cable
and
lead
wires
5
Remove
thermo
switch
Note
Capillary
lube
is
fitted
into
groove
in
cooler
unit
6
To
install
thermo
switch
reverse
the
order
of
removal
I
I
AC773
Fig
AC
47
Removing
thermo
switch
AC
32
Inspection
I
Fully
move
thermo
swirch
lever
to
COLD
2
Test
continuity
between
ter
minals
with
a
test
tamp
or
an
ohm
meter
Continuity
should
exist
3
Dip
capillary
tube
end
into
ice
water
Test
continuity
between
ter
minals
Continuity
should
not
exist
4
Replace
if
switch
is
found
dam
aged
F
I
C
D
SOLENOID
VALVE
Removal
and
installation
I
Disconnect
battery
ground
cable
2
Disconnect
lead
wires
and
vacu
um
tube
3
Remove
two
screws
securing
sole
noid
valve
and
remove
solenoid
valve
AC77
4
Fig
AC
48
Removing
F
l
C
D
solenoid
valve
4
To
install
solenoid
valve
reverse
the
order
of
removal
Inspection
1
Test
continuity
in
solenoid
valve
circuit
with
a
test
lamp
or
an
ohm
meter
2
Turn
both
fan
switch
and
thermo
switch
on
3
Run
engine
at
idle
and
check
to
be
sure
that
vacuum
is
present
in
line
between
solenoid
valve
and
diaphragm
Page 524 of 537
2
Install
the
clutch
assembly
on
the
crankshaft
Note
Key
should
be
set
on
crank
shaft
before
installing
clutch
assem
bly
3
Using
Clutch
Spanner
Wrench
hold
clutch
hub
With
socket
wrench
secure
clutch
hub
securing
bolt
Tightening
torque
Clutch
hub
securing
bolt
1
5
kg
m
II
ft
lb
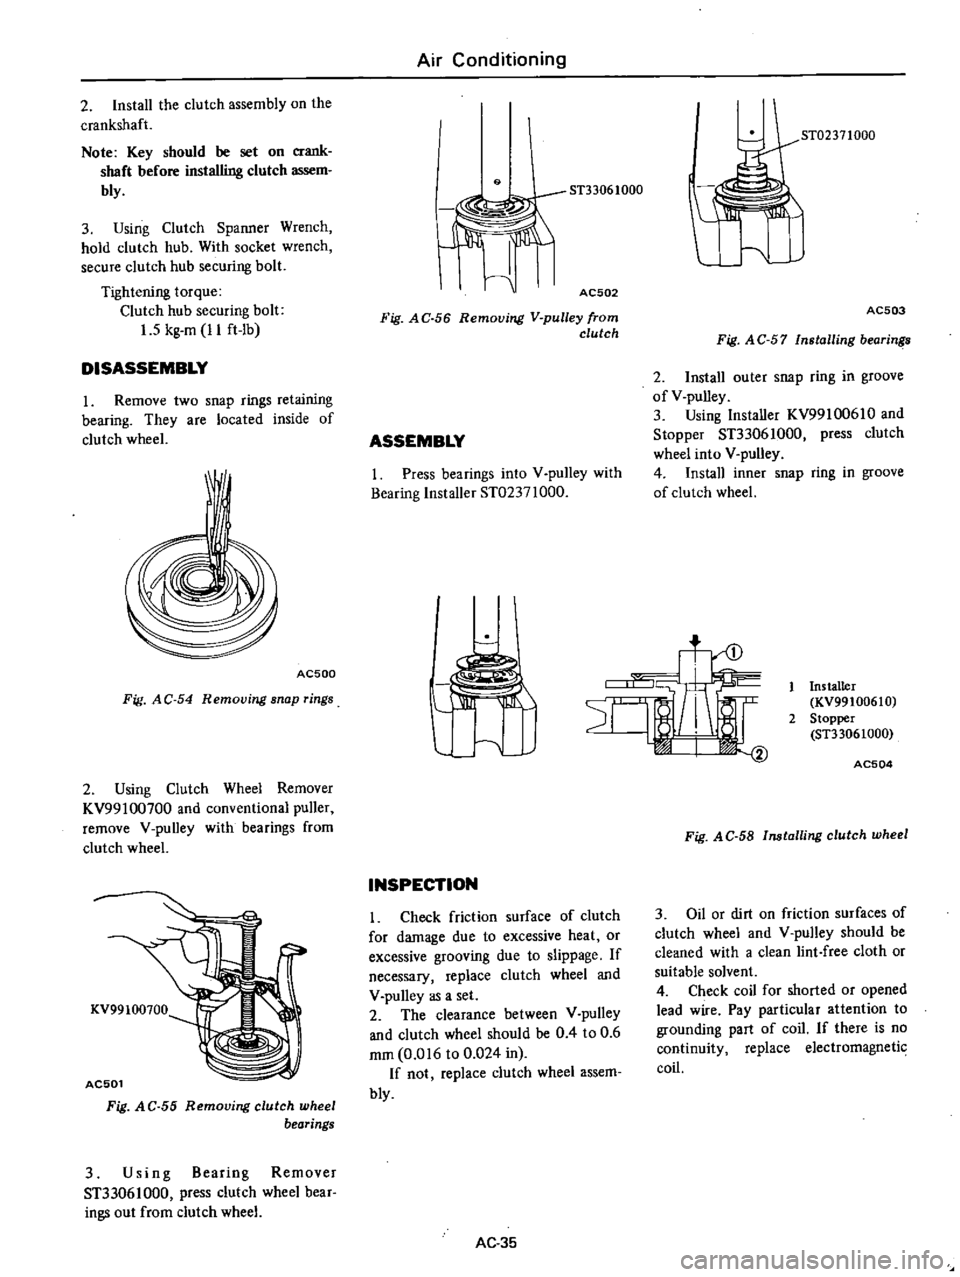
DISASSEMBLY
1
Remove
two
snap
rings
retaining
bearing
They
are
located
inside
of
clutch
wheel
AC500
Fig
AC
54
Removing
snap
rings
2
Using
Clutch
Wheel
Remover
KV99100700
and
conventional
puller
remove
V
pulley
with
bearings
from
clutch
wheel
KV99100700
AC501
Fig
A
C
55
Removing
clutch
wheel
bearings
3
Using
Bearing
Remover
ST33061000
press
clutch
wheel
bear
ings
out
from
clutch
wheel
Air
Conditioning
9
AC502
Fig
AC
56
Removing
V
pulley
from
clutch
ASSEMBLY
I
Press
bearings
into
V
pulley
with
Bearing
Installer
ST02371000
ST02371000
AC503
Fig
A
C
57
Installing
bearin
2
Install
outer
snap
ring
in
groove
of
V
pulley
3
Using
Installer
KV99100610
and
Stopper
ST33061000
press
clutch
wheel
into
V
pulley
4
Install
inner
snap
ring
in
groove
of
clutch
wheel
t
INSPECTION
Check
friction
surface
of
clutch
for
damage
due
to
excessive
heat
or
excessive
grooving
due
to
slippage
If
necessary
replace
clutch
wheel
and
V
pulley
as
a
set
2
The
clearance
between
V
pulley
and
clutch
wheel
should
be
0
4
to
0
6
mm
0
016
to
0
024
in
If
not
replace
clutch
wheel
assem
bly
AC
35
Installer
KV99100610
2
Stopper
ST33061000
AC504
Fig
AC
58
Installing
clutch
wheel
3
Oil
or
dirt
on
friction
surfaces
of
clutch
wheel
and
V
pulley
should
be
cleaned
with
a
clean
lint
free
cloth
or
suitable
solvent
4
Check
coil
for
shorted
or
opened
lead
wire
Pay
particular
attention
to
grounding
part
of
coil
If
there
is
no
continuity
replace
electromagnetic
coil
Page 526 of 537

INSPECTION
Check
for
gas
leakage
as
follows
I
Plug
high
and
low
pressure
joints
on
compressor
with
blind
caps
2
Connect
charging
hoses
in
lines
between
manifold
gauge
and
high
and
low
pressure
service
valves
Connect
refrigerant
can
to
middle
hose
of
manifold
gauge
3
Open
valve
of
can
tap
and
charge
refrigerant
Loosen
oil
filler
plug
at
side
of
compressor
to
purge
air
out
of
compressor
4
Turn
shaft
5
or
6
turns
Then
confirm
that
pressure
does
not
decrease
on
low
pressure
gauge
If
gauge
indicates
a
pressure
decrease
there
is
a
leak
Conduct
a
leak
test
Under
such
a
condition
remove
and
then
install
parts
again
CYLINDER
HEAD
AND
VALVES
Insufficient
refrigerant
compression
is
likely
to
be
caused
by
damaged
head
gasket
or
damaged
valves
Prior
to
servicing
the
head
and
valve
plate
both
service
valves
should
be
opened
to
free
any
gas
pressure
which
may
be
in
the
compressor
REMOVAL
I
Remove
the
bolts
from
flanged
type
service
valves
using
Torx
Driver
Bit
Note
The
direction
of
flanged
type
service
valves
should
be
noted
for
reinstallation
AC812
Fig
AC
66
Removing
service
valves
2
Remove
the
remaining
bolts
in
the
head
Air
Conditioning
AC813
Fig
A
C
6
7
Removing
cylinder
head
bolts
3
Remove
valve
plate
and
head
from
cylinder
by
prying
or
tapping
under
the
ears
which
extend
from
valve
plate
If
head
and
valve
plate
adhere
hold
head
and
tap
valve
plate
ears
away
from
head
with
a
soft
hammer
Note
Do
not
hit
or
tap
head
to
separate
head
and
valve
plate
be
3use
damage
to
head
may
result
Fig
AC
68
Removing
valve
plate
and
head
4
When
removing
the
gaskets
use
a
sharp
edged
knife
Notes
a
In
removing
head
gasket
be
very
careful
not
to
damage
machined
sealing
surface
b
Do
not
reuse
gaskets
AC815
Fig
A
C
69
Removing
gasket
AC37
INSTALLATION
Valves
and
valve
plates
are
furnish
ed
only
as
a
complete
assembly
I
Apply
a
thin
film
of
clean
refrig
eration
oil
on
area
of
crankcase
to
be
covered
by
cylinder
gasket
2
Place
cylinder
gasket
in
position
on
cylinder
so
dowel
pins
in
crankcase
go
through
dowel
pin
holes
in
cylinder
gasket
3
Apply
a
thin
film
of
clean
refrig
eration
oil
to
top
and
bottom
valve
plate
areas
to
be
covered
by
gaskets
AC816
Fig
A
C
70
Applying
clean
refrigeration
oil
4
Place
valve
plate
in
position
on
cylinder
gasket
so
discharge
valve
as
semblies
i
e
smaller
diameter
assem
blies
with
restrainer
over
valve
reed
are
facing
up
and
locating
dowel
pins
go
through
dowel
pin
holes
in
valve
plate
Fig
A
C
71
Placing
valve
plate