drain bolt DATSUN PICK-UP 1977 Owner's Manual
[x] Cancel search | Manufacturer: DATSUN, Model Year: 1977, Model line: PICK-UP, Model: DATSUN PICK-UP 1977Pages: 537, PDF Size: 35.48 MB
Page 398 of 537

Condition
Brake
chatters
Brake
squeals
Pedal
pulsates
Brakes
fade
Brakes
drag
Unbalanced
brakes
Brake
System
Probable
cause
Groove
or
out
of
round
brake
drum
Loose
or
bent
brake
disc
Distorted
brake
shoes
or
pads
Grease
or
brake
fluid
on
linings
Dirty
or
scored
brake
drums
Distorted
brake
shoes
or
bent
support
plate
Weak
or
broken
brake
shoe
retaining
spring
or
return
spring
Glazed
or
contaminated
brake
lining
Out
of
round
or
off
center
drum
Brake
fluid
has
too
low
boiling
point
Use
of
improper
linings
or
brake
linings
are
contaminated
Brake
drums
are
out
of
round
Hydraulic
connections
master
cylinder
and
wheel
cylinders
are
corroded
or
damaged
Bleed
screw
is
open
Pedal
linkage
is
binding
or
push
rod
adjust
ment
is
too
long
Master
cylinder
compensator
part
is
ob
structed
Seized
master
cylinder
piston
Poor
shoe
condition
Poor
wheel
cylinder
condition
Deformation
of
piston
cups
Hand
brake
will
not
return
Clogged
master
cylinder
return
port
Improper
tire
inflation
Improper
adjustment
of
shoe
to
drum
clear
anee
Grease
oil
mud
or
water
on
linings
or
pads
Mud
in
brake
drum
Deterioration
of
linings
or
pads
Excessive
wear
of
linings
or
pads
BR
23
Corrective
action
Grind
or
replace
as
required
Tighten
support
plate
bolts
to
specified
torque
or
replace
plate
Replace
as
necessary
Replace
linings
Blowout
assembly
with
compressed
air
or
refinish
drum
Replace
faulty
unit
Replace
if
faulty
Cam
ground
lining
to
eliminate
glaze
If
it
doesn
t
replace
linings
Turn
drum
or
replace
as
necessary
Drain
and
fill
system
with
approved
fluid
Replace
linings
Repair
or
replace
as
necessary
Repair
as
necessary
Close
screw
and
bleed
system
Lubricate
linkage
check
pedal
return
spring
for
condition
and
adjust
push
rod
as
neces
sary
Blowout
foreign
matter
with
compressed
air
Disassemble
master
cylinder
and
replace
piston
Bleed
system
Clean
and
repair
Repair
or
replace
Replace
Check
and
repair
Clean
Inflate
to
correct
pressure
Readjust
Clean
brake
mechanism
and
check
for
cause
of
problem
Replace
linings
or
pads
Clean
Replace
Replace
Page 409 of 537
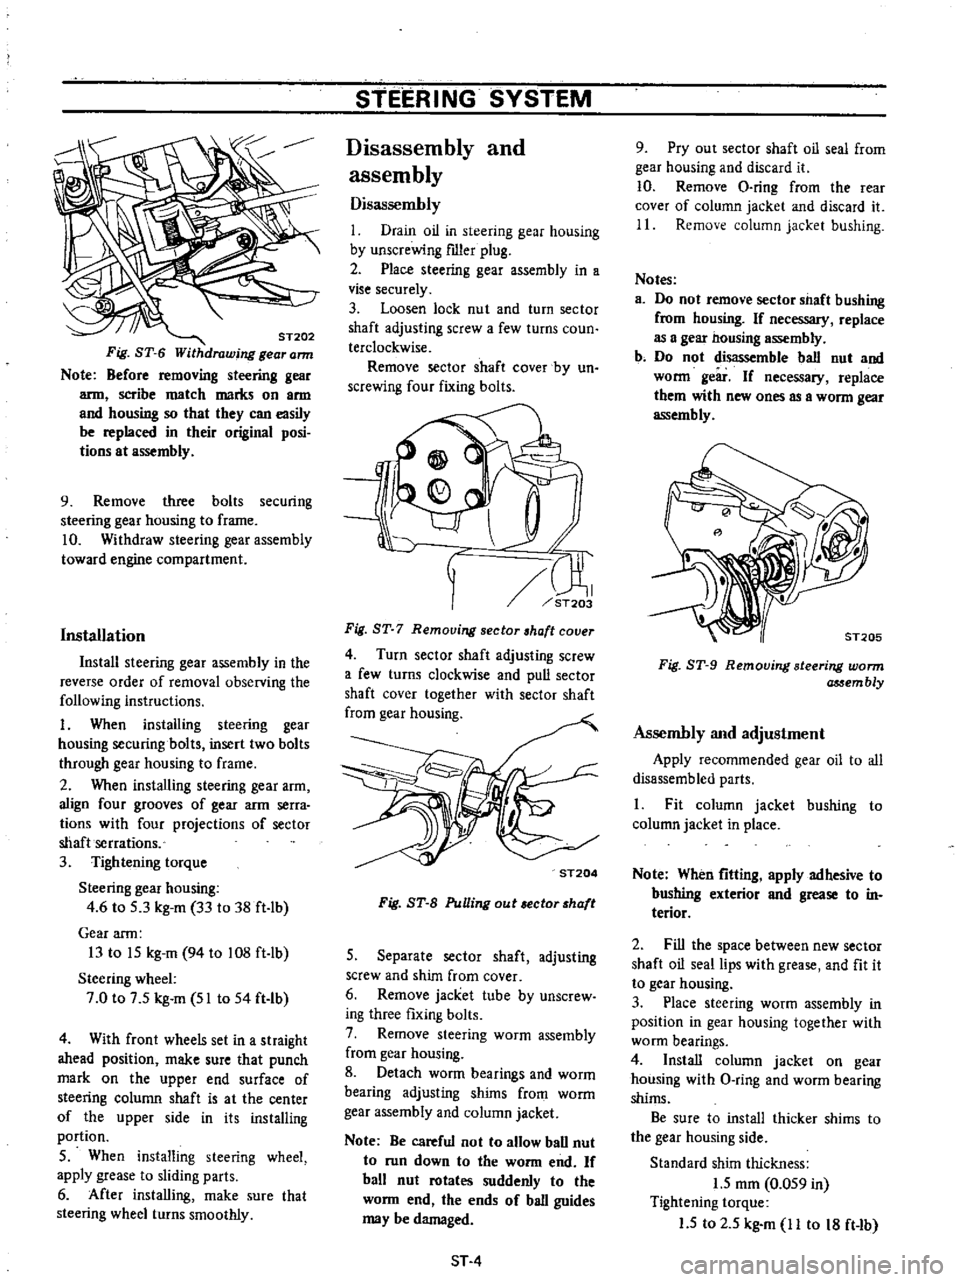
ST202
Fig
ST
6
Withdrawing
gear
ann
Note
Before
removing
steering
gear
arm
scribe
match
marks
on
arm
and
housing
so
that
they
can
easily
be
replaced
in
their
original
posi
tions
at
assembly
9
Remove
three
bolts
securing
steering
gear
housing
to
frame
10
Withdraw
steering
gear
assembly
toward
engine
compartment
Installation
Install
steering
gear
assembly
in
the
reverse
order
of
removal
observing
the
following
instructions
I
When
installing
steering
gear
housing
securing
bolts
insert
two
bolts
through
gear
housing
to
frame
2
When
installing
steering
gear
arm
align
four
grooves
of
gear
arm
serra
tions
with
four
projections
of
sector
shaft
serrations
3
Tightening
torque
Steering
gear
housing
4
6
to
S
3
kg
m
33
to
38
ft
lb
Gear
arm
13
to
IS
kg
m
94
to
108
ft
lb
Steering
wheel
7
0
to
7
S
kg
m
51
to
54
ft
Ib
4
With
front
wheels
set
in
a
straight
ahead
position
make
sure
that
punch
mark
on
the
upper
end
surface
of
steering
column
shaft
is
at
the
center
of
the
upper
side
in
its
installing
portion
S
When
installing
steering
wheel
apply
grease
to
sliding
parts
6
After
installing
make
sure
that
steering
wheel
turns
smoothly
STEERING
SYSTEM
Disassembly
and
assembly
Disassembly
I
Drain
oil
in
steering
gear
housing
by
unscrewing
fIller
plug
2
Place
steering
gear
assembly
in
a
vise
securely
3
Loosen
lock
nut
and
turn
sector
shaft
adjusting
screw
a
few
turns
coun
terclockwise
Remove
sector
shaft
cover
by
un
screwing
four
fixing
bolts
rn
ST203
Fig
ST
7
Remouing
sector
haft
couer
4
Turn
sector
shaft
adjusting
screw
a
few
turns
clockwise
and
pull
sector
shaft
cover
together
with
sector
shaft
from
gear
housing
ST204
Fig
ST
B
PuUing
out
ector
haft
S
Separate
sector
shaft
adjusting
screw
and
shim
from
cover
6
Remove
jacket
tube
by
unscrew
ing
three
fixing
bolts
7
Remove
steering
worm
assembly
from
gear
housing
8
Detach
worm
bearings
and
worm
bearing
adjusting
shims
from
worm
gear
assembly
and
column
jacket
Note
Be
careful
not
to
allow
ball
nut
to
run
down
to
the
worm
end
If
ball
nut
rotates
suddenly
to
the
worm
end
the
ends
of
ball
guides
may
be
damaged
ST
4
9
Pry
out
sector
shaft
oil
seal
from
gear
housing
and
discard
it
10
Remove
O
ring
from
the
rear
cover
of
column
jacket
and
discard
it
11
Remove
column
jacket
bushing
Notes
a
Do
not
remove
sector
shaft
bushing
from
housing
If
necessary
replace
as
a
gea2
nousing
assembly
b
Do
not
disassemble
ball
nut
and
worm
geir
If
necessary
replace
them
with
new
ones
as
a
worm
gear
assembly
Fig
ST
9
Removing
steering
worm
assem
bly
Assembly
and
adjustment
Apply
recommended
gear
oil
to
all
disassembled
parts
1
Fit
column
jacket
bushing
to
column
jacket
in
place
Note
When
fitting
apply
adhesive
to
bushing
exterior
and
grease
to
in
terior
2
Fill
the
space
between
new
sector
shaft
oil
seal
lips
with
grease
and
fit
it
to
gear
housing
3
Place
steering
worm
assembly
in
position
in
gear
housing
together
with
worm
bearings
4
Install
column
jacket
on
gear
housing
with
O
ring
and
worm
bearing
shims
Be
sure
to
install
thicker
shims
to
the
gear
housing
side
Standard
shim
thickness
1
5
mOl
0
OS9
in
Tightening
torque
1
5
to
2
S
kg
m
11
to
18
ft
Ib
Page 420 of 537
Detail
A
Detail
D
REMOVAL
Engine
Control
Fuel
Exhaust
Systems
Detail
Bn
4
Detail
e
@
Detail
E
B
Fuel
tank
See
Figure
FE
a
I
Disconnect
battery
ground
cable
2
Remove
drain
plug
and
receive
the
remaining
fuel
into
a
suitable
container
3
Disconnect
filler
tube
fro
filler
hose
4
Remove
fuel
tank
securing
bolts
5
Disconnect
two
ventilation
hoses
fuel
return
hose
and
fuel
outlet
hose
from
fuel
tank
6
Disconnect
fuel
tank
gauge
unit
wires
at
connector
7
Remove
fuel
tank
Note
Plug
hose
and
tube
opening
l
to
prevent
entry
of
dust
or
dirt
while
removing
ReservoIr
tank
1
Disconnect
battery
ground
cable
2
Disconnect
two
ventilation
hoses
evaporation
hose
and
breather
hose
3
Remove
reservoir
tank
securing
bolts
and
remove
tank
with
protector
Note
Plug
hose
and
tube
opening
l
to
prevent
entry
of
dust
or
dirt
while
removing
Fuel
tank
gauge
unit
Disconnect
battery
ground
cable
2
Disconnect
wires
from
fuel
tank
gauge
unit
3
Remove
fuel
tank
For
details
refer
to
fuel
tank
removal
4
Unit
gauge
is
a
bayonet
type
and
can
be
removed
by
turning
it
counter
clockwise
with
screwdriver
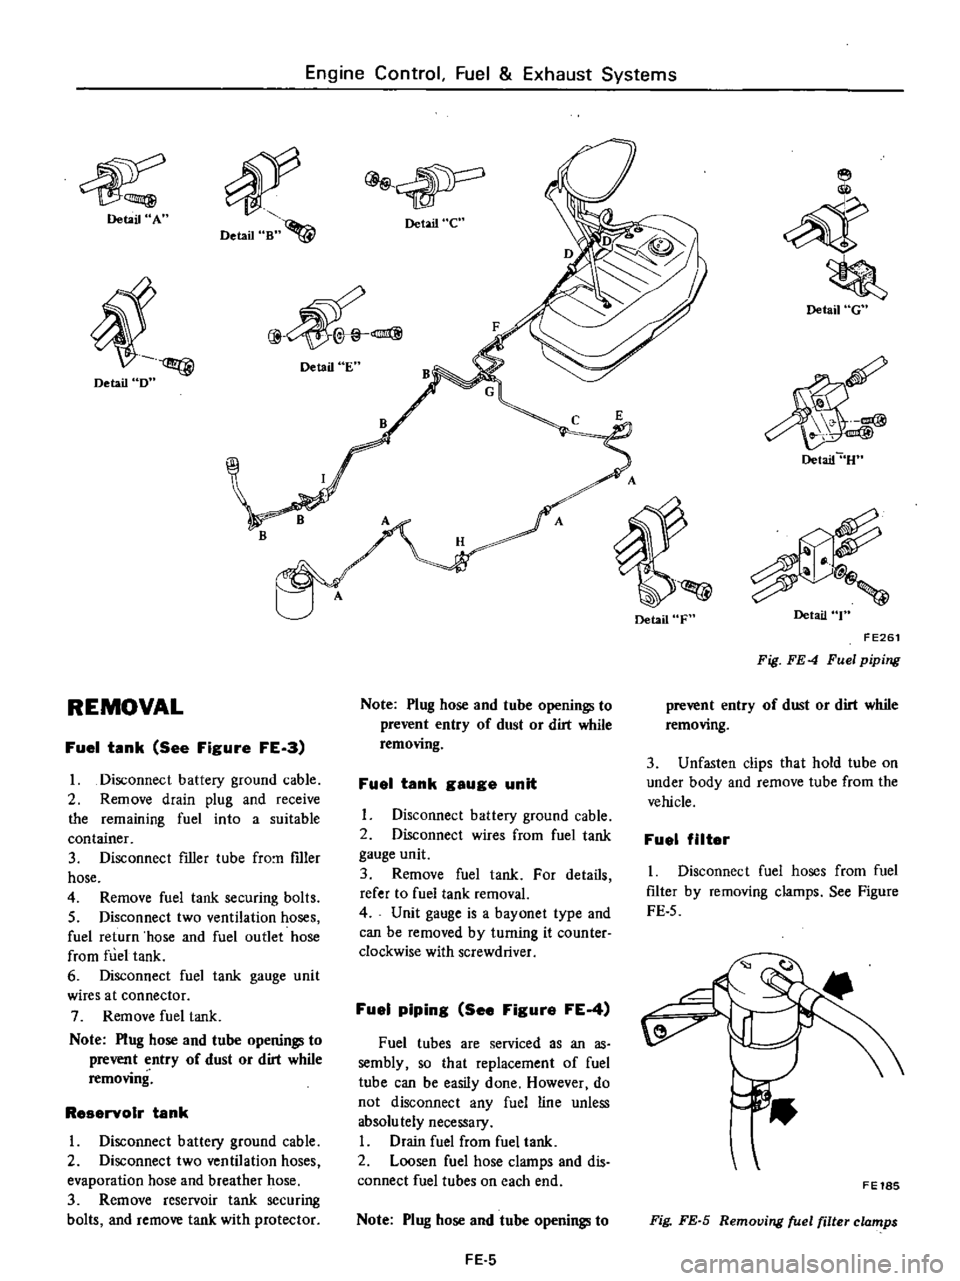
Fuel
piping
See
Figure
FE
4
Fuel
tubes
are
serviced
as
an
as
sembly
so
that
replacement
of
fuel
tube
can
be
easily
done
However
do
not
disconnect
any
fuel
line
unless
absolu
tely
necessary
I
Drain
fuel
from
fuel
tank
2
Loosen
fuel
hose
clamps
and
dis
connect
fuel
tubes
on
each
end
Note
Plug
hose
and
tube
openings
to
FE
5
Detail
F
Detail
G
Detail
U
Detail
T
FE261
Fig
FE
4
Fuel
piping
prevent
entry
of
dust
or
dirt
while
removing
3
Unfasten
clips
that
hold
tube
on
under
body
and
remove
tube
from
the
vehicle
Fuel
filter
I
Disconnect
fuel
hoses
from
fuel
filter
by
removing
clamps
See
Figure
FE
5
FE18S
Fig
FE
S
Removing
fuel
filter
clamps
Page 421 of 537
Engine
Control
Fuel
Exhaust
Systems
2
Remove
fuel
filter
INSPECTION
Fuel
tanle
Check
fuel
tank
for
cracks
or
deformation
If
necessary
replace
2
Fuel
hose
Inspect
all
hoses
for
cracks
fatigue
sweating
or
deterioration
Replace
any
hose
that
is
damaged
3
Fuel
tube
Replace
any
fuel
tube
that
is
crack
ed
rusted
collapsed
or
deformed
Note
Inspect
hoses
and
tubes
ac
cording
to
the
periodic
mainte
nance
schedule
4
Fuel
filter
Replace
fuel
filter
according
to
the
periodic
maintenance
schedule
or
when
it
is
clogged
or
restricted
DESCRIPTION
REMOVAL
DESCRIPTION
The
exhaust
systems
installed
on
the
non
California
models
differ
in
specifications
from
those
installed
on
the
California
models
Fuel
filter
is
of
a
cartridge
type
and
cannot
be
cleaned
Always
replace
with
a
new
one
5
Fuel
tank
gauge
unit
Check
gauge
unit
for
rust
deforma
tion
or
deterioration
If
necessary
replace
INSTALLATION
To
install
reverse
the
order
of
removal
Observe
the
following
I
Install
hose
clamps
securely
Do
not
tighten
excessively
to
avoid
damaging
hoses
2
Fasten
clips
holding
fuel
tube
on
under
body
securely
Failure
to
follow
this
caution
could
result
in
damage
to
the
surface
of
fuel
tube
3
Do
not
kink
or
twist
hose
and
tube
when
they
are
routed
EXHAUST
SYSTEM
CONTENTS
FE
6
FE
8
INSPECTION
INSTAllATION
Non
California
models
The
exhaust
system
consists
of
a
front
exhaust
tube
a
main
muffler
assembly
with
rear
tube
mounting
hangers
brackets
and
a
heat
insulator
FE
6
4
Install
fIller
hose
after
fuel
tank
has
been
mounted
in
place
Failure
to
follow
this
caution
could
result
in
leakage
from
around
hose
connections
5
When
installing
fuel
tank
gauge
unit
align
the
projection
of
tank
gauge
unit
with
the
notch
in
fuel
tank
and
tighten
it
securely
Be
sure
to
install
gauge
unit
with
O
ring
in
place
6
Run
engine
and
check
for
leaks
at
connections
Tightening
torque
Drain
plug
5
0
to
6
0
kg
m
36
to
43
ft
Ib
Fuel
tank
securing
bolt
0
8
to
1
I
kg
m
6
to
8
ft
Ib
Reservoir
tank
securing
bolt
032
to
0
44
kg
m
2
to
3
ft
Ib
FE
8
FE
8
California
models
The
exhaust
system
cOllsists
of
a
front
exhaust
tube
a
catalytic
conver
ter
assembly
a
center
tube
a
main
muffler
assembly
with
rear
tube
mounting
hangers
brackets
and
heat
insulators
The
catalytic
converter
is
COD
nected
to
the
front
tube
and
the
center
tube
with
bolts
and
nuts
Page 428 of 537
CAB
BODY
Body
Frame
Ist
mounting
2nd
mounting
1
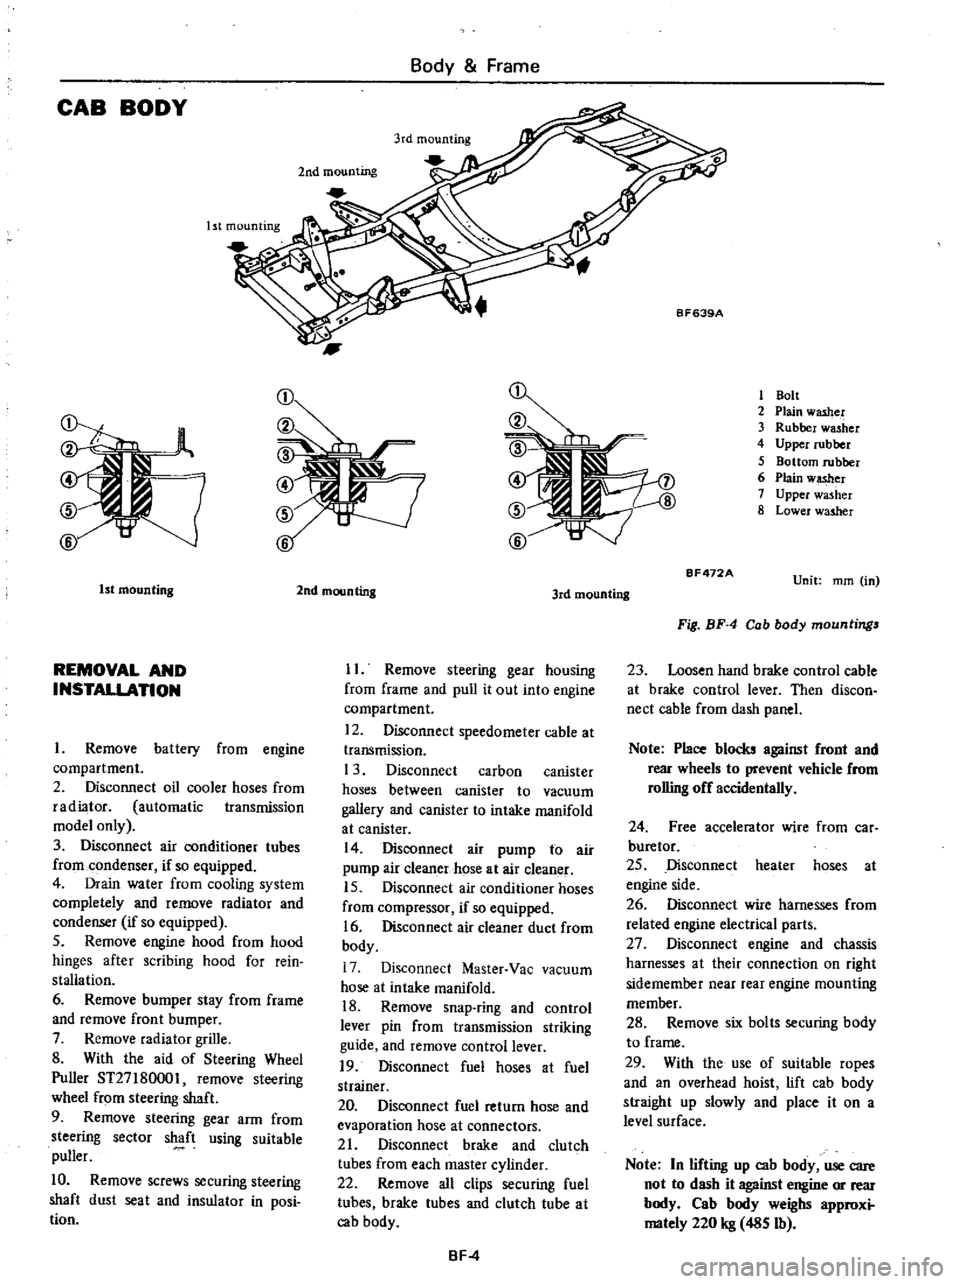
Bolt
2
Plain
washer
3
Rubber
washer
4
Upper
rubber
5
Bottom
rubber
6
Plain
w
er
7
Upper
washer
8
Lower
washer
1st
mounting
REMOVAL
AND
INSTALLATION
Remove
battery
from
engine
compartment
2
Disconnect
oil
cooler
hoses
from
radiator
automatic
transmission
model
only
3
Disconnect
air
conditioner
tubes
from
condenser
if
so
equipped
4
Drain
water
from
cooling
system
completely
and
remove
radiator
and
condenser
if
so
equipped
5
Remove
engine
hood
from
hood
hinges
after
scribing
hood
for
rein
stallation
6
Remove
bumper
stay
from
frame
and
remove
front
bumper
7
Remove
radiator
grille
8
With
the
aid
of
Steering
Wheel
Puller
ST27
180001
remove
steering
wheel
from
steering
shaft
9
Remove
steering
gear
arm
from
steering
sector
shaft
using
suitable
puller
10
Remove
screws
securing
steering
shaft
dust
seat
and
insulator
in
posi
tion
2nd
mounting
3rd
mounting
II
Remove
steering
gear
housing
from
frame
and
pull
it
out
into
engine
compartment
12
Disconnect
speedometer
cable
at
transmission
1
3
Disconnect
carbon
canister
hoses
between
canister
to
vacuum
gallery
and
canister
to
intake
manifold
at
canister
14
Disconnect
air
pump
to
air
pump
air
cleaner
hose
at
air
cleaner
15
Disconnect
air
conditioner
hoses
from
compressor
if
so
equipped
16
Disconnect
air
cleaner
duct
from
body
17
Disconnect
Master
Vac
vacuum
hose
at
intake
manifold
18
Remove
snap
ring
and
control
lever
pin
from
transmission
striking
guide
and
remove
control
lever
19
Disconnect
fuel
hoses
at
fuel
strainer
20
Disconnect
fuel
return
hose
and
evaporation
hose
at
connectors
21
Disconnect
brake
and
clutch
tubes
from
each
master
cylinder
22
Remove
all
clips
securing
fuel
tubes
brake
tubes
and
clutch
tube
at
cab
body
BF
4
BF472A
Unit
mm
in
Fig
BF
4
Cab
body
mountings
23
Loosen
hand
brake
control
cable
at
brake
control
lever
Then
discon
nect
cable
from
dash
panel
Note
Place
blocks
against
front
and
rear
wheels
to
prevent
vehicle
from
rolling
off
accidentally
24
Free
accelerator
wire
from
car
buretor
25
Disconnect
heater
hoses
at
engine
side
26
Disconnect
wire
harnesses
from
related
engine
electrical
parts
27
Disconnect
engine
and
chassis
harnesses
at
their
connection
on
right
sidemember
near
rear
engine
mounting
member
28
Remove
six
bolts
securing
body
to
frame
29
With
the
use
of
suitable
ropes
and
an
overhead
hoist
lift
cab
body
straight
up
slowly
and
place
it
on
a
level
surface
Note
In
lifting
up
cab
body
use
care
not
to
dash
it
against
engine
or
rear
body
Cab
body
weighs
approxi
mately
220
kg
485
Ib
Page 432 of 537
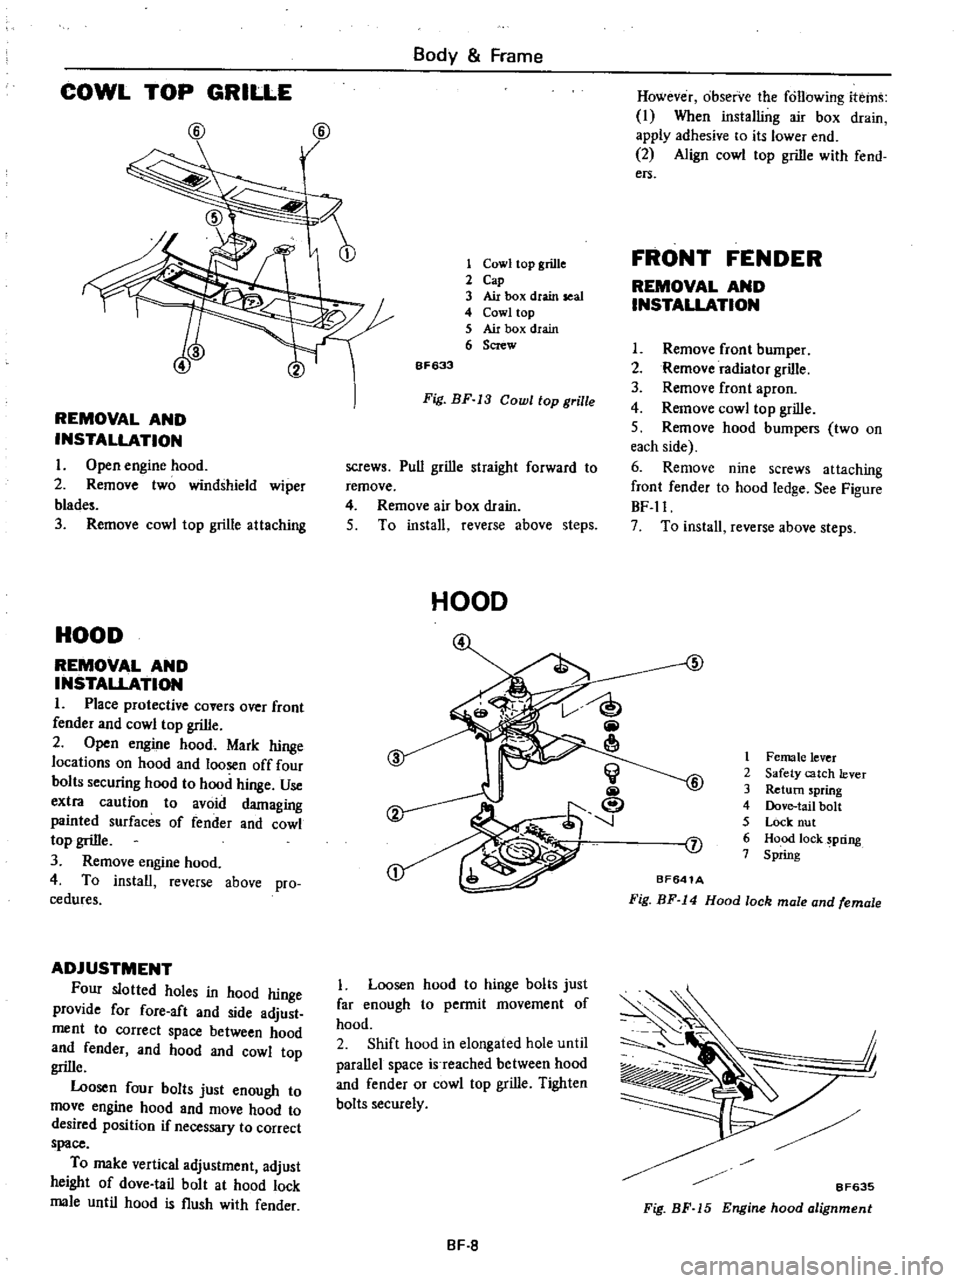
COWL
TOP
GRILLE
@
@
REMOVAL
AND
INSTALLATION
I
Open
engine
hood
2
Remove
two
windshield
wiper
blad
3
Remove
cowl
top
grille
attaching
HOOD
REMOVAL
AND
INSTALLATION
1
Place
protective
covers
over
front
fender
and
cowl
top
grille
2
Open
engine
hood
Mark
hinge
locations
on
hood
and
loosen
off
four
bolts
securing
hood
to
hood
hinge
Use
extra
caution
to
avoid
damaging
painted
surfaces
of
fender
and
cowl
top
grille
3
Remove
engine
hood
4
To
install
reverse
above
pro
cedures
ADJUSTMENT
Four
slotted
holes
in
hood
hinge
provide
for
fore
aft
and
side
adjust
ment
to
correct
space
between
hood
and
fender
and
hood
and
cowl
top
grille
Loosen
four
bolts
just
enough
to
move
engine
hood
and
move
hood
to
desired
position
if
necessary
to
correct
space
To
make
vertical
adjustment
adjust
height
of
dove
tail
bolt
at
hood
lock
male
until
hood
is
flush
with
fender
Body
Frame
1
Cowl
top
grille
2
Cap
3
Air
box
dtain
seal
4
Cowl
top
5
Air
box
drain
6
Screw
6F633
Fig
BF
13
Cowl
top
grille
screws
Pull
grille
straight
forward
to
remove
4
Remove
air
box
drain
5
To
install
reverse
above
steps
HOOD
Loosen
hood
to
hinge
bolts
just
far
enough
to
permit
movement
of
hood
2
Shift
hood
in
elongated
hole
until
parallel
space
is
reached
between
hood
and
fender
or
cowl
top
grille
Tighten
bolts
securely
BF
8
However
observe
the
following
items
I
When
installing
air
box
drain
apply
adhesive
to
its
lower
end
2
Align
cowl
top
grille
with
fend
ers
FRONT
FENDER
REMOVAL
AND
INSTALLATION
I
Remove
front
bumper
2
Remove
radiator
grille
3
Remove
front
apron
4
Remove
cowl
top
grille
S
Remove
hood
bumpers
two
on
each
side
6
Remove
nine
screws
attaching
front
fender
to
hood
ledge
See
Figure
BF
ll
7
To
install
reverse
above
steps
5
1
Female
lever
2
Safety
catch
lever
3
Return
spring
4
Dove
tail
bolt
S
Lock
nut
6
Hood
lock
pring
7
Spring
J
BF641A
Fig
BF
14
Hood
lock
male
and
female
j
I
8F635
Fig
BF
15
Engine
hood
alignment
Page 474 of 537
HEATER
UNIT
ASSEMBLY
Removal
L
Disconnect
battery
ground
cable
2
Drain
engine
coolant
3
Remove
defroster
hoses
4
Remove
three
cable
retaining
clips
and
disconnect
control
cables
from
valves
and
water
cock
5
Disconnect
two
fan
motor
lead
wires
from
each
connector
6
Disconnect
two
resistor
lead
wires
from
each
connector
7
Disconnect
water
hoses
from
core
and
water
cock
8
Remove
three
heater
housing
mounting
bolts
and
dismount
heater
unit
from
vehicle
Installation
1
Position
heater
unit
under
instru
ment
panel
and
install
three
heater
unit
securing
bolts
2
Install
water
hoses
3
Position
heater
control
cables
to
room
valve
air
intake
valve
and
water
cock
4
Adjust
control
cable
length
for
proper
operation
as
outlined
in
Adjust
ment
5
Connect
fan
motor
wires
and
resistance
wires
to
each
connector
plug
6
Install
defroster
hoses
7
Connect
battery
ground
cable
8
Fill
cooling
systeIT
9
Run
engine
at
2
000
rpm
with
AIR
lever
in
the
HOT
position
Make
sure
that
engine
coolant
is
fIlled
up
to
correct
level
HEATER
CORE
Removal
and
installation
L
Drain
engine
coolant
2
Remove
defroster
hoses
3
Disconnect
water
hoses
from
inlet
and
outlet
pipes
of
heater
core
4
Remove
four
clips
and
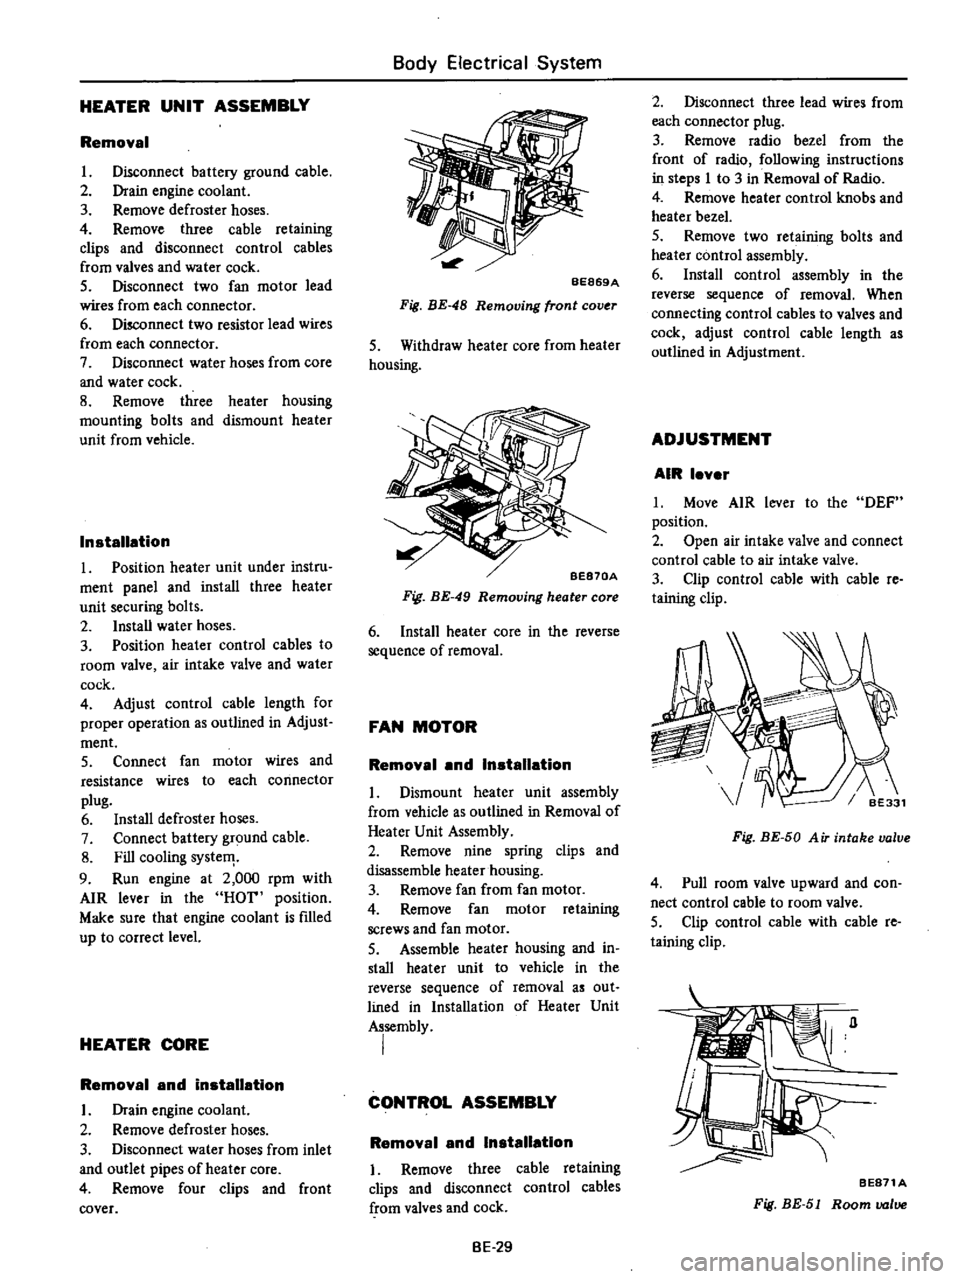
front
cover
Body
Electrical
System
BE869A
Fig
BE
48
Removing
front
cov
r
S
Withdraw
heater
core
from
heater
housing
BE870A
Fig
BE
49
Removing
heater
core
6
Install
heater
core
in
the
reverse
sequence
of
removal
FAN
MOTOR
Removal
and
Installation
L
Dismount
heater
unit
assembly
from
vehicle
as
outlined
in
Removal
of
Heater
Unit
Assembly
2
Remove
nine
spring
clips
and
disassemble
heater
housing
3
Remove
fan
from
fan
motor
4
Remove
fan
motor
retaining
screws
and
fan
motor
S
Assemble
heater
housing
and
in
stall
heater
unit
to
vehicle
in
the
reverse
sequence
of
removal
as
out
lined
in
Installation
of
Heater
Unit
Assembly
I
CONTROL
ASSEMBLY
Removal
and
Installation
I
Remove
three
cable
retaining
clips
and
disconnect
control
cables
from
valves
and
cock
BE
29
2
Disconnect
three
lead
wires
from
each
connector
plug
3
Remove
radio
bezel
from
the
front
of
radio
following
instructions
in
steps
I
to
3
in
Removal
of
Radio
4
Remove
heater
control
knobs
and
heater
bezel
5
Remove
two
retaining
bolts
and
heater
control
assembly
6
Install
control
assembly
in
the
reverse
sequence
of
removal
When
connecting
control
cables
to
valves
and
cock
adjust
control
cable
length
as
outlined
in
Adjustment
ADJUSTMENT
AIR
lever
L
Move
AIR
lever
to
the
DEF
position
2
Open
air
intake
valve
and
connect
control
cable
to
air
intake
valve
3
Clip
control
cable
with
cable
re
taining
clip
Fig
BE
50
A
iT
intake
valve
4
Pull
room
valve
upward
and
con
nect
control
cable
to
room
valve
5
Clip
control
cable
with
cable
re
taining
clip
BE871A
Fig
BE
51
Room
valve