check engine DATSUN PICK-UP 1977 Manual Online
[x] Cancel search | Manufacturer: DATSUN, Model Year: 1977, Model line: PICK-UP, Model: DATSUN PICK-UP 1977Pages: 537, PDF Size: 35.48 MB
Page 155 of 537
j
EC231
Thermal
vacuum
valva
o
o
m
Emission
Control
System
0
o
o
o
l
l
@
The
thermal
vacuum
valve
is
mounted
in
the
engine
thermostat
housing
It
detects
engine
coolan
t
tem
perature
by
means
of
a
built
in
bi
metal
and
opensor
closes
the
vacuum
passage
in
the
thermal
vacuum
valve
mt
li
t
00
t
EC232
Fig
EC
54
Thennal
vacuum
valve
To
E
G
R
control
valve
From
carburetor
1
Spring
2
Bi
metal
3
O
ring
E
G
R
warning
system
The
E
G
R
warning
system
install
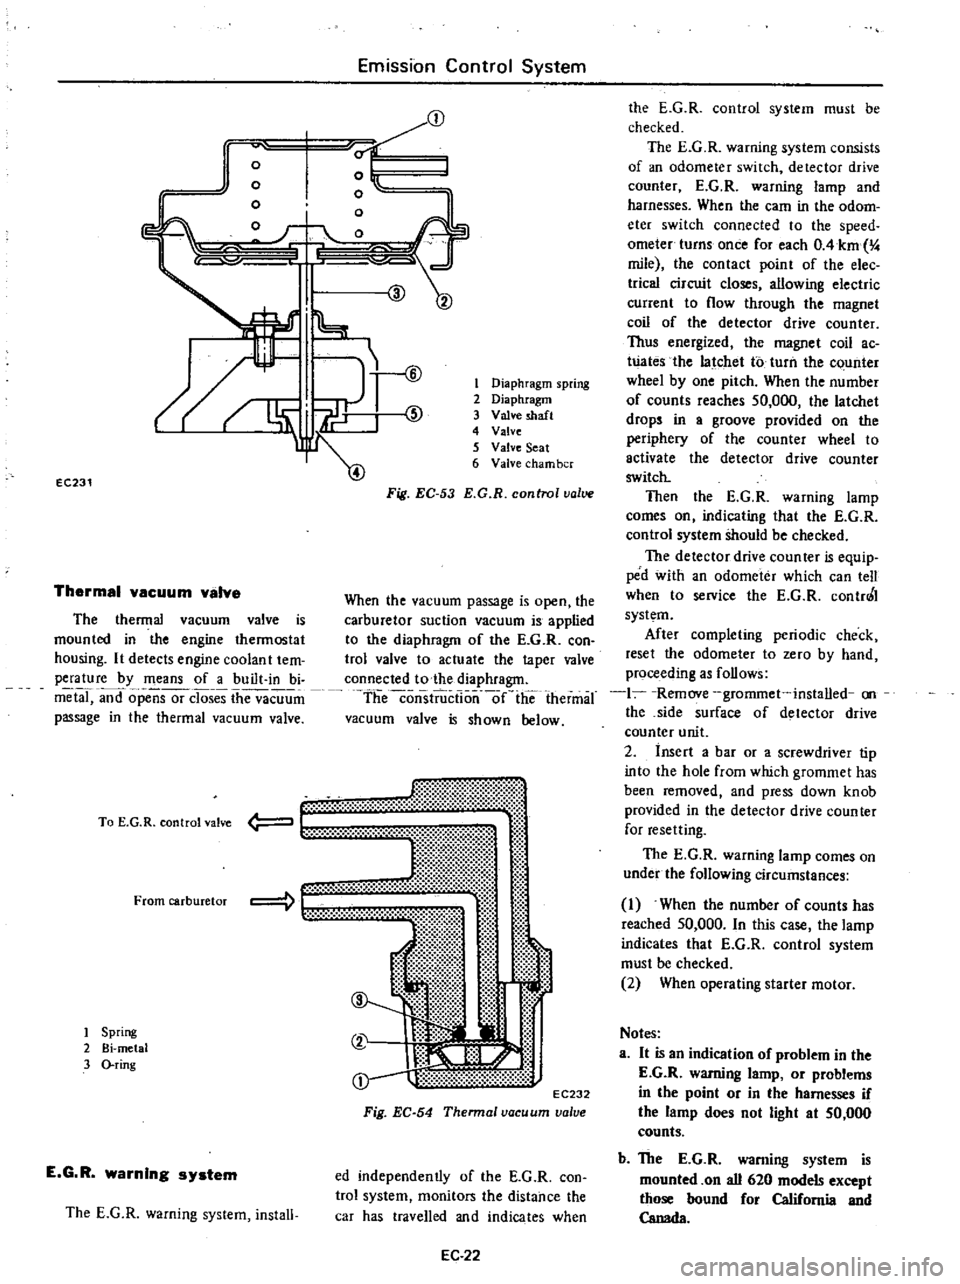
1
Diaphragm
spring
2
Diaphragm
3
Valve
shaft
4
Valve
5
Valve
Seat
6
Valve
cham
ber
Fig
EC
53
E
G
R
control
value
When
the
vacuum
passage
is
open
the
carburetor
suction
vacuum
is
applied
to
the
diaphragm
of
the
E
G
R
con
trol
valve
to
actuate
the
taper
valve
connected
to
the
diaphragm
theconsiiiictlo
nlie
thermal
vacuum
valve
is
shown
below
ed
independently
of
the
E
G
R
con
trol
system
monitors
the
distance
the
car
has
travelled
and
indicates
when
EC
22
the
E
G
R
control
system
must
be
checked
The
E
G
R
warning
system
consists
of
an
odometer
switch
detector
drive
counter
E
G
R
warning
lamp
and
harnesses
When
the
earn
in
the
odom
eter
switch
connected
to
the
speed
ometer
turns
once
for
each
OAkm
4
mile
the
contact
point
of
the
elec
trica
circuit
closes
allowing
electric
current
to
flow
through
the
magnet
coil
of
the
detector
drive
counter
Thus
energized
the
magnet
coil
ac
Wates
the
latchet
to
turn
the
c
unter
wheel
by
one
pitch
When
the
number
of
counts
reaches
50
000
the
latchet
drops
in
a
groove
provided
on
the
periphery
of
the
counter
wheel
to
activate
the
detector
drive
counter
switch
Then
the
E
G
R
warning
lamp
comes
on
indicating
that
the
E
G
R
control
system
Should
be
checked
The
detector
drive
coun
teT
is
equip
ped
with
an
odometer
which
can
tell
when
to
service
the
E
G
R
contr0
I
system
After
completing
periodic
check
reset
the
odometer
to
zero
by
hand
proceeding
as
follows
1
Remove
grommet
installed
on
the
side
surface
of
detector
drive
counter
unit
2
insert
a
bar
or
a
screwdriver
tip
into
the
hole
from
which
grommet
has
been
removed
and
press
down
knob
provided
in
the
detector
drive
counter
for
resetting
The
E
G
R
warning
lamp
comes
on
under
the
following
circumstances
1
When
the
number
of
counts
has
reached
50
000
In
this
case
the
lamp
indicates
that
E
G
R
control
system
must
be
checked
2
When
operating
starter
motor
Notes
a
It
is
an
indication
of
problem
in
the
E
G
R
warning
lamp
or
problems
in
the
point
or
in
the
harnesses
if
the
lamp
does
not
light
at
50
000
counts
b
The
E
G
R
warning
system
is
mounted
on
all
620
models
except
those
bound
for
California
and
Canada
Page 157 of 537
4
E
G
R
warning
system
EC251
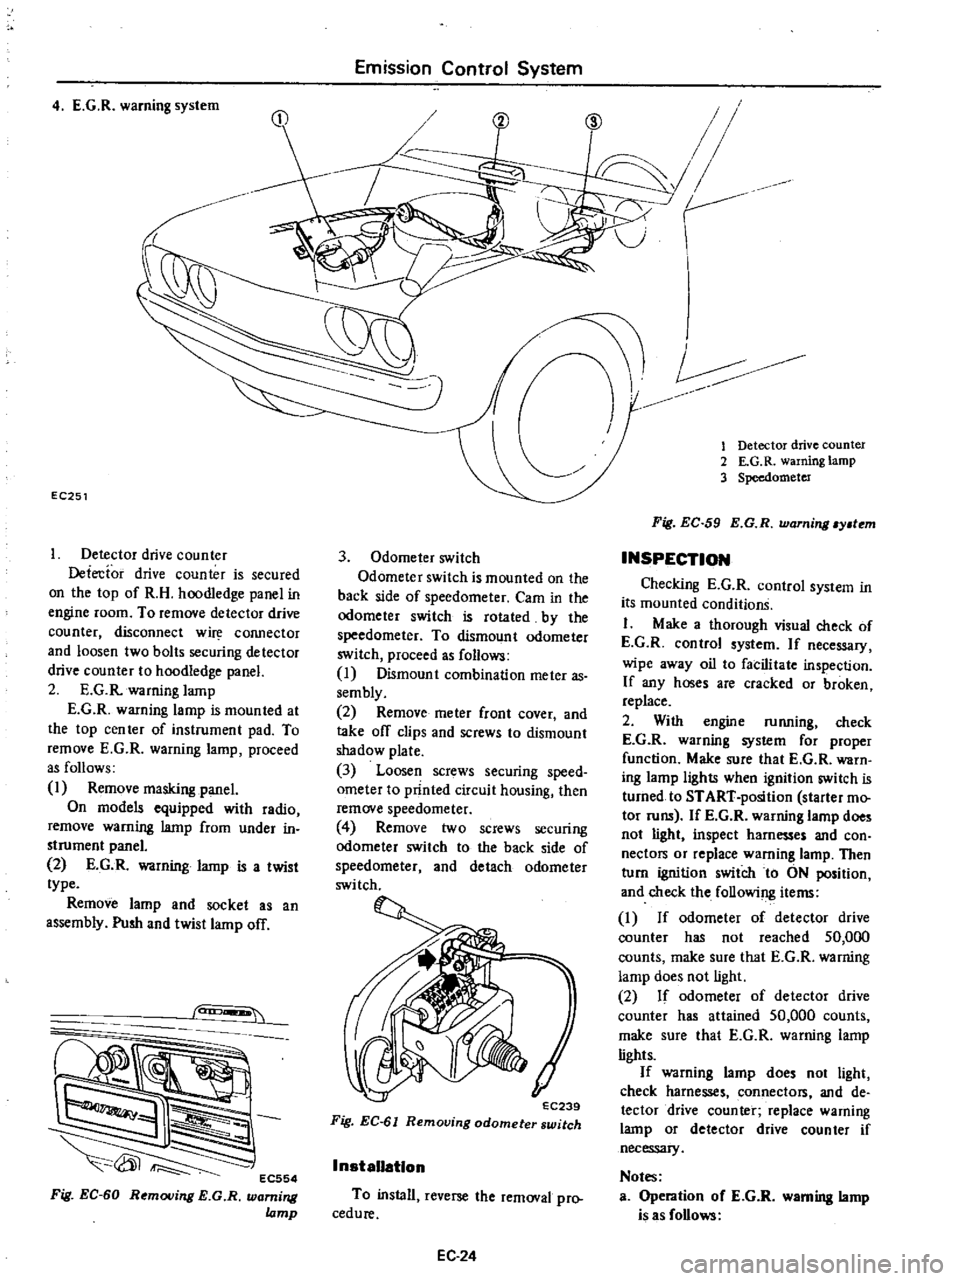
Detector
drive
counter
Detecfor
drive
counter
is
secured
on
the
top
of
R
H
hoodledge
panel
in
engine
room
To
remove
detector
drive
counter
disconnect
w
COJUlector
and
loosen
two
bolts
securing
detector
drive
counter
to
hoodledge
panel
2
E
G
R
warning
lamp
E
G
R
warning
lamp
is
mounted
at
the
top
cen
ter
of
instrument
pad
To
remove
E
G
R
warning
lamp
proceed
as
follows
1
Remove
masking
panel
On
models
equipped
with
radio
remove
warning
lamp
from
under
in
strument
panel
2
E
G
R
warning
lamp
is
a
twist
type
Remove
lamp
and
socket
as
an
assembly
Push
and
twist
lamp
off
can
EC554
Fig
EC
60
Removing
E
G
R
warning
lamp
Emission
Control
System
3
Odometer
switch
Odometer
switch
is
mounted
on
the
back
side
of
speedometer
Cam
in
the
odometer
switch
is
rotated
by
the
speedometer
To
dismount
odometer
switch
proceed
as
follows
I
Dismount
combination
meter
as
sembly
2
Remove
meter
front
cover
and
take
off
clips
and
screws
to
dismount
shadow
plate
3
Loosen
screws
securing
speed
ometer
to
printed
circuit
housing
then
remove
speedometer
4
Remove
two
screws
securing
odomete
switch
to
the
back
side
of
speedometer
and
detach
odometer
switch
EC239
Fig
EC
61
Removing
odometer
switch
InstaUatlon
To
install
reverse
the
removal
pro
cedure
EC24
V
r
CID
1
Detector
drive
counter
2
E
G
R
warning
lamp
3
Speedometer
Fig
EC
59
E
G
R
warning
y
tem
INSPECTION
Checking
E
G
R
control
system
in
its
mounted
conditionS
I
Make
a
thorough
visual
check
of
E
G
R
control
system
If
necessary
wipe
away
oil
to
facilitate
inspection
If
any
hoses
are
cracked
or
broken
replace
2
With
engine
running
check
E
G
R
warning
system
for
proper
function
Make
sure
that
E
G
R
warn
ing
lamp
lights
when
ignition
switch
is
turned
to
START
position
starter
mo
tor
runs
If
E
G
R
wanung
lamp
does
not
light
inspect
harnesses
and
con
nectors
or
replace
warning
lamp
Then
turn
ignition
switch
to
ON
position
and
check
the
following
items
I
If
odometer
of
detector
drive
counter
has
not
reached
50
000
counts
make
sure
that
E
G
R
warning
lamp
does
not
light
2
If
odomete
of
detector
drive
counter
has
attained
50
000
counts
make
sure
that
E
G
R
warning
lamp
lights
If
warning
lamp
does
not
light
check
harnesses
connectors
and
de
tector
drive
counter
replace
warning
lamp
or
detector
drive
counter
if
necessary
Notes
Operation
oC
E
G
R
warning
lamp
is
as
Collows
Page 158 of 537
Ignition
Switch
Position
START
Detector
Drive
Counter
E
G
R
Warning
Lamp
ON
b
After
completing
inspection
of
E
G
R
control
system
be
sure
to
reset
odometer
of
detector
drive
counter
to
zero
c
This
item
applies
to
all
620
models
except
those
bound
for
California
and
Canada
3
With
engine
stopped
inspect
E
G
R
control
valve
for
any
indication
of
binding
or
sticking
by
moving
dia
phragm
of
control
valve
upwards
with
a
finger
2
When
engine
coolant
tempera
ture
is
high
I
Make
sure
that
E
G
R
control
valve
operates
when
engine
speed
is
in
creased
from
idling
to
3
000
to
3
500
rpm
Place
a
fmger
on
the
diaphragm
of
E
G
R
control
valve
to
check
for
valve
operation
2
If
E
G
R
control
valve
does
not
operate
check
as
follows
Disconnect
one
end
E
G
R
control
valve
side
of
vacuum
hose
connect
ing
thermal
vacuum
valve
to
E
G
R
Emission
Control
System
ON
Below
50
000
counts
Above
50
000
counts
OFF
ON
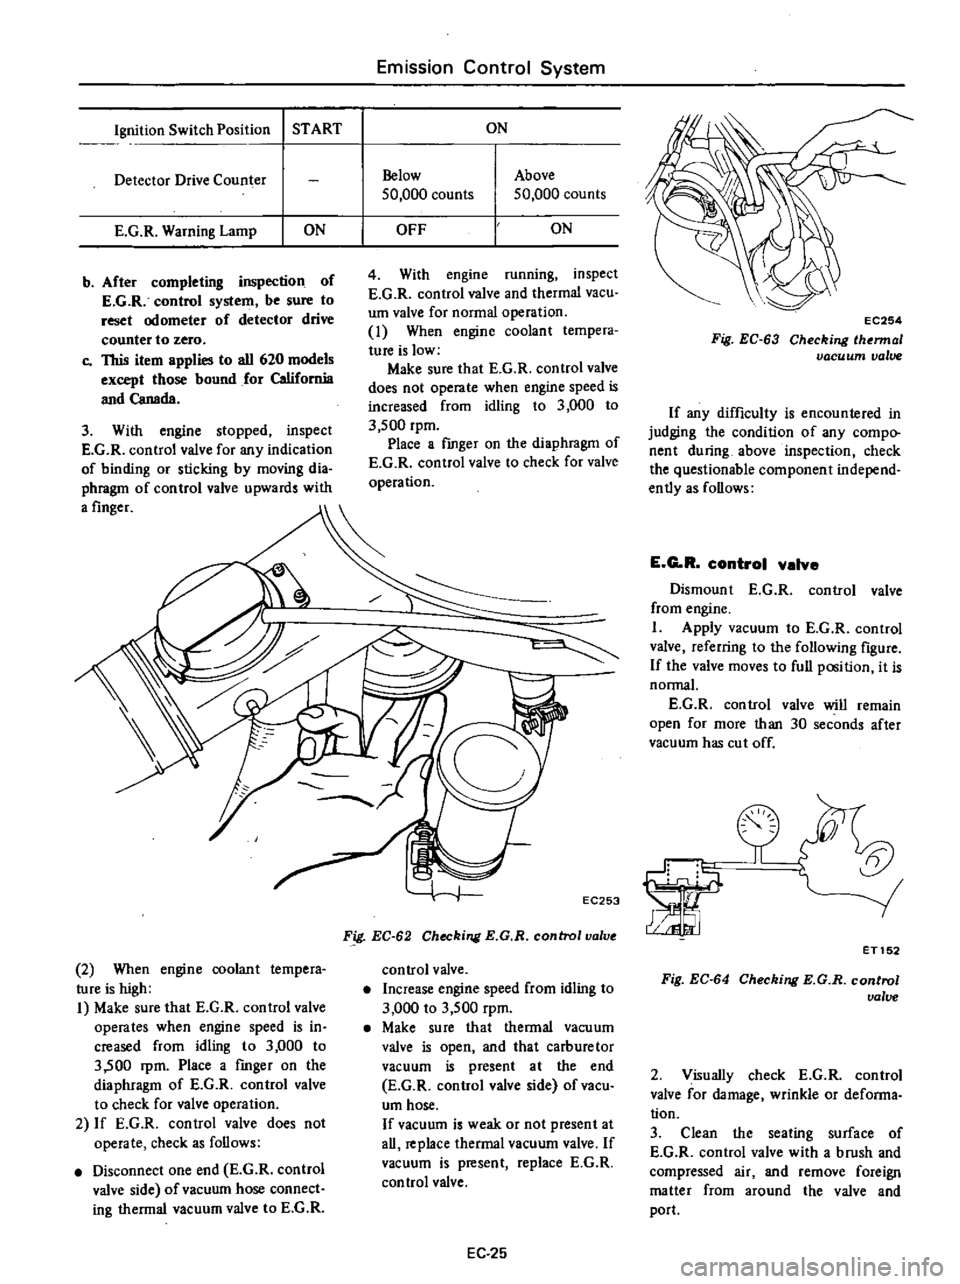
4
With
engine
running
inspect
E
G
R
control
valve
and
thermal
vacuo
um
valve
for
normal
operation
1
When
engine
coolant
tempera
ture
is
low
Make
sure
that
E
G
R
control
valve
does
not
operate
when
engine
speed
is
increased
from
idling
to
3
000
to
3
500
rpm
Place
a
fmger
on
the
diaphragm
of
E
G
R
control
valve
to
check
for
valve
operation
EC253
Fig
EC
62
Checking
E
G
R
control
valve
control
valve
Increase
engine
speed
from
idling
to
3
000
to
3
500
rpm
Make
su
re
that
thermal
vacu
um
valve
is
open
and
that
carburetor
vacuum
is
present
at
the
end
E
G
R
control
valve
side
of
vacu
um
hose
If
vacuum
is
weak
or
not
present
at
all
replace
thermal
vacuum
valve
If
vacuum
is
present
replace
E
G
R
control
valve
EC
25
EC254
Fig
EC
63
Checking
lhermal
vacuum
valve
If
any
difficulty
is
encountered
in
judging
the
condition
of
any
compo
nent
during
above
inspection
check
the
questionable
component
independ
ently
as
follows
E
G
R
control
valve
Dismount
E
G
R
control
valve
from
engine
I
Apply
vacuum
to
E
G
R
control
valve
referring
to
the
following
figure
If
the
valve
moves
to
full
position
it
is
normal
E
G
R
control
valve
will
remain
open
for
more
than
30
seconds
after
vacuum
has
cut
off
la
ET152
Fig
EC
64
Checking
E
G
R
control
ualue
2
Visually
check
E
G
R
control
valve
for
damage
wrinkle
or
defonna
tion
3
Clean
the
seating
surface
of
E
G
R
control
valve
with
a
brush
and
compressed
air
and
remove
foreign
matter
from
around
the
valve
and
port
Page 159 of 537
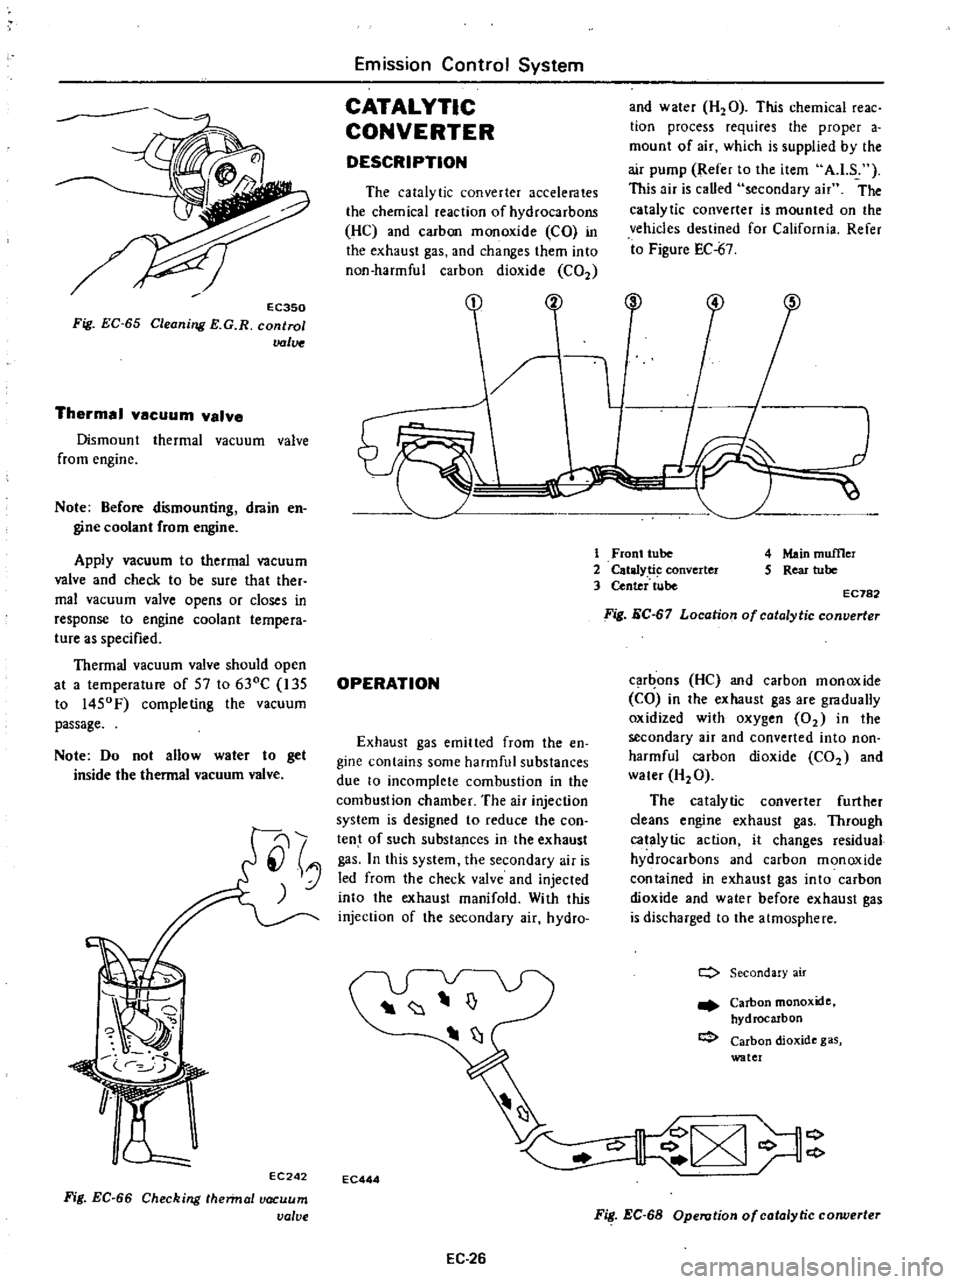
EC350
Fig
EC
65
Cleaning
E
G
R
control
valve
Thermal
vacuum
valve
Dismount
thermal
vacuum
valve
from
engine
Note
Before
dismounting
drain
en
gine
coolant
from
engine
Apply
vacuum
to
thermal
vacuum
valve
and
check
to
be
sure
thaI
ther
mal
vacuum
valve
opens
or
closes
in
response
to
engine
coolant
tempera
ture
as
specified
Thermal
vacuum
valve
should
open
at
a
temperature
of
57
to
630C
135
to
1450F
completing
the
vacuum
passage
Note
Do
not
allow
water
to
get
inside
the
thermal
vacuum
valve
EC242
Fig
EC
66
Checking
hennal
vacuum
valve
Emission
Control
System
CATALYTIC
CONVERTER
DESCRIPTION
The
catalytic
converter
accelerates
the
chemical
reaction
of
hydrocarbons
HC
and
carbon
monoxide
CO
in
the
exhaust
gas
and
changes
them
into
non
harmful
carbon
dioxide
C02
OPERATION
Exhaust
gas
emitted
from
the
en
gine
contains
some
harmful
substances
due
to
incomplete
combustion
in
the
combustion
chamber
The
air
injection
system
is
designed
to
reduce
the
con
tent
of
such
substances
in
the
exhaust
gas
In
this
system
the
secondary
air
is
led
from
the
check
valve
and
injected
into
the
exhaust
manifold
With
this
injection
of
the
secondary
air
hydro
EC444
EC
26
and
water
H20
This
chemical
reac
tion
process
requires
the
proper
a
mount
of
air
which
is
supplied
by
the
air
pump
Refer
to
the
item
AJ
S
This
air
is
caUed
secondary
air
The
catalytic
converter
is
mounted
on
the
vehicles
destined
for
California
Refer
to
Figure
EC
67
3
4
1
Front
tube
2
Catalyti
converter
3
Center
tube
4
Main
muffler
5
Rear
tube
EC782
Fig
EC
67
Location
of
catalytic
converter
car
ons
He
and
carbon
monoxide
CO
in
the
exhaust
gas
are
gradually
oxidized
with
oxygen
02
in
the
secondary
air
and
converted
into
non
harmful
carbon
dioxide
C02
and
water
H20
The
catalytic
converter
further
cleans
engine
exhaust
gas
Through
catalytic
action
it
changes
residual
hydrocarbons
and
carbon
monoxide
contained
in
exhaust
gas
into
carbon
dioxide
and
water
before
exhaust
gas
is
discharged
to
the
atmosphere
c
Secondary
air
Carbon
monoxide
hydrocarbon
Carbon
dioxide
gas
water
F
EC
68
Operution
of
catalytic
corwerter
Page 160 of 537
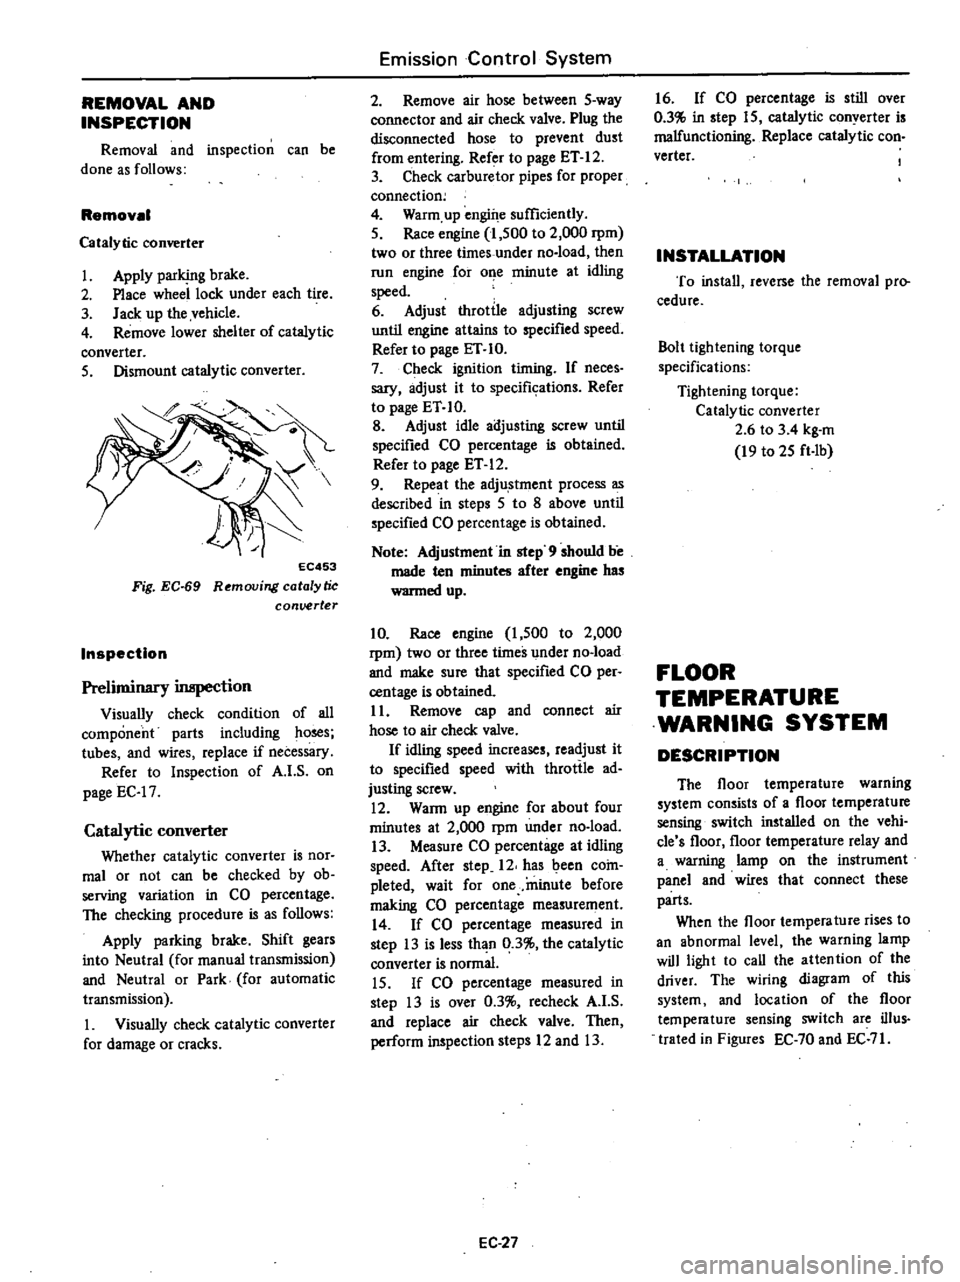
REMOVAL
AND
INSPECTION
Removal
and
inspection
can
be
done
as
follows
Removal
Catalytic
converter
1
Apply
parking
brake
2
Place
wheel
lock
under
each
tire
3
Jack
up
the
vehicle
4
Remove
lower
shelter
of
catalytic
converter
5
Dismount
catalytic
converter
EC453
Fig
EC
69
Removing
catalytic
conuerter
Inspection
Preliminary
inspection
Visually
check
condition
of
all
component
parts
including
ho
s
tubes
and
wires
replace
if
necessary
Refer
to
Inspection
of
A
I
S
on
page
EC
17
Catalytic
converter
Whether
catalytic
converter
is
nor
mal
or
not
can
be
checked
by
ob
serving
variation
in
CO
percentage
The
checking
procedure
is
as
follows
Apply
parking
brake
Shift
gears
into
Neutral
for
manual
transmission
and
Neutral
or
Park
for
automatic
transmission
1
Visually
check
catalytic
converter
for
damage
or
cracks
Emission
Control
System
2
Remove
air
hose
between
5
way
connector
and
air
check
valve
Plug
the
disconnected
hose
to
prevent
dust
from
entering
Refer
to
page
ET
12
3
Check
carburetor
pipes
for
proper
connection
4
Warm
up
engine
sufficiently
5
Race
engine
1
500
to
2
000
rpm
two
or
three
times
under
no
load
then
run
engine
for
o
e
minute
at
idling
speed
6
Adjust
throttle
adjusting
screw
until
engine
attains
to
specified
speed
Refer
to
page
ET
10
7
Check
ignition
timing
If
neces
sary
adjust
it
to
specifkations
Refer
to
page
ET
10
B
Adjust
idle
adjusting
screw
until
specified
CO
percentage
is
obtained
Refer
to
page
ET
12
9
Repeat
the
adju
stment
process
as
described
in
steps
5
to
8
above
until
specified
CO
percentage
is
obtained
Note
Adjustment
in
step
9
should
be
made
ten
minutes
after
engine
has
wanned
up
10
Race
engine
1
500
to
2
000
rpm
two
or
three
times
under
no
load
and
make
sure
that
specified
CO
per
centage
is
obtained
11
Remove
cap
and
connect
air
hose
to
air
check
valve
If
idling
speed
increases
readjust
it
to
specified
speed
with
throttle
ad
justing
screw
12
WaRn
up
engine
for
about
four
minutes
at
2
000
rpm
under
no
load
13
Measure
CO
percentage
at
idling
speed
After
step
12
has
been
coin
pleted
wait
for
one
minute
before
making
CO
percentage
measurement
14
If
CO
percentage
measured
in
step
13
is
less
than
0
3
the
catalytic
converter
is
normal
15
If
CO
percentage
measured
in
step
13
is
over
0
3
recheck
A
I
S
and
replace
air
check
valve
Then
perform
inspection
steps
12
and
13
EC
27
16
If
CO
percentage
is
still
over
0
3
in
step
15
catalytic
conyerter
is
malfunctioning
Replace
catalytic
con
verter
INSTALLATION
To
install
reverse
the
removal
pro
cedure
Bolt
lightening
torque
specifications
Tightening
torque
Catalytic
converter
2
6
to
3
4
kg
m
19
to
25
ft
Ib
FLOOR
TEMPERATURE
WARNING
SYSTEM
DESCRIPTION
The
floor
temperature
warning
system
consists
of
a
floor
temperature
sensing
switch
installed
on
the
vehi
cle
s
floor
floor
temperature
relay
and
a
warning
lamp
on
the
instrument
panel
and
wires
that
connect
these
parts
When
the
floor
tempera
ture
rises
to
an
abnormal
level
the
warning
lamp
will
light
to
call
the
attention
of
the
driver
The
wiring
diagram
of
this
system
and
location
of
the
floor
temperature
sensing
switch
are
ilIus
trated
in
Figures
EC
70
and
EC
71
Page 163 of 537

3
Check
ignition
system
with
regard
to
the
following
items
Refer
to
Inspection
of
Ignition
System
1
Ignition
AMP
2
Distributor
Emission
Control
System
3
Ignition
coil
4
High
tension
code
5
Spark
plug
4
Check
idle
CO
adjustment
Refer
to
Inspection
of
Idle
CO
Adjustment
Note
Even
if
there
is
nothing
wrong
with
engine
the
warning
lamp
may
come
on
if
vebicle
is
being
driven
on
a
steep
slope
continuously
in
lower
gears
at
high
engine
speeds
EVAPORATIVE
EMISSION
CONTROL
SYSTEM
CONTENTS
DESCRIPTION
OPERATION
INSPECTION
FUEL
TANK
VAPOR
LIQUID
SEPARATOR
AND
VAPOR
VENT
LINE
DESCRIPTION
The
evaporative
emission
control
system
is
used
to
reduce
hydrocarbons
emitted
to
the
atmosphere
from
the
fuel
system
This
reduction
of
hydro
EC
30
EC
30
EC
31
CARBON
CANISTER
PURGE
CONTROL
VALVE
CARBON
CANISTER
FILTER
FUEL
TANK
VACUUM
RELIEF
VALVE
IEC
32
IEC
32
EC
32
EC
31
carbons
is
accomplished
by
activated
charcoals
in
the
carbon
canister
This
system
is
made
up
to
the
following
I
Fuel
tank
with
positive
sealing
filler
cap
@
2
Vapor
liquid
separator
3
Vapor
vent
line
4
Carbon
canister
5
Vacuum
signal
line
6
Canister
purge
line
5
OPERATION
Fuel
vapors
from
the
sealed
fuel
tank
are
led
into
the
carbon
canister
1
Fuel
tank
2
Fuel
nIler
cap
with
vacuum
relief
valve
3
liquid
vapor
separator
4
Vapor
vent
line
5
Canister
purge
line
6
Vacuum
signal
line
7
Carbon
canister
EF274
Fig
EC
76
Schematic
drawing
of
l
Iaporotive
emiaion
control6ydem
The
canister
is
fined
with
activated
charcoals
to
absorb
the
fuel
vapors
EC
30
when
the
engirie
is
at
rest
or
at
idlin
ll
See
Figure
EC
77
Page 164 of 537
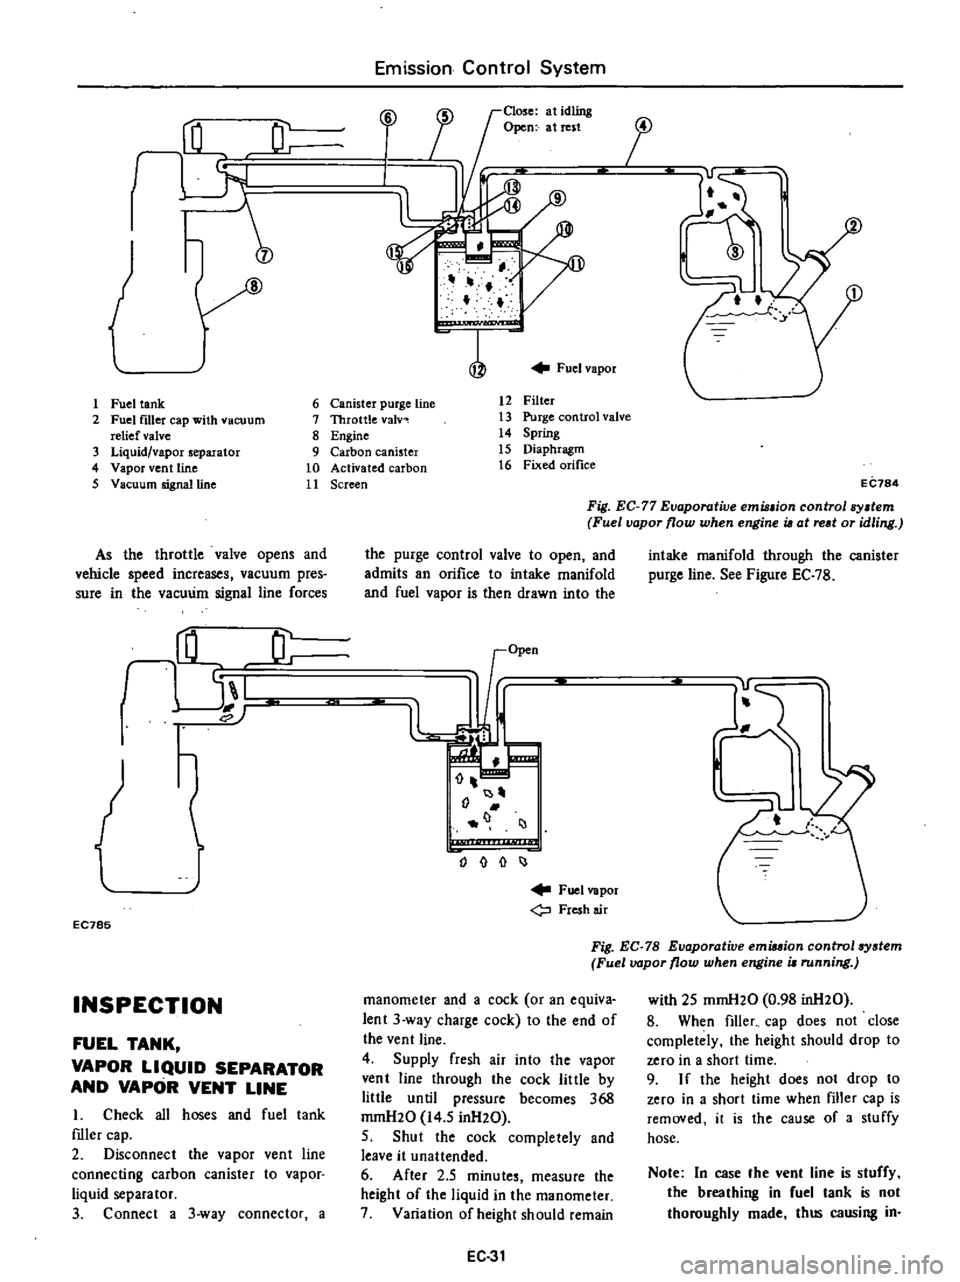
J
1
Fuel
tank
2
Fuel
f1l1er
cap
with
vacuum
relief
valve
3
Liquid
vapor
separator
4
Vapor
vent
line
5
Vacuum
signalUne
As
the
throttle
valve
opens
and
vehicle
speed
increases
vacuum
pres
sure
in
the
vacuum
signal
line
forces
rHL
JL
I
EC785
INSPECTION
FUEL
TANK
VAPOR
LIQUID
SEPARATOR
AND
VAPOR
VENT
LINE
I
Check
all
hoses
and
fuel
tank
mler
cap
2
Disconnect
the
vapor
vent
line
connecting
carbon
canister
to
vapor
liquid
separator
3
Connect
a
3
way
connector
a
Emission
Control
System
Close
at
idling
Open
at
rest
i
J
17
f
Fuel
vapor
6
Canister
purge
line
7
Throttle
valv
8
Engine
9
Carbon
canister
10
Activated
carbon
11
Screen
12
Filter
13
Purge
control
valve
14
Spring
15
Diaphragm
16
Fixed
orifice
i
j
EC784
Fig
EC
77
Evaporative
emu
ion
control
sy
tem
Fuel
vapor
flow
when
engine
i6
at
red
or
idling
the
purge
control
valve
to
open
and
admits
an
orifice
to
intake
manifold
and
fuel
vapor
is
then
drawn
into
the
I
J
o
I
Fuel
vapor
Fresh
air
intake
manifold
through
the
canister
purge
line
See
Figure
EC
7B
Fig
EC
78
Evaporative
emiuion
control
system
Fuel
vapor
flow
when
engine
i
running
manometer
and
a
cock
or
an
equiva
lent
3
way
charge
cock
to
the
end
of
the
vent
line
4
Supply
fresh
air
into
the
vapor
vent
line
through
the
cock
little
by
little
until
pressure
becomes
368
mrnH20
14
5
inH20
5
Shut
the
cock
completely
and
leave
it
unattended
6
After
2
5
minutes
measure
the
height
of
the
liquid
in
the
manometer
7
Variation
of
height
should
remain
EC
31
with
25
mmH20
0
98
inH20
8
When
filler
cap
does
not
close
completely
the
height
should
drop
to
zero
in
a
short
time
9
I
f
the
height
does
not
drop
to
zero
in
a
short
time
when
filler
cap
is
removed
it
is
the
cause
of
a
stuffy
hose
Note
In
case
the
vent
line
is
stuffy
the
breathing
in
fuel
tank
is
not
thoroughly
made
thus
causing
in
Page 165 of 537

sufficient
delivery
of
fuel
to
engine
or
vapor
lock
It
must
therefore
be
1
3
connectur
COCk
Air
Manometer
Emission
Control
System
repaired
or
replaced
368
mmH20
14
5
inH20
LL
IPO
liqUid
epo
o
36
r
@
Carbon
canister
EC786
Fig
EC
79
Checking
evaporative
emmion
control
syatem
CARBON
CANISTER
PURGE
CONTROL
VALVE
Check
for
fuel
vapor
leakage
in
the
distributor
vacuum
line
at
diaphragm
of
carbon
canister
purge
control
valve
To
check
for
leakage
proceed
as
follows
I
Disconnect
rubber
hose
in
the
line
between
T
connector
and
carbon
canister
at
T
connector
2
Inhale
air
into
the
opening
of
rubber
hose
running
to
vacuum
hole
in
carbon
canister
and
ensure
that
there
is
no
leak
ET349
Fig
EC
so
Checking
carbon
canuter
purge
control
valve
3
If
there
is
a
leak
remove
top
cover
from
purge
control
valve
and
check
for
dislocated
or
cracked
dia
phragm
If
necessary
replace
dia
phragm
kit
which
is
made
up
of
a
retainer
a
diaphragm
and
a
spring
@
@
1
Cover
2
Diaphragm
3
Retainer
4
Spring
ET350
Fig
EC
81
Carbon
catU
ter
purge
control
valve
CARBON
CANISTER
FILTER
Check
for
a
contaminated
element
Element
can
be
removed
at
the
bottom
of
canister
installed
on
vehicle
body
EC
32
ET37Q
Fig
EC
s2
Replacing
carbon
canuter
filter
FUEL
TANK
VACUUM
RELIEF
VALVE
Remove
fuel
filler
cap
and
see
it
functions
properly
I
Wipe
clean
valve
housing
and
have
it
in
your
mouth
2
Inhale
air
A
slight
resistance
ac
companied
by
valve
indicates
that
valve
is
in
good
mechanical
condition
Note
also
that
by
further
inhaling
air
the
resistance
should
be
disappeared
with
valve
clicks
3
If
valve
is
clogged
or
if
no
resist
ance
is
felt
replace
cap
as
an
assem
bled
uni
t
l
u
ET369
Fig
EC
83
Fuel
filler
cap
Page 169 of 537

REMOVAL
CHECKING
ELECTROLYTE
LEVEL
CHECKING
SPECIFIC
GRAVITY
REMOVAL
I
Disconnect
negative
and
positive
cables
2
Remove
nuts
from
battery
clamps
take
off
clamps
3
Remove
battery
CHECKING
ELECTROLYTE
LEVEL
Remove
six
vent
plugs
and
check
for
electrolyte
level
in
each
cell
If
nccessaJ
pour
distilled
water
CHECKING
SPECIFIC
GRAVITY
Specific
gravity
of
battery
electro
lyte
is
tested
by
a
hydrometer
If
the
srate
of
charge
of
battery
is
60
or
specific
gravity
reading
is
below
1
20
as
corrected
at
200e
680F
bat
tery
must
be
recharged
or
battery
electrolyte
concentration
adjusted
Add
or
subtract
gravity
points
according
to
whether
the
electrolyte
temperature
is
above
or
below
200e
680F
standard
The
gravity
of
electrolyte
chlll
ges
0
0007
for
every
Ioe
1
80F
tem
petature
A
correction
can
then
be
made
by
using
the
following
formula
Engine
Electrical
System
BATTERY
CONTENTS
EE
2
EE
2
EE
2
BATTERY
FREEZING
CHARGING
INST
ALLA
TION
S
20
St
0
0007
t
20
Where
St
Specific
gravity
of
electrolyte
at
tOe
520
Specific
gravity
of
electrolyte
corrected
at
200e
680F
t
Electrolyte
temperature
For
example
A
hydrometer
reading
of
1
260
at
300e
860F
would
be
1
267
corrected
to
200e
6goF
indicating
fully
charged
battery
On
the
other
hand
a
hydro
meter
reading
of
1
220
at
lOoe
140
F
would
be
1
199
corrected
to
200e
680F
indicating
a
partially
charged
battery
The
state
of
charge
of
battery
can
be
determined
by
the
following
table
if
the
specific
gravity
of
electrolyte
is
known
BefOIe
checking
be
sure
that
cells
are
filled
to
correct
level
G
U
o
N
b
t
E
u
ol
1
lilt
I
i
I
m
J
I
I
I
I
J
1
I
J
Sf
to
7
1
II
It
100
0wJIztI
COJJditioD
EE002
Fig
EE
2
ChaJ
ffing
condition
EE
2
1
28
@
126
S
Sow
E
l
l
u
o
o
l
e
u
0
U21
1
101
EE
3
EE
3
EE
3
Read
top
level
with
scale
1
Thermal
gauge
2
Hydrometer
feOOl
Fig
EE
l
Checking
pccme
gravity
Converted
specific
gavity
20
1
Je
I
dOldlOiJ
OSQ
Electrolyte
temperature
oC
EEOO3
Fig
EE
3
Specific
lNWity
at
eiectroly
te
temperature
Page 170 of 537

BATTERY
FREEZING
Battery
electrolyte
freezing
point
varies
with
acid
concentration
or
its
specific
gravity
A
battery
with
an
insufficient
charge
will
freeze
at
lower
temperatures
If
specific
gravity
of
a
battery
falls
below
1
1
this
is
an
0
10
20
30
g
40
I
u
il
SO
I
0
e
60
0
E
70
Engine
Electrical
System
indication
that
battery
is
completely
discharged
and
will
freeze
readily
when
temperatures
fall
below
freezing
Note
Use
extreme
caution
to
avoid
freezing
battery
since
freezing
will
generally
ruin
the
battery
1
80
1
00
1
04
1
08
t
l2
1
16
t
20
1
24
1
28
Specific
gravity
of
electrolyte
CHARGING
I
f
electrolyte
level
is
satisfactory
battery
must
be
charged
when
electro
lyte
gravity
reading
falls
below
1
20
If
battery
on
car
is
quick
charged
to
1
32
EEOQ4
Fig
EE
4
Froezing
point
of
electrolyte
bring
it
up
to
full
charge
the
opera
tion
should
be
carried
out
with
nega
tive
cable
removed
Prior
to
charging
corroded
termi
EE
3
nals
should
be
cleaned
with
a
brush
and
common
baking
soda
solution
In
addition
the
following
items
should
be
observed
while
battery
is
being
charged
I
Be
sure
that
electrolyte
level
is
above
top
of
each
plate
2
Keep
removed
plugs
in
a
safe
place
3
Do
not
allow
electrolyte
tempera
ture
to
go
over
450C
I130F
4
After
charging
check
to
be
cer
tain
that
specific
gravity
does
not
exceed
1
260
at
200C
680P
Cor
rection
can
be
made
by
adding
dis
tilled
water
into
cells
as
necessary
5
Keep
battery
away
from
open
flame
while
it
is
being
charged
6
After
all
vent
plugs
have
been
tightened
clean
all
sprayed
electrolyte
off
upper
face
of
battery
INSTALLATION
1
Install
and
tighten
clamps
secure
Iy
2
After
clamps
have
been
tightened
clean
battery
cable
terminals
and
apply
grease
to
retard
formation
of
corrosion