fuel cap DATSUN PICK-UP 1977 Service Manual
[x] Cancel search | Manufacturer: DATSUN, Model Year: 1977, Model line: PICK-UP, Model: DATSUN PICK-UP 1977Pages: 537, PDF Size: 35.48 MB
Page 6 of 537
General
Information
L
GENERAL
INFORMATION
CONTENTS
MOOEL
VARIATION
GI
3
APPROXIMATE
REFILL
CAPACITIES
GI
B
IDENTIFICATION
NUMBERS
GI
5
RECOMMENDED
FUEL
GI
B
LIFTING
POINTS
AND
TOWING
GI
B
RECOMMENDED
LUBRICANTS
GI
8
LIFTING
POINTS
GI
B
RECOMMENDED
SAE
VISCOSITY
SUPPORTABLE
POINTS
GI
7
NUMBER
GI
8
TOWING
GI
7
LUBRICANT
SPECIFICATIONS
GI
g
TIE
DOWN
GI
7
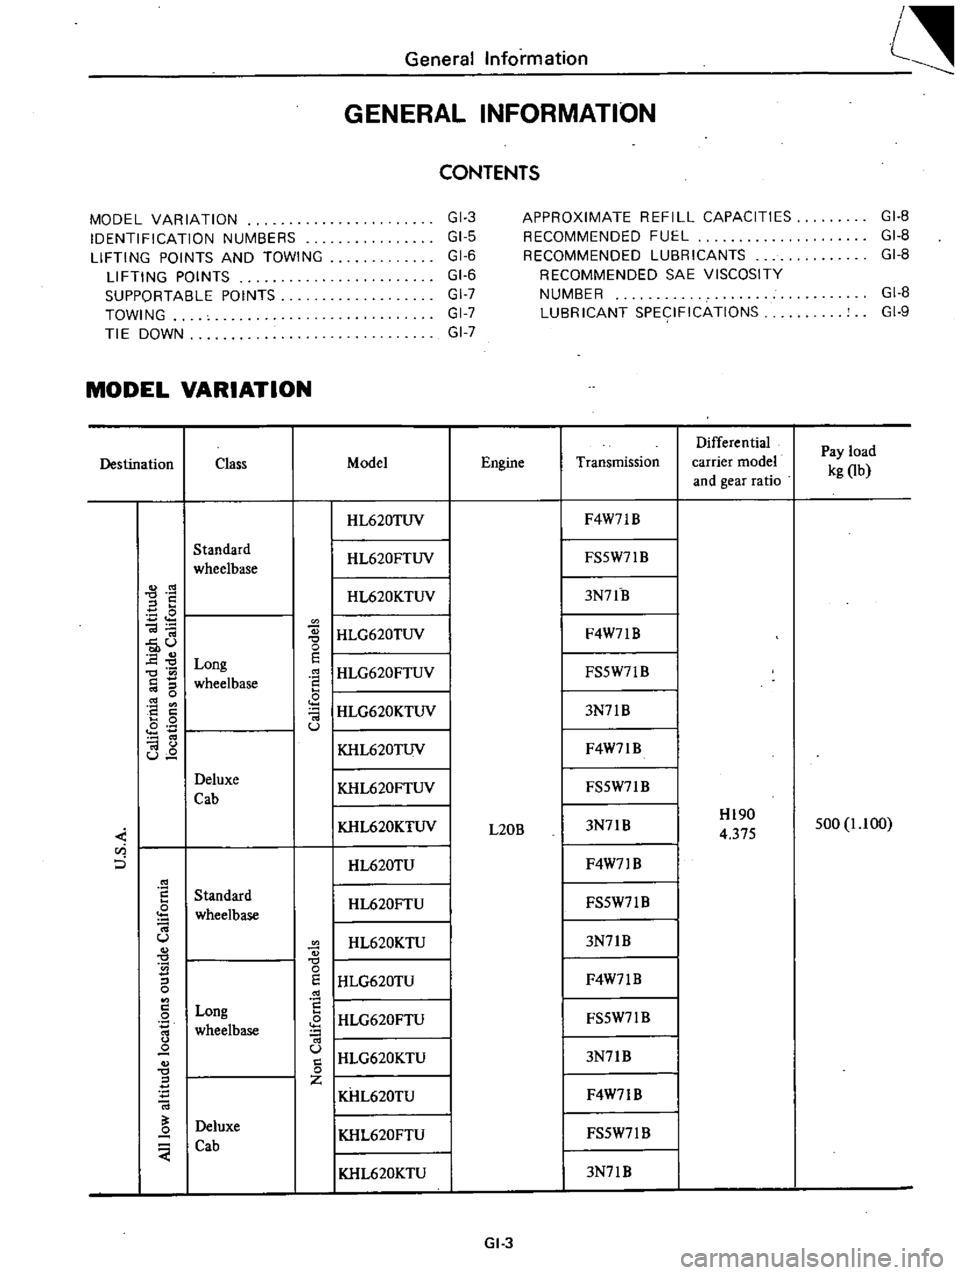
MODEL
VARIATION
Differential
Pay
load
Destination
Class
Model
Engine
Transmission
carrier
model
kg
Ob
and
gear
ratio
I
HL620TUV
F4W7lB
Standard
I
HL620FTUV
FS5W71
B
wheelbase
S
I
HL620KTUV
3N7lB
E
I
HLG620TUV
Ol
F4W7lB
u
0
0
E
Long
E
I
HLG620FTUV
0
FS5W71B
wheelbase
0
I
HLG620KTUV
8
a
3N7lB
0
Ol
0
u
I
KHL620TUV
Ol
F4W7lB
u
Deluxe
I
KHL620FTUV
FS5W7lB
Cab
KHL620KTUV
3N7lB
Hl90
500
1
1
00
L20B
4
375
u
i
0
HL620TU
F4W71
B
Standard
HL620FTU
FS5W7l
B
wheelbase
U
HL620KTU
3N7lB
S
0
I
HLG620TU
0
E
F4W7lB
0
8
Long
I
HLG620FTU
0
FS5W7lB
wheelbase
IHLG620KTU
Q
u
3N7lB
0
0
Z
KHL620TU
F4W71B
Deluxe
Q
KHL620FTU
FS5W7l
B
Cab
I
KHL620KTU
3N7lB
GI
3
Page 11 of 537
General
Information
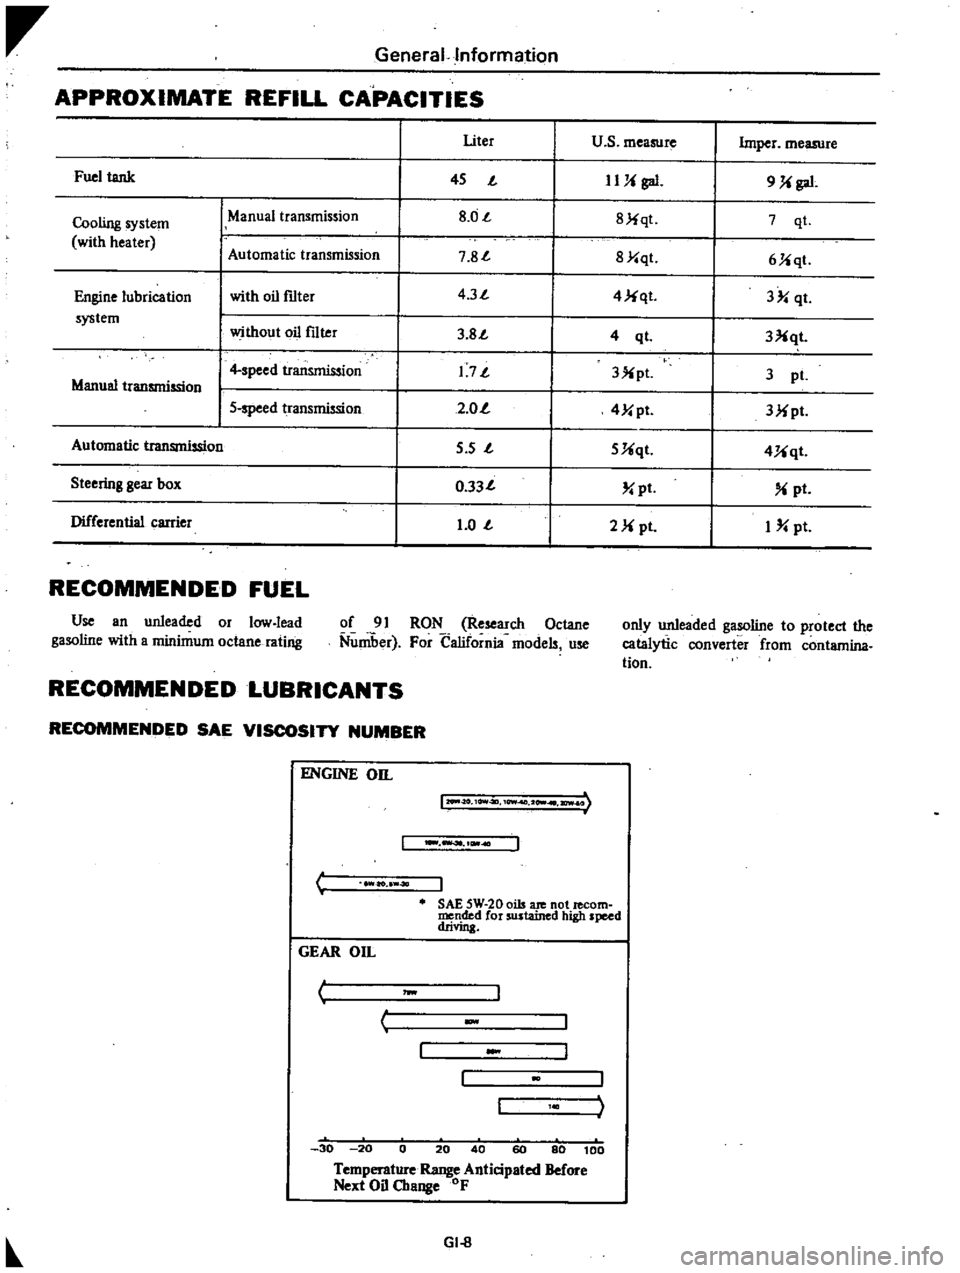
APPROXIMATE
REFILL
CAPACITIES
I
Uter
u
s
measure
Imper
measure
Fuel
tank
I
45
J
IUi
gal
9
Ji
gal
Cooling
system
ManUal
transmission
I
8
0J
I
8Jiqt
7
qt
with
heater
Automatic
tr
smission
I
7
8J
I
8Y
qt
6Jiqt
Engine
lubrication
with
oil
f1lter
I
4
3J
I
4
Ji
qt
3
qt
system
without
oil
f1lter
I
3
8J
I
3Xqt
4
ql
I
4
speed
transmission
I
1
7J
I
3X
pl
3
pI
Manual
transmission
I
5
speed
transmission
I
2
0
I
4Y
pt
3Mpt
Automatic
transmission
I
5
s
J
I
5Uqt
4Uqt
Steering
gear
box
I
0
33J
I
pt
pt
Differential
carrier
I
1
0
J
I
2M
pI
I
pt
RECOMMENDED
FUEL
Use
an
unleaded
or
low
lead
gasoline
with
a
minimum
octane
rating
of
91
RON
Research
Octane
Nuniber
For
California
models
use
only
unleaded
gasoline
to
protect
the
catalytic
converter
from
contamina
tion
RECOMMENDED
LUBRICANTS
RECOMMENDED
SAE
VISCOSITY
NUMBER
C
ENGINE
on
12O
II
O
10Vt4ll
10Wf
2
I
ICWI
I
ao
40
J
SAE
5W
20
oils
ate
not
lecom
mended
for
sustained
high
speed
drivin
GEAR
On
I
J
w
c
30
20
0
20
40
60
80
100
Temperature
Range
Anticipated
Before
Next
Oil
Change
OF
GI
8
Page 21 of 537
Yellow
line
Spark
delay
valve
to
distributor
Spark
delay
valve
to
vacuum
tube
Distributor
to
vacuum
tube
Vacuum
tube
to
carburetor
Vacuum
tube
to
canister
Green
line
Anti
backfire
valve
to
intake
mani
fold
Air
control
valve
to
emergency
air
relief
valve
Intake
manifold
to
vacuum
hose
connector
Intake
manifold
to
canister
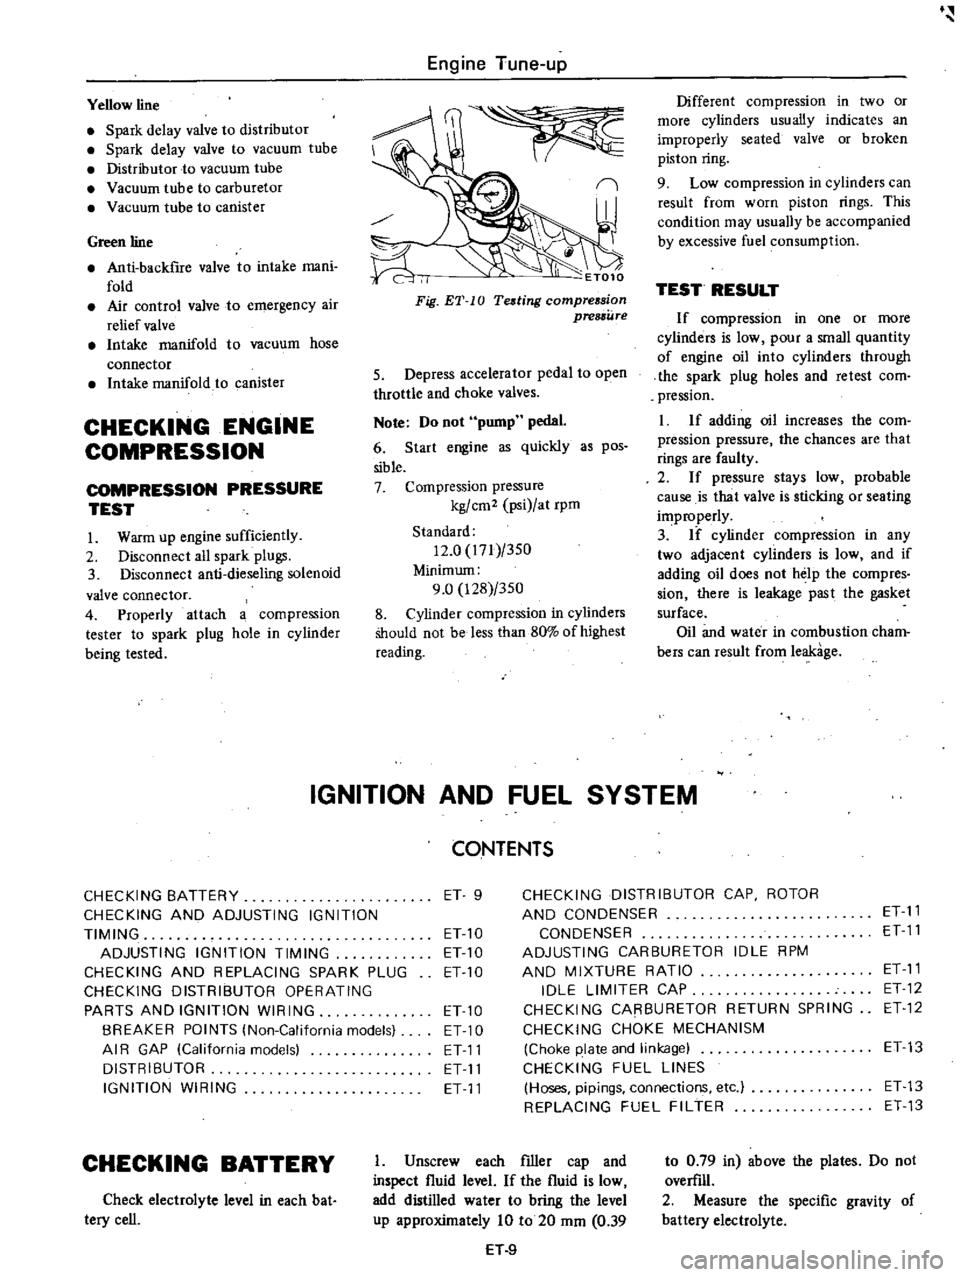
CHECKING
ENGINE
COMPRESSION
COMPRESSION
PRESSURE
TEST
I
Warm
up
engine
sufficiently
2
Disconnect
all
spark
plugs
3
Disconnect
anti
dieseling
solenoid
valve
connector
4
Properly
attach
a
compression
tester
to
spark
plug
hole
in
cylinder
being
tested
Engine
Tune
up
I
ET010
Different
compression
in
two
or
more
cylinders
usually
indicates
an
improperly
seated
valve
or
broken
piston
ring
9
Low
compression
in
cylinders
can
result
from
worn
piston
rings
This
condition
may
usually
be
accompanied
by
excessive
fuel
consumption
TEST
RESULT
If
compression
in
one
or
more
cylinders
is
low
pour
a
small
quantity
of
engine
oil
into
cylinders
through
the
spark
plug
holes
and
retest
com
pression
I
If
adding
oil
increases
the
com
pression
pressure
the
chances
are
that
rings
are
faulty
2
If
pressure
stays
low
probable
cause
is
that
valve
is
sticking
or
seating
improperly
3
If
cylinder
compression
in
any
two
adjacent
cylinders
is
low
and
if
adding
oil
does
not
help
the
compres
sian
there
is
leakage
past
the
gasket
surface
Oil
and
water
in
combustion
cham
bers
can
result
from
leakage
IGNITION
AND
FUEL
SYSTEM
Fig
ET
10
Teding
compression
pressure
5
Depress
accelerator
pedal
to
open
throttle
and
choke
valves
Note
Do
not
pump
pedal
6
Start
engine
as
quickly
as
pos
sible
7
Compression
pressure
kg
cm2
psi
at
rpm
Standard
12
0
171
350
Minimum
9
0
128
350
8
Cylinder
compression
in
cylinders
Should
not
be
less
than
80
of
highest
reading
CONTENTS
CHECKING
BATTERY
ET
9
CHECKING
DISTRIBUTOR
CAP
ROTOR
CHECKING
AND
ADJUSTING
IGNITION
AND
CONDENSER
ET
11
TIMING
ET
10
CONDENSER
ET
11
ADJUSTING
IGNITION
TIMING
ET10
ADJUSTING
CARBURETOR
IDLE
RPM
CHECKING
AND
REPLACING
SPARK
PLUG
ETlO
AND
MIXTURE
RATIO
ET
11
CHECKING
DISTRIBUTOR
OPERATING
IDLE
LIMITER
CAP
ET
12
PARTS
AND
IGNITION
WIRING
ETlO
CHECKING
CARBURETOR
RETURN
SPRING
ET
12
BREAKER
POINTS
lNon
California
models
ET
10
CHECKING
CHOKE
MECHANISM
AI
R
GAP
lCalifornia
models
ET11
Choke
plate
and
linkage
ET13
DISTRIBUTOR
ET
11
CHECKING
FUEL
LINES
IGNITION
WIRING
ET
11
Hoses
pipings
connections
etc
ET
13
REPLACING
FUEL
FILTER
ET
13
CHECKING
BATTERY
Check
electrolyte
level
in
each
bat
tery
cell
I
Unscrew
each
filler
cap
and
inspect
fluid
level
If
the
fluid
is
low
add
distilled
water
to
bring
the
level
up
approximately
10
to
20
mm
0
39
H
9
to
0
79
in
above
the
plates
Do
not
overfill
2
Measure
the
specific
gravity
of
battery
electrolyte
Page 34 of 537
r
EC350
Fig
ET
43
Cleanill
l
E
G
R
control
lJ
Jlue
Thermal
VBCuum
valve
Dismount
thermal
vacuum
valve
from
engine
Note
Before
dismounting
drain
e
gine
coolant
from
engine
Apply
vacuum
to
thermal
vacuum
valve
and
check
to
be
sure
that
ther
mal
vacuum
valve
opens
or
closes
in
response
to
engine
coolant
tempera
lurt
i1
i
iYCl
lt
lt
U
Thermal
vacuum
valve
should
open
at
a
temperature
of
57
to
630C
134
to
1450F
completing
the
vacuum
passage
Note
Do
not
aUow
water
to
get
inside
the
thermal
vacuum
valve
EC
242
Fig
ET
44
Checkill
lthermallXlCuum
valve
Engine
Tune
up
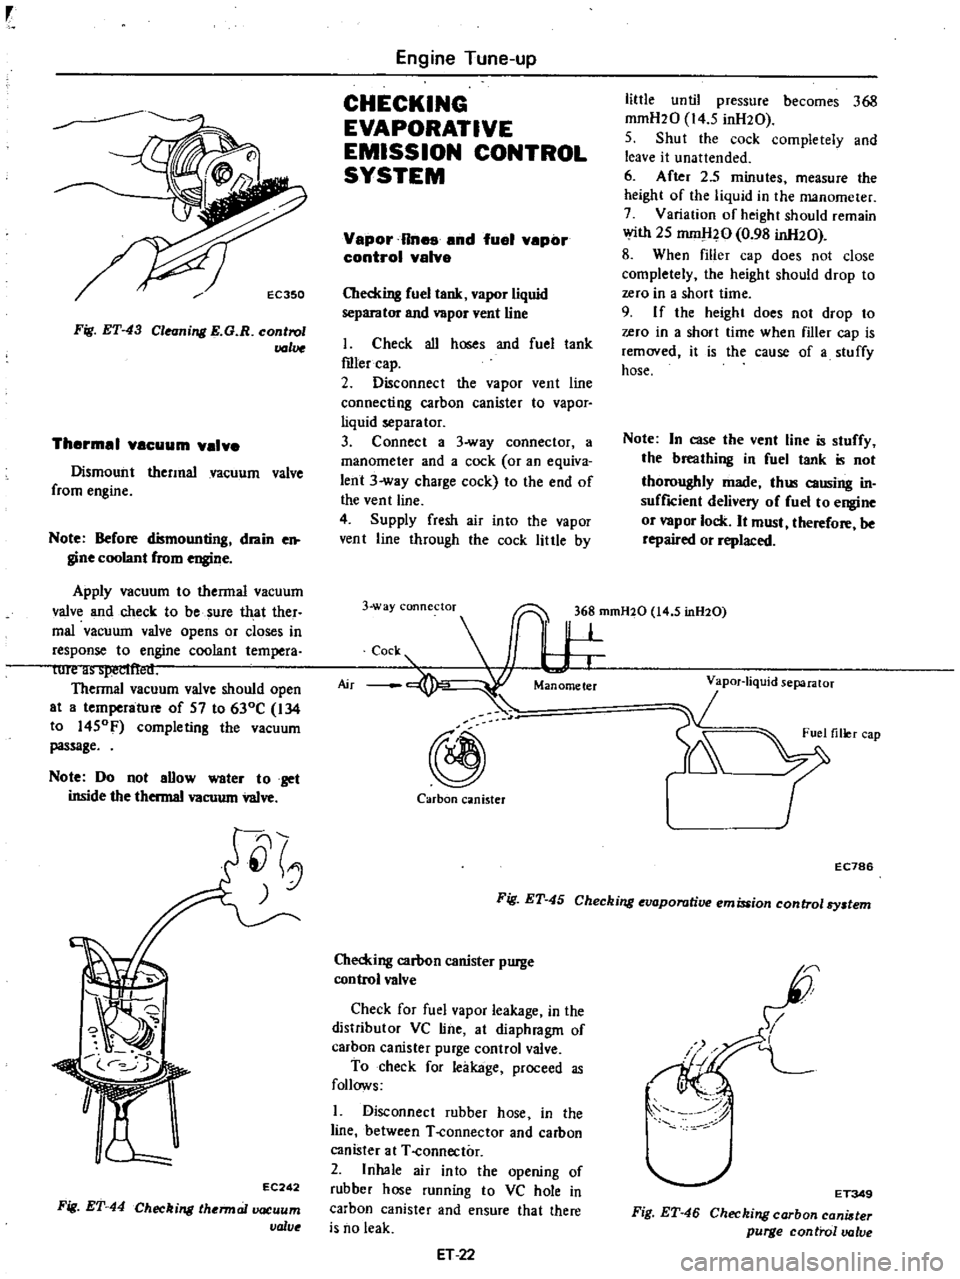
CHECKING
EVAPORATIVE
EMISSION
CONTROL
SYSTEM
Vapor
Rnes
and
fuel
vepor
control
valve
Checking
fuel
tank
vapor
liquid
separator
and
vapor
vent
line
I
Check
all
hoses
and
fuel
tank
roler
cap
2
Disconnect
the
vapor
vent
line
connecting
carbon
canister
to
vapor
liquid
separator
3
Connect
a
3
way
connector
a
manometer
and
a
cock
or
an
equiva
lent
3
way
charge
cock
to
the
end
of
the
vent
line
4
Supply
fresh
air
into
the
vapor
vent
line
through
the
cock
little
by
little
until
pressure
becomes
368
mmH20
14
5
inH20
5
Shut
the
cock
completely
and
leave
it
unattended
6
After
2
5
minutes
measure
the
height
of
the
liquid
in
the
manometer
7
Variation
of
height
should
remain
with
25
mm
l20
0
98
inH20
8
When
filler
cap
does
not
close
completely
the
height
should
drop
to
zero
in
a
short
time
9
I
f
the
height
does
not
drop
to
zero
in
a
short
time
when
filler
cap
is
removed
it
is
the
cause
of
a
stuffy
hose
Note
In
case
the
vent
line
is
stuffy
the
breathing
in
fuel
tank
is
not
thoroughly
made
thl
causing
in
suffICient
delivery
of
fuel
to
engine
or
vapor
lock
It
must
therefore
be
repaired
or
replaced
3
way
connectoT
36
mmH20
14
5
inH20
c
s
I
W
@
Carbon
canister
r
EC786
Fig
ET
45
Checking
evaporative
emission
control
By
tem
Checking
carbon
canister
purge
control
valve
Check
for
fuel
vapor
leakage
in
the
distributor
VC
line
at
diaphragm
of
carhon
canister
purge
control
valve
To
check
for
leakage
proceed
as
follows
1
Disconnect
rubber
hose
in
the
line
between
T
connector
and
carbon
canister
at
T
connector
2
Inhale
air
into
the
opening
of
rubber
hose
running
to
VC
hole
in
carbon
canister
and
ensure
that
there
is
no
leak
ET
22
I
I
L
I
ET349
Fig
ET
46
Checking
carbon
cani
ter
purge
control
valve
Page 35 of 537
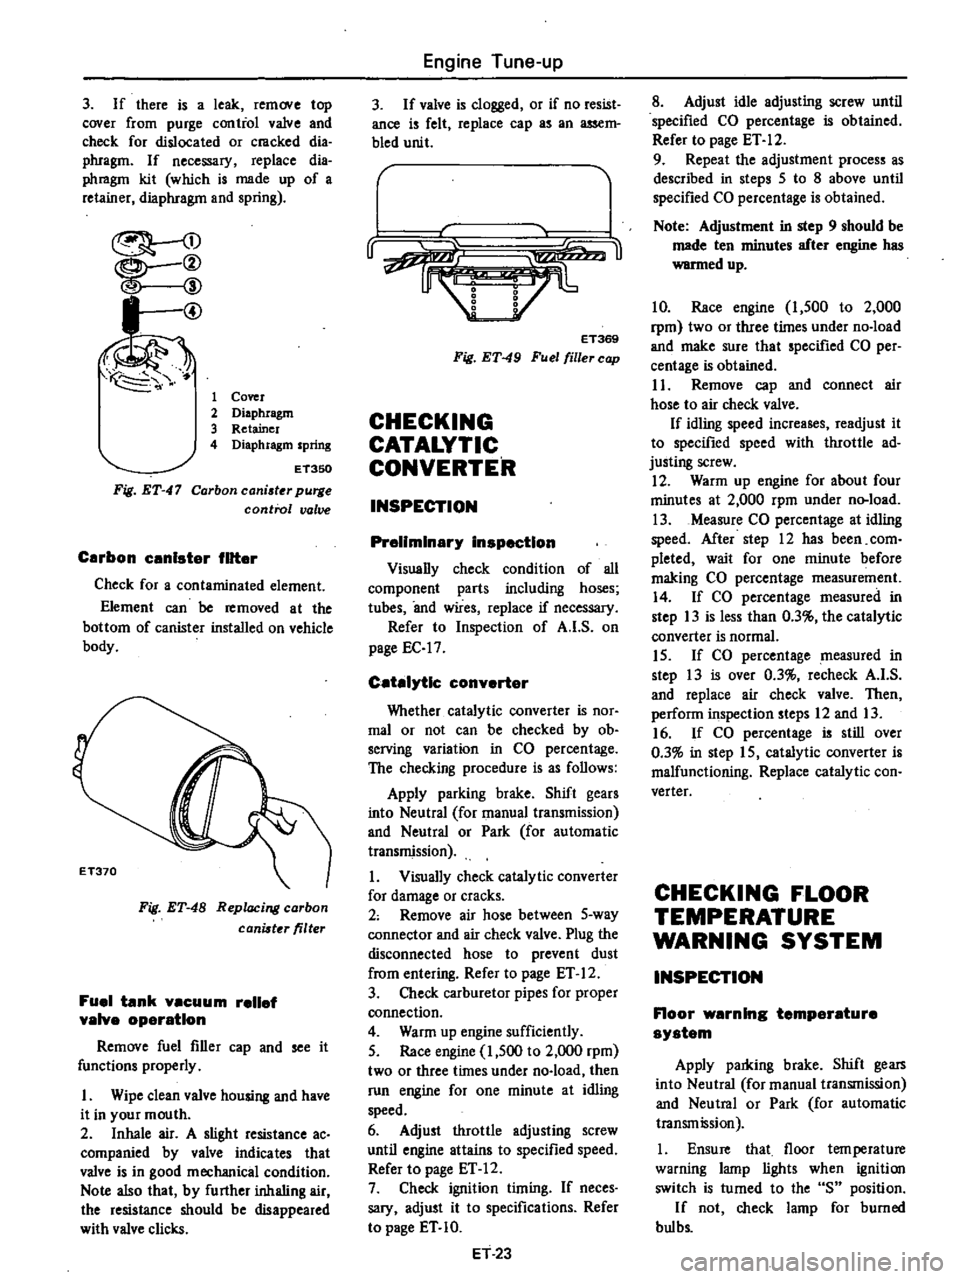
3
If
there
is
a
leak
remove
top
cover
from
purge
contiol
valve
and
check
for
dislocated
or
cmcked
dia
phragm
If
necessary
replace
dia
phmgm
kit
which
is
made
up
of
a
retainer
diaphragm
and
spring
I
@
1
Cover
2
Diaphragm
3
Retainer
4
Diaphragm
spring
Fig
ET
47
ET350
Carbon
caniater
purge
control
valve
Carbon
unlster
filter
Check
for
a
contaminated
element
Element
can
be
removed
at
the
bottom
of
canister
installed
on
vehicle
body
Fig
ET
48
Replacing
carbon
canister
filter
Fuel
tank
vacuum
relief
valve
operation
Remove
fuel
filler
cap
and
see
it
functions
properly
I
Wipe
clean
valve
housing
and
have
it
in
your
mouth
2
Inhale
air
A
slight
resistance
ac
companied
by
valve
indicates
that
valve
is
in
good
mechanical
condition
Note
also
that
by
further
inhaling
air
the
resistance
should
be
disappeared
with
valve
clicks
Engine
Tune
up
3
If
valve
is
clogged
or
if
no
resist
ance
is
felt
replace
cap
as
an
assem
bled
unit
r
u
ET369
Fig
ET
49
Fuel
filler
cap
CHECKING
CATALYTIC
CONVERTER
INSPECTION
Preliminary
inspection
Visually
check
condition
of
all
component
parts
including
hoses
tubes
and
wires
replace
if
necessary
Refer
to
Inspection
of
A
I
S
on
page
EC
17
Catalytic
converter
Whether
catalytic
converter
is
nOf
mal
or
not
can
be
checked
by
ob
serving
variation
in
CO
percentage
The
checking
procedure
is
as
follows
Apply
parking
brake
Shift
gears
into
Neutral
for
manual
transmission
and
Neutral
or
Park
for
automatic
transmission
1
Visually
check
catalytic
converter
for
damage
or
cracks
2
Remove
air
hose
between
5
way
connector
and
air
check
valve
Plug
the
disconnected
hose
to
prevent
dust
from
entering
Refer
to
page
ET
12
3
Check
carburetor
pipes
for
proper
connection
4
Warm
up
engine
sufficiently
5
Race
engine
1
500
to
2
000
rpm
two
or
three
times
under
no
load
then
run
engine
for
one
minute
at
idling
speed
6
Adjust
throttle
adjusting
screw
until
engine
attains
to
specified
speed
Refer
to
page
ET
12
7
Check
ignition
timing
If
neces
sary
adjust
it
to
specifications
Refer
to
page
ET
10
ET
23
8
Adjust
idle
adjusting
screw
until
specified
CO
percentage
is
obtained
Refer
to
page
ET
12
9
Repeat
the
adjustment
process
as
described
in
steps
5
to
8
above
until
specified
CO
percentage
is
obtained
Note
Adjustment
in
step
9
should
be
made
ten
minutes
after
engine
has
warmed
up
10
Race
engine
1
500
to
2
000
rpm
two
or
three
times
under
no
load
and
make
sure
that
specified
CO
per
centage
is
obtained
I
1
Remove
cap
and
connect
air
hose
to
air
check
valve
If
idling
speed
increases
readjust
it
to
specified
speed
with
throttle
ad
justing
screw
12
Warm
up
engine
for
about
four
minutes
at
2
000
rpm
under
n
load
13
Measure
CO
percentage
at
idling
speed
After
step
12
has
been
com
pleted
wait
for
one
minute
before
making
CO
percentage
measurement
14
If
CO
percentage
measured
in
step
13
is
less
than
0
3
the
catalylic
converter
is
normal
15
If
CO
percentage
measured
in
step
13
is
over
0
3
recheck
A
I
S
and
replace
air
check
valve
Then
perform
inspection
steps
12
and
13
16
If
CO
percentage
is
still
over
0
3
in
step
15
catalytic
converter
is
malfunctioning
Replace
catalytic
con
verter
CHECKING
FLOOR
TEMPERATURE
WARNING
SYSTEM
INSPECTION
Floor
warning
temperature
system
Apply
parldng
brake
Shift
gears
into
Neutral
for
manual
transmission
and
Neutral
or
Park
for
automatic
transmission
1
Ensure
that
floor
tern
perature
warning
lamp
lights
when
ignition
switch
is
turned
to
the
S
position
If
not
check
lamp
for
burned
bul
bs
Page 40 of 537

Engine
Tune
up
Condition
Probable
cause
Low
or
no
current
Ign
tion
system
out
of
order
Burned
distributor
point
Improper
point
gap
Faulty
condenser
Leak
at
rotor
cap
and
rotor
Faulty
spark
plug
Improper
ignition
timing
Faulty
ignition
coil
Disconnection
of
high
tension
cable
Loose
connection
or
disconnection
in
primary
circuit
Fuel
system
out
of
order
Lack
offuel
Dirty
fuel
strainer
Dirty
or
clogged
fuel
pipe
Fuel
pump
will
not
work
properly
Carburetor
choke
will
not
work
properly
Improper
adjustment
of
float
level
Improper
idling
Dirty
or
clogged
carburetor
Clogged
breather
pip
of
fuel
tank
Malfunctioning
an
ti
dieseling
solenoid
valve
Incorrect
sparle
plug
tightening
or
faulty
gasket
Improper
grade
engine
oil
or
low
viscosity
Incorrect
valve
clearance
Compression
leak
from
valve
seat
Sticky
valve
stem
Weak
or
damaged
valve
springs
Compression
leak
at
cylinder
head
gasket
Sticking
or
damaged
piston
ring
Worn
piston
ring
or
cylinder
Trouble
ooting
procedure
Pour
the
engine
oil
from
plug
hole
and
then
measure
cylinder
compression
Compression
increases
Compression
does
not
change
Low
comp
ion
ET
28
Corrective
action
Check
for
loose
terminal
or
disconnection
in
primary
circuit
Check
for
burned
points
Repair
or
replace
Adjust
Replace
Clean
or
replace
aean
adjust
plug
gap
or
replace
Adjust
Replace
Replace
Repair
or
replace
Supply
Replace
Clean
Repair
or
replace
Check
and
adjust
Correct
Adjust
Disassemble
and
clean
Repair
and
clean
Check
for
loose
terminal
or
wire
harness
Tighten
to
normal
torque
or
replace
gasket
Replace
with
proper
grade
oil
Adjust
Remove
cyljnder
head
and
lap
valves
Correct
or
replace
valve
and
valve
guide
Replace
valve
springs
Replace
gasket
Replace
piston
rings
Overhaul
engine
Malfunctiong
cylinder
or
piston
ring
Compression
leaks
from
valve
cylinder
head
or
head
gasket
Except
transistor
ignition
system
Page 42 of 537
Condition
ENGINE
POWER
NOT
UP
TO
NORMAL
Low
compression
Ignition
system
out
of
order
Fuel
system
out
of
order
Air
intake
system
out
of
order
Emission
control
Overheating
O
cooIing
Others
Engine
Tune
up
Probable
cause
Incorrect
iSnition
timing
Damaged
spark
plugs
Worn
distributor
points
Malfunction
of
choke
system
Clogged
fuel
pipe
or
floating
valve
Dirty
or
clogged
fuel
strainer
Fuel
pump
will
not
work
properly
C10ssed
carburetor
jets
Malfunction
of
altitude
compensator
CIOJBed
air
cleaner
Ail
inhaling
from
manifold
gasket
or
carburetor
gasket
Malfunction
of
E
G
R
valve
Stick
E
F
E
valve
shaft
Insufficient
coolant
Loose
fan
belt
Worn
or
oiled
fan
belt
Inoperative
thermostat
Worn
water
pump
Clogged
or
leaky
radiator
Worn
radiator
filler
cap
Ail
in
cooling
system
Improper
engine
oil
grade
Incorrect
ignition
timing
Clossed
carburetor
lean
mixture
Disconnected
altitude
compensator
hOlle
Inoperative
thermostat
Improper
octane
fuel
L
j
tire
pressure
Dragging
brake
Clutch
slipping
ET
30
Corrective
action
Previously
mentioned
Adjust
Clean
adjust
or
replace
plull
Dress
or
replace
points
Also
check
condenser
Adj
lst
Clean
Replace
Repair
or
replace
Disassemble
and
clean
Check
and
replace
Replace
element
Replace
gasket
Check
and
replace
Repair
Replenish
Adjust
fan
belt
Replace
Replace
Replace
Flush
repair
or
replace
Replace
Retighten
each
part
of
cooling
system
Replace
with
proper
grade
oil
Adjust
Overhaul
carburetor
Connect
Replace
Replace
with
specified
octane
fuel
Inflate
to
specified
pressure
Adjust
Adjust
Except
transistor
ignition
system
Page 51 of 537
r
28
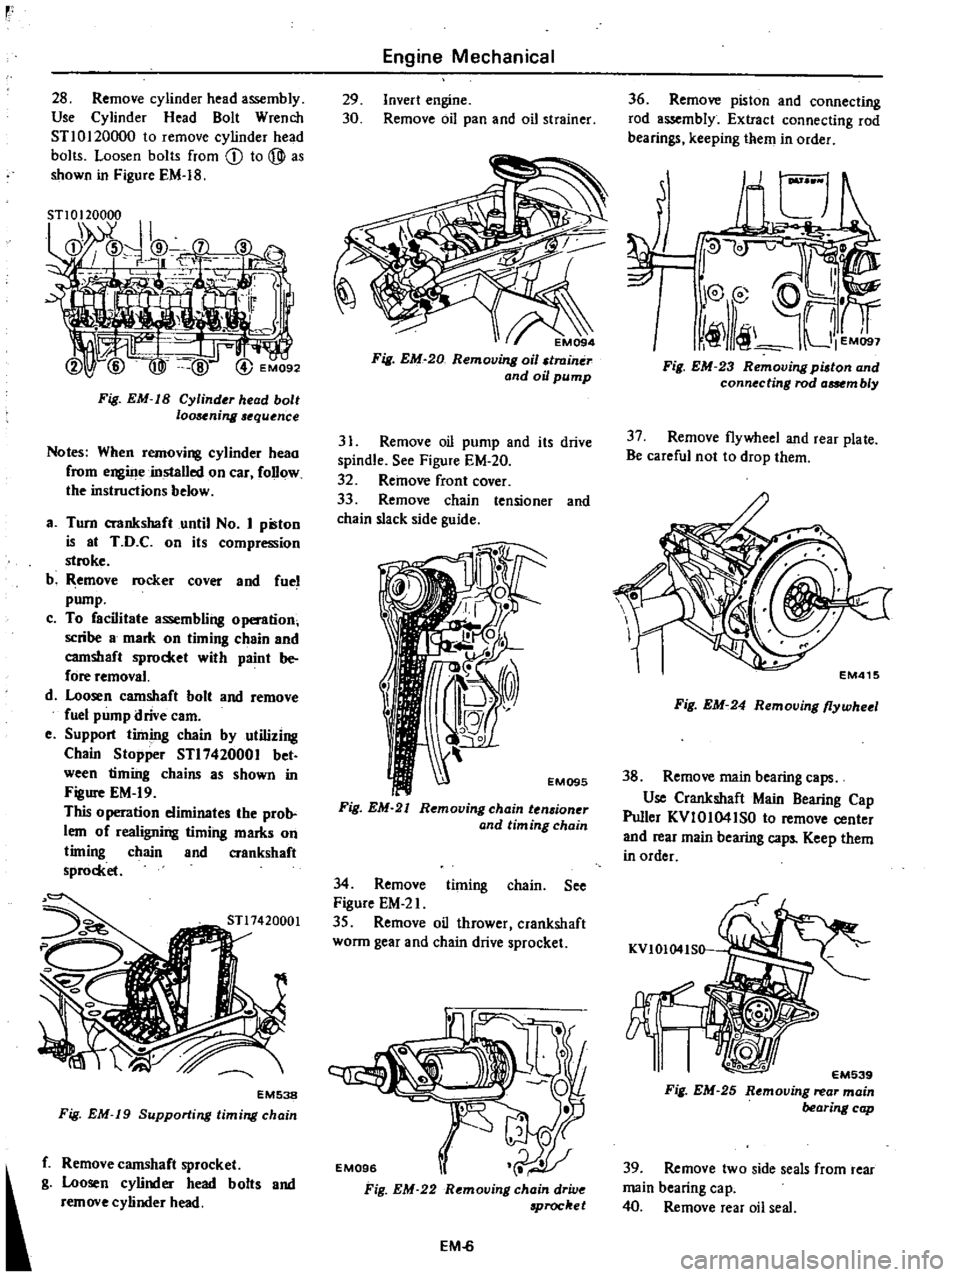
Remove
cylinder
head
assembly
Use
Cylinder
Head
Bolt
Wrench
STl0120000
to
remove
cylinder
head
bolts
Loosen
bolts
from
CD
to
@
as
shown
in
Figure
EM
18
Fig
EM
IS
Cylinder
head
bolt
loosening
equence
Notes
When
removing
cylinder
heao
from
engiJJe
installed
on
car
follow
the
instructions
below
a
Turn
crankshaft
until
No
I
pilton
is
at
T
D
C
on
its
compression
stroke
b
Remove
rocker
Cover
and
fuel
pump
c
To
facilitate
assembling
o
tion
scribe
8
mark
on
timing
c
8in
and
camshaft
sprocket
with
paint
be
fore
removal
d
Loosen
camshaft
bolt
and
remove
fuel
pump
drive
earn
e
Support
timing
chain
by
utilizing
Chain
Stopper
STl7420001
bet
ween
timiilg
chains
as
shown
in
Figure
EM
19
This
0
peration
eliminates
the
prob
lem
of
realigning
timing
marks
on
timing
chain
and
crankshaft
sprocket
EM538
Fig
EM
19
Supporting
timing
chain
f
Remove
camshaft
sprocket
g
Loosen
cylinder
head
bolts
and
remove
cylinder
head
Engine
Mechanical
29
Invert
engine
30
Remove
oil
pan
and
oil
strainer
EM094
Fig
EM
20
Removing
oil
traintir
and
oil
pump
31
Remove
oil
pump
and
its
drive
spindle
See
Figure
EM
20
32
Remove
front
cover
33
Remove
chain
tensioner
and
chain
slack
side
guide
EM095
Fig
EM
21
Removing
chain
ten
ioner
and
tim
ing
chain
34
Remove
timing
chain
See
Figure
EM
2l
35
Remove
oil
thrower
crankshaft
wonn
gear
and
chain
drive
sprocket
Fig
EM
22
Removing
chain
drive
Proc
et
EM
6
36
Remove
piston
and
connecting
rod
a
mbly
Extract
connecting
rod
bearings
keeping
them
in
order
I
Fig
EM
23
Removing
pilton
and
connecting
rod
aat
m
b
y
37
Remove
flywheel
and
rear
plate
Be
careful
not
to
drop
them
EM415
Fig
EM
24
Removing
flywheel
38
Remove
main
bearing
caps
Use
Crankshaft
Main
Bearing
Cap
Puller
KVIOI04ISO
to
remove
center
and
rear
main
bearing
caps
Keep
them
in
order
KVIOI04IS0
EM539
Fig
EM
25
Removing
rear
main
bearing
cap
39
Remove
two
side
seals
from
rear
main
bearing
ca
p
40
Remove
rear
oil
seal
Page 66 of 537
PRECAUTIONS
CYLINDER
HEAD
PRECAUTIONS
I
Use
thoroughly
cleaned
parts
Especially
make
sure
that
oil
holes
are
clear
of
foreign
matter
2
When
installing
sliding
parts
such
as
bearings
be
s
uIe
to
apply
engine
oil
to
them
3
Use
new
packing
and
oil
seals
4
Do
not
reuse
lock
washers
5
Keep
tools
and
work
benches
clean
6
Keep
necessary
parts
and
tools
near
at
hand
7
Be
sure
to
follow
specified
tight
ening
torque
and
order
8
Applying
sealant
Use
sealant
to
eliminate
water
and
oil
leaks
Parts
requiring
sealant
are
I
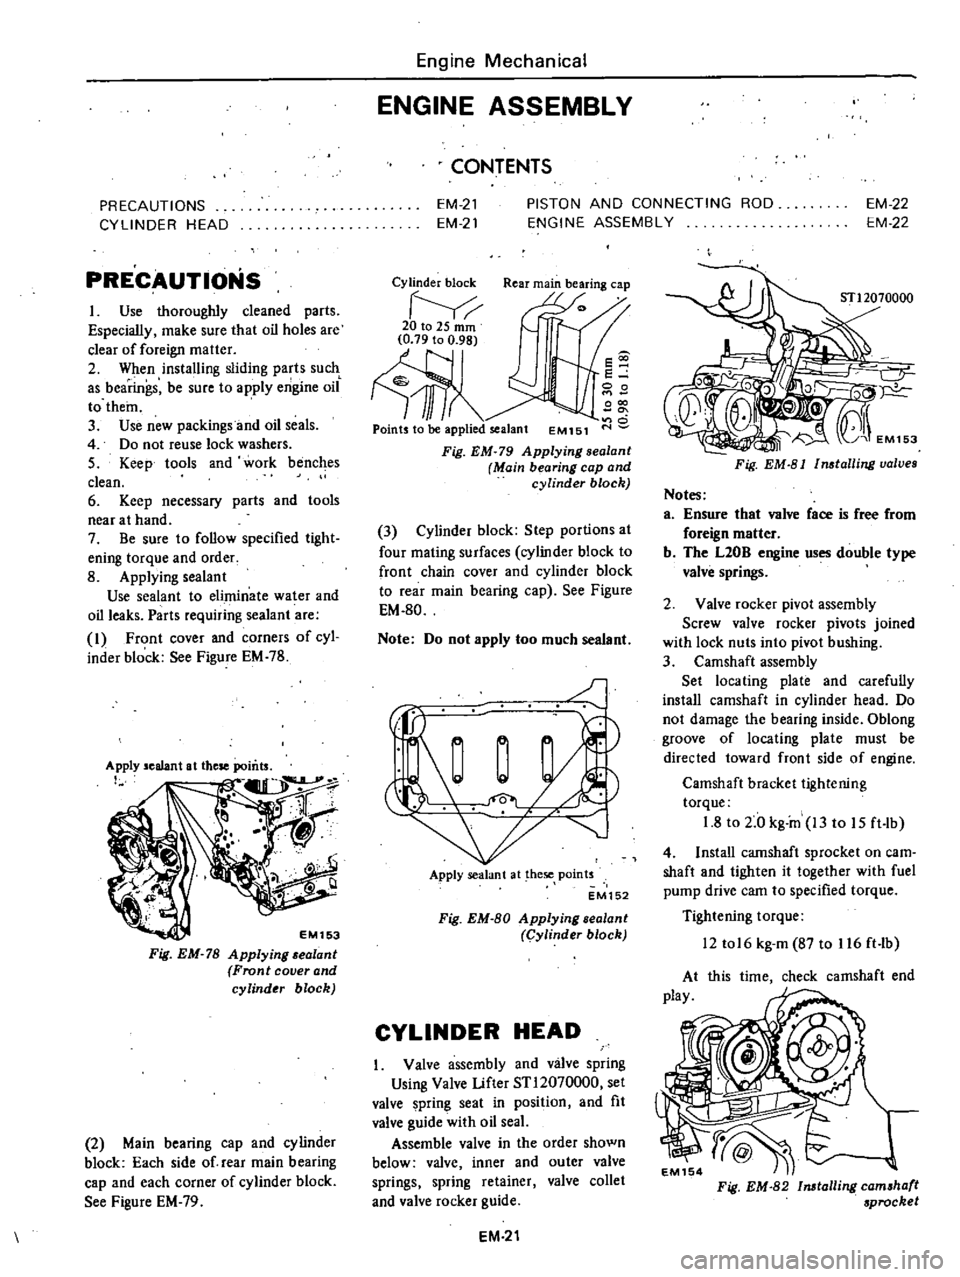
Front
cover
and
corners
of
cyl
inder
block
See
Figure
EM
78
EM153
Fig
EM
78
Applying
alant
Front
cover
and
cylinder
block
2
Main
bearing
cap
and
cylinder
block
Each
side
of
rear
main
bearing
cap
and
each
corner
of
cylinder
block
See
Figure
EM
79
Engine
Mechanical
ENGINE
ASSEMBLY
CONTENTS
EM
21
EM
21
PISTON
AND
CONNECTING
ROD
ENGINE
ASSEMBLY
EM
22
EM
22
Cylinder
block
Rear
main
bearing
cap
20to2Smm
Ill
Points
to
be
applied
sealant
EM151
s
e
00
000
o
Fig
EM
79
Applying
sealanl
Main
bearing
cap
and
cylinder
block
3
Cylinder
block
Step
portions
at
four
mating
surfaces
cylinder
block
to
front
chain
cover
and
cylinder
block
to
rear
main
bearing
cap
See
Figure
EM
80
Note
Do
not
apply
too
much
sealant
J
Apply
sealant
at
hese
points
EM152
Fig
EM
80
Applying
sealant
Cylinder
block
CYLINDER
HEAD
Valve
assembly
and
valve
spring
Using
Valve
Lifter
STl2070000
set
valve
pring
seat
in
position
and
fit
valve
guide
with
oil
seaL
Assemble
valve
in
the
order
shown
below
valve
inner
and
outer
valve
springs
spring
retainer
valve
collet
and
valve
rocker
guide
EM
21
Fig
EM
81
Installing
valves
Notes
a
Ensure
that
valve
face
is
free
from
foreign
matter
b
The
L20B
engine
uses
double
type
valve
springs
2
Valve
rocker
pivot
assembly
Screw
valve
rocker
pivots
joined
with
lock
nuts
into
pivot
hushing
3
Camshaft
assembly
Set
locating
plate
and
carefully
install
camshaft
in
cylinder
head
Do
not
damage
the
bearing
inside
Oblong
groove
of
locating
plate
must
be
directed
toward
front
side
of
engine
Camshaft
bracket
tightening
torque
1
8
to
2
0
kg
in
13
to
15
ft
lb
4
Install
camshaft
sprocket
on
earn
shaft
and
tighten
it
together
with
fuel
pump
drive
cam
to
specified
torque
Tightening
torque
12
tol6
kg
m
87
to
116
ft
lb
this
time
check
camshaft
end
Fig
EM
82
Installing
camshaft
sprocket
Page 75 of 537
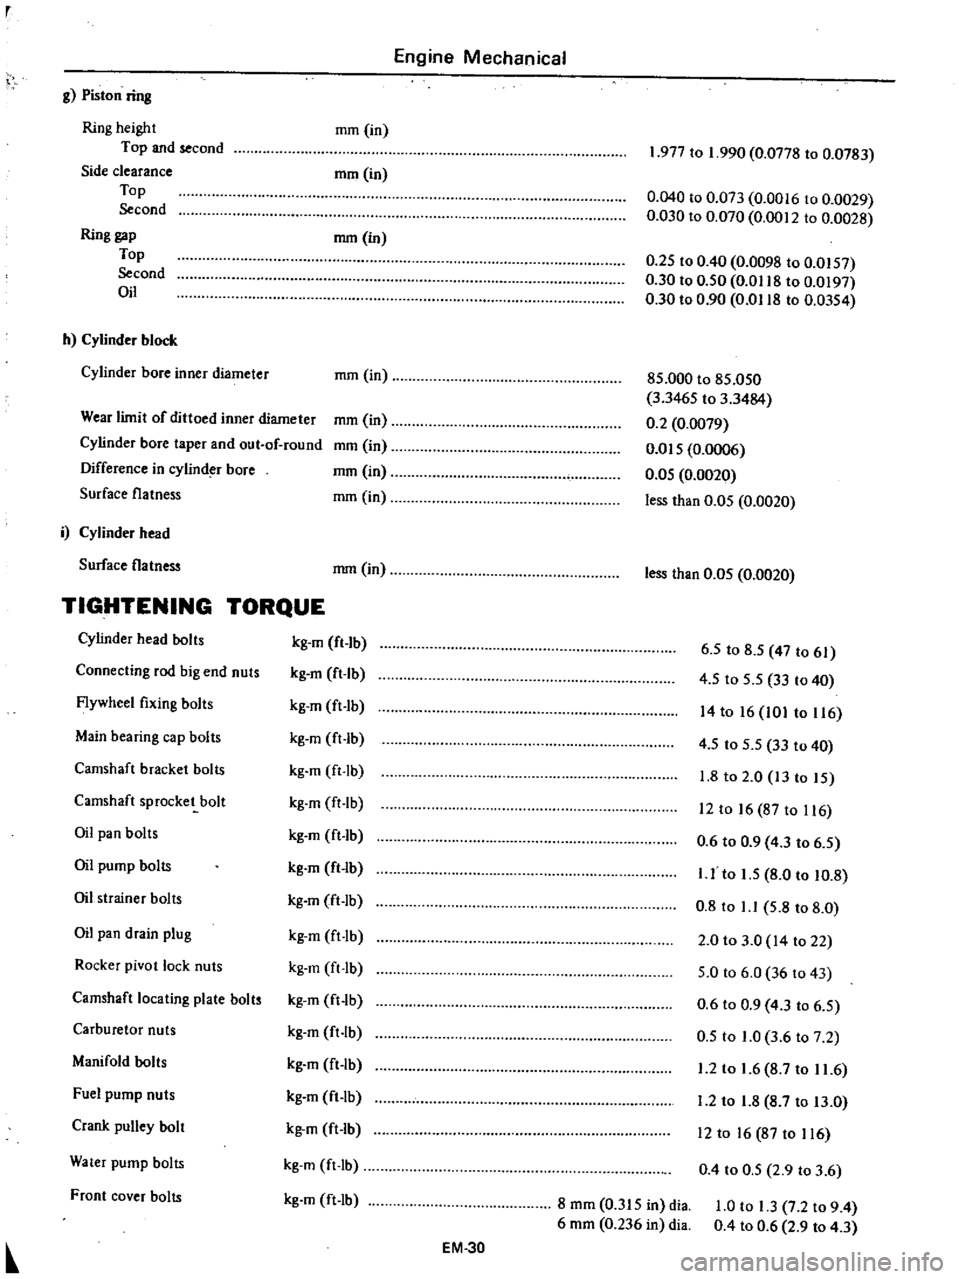
Engine
Mechanical
g
Piston
ring
Ring
height
Top
and
second
Side
clearance
Top
Second
Ring
gap
Top
Second
Oil
mm
in
mrn
in
mm
in
h
Cylinder
block
Cylinder
bore
inner
diameter
mm
in
Wear
limit
of
dittoed
inner
diameter
Cylinder
bore
taper
and
out
of
round
Difference
in
cylind
bore
Surface
flatness
mm
in
mm
in
mm
in
mm
in
i
Cylinder
head
Surface
flatness
mm
in
TIGHTENING
TORQUE
Cylinder
head
bolts
kg
m
fl
lb
Connecting
rod
big
end
nuts
kg
m
ft
Ib
Flywheel
fixing
bolts
kg
m
ft
Ib
Main
bearing
cap
bolts
kg
m
ft
lb
Camshaft
bracket
bolts
kg
m
ft
lb
Camshaft
sprocket
bolt
kg
m
ft
lb
Oil
pan
bolts
kg
m
ft
1b
Oil
pump
bolts
kg
m
ft
lb
Oil
strainer
bolts
kg
m
ft
lb
Oil
pan
drain
plug
kg
m
ft
lb
Rocker
pivot
lock
nuts
kg
m
ft
Ib
Camshaft
locating
plate
bolts
kg
m
ft
lb
Carburetor
nuts
kg
m
ft
lb
Manifold
bolts
kg
m
ft
lb
Fuel
pump
nuts
kg
m
ft
lb
Crank
pulley
bolt
kg
m
ft
lb
Water
pump
bolts
kg
m
ft
Ib
Front
cover
bolts
kg
m
ft
lb
EM
30
1
977
to
1
990
0
0778
to
0
0783
0
040
to
0
073
0
0016
to
0
0029
0
030
to
0
070
0
0012
to
0
0028
0
25
to
0
40
0
0098
to
0
0157
0
30
to
0
50
0
0118
to
0
0197
0
30
to
0
90
0
0118
to
0
0354
85
000
to
85
050
3
3465
to
3
3484
0
2
0
0079
om
5
0
0006
0
05
0
0020
less
than
0
05
0
0020
less
than
0
05
0
0020
6
5
to
8
5
47
to
61
4
5
to
5
5
33
to
40
14
to
16
101
to
116
4
5
to
5
5
33
to
40
1
8
to
2
0
13
to
15
12
to
16
87
to
116
0
6
to
0
9
4
3
to
6
5
I
J
to
1
5
8
0
to
10
8
0
8
to
1
1
5
8
to
8
0
2
0
to
3
0
14
to
22
5
0
to
6
0
36
to
43
0
6
to
0
9
4
3
to
6
5
0
5
to
1
0
3
6
to
7
2
1
2
to
1
6
8
7
to
11
6
1
2
to
1
8
8
7
to
13
0
12
to
16
87
to
116
0
4
to
0
5
2
9
to
3
6
8
mm
0
315
in
dia
6
mm
0
236
in
dia
1
0
to
1
3
7
2
to
9
4
0
4
to
0
6
2
9
to
4
3