fuel cap DATSUN PICK-UP 1977 User Guide
[x] Cancel search | Manufacturer: DATSUN, Model Year: 1977, Model line: PICK-UP, Model: DATSUN PICK-UP 1977Pages: 537, PDF Size: 35.48 MB
Page 105 of 537
DESCRIPTION
FUEL
PUMP
TESTING
STATIC
PRESSURE
TEST
CAPACITY
TEST
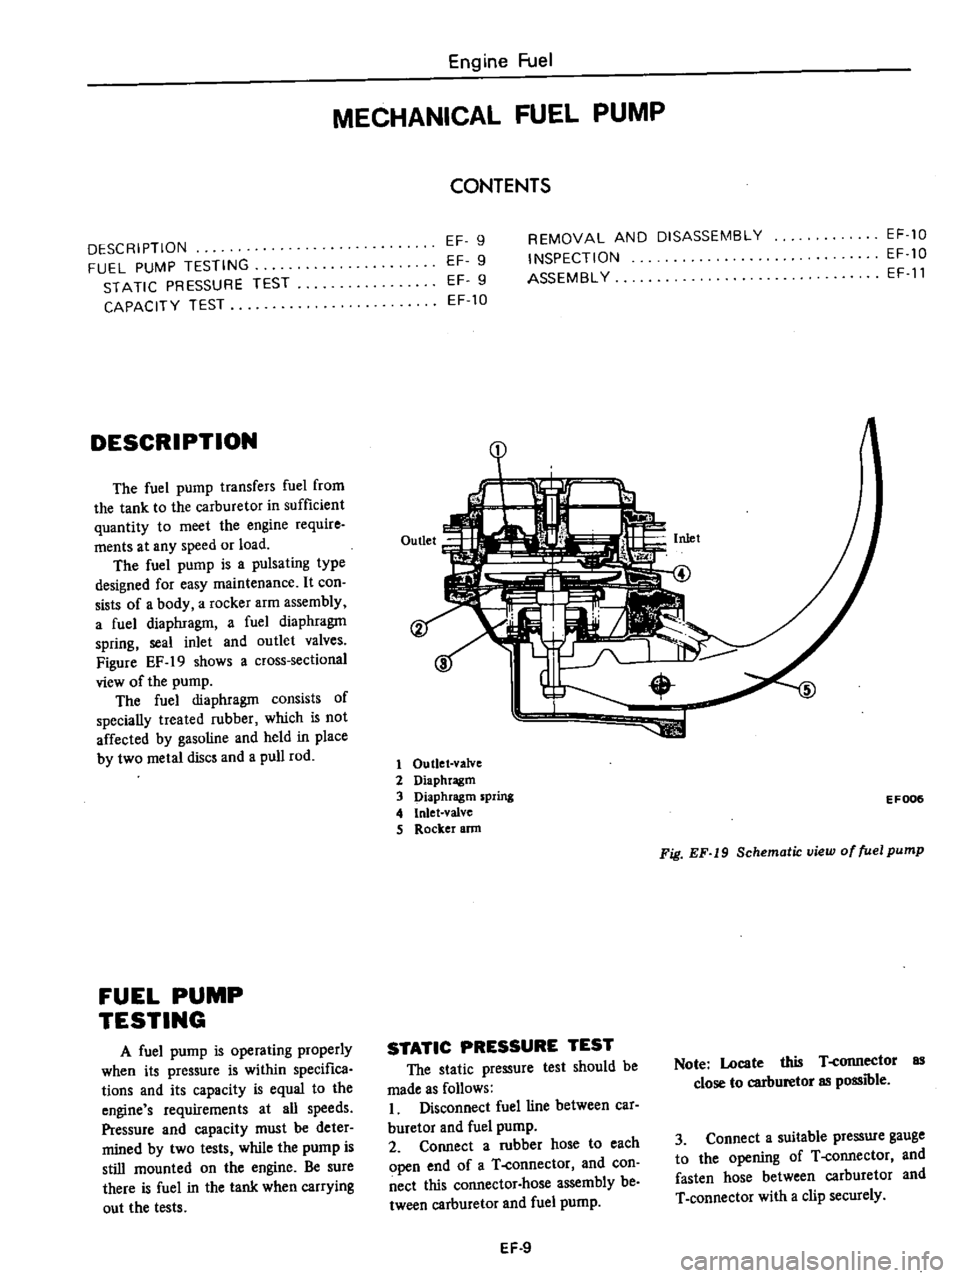
DESCRIPTION
The
fuel
pump
transfers
fuel
from
the
tank
to
the
carburetor
in
sufficient
quantity
to
meet
the
engine
require
ments
at
any
speed
or
load
The
fuel
pump
is
a
pulsating
type
designed
for
easy
maintenance
It
con
sists
of
a
body
a
rocker
arm
assembly
a
fuel
diaphragm
a
fuel
diaphragm
spring
seal
inlet
and
outlet
valves
Figure
EF
19
shows
a
cross
sectional
view
of
the
pump
The
fuel
diaphragm
consists
of
specially
treated
rubber
which
is
not
affected
by
gasoline
and
held
in
place
by
two
metal
discs
and
a
pull
rod
FUEL
PUMP
TESTING
A
fuel
pump
is
operating
properly
when
its
pressure
is
within
specifica
tions
and
its
capacity
is
equal
to
the
engine
s
requirements
at
all
speeds
Pressure
and
capacity
must
be
deter
mined
by
two
tests
while
the
pump
is
still
mounted
on
the
engine
Be
sure
there
is
fuel
in
the
tank
when
carrying
out
the
tests
Engine
Fuel
MECHANICAL
FUEL
PUMP
CONTENTS
EF
9
EF
9
EF
9
EF
10
REMOVAL
AND
DISASSEMBLY
INSPECTION
ASSEMBL
Y
EF
10
EF
10
EF
11
1
1
Outlet
valve
2
Diaphragm
3
Diaphragm
spring
4
Inlet
valve
S
Rocker
ann
EF006
Fig
EF
19
Schematic
view
of
fuel
pump
STATIC
PRESSURE
TEST
The
static
pressure
test
should
be
made
as
follows
I
Disconnect
fuel
line
between
car
buretor
and
fuel
pump
2
Connect
a
rubber
hose
to
each
open
end
of
a
T
connector
and
con
nect
this
connector
hose
assembly
be
tween
carburetor
and
fuel
pump
Note
Locate
this
T
connector
as
close
to
carburetor
as
possible
3
Connect
a
suitable
pressure
gauge
to
the
opening
of
T
connector
and
fasten
hose
between
carburetor
and
T
connector
with
a
clip
securely
EF
9
Page 106 of 537

4
Run
the
engine
at
varying
speeds
5
The
pressure
gauge
indicates
static
fuel
pressure
in
the
line
The
gauge
reading
should
be
within
the
following
range
0
21
to
0
27
kg
em2
3
0
to
3
8
psi
Note
If
the
fuel
in
carburetor
float
chamber
has
run
out
and
engine
has
stopped
clip
and
pour
fuel
into
carburetor
Fasten
clip
secure
ly
and
repe
1
static
pressure
test
Pressure
below
the
lower
limit
indi
cates
extreme
wear
on
one
part
or
a
small
amount
of
wear
on
each
working
part
It
also
indicates
ruptured
dia
phragm
worn
warped
dirty
or
gum
ming
valves
and
seats
or
a
weak
diaphragm
return
spring
Pressure
above
the
upper
limit
indicates
an
excessively
strong
tension
of
dia
phragm
return
spring
or
a
diaphragm
that
is
too
tight
Both
of
these
condi
tions
require
the
removal
of
pump
assembly
for
replacement
or
repair
CAPACITY
TEST
The
capacity
test
is
made
only
when
static
pressure
is
within
the
specifications
To
make
this
test
pro
ceed
as
follows
1
Disconnect
pressure
gauge
from
T
connector
and
in
its
vacant
place
install
a
suitable
container
as
a
fuel
sump
2
Run
engine
at
1
000
rpm
3
The
pump
should
deliver
1
000
cc
2
11
US
pt
of
fuel
in
one
minute
or
less
If
little
or
no
fuel
flows
from
the
open
end
of
pipe
it
is
an
indication
that
fuel
line
is
clogged
or
pump
is
malfunctioning
REMOVAL
AND
DISASSEMBLY
Remove
fuel
pump
assembly
by
unscrewing
two
mounting
nuts
and
disassemble
in
the
following
order
1
Separate
upper
body
and
lower
body
by
unscrewing
body
set
screws
Engine
Fuel
2
Take
off
cap
and
cap
gasket
by
removing
cap
screws
3
Unscrew
elbow
and
connector
4
Take
off
valve
retainer
by
un
screwing
two
retainer
screws
and
re
move
two
valves
5
To
remove
diaphragm
press
down
its
center
against
spring
force
With
diaphragm
pressed
down
tilt
it
until
the
end
of
pull
rod
touches
the
inne
wall
of
body
Then
release
diaphragm
to
unhook
push
rod
Be
careful
during
this
operation
not
to
damage
diaphragm
or
oil
se
L
i
J
EFOO7
Fig
EF
20
Remouing
pull
rod
6
Drive
rocker
arm
pin
out
with
a
press
or
hammer
8
o
6
7
8
@
INSPECTION
I
Check
upper
body
and
lower
body
for
cracks
EF
10
I
fuel
pump
cap
2
Cap
gasket
3
Valve
packing
4
fuel
pump
val
e
assembly
S
Valve
retainer
6
Diaphragm
assembly
7
Diaphragm
spring
8
PuRro
9
Lower
body
seal
washer
10
Lower
body
seal
11
Inkl
connector
12
Outlet
connector
13
Rocker
arm
spring
14
Rocker
arm
I
S
Rocker
artyl
side
pin
16
Fuel
pump
packing
17
Spacer
fuel
pump
fo
cylinder
block
EF510
Fig
EF
21
Slruc
ure
of
fuel
pump
2
Check
valve
assembly
for
wear
on
valve
and
valve
spring
Blow
valve
assembly
with
brea
th
to
examine
its
function
Page 107 of 537
3
Check
diaphragm
for
small
holes
carcks
or
wear
4
Check
rocker
arm
for
wear
at
the
mating
portion
with
camshaft
5
Check
rocker
arm
pin
for
wear
A
worn
pin
may
cause
oil
leakage
6
Check
all
other
components
for
any
abnormalities
and
replace
if
neces
sary
DESCRIPTION
INSPECTION
REMOVAL
AND
INSTALLATION
DESCRIPTION
The
electric
fuel
pump
is
adopted
on
air
conditioner
equipped
models
Engine
Fuel
ASSEMBLY
Reverse
the
order
of
disassembly
Closely
observe
the
following
instruc
tions
L
Use
new
gaskets
2
Lubricate
rocker
ann
rocker
arm
link
and
rocker
arm
pin
before
installa
tion
3
To
test
the
function
proceed
as
follows
Position
fuel
pump
assembly
about
I
meter
3
3
ft
above
fuel
level
of
fuel
strainer
and
connect
a
pipe
from
strainer
to
fuel
pump
Operate
rocker
arm
by
hand
If
fuel
is
drawn
up
soon
after
rocker
arm
is
released
fuel
pump
is
functioning
properly
ELECTRIC
FUEL
PUMP
CONTENTS
EF
11
EF
11
EF
12
DISASSEMBL
Y
ASSEMBL
Y
TROUBLE
DIAGNOSES
AND
CORRECTIONS
EF
12
EF
12
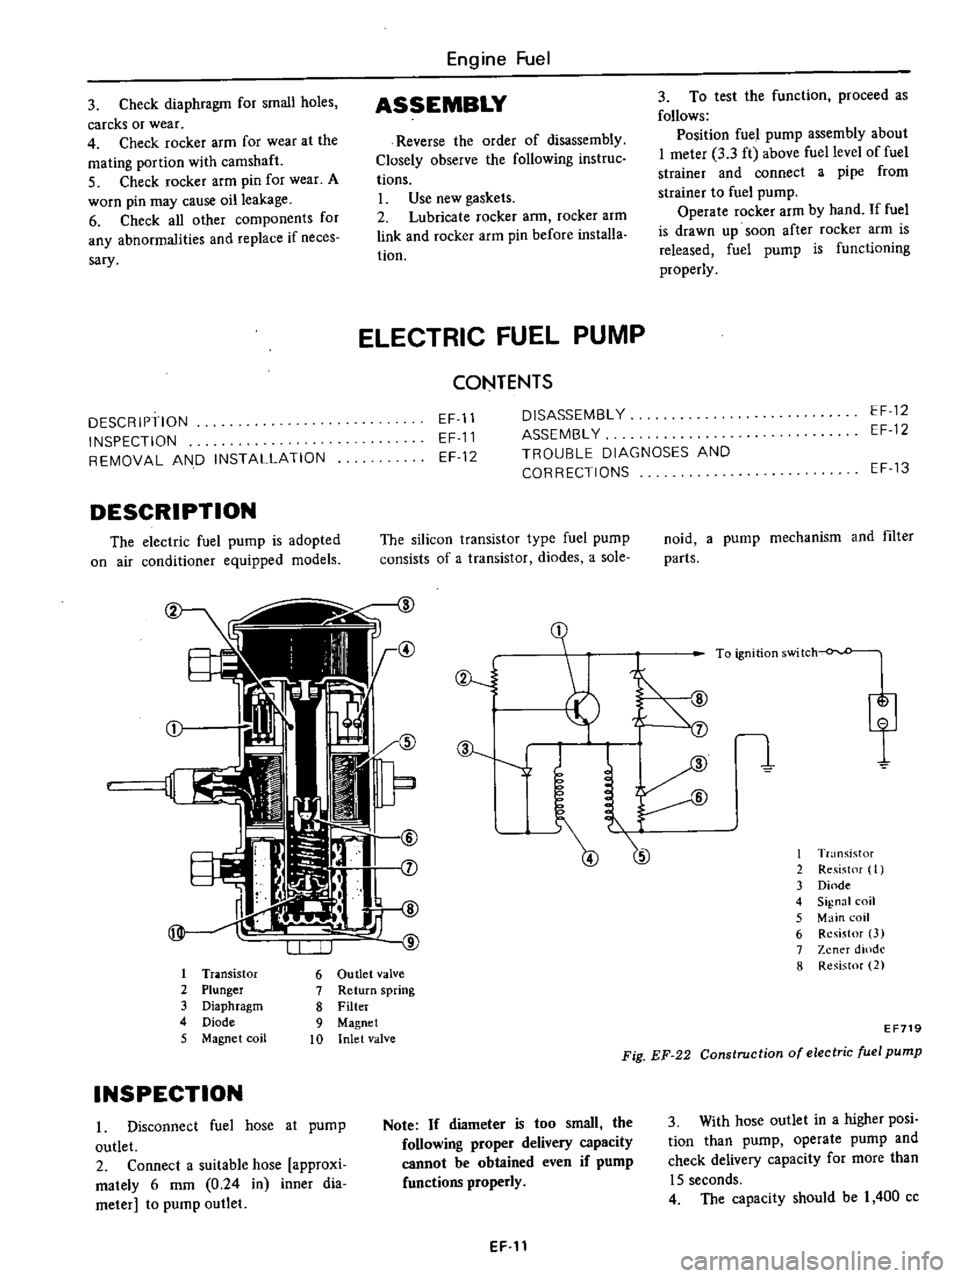
The
silicon
transistor
type
fuel
pump
consists
of
a
transistor
diodes
a
sole
I
Tr
lOsistor
6
Ou
tIet
valve
2
Plunger
7
Return
spring
3
Diaphragm
8
Filter
4
Diode
9
Magnet
5
Magnet
coil
10
Inlet
valve
INSPECTION
I
Disconnect
fuel
hose
at
pump
outlet
2
Connect
a
suitable
hose
approxi
mately
6
mm
0
24
in
inner
dia
meter
to
pump
outlet
ev
J
J
Note
If
diameter
is
too
small
the
following
proper
delivery
capacity
cannot
be
obtained
even
if
pump
functions
properly
EF
11
EF
13
noid
a
pump
mechanism
and
filter
parts
I
T
nsistor
2
Re
ist
f
I
3
Dinde
4
Signal
coil
5
Main
coil
6
Resistor
3
7
Zener
dlOdl
8
Resistor
2
EF719
Fig
EF
22
Construction
of
electric
fuel
pump
3
With
hose
outlet
in
a
higher
posi
tion
than
pump
operate
pump
and
check
delivery
capacity
for
more
than
15
seconds
4
The
capacity
should
be
I
400
cc
Page 117 of 537
Notes
a
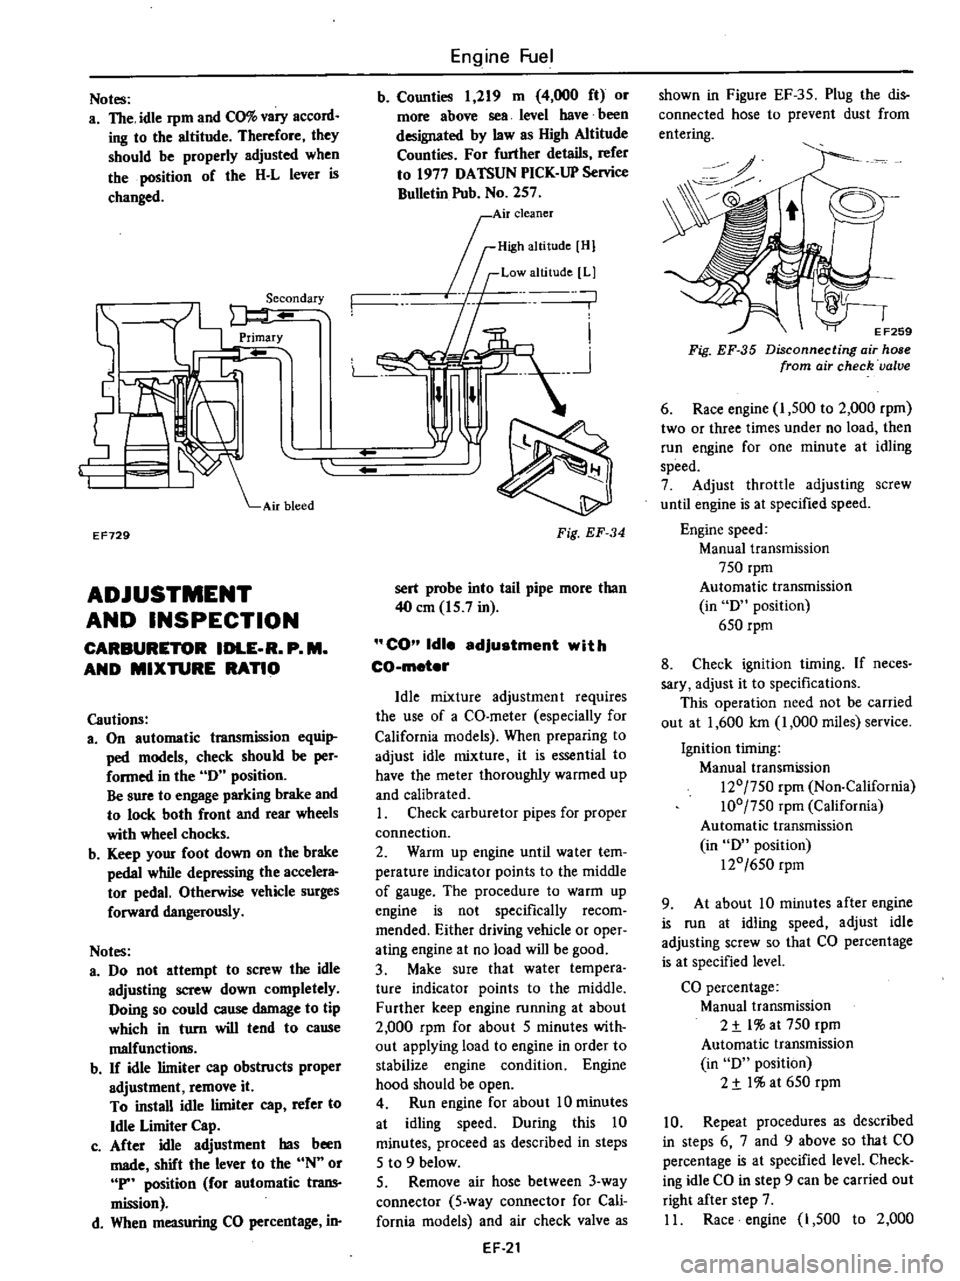
The
idle
rpm
and
CO
vary
accord
ing
to
the
altitude
Therefore
they
should
be
properly
adjusted
when
the
position
of
the
H
L
lever
is
changed
EF729
ADJUSTMENT
AND
INSPECTION
CARBURETOR
IDLE
R
P
M
AND
MIXTURE
RATIO
Cautions
3
On
automatic
transmission
equi
ped
models
check
should
be
per
formed
in
the
0
position
Be
sure
to
engage
parking
brake
and
to
lock
both
front
and
rear
wheels
with
wheel
chocks
b
Keep
your
foot
down
on
the
brake
pedal
while
depressing
the
accelera
tor
pedal
Otherwise
vehicle
surges
forward
dangerously
Notes
a
00
not
attempt
to
screw
the
idle
adjusting
screw
down
completely
Ooing
so
could
cause
damage
to
tip
which
in
turn
will
tend
to
cause
malfunctio11ll
b
If
idle
limiter
cap
obstructs
proper
adjustment
remove
it
To
install
idle
limiter
cap
refer
to
Idle
Limiter
Cap
c
After
idle
adjustment
has
been
made
shift
the
lever
to
the
N
or
P
position
for
automatic
trans
mission
d
When
measuring
CO
percentage
in
Engine
Fuel
b
Counties
1
219
m
4
000
ft
or
more
above
sea
level
have
been
designated
by
law
as
High
Altitude
Counties
For
further
details
refer
to
1977
OATSUN
PICK
UP
Service
Bulletin
Pub
No
257
0
I
Air
cleaner
rID
mOl
If
Low
altitude
Ll
n
n
L
n
Fig
EF
34
sert
probe
into
tail
pipe
more
than
40
em
15
7
in
CO
Idle
adjustment
with
CO
meter
Idle
mixture
adjustment
requires
the
use
of
a
CO
meter
especially
for
California
models
When
preparing
to
adjust
idle
mixture
it
is
essential
to
have
the
meter
thoroughly
warmed
up
and
calibrated
I
Check
carburetor
pipes
for
proper
connection
2
Warm
up
engine
until
water
tem
perature
indicator
points
to
the
middle
of
gauge
The
procedure
to
warm
up
engine
is
not
specifically
recom
mended
Either
driving
vehicle
or
oper
ating
engine
at
no
load
will
be
good
3
Make
sure
that
water
tempera
ture
indicator
points
to
the
middle
Further
keep
engine
running
at
about
2
000
rpm
for
about
5
minutes
with
out
applying
load
to
engine
in
order
to
stabilize
engine
condition
Engine
hood
should
be
open
4
Run
engine
for
about
10
minutes
at
idling
speed
Ouring
this
10
minutes
proceed
as
described
in
steps
5
to
9
below
5
Remove
air
hose
between
3
way
connector
5
way
connector
for
Cali
fornia
models
and
air
check
valve
as
EF
21
shown
in
Figure
EF
35
Plug
the
dis
connected
hose
to
prevent
dust
from
entering
0
o
EF259
Fig
EF
35
Disconnecting
air
hose
from
air
check
valve
6
Race
engine
I
500
to
2
000
rpm
two
or
three
times
under
no
load
then
run
engine
for
one
minute
at
idling
speed
7
Adjust
throttle
adjusting
screw
until
engine
is
at
specified
speed
Engine
speed
Manual
transmission
750
rpm
Automatic
transmission
in
0
position
650
rpm
8
Check
ignition
timing
If
neces
sary
adjust
it
to
specifications
This
operation
need
not
be
carried
out
at
1
600
Ian
1
000
miles
service
Ignition
timing
Manual
transmission
120
750
rpm
Non
California
100
750
rpm
California
Automatic
transmission
in
0
position
120
650
rpm
9
At
about
10
minutes
after
engine
is
run
at
idling
speed
adjust
idle
adjusting
screw
so
that
CO
percentage
is
at
specified
level
CO
percentage
Manual
transmission
2
t
l
at
750
rpm
Automatic
transmission
in
0
position
2
t
I
at
650
rpm
10
Repeat
procedures
as
described
in
steps
6
7
and
9
above
so
that
CO
percentage
is
at
specified
level
Check
ing
idle
CO
in
step
9
can
be
carried
out
right
after
step
7
II
Race
engine
1
500
to
2
000
Page 118 of 537
rpm
two
or
three
iimes
under
no
load
and
make
sure
that
specified
CO
per
centage
is
obtained
12
Connect
air
hose
to
air
check
valve
If
engine
speed
increases
readjust
it
to
the
specified
speed
with
throttle
adjustingsqew
CO
idle
edJustment
without
CO
meter
If
CO
meter
is
not
available
the
following
procedures
may
be
used
L
Check
carburetor
pipes
for
proper
connection
2
Warm
up
engine
until
water
tem
perature
indicator
points
to
the
middle
of
gauge
The
procedure
to
warm
up
engine
is
not
specifically
recom
mended
Either
driving
vehicle
or
oper
ating
engine
at
no
load
will
be
good
3
Make
sure
that
water
temperature
indicator
points
to
the
middle
Further
keep
engine
running
at
about
2
000
rpm
for
about
5
minutes
without
applying
load
to
engine
in
order
to
stabilize
engine
condition
Engine
hood
should
be
open
4
Run
engine
for
about
10
minutes
at
idling
speed
During
this
10
minutes
proceed
as
described
in
steps
5
to
9
below
5
Remove
air
hose
between
3
way
connector
5
way
connector
for
Cali
fornia
models
and
air
check
valve
shown
in
Figure
EF
35
Plug
the
dis
connected
hose
19
prevent
dust
from
entering
6
Race
engine
1
500
to
2
000
rpm
two
or
three
times
under
no
load
then
run
engine
for
one
minute
at
idling
speed
7
Adjust
throttle
adjusting
screw
so
that
engine
speeds
are
as
indicated
below
Engine
speed
Manual
transmission
815
rpm
Automatic
transmission
in
D
position
670
rpm
8
Check
ignition
timing
if
neces
sary
adjust
it
to
the
value
required
by
specifications
This
operation
need
not
be
carried
out
at
1
600
km
1
000
miles
service
9
At
about
10
minutes
after
engine
Engine
Fuel
is
run
at
idling
speed
adjust
idle
adjusting
screw
until
maximum
rpm
is
obtained
10
Repeat
procedures
as
described
in
steps
6
7
and
9
above
until
engine
speed
at
best
idle
mixture
is
815
rpm
for
manual
transmission
models
and
670
rpm
for
automatic
transmission
models
in
D
position
Adjustment
in
step
9
can
be
carried
out
right
after
step
7
11
Turn
the
idle
adjusting
screw
clockwise
until
engine
speed
drops
off
below
specified
rpm
Engine
speed
drops
off
Manual
transmission
60
to
70
rpm
Automatic
transmission
in
D
position
15
to
25
rpm
12
Connect
air
hose
to
air
check
valve
If
engine
speed
increases
readjust
it
to
the
specified
speed
with
throttle
adjusting
screw
Idle
limiter
cep
Do
not
remove
this
idle
limiter
cap
unless
necessary
If
this
unit
is
re
moved
it
must
be
readjusted
at
lime
of
installation
To
adjust
proceed
as
follows
I
After
adjusting
throttle
or
idle
speed
adjusting
screw
check
to
be
sure
that
the
amount
of
CO
contained
in
exhaust
gases
meets
the
established
standard
2
Install
idle
limiter
cap
in
position
making
sure
that
the
adjusting
screw
can
rotate
another
1
8
turn
in
the
CO
RICH
direction
Carbo
to
per
CO
rich
450
lIS
rotation
t
CO
lean
J
SQ
dl
lim
ET031
1
e
Iter
cap
Fig
EF
36
Setting
idle
limiter
cap
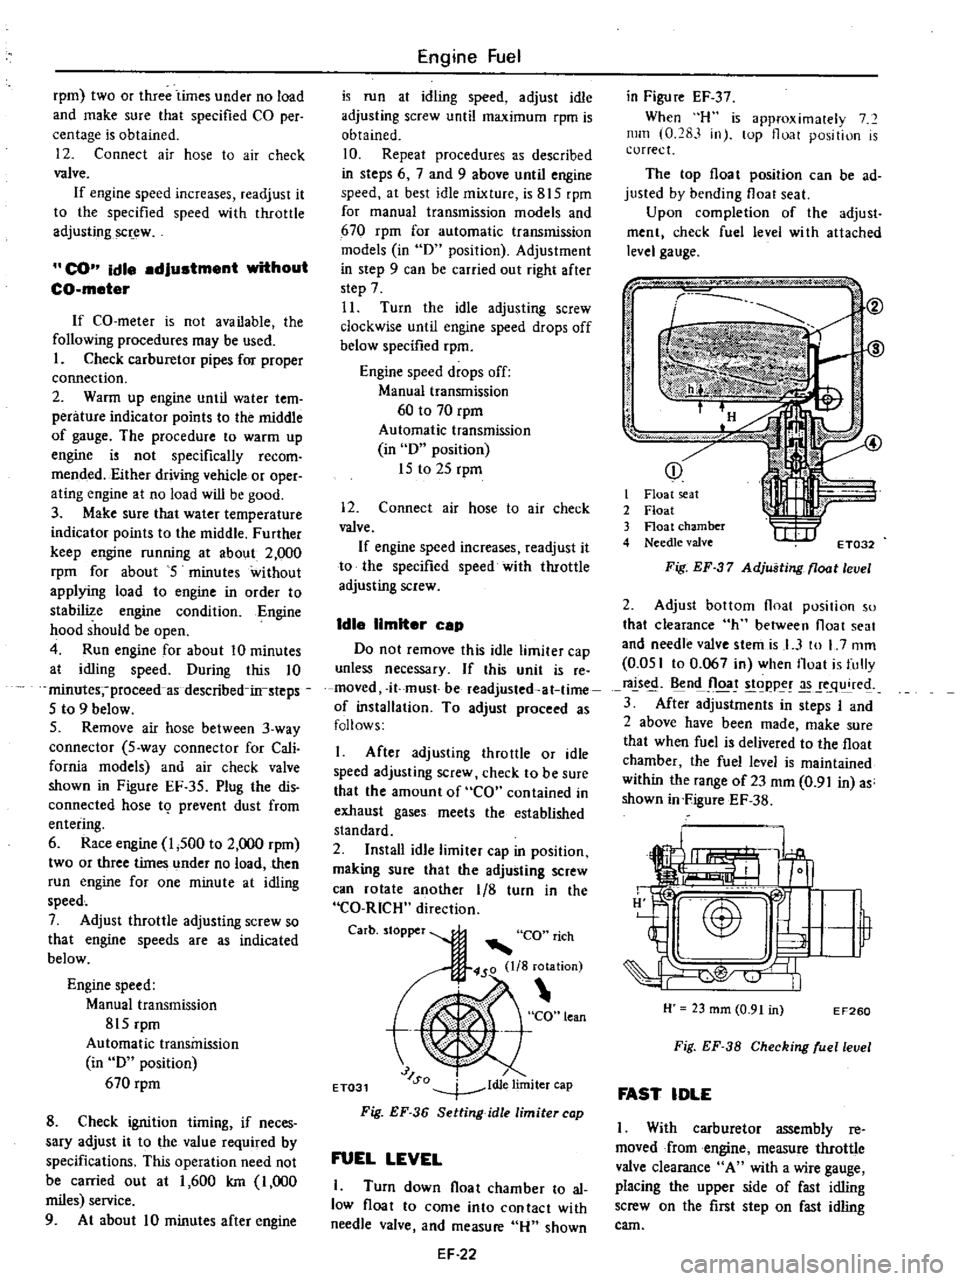
FUEL
LEVEL
1
Turn
down
float
chamber
to
al
low
float
to
come
into
contact
with
needle
valve
and
measure
Hu
shown
EF
22
in
Figu
re
EF
37
When
H
is
approximalely
7
mill
0
283
in
lOp
float
position
is
correct
The
top
float
position
can
be
ad
justed
by
bending
float
seat
Upon
completion
of
the
adjust
ment
check
fuel
level
wi
th
attached
level
gauge
p
j
i
I
it
I
Float
seat
2
Float
3
Float
chamber
4
Needle
valve
t
I
IIf
ET032
Fig
EF
37
Adjusting
float
level
2
Adjust
bottom
float
position
so
that
clearance
h
between
float
seat
and
needle
valve
stemis
I
3
to
L
7
mm
0
051
to
0
067
in
when
Iloat
is
fully
rals
n
Jloa
t
goppe
q
re
3
After
adjustments
in
steps
I
and
2
above
have
been
made
make
sure
that
when
fuel
is
delivered
to
the
float
chamber
the
fuel
level
is
maintained
within
the
range
of23
mm
0
91
in
as
shown
in
FigureEF
38
H
23
mm
0
91
in
EF260
Fig
EF
38
Checking
ruellevel
FAST
IDLE
I
With
carburetor
assembly
reo
moved
from
engine
measure
throttle
valve
clearance
A
with
a
wire
gauge
placing
the
upper
side
of
fast
idling
screw
on
the
first
step
on
fast
idling
cam
Page 126 of 537
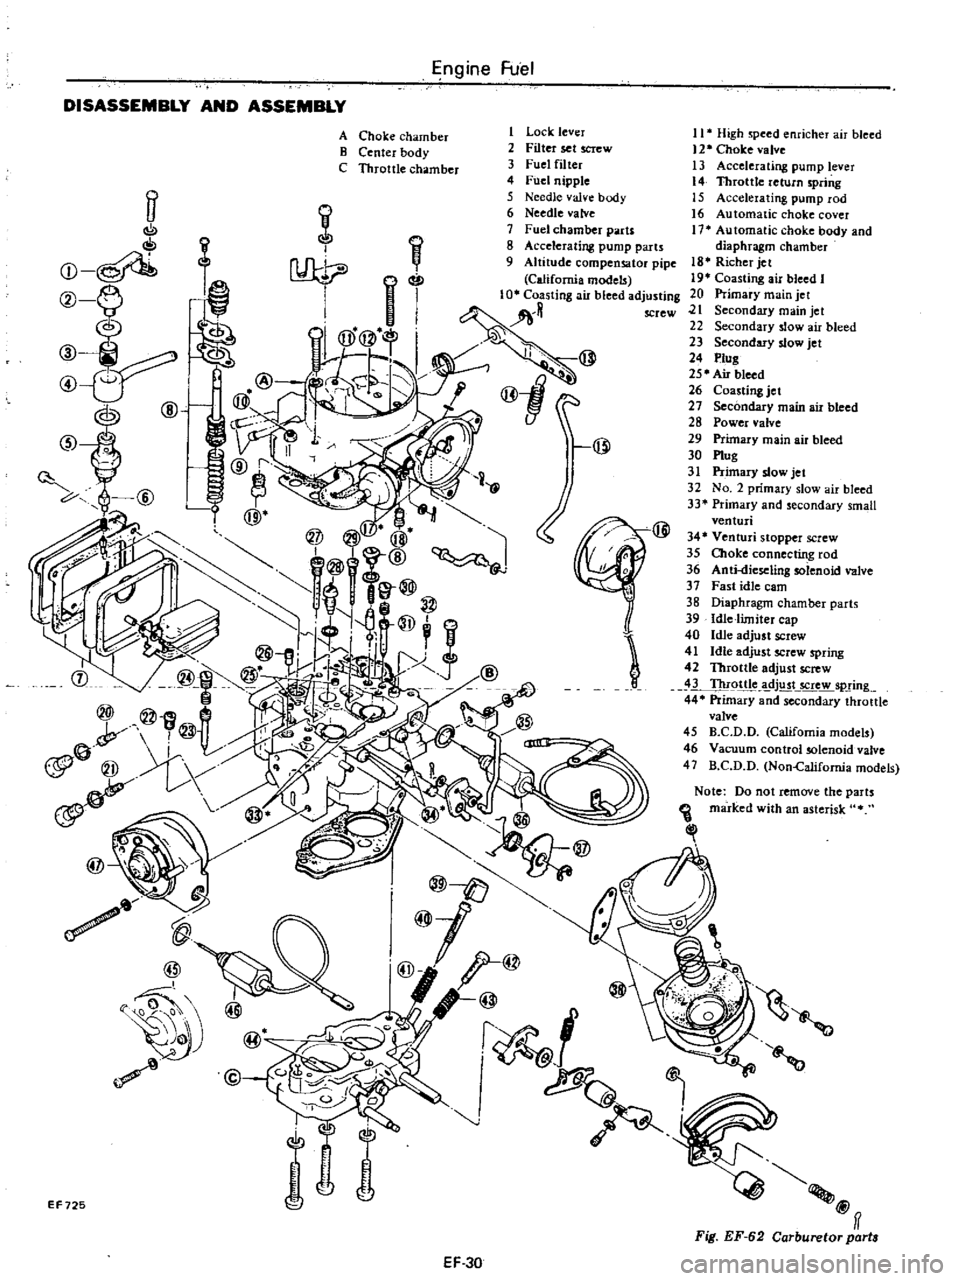
Engine
Fuel
DISASSEMBLY
AND
ASSEMBLY
ff
C
oI
Q
f
@
ID
J
@
tJ
@
1
Lock
lever
2
Filter
set
screw
3
Fuel
filter
4
Fuel
nipple
5
Needle
valve
body
6
Needle
valve
7
Fuel
chamber
parts
8
Accelerating
pump
parts
9
Altitude
compensator
pipe
California
models
tng
ail
bleed
adJ
@
@1
@
A
Choke
chamber
B
Center
body
C
Throttle
chamber
I
J
@
EF725
EF30
11
High
speed
enricher
air
bleed
12
Choke
valve
13
Accelerating
pump
lever
14
Throttle
return
spring
15
Accelerating
pump
rod
16
Automatic
choke
cover
17
Automatic
choke
body
and
diaphragm
chamber
18
Richer
jet
19
Coasting
air
bleed
I
20
Primary
main
jet
21
Secondary
main
jet
22
Secondary
slow
air
bleed
23
Secondary
slow
jet
24
Plug
25
Air
bleed
26
Coasting
jet
27
Secondary
main
air
bleed
28
Power
valve
29
Primary
main
air
bleed
30
Plug
31
Primary
slow
jet
32
No
2
primary
slow
air
bleed
33
Primary
and
secondary
small
venturi
34
Venturi
stopper
screw
35
Choke
connecting
rod
36
Anti
dieseling
solenoid
valve
37
Fast
idle
cam
38
Diaphragm
chamber
parts
39
Idle
limiter
cap
40
Idle
adjust
screw
41
Idle
adjust
screw
spring
42
Throttle
adjust
screw
3
Thr9ttle
dj
t
5Crew
spring
44
Primary
and
secondary
throttle
valve
45
B
C
D
D
California
models
46
Vacuum
control
solenoid
valve
47
B
C
D
D
Non
Califomia
models
Note
Do
not
remove
the
parts
marked
with
an
asterisk
Ill
@ff
Fig
EF
62
Carburetor
part
Page 129 of 537
Engine
Fuel
Throttle
chamber
parts
I
Idle
limiter
cap
2
Idle
adjust
screw
3
Idle
adjust
screw
sprinl
4
Throttle
adjust
screw
5
Throttle
adjust
screw
sprini
6
Primary
and
secondary
throttle
valves
7
Nut
Notc
Do
not
remove
the
parlS
marked
with
an
asterisk
@ff
EF827
Fig
EF
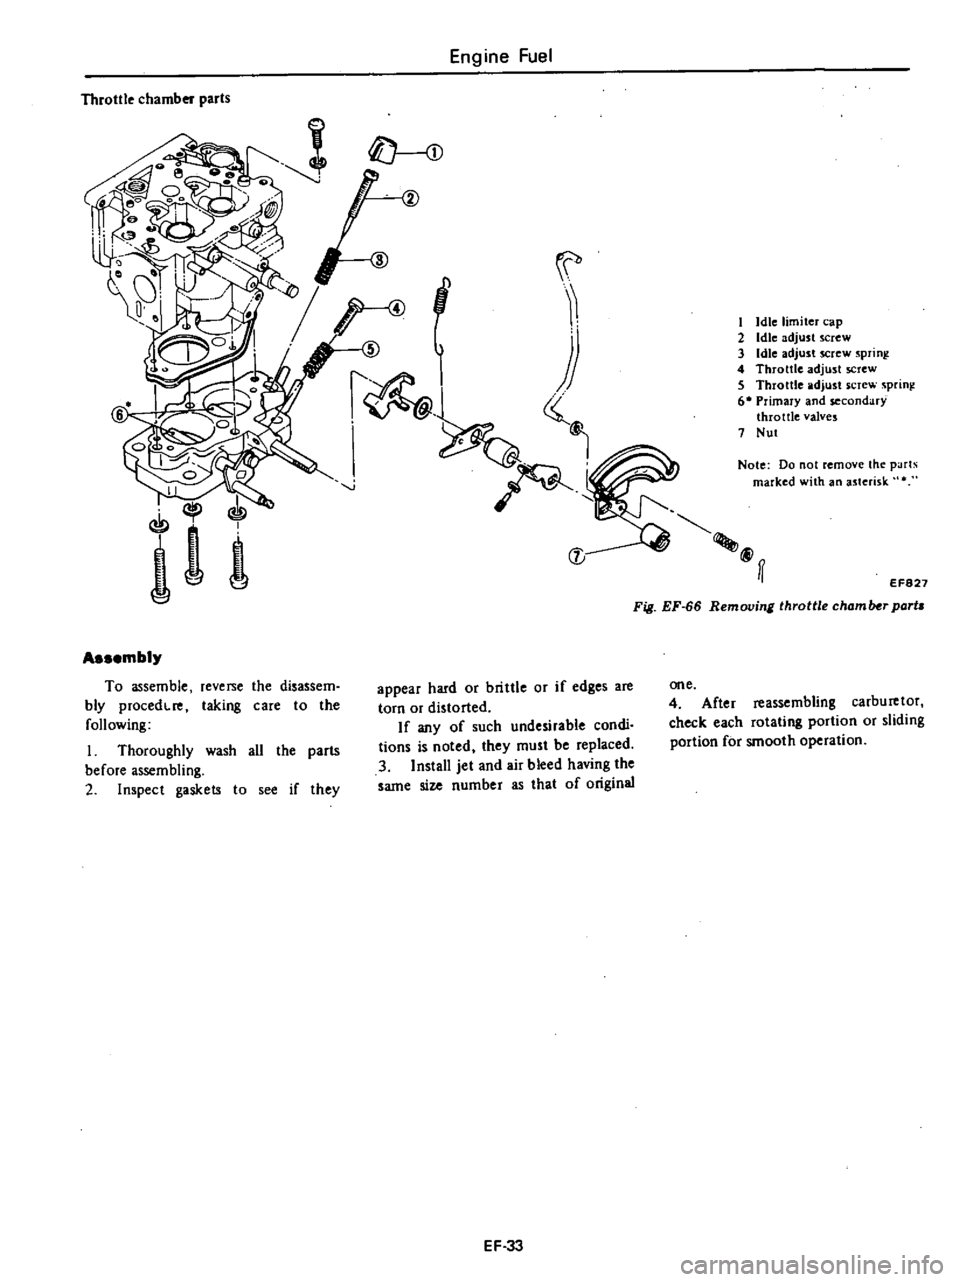
66
Removing
throttle
chamlHr
parta
Assembly
To
assemble
reverse
the
disassem
bly
procedcre
taking
care
to
the
following
I
Thoroughly
wash
all
the
parts
before
assembling
2
Inspect
gaskets
to
see
if
they
appear
hard
or
brittle
or
if
edges
are
torn
or
distorted
If
any
of
such
undesirable
condi
tions
is
noted
they
must
be
replaced
3
Install
jet
and
air
bleed
having
the
same
size
number
as
that
of
original
one
4
After
reassembling
carburetor
check
each
rotating
portion
or
sliding
portion
for
smooth
operation
EF
33
Page 139 of 537
Emission
Control
System
EARLY
FUEL
EVAPORATIVE
SYSTEM
E
F
E
DESCRIPTION
spring
and
counterweight
which
are
assembled
on
the
valve
shaft
projecting
to
the
rear
outside
of
the
exhaust
manifold
The
counterweight
is
se
cured
to
the
valve
shaft
with
key
bolt
and
snap
ring
EC
4
A
control
valve
welded
to
the
valve
shaft
is
wtalled
on
the
exhaust
manifold
through
bushing
This
con
trol
valve
is
called
Heat
control
valve
The
heat
control
valve
is
ac
luated
by
the
coil
spring
thermostat
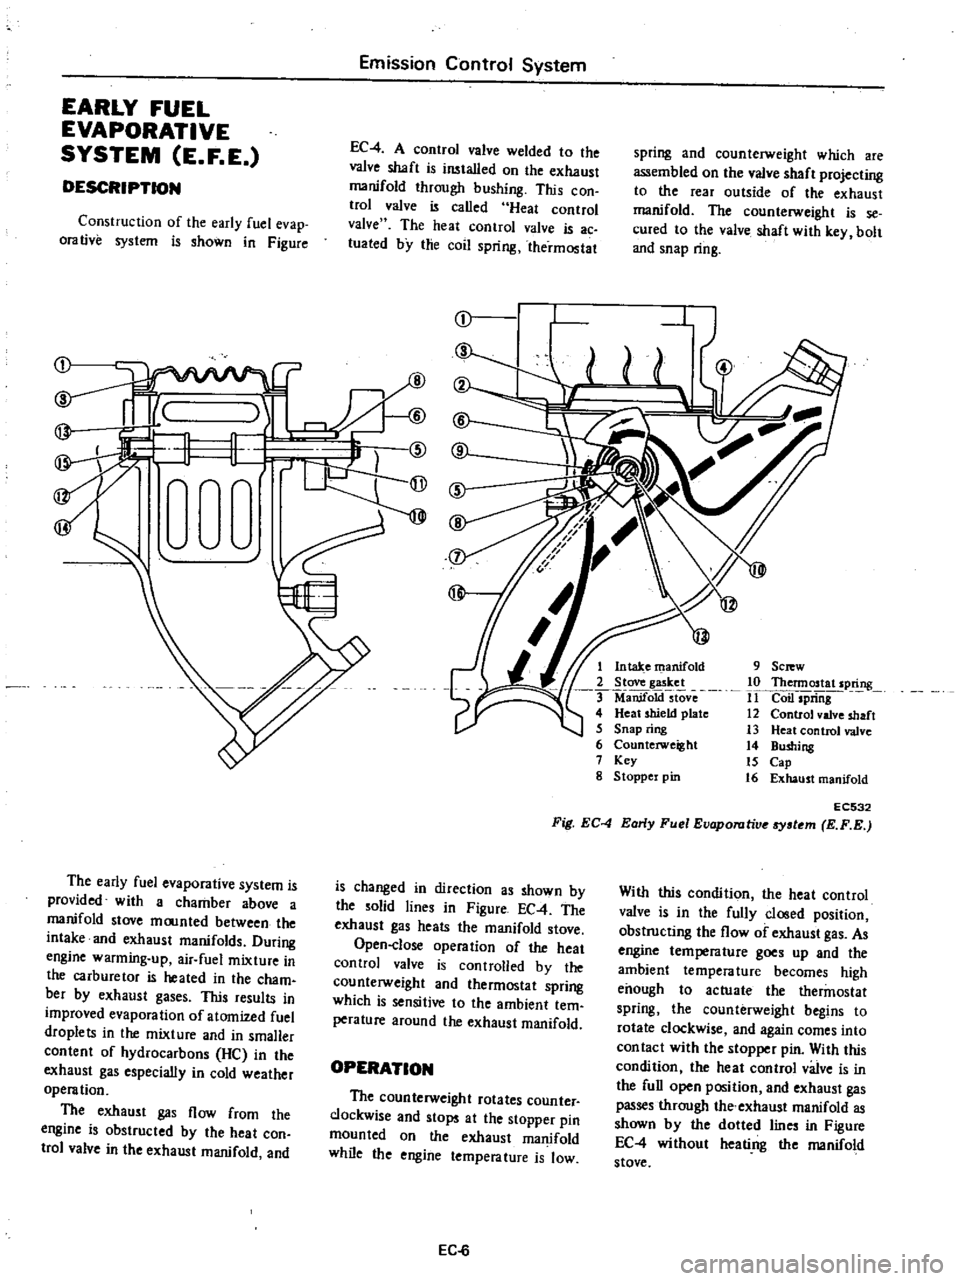
Construction
of
the
early
fuel
evap
orative
system
is
shown
in
Figure
r
I
1
@
rW
9
Sc
w
10
Thennostat
spring
11
Coil
spriiig
12
Control
valve
shaft
13
Heat
control
valve
14
Bushing
15
Cap
16
Exhaust
manifold
1
Intake
manifold
2
Stove
gasket
ManifoktstOve
4
Heat
shield
plate
5
Snap
ring
6
Counterweight
7
Key
g
Stoppel
pin
EC532
Fig
EC
4
Early
Fuel
Evaporutive
tem
E
F
E
The
early
fuel
evaporative
system
is
provided
with
a
chamber
above
a
manifold
stove
moonted
between
the
intake
and
exhaust
manifolds
During
engine
warming
up
air
fuel
mixture
in
the
carburetor
is
heated
in
the
cham
bet
by
exhaust
gases
This
results
in
improved
evaporation
of
atomized
fuel
droplets
in
the
mixture
and
in
smaller
content
of
hydrocarbons
He
in
the
exhaust
gas
especially
in
cold
weather
operation
The
exhaust
gas
flow
from
the
engine
is
obstructed
by
the
heat
con
trol
valve
in
the
exhaust
manifold
and
is
changed
in
direction
as
shown
by
the
solid
lines
in
Figure
EC
4
The
exhaust
gas
heats
the
manifold
stove
Open
close
operation
of
the
heat
control
valve
is
controlled
by
the
counterweight
and
thermostat
spring
which
is
sensitive
to
the
ambient
tem
perature
around
the
exhaust
manifold
With
this
condition
the
heat
control
valve
is
in
the
fully
closed
position
obstructing
the
flow
of
exhaust
gas
As
engine
tempera
lure
goes
up
and
the
ambient
temperature
becomes
high
enough
to
actuate
the
thermostat
spring
the
counterweight
begins
to
rotate
clockwise
and
again
comes
into
con
tact
with
the
stopper
pin
With
this
condition
the
heat
control
valve
is
in
the
full
open
position
and
exhaust
gas
passes
through
the
exhaust
manifold
as
shown
by
the
dotted
lines
in
Figure
EC
4
without
heati
ng
the
manifold
stove
OPERATION
The
counterweight
rotates
counter
clockwise
and
stops
at
the
stopper
pin
mounted
on
the
exhaust
manifold
while
the
engine
temperature
is
low
EC
6
Page 163 of 537

3
Check
ignition
system
with
regard
to
the
following
items
Refer
to
Inspection
of
Ignition
System
1
Ignition
AMP
2
Distributor
Emission
Control
System
3
Ignition
coil
4
High
tension
code
5
Spark
plug
4
Check
idle
CO
adjustment
Refer
to
Inspection
of
Idle
CO
Adjustment
Note
Even
if
there
is
nothing
wrong
with
engine
the
warning
lamp
may
come
on
if
vebicle
is
being
driven
on
a
steep
slope
continuously
in
lower
gears
at
high
engine
speeds
EVAPORATIVE
EMISSION
CONTROL
SYSTEM
CONTENTS
DESCRIPTION
OPERATION
INSPECTION
FUEL
TANK
VAPOR
LIQUID
SEPARATOR
AND
VAPOR
VENT
LINE
DESCRIPTION
The
evaporative
emission
control
system
is
used
to
reduce
hydrocarbons
emitted
to
the
atmosphere
from
the
fuel
system
This
reduction
of
hydro
EC
30
EC
30
EC
31
CARBON
CANISTER
PURGE
CONTROL
VALVE
CARBON
CANISTER
FILTER
FUEL
TANK
VACUUM
RELIEF
VALVE
IEC
32
IEC
32
EC
32
EC
31
carbons
is
accomplished
by
activated
charcoals
in
the
carbon
canister
This
system
is
made
up
to
the
following
I
Fuel
tank
with
positive
sealing
filler
cap
@
2
Vapor
liquid
separator
3
Vapor
vent
line
4
Carbon
canister
5
Vacuum
signal
line
6
Canister
purge
line
5
OPERATION
Fuel
vapors
from
the
sealed
fuel
tank
are
led
into
the
carbon
canister
1
Fuel
tank
2
Fuel
nIler
cap
with
vacuum
relief
valve
3
liquid
vapor
separator
4
Vapor
vent
line
5
Canister
purge
line
6
Vacuum
signal
line
7
Carbon
canister
EF274
Fig
EC
76
Schematic
drawing
of
l
Iaporotive
emiaion
control6ydem
The
canister
is
fined
with
activated
charcoals
to
absorb
the
fuel
vapors
EC
30
when
the
engirie
is
at
rest
or
at
idlin
ll
See
Figure
EC
77
Page 164 of 537
J
1
Fuel
tank
2
Fuel
f1l1er
cap
with
vacuum
relief
valve
3
Liquid
vapor
separator
4
Vapor
vent
line
5
Vacuum
signalUne
As
the
throttle
valve
opens
and
vehicle
speed
increases
vacuum
pres
sure
in
the
vacuum
signal
line
forces
rHL
JL
I
EC785
INSPECTION
FUEL
TANK
VAPOR
LIQUID
SEPARATOR
AND
VAPOR
VENT
LINE
I
Check
all
hoses
and
fuel
tank
mler
cap
2
Disconnect
the
vapor
vent
line
connecting
carbon
canister
to
vapor
liquid
separator
3
Connect
a
3
way
connector
a
Emission
Control
System
Close
at
idling
Open
at
rest
i
J
17
f
Fuel
vapor
6
Canister
purge
line
7
Throttle
valv
8
Engine
9
Carbon
canister
10
Activated
carbon
11
Screen
12
Filter
13
Purge
control
valve
14
Spring
15
Diaphragm
16
Fixed
orifice
i
j
EC784
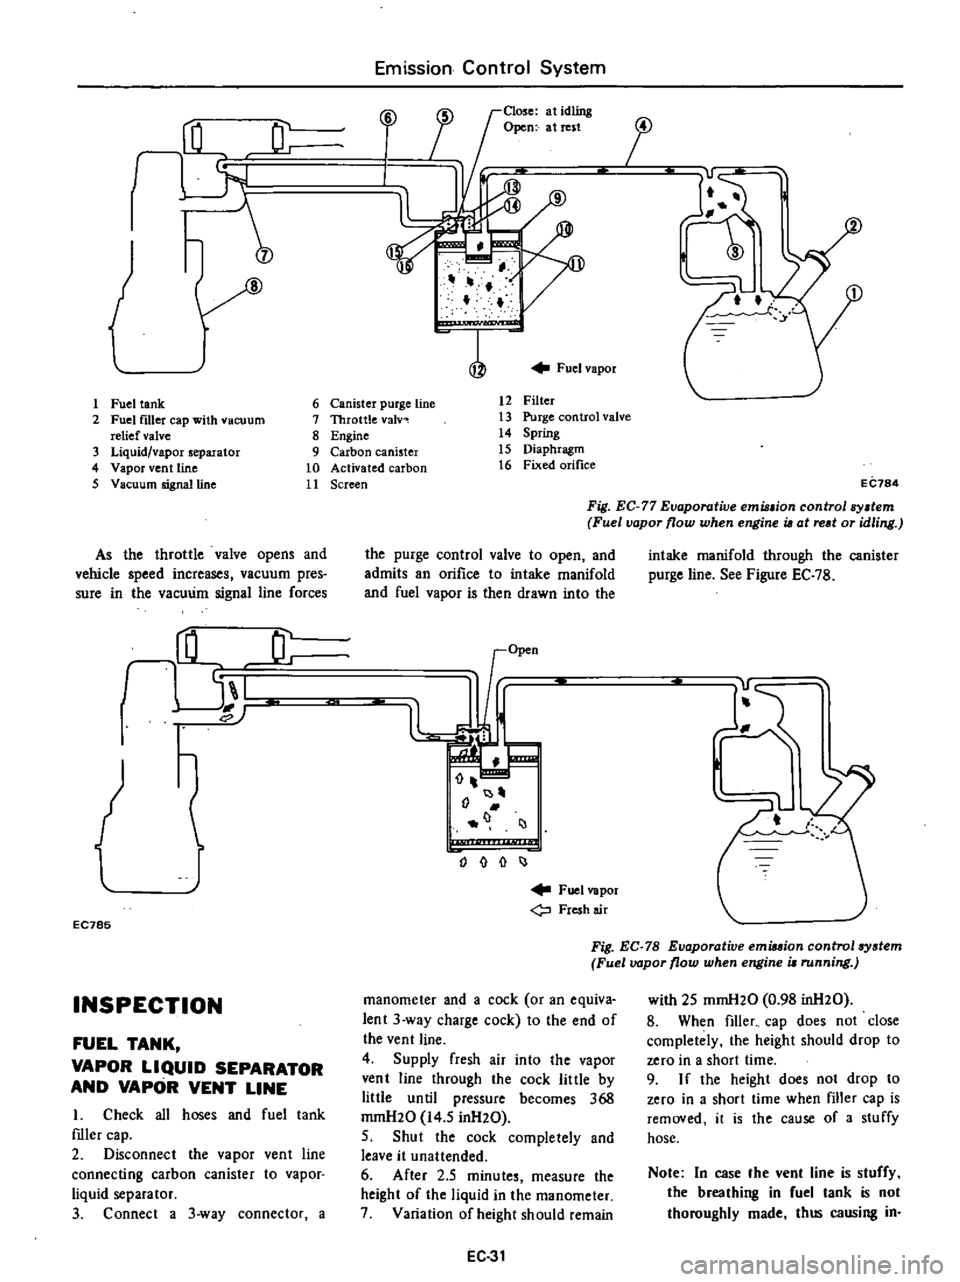
Fig
EC
77
Evaporative
emu
ion
control
sy
tem
Fuel
vapor
flow
when
engine
i6
at
red
or
idling
the
purge
control
valve
to
open
and
admits
an
orifice
to
intake
manifold
and
fuel
vapor
is
then
drawn
into
the
I
J
o
I
Fuel
vapor
Fresh
air
intake
manifold
through
the
canister
purge
line
See
Figure
EC
7B
Fig
EC
78
Evaporative
emiuion
control
system
Fuel
vapor
flow
when
engine
i
running
manometer
and
a
cock
or
an
equiva
lent
3
way
charge
cock
to
the
end
of
the
vent
line
4
Supply
fresh
air
into
the
vapor
vent
line
through
the
cock
little
by
little
until
pressure
becomes
368
mrnH20
14
5
inH20
5
Shut
the
cock
completely
and
leave
it
unattended
6
After
2
5
minutes
measure
the
height
of
the
liquid
in
the
manometer
7
Variation
of
height
should
remain
EC
31
with
25
mmH20
0
98
inH20
8
When
filler
cap
does
not
close
completely
the
height
should
drop
to
zero
in
a
short
time
9
I
f
the
height
does
not
drop
to
zero
in
a
short
time
when
filler
cap
is
removed
it
is
the
cause
of
a
stuffy
hose
Note
In
case
the
vent
line
is
stuffy
the
breathing
in
fuel
tank
is
not
thoroughly
made
thus
causing
in