weight DATSUN PICK-UP 1977 Service Manual
[x] Cancel search | Manufacturer: DATSUN, Model Year: 1977, Model line: PICK-UP, Model: DATSUN PICK-UP 1977Pages: 537, PDF Size: 35.48 MB
Page 26 of 537
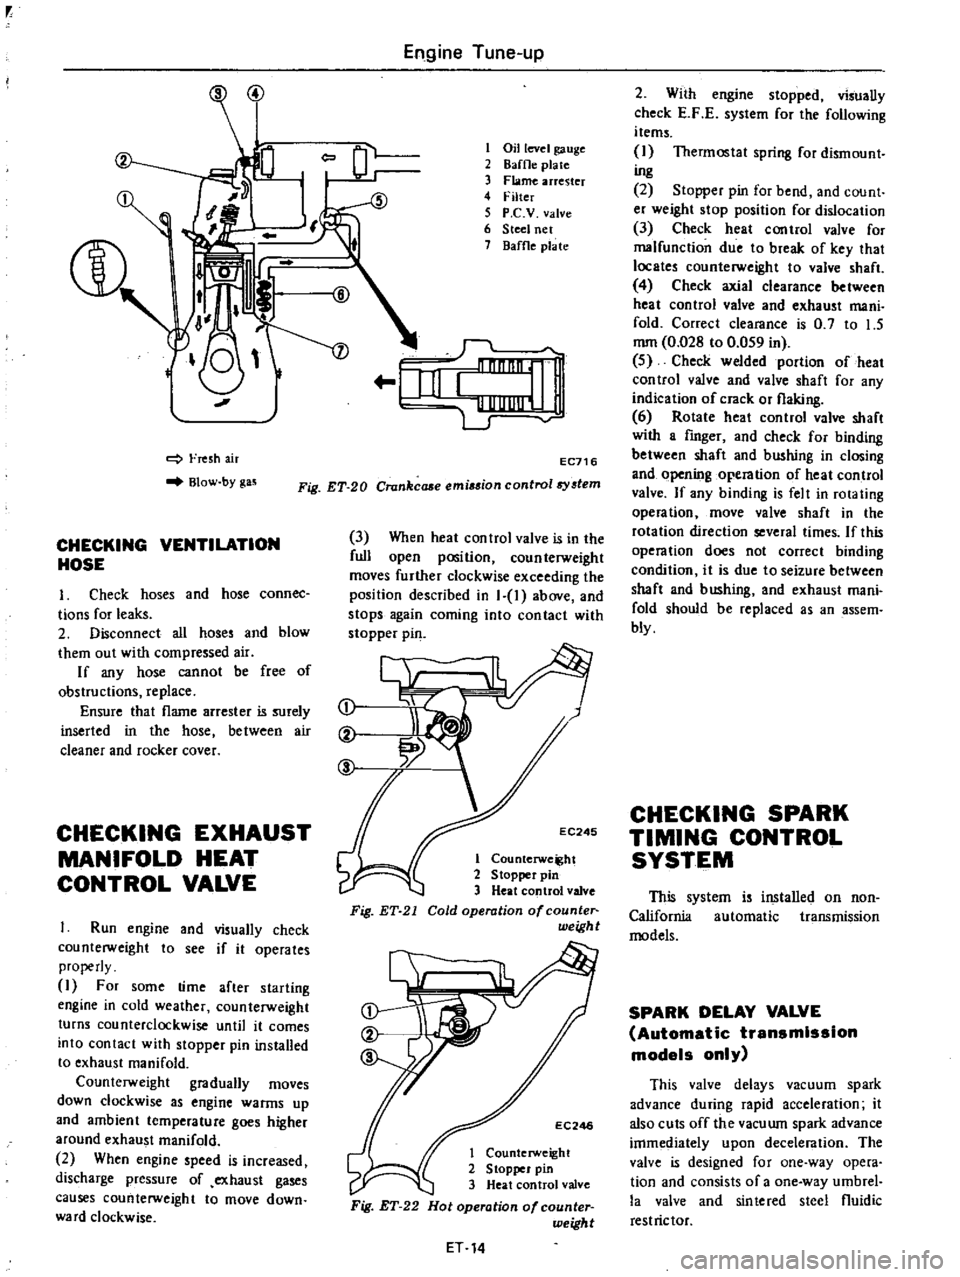
Fresh
air
Blow
by
gas
CHECKING
VENTILATION
HOSE
1
Check
hoses
and
hose
connec
tions
for
leaks
2
Disconnect
all
hoses
and
blow
them
out
with
compressed
air
If
any
hose
cannot
be
free
of
obstructions
replace
Ensure
that
flame
arrester
is
surely
inserted
in
the
hose
between
air
cleaner
and
rocker
cover
CHECKING
EXHAUST
MANIFOLD
HEAT
CONTROL
VALVE
Run
engine
and
visually
check
counterweight
to
see
if
it
operates
properly
I
For
some
time
after
starting
engine
in
cold
weather
counterweight
turns
counterclockwise
until
it
comes
into
contact
with
stopper
pin
installed
to
exhaust
manifold
Counterweight
gradually
moves
down
clockwise
as
engine
warms
up
and
ambient
temperature
goes
higher
around
exhaust
manifold
2
When
engine
speed
is
increased
discharge
pressure
of
exhaust
gases
causes
counterweight
to
move
down
ward
clockwise
Engine
Tune
up
CoOl
1
Oil
level
gauge
2
8affle
pia
te
3
Flame
arrester
4
Filter
5
P
C
V
valve
6
Steel
net
7
Baffle
plate
1fiI
o
EC716
Fig
ET
20
Crankcaae
emi
ion
control8
tem
3
When
heat
control
valve
is
in
the
full
open
position
counterweight
moves
further
clockwise
exceeding
the
position
described
in
1
1
above
and
stops
again
coming
into
contact
with
stopper
pin
ct
t
C
EC245
1
Counterwe
ht
2
Stopper
pin
3
Heat
control
valve
Fig
ET
21
Cold
operation
of
counte
weigh
t
EC246
1
Counterweight
2
Stopper
pin
3
Heat
control
valve
Fig
ET
22
Hot
operation
of
counter
weight
ET
14
2
With
engine
stopped
visually
check
E
F
E
system
for
the
following
items
I
Thermostat
spring
for
dismount
ing
2
Stopper
pin
for
bend
and
count
er
weight
stop
position
for
dislocation
3
Check
heat
control
valve
for
malfunction
due
to
break
of
key
that
locates
counterweight
to
valve
shaft
4
Check
axial
clearance
between
heat
control
valve
and
exhaust
mani
fold
Correct
clearance
is
0
7
to
1
5
mm
0
028
to
0
059
in
5
Check
welded
portion
of
heat
control
valve
and
valve
shaft
for
any
indication
of
crack
or
flaking
6
Rotate
heat
control
valve
shaft
with
a
fmger
and
check
for
binding
between
shaft
and
bushing
in
closing
and
opening
operation
of
heat
control
valve
If
any
binding
is
felt
in
rotating
operation
move
valve
shaft
in
the
rotation
direction
several
times
If
this
operation
does
not
correct
binding
condition
it
is
due
to
seizure
between
shaft
and
bushing
and
exhaust
mani
fold
should
be
replaced
as
an
assem
bly
CHECKING
SPARK
TIMING
CONTROL
SYSTEM
This
system
is
installed
on
non
California
automatic
transmission
models
SPARK
DELAY
VALVE
Automatic
transmission
models
only
This
valve
delays
vacuum
spark
advance
during
rapid
acceleration
it
also
cuts
off
the
vacuwn
spark
advance
imme
iately
upon
deceleration
The
valve
is
designed
for
one
way
opera
tion
and
consists
of
a
one
way
umbrel
la
valve
and
sintered
steel
fluidic
restrictor
Page 47 of 537
Engine
Mechanical
GENERAL
DESCRIPTION
MODEL
L20B
ENGINE
CYLINDER
BLOCK
CRANKSHAFT
PISTON
AND
CONNECTING
ROD
CYLINDER
HEAD
CONTENTS
EM
2
EM
3
EM
3
EM
3
EM
3
CAMSHAFT
VALVE
MECHANISM
CAMSHAFT
DRIVE
MANIFOLDS
out
smooth
dependable
power
The
cylinder
block
is
cast
as
a
single
unit
and
featllres
deep
skirting
This
engine
is
equipped
with
a
single
2
barrel
downdraft
carburetor
that
in
corporates
a
special
device
to
control
emissions
MODEL
L20B
ENGINE
The
L20B
engine
features
O
H
C
valves
wedge
shaped
combustion
chamber
aluminum
head
and
a
fully
balanced
5
bearing
crankshaft
to
turn
Main
specifications
Oisplacemen
t
cc
cu
in
Bore
x
stroke
mm
in
Compression
ratio
Ignition
timing
Degree
B
T
O
C
rpm
MIT
AlT
MIT
Manual
Transmission
EM535
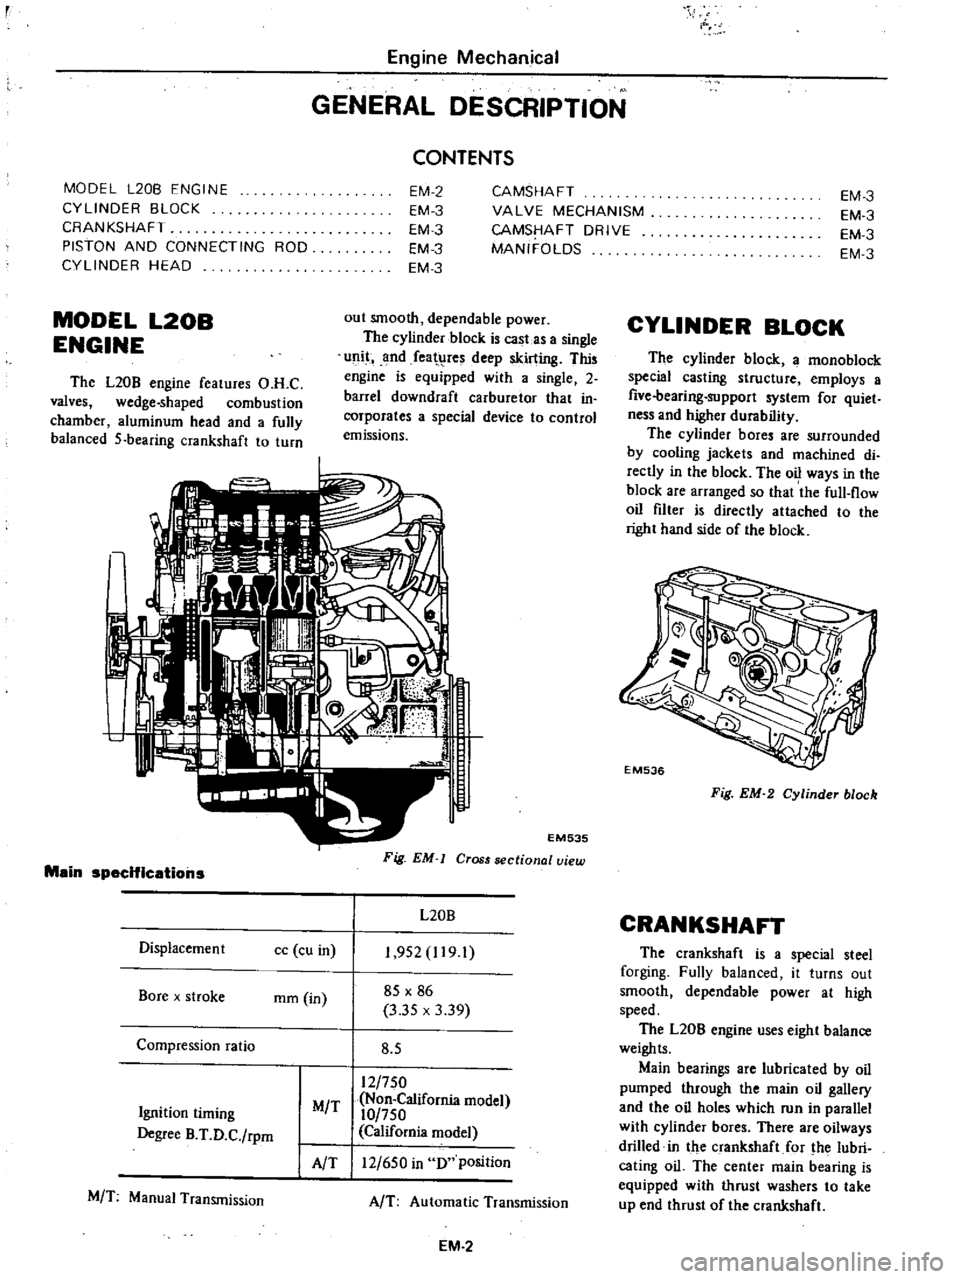
Fig
EM
Cross
sectional
view
L20B
1
952
1191
85
X
86
3
35
x
3
39
8
5
12
750
Non
California
model
10
750
California
model
12
650
in
0
position
AIT
Automatic
Transmission
EM
2
EM
3
EM
3
EM
3
EM
3
CYLINDER
BLOCK
The
cylinder
block
a
mono
block
special
casting
structure
employs
a
five
bearing
support
system
for
quiet
ness
and
higher
durability
The
cylinder
bores
are
surrounded
by
cooling
jackets
and
machined
di
rectly
in
the
block
The
oil
ways
in
the
block
are
arranged
so
that
the
full
flow
oil
filter
is
directly
attached
to
the
right
hand
side
of
the
block
EM536
Fig
EM
2
Cylinder
block
CRANKSHAFT
The
crankshaft
is
a
special
steel
forging
Fully
balanced
it
turns
out
smooth
dependable
power
at
high
speed
The
L20B
engine
uses
eight
balance
weights
Main
bearings
are
lubricated
by
oil
pumped
through
the
main
oil
gallery
and
the
oil
holes
which
run
in
parallel
with
cylinder
bores
There
are
oilways
drilled
in
the
crankshaft
for
the
lubri
cating
oil
The
center
main
bearing
is
equipped
with
thrust
washers
to
take
up
end
thrust
of
the
crankshaft
Page 61 of 537
r
Piston
pin
outside
diameter
Piston
pin
hole
diameter
Piston
pin
to
piston
clearance
I
Interference
fit
of
piston
pin
to
connecting
rod
CONNECTING
ROD
I
If
a
connecting
rod
has
any
flaw
on
either
side
of
the
thrust
face
or
the
large
end
correct
or
replace
it
EM133
Fig
EM
61
Ch
cking
rod
alignment
Connecting
rod
bend
or
torsion
per
100
mm
or
3
94
in
length
mm
in
3
When
replacing
connecting
rod
select
rod
so
that
weight
difference
between
new
and
old
ones
is
within
7
gr
0
25
oz
Do
not
use
a
combination
of
new
and
former
connecting
rod
big
end
nuts
and
connecting
rod
bolts
which
affect
specified
weight
variations
4
Install
connecting
rods
with
bear
ings
on
to
corresponding
crank
pins
and
measure
thrust
clearance
Ifmeas
ured
value
exceeds
limit
replace
Engine
Mechanical
Unit
mm
in
20
993
to
20
998
0
8265
to
0
8267
21
001
to
21
008
0
8268
to
0
8271
0
003
to
0
015
0
0001
to
0
006
0
015
to
0
035
0
0006
to
0
0014
2
Check
connecting
rod
for
bend
or
torsion
using
a
connecting
rod
aligner
If
bend
or
torsion
exceeds
the
limit
q
rrect
or
replace
Standard
Maximum
0
03
0
0012
0
05
0
0020
Fig
EM
62
Checking
big
end
play
Standard
Maximum
Big
end
play
mm
in
0
2
to
0
3
0
0079
to
0
01
18
0
6
0
0236
EM
16
CRANKSHAFT
1
Whenever
crankshaft
is
removed
from
engine
it
should
be
cleaned
thoroughly
in
a
suitable
solvent
After
cleaning
check
crankshaft
journal
and
crank
pin
Jor
score
bias
wear
or
cracks
Rep
air
or
replace
as
required
If
damage
is
minor
dress
with
fine
crocus
cloth
2
Check
journals
and
crank
pins
for
taper
and
out
of
round
with
a
micro
meter
Measurement
should
be
taken
along
journals
for
taper
and
around
journals
for
out
of
round
See
Figure
EM
63
for
detailed
information
If
journals
or
crank
pins
are
tapered
or
out
of
round
beyond
limits
replace
with
a
new
shaft
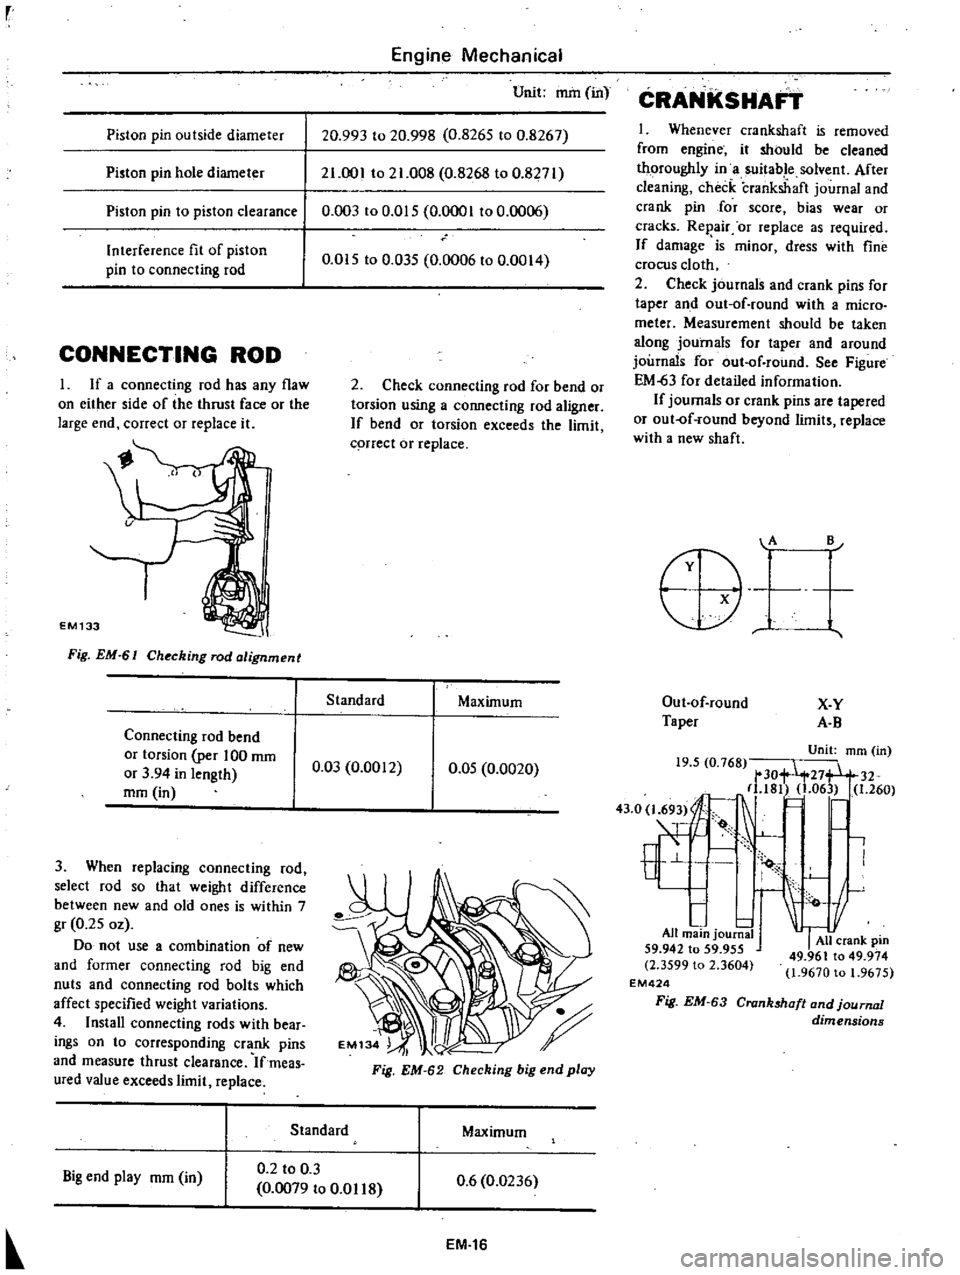
A
B
Out
of
round
X
Y
Taper
A
B
Unit
mm
in
19
5
0
768
tt
30
27
32
181
1
06
1
260
43
O
l
69
I
E
1
All
main
journa
59
942
to
59
955
All
crank
pm
2
3599
l
2
3604
49
961
to
49
974
o
1
9670
to
1
9675
EM424
Fig
EM
63
Crankshaft
and
journal
dimensions
Page 63 of 537
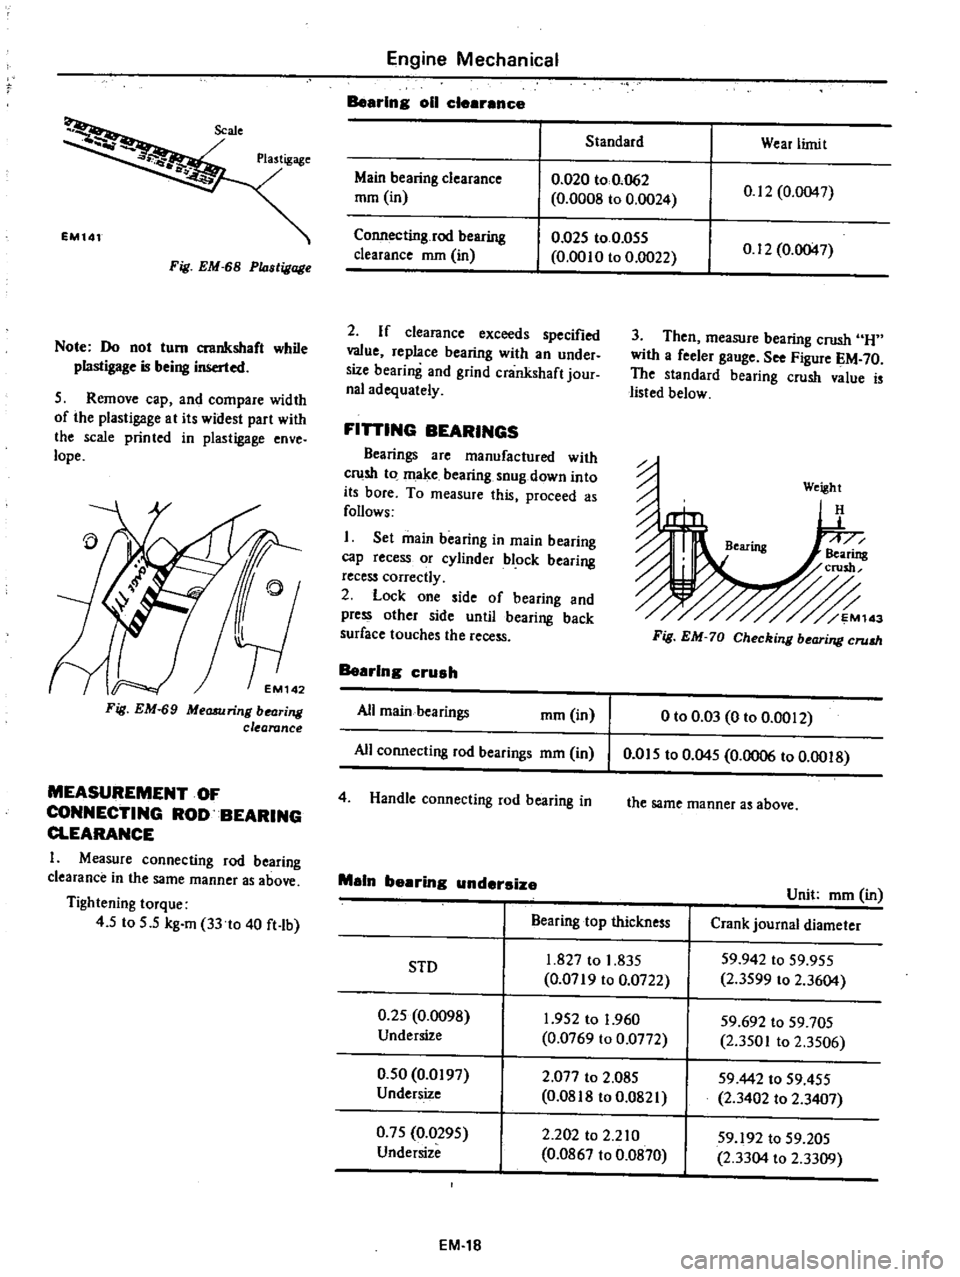
Fig
EM
68
P14stigage
Note
Do
not
tum
crankshaft
while
plastigage
is
being
inserted
5
Remove
cap
and
compare
width
of
the
plastigage
at
its
widest
part
with
the
scale
printed
in
plastigage
enve
lope
Fig
EM
69
Measuring
bearing
clearance
MEASUREMENT
OF
CONNECTING
ROD
BEARING
CLEARANCE
I
Measure
connecting
rod
bearing
clearance
in
the
same
manner
as
above
Tightening
torque
4
5
to
5
5
kg
m
33
to
40
ft
lb
Engine
Mechanical
Bearing
011
clearance
Standard
Wear
limit
Main
bearing
clearance
mm
in
0
020
to
0
062
0
0008
to
0
0024
0
12
0
0047
Connecting
rod
bearing
clearance
mm
in
0
025
to
0
055
0
0010
to
0
0022
0
12
0
0047
2
If
clearance
exceeds
specified
value
replace
bearing
with
an
under
size
bearing
and
grind
crankshaft
jour
nal
adequately
FiniNG
BEARINGS
Bearings
are
manufactured
with
crush
to
make
bearing
snug
down
into
its
bore
To
measure
this
proceed
as
follows
I
Set
main
bearing
in
main
bearing
cap
recess
or
cylinder
block
bearing
recess
correctly
2
Lock
one
side
of
bearing
and
press
other
side
until
bearing
back
surface
touches
the
recess
Bearing
crush
All
main
bearings
mm
in
All
connecting
rod
bearings
mm
in
4
Handle
connecting
rod
bearing
in
3
Then
measure
bearing
crush
H
with
a
feeler
gauge
See
Figure
EM
70
The
standard
bearing
crush
value
is
listed
below
Weight
H
Fig
EM
70
Checking
bearing
crum
o
to
0
03
0
to
0
0012
0
015
to
0
045
0
0006
to
0
0018
the
same
manner
as
above
Main
bearing
undersize
Unit
mm
in
Bearing
top
thickness
Crank
journal
diameter
1
827
to
1
835
59
942
to
59
955
SID
0
0719
to
0
0722
2
3599
to
2
3604
0
25
0
0098
1
952
to
1
960
59
692
to
59
705
Undersize
0
0769
to
0
0772
2
3501
to
2
3506
0
50
0
0197
2
077
to
2
085
59442
to
59
455
Undersize
0
0818
to
0
0821
2
3402
to
2
3407
0
75
0
0295
2
202
to
2
210
59
192
to
59
205
Undersize
0
0867
to
0
0870
2
3304
to
2
3309
EM
18
Page 112 of 537
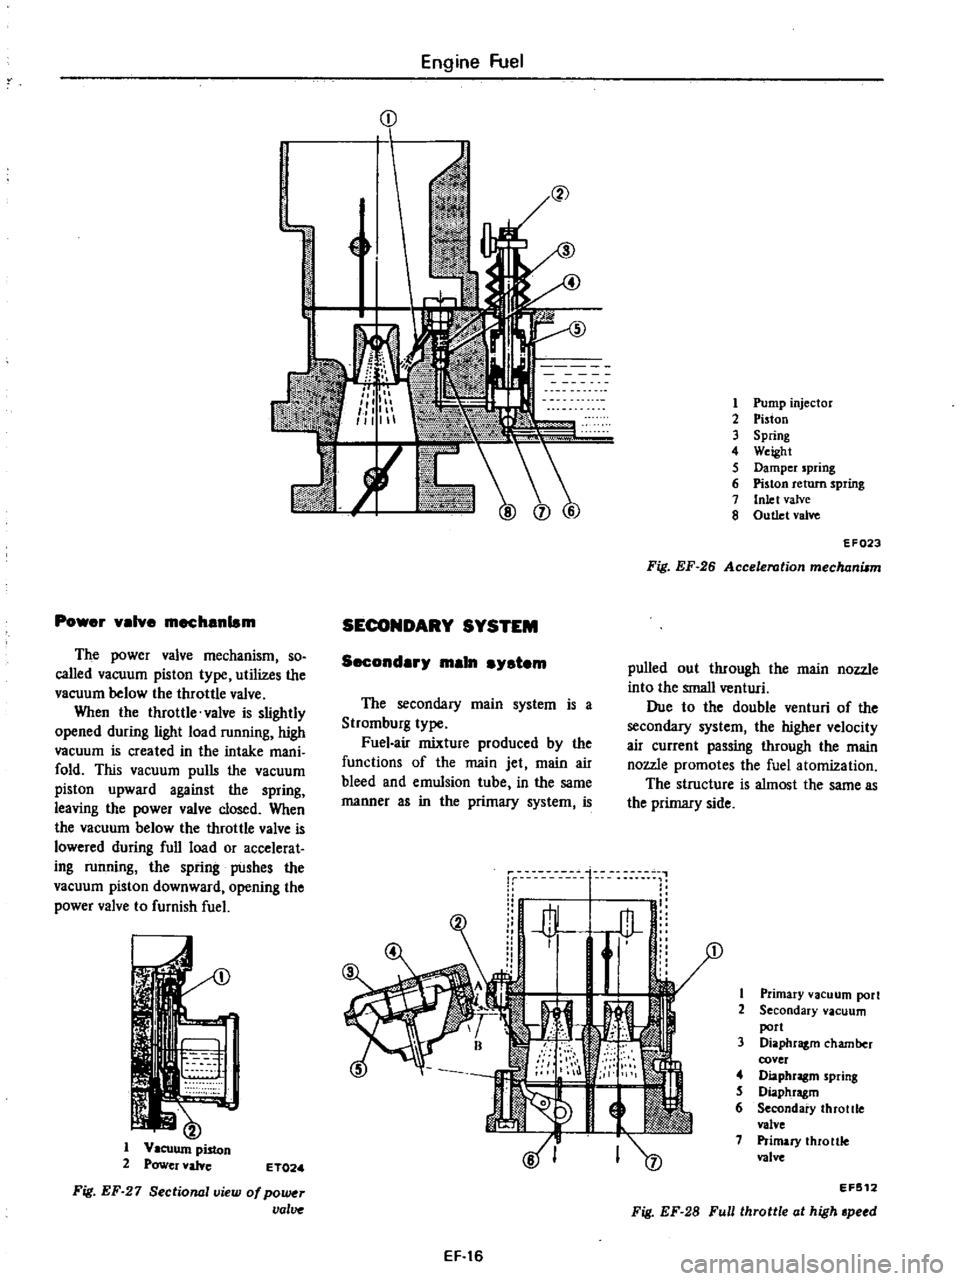
Engine
Fuel
1
L
if
1
Pump
injector
2
Piston
3
Spring
4
Weight
5
Damper
spring
6
Piston
return
spring
7
Inlet
valve
8
Outlet
valve
EF023
Fig
EF
26
Acceleration
mechanism
Power
valve
mechanism
SECONDARY
SYSTEM
The
power
valve
mechanism
so
called
vacuum
piston
type
utilizes
the
vacuum
below
the
throttle
valve
When
the
throttle
valve
is
slightly
opened
during
light
load
running
high
vacuum
is
created
in
the
intake
mani
fold
This
vacuum
pulls
the
vacuum
piston
upward
against
the
spring
leaving
the
power
valve
closed
When
the
vacuum
below
the
throttle
valve
is
lowered
during
full
load
or
accelerat
ing
running
the
spring
pushes
the
vacuum
piston
downward
opening
the
power
valve
to
furnish
fuel
Secondary
main
lIYlltem
pulled
out
through
the
main
nozzle
into
the
small
venturi
Due
to
the
double
venturi
of
the
secondary
system
the
higher
velocity
air
current
passing
through
the
main
nozzle
promotes
the
fuel
atomization
The
structure
is
almost
the
same
as
the
primary
side
The
secondary
main
system
is
a
Stromburg
type
Fuel
air
mixture
produced
by
the
functions
of
the
main
jet
main
air
bleed
and
emulsion
tube
in
the
same
manner
as
in
the
primary
system
is
11
1
I
1
1
Primary
vacuum
port
2
Secondary
vacuum
port
3
Diaphragm
chamber
cover
of
Diaphragm
spring
S
Diaphragm
6
Secondary
throttle
valve
7
Primary
theo
nle
valve
lWll
I
1
11
l
v
1
Vacuum
piston
2
Power
valve
ET02
a
EF
512
Fig
EF
27
Sectional
view
of
po
r
valve
Fig
EF
28
Full
throttle
al
high
peed
EF
16
Page 128 of 537
Engine
Fuel
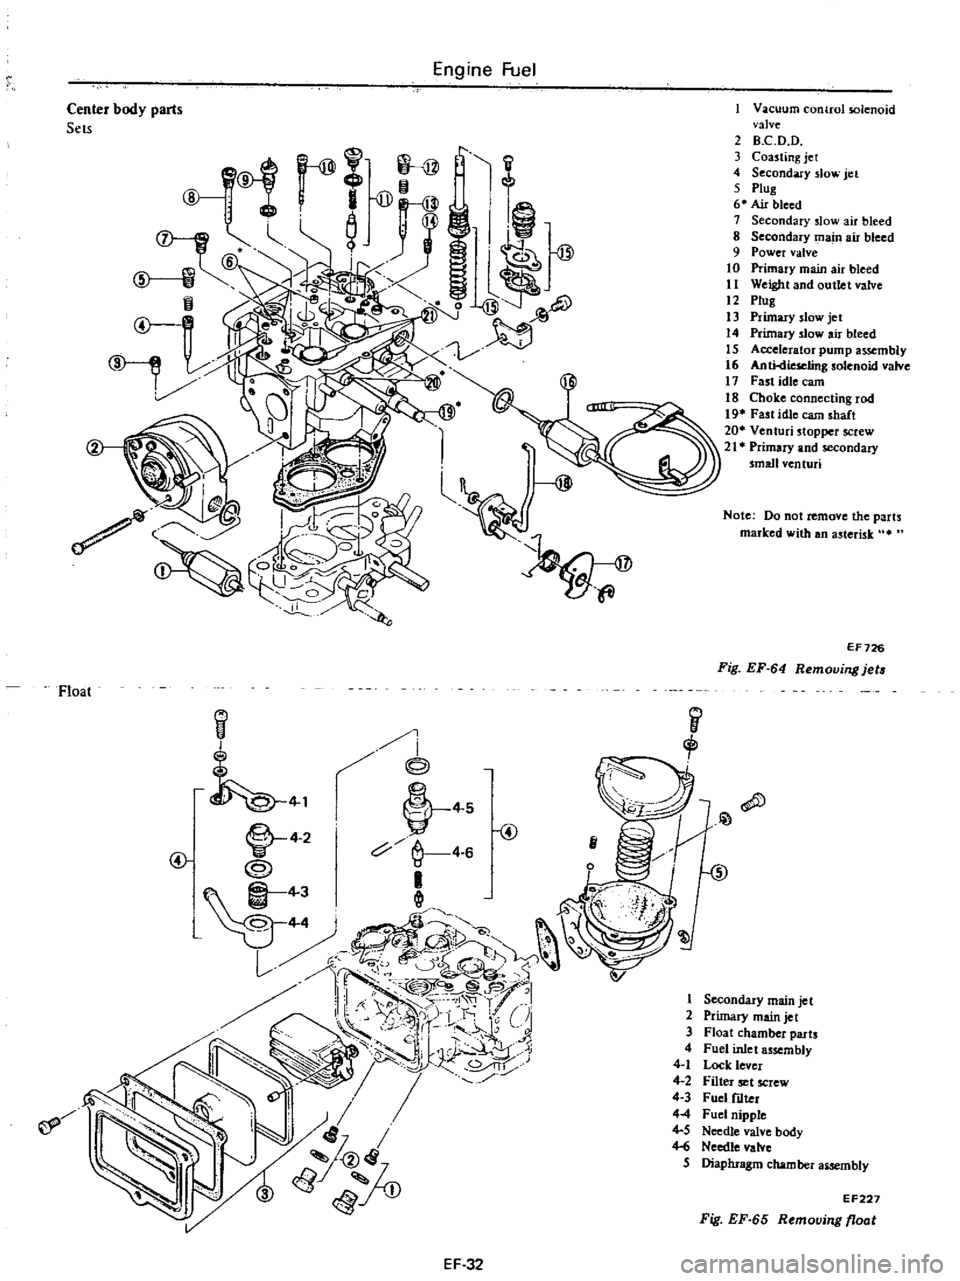
1
l
@
Vacuum
control
solenoid
valve
2
B
C
D
D
3
Coasting
jet
4
Secondary
slow
jet
5
ptug
6
Air
bleed
1
Secondary
slow
air
bleed
8
Secondary
main
air
bleed
9
Power
valve
10
Primary
main
air
bleed
11
Weight
and
outlet
valve
12
ptug
13
Primary
slow
jet
14
Ptirnar
slow
air
bleed
15
Accelerator
pump
assembly
16
AntkUeselingsolenoid
vain
17
Fast
idle
earn
18
Chok
e
connecting
rod
19
Fast
idle
earn
shaft
20
Ventuci
stopper
screw
21
Primary
and
secondary
small
venturi
Center
body
parts
Sets
Note
Do
not
remove
the
parts
marked
with
an
asterisk
It
EF726
Fig
EF
64
Removing
jets
Float
I
i
@
i
j
1
L
4
2
V
4
S
@
c
4
6
e4
11
Qll
1D
Yr
J
1
t
t
1
lil
c
@5
1
p
u
I
r
i
r
1
CJi
U
7
to1
8rtj
lv
Ji
JlJ
if
I
1
2
3
4
4
1
4
2
4
3
44
4
5
Hi
5
Secondary
main
jet
Primary
main
jet
Float
chamber
parts
Fuel
inlet
assembly
Lock
lever
Filter
set
screw
Fuel
f1Iter
Fuel
nipple
Needle
valve
body
Needle
valve
Diaphragm
chamber
aiSembly
EF227
Fig
EF
65
Removing
float
EF
32
Page 139 of 537
Emission
Control
System
EARLY
FUEL
EVAPORATIVE
SYSTEM
E
F
E
DESCRIPTION
spring
and
counterweight
which
are
assembled
on
the
valve
shaft
projecting
to
the
rear
outside
of
the
exhaust
manifold
The
counterweight
is
se
cured
to
the
valve
shaft
with
key
bolt
and
snap
ring
EC
4
A
control
valve
welded
to
the
valve
shaft
is
wtalled
on
the
exhaust
manifold
through
bushing
This
con
trol
valve
is
called
Heat
control
valve
The
heat
control
valve
is
ac
luated
by
the
coil
spring
thermostat
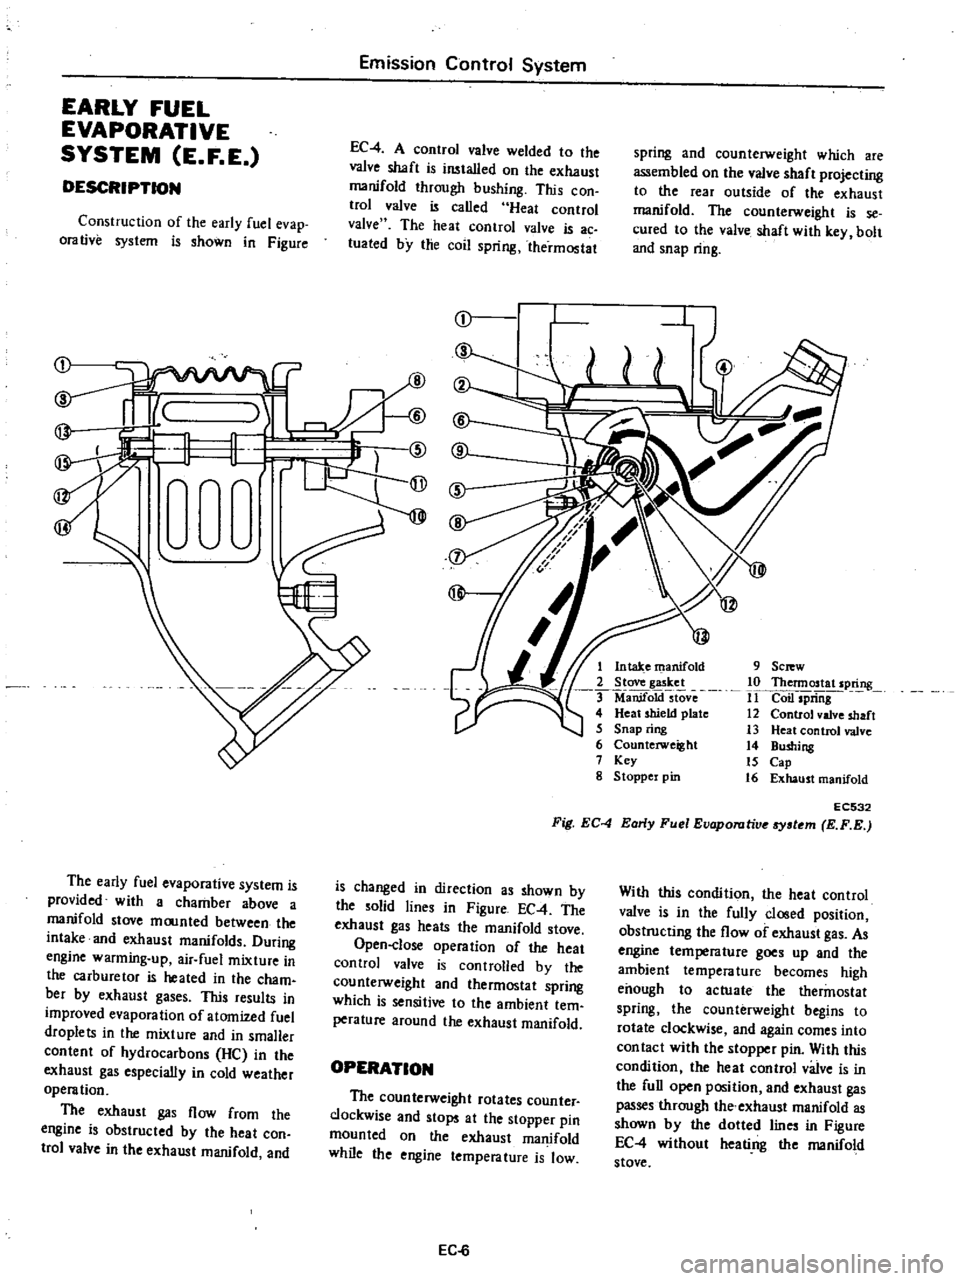
Construction
of
the
early
fuel
evap
orative
system
is
shown
in
Figure
r
I
1
@
rW
9
Sc
w
10
Thennostat
spring
11
Coil
spriiig
12
Control
valve
shaft
13
Heat
control
valve
14
Bushing
15
Cap
16
Exhaust
manifold
1
Intake
manifold
2
Stove
gasket
ManifoktstOve
4
Heat
shield
plate
5
Snap
ring
6
Counterweight
7
Key
g
Stoppel
pin
EC532
Fig
EC
4
Early
Fuel
Evaporutive
tem
E
F
E
The
early
fuel
evaporative
system
is
provided
with
a
chamber
above
a
manifold
stove
moonted
between
the
intake
and
exhaust
manifolds
During
engine
warming
up
air
fuel
mixture
in
the
carburetor
is
heated
in
the
cham
bet
by
exhaust
gases
This
results
in
improved
evaporation
of
atomized
fuel
droplets
in
the
mixture
and
in
smaller
content
of
hydrocarbons
He
in
the
exhaust
gas
especially
in
cold
weather
operation
The
exhaust
gas
flow
from
the
engine
is
obstructed
by
the
heat
con
trol
valve
in
the
exhaust
manifold
and
is
changed
in
direction
as
shown
by
the
solid
lines
in
Figure
EC
4
The
exhaust
gas
heats
the
manifold
stove
Open
close
operation
of
the
heat
control
valve
is
controlled
by
the
counterweight
and
thermostat
spring
which
is
sensitive
to
the
ambient
tem
perature
around
the
exhaust
manifold
With
this
condition
the
heat
control
valve
is
in
the
fully
closed
position
obstructing
the
flow
of
exhaust
gas
As
engine
tempera
lure
goes
up
and
the
ambient
temperature
becomes
high
enough
to
actuate
the
thermostat
spring
the
counterweight
begins
to
rotate
clockwise
and
again
comes
into
con
tact
with
the
stopper
pin
With
this
condition
the
heat
control
valve
is
in
the
full
open
position
and
exhaust
gas
passes
through
the
exhaust
manifold
as
shown
by
the
dotted
lines
in
Figure
EC
4
without
heati
ng
the
manifold
stove
OPERATION
The
counterweight
rotates
counter
clockwise
and
stops
at
the
stopper
pin
mounted
on
the
exhaust
manifold
while
the
engine
temperature
is
low
EC
6
Page 140 of 537
REMOVAL
AND
INSTAUATION
Emission
Control
System
EC533
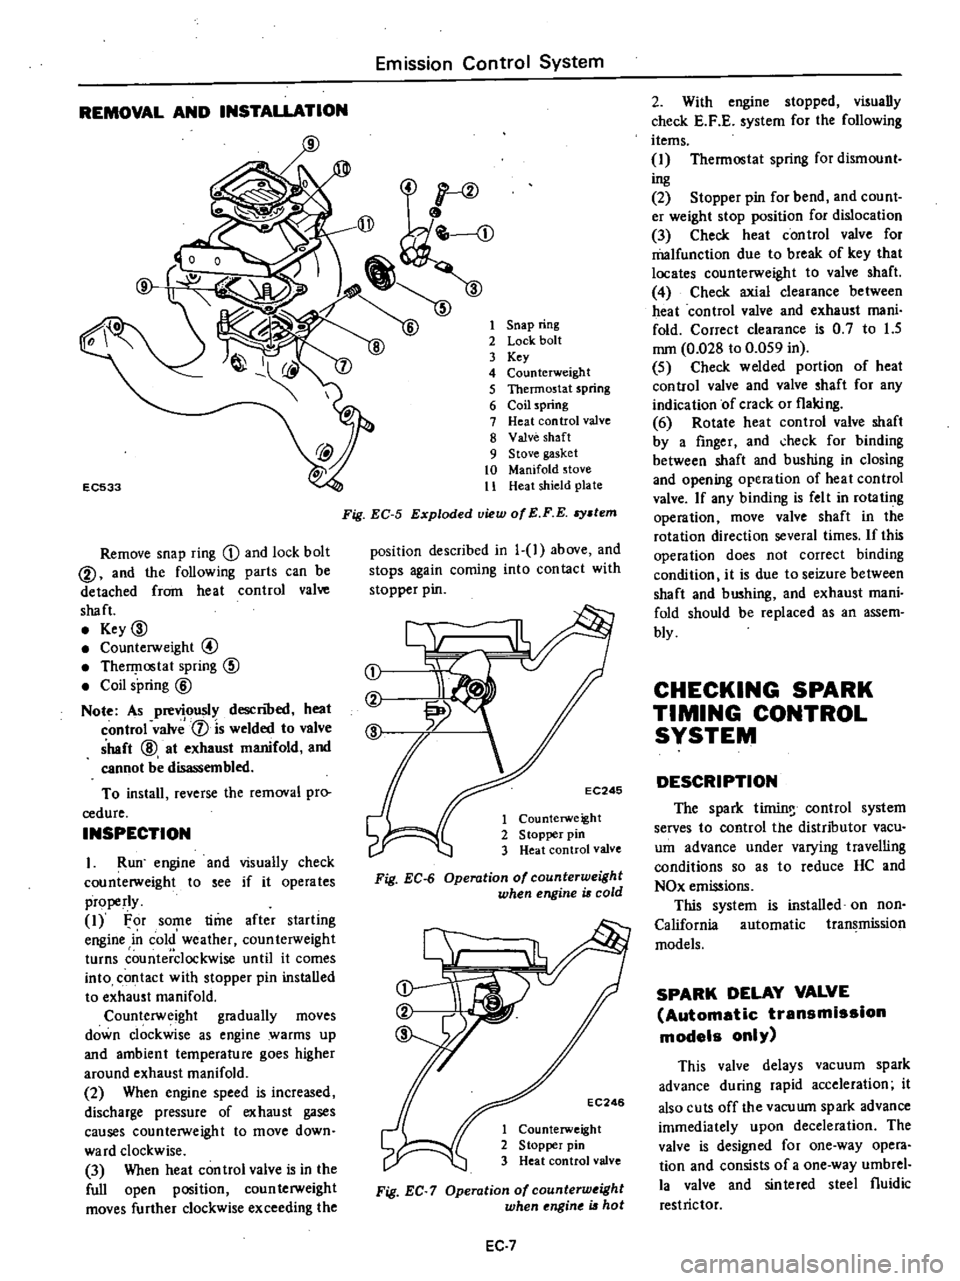
Remove
snap
ring
D
and
lock
bolt
@
and
the
following
parts
can
be
detached
from
heat
control
valve
shaft
Key
00
Counterweight
@
TherI
lostat
spring
CID
Coil
spring
@
Note
As
previously
descnoed
heat
control
valv
1
is
welded
to
valve
shaft
@
at
exhaust
manifold
and
cannot
be
disassembled
To
install
reverse
the
removal
pro
cedure
INSPECTION
I
Run
engine
and
visually
check
counterweight
to
see
if
it
operates
properly
1
For
some
time
after
starling
engine
in
cold
weather
counterweight
turns
counterclockwise
until
it
comes
into
contact
with
stopper
pin
installed
to
exhaust
manifold
Counterweight
gradually
moves
down
clockwise
as
engine
warms
up
and
ambient
temperature
goes
higher
around
exhaust
manifold
2
When
engine
speed
is
increased
discharge
pressure
of
exhaust
gases
causes
counterweight
to
move
down
ward
clockwise
3
When
heat
con
trol
valve
is
in
the
full
open
position
coun
terweight
moves
further
clockwise
exceeding
the
1
Snap
ring
2
Lock
bolt
3
Key
4
Counterweight
5
Thermostat
spring
6
Coil
spring
7
Heat
control
valve
8
Valve
shaft
9
Stove
gasket
10
Manifold
stove
11
Heat
shield
plate
Fig
EC
5
Exploded
view
of
E
F
E
stem
position
described
in
1
1
above
and
stops
again
coming
into
con
tact
with
stopper
pin
j
EC246
1
Counterweight
2
S
topper
pin
3
Heat
control
valve
Fig
EC
6
Operation
of
counterweight
when
engine
is
cold
EC246
1
Counterweight
2
Stopper
pin
3
Heat
control
valve
Fig
EC
7
Operation
of
counterw
ight
when
ngine
is
hot
EC
7
2
With
engine
stopped
visually
check
E
F
E
system
for
the
following
items
1
Thermostat
spring
for
dismount
ing
2
Stopper
pin
for
bend
and
count
er
weight
stop
position
for
dislocation
3
Check
heat
control
valve
for
malfunction
due
to
break
of
key
that
locates
counterweight
to
valve
shaft
4
Check
axial
clearance
between
heat
control
valve
and
exhaust
mani
fold
Correct
clearance
is
0
7
to
1
5
mm
0
028
to
0
059
in
5
Check
welded
portion
of
heat
control
valve
and
valve
shaft
for
any
indication
of
crack
or
flaking
6
Rotate
heat
control
valve
shaft
by
a
finger
and
check
for
binding
between
shaft
and
bushing
in
closing
and
opening
operation
of
heat
control
valve
If
any
binding
is
felt
in
rotating
operation
move
valve
shaft
in
the
rotation
direction
several
times
If
this
operation
does
not
correct
binding
condition
it
is
due
to
seizure
between
shaft
and
bushing
and
exhaust
mani
fold
should
be
replaced
as
an
assem
bly
CHECKING
SPARK
TIMING
CONTROL
SYSTEM
DESCRIPTION
The
spark
tirnin
control
system
serves
to
control
the
distributor
vacu
um
advance
under
varying
travelling
conditions
so
as
to
reduce
HC
and
NOx
emissions
This
system
is
installed
on
non
California
automatic
transmission
models
SPARK
DELAY
VALVE
Automatic
transmission
models
only
This
valve
delays
vacuum
spark
advance
during
rapid
acceleration
it
also
cuts
off
the
vacuwn
spark
advance
immediately
upon
deceleration
The
valve
is
designed
for
one
way
opera
tion
and
consists
of
a
one
way
umbrel
la
valve
and
sinlered
steel
fluidic
restrictor
Page 182 of 537
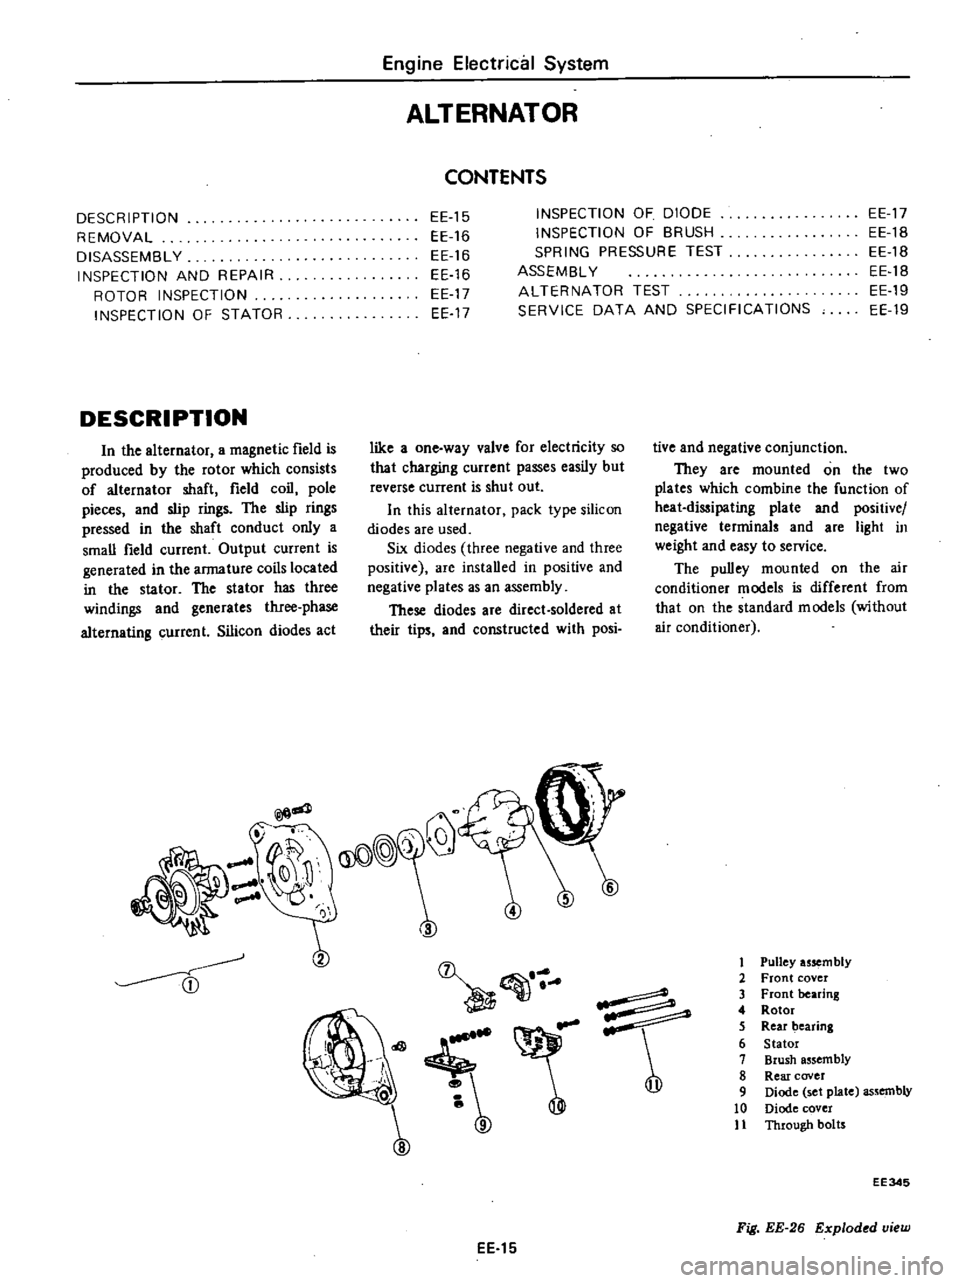
DESCRIPTION
REMOVAL
DISASSEMBLY
INSPECTION
AND
REPAIR
ROTOR
INSPECTION
INSPECTION
OF
STATOR
DESCRIPTION
In
the
alternator
a
magnetic
field
is
produced
by
the
rotor
which
consists
of
alternator
shaft
field
coil
pole
pieces
and
slip
rings
The
slip
rings
pressed
in
the
shaft
conduct
only
a
small
field
current
Output
current
is
generated
in
the
armature
coils
located
in
the
stator
The
stator
has
three
windings
and
generates
three
phase
alternating
current
Silicon
diodes
act
@God
A
tfff
Engine
Electrical
System
ALTERNATOR
CONTENTS
EE
15
EE
16
EE
16
EE
16
EE
17
EE
17
INSPECTION
OF
DIODE
INSPECTION
OF
BRUSH
SPRING
PRESSURE
TEST
ASSEMBL
Y
ALTERNATOR
TEST
SERVICE
DATA
AND
SPECIFICATIONS
EE
17
EE
1B
EE1B
EE
1B
EE19
EE
19
like
a
one
way
valve
for
electricity
so
that
charging
current
passes
easily
but
reverse
current
is
shut
out
In
this
alternator
pack
type
silicon
di
odes
are
used
Six
diodes
three
negative
and
three
positive
are
installed
in
positive
and
negative
plates
as
an
assembly
These
diodes
are
direct
soldered
at
their
tips
and
constructed
with
posi
3
2
I
4
e
o
e
9
tive
and
negative
conjunction
They
are
mounted
on
the
two
plates
which
combine
the
function
of
heat
dissipating
plate
and
positive
negative
terminals
and
are
light
in
weight
and
easy
to
service
The
pulley
mounted
on
the
air
conditioner
models
is
different
from
that
on
the
standard
models
without
air
conditioner
1
Pulley
usem
bly
2
Front
cover
3
Front
bearing
4
Rotor
5
Rear
bearing
6
Stator
7
Brush
assembly
8
Rear
cover
9
Diode
set
plate
assembly
10
Diode
cover
11
Through
botrs
EE
15
EE345
Fig
EE
26
Exploded
view
Page 197 of 537
Engine
Electrical
System
DISTRIBUTOR
Non
California
models
CONTENTS
CONSTRUCTION
CHECKING
AND
ADJUSTMENT
CAP
AND
ROTOR
HEAD
CONTACT
POINT
CONOENSER
EE
30
EE
31
EE
31
EE
31
EE
31
ADVANCE
MECHANISMS
DISASSEMBL
Y
ASSEMBLY
SERVICE
DATA
AND
SPECIFICATIONS
EE
31
EE
32
EE
32
EE
33
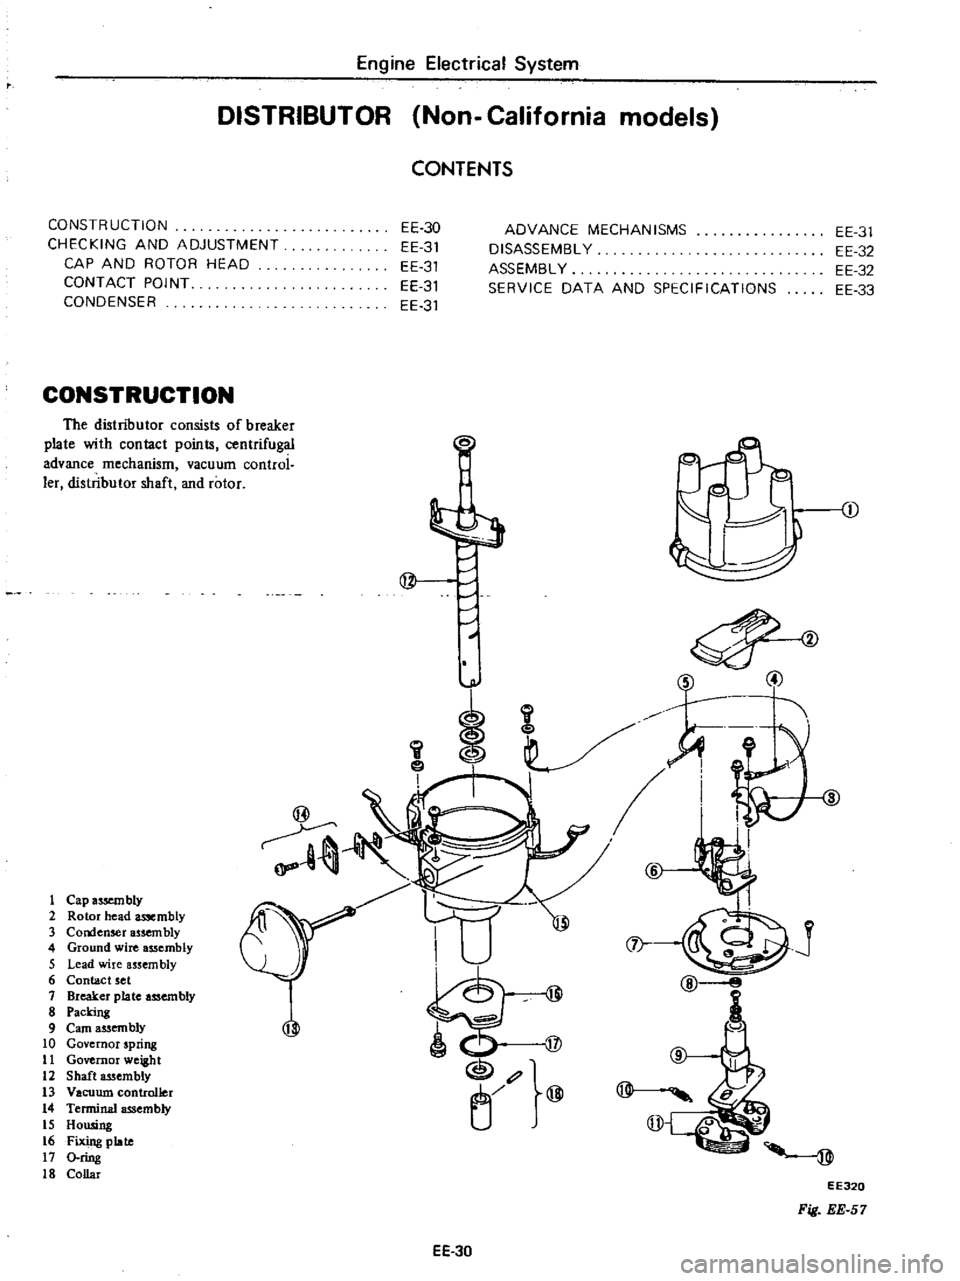
CONSTRUCTION
The
distributor
consists
of
breaker
plate
with
contact
points
centrifugal
advance
mechanism
vacuum
control
ler
distributor
shaft
and
rotor
D
@
t
Cap
assembly
2
Rotor
head
assembly
3
Condenser
assembly
4
Ground
wire
assembly
5
Lead
wire
assem
bly
6
Contact
set
7
Breaker
plate
assembly
8
Packing
9
earn
assembly
10
Governor
spring
11
GoVernor
weight
12
Shaft
assembly
13
Vacuum
controller
14
Terminal
assembly
IS
Housing
16
Fixing
plate
17
O
ring
IS
Collar
v
i
@
D
@
EE32Q
Fig
EE
57
EE
30