warning DATSUN PICK-UP 1977 Owner's Manual
[x] Cancel search | Manufacturer: DATSUN, Model Year: 1977, Model line: PICK-UP, Model: DATSUN PICK-UP 1977Pages: 537, PDF Size: 35.48 MB
Page 394 of 537
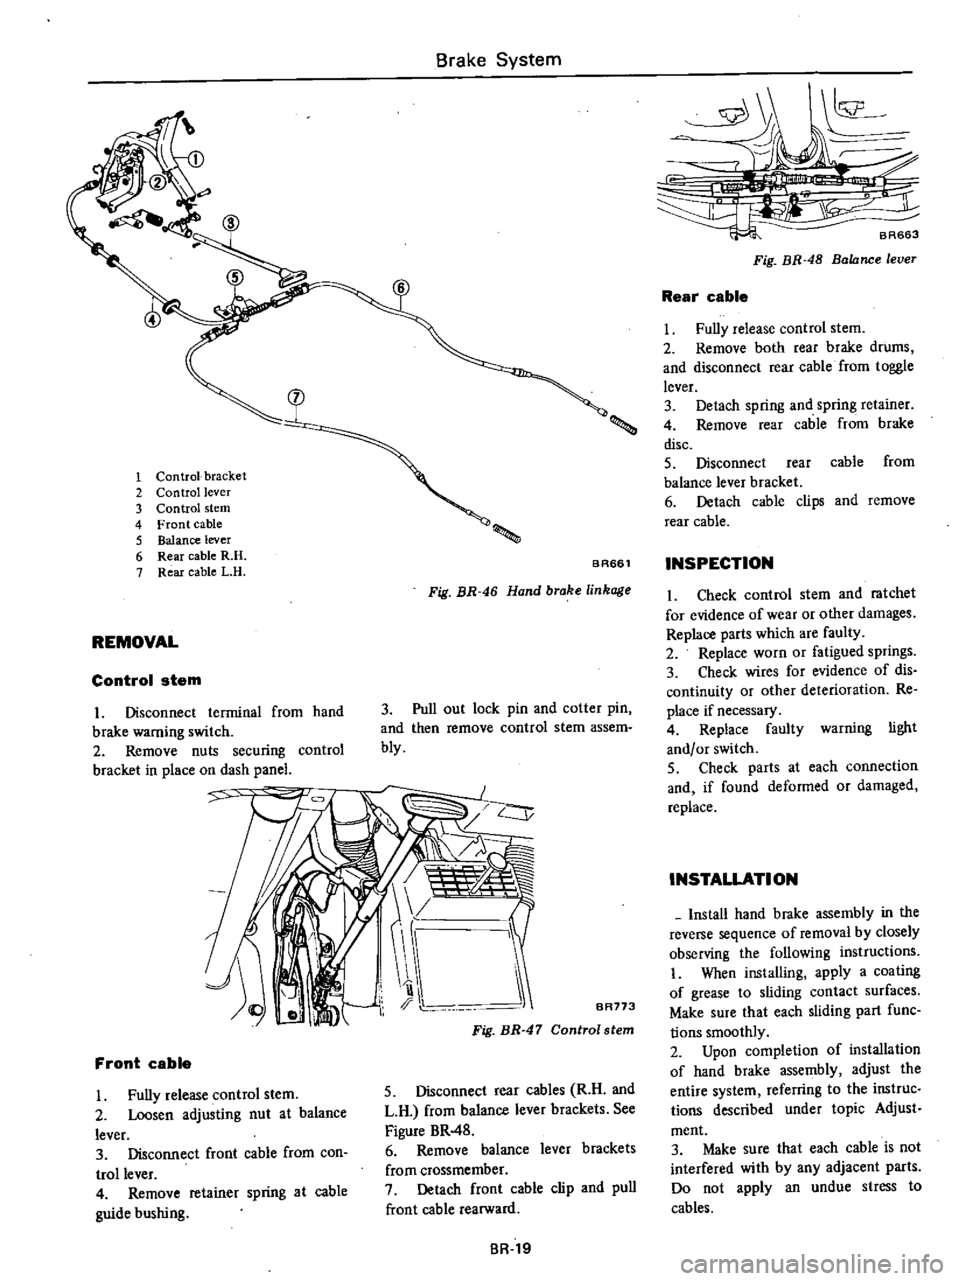
1
Control
bracket
2
Control
lever
3
Control
stem
4
Front
cable
5
Balance
lever
6
Rear
cable
R
H
7
Rear
cable
L
H
REMOVAL
Control
stem
I
Disconnect
terminal
from
hand
brake
warning
switch
2
Remove
nuts
securing
control
bracket
in
place
on
dash
panel
Brake
System
BAS6l
Fig
BR
46
Hand
brake
linkage
3
Pull
out
lock
pin
and
colter
pin
and
then
remove
control
stem
assem
bly
y
J
b
i1
I
I
1
II
i
l
I
BR773
Front
cable
Fully
release
control
stem
2
Loosen
adjusting
nut
at
balance
lever
3
Disconnect
front
cable
from
con
trollever
4
Remove
retainer
spring
at
cable
guide
bushing
Fig
BR
47
Control
stem
5
Disconnect
rear
cables
R
H
and
L
H
from
balance
lever
brackets
See
Figure
BR
48
6
Remove
balance
lever
brackets
from
crossmember
7
Detach
front
cable
clip
and
pull
front
cable
rearward
BR
19
k
1
BR663
Fig
BR
48
Balance
lever
Rear
cable
Fully
release
control
stem
2
Remove
both
rear
brake
drums
and
disconnect
rear
cable
from
toggle
lever
3
Detach
spring
and
spring
retainer
4
Remove
rear
cable
from
brake
disc
5
Disconnect
rear
cable
from
balance
lever
bracket
6
Detach
cable
clips
and
remove
rear
cable
INSPECTION
1
Check
control
stem
and
ratchet
for
evidence
of
wear
or
other
damages
Replace
parts
which
are
faulty
2
Replace
worn
or
fatigued
springs
3
Check
wires
for
evidence
of
dis
continuity
or
other
deterioration
Re
place
if
necessary
4
Replace
faulty
warning
light
and
or
switch
S
Check
parts
at
each
connection
and
if
found
deformed
or
damaged
replace
INSTALLATION
Install
hand
brake
assembly
in
the
reverse
sequence
of
removal
by
closely
observing
the
following
instructions
When
installing
apply
a
coating
of
grease
to
sliding
contact
surfaces
Make
Sure
that
each
sliding
part
func
lions
smoothly
2
Upon
completion
of
installation
of
hand
brake
assembly
adjust
the
entire
system
referring
to
the
instruc
lions
described
under
topic
Adjust
ment
3
Make
sure
that
each
cable
is
not
interfered
with
by
any
adjacent
parts
Do
not
apply
an
undue
stress
to
cables
Page 444 of 537
Body
Frame
Removal
and
installation
assembly
2
To
install
seat
reverse
above
re
moval
procedure
1
Remove
four
bolts
retaining
seat
slide
assembly
to
floor
take
out
seat
SEPARATE
SEAT
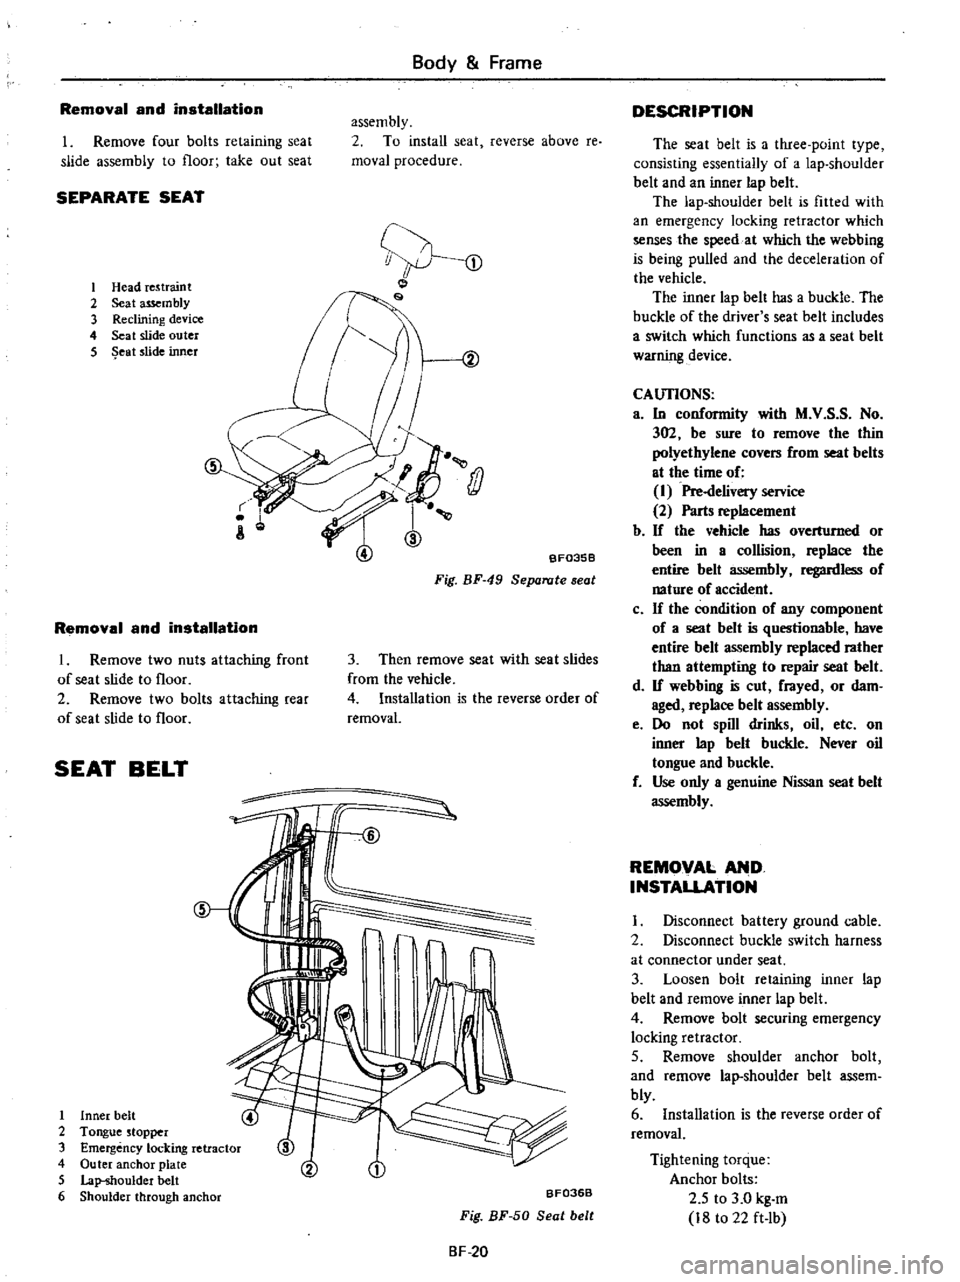
1
Head
re5traint
2
Seat
assembly
3
Reclining
device
4
Seat
slide
outer
5
eat
slide
inner
s
J
j
BF0358
Fig
BF
49
Separate
seat
Removal
and
installation
I
Remove
two
nuts
attaching
front
of
seat
slide
to
floor
2
Remove
two
bolts
attaching
rear
of
seat
slide
to
floor
3
Then
remove
seat
with
seat
slides
from
the
vehicle
4
Installation
is
the
reverse
order
of
removal
SEAT
BELT
1
Inner
belt
2
Tongue
stopper
3
Emergency
locking
retractor
4
Outer
anchor
plate
5
Lap
shoulder
belt
6
Shoulder
through
anchor
BF036B
Fig
BF
50
Seat
belt
BF
20
DESCRIPTION
The
seat
belt
is
a
three
point
type
consisting
essentiaily
of
a
lap
shoulder
belt
and
an
inner
lap
belt
The
lap
shoulder
belt
is
fitted
with
an
emergency
locking
retractor
which
senses
the
speed
at
which
the
webbing
is
being
pulled
and
the
deceleration
of
the
vehicle
The
inner
lap
belt
has
a
buckle
The
buckle
of
the
driver
s
seat
belt
includes
a
switch
which
functions
as
a
seat
belt
warning
device
CAlJI10NS
a
In
conformity
with
M
V
S
S
No
302
be
sure
to
remove
the
thin
polyethylene
covers
from
seat
belts
at
the
time
of
I
Pre
delivery
service
2
Parts
replacement
b
If
the
vehicle
has
overturned
or
been
in
a
collision
replace
the
entire
belt
assembly
regardless
of
nature
of
accident
c
If
the
condition
of
any
component
of
a
seat
belt
is
questionable
have
entire
belt
assembly
replaced
rather
than
attempting
to
repair
seat
belt
d
If
webbing
is
cut
frayed
or
dam
aged
replace
belt
assembly
e
Do
not
spill
drinks
oil
etc
on
inner
lap
belt
buckle
Never
oil
tongue
and
buckle
f
Use
only
a
genuine
Nissan
seat
belt
assembly
REMOVAL
AND
INSTAUATION
I
Disconnect
battery
ground
cable
2
Disconnect
buckle
switch
harness
at
connector
under
seat
3
Loosen
bolt
retaining
inner
lap
belt
and
remove
inner
lap
belt
4
Remove
bolt
securing
emergency
locking
retractor
5
Remove
shoulder
anchor
bolt
and
remove
lap
shoulder
belt
assem
bly
6
Installation
is
the
reverse
order
of
removal
Tightening
torque
Anchor
bolts
2
5
to
3
0
kg
m
18
to
22
ft
lb
Page 446 of 537

DATSUN
PICK
UP
MODEL
620
SERIES
I
NISSAN
I
NISSAN
MOTOR
CO
LTD
TOKYO
JAPAN
SECTION
BE
BODY
ELECTRICAL
SYSTEM
BODY
ELECTRICAL
WIRING
BE
2
LIGHTING
AND
SIGNAL
BE
3
LAMP
SYSTEM
METERS
AND
GAUGES
BE
14
ELECTRICAL
ACCESSORIES
BE
21
EMISSION
WARNING
SYSTEM
BE
43
California
models
Page 449 of 537

Body
Electrical
System
DESCRIPTION
LIGHTING
SYSTEM
CI
RCUIT
DIAGRAM
Headlamp
tail
lamp
and
license
lamp
system
G
o
@
LI
U
CIl
HEADl
AMP
L
H
e
FRONT
SlOE
lIIIARI
ER
LAMP
IR
H
USl
LE
LINK
CJ
lOA
CJ
154
CJ
CJ
FUSE
BLOCK
I
2
IR
n
fMP
IL
H
l
REAR
SIDE
MARKER
LAMP
R
1
1
LIGHTING
SWITCH
l
J
ll
f
1121
I
r
1
x
DIMMER
SWITCH
101
1
I
ON
t
0
I
EA
i
METE
LAMP
ILLUMINATION
LAMP
jSTOPBrURH
STOP
8
TURN
TAIL
TAIL
BSAOC
UP
RE
AR
COMBINATION
LAMP
R
H
I
J
LICE
NSf
r
LAMP
I3
BACIC
UP
TA
L
ST
OP8TURN
TAIL
STOP8TURN
REAR
COMBINATION
LAMP
ILH
I
Q
REAR
SIDE
NAR
tAMP
BEBSOA
Fig
BE
3
Headlamp
tail
lamp
and
liceme
lamp
ay6t
m
Turn
signal
hazard
warning
lamp
stop
lamp
and
back
up
lamp
system
I
HEAOLAMP
R
H
l
CR
H
Ll
lHTINIi
j
nn
A
iNAnON
8A
LAMP
BATTERY
@
4j
Jl
FRONT
COM8IfUl
1ON
LAMP
H
FUSIBLE
LINK
I
a
FUSE
BLOCK
FUSE
FROM
IGNITION
SWITCH
@
h
FRONT
COMBINATION
LAMP
L
H
REAR
COMBINATION
LAMP
R
H
BACK
UP
LAMP
T
A
I
L
SWITCH
n
8ACK
UP
E
W
P
HAZARO
FLASHER
UNIT
HAIARD
2
ON
WA
NING
SWITCH
3
r
TU
N
SIGNAL
FLASHER
UNIT
CJ
U
t
N
iH
ij
I
STOP
t
H
J
EL
L
H
I
TURN
SIGNAL
INDICATOR
LAMP
TURN
SIGNAL
SWITCH
G
BACK
UP
JTA
STOP8TURN
TAIL
STOP
8
TURN
REAR
COMelNATlON
LAMP
IL
H
I
BE851A
Fig
BE
4
Turn
signal
Juuard
warning
lamp
stop
lamp
and
back
up
lamp
system
BE
4
Page 459 of 537

Body
Electrical
System
METERS
AND
GAUGES
COMBINATION
METER
COMBINATION
METER
CIRCUIT
DIAGRAM
REMOVAL
AND
INSTALLATION
SPEEDOMETER
REMOVAL
AND
INSTALLATION
ODOMETER
SWITCH
REMOVAL
AND
INSTALLATION
FUEL
GAUGE
AND
WATER
TEMPERATURE
GAUGE
DESCRIPTION
REMOVAL
AND
INSTALLATION
OIL
PRESSURE
WARNING
LAMP
DESCRIPTION
01
L
PRESSURE
SWITCH
COMBINATION
METER
COMBINATION
METER
CIRCUIT
DIAGRAM
@
BE6828
CONTENTS
BE
14
BE
14
BE
16
BE
16
BE
16
BE
16
8E
16
BE
16
BE
16
BE
16
8E
17
BE
17
BE
17
Turn
signal
indicator
lamp
L
H
OIL
0
BEAM
BE
14
Meter
illumination
lamps
M
T
only
9
9
Turn
sq
nal
indicator
lamp
lL
J
R
H
Tj
O
iJ
I
l
g
r
i
o
I
l8
J
CHARGE
WARNING
LAMP
DESCRIPTION
HAND
BRAKE
WARNING
LAMP
DESCRIPTION
HAND
BRAKE
SWITCH
METER
ILLUMINATION
INDICATOR
AND
WARNING
BULBS
REMOVAL
AND
INSTALLATION
8ULB
SPECIFICATIONS
TROUBLE
DIAGNOSES
AND
CORRECTIONS
SPEEDOMETER
WATER
TEMPERATURE
AND
FUEL
GAUGES
OIL
PRESSURE
AND
CHARGE
WARNING
LAMPS
Voltage
regulator
TEMP
FUEL
CHG
0
BRK
C
I
Speedometer
2
Thermometer
3
Fuel
meter
4
Tachometer
Option
5
Cluster
lid
6
Speedometer
cable
7
Speed
switch
amplifier
Manual
transmission
only
BE
17
BE
17
BE
18
BE
18
8E
18
8E
18
BE
18
BE
18
BE
18
BE
18
BE
19
BE
20
Q
Speed
switch
BE856A
Fig
BE
21
Ci1
Cuit
diagram
of
combination
meter
Page 462 of 537
Fuse
M
Body
Electrical
System
YR
Meter
voltage
regulator
Water
temperature
gauge
BE261
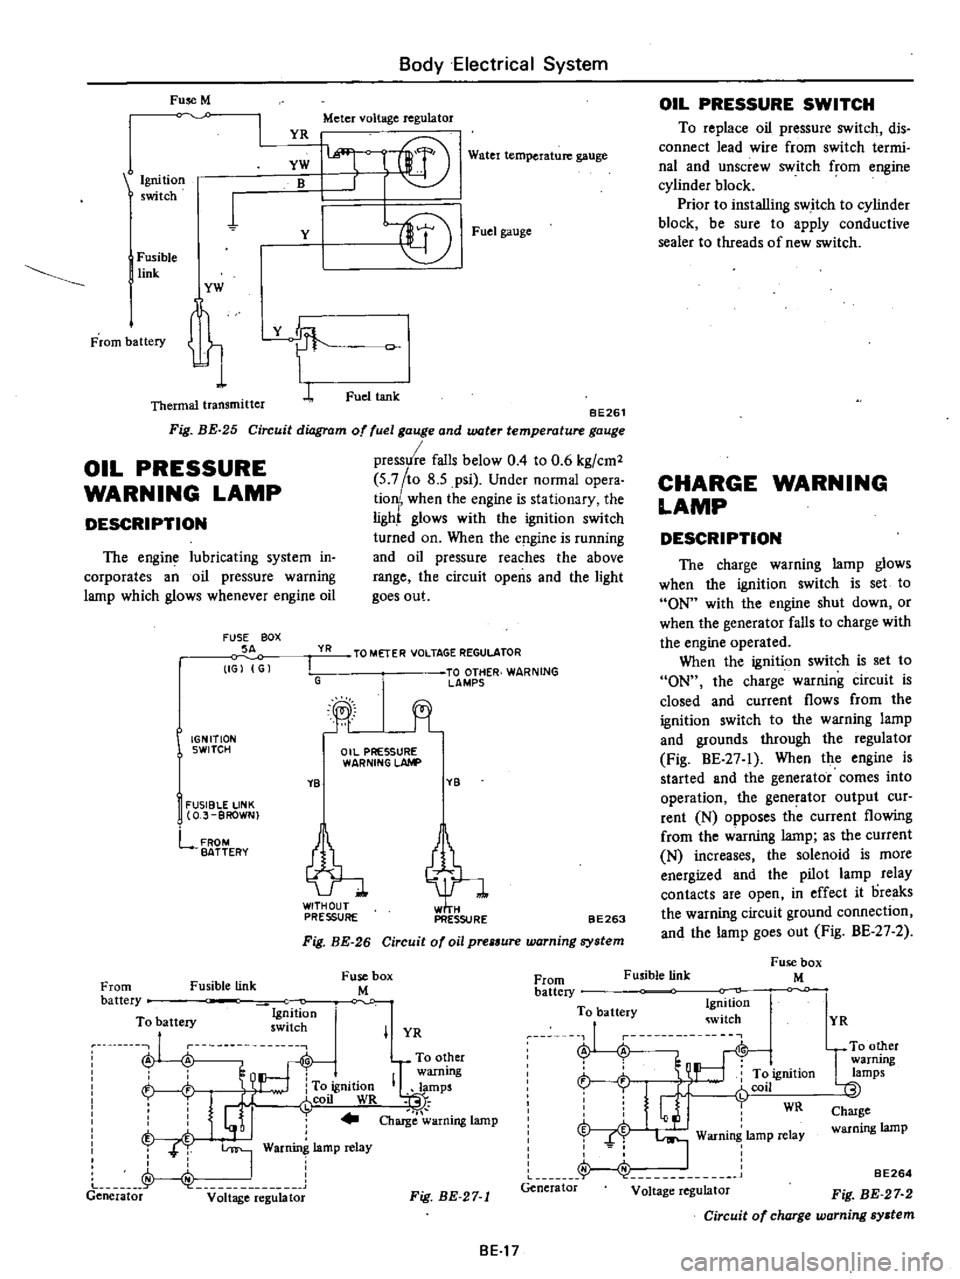
Circuit
diagram
of
fuel
gauge
and
water
temperature
gauge
pressure
falls
below
0
4
to
0
6
kg
cm2
5
7
to
8
5
psi
Under
normal
opera
tion
when
the
engine
is
stationary
the
ligh
glows
with
the
ignition
switch
turned
on
When
the
e
gine
is
running
and
oil
pressure
reaches
the
above
range
the
circuit
opens
and
the
light
goes
out
Ignition
switch
YW
B
1
Y
I
Fusible
link
YW
t
Thermal
transmitter
L
Fig
BE
25
OIL
PRESSURE
WARNING
LAMP
DESCRIPTION
The
engine
lubricating
system
in
corporates
an
oil
pressure
warning
lamp
which
glows
whenever
engine
oil
FUSE
BOX
SA
IGJ
G
YR
I
G
IGNITION
SWITCH
YB
I
FUSIBLE
LINK
O
J
BROWN
lffi
l
f
r@
Fuel
gauge
Fuel
tank
TO
METER
VOLTAGE
REGULATOR
TO
OTHER
WARNING
lAMPS
jt
Oil
PRESSURE
WARNING
LAhlP
YB
tl
PRESSURE
PRESSURE
FROM
BATTERY
BE263
Fig
BE
26
Circuit
of
oil
prelSure
warning
system
Fusible
link
Fuse
box
M
OIL
PRESSURE
SWITCH
To
replace
oil
pressure
switch
dis
connect
lead
wire
from
switch
termi
nal
and
unscrew
switch
from
engine
cylinder
block
Prior
to
installing
switch
to
cylinder
block
be
sure
to
apply
conductive
sealer
to
threads
of
new
switch
CHARGE
WARNING
LAMP
DESCRIPTION
The
charge
warning
lamp
glows
when
the
ignition
switch
is
set
to
ON
with
the
engine
shut
down
or
when
the
generator
falls
to
charge
with
the
engine
operated
When
the
ignition
switch
is
set
to
ON
the
charge
warning
circuit
is
closed
and
current
flows
from
the
ignition
switch
to
the
warning
lamp
and
grounds
through
the
regulator
Fig
BE
27
1
When
the
engine
is
started
and
the
generator
comes
into
operation
the
generator
output
cur
rent
N
opposes
th
current
flowing
from
the
warning
lamp
as
the
current
N
increases
the
solenoid
is
more
energized
and
the
pilot
lamp
relay
contacts
are
open
in
effect
it
oreaks
the
warning
circuit
ground
connection
and
the
lamp
goes
out
Fig
BE
27
2
Fusible
link
Fuse
box
M
From
battery
To
battery
Ig
ition
ru
nu
swllch
A
A
To
other
warning
h
To
ignition
IQlamps
i
J
r
coil
WR
t
I
j
Charge
warning
lamp
T
T
I
War
lamp
relay
J
I
Generator
v
it
ge
e
g
bt
From
battery
To
battery
Ignition
witch
J
i
L
r
t
ft
ignition
r
Glj
fCOil
WR
f
I
Warning
lamp
relay
Generator
Voltage
regulator
I
YR
Fig
BE
27
1
BE17
YR
UTO
other
warrung
lamps
Charge
warning
lamp
BE264
Fig
BE
27
2
Circuit
of
charge
warning
system
Page 463 of 537
HAND
BRAKE
WARNING
LAMP
DESCRIPTION
The
hand
brake
warning
lamp
glows
when
the
hand
brake
is
applied
When
the
ignition
switch
is
set
to
ON
current
flows
from
the
ignition
switch
to
the
warning
lamp
When
the
hand
brake
is
applied
hand
brake
warning
switch
is
closed
and
warning
lamp
glows
Fuse
M
Ignition
5
tch
Fusible
link
From
battery
I
YG
1
1
Hand
brake
sWitch
BE314
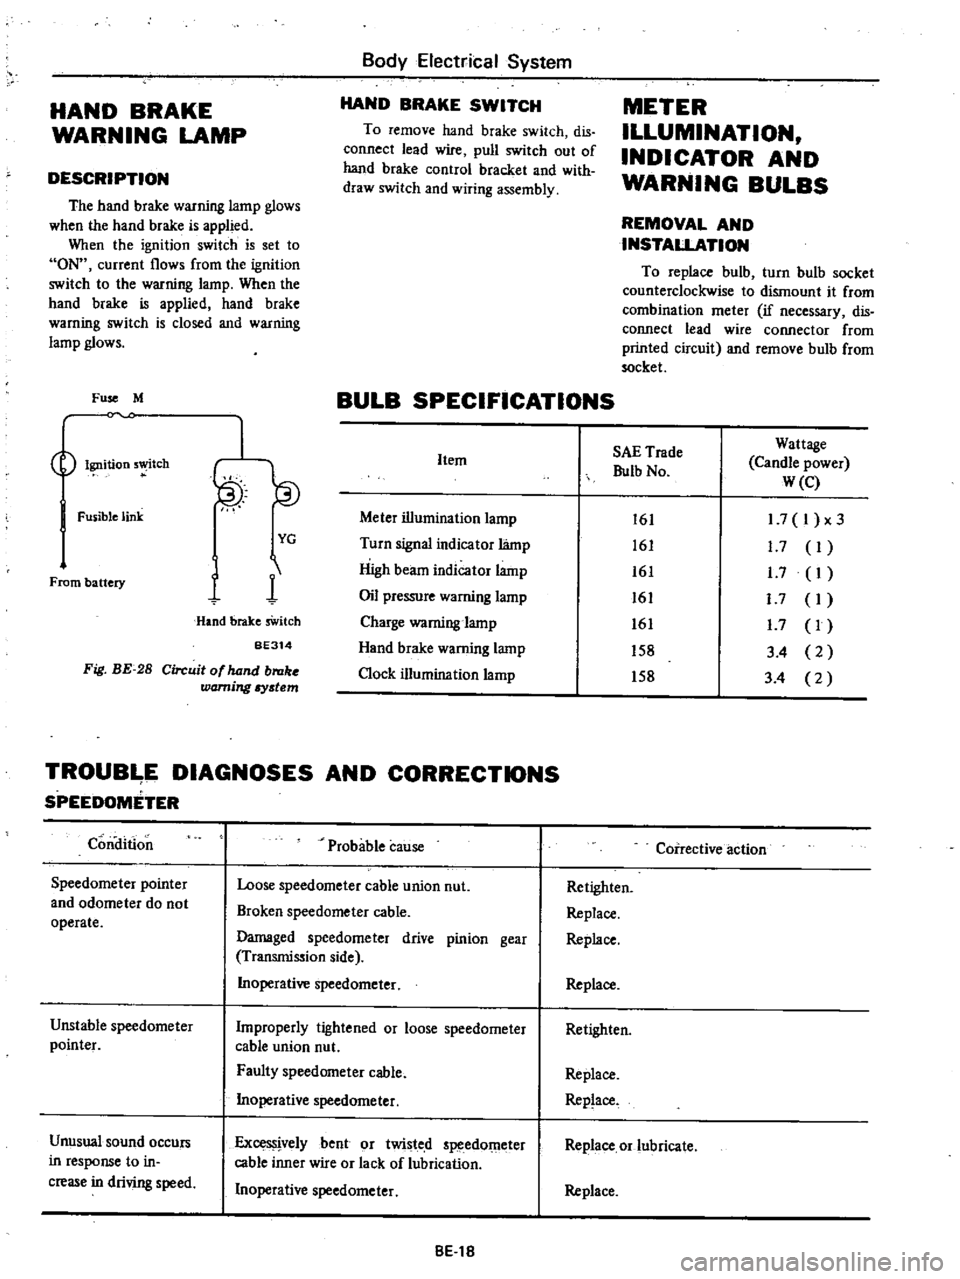
Fig
BE
28
Circuit
of
hand
broke
warning
Iystem
Body
Electrical
System
HAND
BRAKE
SWITCH
To
remove
hand
brake
switch
dis
connect
lead
wire
pull
switch
out
of
hand
brake
control
bracket
and
with
draw
switch
and
wiring
assembly
METER
ILLUMINATION
INDICATOR
AND
WARNING
BULBS
REMOVAL
AND
INSTALLATION
To
replace
bulb
turn
bulb
socket
counterclockwise
to
dismount
it
from
combination
meter
if
necessary
dis
connect
lead
wire
connector
from
printed
circuit
and
remove
bulb
from
socket
BULB
SPECIFICATIONS
Item
Meter
illumination
lamp
Turn
signal
indicator
lamp
High
beam
indicator
lamp
Oil
pressure
warning
lamp
Charge
warning
lamp
Hand
brake
warning
lamp
Clock
illumination
lamp
SAE
Trade
Bulb
No
Wattage
Candle
power
W
e
161
161
161
161
161
158
158
1
7
I
x3
1
7
I
1
7
I
I
7
I
1
7
I
3
4
2
3
4
2
TROUB
E
DIAGNOSES
AND
CORRECTIONS
SPEEDOMETER
Condition
Speedometer
pointer
and
odometer
do
not
operate
Unstable
speedometer
pointer
Unusual
sound
occurs
in
response
to
in
crease
in
driving
speed
Probable
cause
Loose
speedometer
cable
union
nut
Broken
speedometer
cable
Damaged
speedometer
drive
pinion
gear
Transmission
side
Inoperative
speedometer
Improperly
tightened
or
loose
speedometer
cable
union
nut
Faulty
speedometer
cable
Inoperative
speedometer
ExceS
jvelybent
or
twisted
speedOmeter
cable
inner
wire
or
lack
of
lubrication
Inoperative
speedometer
8El8
Coirective
action
Retighten
Replace
Replace
Replace
Retighten
Replace
Replace
Replace
or
lubricate
Replace
Page 465 of 537
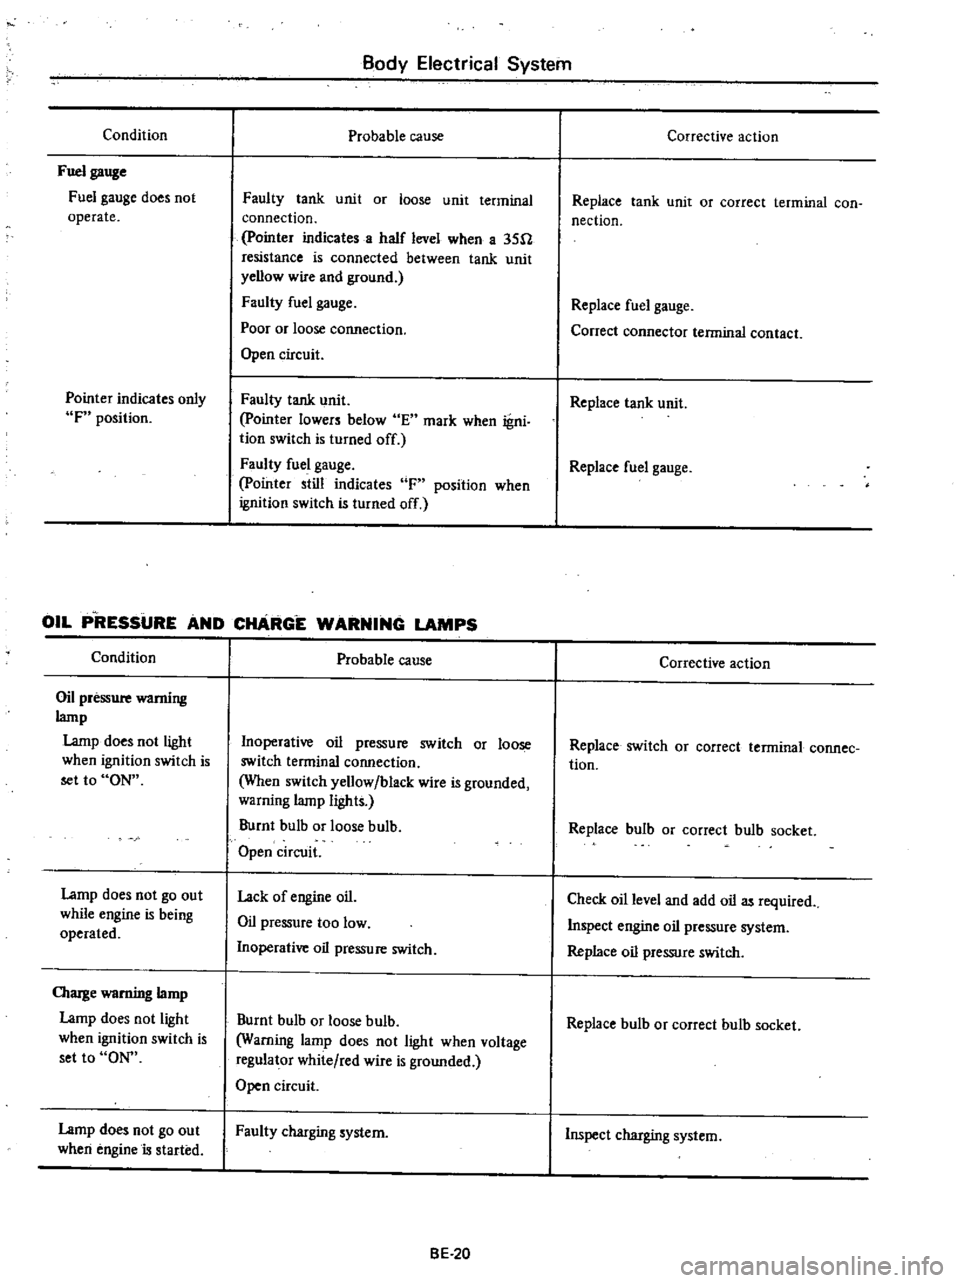
Condition
Fuel
gauge
Fuel
gauge
does
not
operate
Pointer
indicates
only
F
position
Body
Electrical
System
Probable
cause
Faulty
tank
unit
or
loose
unit
terminal
connection
pointer
indicates
a
half
level
when
a
35U
resistance
is
connected
between
tank
unit
yellow
wire
and
ground
Faulty
fuel
gauge
Poor
or
loose
cormection
Open
circuit
Faulty
tank
unit
pointer
lowers
below
E
mark
when
igni
tion
switch
Is
turned
off
Faulty
fuel
gauge
pointer
still
indicates
F
position
when
ignition
switch
is
turned
off
OIL
P
RESSURE
AND
CHARGE
WARNING
LAMPS
Condition
Oil
pressure
wamiug
lamp
Lamp
does
not
light
when
ignition
switch
is
set
to
ON
Lamp
does
not
go
out
while
engine
is
being
operated
OIarge
warning
lamp
Lamp
does
not
light
when
ignition
switch
is
set
to
ON
Lamp
does
not
go
out
when
engine
is
started
Probable
cause
Inoperative
oil
pressure
switch
or
loose
switch
terminal
connection
When
switch
yellow
black
wire
is
grounded
warning
lamp
lights
Burnt
bulb
or
loose
bulb
Open
circuit
Lack
of
engine
oil
Oil
pressure
too
low
Inoperative
oil
pressure
switch
Burnt
bulb
or
loose
bulb
Warning
lamp
does
not
light
when
voltage
regulator
white
red
wire
is
grounded
Open
circuit
Faulty
charging
system
BE
20
Corrective
action
Replace
tank
unit
or
correct
terminal
con
nection
Replace
fuel
gauge
Conect
connector
terminal
contact
Replace
tank
unit
Replace
fuel
gauge
Corrective
action
Replace
switch
OJ
correct
terminal
connee
tion
Replace
bulb
or
correct
bulb
socket
Check
oil
level
and
add
oil
as
required
Inspect
engine
oil
pressure
system
Replace
oil
pressure
switch
Replace
bulb
or
correct
bulb
socket
Inspect
charging
system
Page 466 of 537
Body
Electrical
System
ELECTRICAL
ACCESSORIES
CONTENTS
HORN
DESCRIPTION
REMOVAL
AND
INSTALLATION
IGNITION
SWITCH
REMOVAL
AND
INSTALLATION
INSPECTION
WINDSHIELD
WIPER
AND
WASHER
REMOVAL
AND
INSTALLATION
INSPECTION
RADIO
REMOVAL
AND
INSTALLATION
ADJUSTMENT
CLOCK
REMOVAL
I
NST
ALLA
TION
HEATER
DESCRIPTION
AIRFLOW
HEATER
UNIT
ASSEMBLY
BE
21
BE
21
BE
21
8E
n
BE
22
BE
22
BE
23
BE
23
BE
23
BE
25
BE
25
BE
25
BE
25
BE
25
BE
26
BE
26
BE
26
BE
28
BE
29
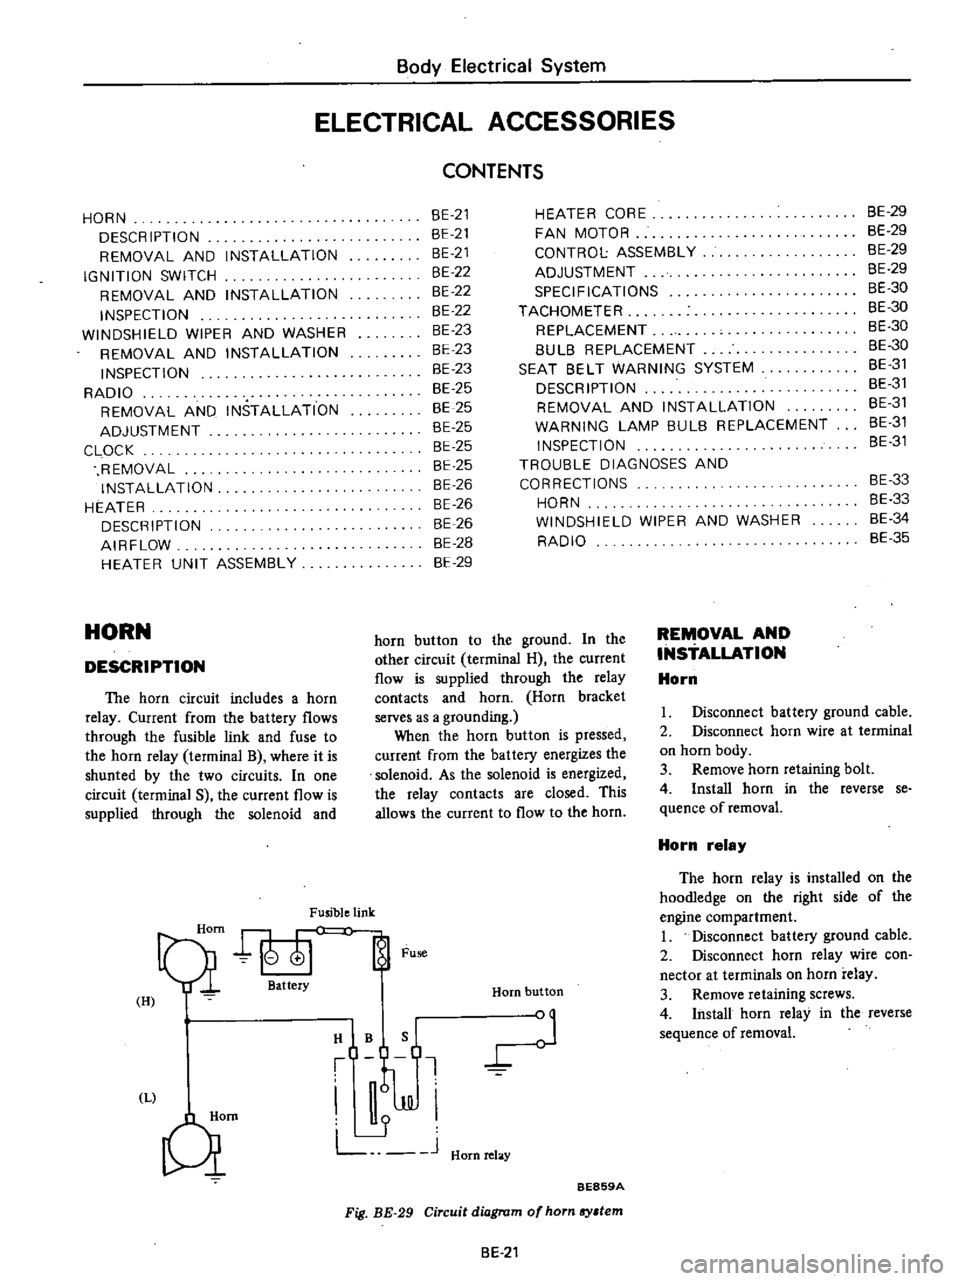
HORN
DESCRIPTION
The
horn
circuit
includes
a
horn
relay
Current
from
the
battery
flows
through
the
fusible
link
and
fuse
to
the
horn
relay
terminal
B
where
it
is
shunted
by
the
two
circuits
In
one
circuit
terminal
S
the
current
flow
is
supplied
through
the
solenoid
and
Fusible
link
Qi
att
Fu
H
I
HIBQ
t
J
JJI
L
J
Hornrelay
Qm
HEATER
CORE
FAN
MOTOR
CONTROL
ASSEMBLY
ADJUSTMENT
SPECIFICATIONS
TACHOMETER
REPLACEMENT
8UL8
REPLACEMENT
SEAT
8ELT
WARNING
SYSTEM
DESCRIPTION
REMOVAL
AND
INSTALLATION
WARNING
LAMP
BULB
REPLACEMENT
INSPECTION
TROUBLE
DIAGNOSES
AND
CORRECTIONS
HORN
WINDSHIELD
WIPER
AND
WASHER
RADIO
Horn
button
BE859A
Fig
BE
29
Circuit
diagram
of
horn
sy
tem
horn
button
to
the
ground
In
the
other
circuit
terminal
H
the
current
flow
is
supplied
through
the
relay
contacts
and
horn
Horn
bracket
serves
as
a
grounding
When
the
horn
button
is
pressed
current
from
the
battery
energizes
the
solenoid
As
the
solenoid
is
energized
the
relay
contacts
are
closed
This
allows
the
current
to
flow
to
the
horn
BE
21
REMOVAL
AND
INSTALLATION
Horn
8E
29
BE
29
BE
29
8E
29
BE
30
BE
30
BE
30
8E
30
8E
31
BE
31
BE
31
8E
31
8E
31
BE
33
8E
33
8E
34
BE
35
I
Disconnect
battery
ground
cable
2
Disconnect
horn
wire
at
terminal
on
horn
body
3
Remove
horn
retaining
bolt
4
Install
horn
in
the
reverse
se
quence
of
removal
Horn
relay
The
horn
relay
is
installed
on
the
hoodIedge
on
the
right
side
of
the
engine
compartment
I
Disconnect
battery
ground
cable
2
Disconnect
horn
relay
wire
con
nector
at
terminals
on
horn
relay
3
Remove
retaining
screws
4
Install
horn
relay
in
the
reverse
sequence
of
removal
Page 476 of 537
SEAT
BELT
WARNING
SYSTEM
DESCRIPTION
Except
Canada
When
the
ignition
switch
is
turned
to
the
ON
position
the
warning
lamp
comes
on
and
remains
on
for
4
to
8
seconds
The
warning
buzzer
sounds
for
4
to
8
seconds
intermittent
ly
if
the
driver
s
seat
belt
is
not
fastened
properly
The
seat
belt
warning
system
con
sists
of
a
driver
s
belt
switch
a
warning
buzzer
a
warning
lamp
a
timer
unit
and
an
ignition
switch
For
Canada
When
the
ignition
switch
is
turned
Body
Electrical
System
to
the
ON
position
the
warning
lamp
comes
on
and
the
warning
buz
zer
sounds
if
the
driver
s
seat
belt
is
not
fastened
properly
The
seat
belt
warning
system
con
sists
of
a
driver
s
belt
switch
a
warning
buzzer
a
warning
lamp
and
an
igni
tion
switch
REMOVAL
AND
INSTALLATION
Ignition
switch
Refer
to
page
BE
22
for
Removal
and
Installation
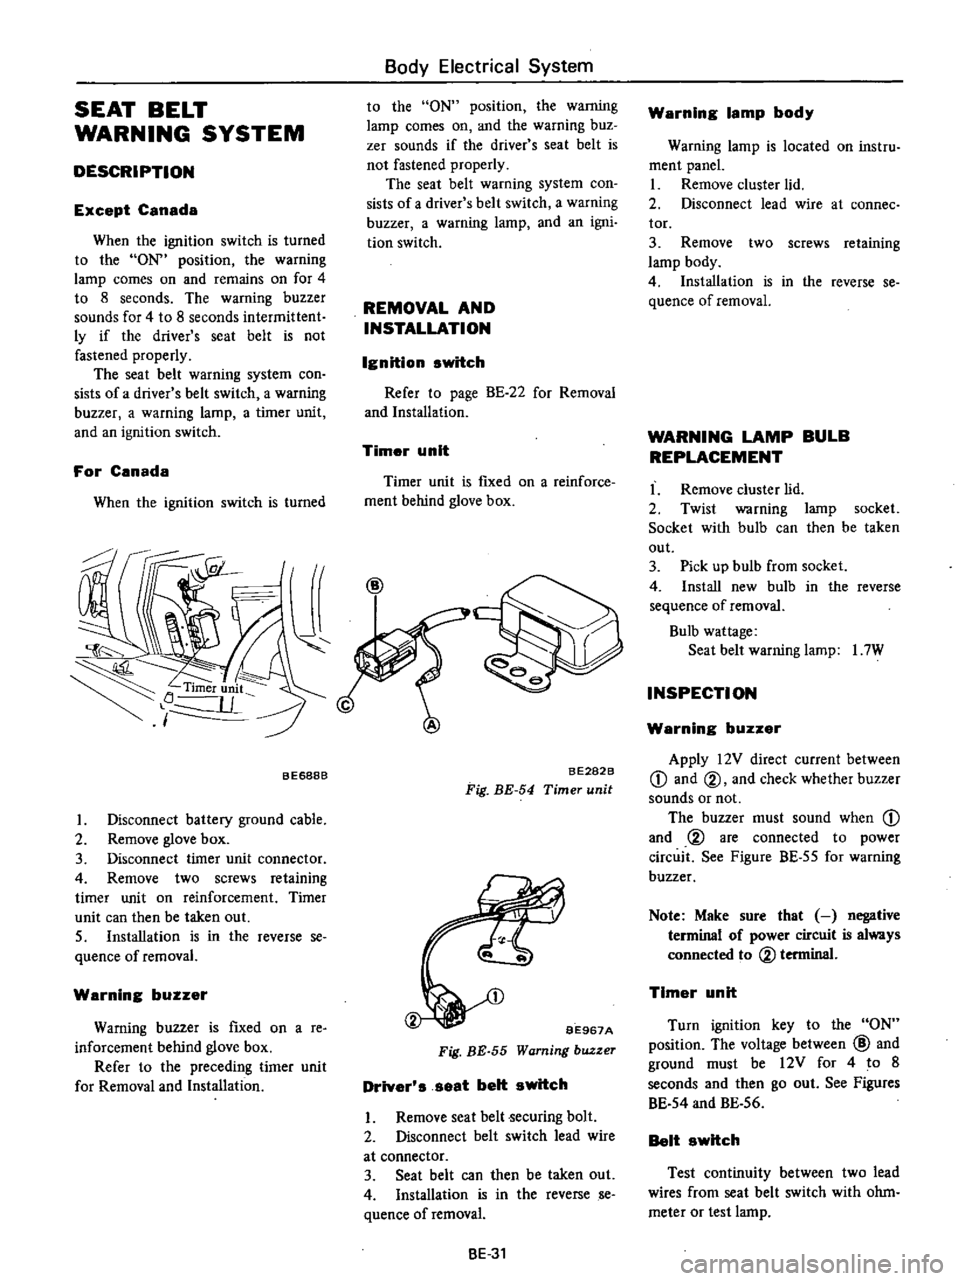
Timer
unit
Timer
unit
is
fIXed
on
a
reinforce
ment
behind
glove
box
BE688B
I
Disconnect
battery
ground
cable
2
Remove
glove
box
3
Disconnect
timer
unit
connector
4
Remove
two
screws
retaining
timer
unit
on
reinforcement
Timer
unit
can
then
be
taken
out
S
Installation
is
in
the
reverse
se
quence
of
removal
Warning
buzzer
Warning
buzzer
is
fIxed
on
a
re
inforcement
behind
glove
box
Refer
to
the
preceding
timer
unit
for
Removal
and
Installation
BE282B
Fig
BE
54
Timer
unit
BE967A
Fig
BE
55
Warning
buzzer
Driver
s
seat
belt
switch
I
Remove
seat
belt
ecuring
bolt
2
Disconnect
belt
switch
lead
wire
at
connector
3
Seat
belt
can
then
be
taken
out
4
Installation
is
in
the
reverse
se
quence
ofremoval
BE
31
Warning
lamp
body
Warning
lamp
is
located
on
instru
ment
panel
I
Remove
cluster
lid
2
Disconnect
lead
wire
at
connee
tor
3
Remove
two
screws
retaining
lamp
body
4
Installation
is
in
the
reverse
se
quence
of
removal
WARNING
LAMP
BULB
REPLACEMENT
I
Remove
cluster
lid
2
Twist
warning
lamp
socket
Socket
with
bulb
can
then
be
taken
out
3
Pick
up
bulb
from
socket
4
Install
new
bulb
in
the
reverse
sequence
of
removal
Bulb
wattage
Seat
belt
warning
lamp
I
7W
INSPECTION
Warning
buzzer
Apply
12V
direct
current
between
CD
and
@
and
check
whether
buzzer
sounds
or
not
The
buzzer
must
sound
when
CD
and
@
are
connected
to
power
circuit
See
Figure
BE
55
for
warning
buzzer
Note
Make
sure
that
negative
terminal
of
power
circuit
is
always
connected
to
@
terminal
Timer
unit
Turn
ignition
key
to
the
ON
position
The
voltage
between
@
and
ground
must
be
12V
for
4
to
8
seconds
and
then
go
out
See
Figures
BE
54
and
BE
56
Belt
switch
Test
continuity
between
two
lead
wires
from
seat
belt
switch
with
ohm
meter
or
test
lamp