DODGE DURANGO 2020 Owners Manual
Manufacturer: DODGE, Model Year: 2020, Model line: DURANGO, Model: DODGE DURANGO 2020Pages: 464, PDF Size: 22.14 MB
Page 261 of 464
STARTING AND OPERATING259
Driving In Snow, Mud And Sand
In heavy snow, when pulling a load, or for
additional control at slower speeds, shift the
transmission to a low gear and shift the transfer
case to LOW if necessary. Refer to “All-Wheel
Drive Operation” in “Starting And Operating” for
further information. Do not shift to a lower gear
than necessary to maintain forward motion.
Over-revving the engine can spin the wheels
and traction will be lost.
Avoid abrupt downshifts on icy or slippery roads,
because engine braking may cause skidding
and loss of control.
Hill Climbing
NOTE:
Before attempting to climb a hill, determine the
conditions at the crest and/or on the other side.
Before climbing a steep hill, shift the
transmission to a lower gear and shift the
transfer case to LOW. Use FIRST gear and LOW
for very steep hills. If you stall or begin to lose forward motion while
climbing a steep hill, allow your vehicle to come
to a stop and immediately apply the brakes.
Restart the engine, and shift into REVERSE.
Back slowly down the hill, allowing the
compression braking of the engine to help
regulate the speed. If the brakes are required to
control vehicle speed, apply them lightly and
avoid locking or skidding the tires.
Remember, never drive diagonally across a hill;
always drive straight up or down.
If the wheels start to slip as you approach the
crest of a hill, ease off the accelerator and
maintain forward motion by turning the front
wheels slowly. This may provide a fresh “bite”
into the surface and will usually provide traction
to complete the climb.
Traction Downhill
Shift the transmission into a low gear, and the
transfer case into LOW range. Let the vehicle go
slowly down the hill with all four wheels turning
against engine compression drag. This will
permit you to control the vehicle speed and
direction.
When descending mountains or hills, repeated
braking can cause brake fade with loss of
braking control. Avoid repeated heavy braking
by downshifting the transmission whenever
possible.WARNING!
If the engine stalls, you lose forward motion,
or cannot make it to the top of a steep hill or
grade, never attempt to turn around. To do so
may result in tipping and rolling the vehicle.
Always back carefully straight down a hill in
REVERSE gear. Never back down a hill in
NEUTRAL using only the brake.5
20_WD_OM_EN_USC_t.book Page 259
Page 262 of 464
260STARTING AND OPERATING
After Driving Off-Road
Off-road operation puts more stress on your
vehicle than does most on-road driving. After
going off-road, it is always a good idea to check
for damage. That way you can get any problems
taken care of right away and have your vehicle
ready when you need it.
Completely inspect the underbody of your
vehicle. Check tires, body structure, steering,
suspension, and exhaust system for damage.
Inspect the radiator for mud and debris and
clean as required.
Check threaded fasteners for looseness,
particularly on the chassis, drivetrain compo -
nents, steering, and suspension. Retighten
them, if required, and torque to the values
specified in the Service Manual.
Check for accumulations of plants or brush.
These things could be a fire hazard. They
might hide damage to fuel lines, brake hoses,
axle pinion seals, and propeller shafts.
After extended operation in mud, sand,
water, or similar dirty conditions, have the
radiator, fan, brake rotors, wheels, brake
linings, and axle yokes inspected and
cleaned as soon as possible.
If you experience unusual vibration after
driving in mud, slush or similar conditions,
check the wheels for impacted material.
Impacted material can cause a wheel imbal-
ance and freeing the wheels of it will correct
the situation.
WARNING!
Abrasive material in any part of the brakes
may cause excessive wear or unpredictable
braking. You might not have full braking
power when you need it to prevent a collision.
If you have been operating your vehicle in
dirty conditions, get your brakes checked and
cleaned as necessary.
20_WD_OM_EN_USC_t.book Page 260
Page 263 of 464
261
IN CASE OF EMERGENCY
HAZARD WARNING FLASHERS
The Hazard Warning Flashers switch is located
on the switch bank just above the climate
controls.
Hazard Warning Flashers Switch
Push the switch to turn on the Hazard Warning
Flashers. When the switch is activated, all
directional turn signals will flash on and off to
warn oncoming traffic of an emergency. Push
the switch a second time to turn off the Hazard
Warning Flashers. This is an emergency warning system and it
should not be used when the vehicle is in
motion. Use it when your vehicle is disabled and
it is creating a safety hazard for other motorists.
When you must leave the vehicle to seek
assistance, the Hazard Warning Flashers will
continue to operate even though the ignition is
placed in the OFF position.
NOTE:
With extended use, the Hazard Warning
Flashers may discharge the battery.
ASSIST AND SOS MIRROR — IF EQUIPPED
Assist And SOS Mirror
If equipped, the rearview mirror contains an
ASSIST and a SOS button.
1 — SOS Button
2 — ASSIST Button
6
20_WD_OM_EN_USC_t.book Page 261
Page 264 of 464
262IN CASE OF EMERGENCY
NOTE:
Your vehicle may be transmitting data as
authorized by the subscriber.
The SOS and ASSIST buttons will only func -
tion if you are connected to an operable LTE
(voice/data) or 4G (data) network. Other
Uconnect services will only be operable if
your SiriusXM Guardian™ service is active
and you are connected to an operable LTE
(voice/data) or 4G (data) network. ASSIST Call
The ASSIST Button is used to automatically
connect you to any one of the following support
centers:
Roadside Assistance – If you get a flat tire, or
need a tow, just push the ASSIST button and
you will be connected to a representative for
assistance. Roadside Assistance will know
what vehicle you’re driving and its location.
Additional fees may apply for roadside assis
-
tance.
SiriusXM Guardian™ Customer Care –
In-vehicle support for SiriusXM Guardian™.
Vehicle Customer Care – Total support for all
other vehicle issues.
SOS Call
1. Push the SOS Call button on the Rearview Mirror.
NOTE:
In case the SOS Call button is pushed in error,
there will be a 10 second delay before the SOS
Call system initiates a call to a SOS operator. To cancel the SOS Call connection, push the
SOS call button on the Rearview Mirror or press
the cancellation button on the Device Screen.
Termination of the SOS Call will turn off the
green LED light on the Rearview Mirror.
2. The LED light located between the ASSIST
and SOS buttons on the Rearview Mirror will
turn green once a connection to a SOS
operator has been made.
3. Once a connection between the vehicle and a SOS operator is made, the SOS Call
system may transmit the following
important vehicle information to a SOS
operator: Indication that the occupant placed a
SOS Call
The vehicle brand
The last known GPS coordinates of the
vehicle
4. You should be able to speak with the SOS operator through the vehicle audio system
to determine if additional assistance is
needed.
WARNING!
ALWAYS obey traffic laws and pay attention to
the road. ALWAYS drive safely with your hands
on the steering wheel. You have full
responsibility and assume all risks related to
the use of the features and applications in
this vehicle. Only use the features and
applications when it is safe to do so. Failure
to do so may result in an accident involving
serious injury or death.
20_WD_OM_EN_USC_t.book Page 262
Page 265 of 464
IN CASE OF EMERGENCY263
(Continued)
NOTE:
Your vehicle may be transmitting data as
authorized by the subscriber.
Once a connection is made between the
vehicle’s SOS Call system and the SOS oper -
ator, the SOS operator may be able to open a
voice connection with the vehicle to deter -
mine if additional assistance is needed. Once
the SOS operator opens a voice connection
with the vehicle’s SOS Call system, the oper -
ator should be able to speak with you or other
vehicle occupants and hear sounds occurring
in the vehicle. The vehicle’s SOS Call system will attempt to
remain connected with the SOS operator
until the SOS operator terminates the
connection.
5. The SOS operator may attempt to contact appropriate emergency responders and
provide them with important vehicle
information and GPS coordinates.
WARNING!
ALWAYS obey traffic laws and pay attention to
the road. ALWAYS drive safely with your hands
on the steering wheel. You have full
responsibility and assume all risks related to
the use of the features and applications in
this vehicle. Only use the features and
applications when it is safe to do so. Failure
to do so may result in an accident involving
serious injury or death.
WARNING!
If anyone in the vehicle could be in danger
(e.g., fire or smoke is visible, dangerous
road conditions or location), do not wait for
voice contact from an Emergency Services
Agent. All occupants should exit the vehicle
immediately and move to a safe location.
Never place anything on or near the
vehicle’s operable network and GPS
antennas. You could prevent operable
network and GPS signal reception, which
can prevent your vehicle from placing an
emergency call. An operable network and
GPS signal reception is required for the SOS
Call system to function properly.
The SOS Call system is embedded into the
vehicle’s electrical system. Do not add
aftermarket electrical equipment to the
vehicle’s electrical system. This may
prevent your vehicle from sending a signal
to initiate an emergency call. To avoid inter -
ference that can cause the SOS Call system
to fail, never add aftermarket equipment
(e.g., two-way mobile radio, CB radio, data
recorder, etc.) to your vehicle’s electrical
system or modify the antennas on your
vehicle. IF YOUR VEHICLE LOSES BATTERY
POWER FOR ANY REASON (INCLUDING
DURING OR AFTER AN ACCIDENT), THE
UCONNECT FEATURES, APPS AND
SERVICES, AMONG OTHERS, WILL NOT
OPERATE.
Modifications to any part of the SOS Call
system could cause the air bag system to
fail when you need it. You could be injured
if the air bag system is not there to help
protect you.
WARNING! (Continued)
6
20_WD_OM_EN_USC_t.book Page 263
Page 266 of 464
264IN CASE OF EMERGENCY
SOS Call System Limitations
Vehicles sold in Mexico DO NOT have SOS Call
system capabilities.
SOS or other emergency line operators in
Mexico may not answer or respond to SOS
system calls.
If the SOS Call system detects a malfunction,
any of the following may occur at the time the
malfunction is detected, and at the beginning of
each ignition cycle:
The Rearview Mirror light located between
the ASSIST and SOS buttons will continuously
illuminate red.
The Device Screen will display the following
message “Vehicle device requires service.
Please contact an authorized dealer.”
An In-Vehicle Audio message will state
“Vehicle device requires service. Please
contact an authorized dealer.” Even if the SOS Call system is fully functional,
factors beyond FCA US LLC’s control may
prevent or stop the SOS Call system operation.
These include, but are not limited to, the
following factors:
The ignition is in the OFF position
The vehicle’s electrical systems are not intact
The SOS Call system software and/or hard
-
ware are damaged during a crash
The vehicle battery loses power or becomes
disconnected during a vehicle crash
LTE (voice/data) or 4G (data) network and/or
Global Positioning Satellite signals are
unavailable or obstructed
Equipment malfunction at the SOS operator
facility
Operator error by the SOS operator
LTE (voice/data) or 4G (data) network
congestion
Weather
Buildings, structures, geographic terrain, or
tunnels
WARNING!
Ignoring the Rearview Mirror light could
mean you will not have SOS Call services. If
the Rearview Mirror light is illuminated,
have an authorized dealer service the SOS
Call system immediately.
The Occupant Restraint Control module
turns on the air bag Warning Light on the
instrument panel if a malfunction in any
part of the system is detected. If the Air Bag
Warning Light is illuminated, have an
authorized dealer service the Occupant
Restraint Control system immediately.
WARNING!
ALWAYS obey traffic laws and pay attention to
the road. ALWAYS drive safely with your hands
on the steering wheel. You have full
responsibility and assume all risks related to
the use of the features and applications in
this vehicle. Only use the features and
applications when it is safe to do so. Failure
to do so may result in an accident involving
serious injury or death.
20_WD_OM_EN_USC_t.book Page 264
Page 267 of 464
IN CASE OF EMERGENCY265
NOTE:
Your vehicle may be transmitting data as
authorized by the subscriber.
Never place anything on or near the vehicle’s
LTE (voice/data) or 4G (data) and GPS
antennas. You could prevent LTE (voice/
data) or 4G (data) and GPS signal reception,
which can prevent your vehicle from placing
an emergency call. An operable LTE (voice/
data) or 4G (data) network connection and a
GPS signal is required for the SOS Call
system to function properly.
NOTE:
Changes or modifications not expressly
approved by the party responsible for compli -
ance could void the user's authority to operate
the equipment.
GENERAL INFORMATION
The following regulatory statement applies to all
Radio Frequency (RF) devices equipped in this
vehicle:
This device complies with Part 15 of the FCC
Rules and with Innovation, Science and
Economic Development Canada license-exempt
RSS standard(s). Operation is subject to the
following two conditions:
1. This device may not cause harmful interference, and
2. This device must accept any interference received, including interference that may
cause undesired operation. Le présent appareil est conforme aux CNR
d`Innovation, Science and Economic
Development applicables aux appareils radio
exempts de licence. L'exploitation est autorisée
aux deux conditions suivantes:
1. l'appareil ne doit pas produire de
brouillage, et
2. l'utilisateur de l'appareil doit accepter tout brouillage radioélectrique subi, même si le
brouillage est susceptible d'en compro -
mettre le fonctionnement.
La operación de este equipo está sujeta a las
siguientes dos condiciones:
1. es posible que este equipo o dispositivo no cause interferencia perjudicial y
2. este equipo o dispositivo debe aceptar cualquier interferencia, incluyendo la que
pueda causar su operación no deseada.
NOTE:
Changes or modifications not expressly
approved by the party responsible for compli -
ance could void the user’s authority to operate
the equipment.
CAUTION!
To avoid damage to the mirror during
cleaning, never spray any cleaning solution
directly onto the mirror. Apply the solution
onto a clean cloth and wipe the mirror clean.
6
20_WD_OM_EN_USC_t.book Page 265
Page 268 of 464
266IN CASE OF EMERGENCY
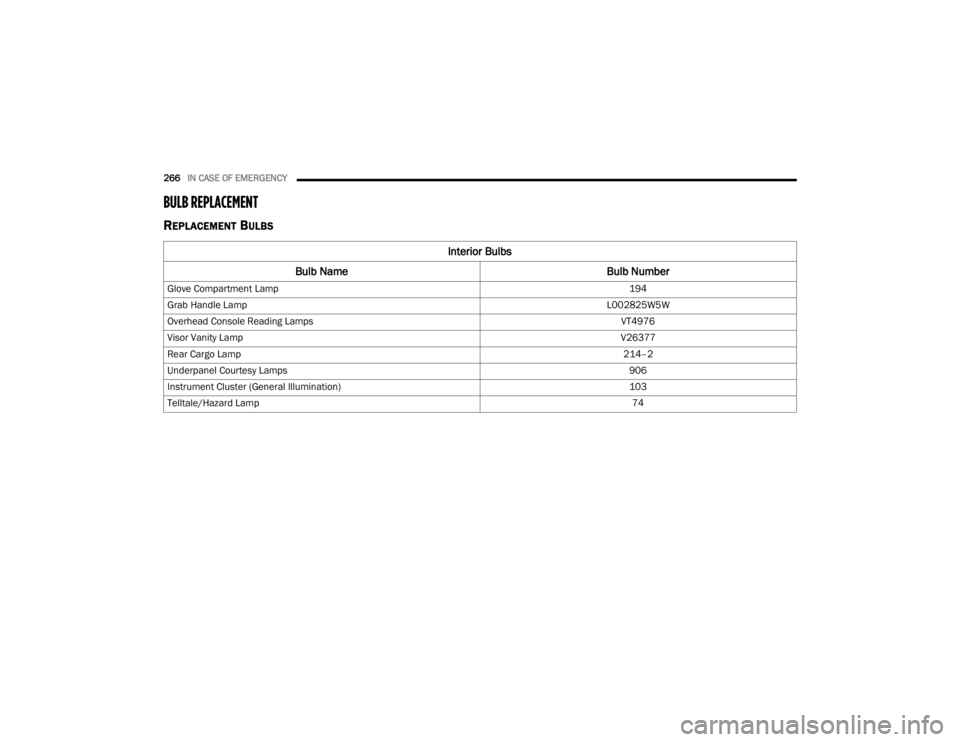
BULB REPLACEMENT
REPLACEMENT BULBS
Interior Bulbs
Bulb Name Bulb Number
Glove Compartment Lamp 194
Grab Handle Lamp L002825W5W
Overhead Console Reading Lamps VT4976
Visor Vanity Lamp V26377
Rear Cargo Lamp 214–2
Underpanel Courtesy Lamps 906
Instrument Cluster (General Illumination) 103
Telltale/Hazard Lamp 74
20_WD_OM_EN_USC_t.book Page 266
Page 269 of 464
IN CASE OF EMERGENCY267
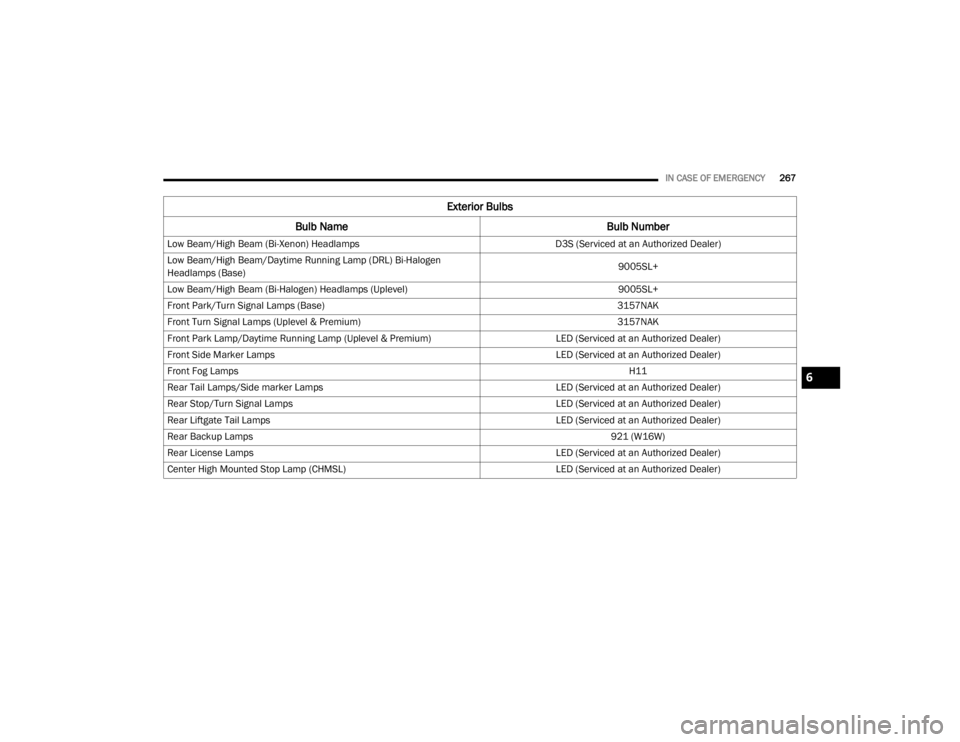
Exterior Bulbs
Bulb Name Bulb Number
Low Beam/High Beam (Bi-Xenon) Headlamps D3S (Serviced at an Authorized Dealer)
Low Beam/High Beam/Daytime Running Lamp (DRL) Bi-Halogen
Headlamps (Base) 9005SL+
Low Beam/High Beam (Bi-Halogen) Headlamps (Uplevel) 9005SL+
Front Park/Turn Signal Lamps (Base) 3157NAK
Front Turn Signal Lamps (Uplevel & Premium) 3157NAK
Front Park Lamp/Daytime Running Lamp (Uplevel & Premium) LED (Serviced at an Authorized Dealer)
Front Side Marker Lamps LED (Serviced at an Authorized Dealer)
Front Fog Lamps H11
Rear Tail Lamps/Side marker Lamps LED (Serviced at an Authorized Dealer)
Rear Stop/Turn Signal Lamps LED (Serviced at an Authorized Dealer)
Rear Liftgate Tail Lamps LED (Serviced at an Authorized Dealer)
Rear Backup Lamps 921 (W16W)
Rear License Lamps LED (Serviced at an Authorized Dealer)
Center High Mounted Stop Lamp (CHMSL) LED (Serviced at an Authorized Dealer)
6
20_WD_OM_EN_USC_t.book Page 267
Page 270 of 464
268IN CASE OF EMERGENCY
BULB REPLACEMENT
NOTE:
Lens fogging can occur under certain atmo -
spheric conditions. This will usually clear as
atmospheric conditions change to allow the
condensation to change back into a vapor.
Turning the lamps on will usually accelerate the
clearing process.
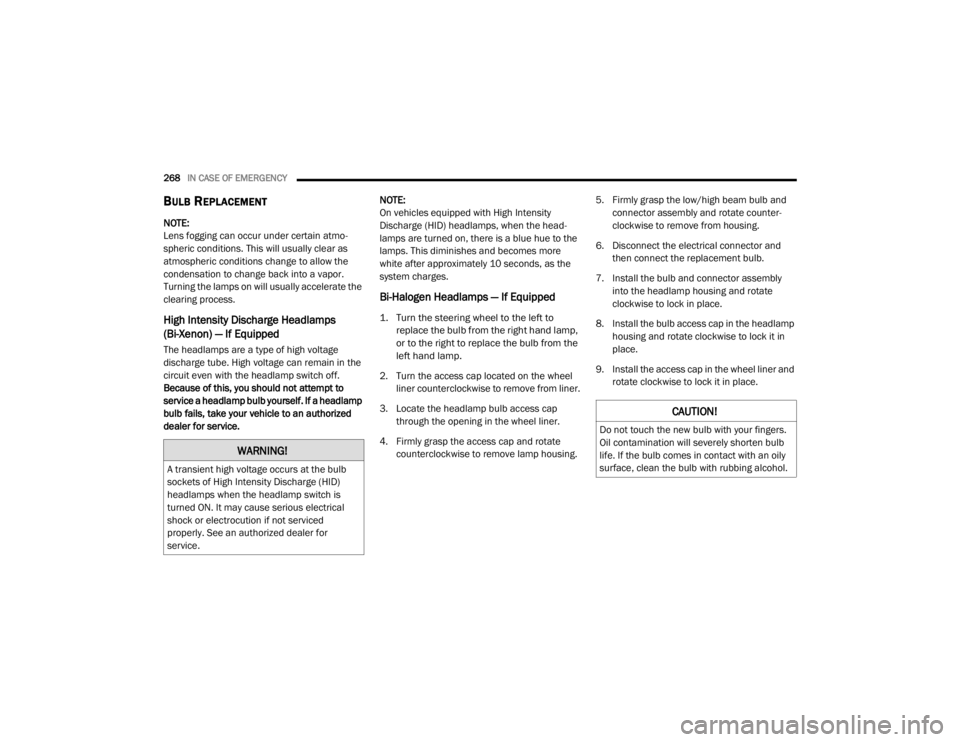
High Intensity Discharge Headlamps
(Bi-Xenon) — If Equipped
The headlamps are a type of high voltage
discharge tube. High voltage can remain in the
circuit even with the headlamp switch off.
Because of this, you should not attempt to
service a headlamp bulb yourself. If a headlamp
bulb fails, take your vehicle to an authorized
dealer for service. NOTE:
On vehicles equipped with High Intensity
Discharge (HID) headlamps, when the head
-
lamps are turned on, there is a blue hue to the
lamps. This diminishes and becomes more
white after approximately 10 seconds, as the
system charges.
Bi-Halogen Headlamps — If Equipped
1. Turn the steering wheel to the left to replace the bulb from the right hand lamp,
or to the right to replace the bulb from the
left hand lamp.
2. Turn the access cap located on the wheel liner counterclockwise to remove from liner.
3. Locate the headlamp bulb access cap through the opening in the wheel liner.
4. Firmly grasp the access cap and rotate counterclockwise to remove lamp housing. 5. Firmly grasp the low/high beam bulb and
connector assembly and rotate counter -
clockwise to remove from housing.
6. Disconnect the electrical connector and then connect the replacement bulb.
7. Install the bulb and connector assembly into the headlamp housing and rotate
clockwise to lock in place.
8. Install the bulb access cap in the headlamp housing and rotate clockwise to lock it in
place.
9. Install the access cap in the wheel liner and rotate clockwise to lock it in place.
WARNING!
A transient high voltage occurs at the bulb
sockets of High Intensity Discharge (HID)
headlamps when the headlamp switch is
turned ON. It may cause serious electrical
shock or electrocution if not serviced
properly. See an authorized dealer for
service.
CAUTION!
Do not touch the new bulb with your fingers.
Oil contamination will severely shorten bulb
life. If the bulb comes in contact with an oily
surface, clean the bulb with rubbing alcohol.
20_WD_OM_EN_USC_t.book Page 268