exhaust DODGE NEON 2000 Service Owner's Manual
[x] Cancel search | Manufacturer: DODGE, Model Year: 2000, Model line: NEON, Model: DODGE NEON 2000Pages: 1285, PDF Size: 29.42 MB
Page 763 of 1285
(13) Install ignition coil and spark plug cables.
Connect coil electrical connector.
(14) Install intake manifold. Refer to procedure in
this section.
(15) Install upper radiator hose.
(16) Install ground wire to cylinder head.
(17) Install coolant recovery container.
(18) Connect fuel line to fuel rail.
(19) Install rear timing belt cover, camshaft
sprocket, and timing belt tensioner and timing belt.
Refer to procedures in this section.
(20) Install front timing belt cover.
(21) Install engine mount bracket.
(22) Position engine and install right side engine
mount to engine mount bracket bolt. Tighten bolt to
118 N´m (87 ft. lbs.). Remove jack from beneath
engine.
(23) Install power steering pump assembly.
(24) Install power steering hose support clip and
ground strap to engine mount bracket.
(25) Install upper torque strut.
(26) Raise vehicle.
(27) Install lower torque strut.
(28) Install crankshaft damper.
(29) Install accessory drive belts. Refer to Group 7,
Cooling System Accessory Drive Belt for procedure.
(30) Install right side splash shield and front
wheel.
(31) Install exhaust pipe to exhaust manifold
flange.
(32) Lower vehicle and fill cooling system. Refer to
Group 7, Cooling System for procedure.
(33) Connect negative cable to battery.
(34) Perform camshaft and crankshaft timing
relearn procedure as follows:
²Connect the DRB scan tool to the data link
(diagnostic) connector. This connector is located in
the passenger compartment; at the lower edge of
instrument panel; near the steering column.
²Turn the ignition switch on and access the ªmis-
cellaneousº screen.
²Select ªre-learn cam/crankº option and follow
directions on DRB screen.
CRANKSHAFT DAMPER
REMOVAL
(1) Remove accessory drive belts. Refer to Group 7,
Cooling System for procedure.
(2) Raise vehicle on a hoist and remove right inner
splash shield.
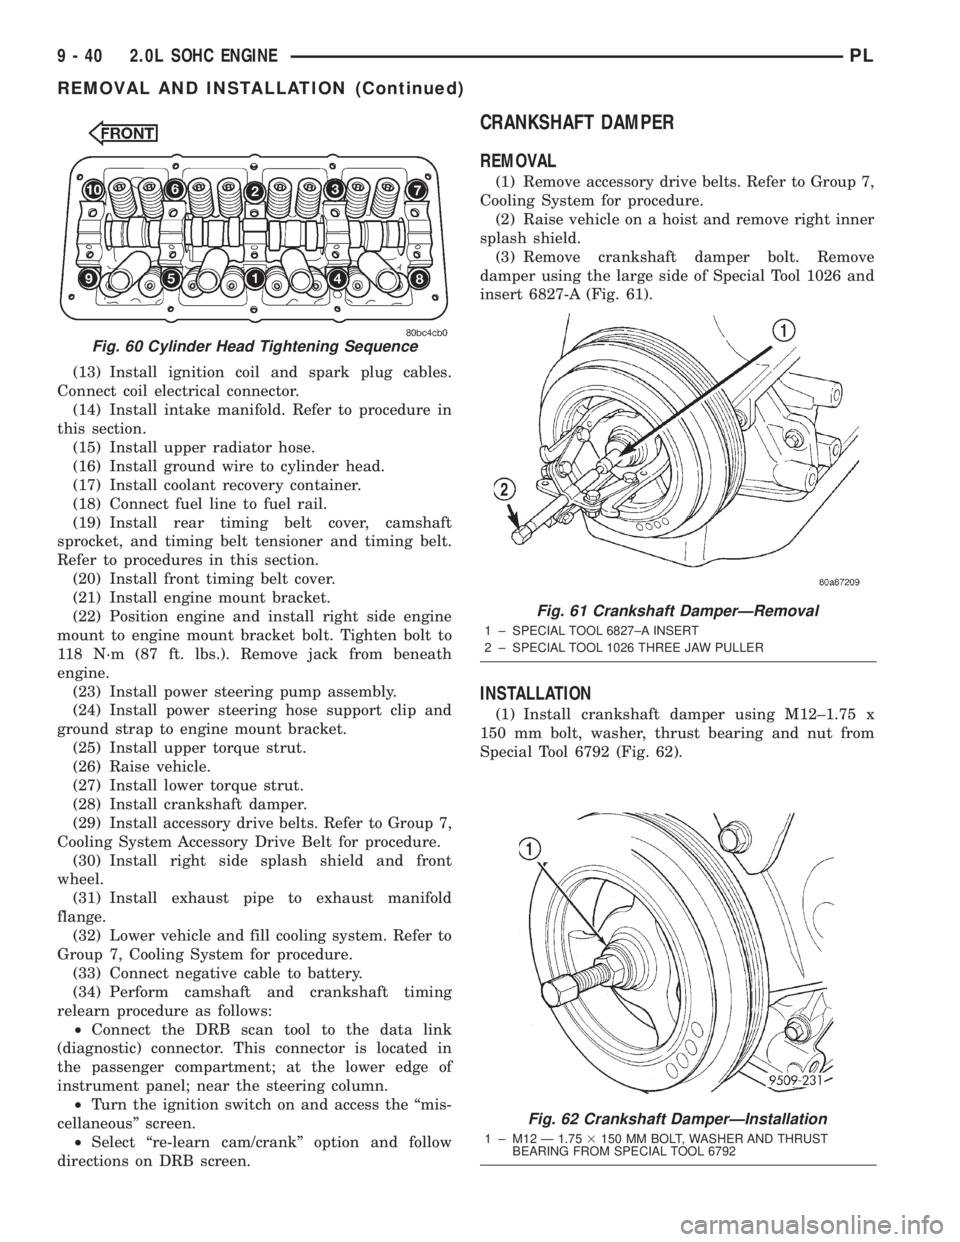
(3) Remove crankshaft damper bolt. Remove
damper using the large side of Special Tool 1026 and
insert 6827-A (Fig. 61).
INSTALLATION
(1) Install crankshaft damper using M12±1.75 x
150 mm bolt, washer, thrust bearing and nut from
Special Tool 6792 (Fig. 62).
Fig. 62 Crankshaft DamperÐInstallation
1 ± M12 Ð 1.753150 MM BOLT, WASHER AND THRUST
BEARING FROM SPECIAL TOOL 6792
Fig. 60 Cylinder Head Tightening Sequence
Fig. 61 Crankshaft DamperÐRemoval
1 ± SPECIAL TOOL 6827±A INSERT
2 ± SPECIAL TOOL 1026 THREE JAW PULLER
9 - 40 2.0L SOHC ENGINEPL
REMOVAL AND INSTALLATION (Continued)
Page 784 of 1285
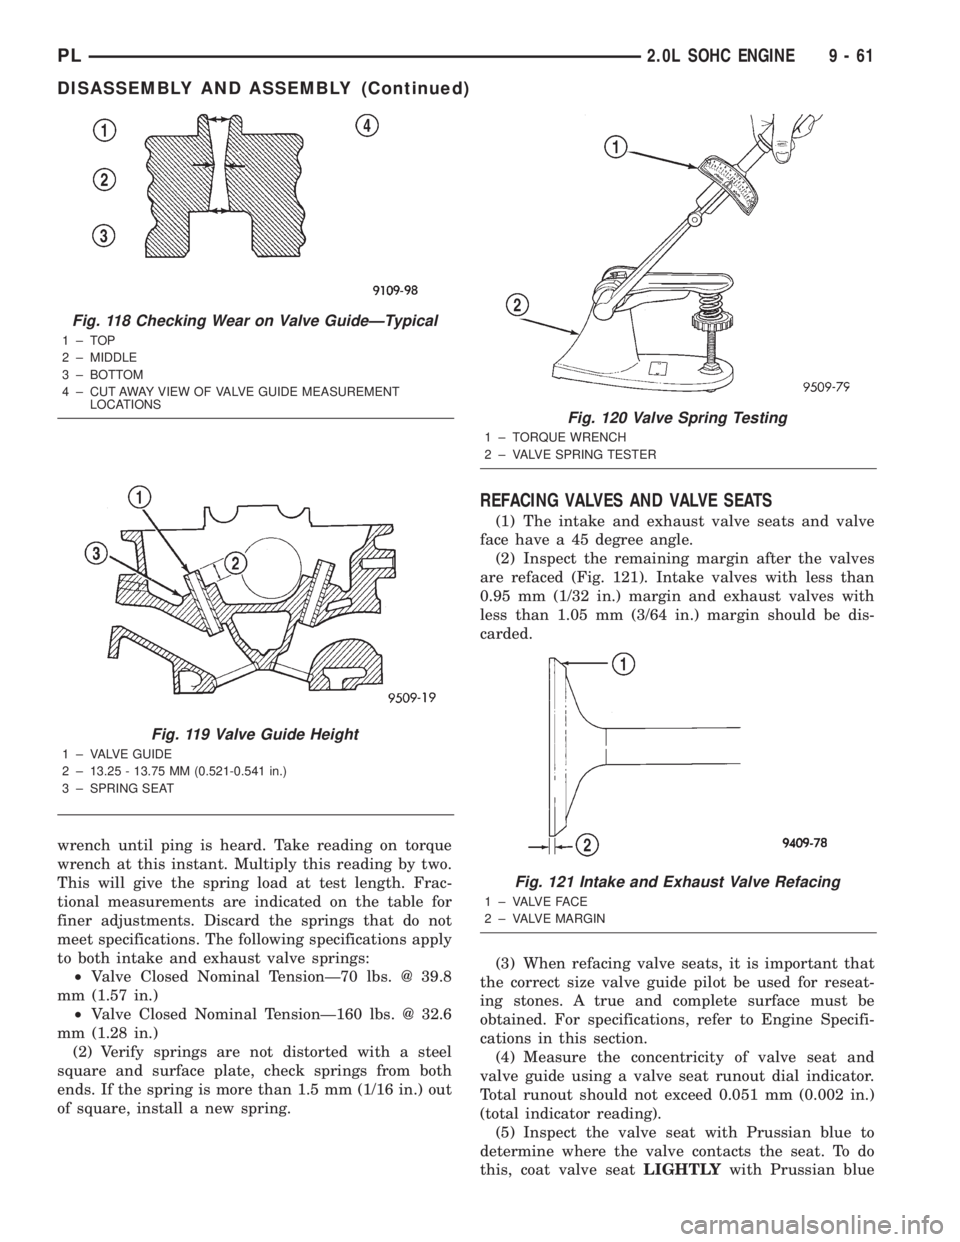
wrench until ping is heard. Take reading on torque
wrench at this instant. Multiply this reading by two.
This will give the spring load at test length. Frac-
tional measurements are indicated on the table for
finer adjustments. Discard the springs that do not
meet specifications. The following specifications apply
to both intake and exhaust valve springs:
²Valve Closed Nominal TensionÐ70 lbs. @ 39.8
mm (1.57 in.)
²Valve Closed Nominal TensionÐ160 lbs. @ 32.6
mm (1.28 in.)
(2) Verify springs are not distorted with a steel
square and surface plate, check springs from both
ends. If the spring is more than 1.5 mm (1/16 in.) out
of square, install a new spring.
REFACING VALVES AND VALVE SEATS
(1) The intake and exhaust valve seats and valve
face have a 45 degree angle.
(2) Inspect the remaining margin after the valves
are refaced (Fig. 121). Intake valves with less than
0.95 mm (1/32 in.) margin and exhaust valves with
less than 1.05 mm (3/64 in.) margin should be dis-
carded.
(3) When refacing valve seats, it is important that
the correct size valve guide pilot be used for reseat-
ing stones. A true and complete surface must be
obtained. For specifications, refer to Engine Specifi-
cations in this section.
(4) Measure the concentricity of valve seat and
valve guide using a valve seat runout dial indicator.
Total runout should not exceed 0.051 mm (0.002 in.)
(total indicator reading).
(5) Inspect the valve seat with Prussian blue to
determine where the valve contacts the seat. To do
this, coat valve seatLIGHTLYwith Prussian blue
Fig. 118 Checking Wear on Valve GuideÐTypical
1±TOP
2 ± MIDDLE
3 ± BOTTOM
4 ± CUT AWAY VIEW OF VALVE GUIDE MEASUREMENT
LOCATIONS
Fig. 119 Valve Guide Height
1 ± VALVE GUIDE
2 ± 13.25 - 13.75 MM (0.521-0.541 in.)
3 ± SPRING SEAT
Fig. 120 Valve Spring Testing
1 ± TORQUE WRENCH
2 ± VALVE SPRING TESTER
Fig. 121 Intake and Exhaust Valve Refacing
1 ± VALVE FACE
2 ± VALVE MARGIN
PL2.0L SOHC ENGINE 9 - 61
DISASSEMBLY AND ASSEMBLY (Continued)
Page 785 of 1285
then set valve in place. Rotate the valve with light
pressure. If the blue is transferred to the center of
valve face, contact is satisfactory. If the blue is trans-
ferred to top edge of the valve face, lower valve seat
with a 15 degrees stone. If the blue is transferred to
the bottom edge of valve face raise valve seat with a
65 degrees stone.
(6) Valve seats which are worn or burned can be
reworked, provided that correct angle and seat width
are maintained. The intake valve seat must be ser-
viced when the valve seat width is 2.0 mm (0.079 in.)
or greater. The exhaust valve seat must be serviced
when the valve seat width is 2.5 mm (0.098 in.) or
greater. Otherwise the cylinder head must be
replaced.
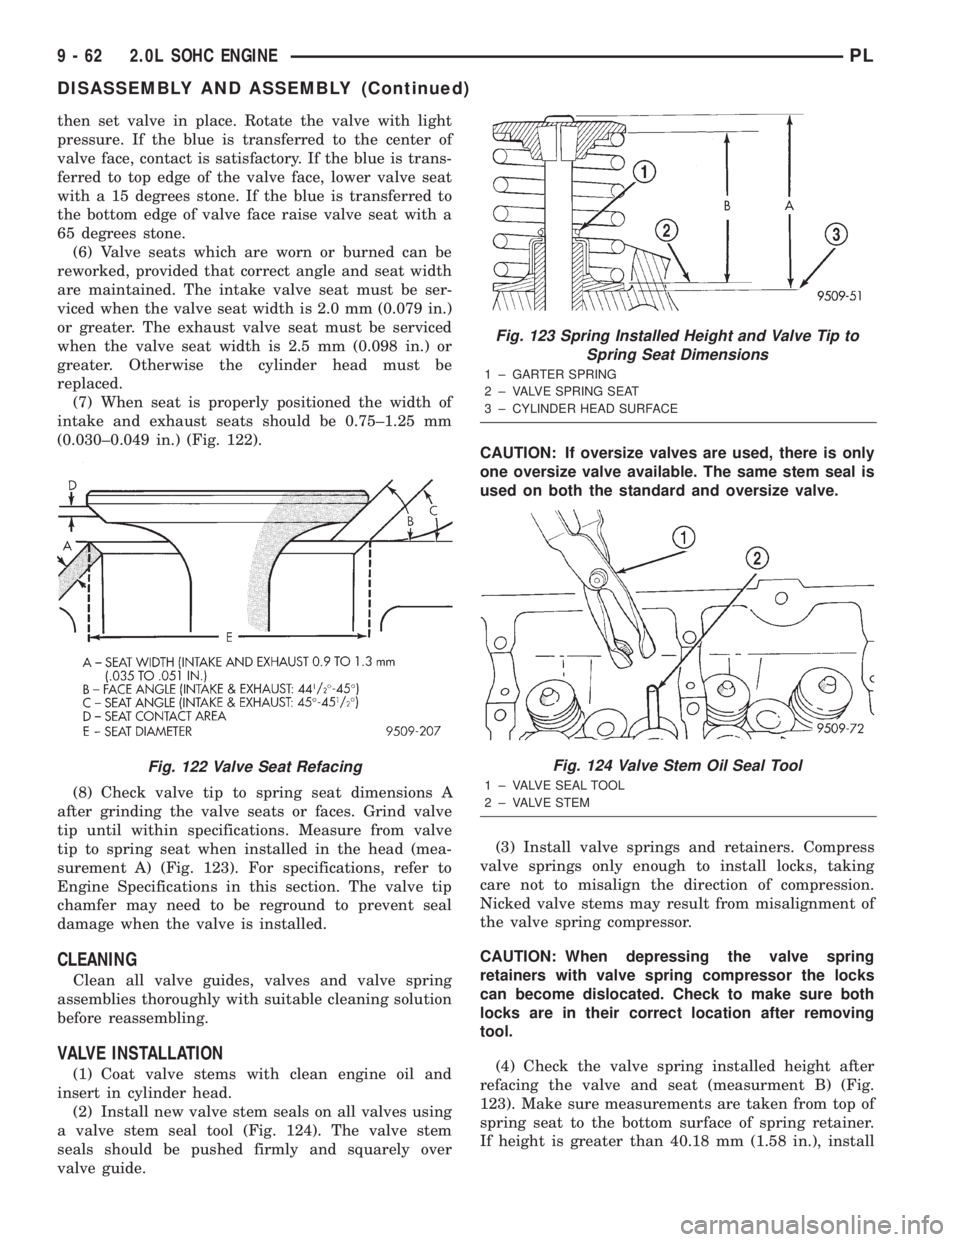
(7) When seat is properly positioned the width of
intake and exhaust seats should be 0.75±1.25 mm
(0.030±0.049 in.) (Fig. 122).
(8) Check valve tip to spring seat dimensions A
after grinding the valve seats or faces. Grind valve
tip until within specifications. Measure from valve
tip to spring seat when installed in the head (mea-
surement A) (Fig. 123). For specifications, refer to
Engine Specifications in this section. The valve tip
chamfer may need to be reground to prevent seal
damage when the valve is installed.
CLEANING
Clean all valve guides, valves and valve spring
assemblies thoroughly with suitable cleaning solution
before reassembling.
VALVE INSTALLATION
(1) Coat valve stems with clean engine oil and
insert in cylinder head.
(2) Install new valve stem seals on all valves using
a valve stem seal tool (Fig. 124). The valve stem
seals should be pushed firmly and squarely over
valve guide.CAUTION: If oversize valves are used, there is only
one oversize valve available. The same stem seal is
used on both the standard and oversize valve.
(3) Install valve springs and retainers. Compress
valve springs only enough to install locks, taking
care not to misalign the direction of compression.
Nicked valve stems may result from misalignment of
the valve spring compressor.
CAUTION: When depressing the valve spring
retainers with valve spring compressor the locks
can become dislocated. Check to make sure both
locks are in their correct location after removing
tool.
(4) Check the valve spring installed height after
refacing the valve and seat (measurment B) (Fig.
123). Make sure measurements are taken from top of
spring seat to the bottom surface of spring retainer.
If height is greater than 40.18 mm (1.58 in.), install
Fig. 122 Valve Seat Refacing
Fig. 123 Spring Installed Height and Valve Tip to
Spring Seat Dimensions
1 ± GARTER SPRING
2 ± VALVE SPRING SEAT
3 ± CYLINDER HEAD SURFACE
Fig. 124 Valve Stem Oil Seal Tool
1 ± VALVE SEAL TOOL
2 ± VALVE STEM
9 - 62 2.0L SOHC ENGINEPL
DISASSEMBLY AND ASSEMBLY (Continued)
Page 786 of 1285
a 0.762 mm (0.030 in.) spacer under the valve spring
seat to bring spring height back within specification.
(5) Install rocker arm shafts as previously
described in this section.
(6) Checking dry lash. Dry lash is the amount of
clearance that exists between the base circle of an
installed cam and the rocker arm roller when the
adjuster is drained of oil and completely collapsed.
Specified dry lash is 1.17 mm (0.046 in.) for intake
and 1.28 mm (0.050 in.) for exhaust. After performing
dry lash check, refill adjuster with oil and allow 10
minutes for adjuster(s) to bleed down before rotating
cam.
CLEANING AND INSPECTION
INTAKE MANIFOLD
CLEAN AND INSPECT
Check for:
²Inspect manifold for cracks or distortions.
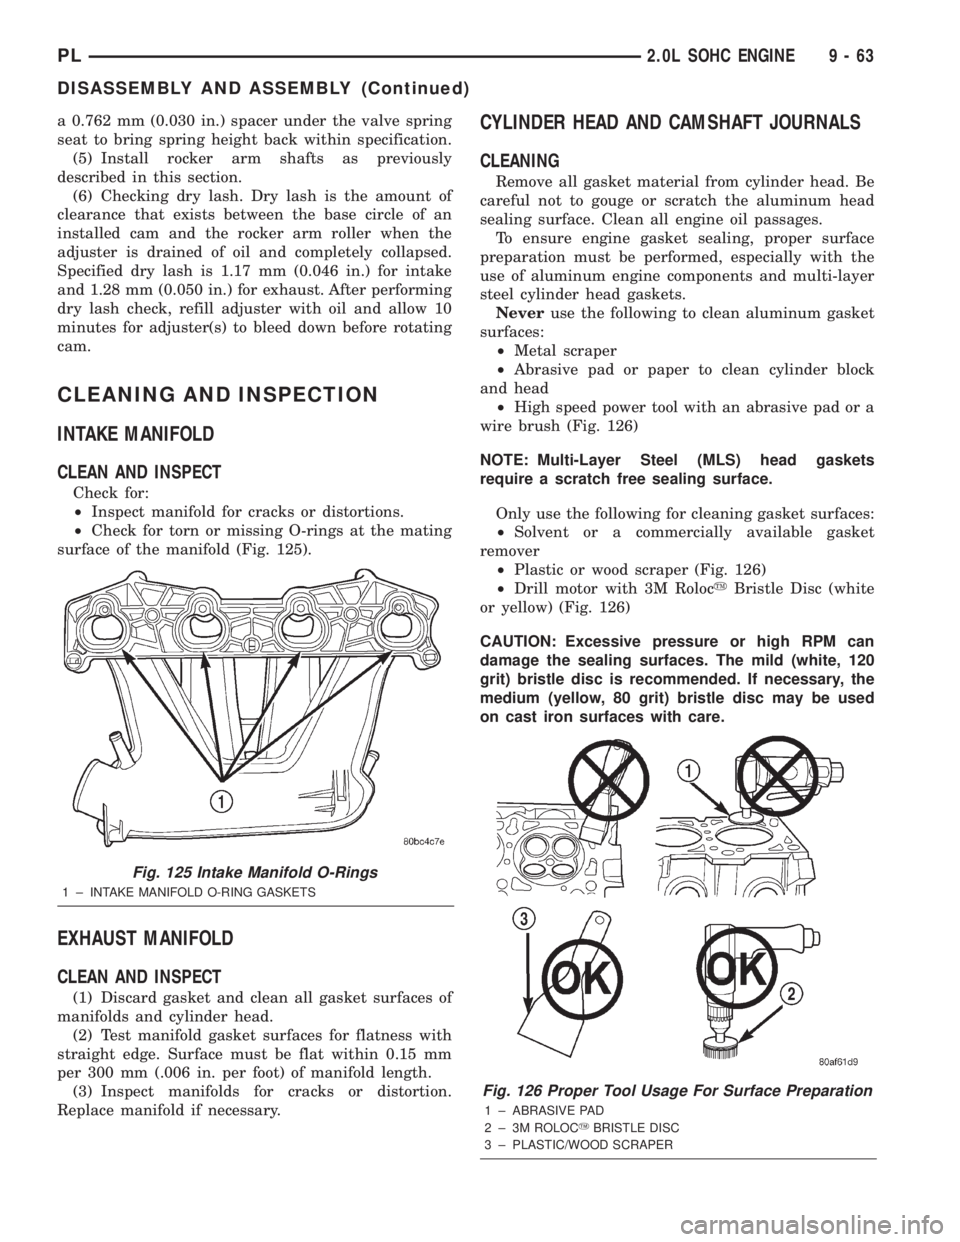
²Check for torn or missing O-rings at the mating
surface of the manifold (Fig. 125).
EXHAUST MANIFOLD
CLEAN AND INSPECT
(1) Discard gasket and clean all gasket surfaces of
manifolds and cylinder head.
(2) Test manifold gasket surfaces for flatness with
straight edge. Surface must be flat within 0.15 mm
per 300 mm (.006 in. per foot) of manifold length.
(3) Inspect manifolds for cracks or distortion.
Replace manifold if necessary.
CYLINDER HEAD AND CAMSHAFT JOURNALS
CLEANING
Remove all gasket material from cylinder head. Be
careful not to gouge or scratch the aluminum head
sealing surface. Clean all engine oil passages.
To ensure engine gasket sealing, proper surface
preparation must be performed, especially with the
use of aluminum engine components and multi-layer
steel cylinder head gaskets.
Neveruse the following to clean aluminum gasket
surfaces:
²Metal scraper
²Abrasive pad or paper to clean cylinder block
and head
²High speed power tool with an abrasive pad or a
wire brush (Fig. 126)
NOTE: Multi-Layer Steel (MLS) head gaskets
require a scratch free sealing surface.
Only use the following for cleaning gasket surfaces:
²Solvent or a commercially available gasket
remover
²Plastic or wood scraper (Fig. 126)
²Drill motor with 3M RolocyBristle Disc (white
or yellow) (Fig. 126)
CAUTION: Excessive pressure or high RPM can
damage the sealing surfaces. The mild (white, 120
grit) bristle disc is recommended. If necessary, the
medium (yellow, 80 grit) bristle disc may be used
on cast iron surfaces with care.
Fig. 125 Intake Manifold O-Rings
1 ± INTAKE MANIFOLD O-RING GASKETS
Fig. 126 Proper Tool Usage For Surface Preparation
1 ± ABRASIVE PAD
2 ± 3M ROLOCYBRISTLE DISC
3 ± PLASTIC/WOOD SCRAPER
PL2.0L SOHC ENGINE 9 - 63
DISASSEMBLY AND ASSEMBLY (Continued)
Page 792 of 1285
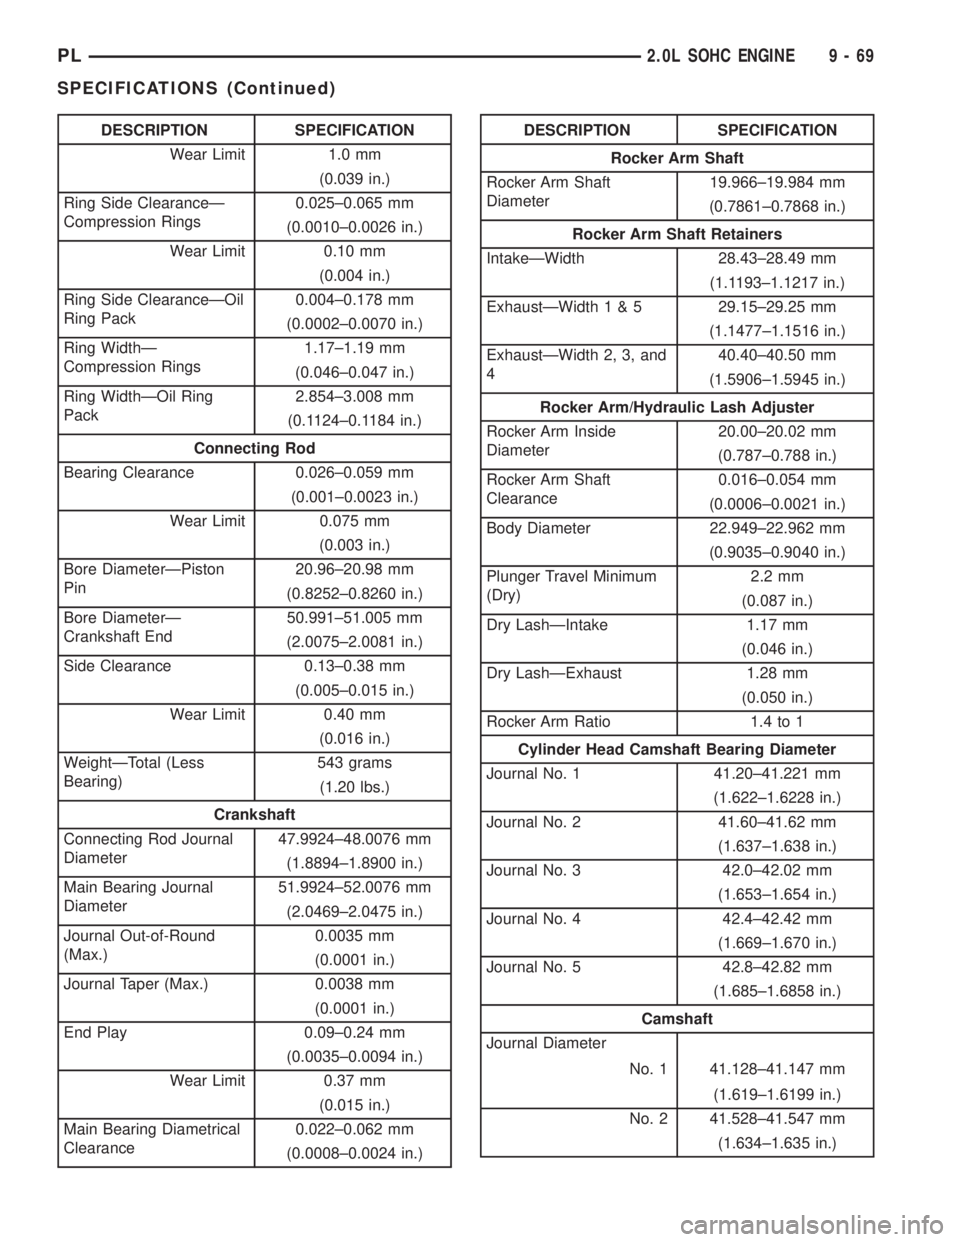
DESCRIPTION SPECIFICATION
Wear Limit 1.0 mm
(0.039 in.)
Ring Side ClearanceÐ
Compression Rings0.025±0.065 mm
(0.0010±0.0026 in.)
Wear Limit 0.10 mm
(0.004 in.)
Ring Side ClearanceÐOil
Ring Pack0.004±0.178 mm
(0.0002±0.0070 in.)
Ring WidthÐ
Compression Rings1.17±1.19 mm
(0.046±0.047 in.)
Ring WidthÐOil Ring
Pack2.854±3.008 mm
(0.1124±0.1184 in.)
Connecting Rod
Bearing Clearance 0.026±0.059 mm
(0.001±0.0023 in.)
Wear Limit 0.075 mm
(0.003 in.)
Bore DiameterÐPiston
Pin20.96±20.98 mm
(0.8252±0.8260 in.)
Bore DiameterÐ
Crankshaft End50.991±51.005 mm
(2.0075±2.0081 in.)
Side Clearance 0.13±0.38 mm
(0.005±0.015 in.)
Wear Limit 0.40 mm
(0.016 in.)
WeightÐTotal (Less
Bearing)543 grams
(1.20 lbs.)
Crankshaft
Connecting Rod Journal
Diameter47.9924±48.0076 mm
(1.8894±1.8900 in.)
Main Bearing Journal
Diameter51.9924±52.0076 mm
(2.0469±2.0475 in.)
Journal Out-of-Round
(Max.)0.0035 mm
(0.0001 in.)
Journal Taper (Max.) 0.0038 mm
(0.0001 in.)
End Play 0.09±0.24 mm
(0.0035±0.0094 in.)
Wear Limit 0.37 mm
(0.015 in.)
Main Bearing Diametrical
Clearance0.022±0.062 mm
(0.0008±0.0024 in.)DESCRIPTION SPECIFICATION
Rocker Arm Shaft
Rocker Arm Shaft
Diameter19.966±19.984 mm
(0.7861±0.7868 in.)
Rocker Arm Shaft Retainers
IntakeÐWidth 28.43±28.49 mm
(1.1193±1.1217 in.)
ExhaustÐWidth1&529.15±29.25 mm
(1.1477±1.1516 in.)
ExhaustÐWidth 2, 3, and
440.40±40.50 mm
(1.5906±1.5945 in.)
Rocker Arm/Hydraulic Lash Adjuster
Rocker Arm Inside
Diameter20.00±20.02 mm
(0.787±0.788 in.)
Rocker Arm Shaft
Clearance0.016±0.054 mm
(0.0006±0.0021 in.)
Body Diameter 22.949±22.962 mm
(0.9035±0.9040 in.)
Plunger Travel Minimum
(Dry)2.2 mm
(0.087 in.)
Dry LashÐIntake 1.17 mm
(0.046 in.)
Dry LashÐExhaust 1.28 mm
(0.050 in.)
Rocker Arm Ratio 1.4 to 1
Cylinder Head Camshaft Bearing Diameter
Journal No. 1 41.20±41.221 mm
(1.622±1.6228 in.)
Journal No. 2 41.60±41.62 mm
(1.637±1.638 in.)
Journal No. 3 42.0±42.02 mm
(1.653±1.654 in.)
Journal No. 4 42.4±42.42 mm
(1.669±1.670 in.)
Journal No. 5 42.8±42.82 mm
(1.685±1.6858 in.)
Camshaft
Journal Diameter
No. 1 41.128±41.147 mm
(1.619±1.6199 in.)
No. 2 41.528±41.547 mm
(1.634±1.635 in.)
PL2.0L SOHC ENGINE 9 - 69
SPECIFICATIONS (Continued)
Page 793 of 1285
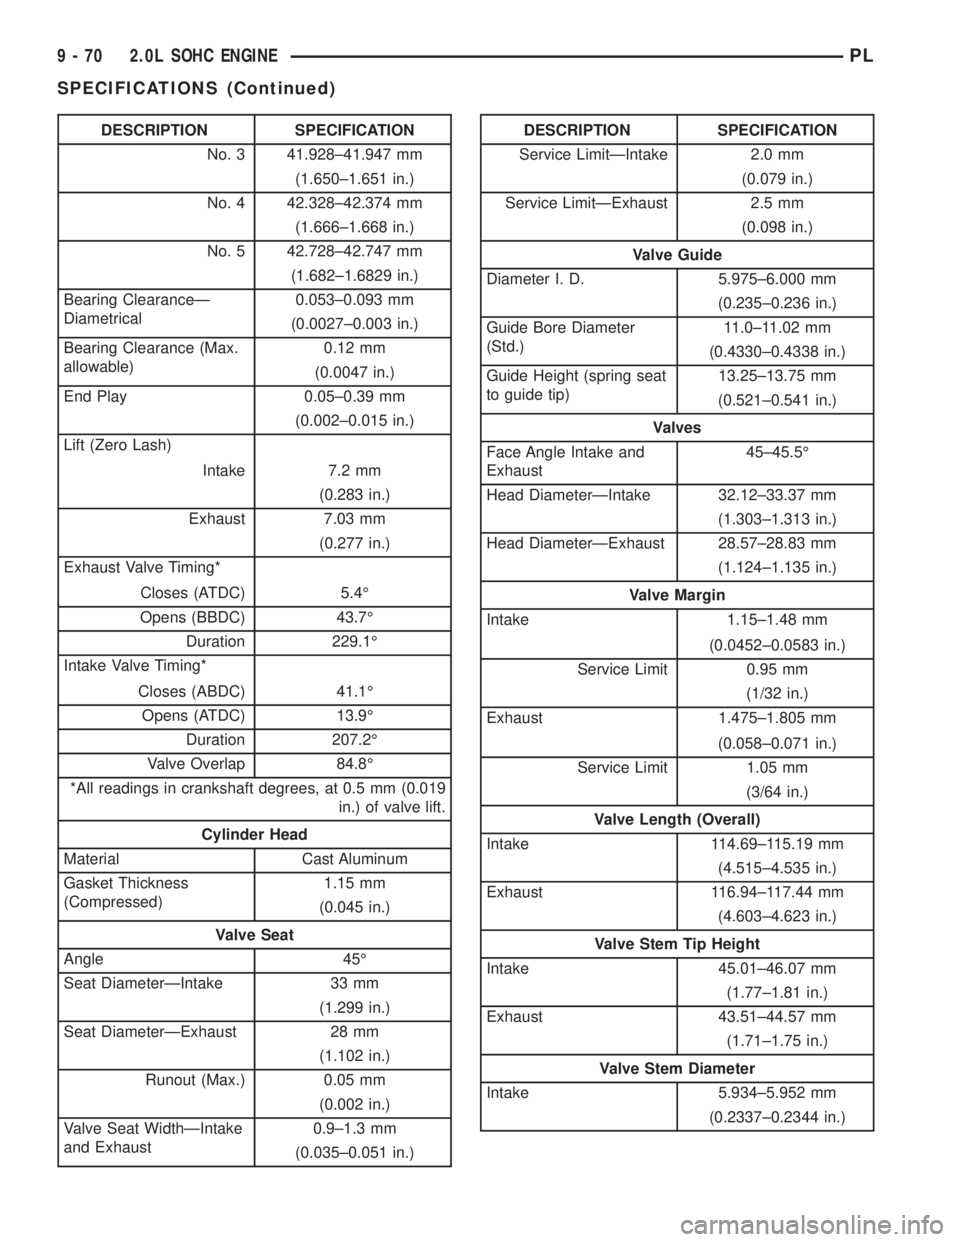
DESCRIPTION SPECIFICATION
No. 3 41.928±41.947 mm
(1.650±1.651 in.)
No. 4 42.328±42.374 mm
(1.666±1.668 in.)
No. 5 42.728±42.747 mm
(1.682±1.6829 in.)
Bearing ClearanceÐ
Diametrical0.053±0.093 mm
(0.0027±0.003 in.)
Bearing Clearance (Max.
allowable)0.12 mm
(0.0047 in.)
End Play 0.05±0.39 mm
(0.002±0.015 in.)
Lift (Zero Lash)
Intake 7.2 mm
(0.283 in.)
Exhaust 7.03 mm
(0.277 in.)
Exhaust Valve Timing*
Closes (ATDC) 5.4É
Opens (BBDC) 43.7É
Duration 229.1É
Intake Valve Timing*
Closes (ABDC) 41.1É
Opens (ATDC) 13.9É
Duration 207.2É
Valve Overlap 84.8É
*All readings in crankshaft degrees, at 0.5 mm (0.019
in.) of valve lift.
Cylinder Head
Material Cast Aluminum
Gasket Thickness
(Compressed)1.15 mm
(0.045 in.)
Valve Seat
Angle 45É
Seat DiameterÐIntake 33 mm
(1.299 in.)
Seat DiameterÐExhaust 28 mm
(1.102 in.)
Runout (Max.) 0.05 mm
(0.002 in.)
Valve Seat WidthÐIntake
and Exhaust0.9±1.3 mm
(0.035±0.051 in.)DESCRIPTION SPECIFICATION
Service LimitÐIntake 2.0 mm
(0.079 in.)
Service LimitÐExhaust 2.5 mm
(0.098 in.)
Valve Guide
Diameter I. D. 5.975±6.000 mm
(0.235±0.236 in.)
Guide Bore Diameter
(Std.)11.0±11.02 mm
(0.4330±0.4338 in.)
Guide Height (spring seat
to guide tip)13.25±13.75 mm
(0.521±0.541 in.)
Valves
Face Angle Intake and
Exhaust45±45.5É
Head DiameterÐIntake 32.12±33.37 mm
(1.303±1.313 in.)
Head DiameterÐExhaust 28.57±28.83 mm
(1.124±1.135 in.)
Valve Margin
Intake 1.15±1.48 mm
(0.0452±0.0583 in.)
Service Limit 0.95 mm
(1/32 in.)
Exhaust 1.475±1.805 mm
(0.058±0.071 in.)
Service Limit 1.05 mm
(3/64 in.)
Valve Length (Overall)
Intake 114.69±115.19 mm
(4.515±4.535 in.)
Exhaust 116.94±117.44 mm
(4.603±4.623 in.)
Valve Stem Tip Height
Intake 45.01±46.07 mm
(1.77±1.81 in.)
Exhaust 43.51±44.57 mm
(1.71±1.75 in.)
Valve Stem Diameter
Intake 5.934±5.952 mm
(0.2337±0.2344 in.)
9 - 70 2.0L SOHC ENGINEPL
SPECIFICATIONS (Continued)
Page 794 of 1285
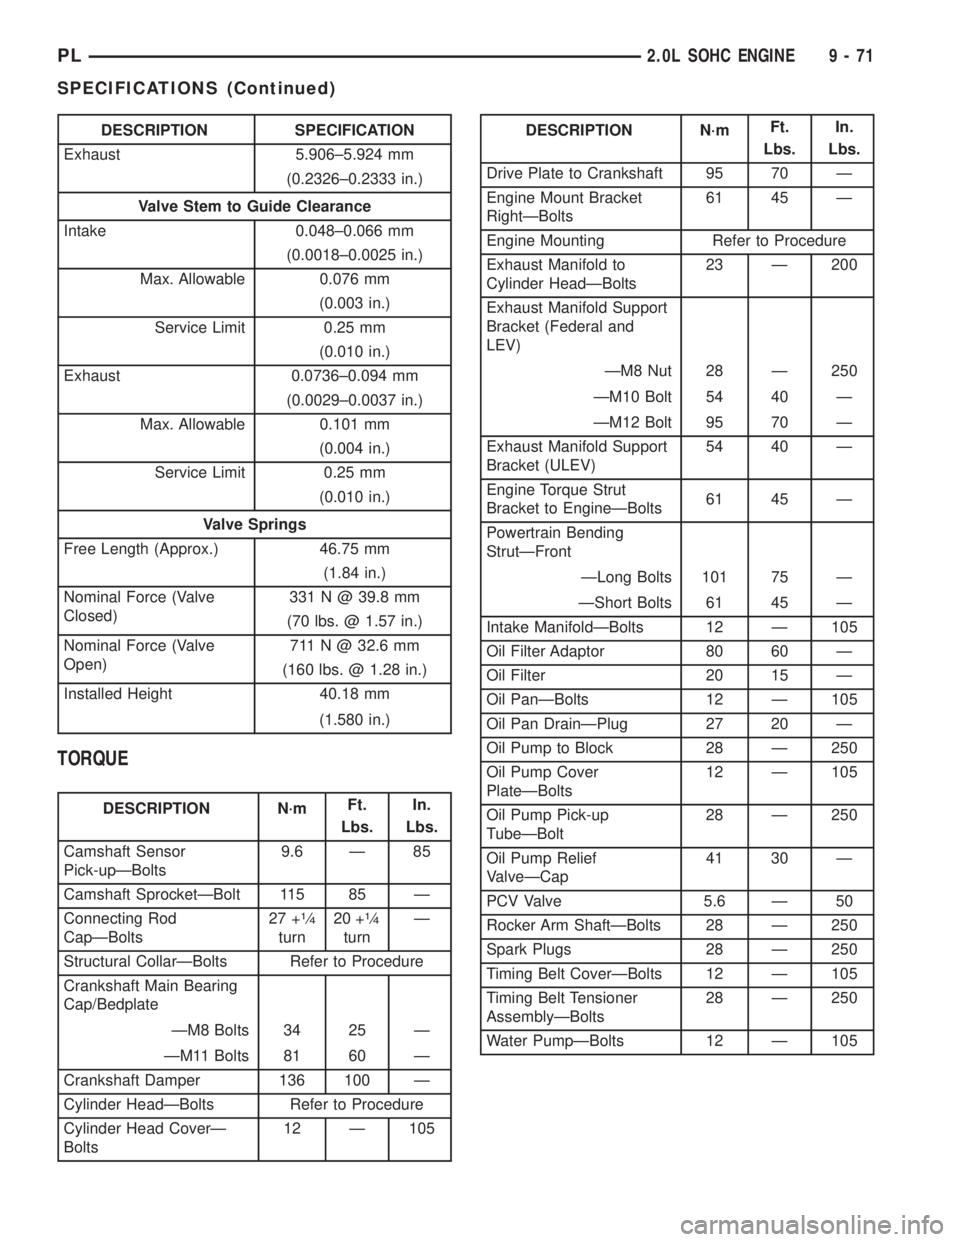
DESCRIPTION SPECIFICATION
Exhaust 5.906±5.924 mm
(0.2326±0.2333 in.)
Valve Stem to Guide Clearance
Intake 0.048±0.066 mm
(0.0018±0.0025 in.)
Max. Allowable 0.076 mm
(0.003 in.)
Service Limit 0.25 mm
(0.010 in.)
Exhaust 0.0736±0.094 mm
(0.0029±0.0037 in.)
Max. Allowable 0.101 mm
(0.004 in.)
Service Limit 0.25 mm
(0.010 in.)
Valve Springs
Free Length (Approx.) 46.75 mm
(1.84 in.)
Nominal Force (Valve
Closed)331 N @ 39.8 mm
(70 lbs. @ 1.57 in.)
Nominal Force (Valve
Open)711 N @ 32.6 mm
(160 lbs. @ 1.28 in.)
Installed Height 40.18 mm
(1.580 in.)
TORQUE
DESCRIPTION N´mFt.
Lbs.In.
Lbs.
Camshaft Sensor
Pick-upÐBolts9.6 Ð 85
Camshaft SprocketÐBolt 115 85 Ð
Connecting Rod
CapÐBolts27 +
1¤4
turn20 +
1¤4
turnÐ
Structural CollarÐBolts Refer to Procedure
Crankshaft Main Bearing
Cap/Bedplate
ÐM8 Bolts 34 25 Ð
ÐM11 Bolts 81 60 Ð
Crankshaft Damper 136 100 Ð
Cylinder HeadÐBolts Refer to Procedure
Cylinder Head CoverÐ
Bolts12 Ð 105
DESCRIPTION N´mFt.
Lbs.In.
Lbs.
Drive Plate to Crankshaft 95 70 Ð
Engine Mount Bracket
RightÐBolts61 45 Ð
Engine Mounting Refer to Procedure
Exhaust Manifold to
Cylinder HeadÐBolts23 Ð 200
Exhaust Manifold Support
Bracket (Federal and
LEV)
ÐM8 Nut 28 Ð 250
ÐM10 Bolt 54 40 Ð
ÐM12 Bolt 95 70 Ð
Exhaust Manifold Support
Bracket (ULEV)54 40 Ð
Engine Torque Strut
Bracket to EngineÐBolts61 45 Ð
Powertrain Bending
StrutÐFront
ÐLong Bolts 101 75 Ð
ÐShort Bolts 61 45 Ð
Intake ManifoldÐBolts 12 Ð 105
Oil Filter Adaptor 80 60 Ð
Oil Filter 20 15 Ð
Oil PanÐBolts 12 Ð 105
Oil Pan DrainÐPlug 27 20 Ð
Oil Pump to Block 28 Ð 250
Oil Pump Cover
PlateÐBolts12 Ð 105
Oil Pump Pick-up
TubeÐBolt28 Ð 250
Oil Pump Relief
ValveÐCap41 30 Ð
PCV Valve 5.6 Ð 50
Rocker Arm ShaftÐBolts 28 Ð 250
Spark Plugs 28 Ð 250
Timing Belt CoverÐBolts 12 Ð 105
Timing Belt Tensioner
AssemblyÐBolts28 Ð 250
Water PumpÐBolts 12 Ð 105
PL2.0L SOHC ENGINE 9 - 71
SPECIFICATIONS (Continued)
Page 798 of 1285
EXHAUST SYSTEM
TABLE OF CONTENTS
page page
DESCRIPTION AND OPERATION
EXHAUST SYSTEM........................1
EXHAUST FLEX-JOINT COUPLING............1
CATALYTIC CONVERTER....................1
EXHAUST HEAT SHIELDS..................3
DIAGNOSIS AND TESTING
EXHAUST SYSTEM DIAGNOSIS CHART.......4
REMOVAL AND INSTALLATION
EXHAUST PIPE AND MUFFLER..............4CATALYTIC CONVERTER....................7
CLEANING AND INSPECTION
EXHAUST SYSTEM........................8
ADJUSTMENTS
EXHAUST SYSTEM ALIGNMENT.............8
SPECIFICATIONS
TORQUE SPECIFICATION CHART.............8
DESCRIPTION AND OPERATION
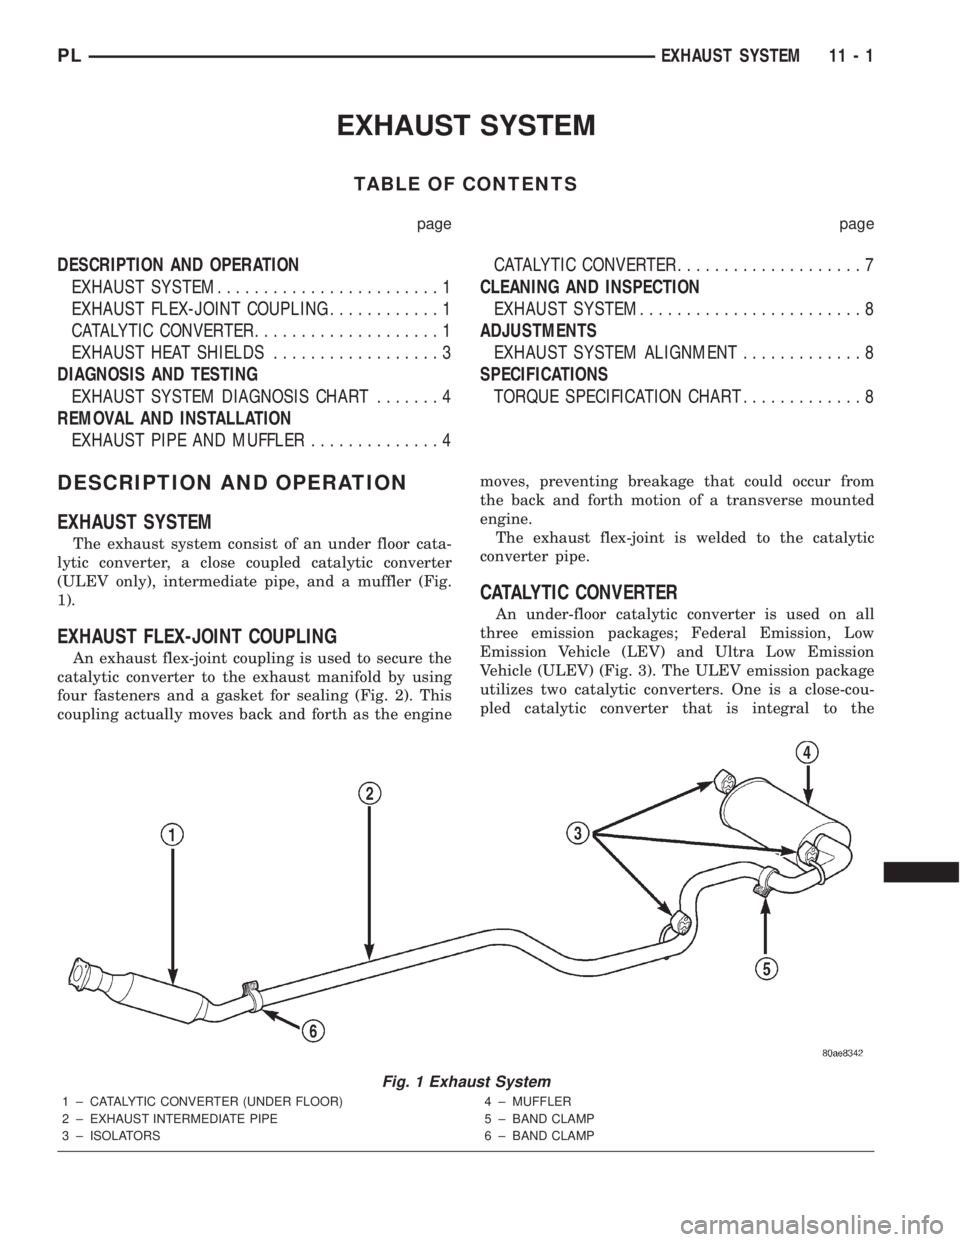
EXHAUST SYSTEM
The exhaust system consist of an under floor cata-
lytic converter, a close coupled catalytic converter
(ULEV only), intermediate pipe, and a muffler (Fig.
1).
EXHAUST FLEX-JOINT COUPLING
An exhaust flex-joint coupling is used to secure the
catalytic converter to the exhaust manifold by using
four fasteners and a gasket for sealing (Fig. 2). This
coupling actually moves back and forth as the enginemoves, preventing breakage that could occur from
the back and forth motion of a transverse mounted
engine.
The exhaust flex-joint is welded to the catalytic
converter pipe.
CATALYTIC CONVERTER
An under-floor catalytic converter is used on all
three emission packages; Federal Emission, Low
Emission Vehicle (LEV) and Ultra Low Emission
Vehicle (ULEV) (Fig. 3). The ULEV emission package
utilizes two catalytic converters. One is a close-cou-
pled catalytic converter that is integral to the
Fig. 1 Exhaust System
1 ± CATALYTIC CONVERTER (UNDER FLOOR)
2 ± EXHAUST INTERMEDIATE PIPE
3 ± ISOLATORS4 ± MUFFLER
5 ± BAND CLAMP
6 ± BAND CLAMP
PLEXHAUST SYSTEM 11 - 1
Page 799 of 1285
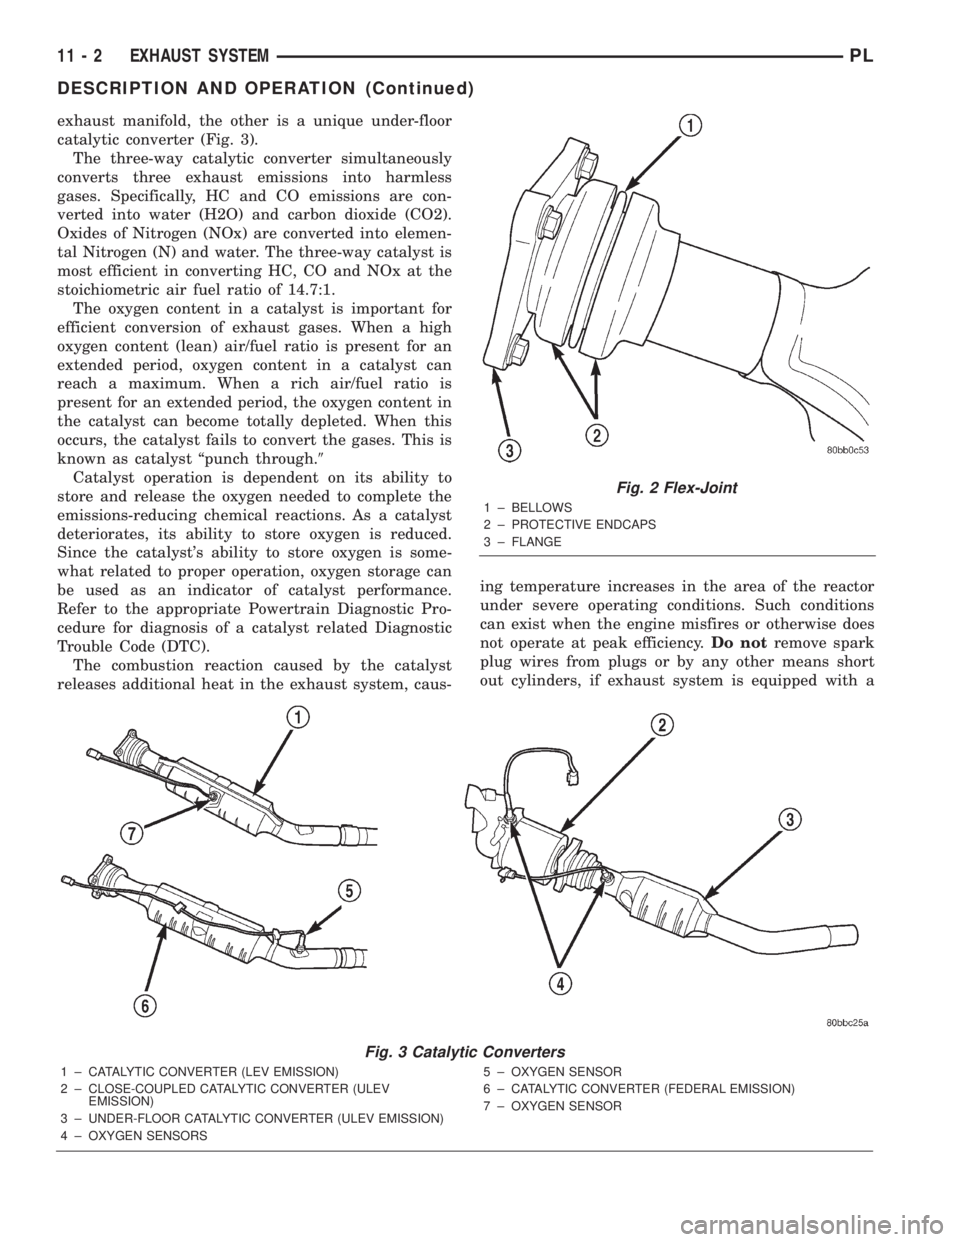
exhaust manifold, the other is a unique under-floor
catalytic converter (Fig. 3).
The three-way catalytic converter simultaneously
converts three exhaust emissions into harmless
gases. Specifically, HC and CO emissions are con-
verted into water (H2O) and carbon dioxide (CO2).
Oxides of Nitrogen (NOx) are converted into elemen-
tal Nitrogen (N) and water. The three-way catalyst is
most efficient in converting HC, CO and NOx at the
stoichiometric air fuel ratio of 14.7:1.
The oxygen content in a catalyst is important for
efficient conversion of exhaust gases. When a high
oxygen content (lean) air/fuel ratio is present for an
extended period, oxygen content in a catalyst can
reach a maximum. When a rich air/fuel ratio is
present for an extended period, the oxygen content in
the catalyst can become totally depleted. When this
occurs, the catalyst fails to convert the gases. This is
known as catalyst ªpunch through.9
Catalyst operation is dependent on its ability to
store and release the oxygen needed to complete the
emissions-reducing chemical reactions. As a catalyst
deteriorates, its ability to store oxygen is reduced.
Since the catalyst's ability to store oxygen is some-
what related to proper operation, oxygen storage can
be used as an indicator of catalyst performance.
Refer to the appropriate Powertrain Diagnostic Pro-
cedure for diagnosis of a catalyst related Diagnostic
Trouble Code (DTC).
The combustion reaction caused by the catalyst
releases additional heat in the exhaust system, caus-ing temperature increases in the area of the reactor
under severe operating conditions. Such conditions
can exist when the engine misfires or otherwise does
not operate at peak efficiency.Do notremove spark
plug wires from plugs or by any other means short
out cylinders, if exhaust system is equipped with a
Fig. 2 Flex-Joint
1 ± BELLOWS
2 ± PROTECTIVE ENDCAPS
3 ± FLANGE
Fig. 3 Catalytic Converters
1 ± CATALYTIC CONVERTER (LEV EMISSION)
2 ± CLOSE-COUPLED CATALYTIC CONVERTER (ULEV
EMISSION)
3 ± UNDER-FLOOR CATALYTIC CONVERTER (ULEV EMISSION)
4 ± OXYGEN SENSORS5 ± OXYGEN SENSOR
6 ± CATALYTIC CONVERTER (FEDERAL EMISSION)
7 ± OXYGEN SENSOR
11 - 2 EXHAUST SYSTEMPL
DESCRIPTION AND OPERATION (Continued)
Page 800 of 1285
catalytic converter. Failure of the catalytic converter
can occur due to temperature increases caused by
unburned fuel passing through the converter. This
deterioration of the catalyst core can result in exces-
sively high emission levels, noise complaints, and
exhaust restrictions.
The use of catalysts also involves some non-auto-
motive problems. Unleaded gasoline must be used to
avoid poisoning the catalyst core. Do not allow engine
to operate above 1200 RPM in neutral for extended
periods over 5 minutes. This condition may result in
excessive exhaust system/floor pan temperatures
because of no air movement under the vehicle.
There is no regularly scheduled maintenance on
any DaimlerChrysler catalytic converter. If damaged,
the converter must be replaced.
CAUTION: Due to exterior physical similarities of
some catalytic converters with pipe assemblies,
extreme care should be taken with replacement
parts.
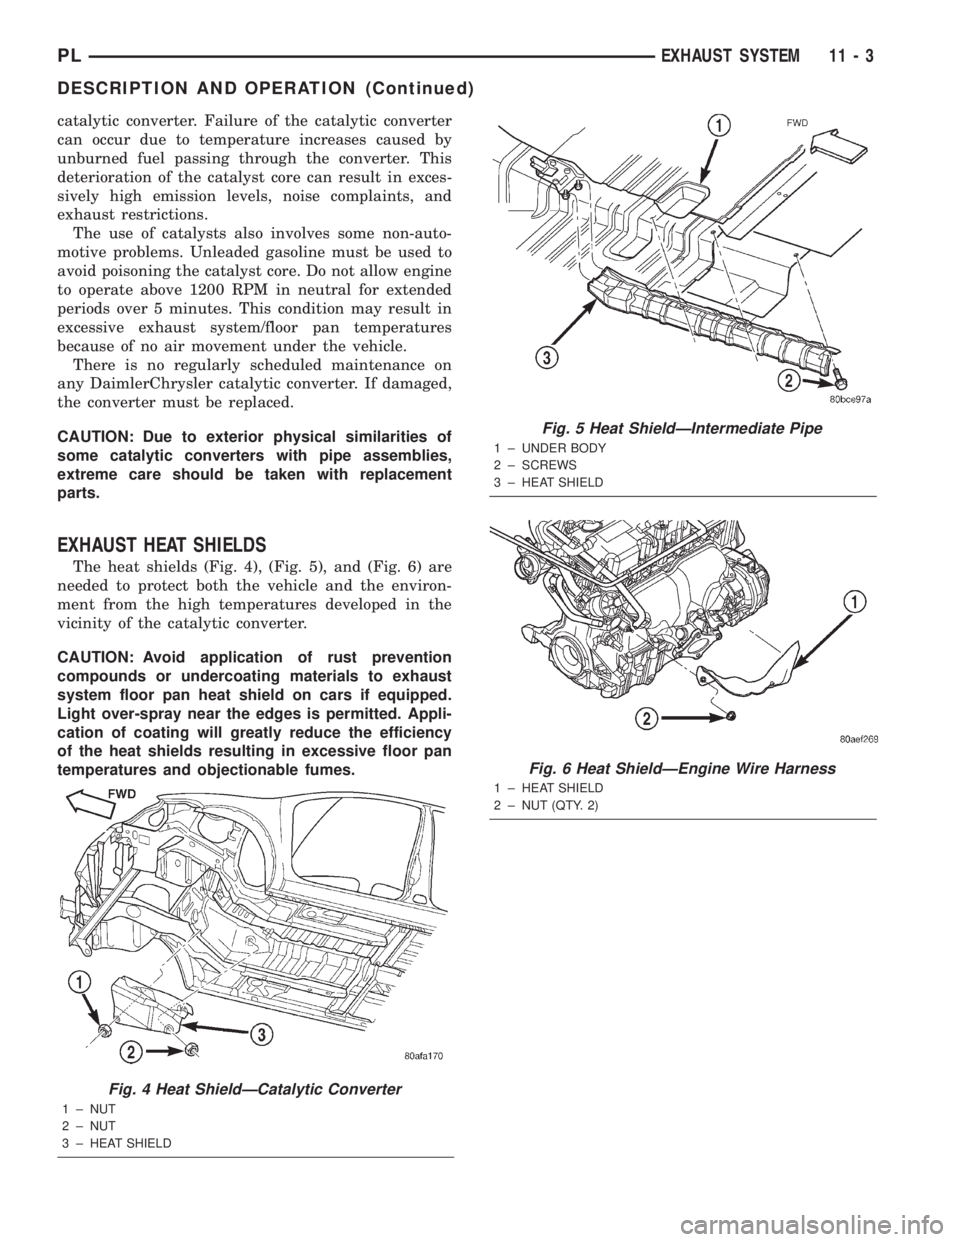
EXHAUST HEAT SHIELDS
The heat shields (Fig. 4), (Fig. 5), and (Fig. 6) are
needed to protect both the vehicle and the environ-
ment from the high temperatures developed in the
vicinity of the catalytic converter.
CAUTION: Avoid application of rust prevention
compounds or undercoating materials to exhaust
system floor pan heat shield on cars if equipped.
Light over-spray near the edges is permitted. Appli-
cation of coating will greatly reduce the efficiency
of the heat shields resulting in excessive floor pan
temperatures and objectionable fumes.
Fig. 4 Heat ShieldÐCatalytic Converter
1 ± NUT
2 ± NUT
3 ± HEAT SHIELD
Fig. 5 Heat ShieldÐIntermediate Pipe
1 ± UNDER BODY
2 ± SCREWS
3 ± HEAT SHIELD
Fig. 6 Heat ShieldÐEngine Wire Harness
1 ± HEAT SHIELD
2 ± NUT (QTY. 2)
PLEXHAUST SYSTEM 11 - 3
DESCRIPTION AND OPERATION (Continued)