DODGE RAM 2001 Service Repair Manual
Manufacturer: DODGE, Model Year: 2001, Model line: RAM, Model: DODGE RAM 2001Pages: 2889, PDF Size: 68.07 MB
Page 2691 of 2889
INTERIOR
TABLE OF CONTENTS
page page
INTERIOR
CAUTION..............................118
A-PILLAR GRAB HANDLE
REMOVAL.............................119
INSTALLATION..........................119
A-PILLAR TRIM
REMOVAL.............................119
INSTALLATION..........................119
COWL TRIM COVER
REMOVAL.............................119
INSTALLATION..........................120
B-PILLAR TRIM
REMOVAL.............................120
INSTALLATION..........................120
REAR CLOSURE PANEL TRIM
REMOVAL.............................120
INSTALLATION..........................121
REAR FLOOR STOWAGE TRAY
REMOVAL.............................121
INSTALLATION..........................121
DOOR SILL TRIM
REMOVAL.............................121
INSTALLATION..........................121
SHIFT BOOT - MANUAL TRANSMISSION
REMOVAL.............................122
INSTALLATION..........................122
4WD FLOOR SHIFT BOOT
REMOVAL.............................122
INSTALLATION..........................122
CENTER CONSOLE
REMOVAL.............................122INSTALLATION..........................122
CARPETS AND FLOOR MATS
REMOVAL.............................123
INSTALLATION..........................123
ASSIST HANDLE
REMOVAL.............................124
INSTALLATION..........................124
COAT HOOK
REMOVAL.............................124
INSTALLATION..........................125
HEADLINER
REMOVAL.............................125
INSTALLATION..........................125
BODY VENT
REMOVAL.............................126
INSTALLATION..........................126
REAR VIEW MIRROR
REMOVAL.............................126
INSTALLATION..........................126
SUN VISOR
REMOVAL.............................127
INSTALLATION..........................127
QUARTER TRIM PANEL
REMOVAL.............................127
INSTALLATION..........................128
C-PILLAR TRIM
REMOVAL.............................128
INSTALLATION..........................128
INTERIOR
CAUTION
CAUTION: Do not attempt to remove interior trim
panels/moldings without first removing the neces-sary adjacent panels. To avoid damaging the pan-
els, ensure that all the screws and clips are
removed before attempting to remove an interior
trim panel/molding. Trim panels are somewhat flex-
ible but can be damaged if handled improperly.
23 - 118 INTERIORBR/BE
Page 2692 of 2889
A-PILLAR GRAB HANDLE
REMOVAL
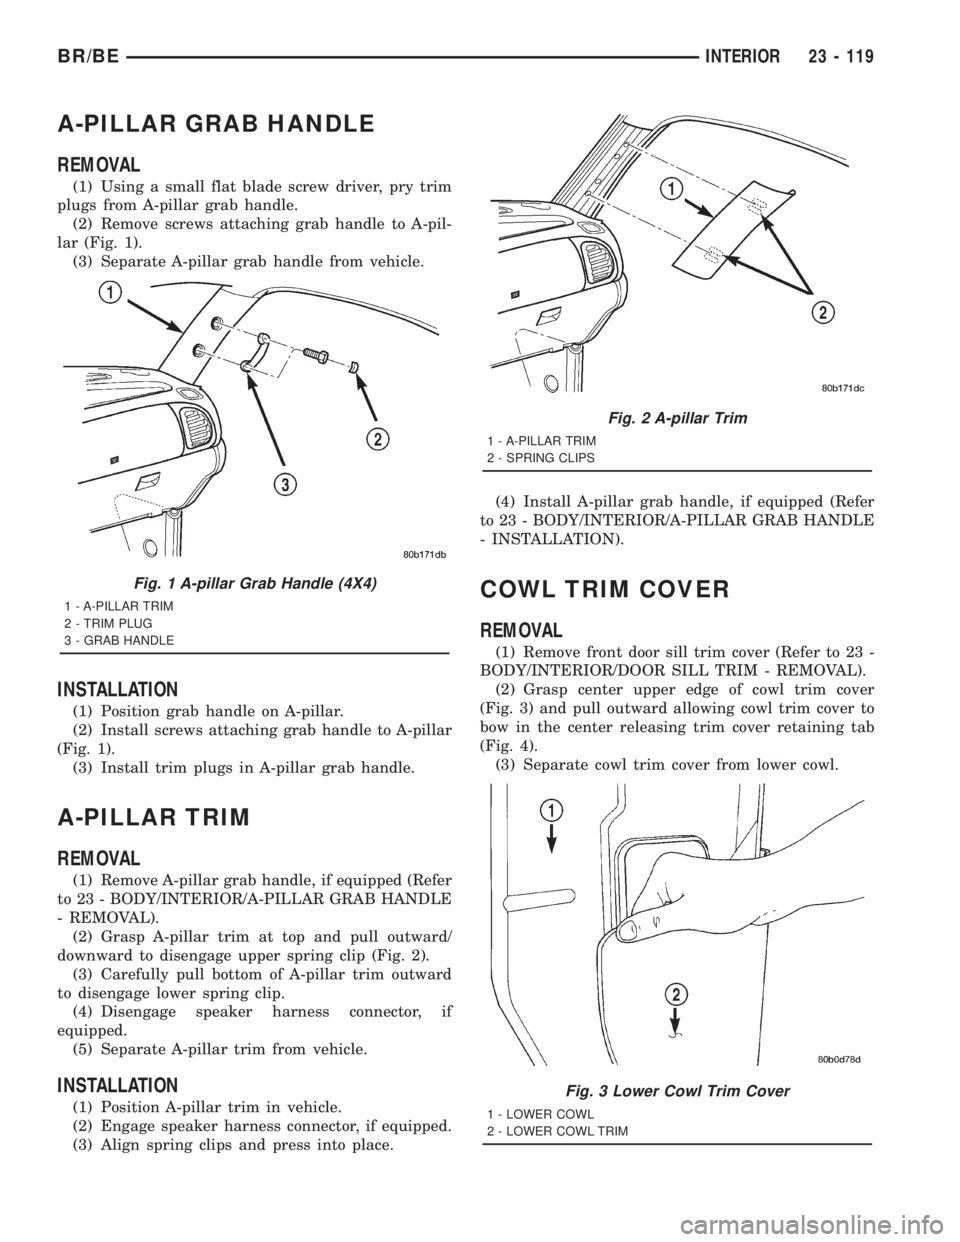
(1) Using a small flat blade screw driver, pry trim
plugs from A-pillar grab handle.
(2) Remove screws attaching grab handle to A-pil-
lar (Fig. 1).
(3) Separate A-pillar grab handle from vehicle.
INSTALLATION
(1) Position grab handle on A-pillar.
(2) Install screws attaching grab handle to A-pillar
(Fig. 1).
(3) Install trim plugs in A-pillar grab handle.
A-PILLAR TRIM
REMOVAL
(1) Remove A-pillar grab handle, if equipped (Refer
to 23 - BODY/INTERIOR/A-PILLAR GRAB HANDLE
- REMOVAL).
(2) Grasp A-pillar trim at top and pull outward/
downward to disengage upper spring clip (Fig. 2).
(3) Carefully pull bottom of A-pillar trim outward
to disengage lower spring clip.
(4) Disengage speaker harness connector, if
equipped.
(5) Separate A-pillar trim from vehicle.
INSTALLATION
(1) Position A-pillar trim in vehicle.
(2) Engage speaker harness connector, if equipped.
(3) Align spring clips and press into place.(4) Install A-pillar grab handle, if equipped (Refer
to 23 - BODY/INTERIOR/A-PILLAR GRAB HANDLE
- INSTALLATION).
COWL TRIM COVER
REMOVAL
(1) Remove front door sill trim cover (Refer to 23 -
BODY/INTERIOR/DOOR SILL TRIM - REMOVAL).
(2) Grasp center upper edge of cowl trim cover
(Fig. 3) and pull outward allowing cowl trim cover to
bow in the center releasing trim cover retaining tab
(Fig. 4).
(3) Separate cowl trim cover from lower cowl.
Fig. 1 A-pillar Grab Handle (4X4)
1 - A-PILLAR TRIM
2 - TRIM PLUG
3 - GRAB HANDLE
Fig. 2 A-pillar Trim
1 - A-PILLAR TRIM
2 - SPRING CLIPS
Fig. 3 Lower Cowl Trim Cover
1 - LOWER COWL
2 - LOWER COWL TRIM
BR/BEINTERIOR 23 - 119
Page 2693 of 2889
INSTALLATION
(1) Position cowl trim cover on lower cowl.
(2) Press into place.
(3) Install front door sill trim cover (Refer to 23 -
BODY/INTERIOR/DOOR SILL TRIM - INSTALLA-
TION).
B-PILLAR TRIM
REMOVAL
(1) Remove rear floor stowage tray, If equipped.
(Refer to 23 - BODY/INTERIOR/REAR FLOOR
STOWAGE TRAY - REMOVAL).
(2) Remove door sill cover (Refer to 23 - BODY/IN-
TERIOR/DOOR SILL TRIM - REMOVAL).
(3) Remove bolt attaching seat belt anchor to floor.
(4) Snap turning loop cover up and remove bolt
attaching turning loop to B-pillar.
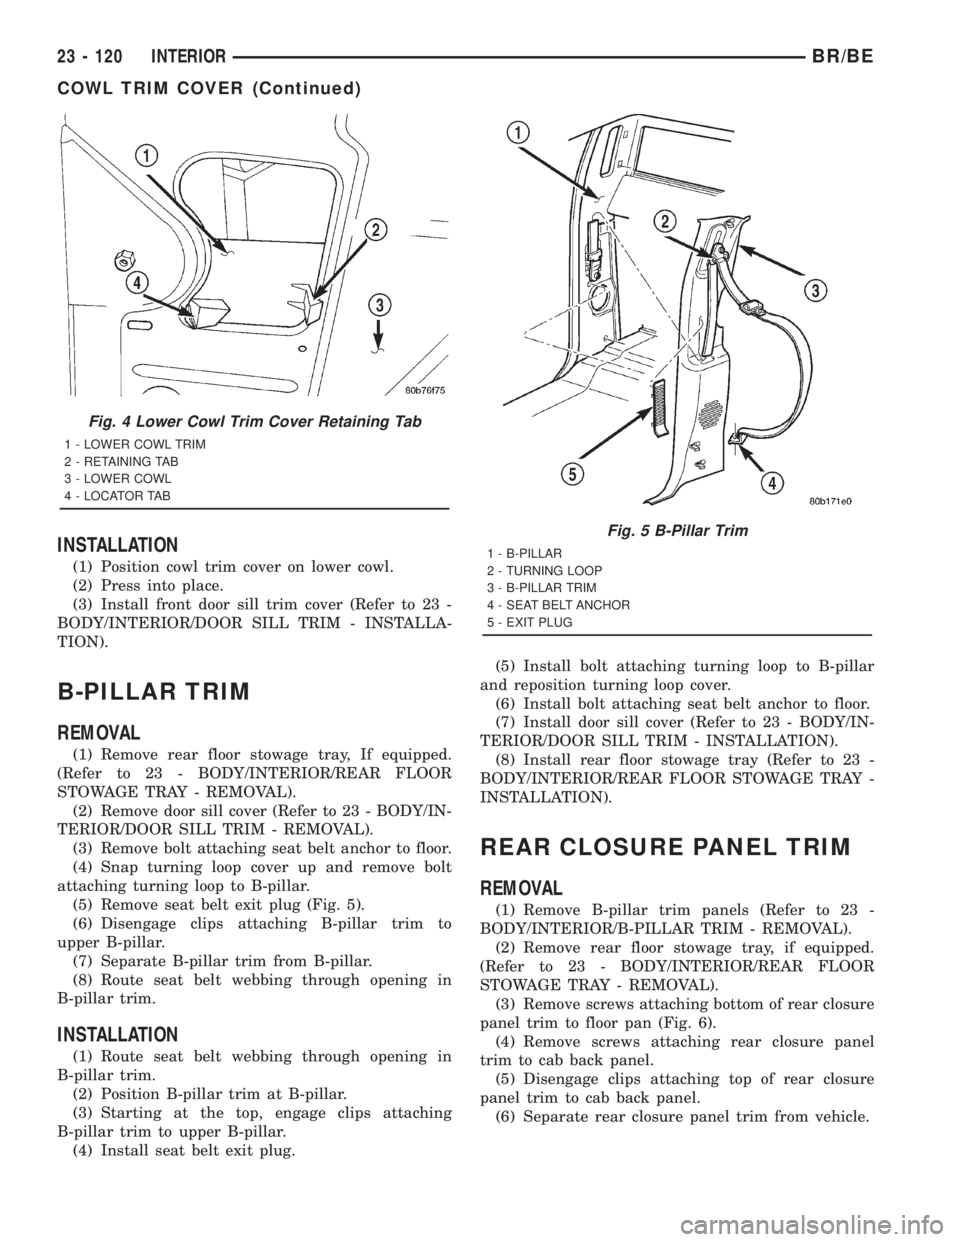
(5) Remove seat belt exit plug (Fig. 5).
(6) Disengage clips attaching B-pillar trim to
upper B-pillar.
(7) Separate B-pillar trim from B-pillar.
(8) Route seat belt webbing through opening in
B-pillar trim.
INSTALLATION
(1) Route seat belt webbing through opening in
B-pillar trim.
(2) Position B-pillar trim at B-pillar.
(3) Starting at the top, engage clips attaching
B-pillar trim to upper B-pillar.
(4) Install seat belt exit plug.(5) Install bolt attaching turning loop to B-pillar
and reposition turning loop cover.
(6) Install bolt attaching seat belt anchor to floor.
(7) Install door sill cover (Refer to 23 - BODY/IN-
TERIOR/DOOR SILL TRIM - INSTALLATION).
(8) Install rear floor stowage tray (Refer to 23 -
BODY/INTERIOR/REAR FLOOR STOWAGE TRAY -
INSTALLATION).
REAR CLOSURE PANEL TRIM
REMOVAL
(1) Remove B-pillar trim panels (Refer to 23 -
BODY/INTERIOR/B-PILLAR TRIM - REMOVAL).
(2) Remove rear floor stowage tray, if equipped.
(Refer to 23 - BODY/INTERIOR/REAR FLOOR
STOWAGE TRAY - REMOVAL).
(3) Remove screws attaching bottom of rear closure
panel trim to floor pan (Fig. 6).
(4) Remove screws attaching rear closure panel
trim to cab back panel.
(5) Disengage clips attaching top of rear closure
panel trim to cab back panel.
(6) Separate rear closure panel trim from vehicle.
Fig. 4 Lower Cowl Trim Cover Retaining Tab
1 - LOWER COWL TRIM
2 - RETAINING TAB
3 - LOWER COWL
4 - LOCATOR TAB
Fig. 5 B-Pillar Trim
1 - B-PILLAR
2 - TURNING LOOP
3 - B-PILLAR TRIM
4 - SEAT BELT ANCHOR
5 - EXIT PLUG
23 - 120 INTERIORBR/BE
COWL TRIM COVER (Continued)
Page 2694 of 2889
INSTALLATION
(1) Position rear closure panel trim in vehicle.
(2) Align and engage clips attaching top of rear
closure panel trim to cab back panel.
(3) Install screws attaching rear closure panel trim
to cab back panel.
(4) Install screws attaching bottom of rear closure
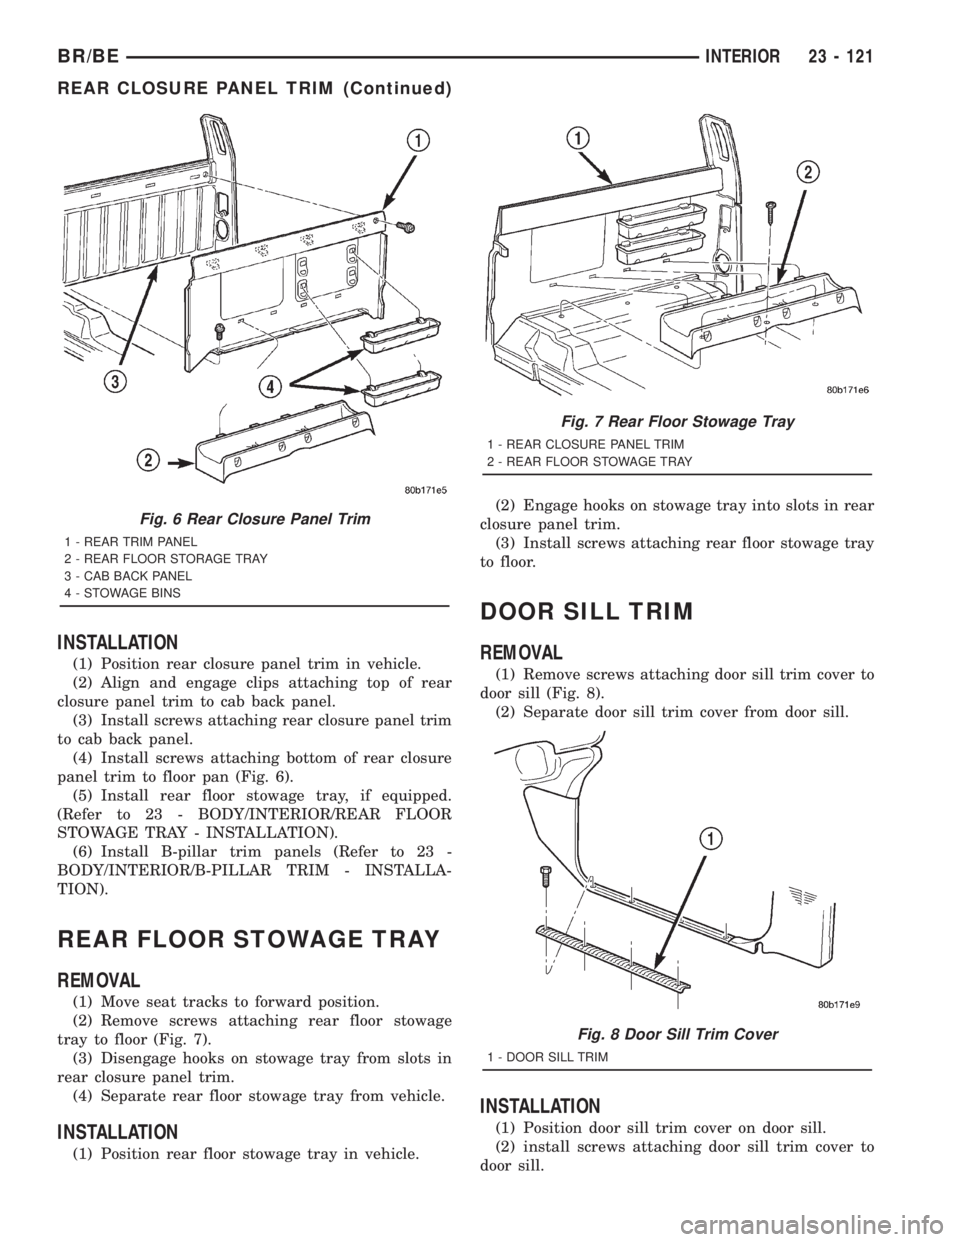
panel trim to floor pan (Fig. 6).
(5) Install rear floor stowage tray, if equipped.
(Refer to 23 - BODY/INTERIOR/REAR FLOOR
STOWAGE TRAY - INSTALLATION).
(6) Install B-pillar trim panels (Refer to 23 -
BODY/INTERIOR/B-PILLAR TRIM - INSTALLA-
TION).
REAR FLOOR STOWAGE TRAY
REMOVAL
(1) Move seat tracks to forward position.
(2) Remove screws attaching rear floor stowage
tray to floor (Fig. 7).
(3) Disengage hooks on stowage tray from slots in
rear closure panel trim.
(4) Separate rear floor stowage tray from vehicle.
INSTALLATION
(1) Position rear floor stowage tray in vehicle.(2) Engage hooks on stowage tray into slots in rear
closure panel trim.
(3) Install screws attaching rear floor stowage tray
to floor.
DOOR SILL TRIM
REMOVAL
(1) Remove screws attaching door sill trim cover to
door sill (Fig. 8).
(2) Separate door sill trim cover from door sill.
INSTALLATION
(1) Position door sill trim cover on door sill.
(2) install screws attaching door sill trim cover to
door sill.
Fig. 6 Rear Closure Panel Trim
1 - REAR TRIM PANEL
2 - REAR FLOOR STORAGE TRAY
3 - CAB BACK PANEL
4 - STOWAGE BINS
Fig. 7 Rear Floor Stowage Tray
1 - REAR CLOSURE PANEL TRIM
2 - REAR FLOOR STOWAGE TRAY
Fig. 8 Door Sill Trim Cover
1 - DOOR SILL TRIM
BR/BEINTERIOR 23 - 121
REAR CLOSURE PANEL TRIM (Continued)
Page 2695 of 2889
SHIFT BOOT - MANUAL
TRANSMISSION
REMOVAL
(1) Using a trim stick, pry the corner of the shift
boot up expose the fasteners.
(2) Remove the screws attaching the shift boot to
the console.
(3) Remove the insert from the shift knob, remove
nut attaching knob to the lever, and remove the shift
knob.
(4) Lift floor shift boot off shifter.
INSTALLATION
(1) Install shift boot over the shift lever, position
boot on console and install the fasteners attaching
boot to concole.
(2) Install the shift knob, shift knob nut, and
tighten to 27.1 N´m (20 ft.lbs) torque.
(3) Install the shift knob insert.
4WD FLOOR SHIFT BOOT
REMOVAL
(1) Remove insert from shift knob.
(2) Remove nut attaching shift knob to shift lever.
(3) Remove shift knob.
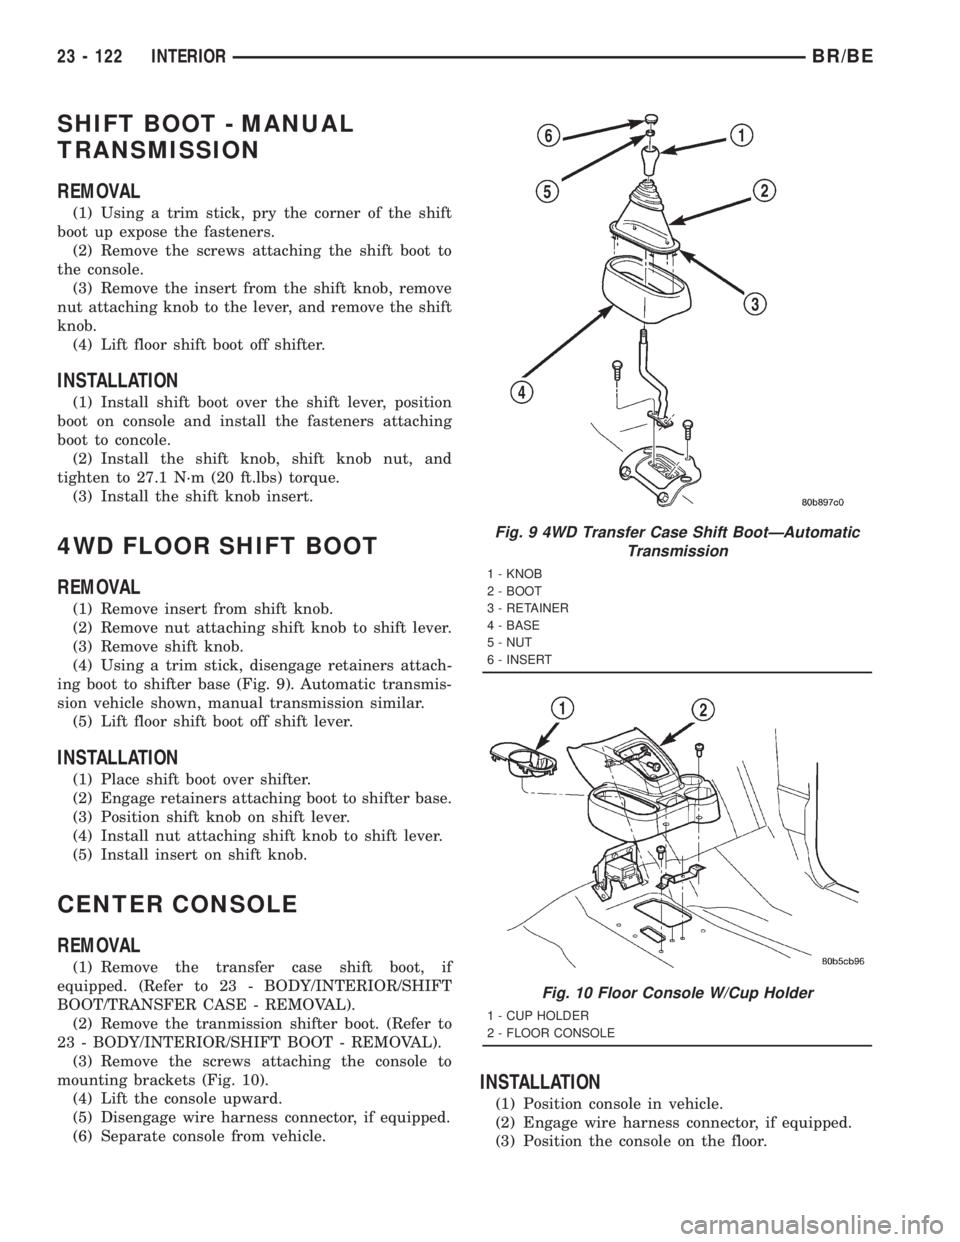
(4) Using a trim stick, disengage retainers attach-
ing boot to shifter base (Fig. 9). Automatic transmis-
sion vehicle shown, manual transmission similar.
(5) Lift floor shift boot off shift lever.
INSTALLATION
(1) Place shift boot over shifter.
(2) Engage retainers attaching boot to shifter base.
(3) Position shift knob on shift lever.
(4) Install nut attaching shift knob to shift lever.
(5) Install insert on shift knob.
CENTER CONSOLE
REMOVAL
(1) Remove the transfer case shift boot, if
equipped. (Refer to 23 - BODY/INTERIOR/SHIFT
BOOT/TRANSFER CASE - REMOVAL).
(2) Remove the tranmission shifter boot. (Refer to
23 - BODY/INTERIOR/SHIFT BOOT - REMOVAL).
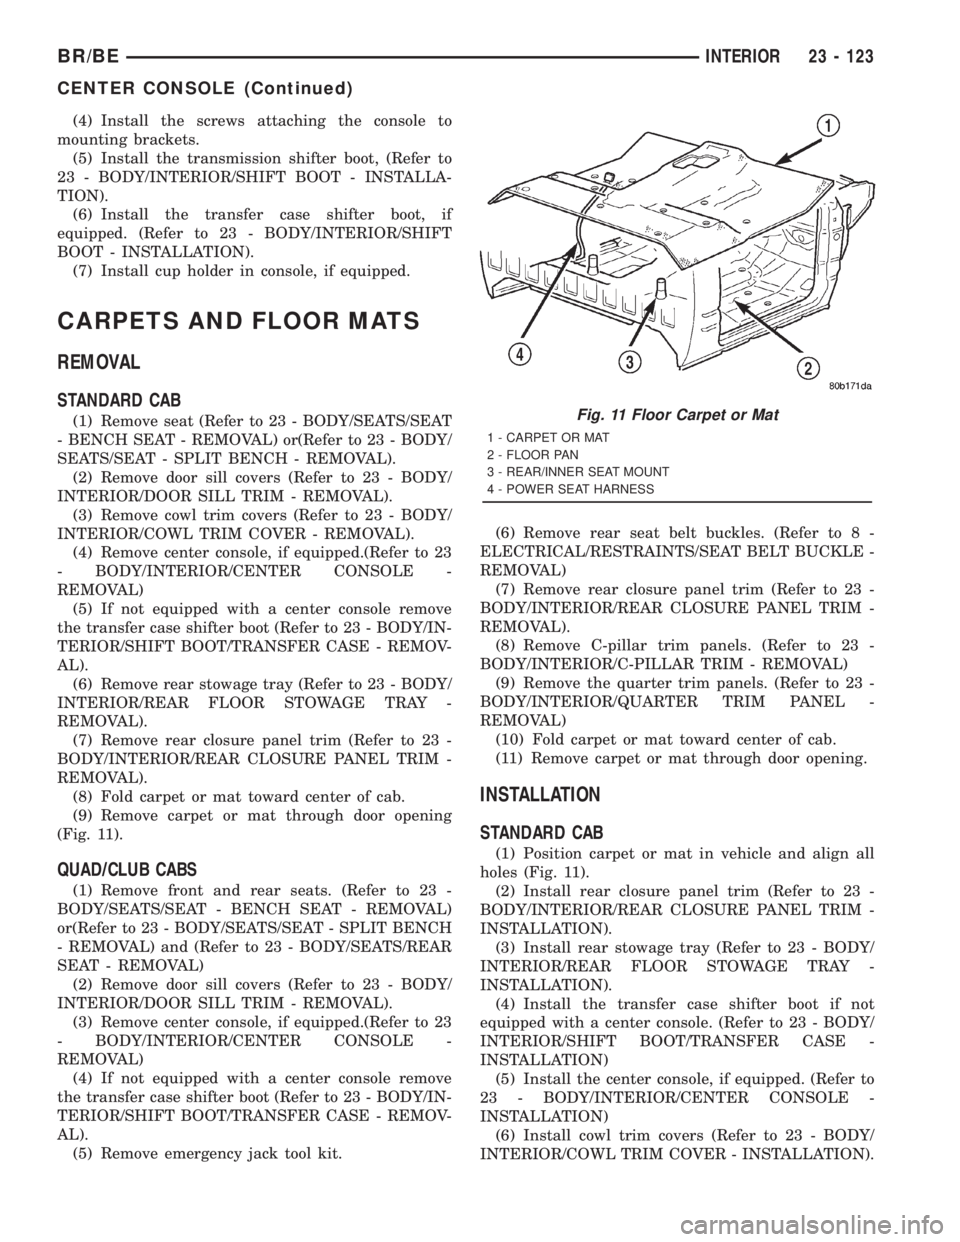
(3) Remove the screws attaching the console to
mounting brackets (Fig. 10).
(4) Lift the console upward.
(5) Disengage wire harness connector, if equipped.
(6) Separate console from vehicle.
INSTALLATION
(1) Position console in vehicle.
(2) Engage wire harness connector, if equipped.
(3) Position the console on the floor.
Fig. 9 4WD Transfer Case Shift BootÐAutomatic
Transmission
1 - KNOB
2 - BOOT
3 - RETAINER
4 - BASE
5 - NUT
6 - INSERT
Fig. 10 Floor Console W/Cup Holder
1 - CUP HOLDER
2 - FLOOR CONSOLE
23 - 122 INTERIORBR/BE
Page 2696 of 2889
(4) Install the screws attaching the console to
mounting brackets.
(5) Install the transmission shifter boot, (Refer to
23 - BODY/INTERIOR/SHIFT BOOT - INSTALLA-
TION).
(6) Install the transfer case shifter boot, if
equipped. (Refer to 23 - BODY/INTERIOR/SHIFT
BOOT - INSTALLATION).
(7) Install cup holder in console, if equipped.
CARPETS AND FLOOR MATS
REMOVAL
STANDARD CAB
(1) Remove seat (Refer to 23 - BODY/SEATS/SEAT
- BENCH SEAT - REMOVAL) or(Refer to 23 - BODY/
SEATS/SEAT - SPLIT BENCH - REMOVAL).
(2) Remove door sill covers (Refer to 23 - BODY/
INTERIOR/DOOR SILL TRIM - REMOVAL).
(3) Remove cowl trim covers (Refer to 23 - BODY/
INTERIOR/COWL TRIM COVER - REMOVAL).
(4) Remove center console, if equipped.(Refer to 23
- BODY/INTERIOR/CENTER CONSOLE -
REMOVAL)
(5) If not equipped with a center console remove
the transfer case shifter boot (Refer to 23 - BODY/IN-
TERIOR/SHIFT BOOT/TRANSFER CASE - REMOV-
AL).
(6) Remove rear stowage tray (Refer to 23 - BODY/
INTERIOR/REAR FLOOR STOWAGE TRAY -
REMOVAL).
(7) Remove rear closure panel trim (Refer to 23 -
BODY/INTERIOR/REAR CLOSURE PANEL TRIM -
REMOVAL).
(8) Fold carpet or mat toward center of cab.
(9) Remove carpet or mat through door opening
(Fig. 11).
QUAD/CLUB CABS
(1) Remove front and rear seats. (Refer to 23 -
BODY/SEATS/SEAT - BENCH SEAT - REMOVAL)
or(Refer to 23 - BODY/SEATS/SEAT - SPLIT BENCH
- REMOVAL) and (Refer to 23 - BODY/SEATS/REAR
SEAT - REMOVAL)
(2) Remove door sill covers (Refer to 23 - BODY/
INTERIOR/DOOR SILL TRIM - REMOVAL).
(3) Remove center console, if equipped.(Refer to 23
- BODY/INTERIOR/CENTER CONSOLE -
REMOVAL)
(4) If not equipped with a center console remove
the transfer case shifter boot (Refer to 23 - BODY/IN-
TERIOR/SHIFT BOOT/TRANSFER CASE - REMOV-
AL).
(5) Remove emergency jack tool kit.(6) Remove rear seat belt buckles. (Refer to 8 -
ELECTRICAL/RESTRAINTS/SEAT BELT BUCKLE -
REMOVAL)
(7) Remove rear closure panel trim (Refer to 23 -
BODY/INTERIOR/REAR CLOSURE PANEL TRIM -
REMOVAL).
(8) Remove C-pillar trim panels. (Refer to 23 -
BODY/INTERIOR/C-PILLAR TRIM - REMOVAL)
(9) Remove the quarter trim panels. (Refer to 23 -
BODY/INTERIOR/QUARTER TRIM PANEL -
REMOVAL)
(10) Fold carpet or mat toward center of cab.
(11) Remove carpet or mat through door opening.
INSTALLATION
STANDARD CAB
(1) Position carpet or mat in vehicle and align all
holes (Fig. 11).
(2) Install rear closure panel trim (Refer to 23 -
BODY/INTERIOR/REAR CLOSURE PANEL TRIM -
INSTALLATION).
(3) Install rear stowage tray (Refer to 23 - BODY/
INTERIOR/REAR FLOOR STOWAGE TRAY -
INSTALLATION).
(4) Install the transfer case shifter boot if not
equipped with a center console. (Refer to 23 - BODY/
INTERIOR/SHIFT BOOT/TRANSFER CASE -
INSTALLATION)
(5) Install the center console, if equipped. (Refer to
23 - BODY/INTERIOR/CENTER CONSOLE -
INSTALLATION)
(6) Install cowl trim covers (Refer to 23 - BODY/
INTERIOR/COWL TRIM COVER - INSTALLATION).
Fig. 11 Floor Carpet or Mat
1 - CARPET OR MAT
2 - FLOOR PAN
3 - REAR/INNER SEAT MOUNT
4 - POWER SEAT HARNESS
BR/BEINTERIOR 23 - 123
CENTER CONSOLE (Continued)
Page 2697 of 2889
(7) Install door sill covers (Refer to 23 - BODY/IN-
TERIOR/DOOR SILL TRIM - INSTALLATION).
(8) Install seat, (Refer to 23 - BODY/SEATS/SEAT
- INSTALLATION) or (Refer to 23 - BODY/SEATS/
SEAT/SPLIT BENCH - INSTALLATION).
QUAD/CLUB CABS
(1) Position carpet or mat in vehicle.
(2) Install quarter trim panels. (Refer to 23 -
BODY/INTERIOR/QUARTER TRIM PANEL -
INSTALLATION)
(3) Install rear seat belt buckles.
(4) Install the C-pillar trim panels, if equipped.
(Refer to 23 - BODY/INTERIOR/C-PILLAR TRIM -
INSTALLATION)
(5) Install rear closure panel trim (Refer to 23 -
BODY/INTERIOR/REAR CLOSURE PANEL TRIM -
INSTALLATION).
(6) Install the rear seat belt buckles. (Refer to 8 -
ELECTRICAL/RESTRAINTS/SEAT BELT BUCKLE -
INSTALLATION)
(7) Install emergency jack tool kit.
(8) Install the transfer case shifter boot if not
equipped with a center console. (Refer to 23 - BODY/
INTERIOR/SHIFT BOOT/TRANSFER CASE -
INSTALLATION)
(9) Install the center console, if equipped. (Refer to
23 - BODY/INTERIOR/CENTER CONSOLE -
INSTALLATION)
(10) Install floor shift boot, if equipped.
(11) Install cowl trim covers (Refer to 23 - BODY/
INTERIOR/COWL TRIM COVER - INSTALLATION).
(12) Install door sill covers (Refer to 23 - BODY/
INTERIOR/DOOR SILL TRIM - INSTALLATION).
(13) Install front and rear seats. (Refer to 23 -
BODY/SEATS/SEAT - BENCH SEAT - INSTALLA-
TION) or (Refer to 23 - BODY/SEATS/SEAT - SPLIT
BENCH - INSTALLATION) and (Refer to 23 - BODY/
SEATS/REAR SEAT - INSTALLATION)
ASSIST HANDLE
REMOVAL
(1) Disengage tabs attaching assist handle end
covers to assist handle.
(2) Remove screws attaching overhead assist han-
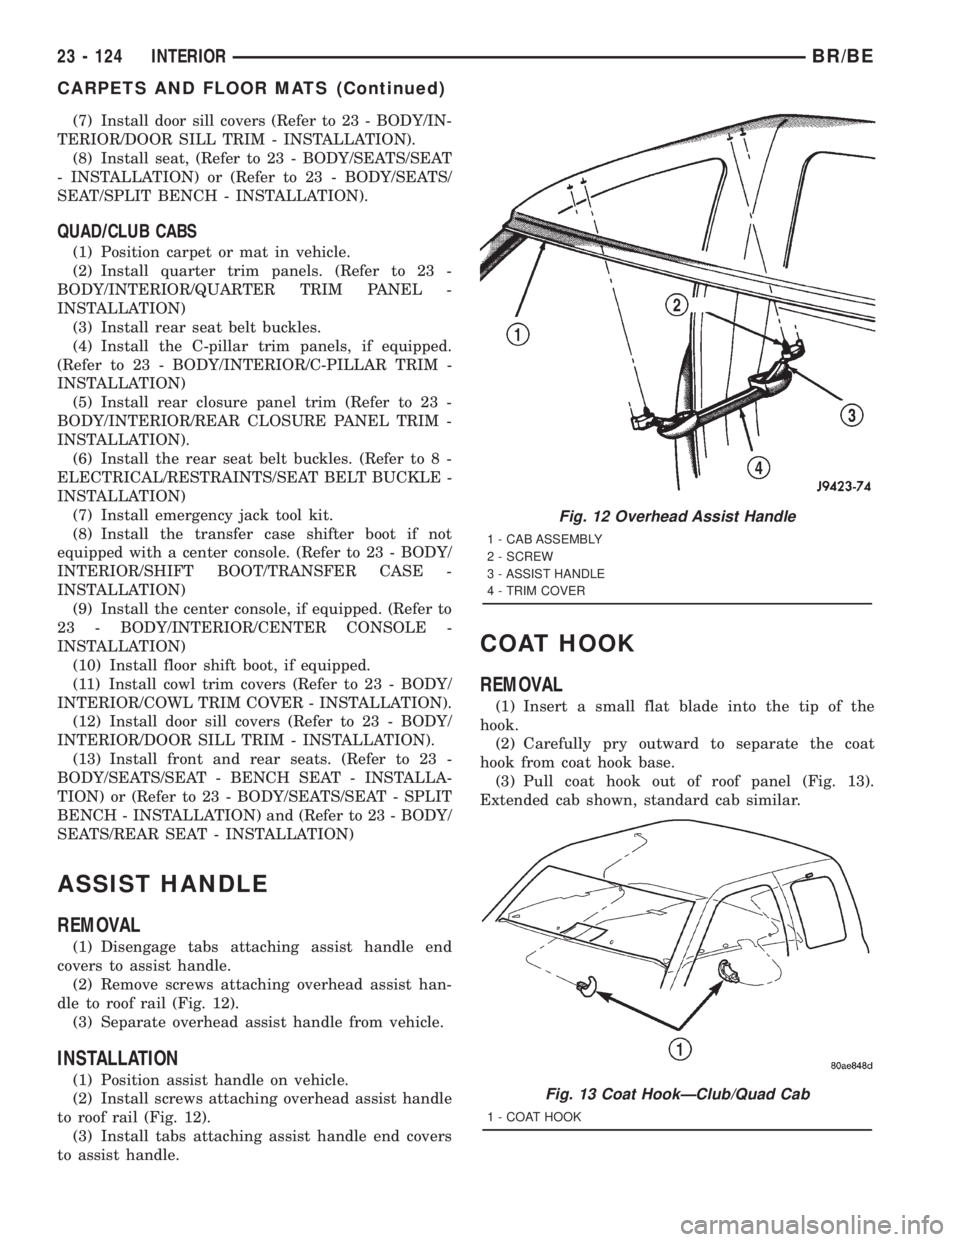
dle to roof rail (Fig. 12).
(3) Separate overhead assist handle from vehicle.
INSTALLATION
(1) Position assist handle on vehicle.
(2) Install screws attaching overhead assist handle
to roof rail (Fig. 12).
(3) Install tabs attaching assist handle end covers
to assist handle.
COAT HOOK
REMOVAL
(1) Insert a small flat blade into the tip of the
hook.
(2) Carefully pry outward to separate the coat
hook from coat hook base.
(3) Pull coat hook out of roof panel (Fig. 13).
Extended cab shown, standard cab similar.
Fig. 12 Overhead Assist Handle
1 - CAB ASSEMBLY
2 - SCREW
3 - ASSIST HANDLE
4 - TRIM COVER
Fig. 13 Coat HookÐClub/Quad Cab
1 - COAT HOOK
23 - 124 INTERIORBR/BE
CARPETS AND FLOOR MATS (Continued)
Page 2698 of 2889
INSTALLATION
(1) Position coat hook in roof panel.
(2) Push the coat hook cover inward and secure
the coat hook to roof panel.
HEADLINER
REMOVAL
(1) Remove sun visors and visor hooks.(Refer to 23
- BODY/INTERIOR/SUN VISOR - REMOVAL).
(2) Remove overhead assist handle.(Refer to 23 -
BODY/INTERIOR/ASSIST HANDLE - REMOVAL).
(3) Remove coat hook(s).(Refer to 23 - BODY/IN-
TERIOR/COAT HOOK - REMOVAL)
(4) Remove overhead console, if equipped. (Refer to
8 - ELECTRICAL/OVERHEAD CONSOLE - REMOV-
AL).
(5) Remove A-pillar trim.(Refer to 23 - BODY/IN-
TERIOR/A-PILLAR TRIM - REMOVAL).
(6) Remove B-pillar trim panels. (Refer to 23 -
BODY/INTERIOR/B-PILLAR TRIM - REMOVAL).
(7) Remove the C-pillar trim panels, if equipped.
(Refer to 23 - BODY/INTERIOR/C-PILLAR TRIM -
REMOVAL)
(8) Remove the quarter trim panels, if equipped.
(Refer to 23 - BODY/INTERIOR/QUARTER TRIM
PANEL - REMOVAL)
(9) Remove dome lamp. (Refer to 8 - ELECTRI-
CAL/LAMPS/LIGHTING - INTERIOR/DOME LAMP
- REMOVAL).
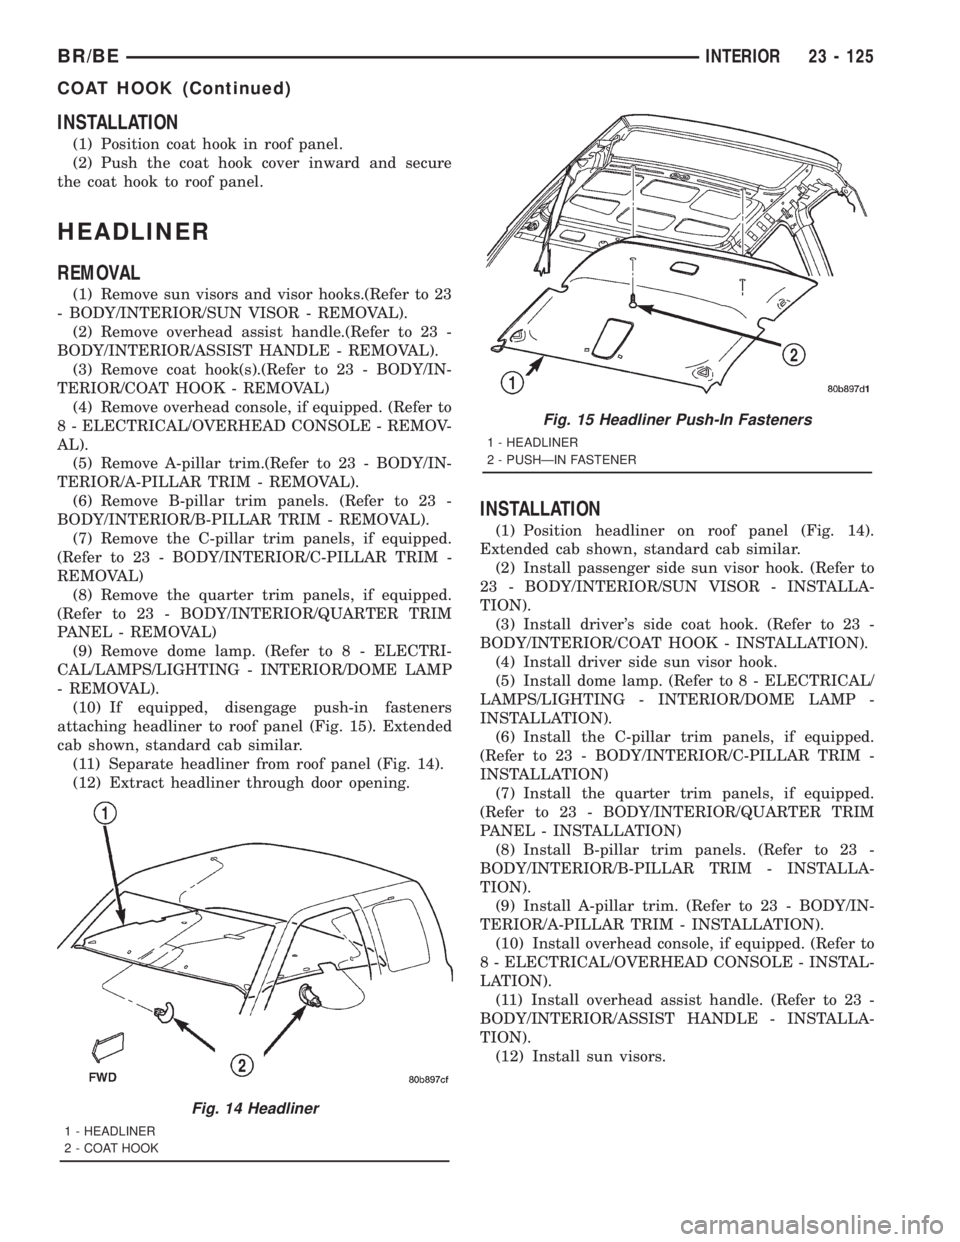
(10) If equipped, disengage push-in fasteners
attaching headliner to roof panel (Fig. 15). Extended
cab shown, standard cab similar.
(11) Separate headliner from roof panel (Fig. 14).
(12) Extract headliner through door opening.
INSTALLATION
(1) Position headliner on roof panel (Fig. 14).
Extended cab shown, standard cab similar.
(2) Install passenger side sun visor hook. (Refer to
23 - BODY/INTERIOR/SUN VISOR - INSTALLA-
TION).
(3) Install driver's side coat hook. (Refer to 23 -
BODY/INTERIOR/COAT HOOK - INSTALLATION).
(4) Install driver side sun visor hook.
(5) Install dome lamp. (Refer to 8 - ELECTRICAL/
LAMPS/LIGHTING - INTERIOR/DOME LAMP -
INSTALLATION).
(6) Install the C-pillar trim panels, if equipped.
(Refer to 23 - BODY/INTERIOR/C-PILLAR TRIM -
INSTALLATION)
(7) Install the quarter trim panels, if equipped.
(Refer to 23 - BODY/INTERIOR/QUARTER TRIM
PANEL - INSTALLATION)
(8) Install B-pillar trim panels. (Refer to 23 -
BODY/INTERIOR/B-PILLAR TRIM - INSTALLA-
TION).
(9) Install A-pillar trim. (Refer to 23 - BODY/IN-
TERIOR/A-PILLAR TRIM - INSTALLATION).
(10) Install overhead console, if equipped. (Refer to
8 - ELECTRICAL/OVERHEAD CONSOLE - INSTAL-
LATION).
(11) Install overhead assist handle. (Refer to 23 -
BODY/INTERIOR/ASSIST HANDLE - INSTALLA-
TION).
(12) Install sun visors.
Fig. 14 Headliner
1 - HEADLINER
2 - COAT HOOK
Fig. 15 Headliner Push-In Fasteners
1 - HEADLINER
2 - PUSHÐIN FASTENER
BR/BEINTERIOR 23 - 125
COAT HOOK (Continued)
Page 2699 of 2889
BODY VENT
REMOVAL
(1) Open door.
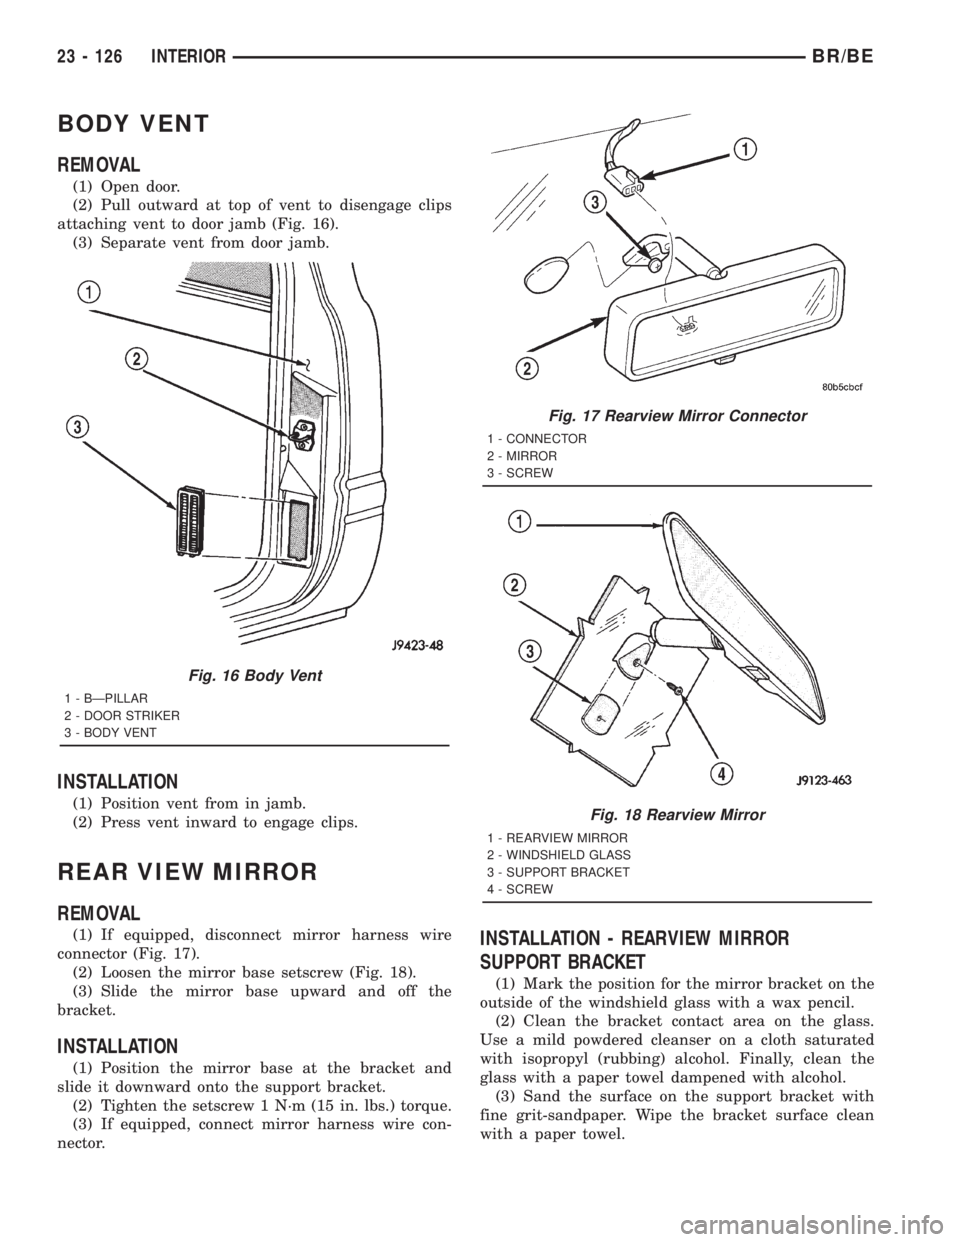
(2) Pull outward at top of vent to disengage clips
attaching vent to door jamb (Fig. 16).
(3) Separate vent from door jamb.
INSTALLATION
(1) Position vent from in jamb.
(2) Press vent inward to engage clips.
REAR VIEW MIRROR
REMOVAL
(1) If equipped, disconnect mirror harness wire
connector (Fig. 17).
(2) Loosen the mirror base setscrew (Fig. 18).
(3) Slide the mirror base upward and off the
bracket.
INSTALLATION
(1) Position the mirror base at the bracket and
slide it downward onto the support bracket.
(2) Tighten the setscrew 1 N´m (15 in. lbs.) torque.
(3) If equipped, connect mirror harness wire con-
nector.
INSTALLATION - REARVIEW MIRROR
SUPPORT BRACKET
(1) Mark the position for the mirror bracket on the
outside of the windshield glass with a wax pencil.
(2) Clean the bracket contact area on the glass.
Use a mild powdered cleanser on a cloth saturated
with isopropyl (rubbing) alcohol. Finally, clean the
glass with a paper towel dampened with alcohol.
(3) Sand the surface on the support bracket with
fine grit-sandpaper. Wipe the bracket surface clean
with a paper towel.
Fig. 16 Body Vent
1 - BÐPILLAR
2 - DOOR STRIKER
3 - BODY VENT
Fig. 17 Rearview Mirror Connector
1 - CONNECTOR
2 - MIRROR
3 - SCREW
Fig. 18 Rearview Mirror
1 - REARVIEW MIRROR
2 - WINDSHIELD GLASS
3 - SUPPORT BRACKET
4 - SCREW
23 - 126 INTERIORBR/BE
Page 2700 of 2889
(4) Apply accelerator to the surface on the bracket
according to the following instructions:
(a) Crush the vial to saturate the felt applicator.
(b) Remove the paper sleeve.
(c) Apply accelerator to the contact surface on
the bracket.
(d) Allow the accelerator to dry for five minutes.
(e) Do not touch the bracket contact surface
after the accelerator has been applied.
(5) Apply adhesive accelerator to the bracket con-
tact surface on the windshield glass. Allow the accel-
erator to dry for one minute. Do not touch the glass
contact surface after the accelerator has been
applied.
(6) Install the bracket according to the following
instructions:
(a) Apply one drop of adhesive at the center of
the bracket contact-surface on the windshield
glass.
(b) Apply an even coat of adhesive to the contact
surface on the bracket.
(c) Align the bracket with the marked position
on the windshield glass.
(d) Press and hold the bracket in place for at
least one minute.
NOTE: Verify that the mirror support bracket is cor-
rectly aligned, because the adhesive will cure rap-
idly.
(7) Allow the adhesive to cure for 8-10 minutes.
Remove any excess adhesive with an alcohol-damp-
ened cloth.
(8) Allow the adhesive to cure for an additional
8-10 minutes before installing the mirror.
SUN VISOR
REMOVAL
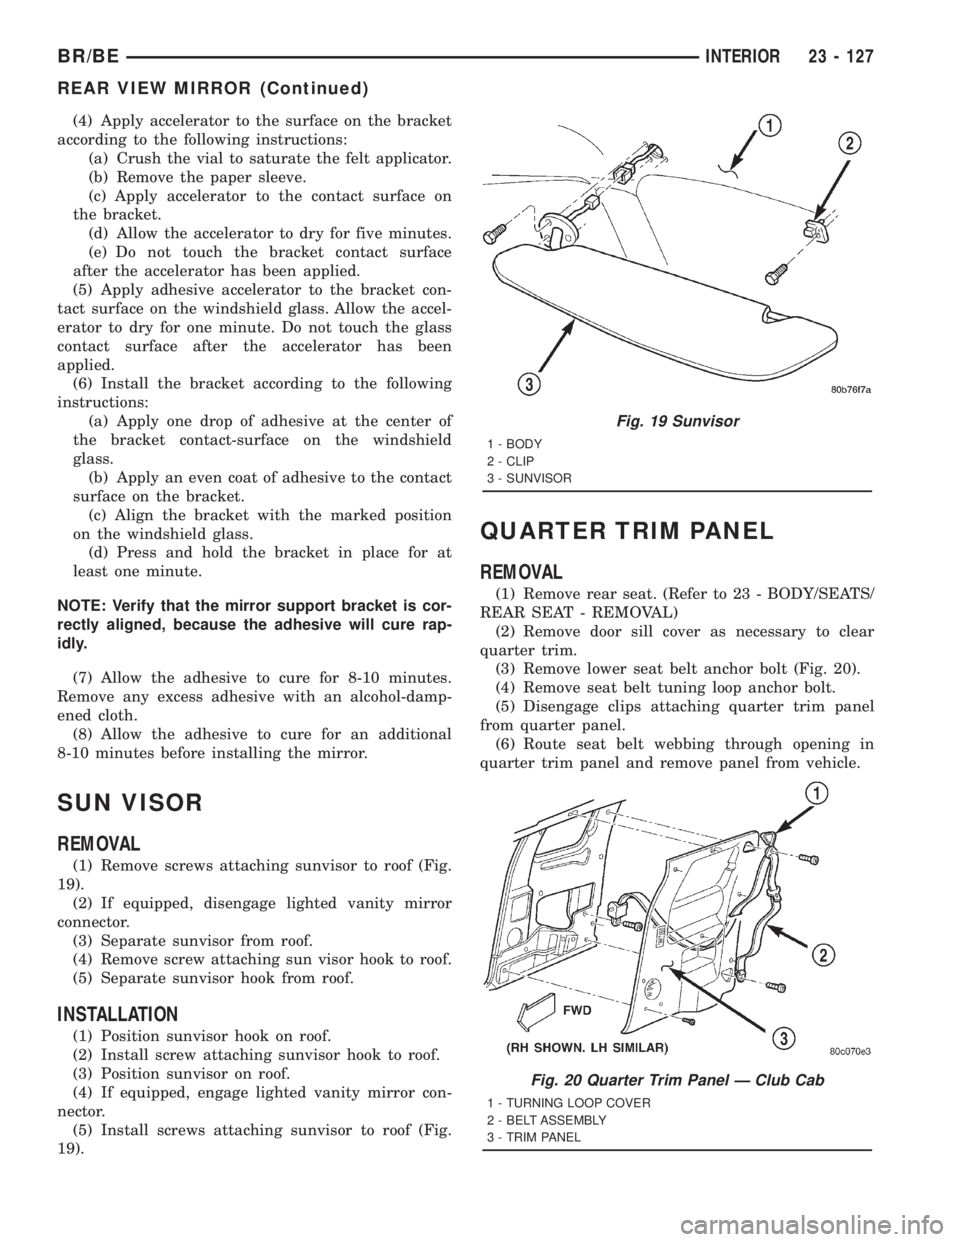
(1) Remove screws attaching sunvisor to roof (Fig.
19).
(2) If equipped, disengage lighted vanity mirror
connector.
(3) Separate sunvisor from roof.
(4) Remove screw attaching sun visor hook to roof.
(5) Separate sunvisor hook from roof.
INSTALLATION
(1) Position sunvisor hook on roof.
(2) Install screw attaching sunvisor hook to roof.
(3) Position sunvisor on roof.
(4) If equipped, engage lighted vanity mirror con-
nector.
(5) Install screws attaching sunvisor to roof (Fig.
19).
QUARTER TRIM PANEL
REMOVAL
(1) Remove rear seat. (Refer to 23 - BODY/SEATS/
REAR SEAT - REMOVAL)
(2) Remove door sill cover as necessary to clear
quarter trim.
(3) Remove lower seat belt anchor bolt (Fig. 20).
(4) Remove seat belt tuning loop anchor bolt.
(5) Disengage clips attaching quarter trim panel
from quarter panel.
(6) Route seat belt webbing through opening in
quarter trim panel and remove panel from vehicle.
Fig. 19 Sunvisor
1 - BODY
2 - CLIP
3 - SUNVISOR
Fig. 20 Quarter Trim Panel Ð Club Cab
1 - TURNING LOOP COVER
2 - BELT ASSEMBLY
3 - TRIM PANEL
BR/BEINTERIOR 23 - 127
REAR VIEW MIRROR (Continued)