torque DODGE RAM 2001 Service Repair Manual
[x] Cancel search | Manufacturer: DODGE, Model Year: 2001, Model line: RAM, Model: DODGE RAM 2001Pages: 2889, PDF Size: 68.07 MB
Page 1467 of 2889
inal equipment parts, or equivalent. This will assure
proper alignment with other parts in the system and
provide acceptable exhaust noise levels.
INSTALLATION
(1) Loosely assemble exhaust tailpipe to permit
proper alignment of all parts.
(2) Connect the support hangers.
(3) Position the exhaust tailpipe for proper clear-
ance with the underbody parts.
(4) Tighten all clamp nuts to 48 N´m (35 ft. lbs.)
torque.
(5) Lower the vehicle.
(6) Start the engine and inspect for exhaust leaks
and exhaust system contact with the body panels. A
minimum of 25.4 mm (1.0 in.) is required between
the exhaust system components and body/frame
parts. Adjust the alignment, if needed.
TAILPIPE - 5.9L HEAVY
DUTY/8.0L
REMOVAL
(1) Raise and support the vehicle.
(2) Saturate the clamp nuts with MopartRust
Penetrant. Allow 5 minutes for penetration.
(3) Disconnect the exhaust tailpipe support hang-
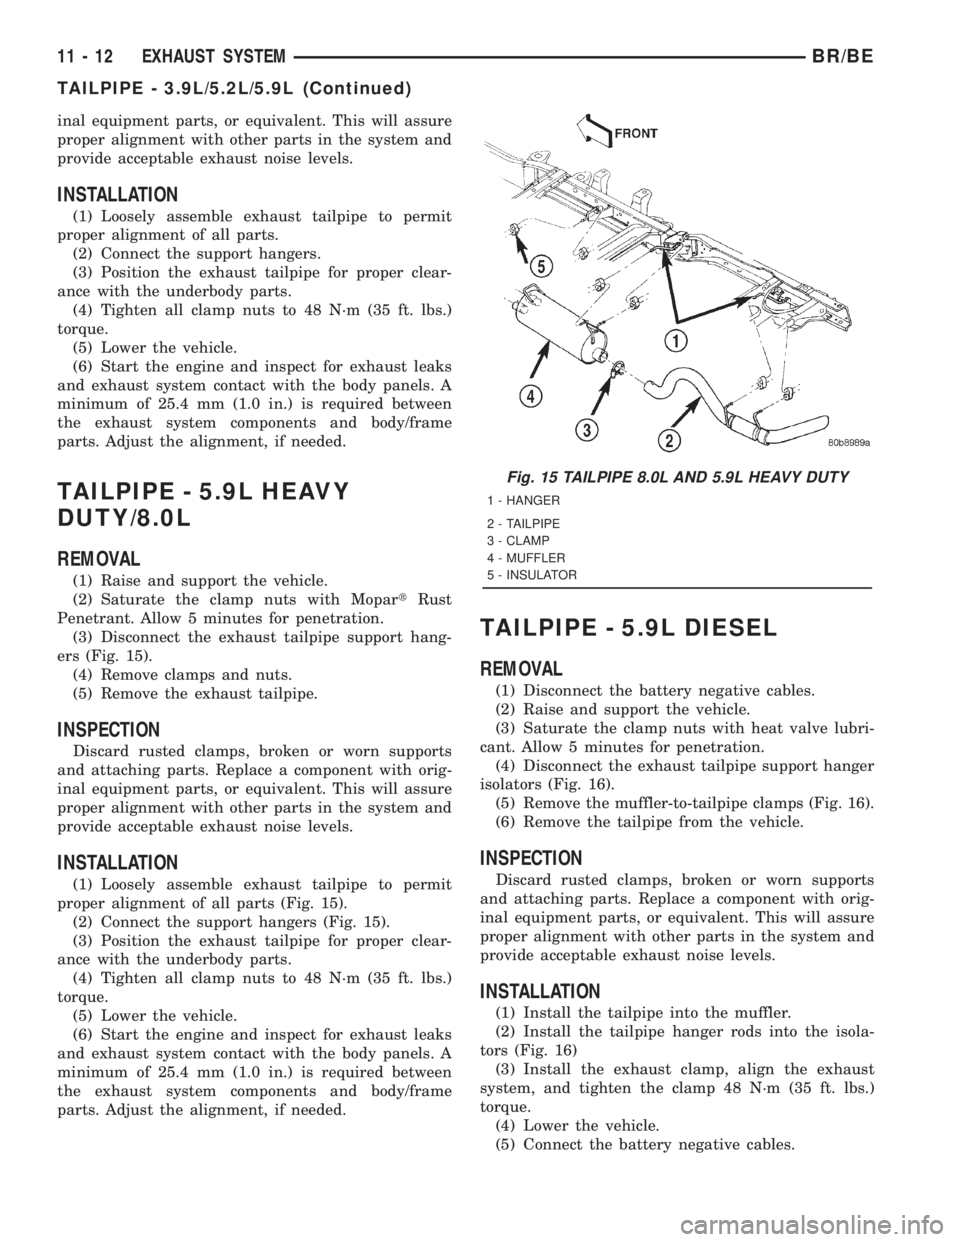
ers (Fig. 15).
(4) Remove clamps and nuts.
(5) Remove the exhaust tailpipe.
INSPECTION
Discard rusted clamps, broken or worn supports
and attaching parts. Replace a component with orig-
inal equipment parts, or equivalent. This will assure
proper alignment with other parts in the system and
provide acceptable exhaust noise levels.
INSTALLATION
(1) Loosely assemble exhaust tailpipe to permit
proper alignment of all parts (Fig. 15).
(2) Connect the support hangers (Fig. 15).
(3) Position the exhaust tailpipe for proper clear-
ance with the underbody parts.
(4) Tighten all clamp nuts to 48 N´m (35 ft. lbs.)
torque.
(5) Lower the vehicle.
(6) Start the engine and inspect for exhaust leaks
and exhaust system contact with the body panels. A
minimum of 25.4 mm (1.0 in.) is required between
the exhaust system components and body/frame
parts. Adjust the alignment, if needed.
TAILPIPE - 5.9L DIESEL
REMOVAL
(1) Disconnect the battery negative cables.
(2) Raise and support the vehicle.
(3) Saturate the clamp nuts with heat valve lubri-
cant. Allow 5 minutes for penetration.
(4) Disconnect the exhaust tailpipe support hanger
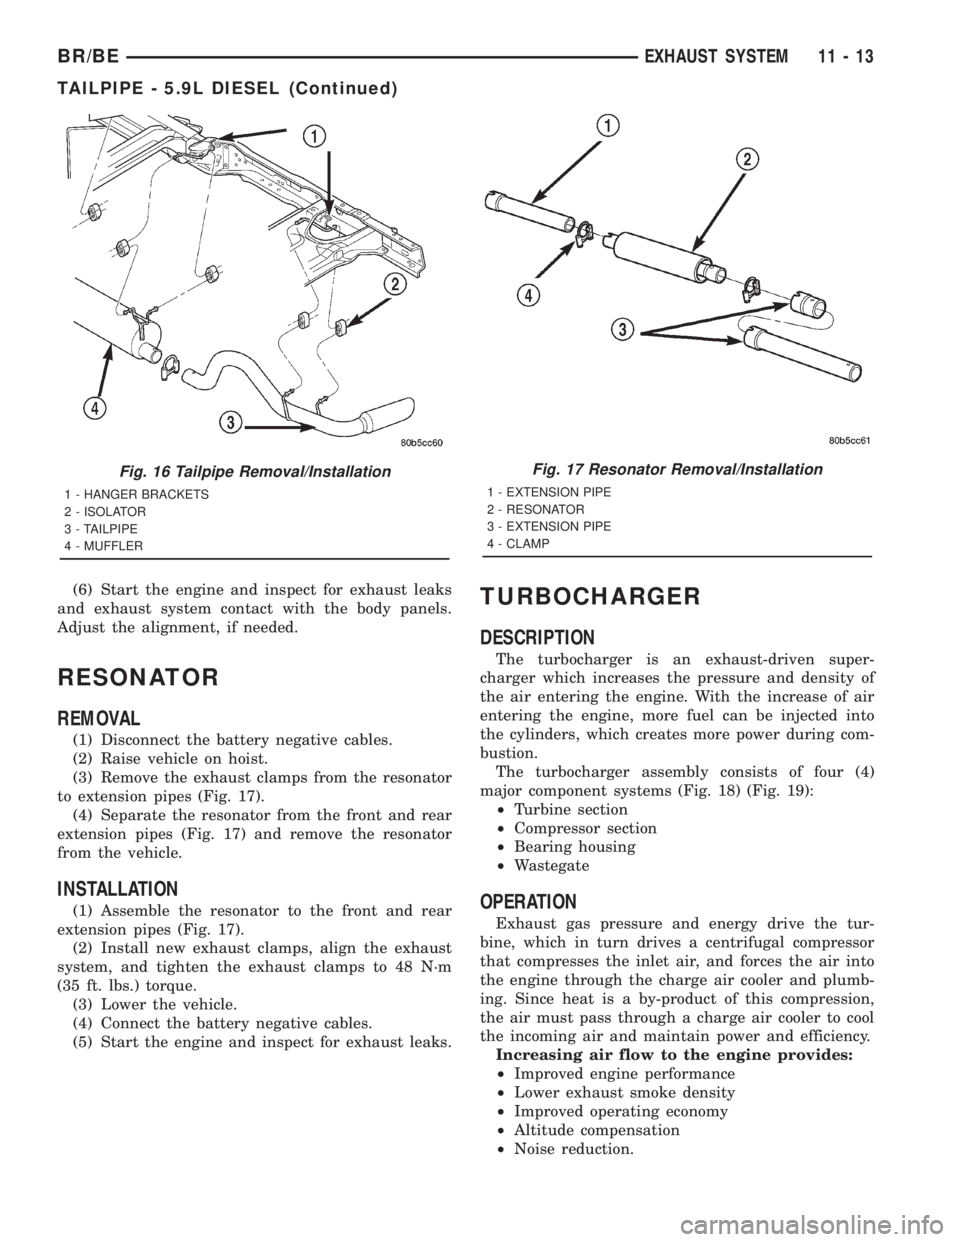
isolators (Fig. 16).
(5) Remove the muffler-to-tailpipe clamps (Fig. 16).
(6) Remove the tailpipe from the vehicle.
INSPECTION
Discard rusted clamps, broken or worn supports
and attaching parts. Replace a component with orig-
inal equipment parts, or equivalent. This will assure
proper alignment with other parts in the system and
provide acceptable exhaust noise levels.
INSTALLATION
(1) Install the tailpipe into the muffler.
(2) Install the tailpipe hanger rods into the isola-
tors (Fig. 16)
(3) Install the exhaust clamp, align the exhaust
system, and tighten the clamp 48 N´m (35 ft. lbs.)
torque.
(4) Lower the vehicle.
(5) Connect the battery negative cables.
Fig. 15 TAILPIPE 8.0L AND 5.9L HEAVY DUTY
1 - HANGER
2 - TAILPIPE
3 - CLAMP
4 - MUFFLER
5 - INSULATOR
11 - 12 EXHAUST SYSTEMBR/BE
TAILPIPE - 3.9L/5.2L/5.9L (Continued)
Page 1468 of 2889
(6) Start the engine and inspect for exhaust leaks
and exhaust system contact with the body panels.
Adjust the alignment, if needed.
RESONATOR
REMOVAL
(1) Disconnect the battery negative cables.
(2) Raise vehicle on hoist.
(3) Remove the exhaust clamps from the resonator
to extension pipes (Fig. 17).
(4) Separate the resonator from the front and rear
extension pipes (Fig. 17) and remove the resonator
from the vehicle.
INSTALLATION
(1) Assemble the resonator to the front and rear
extension pipes (Fig. 17).
(2) Install new exhaust clamps, align the exhaust
system, and tighten the exhaust clamps to 48 N´m
(35 ft. lbs.) torque.
(3) Lower the vehicle.
(4) Connect the battery negative cables.
(5) Start the engine and inspect for exhaust leaks.
TURBOCHARGER
DESCRIPTION
The turbocharger is an exhaust-driven super-
charger which increases the pressure and density of
the air entering the engine. With the increase of air
entering the engine, more fuel can be injected into
the cylinders, which creates more power during com-
bustion.
The turbocharger assembly consists of four (4)
major component systems (Fig. 18) (Fig. 19):
²Turbine section
²Compressor section
²Bearing housing
²Wastegate
OPERATION
Exhaust gas pressure and energy drive the tur-
bine, which in turn drives a centrifugal compressor
that compresses the inlet air, and forces the air into
the engine through the charge air cooler and plumb-
ing. Since heat is a by-product of this compression,
the air must pass through a charge air cooler to cool
the incoming air and maintain power and efficiency.
Increasing air flow to the engine provides:
²Improved engine performance
²Lower exhaust smoke density
²Improved operating economy
²Altitude compensation
²Noise reduction.
Fig. 16 Tailpipe Removal/Installation
1 - HANGER BRACKETS
2 - ISOLATOR
3 - TAILPIPE
4 - MUFFLER
Fig. 17 Resonator Removal/Installation
1 - EXTENSION PIPE
2 - RESONATOR
3 - EXTENSION PIPE
4 - CLAMP
BR/BEEXHAUST SYSTEM 11 - 13
TAILPIPE - 5.9L DIESEL (Continued)
Page 1471 of 2889
CAUTION: The turbocharger is only serviced as an
assembly. Do not attempt to repair the turbocharger
as turbocharger and/or engine damage can result.
CLEANING
Clean the turbocharger and exhaust manifold
mounting surfaces with a suitable scraper.
INSPECTION
Visually inspect the turbocharger and exhaust
manifold gasket surfaces. Replace stripped or eroded
mounting studs.
(1) Visually inspect the turbocharger for cracks.
The following cracks are NOT acceptable:
²Cracks in the turbine and compressor housing
that go completely through.
²Cracks in the mounting flange that are longer
than 15 mm (0.6 in.).
²Cracks in the mounting flange that intersect
bolt through-holes.
²Two (2) Cracks in the mounting flange that are
closer than 6.4 mm (0.25 in.) together.
(2) Visually inspect the impeller and compressor
wheel fins for nicks, cracks, or chips. Note: Some
impellers may have a factory placed paint mark
which, after normal operation, appears to be a crack.Remove this mark with a suitable solvent to verify
that it is not a crack.
(3) Visually inspect the turbocharger compressor
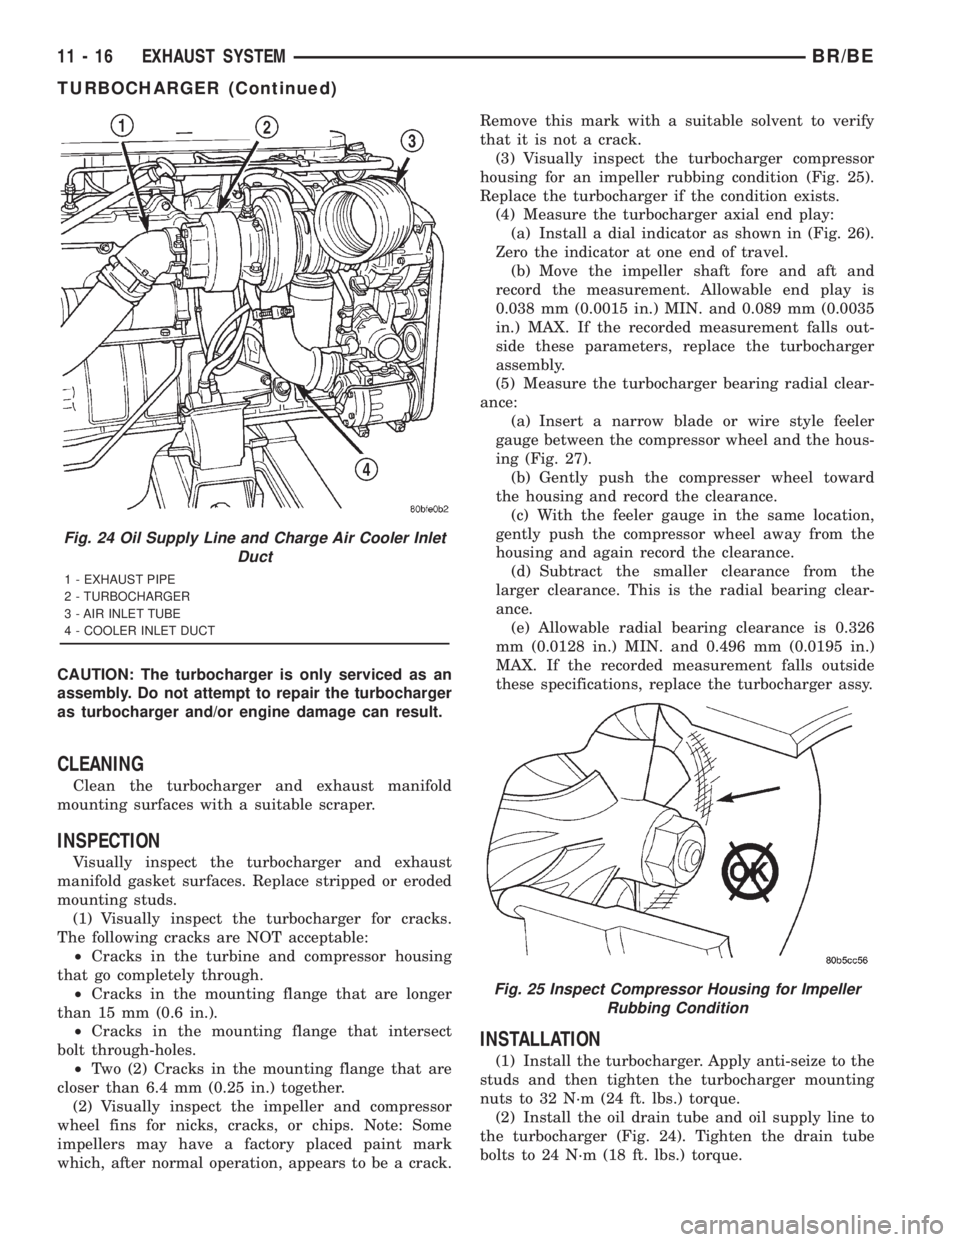
housing for an impeller rubbing condition (Fig. 25).
Replace the turbocharger if the condition exists.
(4) Measure the turbocharger axial end play:
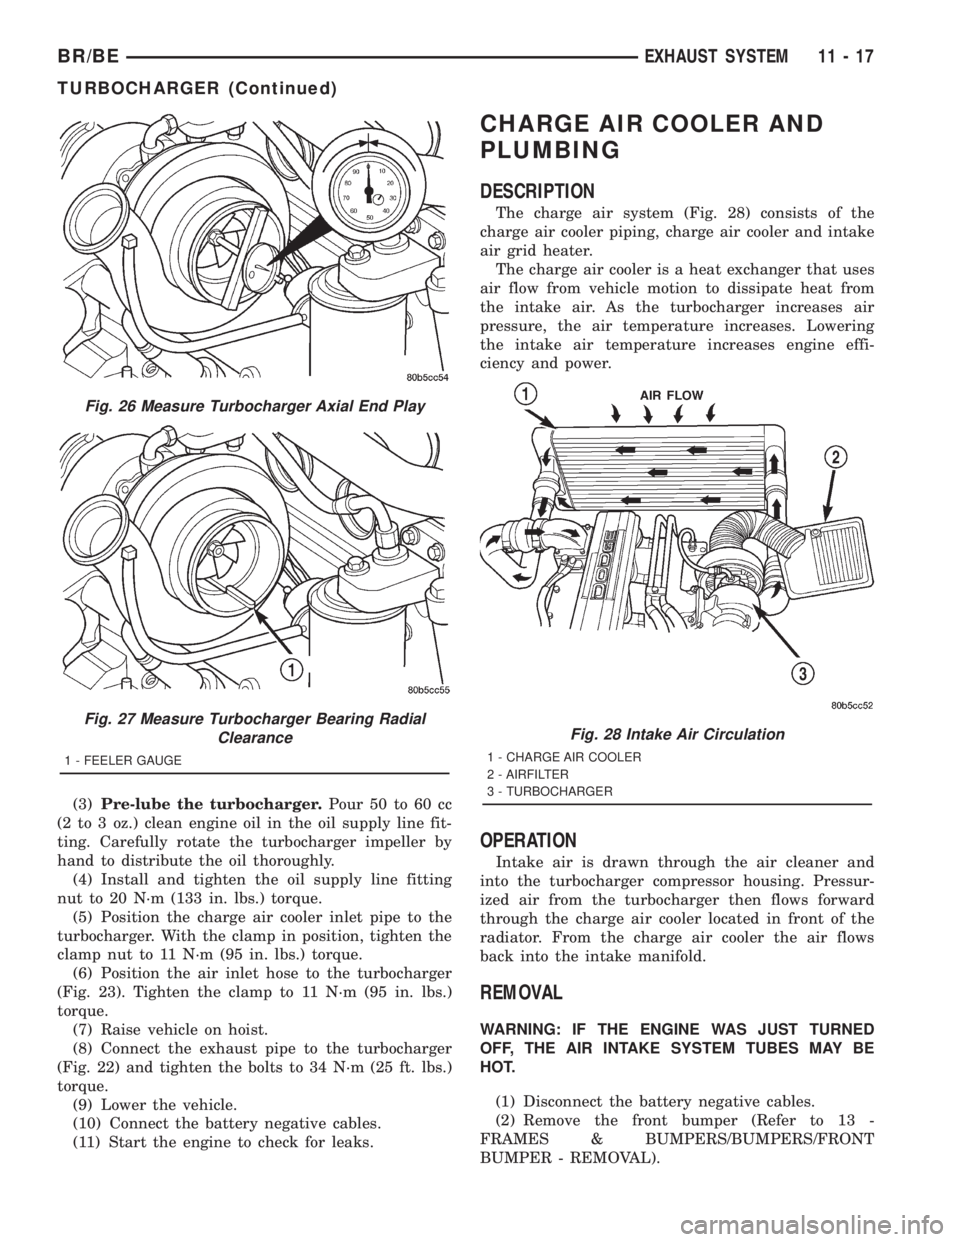
(a) Install a dial indicator as shown in (Fig. 26).
Zero the indicator at one end of travel.
(b) Move the impeller shaft fore and aft and
record the measurement. Allowable end play is
0.038 mm (0.0015 in.) MIN. and 0.089 mm (0.0035
in.) MAX. If the recorded measurement falls out-
side these parameters, replace the turbocharger
assembly.
(5) Measure the turbocharger bearing radial clear-
ance:
(a) Insert a narrow blade or wire style feeler
gauge between the compressor wheel and the hous-
ing (Fig. 27).
(b) Gently push the compresser wheel toward
the housing and record the clearance.
(c) With the feeler gauge in the same location,
gently push the compressor wheel away from the
housing and again record the clearance.
(d) Subtract the smaller clearance from the
larger clearance. This is the radial bearing clear-
ance.
(e) Allowable radial bearing clearance is 0.326
mm (0.0128 in.) MIN. and 0.496 mm (0.0195 in.)
MAX. If the recorded measurement falls outside
these specifications, replace the turbocharger assy.
INSTALLATION
(1) Install the turbocharger. Apply anti-seize to the
studs and then tighten the turbocharger mounting
nuts to 32 N´m (24 ft. lbs.) torque.
(2) Install the oil drain tube and oil supply line to
the turbocharger (Fig. 24). Tighten the drain tube
bolts to 24 N´m (18 ft. lbs.) torque.
Fig. 24 Oil Supply Line and Charge Air Cooler Inlet
Duct
1 - EXHAUST PIPE
2 - TURBOCHARGER
3 - AIR INLET TUBE
4 - COOLER INLET DUCT
Fig. 25 Inspect Compressor Housing for Impeller
Rubbing Condition
11 - 16 EXHAUST SYSTEMBR/BE
TURBOCHARGER (Continued)
Page 1472 of 2889
(3)Pre-lube the turbocharger.Pour 50 to 60 cc
(2 to 3 oz.) clean engine oil in the oil supply line fit-
ting. Carefully rotate the turbocharger impeller by
hand to distribute the oil thoroughly.
(4) Install and tighten the oil supply line fitting
nut to 20 N´m (133 in. lbs.) torque.
(5) Position the charge air cooler inlet pipe to the
turbocharger. With the clamp in position, tighten the
clamp nut to 11 N´m (95 in. lbs.) torque.
(6) Position the air inlet hose to the turbocharger
(Fig. 23). Tighten the clamp to 11 N´m (95 in. lbs.)
torque.
(7) Raise vehicle on hoist.
(8) Connect the exhaust pipe to the turbocharger
(Fig. 22) and tighten the bolts to 34 N´m (25 ft. lbs.)
torque.
(9) Lower the vehicle.
(10) Connect the battery negative cables.
(11) Start the engine to check for leaks.
CHARGE AIR COOLER AND
PLUMBING
DESCRIPTION
The charge air system (Fig. 28) consists of the
charge air cooler piping, charge air cooler and intake
air grid heater.
The charge air cooler is a heat exchanger that uses
air flow from vehicle motion to dissipate heat from
the intake air. As the turbocharger increases air
pressure, the air temperature increases. Lowering
the intake air temperature increases engine effi-
ciency and power.
OPERATION
Intake air is drawn through the air cleaner and
into the turbocharger compressor housing. Pressur-
ized air from the turbocharger then flows forward
through the charge air cooler located in front of the
radiator. From the charge air cooler the air flows
back into the intake manifold.
REMOVAL
WARNING: IF THE ENGINE WAS JUST TURNED
OFF, THE AIR INTAKE SYSTEM TUBES MAY BE
HOT.
(1) Disconnect the battery negative cables.
(2) Remove the front bumper (Refer to 13 -
FRAMES & BUMPERS/BUMPERS/FRONT
BUMPER - REMOVAL).
Fig. 26 Measure Turbocharger Axial End Play
Fig. 27 Measure Turbocharger Bearing Radial
Clearance
1 - FEELER GAUGE
Fig. 28 Intake Air Circulation
1 - CHARGE AIR COOLER
2 - AIRFILTER
3 - TURBOCHARGER
BR/BEEXHAUST SYSTEM 11 - 17
TURBOCHARGER (Continued)
Page 1473 of 2889
(3) Remove the front support bracket.
(4) Discharge the A/C system (Refer to 24 - HEAT-
ING & AIR CONDITIONING/PLUMBING - STAN-
DARD PROCEDURE) and remove the A/C condenser
(Refer to 24 - HEATING & AIR CONDITIONING/
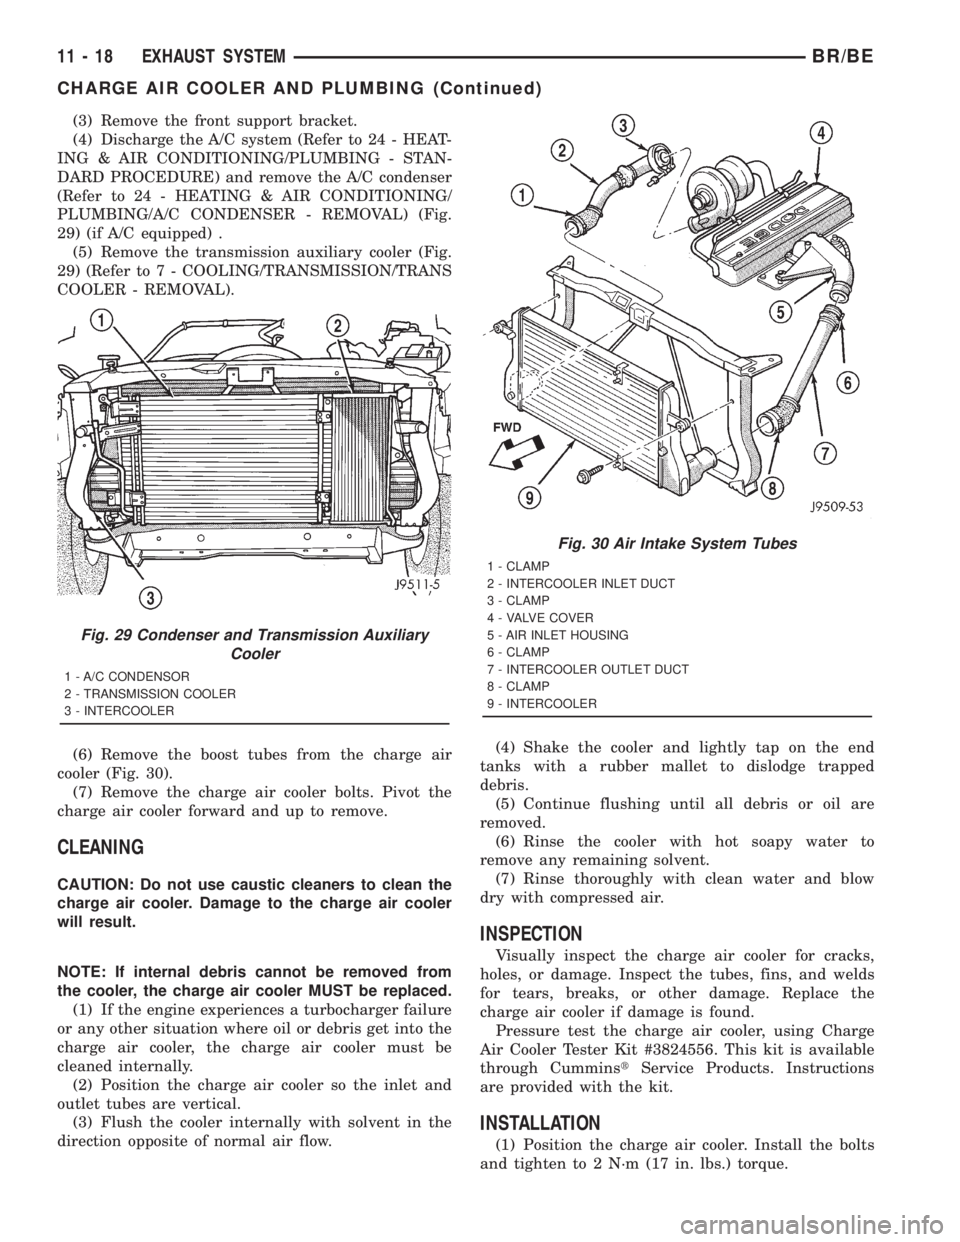
PLUMBING/A/C CONDENSER - REMOVAL) (Fig.
29) (if A/C equipped) .
(5) Remove the transmission auxiliary cooler (Fig.
29) (Refer to 7 - COOLING/TRANSMISSION/TRANS
COOLER - REMOVAL).
(6) Remove the boost tubes from the charge air
cooler (Fig. 30).
(7) Remove the charge air cooler bolts. Pivot the
charge air cooler forward and up to remove.
CLEANING
CAUTION: Do not use caustic cleaners to clean the
charge air cooler. Damage to the charge air cooler
will result.
NOTE: If internal debris cannot be removed from
the cooler, the charge air cooler MUST be replaced.
(1) If the engine experiences a turbocharger failure
or any other situation where oil or debris get into the
charge air cooler, the charge air cooler must be
cleaned internally.
(2) Position the charge air cooler so the inlet and
outlet tubes are vertical.
(3) Flush the cooler internally with solvent in the
direction opposite of normal air flow.(4) Shake the cooler and lightly tap on the end
tanks with a rubber mallet to dislodge trapped
debris.
(5) Continue flushing until all debris or oil are
removed.
(6) Rinse the cooler with hot soapy water to
remove any remaining solvent.
(7) Rinse thoroughly with clean water and blow
dry with compressed air.
INSPECTION
Visually inspect the charge air cooler for cracks,
holes, or damage. Inspect the tubes, fins, and welds
for tears, breaks, or other damage. Replace the
charge air cooler if damage is found.
Pressure test the charge air cooler, using Charge
Air Cooler Tester Kit #3824556. This kit is available
through CumminstService Products. Instructions
are provided with the kit.
INSTALLATION
(1) Position the charge air cooler. Install the bolts
and tighten to 2 N´m (17 in. lbs.) torque.
Fig. 29 Condenser and Transmission Auxiliary
Cooler
1 - A/C CONDENSOR
2 - TRANSMISSION COOLER
3 - INTERCOOLER
Fig. 30 Air Intake System Tubes
1 - CLAMP
2 - INTERCOOLER INLET DUCT
3 - CLAMP
4 - VALVE COVER
5 - AIR INLET HOUSING
6 - CLAMP
7 - INTERCOOLER OUTLET DUCT
8 - CLAMP
9 - INTERCOOLER
11 - 18 EXHAUST SYSTEMBR/BE
CHARGE AIR COOLER AND PLUMBING (Continued)
Page 1474 of 2889
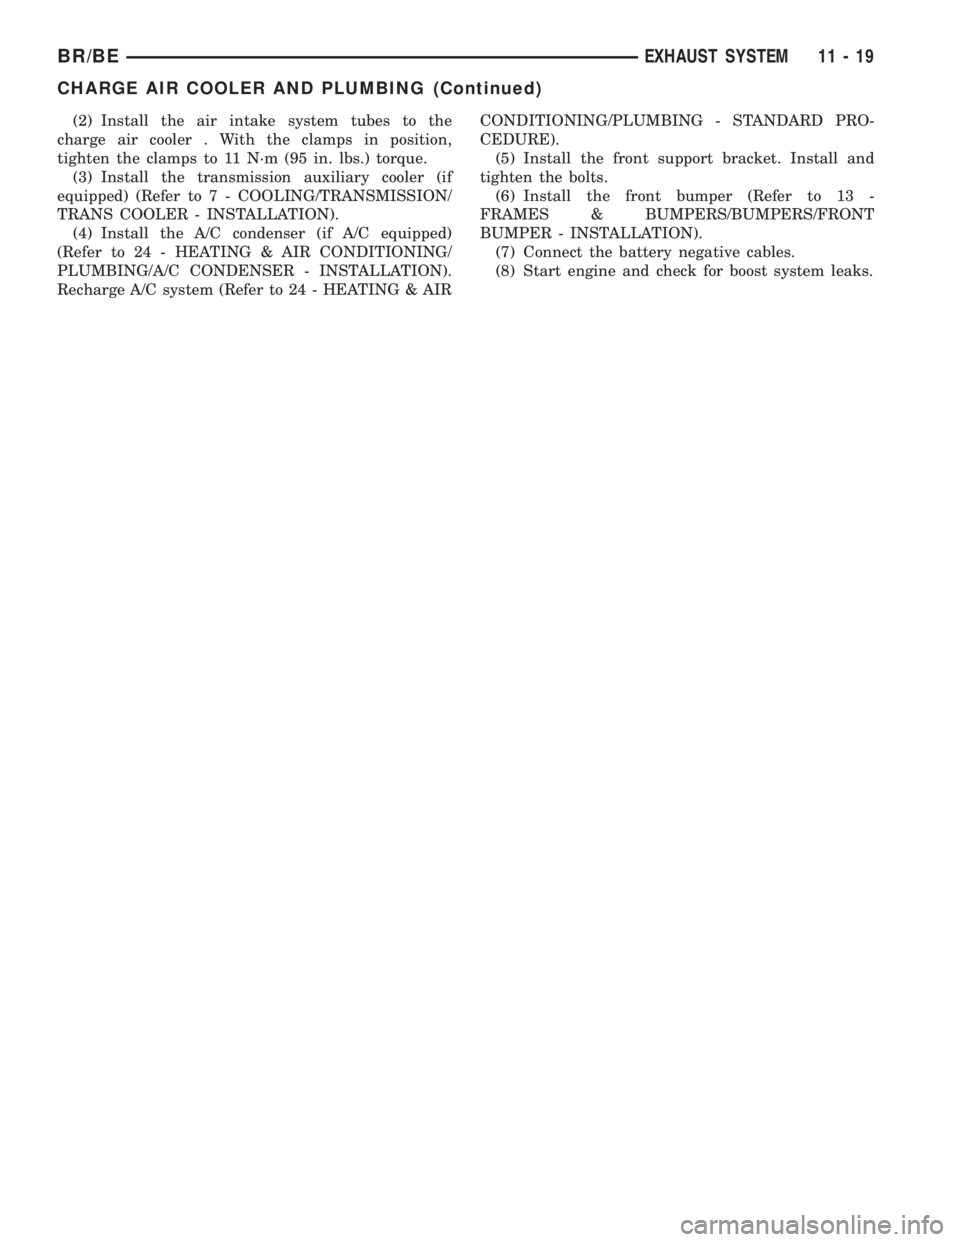
(2) Install the air intake system tubes to the
charge air cooler . With the clamps in position,
tighten the clamps to 11 N´m (95 in. lbs.) torque.
(3) Install the transmission auxiliary cooler (if
equipped) (Refer to 7 - COOLING/TRANSMISSION/
TRANS COOLER - INSTALLATION).
(4) Install the A/C condenser (if A/C equipped)
(Refer to 24 - HEATING & AIR CONDITIONING/
PLUMBING/A/C CONDENSER - INSTALLATION).
Recharge A/C system (Refer to 24 - HEATING & AIRCONDITIONING/PLUMBING - STANDARD PRO-
CEDURE).
(5) Install the front support bracket. Install and
tighten the bolts.
(6) Install the front bumper (Refer to 13 -
FRAMES & BUMPERS/BUMPERS/FRONT
BUMPER - INSTALLATION).
(7) Connect the battery negative cables.
(8) Start engine and check for boost system leaks.
BR/BEEXHAUST SYSTEM 11 - 19
CHARGE AIR COOLER AND PLUMBING (Continued)
Page 1479 of 2889
INSTALLATION
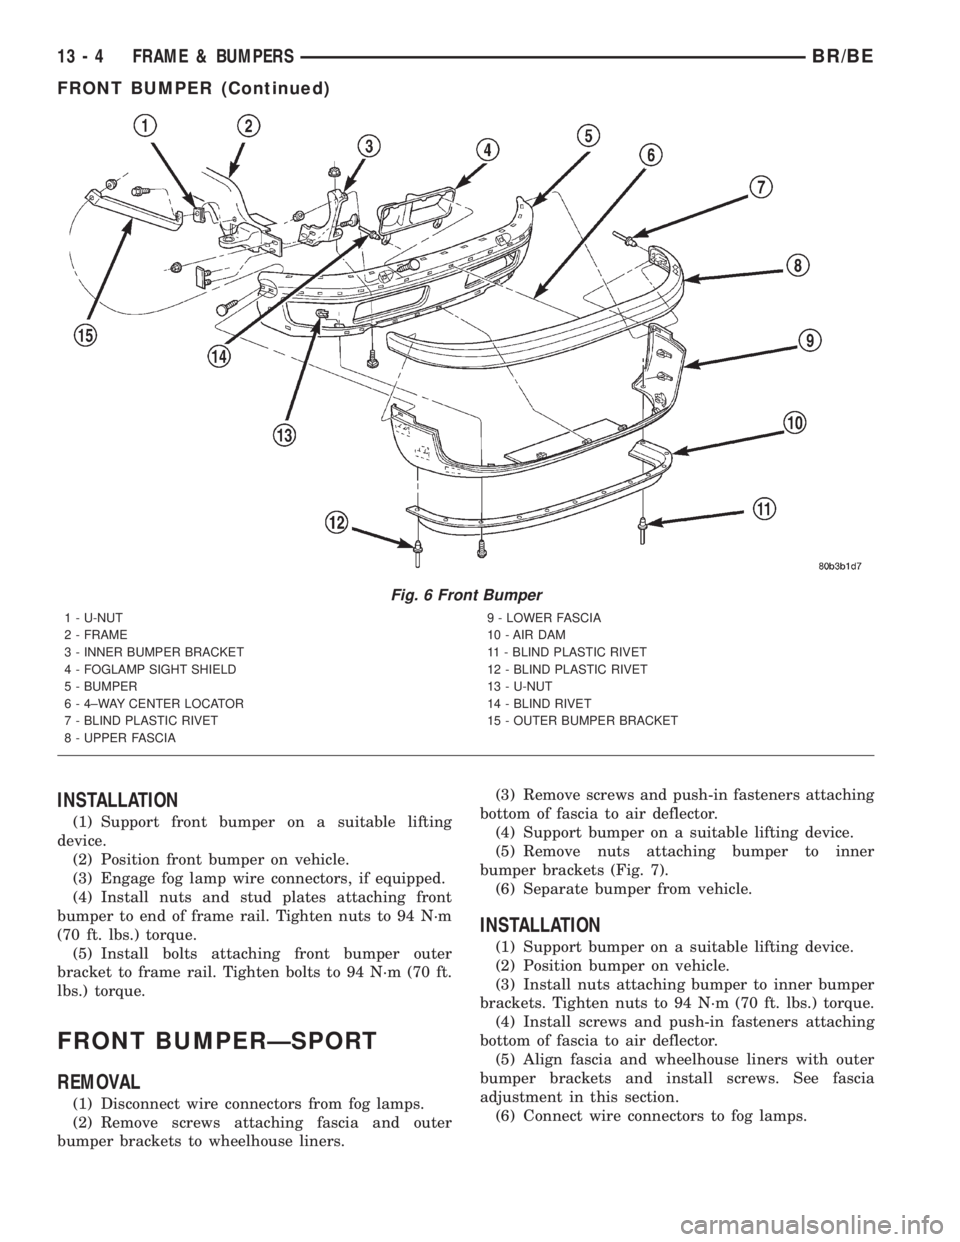
(1) Support front bumper on a suitable lifting
device.
(2) Position front bumper on vehicle.
(3) Engage fog lamp wire connectors, if equipped.
(4) Install nuts and stud plates attaching front
bumper to end of frame rail. Tighten nuts to 94 N´m
(70 ft. lbs.) torque.
(5) Install bolts attaching front bumper outer
bracket to frame rail. Tighten bolts to 94 N´m (70 ft.
lbs.) torque.
FRONT BUMPERÐSPORT
REMOVAL
(1) Disconnect wire connectors from fog lamps.
(2) Remove screws attaching fascia and outer
bumper brackets to wheelhouse liners.(3) Remove screws and push-in fasteners attaching
bottom of fascia to air deflector.
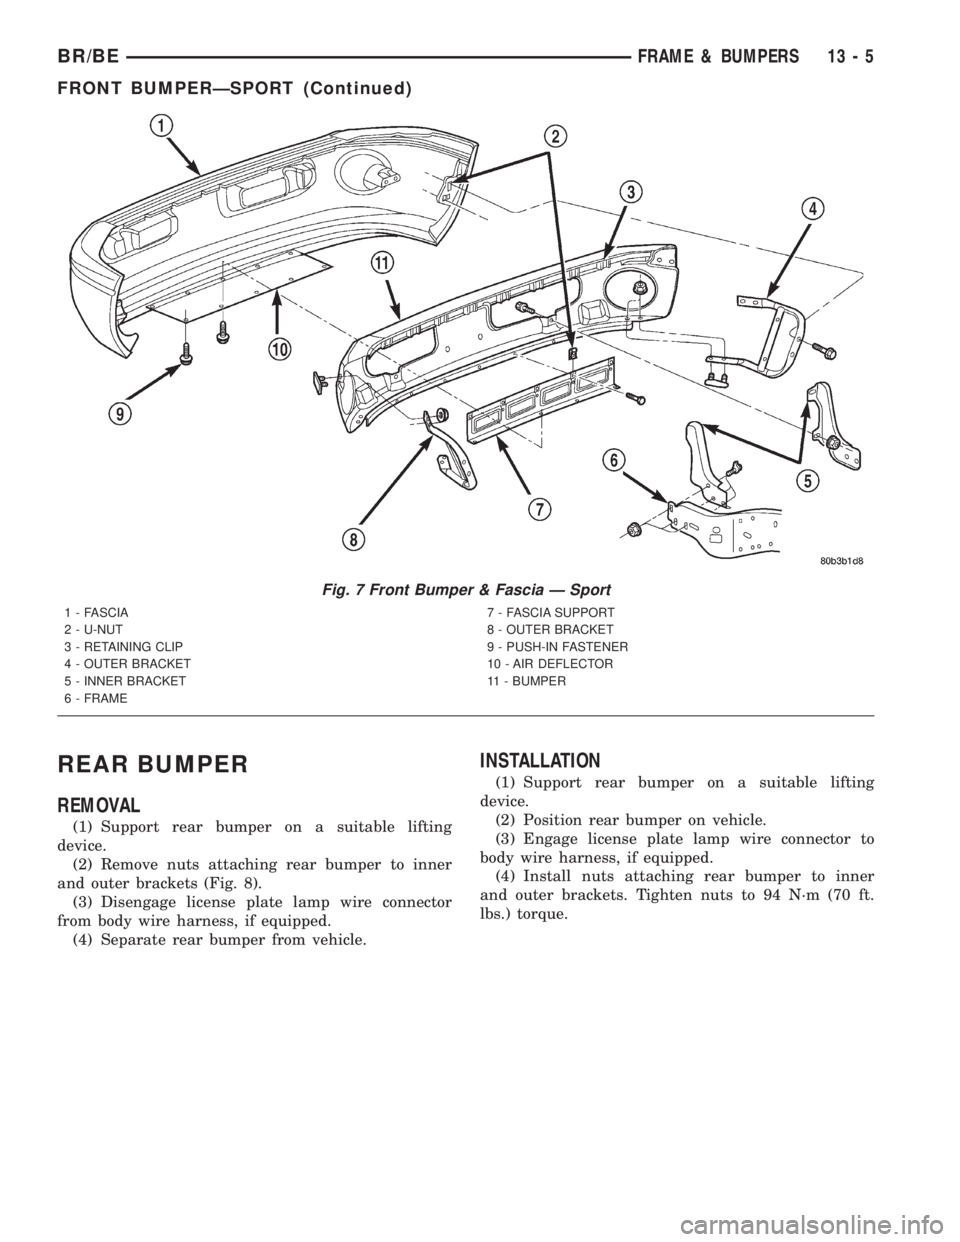
(4) Support bumper on a suitable lifting device.
(5) Remove nuts attaching bumper to inner
bumper brackets (Fig. 7).
(6) Separate bumper from vehicle.
INSTALLATION
(1) Support bumper on a suitable lifting device.
(2) Position bumper on vehicle.
(3) Install nuts attaching bumper to inner bumper
brackets. Tighten nuts to 94 N´m (70 ft. lbs.) torque.
(4) Install screws and push-in fasteners attaching
bottom of fascia to air deflector.
(5) Align fascia and wheelhouse liners with outer
bumper brackets and install screws. See fascia
adjustment in this section.
(6) Connect wire connectors to fog lamps.
Fig. 6 Front Bumper
1 - U-NUT
2 - FRAME
3 - INNER BUMPER BRACKET
4 - FOGLAMP SIGHT SHIELD
5 - BUMPER
6 - 4±WAY CENTER LOCATOR
7 - BLIND PLASTIC RIVET
8 - UPPER FASCIA9 - LOWER FASCIA
10 - AIR DAM
11 - BLIND PLASTIC RIVET
12 - BLIND PLASTIC RIVET
13 - U-NUT
14 - BLIND RIVET
15 - OUTER BUMPER BRACKET
13 - 4 FRAME & BUMPERSBR/BE
FRONT BUMPER (Continued)
Page 1480 of 2889
REAR BUMPER
REMOVAL
(1) Support rear bumper on a suitable lifting
device.
(2) Remove nuts attaching rear bumper to inner
and outer brackets (Fig. 8).
(3) Disengage license plate lamp wire connector
from body wire harness, if equipped.
(4) Separate rear bumper from vehicle.
INSTALLATION
(1) Support rear bumper on a suitable lifting
device.
(2) Position rear bumper on vehicle.
(3) Engage license plate lamp wire connector to
body wire harness, if equipped.
(4) Install nuts attaching rear bumper to inner
and outer brackets. Tighten nuts to 94 N´m (70 ft.
lbs.) torque.
Fig. 7 Front Bumper & Fascia Ð Sport
1 - FASCIA
2 - U-NUT
3 - RETAINING CLIP
4 - OUTER BRACKET
5 - INNER BRACKET
6 - FRAME7 - FASCIA SUPPORT
8 - OUTER BRACKET
9 - PUSH-IN FASTENER
10 - AIR DEFLECTOR
11 - BUMPER
BR/BEFRAME & BUMPERS 13 - 5
FRONT BUMPERÐSPORT (Continued)
Page 1482 of 2889
CAUTION: Do not reuse damaged fasteners, quality
of repair would be suspect. Do not drill holes in top
or bottom frame rail flanges, frame rail failure can
result. Do Not use softer than Grade 5 bolts to
replace production fasteners, loosening or failure
can result. When using heat to straighten frame
components do not exceed 566ÉC (1050ÉF), metal
fatigue can result. Welding the joints around riveted
cross members and frame side rails can weaken
frame.
FRAME STRAIGHTENING
When necessary, a conventional frame that is bent
or twisted can be straightened by application of heat.
The temperature must not exceed 566ÉC (1050ÉF).
The metal will have a dull red glow at the desired
temperature. Excessive heat will decrease the
strength of the metal and result in a weakened
frame.
Welding the joints around riveted cross members
and frame side rails is not recommended.
A straightening repair process should be limited to
frame members that are not severely damaged. The
replacement bolts, nuts and rivets that are used to
join the frame members should conform to the same
specifications as the original bolts, nuts and rivets.
FRAME REPAIRS
DRILLING HOLES
Do not drill holes in frame side rail top and bottom
flanges, metal fatigue can result causing frame fail-
ure. Holes drilled in the side of the frame rail must
be at least 38 mm (1.5 in.) from the top and bottom
flanges.
Additional drill holes should be located away from
existing holes.
WELDING
Use MIG, TIG or arc welding equipment to repair
welded frame components.
Frame components that have been damaged should
be inspected for cracks before returning the vehicle
to use. If cracks are found in accessible frame com-
ponents perform the following procedures.
(1) Drill a hole at each end of the crack with a 3
mm (O.125 in.) diameter drill bit.
(2) Using a suitable die grinder with 3 inch cut off
wheel, V-groove the crack to allow 100% weld pene-
tration.
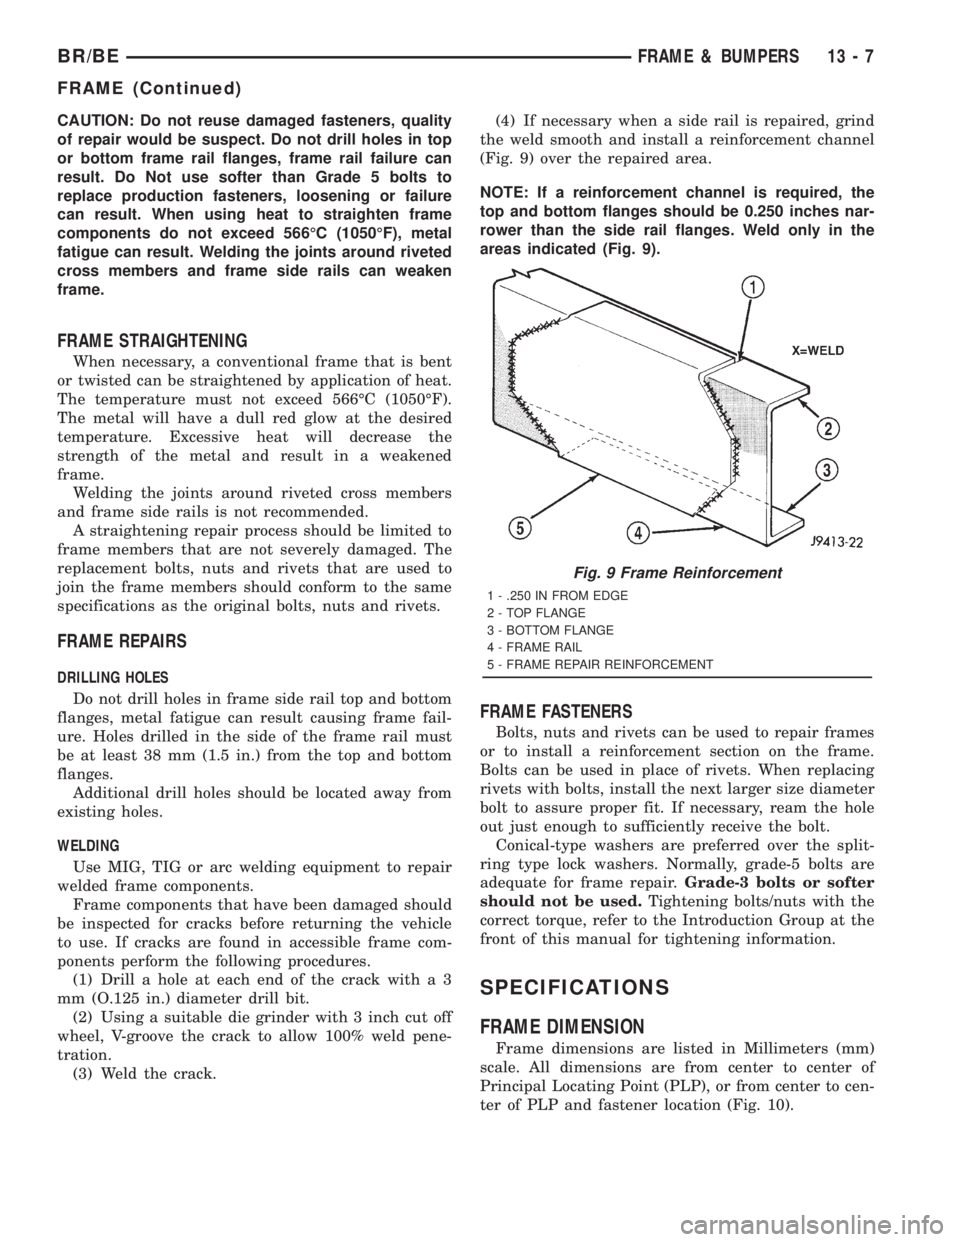
(3) Weld the crack.(4) If necessary when a side rail is repaired, grind
the weld smooth and install a reinforcement channel
(Fig. 9) over the repaired area.
NOTE: If a reinforcement channel is required, the
top and bottom flanges should be 0.250 inches nar-
rower than the side rail flanges. Weld only in the
areas indicated (Fig. 9).
FRAME FASTENERS
Bolts, nuts and rivets can be used to repair frames
or to install a reinforcement section on the frame.
Bolts can be used in place of rivets. When replacing
rivets with bolts, install the next larger size diameter
bolt to assure proper fit. If necessary, ream the hole
out just enough to sufficiently receive the bolt.
Conical-type washers are preferred over the split-
ring type lock washers. Normally, grade-5 bolts are
adequate for frame repair.Grade-3 bolts or softer
should not be used.Tightening bolts/nuts with the
correct torque, refer to the Introduction Group at the
front of this manual for tightening information.
SPECIFICATIONS
FRAME DIMENSION
Frame dimensions are listed in Millimeters (mm)
scale. All dimensions are from center to center of
Principal Locating Point (PLP), or from center to cen-
ter of PLP and fastener location (Fig. 10).
Fig. 9 Frame Reinforcement
1 - .250 IN FROM EDGE
2 - TOP FLANGE
3 - BOTTOM FLANGE
4 - FRAME RAIL
5 - FRAME REPAIR REINFORCEMENT
BR/BEFRAME & BUMPERS 13 - 7
FRAME (Continued)
Page 1484 of 2889
DIMENSIONS FOR DIFFERING WHEELBASES*
WHEELBASE LENGTH
ALENGTH
BLENGTH
C
118 2118.0 3663.6 4185.4
134 2118.0 3994.5 4693.4
138 2626.0 4096.1 4693.4
154 2626.0 4502.5 5201.4
162 2118.0 4705.0 5042.5
*Measurements are in Millimeters (mm).
TORQUE SPECIFICATIONS
DESCRIPTION TORQUE
Cab Chassis adapter nut..... 108N´m(80ft.lbs.)
Front bumper brkt-to-frame nut . 68 N´m (50 ft. lbs.)
Front bumper outer brace bolt . . 68 N´m (50 ft. lbs.)
Rear bumper-to-brace nut..... 40N´m(30ft.lbs.)
Rear bumper brace-to-brkt nut . 101 N´m (75 ft. lbs.)
Rear bumper brkt-to-frame nut......... 101N´m
(75 ft. lbs.)
Skid plate crossmember-to-frame bolt..... 54N´m
(40 ft. lbs.)
Skid plate-to-crossmember bolt . 40 N´m (30 ft. lbs.)
Skid plate-to-trans crossmember bolt...... 54N´m
(40 ft. lbs.)
Spare tire winch bolt......... 27N´m(20ft.lbs.)
Trailer hitch nut............ 108N´m(80ft.lbs.)
CAB CHASSIS ADAPTER
BRACKET
REMOVAL
(1) Remove bolts attaching cab chassis adapter
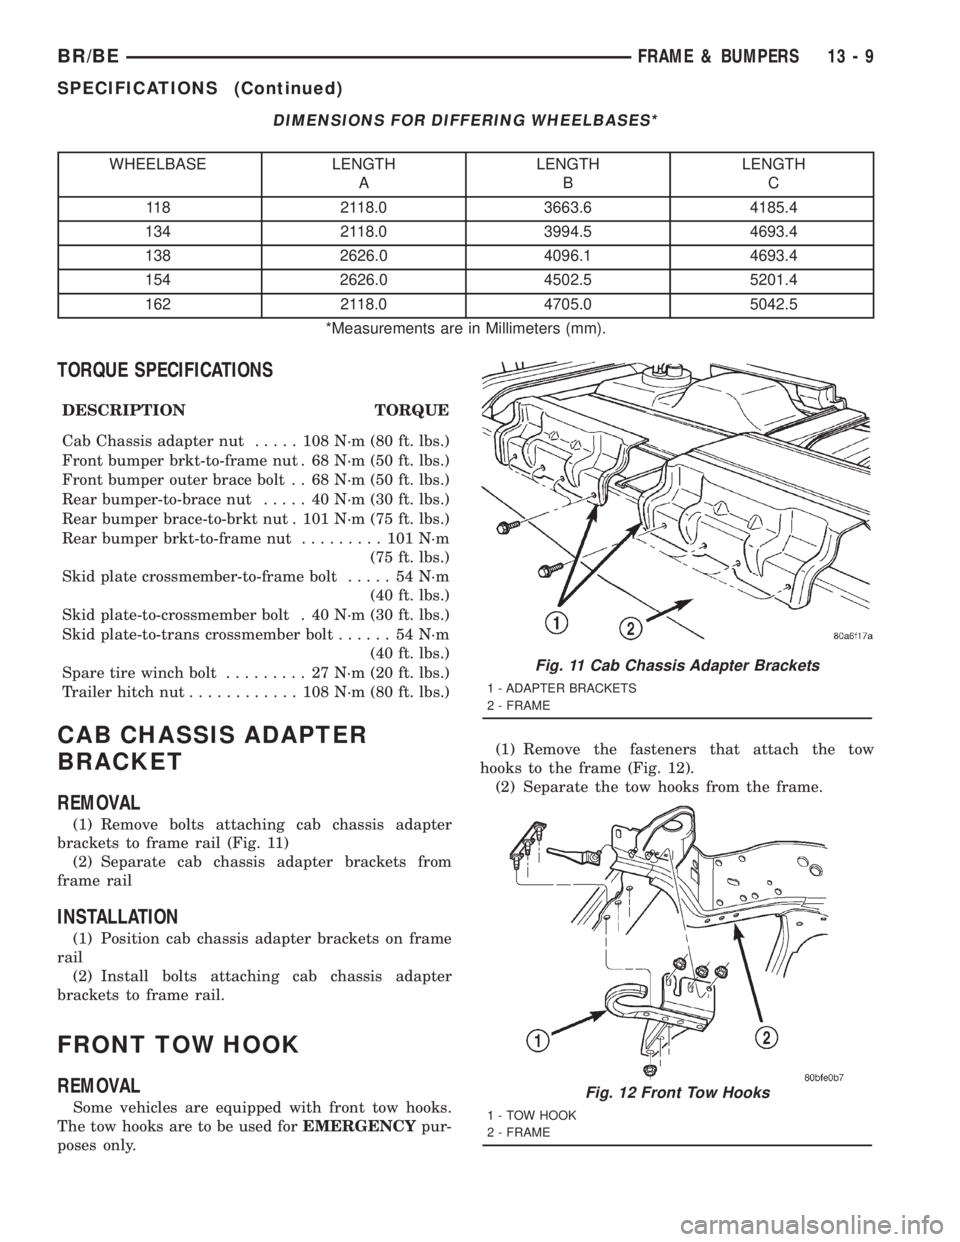
brackets to frame rail (Fig. 11)
(2) Separate cab chassis adapter brackets from
frame rail
INSTALLATION
(1) Position cab chassis adapter brackets on frame
rail
(2) Install bolts attaching cab chassis adapter
brackets to frame rail.
FRONT TOW HOOK
REMOVAL
Some vehicles are equipped with front tow hooks.
The tow hooks are to be used forEMERGENCYpur-
poses only.(1) Remove the fasteners that attach the tow
hooks to the frame (Fig. 12).
(2) Separate the tow hooks from the frame.
Fig. 11 Cab Chassis Adapter Brackets
1 - ADAPTER BRACKETS
2 - FRAME
Fig. 12 Front Tow Hooks
1 - TOW HOOK
2 - FRAME
BR/BEFRAME & BUMPERS 13 - 9
SPECIFICATIONS (Continued)