DODGE RAM 2002 Service Repair Manual
Manufacturer: DODGE, Model Year: 2002, Model line: RAM, Model: DODGE RAM 2002Pages: 2255, PDF Size: 62.07 MB
Page 1281 of 2255
(4) Connect the DRBIIItto the pressure trans-
ducer following the instructions supplied with the
DRB IIIt.
(5) Enter DRBIIItinto pressure reading mode and
test drive vehicle.
(6) The turbocharger boost pressure must be
between 110 - 138 kpa (16 - 20 psi.). If pressure read-
ings are lower than 110 kpa (16 psi.) inspect for the
following:
²Restricted air inlet system
²Leak in the charge air cooler system (Refer to 11
- EXHAUST SYSTEM/TURBOCHARGER SYSTEM/
CHARGE AIR COOLER AND PLUMBING - DIAG-
NOSIS AND TESTING)
²Turbocharger wastegate broken or misadjusted
²Turbocharger damaged (Refer to 11 - EXHAUST
SYSTEM/TURBOCHARGER SYSTEM/TURBO-
CHARGER - INSPECTION)
TURBOCHARGER
DESCRIPTION
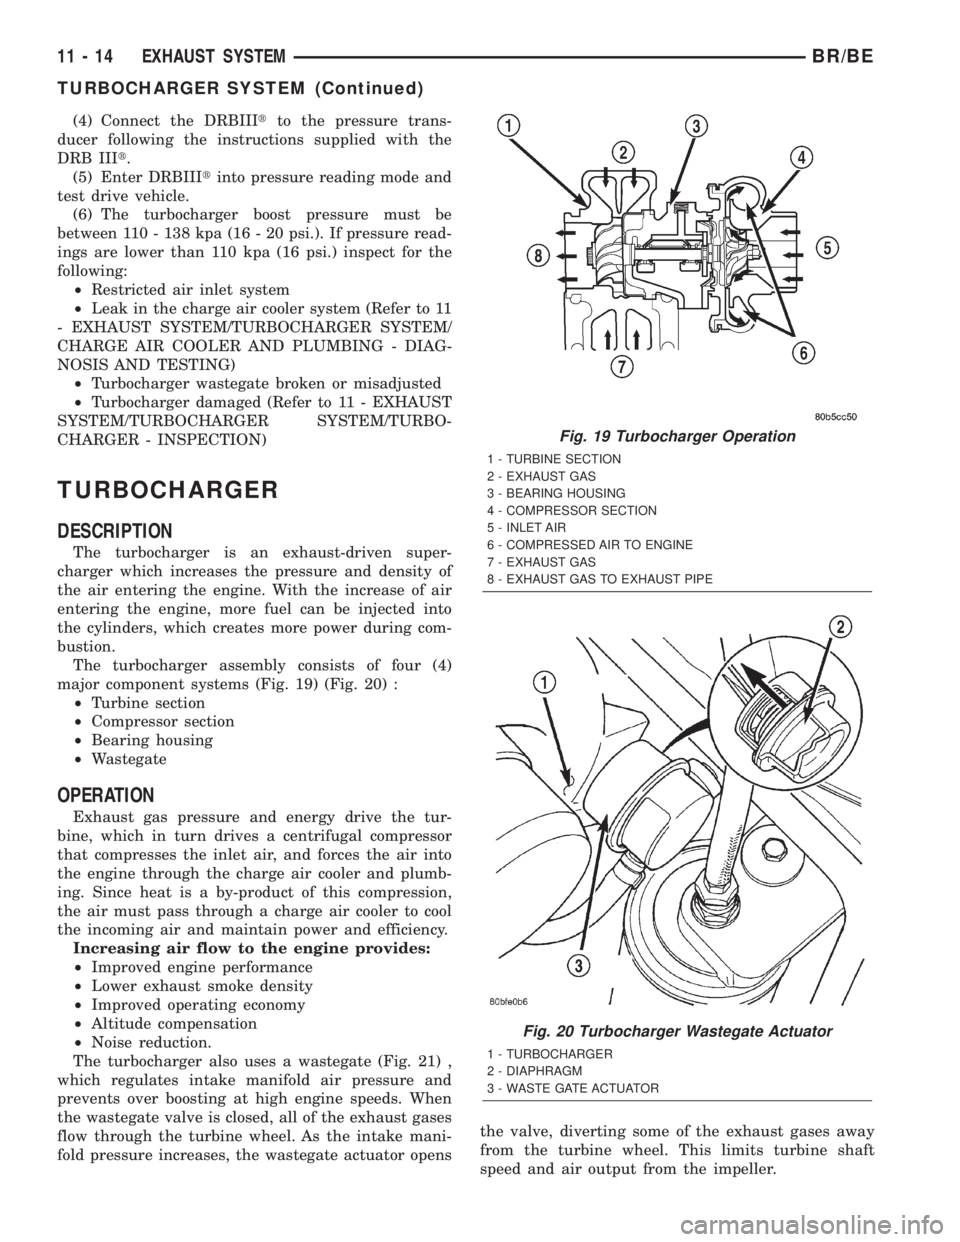
The turbocharger is an exhaust-driven super-
charger which increases the pressure and density of
the air entering the engine. With the increase of air
entering the engine, more fuel can be injected into
the cylinders, which creates more power during com-
bustion.
The turbocharger assembly consists of four (4)
major component systems (Fig. 19) (Fig. 20) :
²Turbine section
²Compressor section
²Bearing housing
²Wastegate
OPERATION
Exhaust gas pressure and energy drive the tur-
bine, which in turn drives a centrifugal compressor
that compresses the inlet air, and forces the air into
the engine through the charge air cooler and plumb-
ing. Since heat is a by-product of this compression,
the air must pass through a charge air cooler to cool
the incoming air and maintain power and efficiency.
Increasing air flow to the engine provides:
²Improved engine performance
²Lower exhaust smoke density
²Improved operating economy
²Altitude compensation
²Noise reduction.
The turbocharger also uses a wastegate (Fig. 21) ,
which regulates intake manifold air pressure and
prevents over boosting at high engine speeds. When
the wastegate valve is closed, all of the exhaust gases
flow through the turbine wheel. As the intake mani-
fold pressure increases, the wastegate actuator opensthe valve, diverting some of the exhaust gases away
from the turbine wheel. This limits turbine shaft
speed and air output from the impeller.
Fig. 19 Turbocharger Operation
1 - TURBINE SECTION
2 - EXHAUST GAS
3 - BEARING HOUSING
4 - COMPRESSOR SECTION
5 - INLET AIR
6 - COMPRESSED AIR TO ENGINE
7 - EXHAUST GAS
8 - EXHAUST GAS TO EXHAUST PIPE
Fig. 20 Turbocharger Wastegate Actuator
1 - TURBOCHARGER
2 - DIAPHRAGM
3 - WASTE GATE ACTUATOR
11 - 14 EXHAUST SYSTEMBR/BE
TURBOCHARGER SYSTEM (Continued)
Page 1282 of 2255
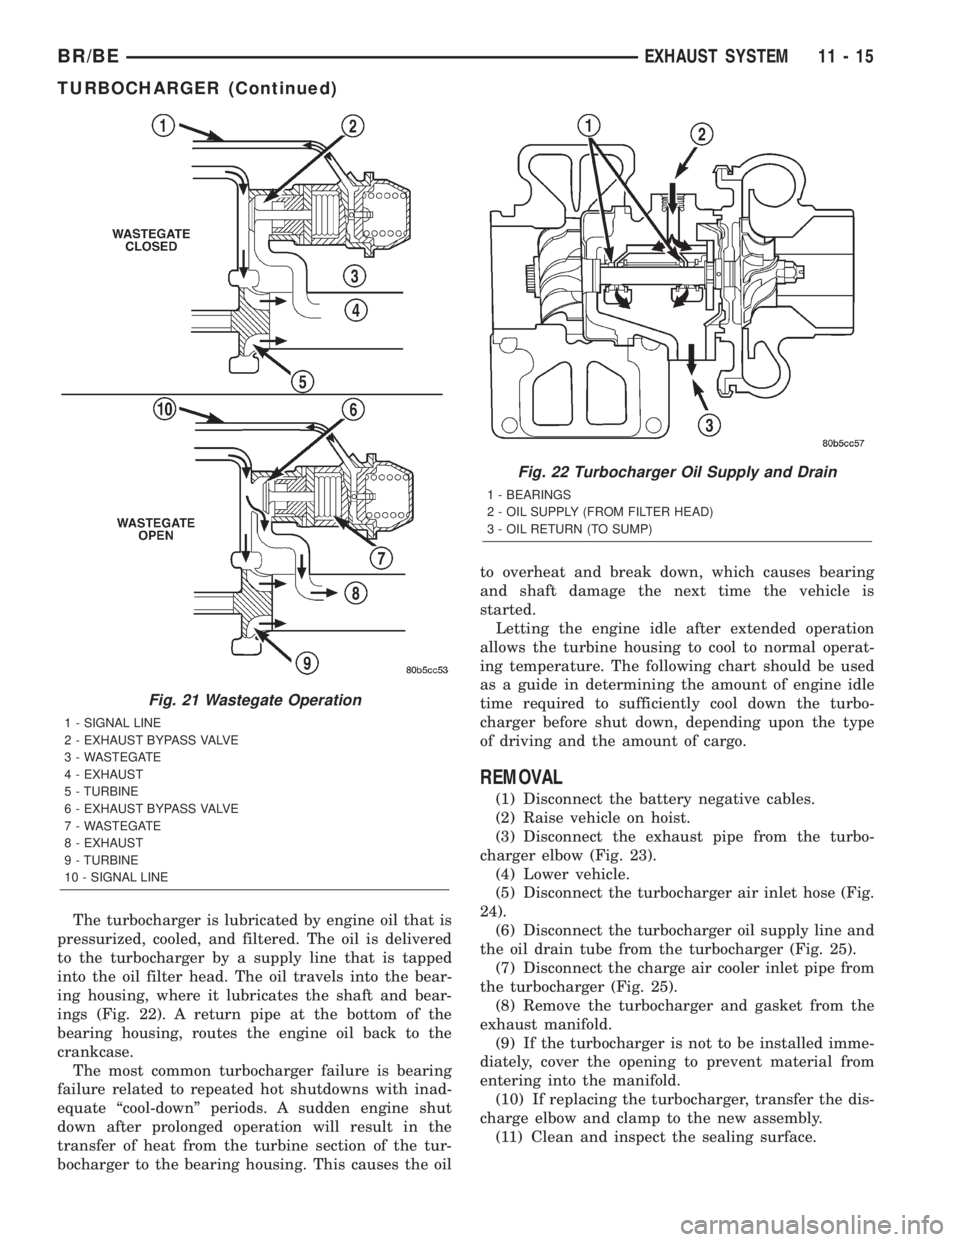
The turbocharger is lubricated by engine oil that is
pressurized, cooled, and filtered. The oil is delivered
to the turbocharger by a supply line that is tapped
into the oil filter head. The oil travels into the bear-
ing housing, where it lubricates the shaft and bear-
ings (Fig. 22). A return pipe at the bottom of the
bearing housing, routes the engine oil back to the
crankcase.
The most common turbocharger failure is bearing
failure related to repeated hot shutdowns with inad-
equate ªcool-downº periods. A sudden engine shut
down after prolonged operation will result in the
transfer of heat from the turbine section of the tur-
bocharger to the bearing housing. This causes the oilto overheat and break down, which causes bearing
and shaft damage the next time the vehicle is
started.
Letting the engine idle after extended operation
allows the turbine housing to cool to normal operat-
ing temperature. The following chart should be used
as a guide in determining the amount of engine idle
time required to sufficiently cool down the turbo-
charger before shut down, depending upon the type
of driving and the amount of cargo.
REMOVAL
(1) Disconnect the battery negative cables.
(2) Raise vehicle on hoist.
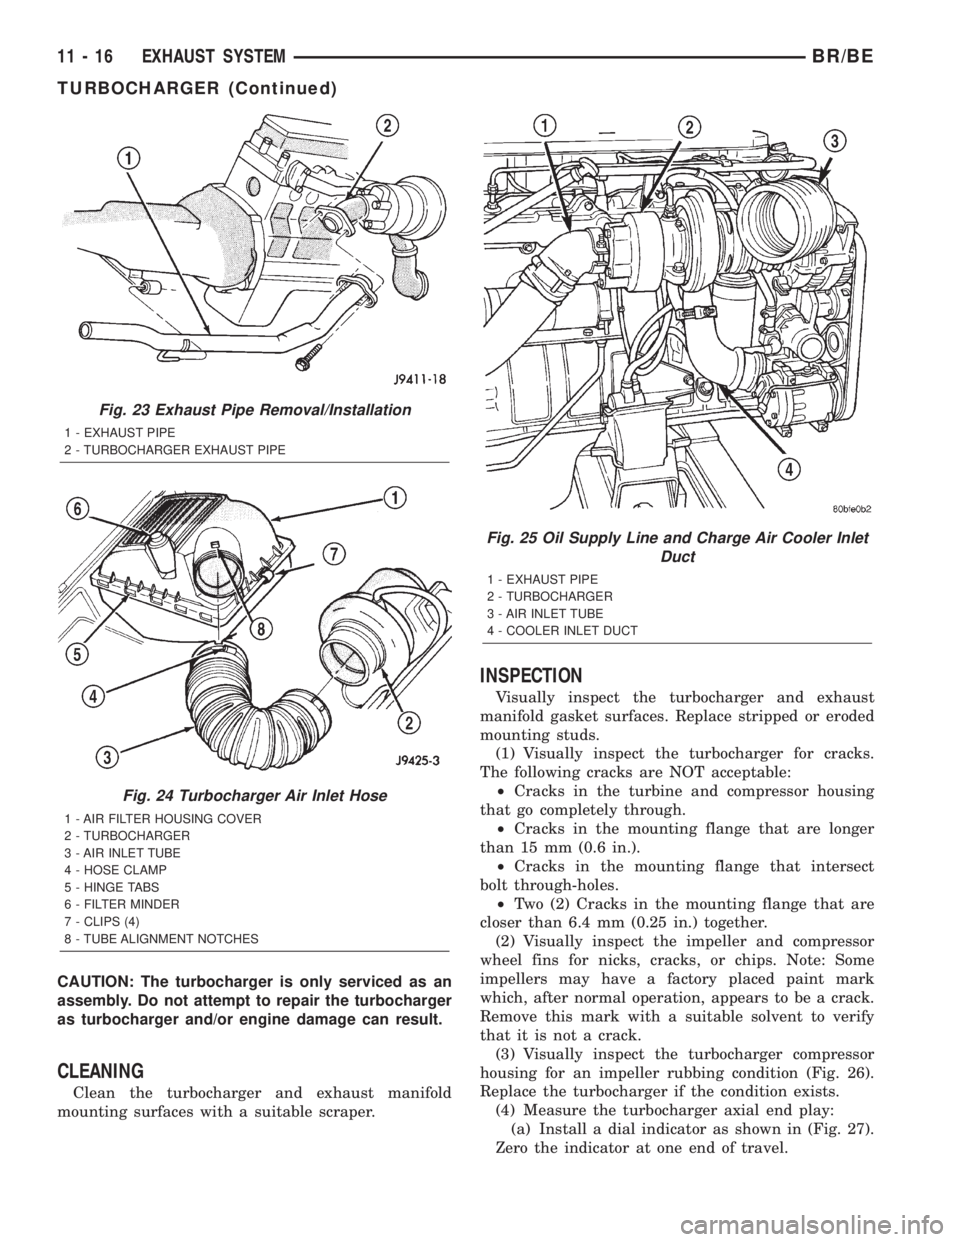
(3) Disconnect the exhaust pipe from the turbo-
charger elbow (Fig. 23).
(4) Lower vehicle.
(5) Disconnect the turbocharger air inlet hose (Fig.
24).
(6) Disconnect the turbocharger oil supply line and
the oil drain tube from the turbocharger (Fig. 25).
(7) Disconnect the charge air cooler inlet pipe from
the turbocharger (Fig. 25).
(8) Remove the turbocharger and gasket from the
exhaust manifold.
(9) If the turbocharger is not to be installed imme-
diately, cover the opening to prevent material from
entering into the manifold.
(10) If replacing the turbocharger, transfer the dis-
charge elbow and clamp to the new assembly.
(11) Clean and inspect the sealing surface.
Fig. 21 Wastegate Operation
1 - SIGNAL LINE
2 - EXHAUST BYPASS VALVE
3 - WASTEGATE
4 - EXHAUST
5 - TURBINE
6 - EXHAUST BYPASS VALVE
7 - WASTEGATE
8 - EXHAUST
9 - TURBINE
10 - SIGNAL LINE
Fig. 22 Turbocharger Oil Supply and Drain
1 - BEARINGS
2 - OIL SUPPLY (FROM FILTER HEAD)
3 - OIL RETURN (TO SUMP)
BR/BEEXHAUST SYSTEM 11 - 15
TURBOCHARGER (Continued)
Page 1283 of 2255
CAUTION: The turbocharger is only serviced as an
assembly. Do not attempt to repair the turbocharger
as turbocharger and/or engine damage can result.
CLEANING
Clean the turbocharger and exhaust manifold
mounting surfaces with a suitable scraper.
INSPECTION
Visually inspect the turbocharger and exhaust
manifold gasket surfaces. Replace stripped or eroded
mounting studs.
(1) Visually inspect the turbocharger for cracks.
The following cracks are NOT acceptable:
²Cracks in the turbine and compressor housing
that go completely through.
²Cracks in the mounting flange that are longer
than 15 mm (0.6 in.).
²Cracks in the mounting flange that intersect
bolt through-holes.
²Two (2) Cracks in the mounting flange that are
closer than 6.4 mm (0.25 in.) together.
(2) Visually inspect the impeller and compressor
wheel fins for nicks, cracks, or chips. Note: Some
impellers may have a factory placed paint mark
which, after normal operation, appears to be a crack.
Remove this mark with a suitable solvent to verify
that it is not a crack.
(3) Visually inspect the turbocharger compressor
housing for an impeller rubbing condition (Fig. 26).
Replace the turbocharger if the condition exists.
(4) Measure the turbocharger axial end play:
(a) Install a dial indicator as shown in (Fig. 27).
Zero the indicator at one end of travel.
Fig. 23 Exhaust Pipe Removal/Installation
1 - EXHAUST PIPE
2 - TURBOCHARGER EXHAUST PIPE
Fig. 24 Turbocharger Air Inlet Hose
1 - AIR FILTER HOUSING COVER
2 - TURBOCHARGER
3 - AIR INLET TUBE
4 - HOSE CLAMP
5 - HINGE TABS
6 - FILTER MINDER
7 - CLIPS (4)
8 - TUBE ALIGNMENT NOTCHES
Fig. 25 Oil Supply Line and Charge Air Cooler Inlet
Duct
1 - EXHAUST PIPE
2 - TURBOCHARGER
3 - AIR INLET TUBE
4 - COOLER INLET DUCT
11 - 16 EXHAUST SYSTEMBR/BE
TURBOCHARGER (Continued)
Page 1284 of 2255
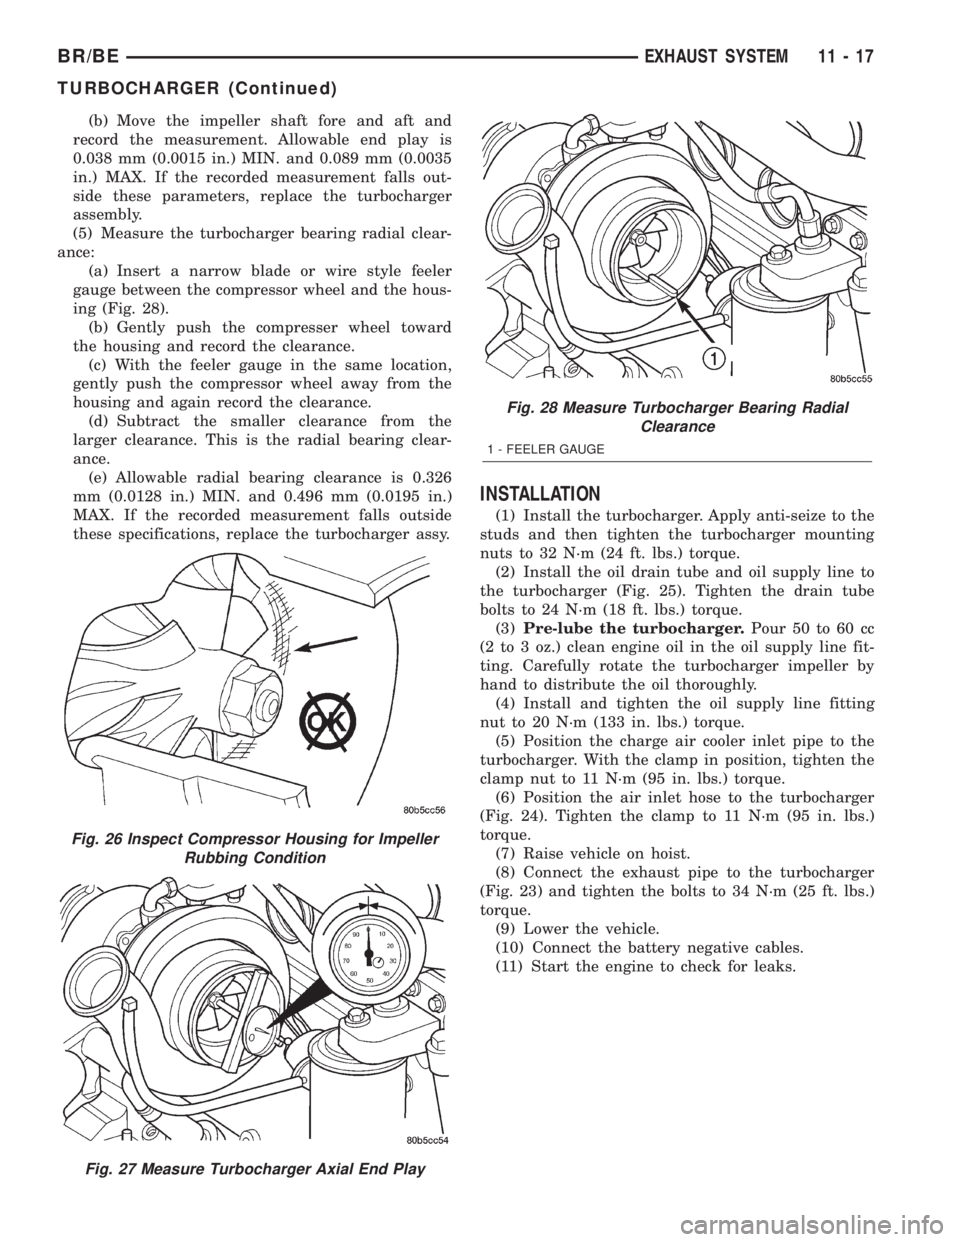
(b) Move the impeller shaft fore and aft and
record the measurement. Allowable end play is
0.038 mm (0.0015 in.) MIN. and 0.089 mm (0.0035
in.) MAX. If the recorded measurement falls out-
side these parameters, replace the turbocharger
assembly.
(5) Measure the turbocharger bearing radial clear-
ance:
(a) Insert a narrow blade or wire style feeler
gauge between the compressor wheel and the hous-
ing (Fig. 28).
(b) Gently push the compresser wheel toward
the housing and record the clearance.
(c) With the feeler gauge in the same location,
gently push the compressor wheel away from the
housing and again record the clearance.
(d) Subtract the smaller clearance from the
larger clearance. This is the radial bearing clear-
ance.
(e) Allowable radial bearing clearance is 0.326
mm (0.0128 in.) MIN. and 0.496 mm (0.0195 in.)
MAX. If the recorded measurement falls outside
these specifications, replace the turbocharger assy.
INSTALLATION
(1) Install the turbocharger. Apply anti-seize to the
studs and then tighten the turbocharger mounting
nuts to 32 N´m (24 ft. lbs.) torque.
(2) Install the oil drain tube and oil supply line to
the turbocharger (Fig. 25). Tighten the drain tube
bolts to 24 N´m (18 ft. lbs.) torque.
(3)Pre-lube the turbocharger.Pour 50 to 60 cc
(2 to 3 oz.) clean engine oil in the oil supply line fit-
ting. Carefully rotate the turbocharger impeller by
hand to distribute the oil thoroughly.
(4) Install and tighten the oil supply line fitting
nut to 20 N´m (133 in. lbs.) torque.
(5) Position the charge air cooler inlet pipe to the
turbocharger. With the clamp in position, tighten the
clamp nut to 11 N´m (95 in. lbs.) torque.
(6) Position the air inlet hose to the turbocharger
(Fig. 24). Tighten the clamp to 11 N´m (95 in. lbs.)
torque.
(7) Raise vehicle on hoist.
(8) Connect the exhaust pipe to the turbocharger
(Fig. 23) and tighten the bolts to 34 N´m (25 ft. lbs.)
torque.
(9) Lower the vehicle.
(10) Connect the battery negative cables.
(11) Start the engine to check for leaks.
Fig. 26 Inspect Compressor Housing for Impeller
Rubbing Condition
Fig. 27 Measure Turbocharger Axial End Play
Fig. 28 Measure Turbocharger Bearing Radial
Clearance
1 - FEELER GAUGE
BR/BEEXHAUST SYSTEM 11 - 17
TURBOCHARGER (Continued)
Page 1285 of 2255
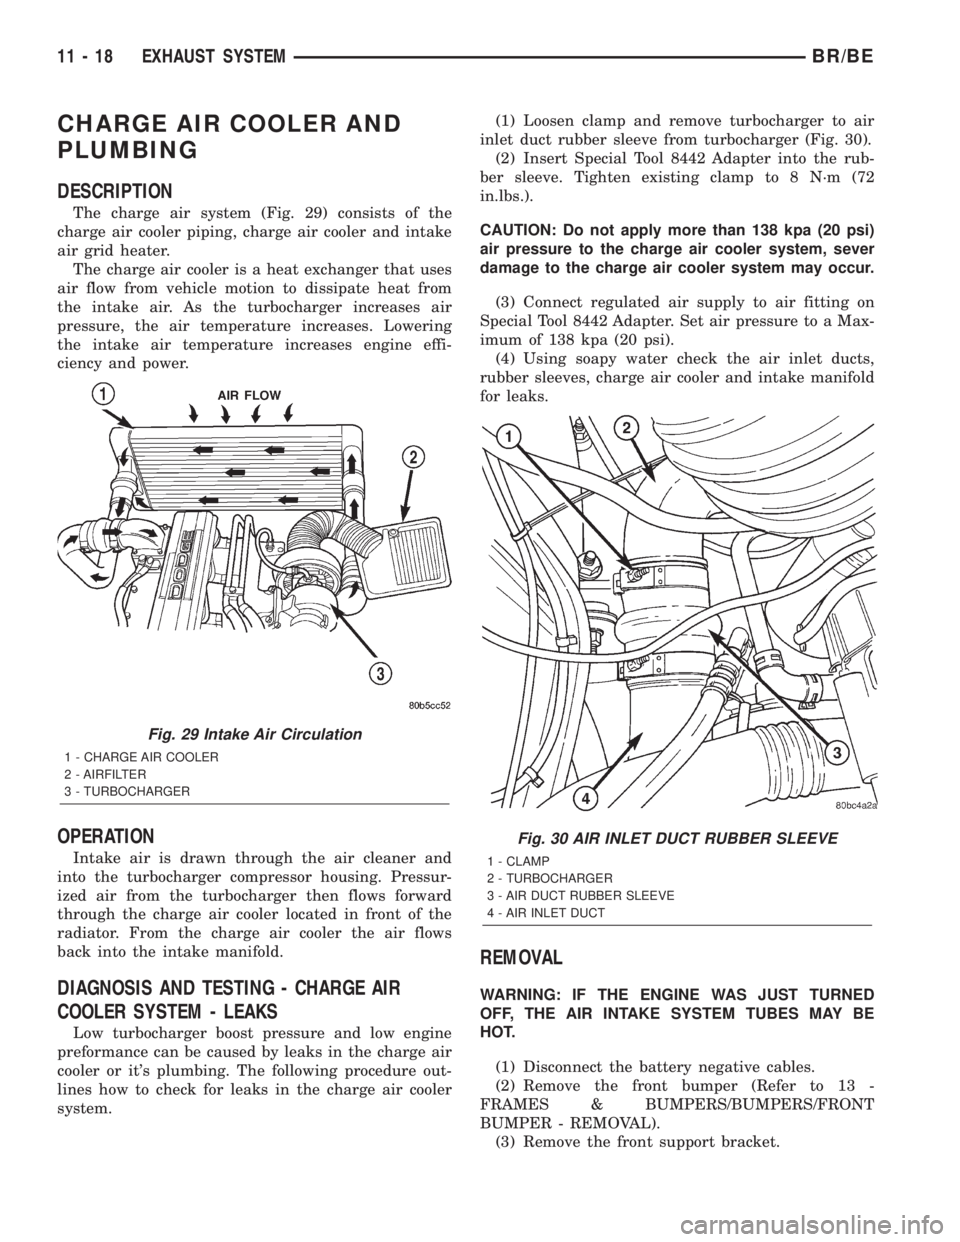
CHARGE AIR COOLER AND
PLUMBING
DESCRIPTION
The charge air system (Fig. 29) consists of the
charge air cooler piping, charge air cooler and intake
air grid heater.
The charge air cooler is a heat exchanger that uses
air flow from vehicle motion to dissipate heat from
the intake air. As the turbocharger increases air
pressure, the air temperature increases. Lowering
the intake air temperature increases engine effi-
ciency and power.
OPERATION
Intake air is drawn through the air cleaner and
into the turbocharger compressor housing. Pressur-
ized air from the turbocharger then flows forward
through the charge air cooler located in front of the
radiator. From the charge air cooler the air flows
back into the intake manifold.
DIAGNOSIS AND TESTING - CHARGE AIR
COOLER SYSTEM - LEAKS
Low turbocharger boost pressure and low engine
preformance can be caused by leaks in the charge air
cooler or it's plumbing. The following procedure out-
lines how to check for leaks in the charge air cooler
system.(1) Loosen clamp and remove turbocharger to air
inlet duct rubber sleeve from turbocharger (Fig. 30).
(2) Insert Special Tool 8442 Adapter into the rub-
ber sleeve. Tighten existing clamp to 8 N´m (72
in.lbs.).
CAUTION: Do not apply more than 138 kpa (20 psi)
air pressure to the charge air cooler system, sever
damage to the charge air cooler system may occur.
(3) Connect regulated air supply to air fitting on
Special Tool 8442 Adapter. Set air pressure to a Max-
imum of 138 kpa (20 psi).
(4) Using soapy water check the air inlet ducts,
rubber sleeves, charge air cooler and intake manifold
for leaks.
REMOVAL
WARNING: IF THE ENGINE WAS JUST TURNED
OFF, THE AIR INTAKE SYSTEM TUBES MAY BE
HOT.
(1) Disconnect the battery negative cables.
(2) Remove the front bumper (Refer to 13 -
FRAMES & BUMPERS/BUMPERS/FRONT
BUMPER - REMOVAL).
(3) Remove the front support bracket.
Fig. 29 Intake Air Circulation
1 - CHARGE AIR COOLER
2 - AIRFILTER
3 - TURBOCHARGER
Fig. 30 AIR INLET DUCT RUBBER SLEEVE
1 - CLAMP
2 - TURBOCHARGER
3 - AIR DUCT RUBBER SLEEVE
4 - AIR INLET DUCT
11 - 18 EXHAUST SYSTEMBR/BE
Page 1286 of 2255
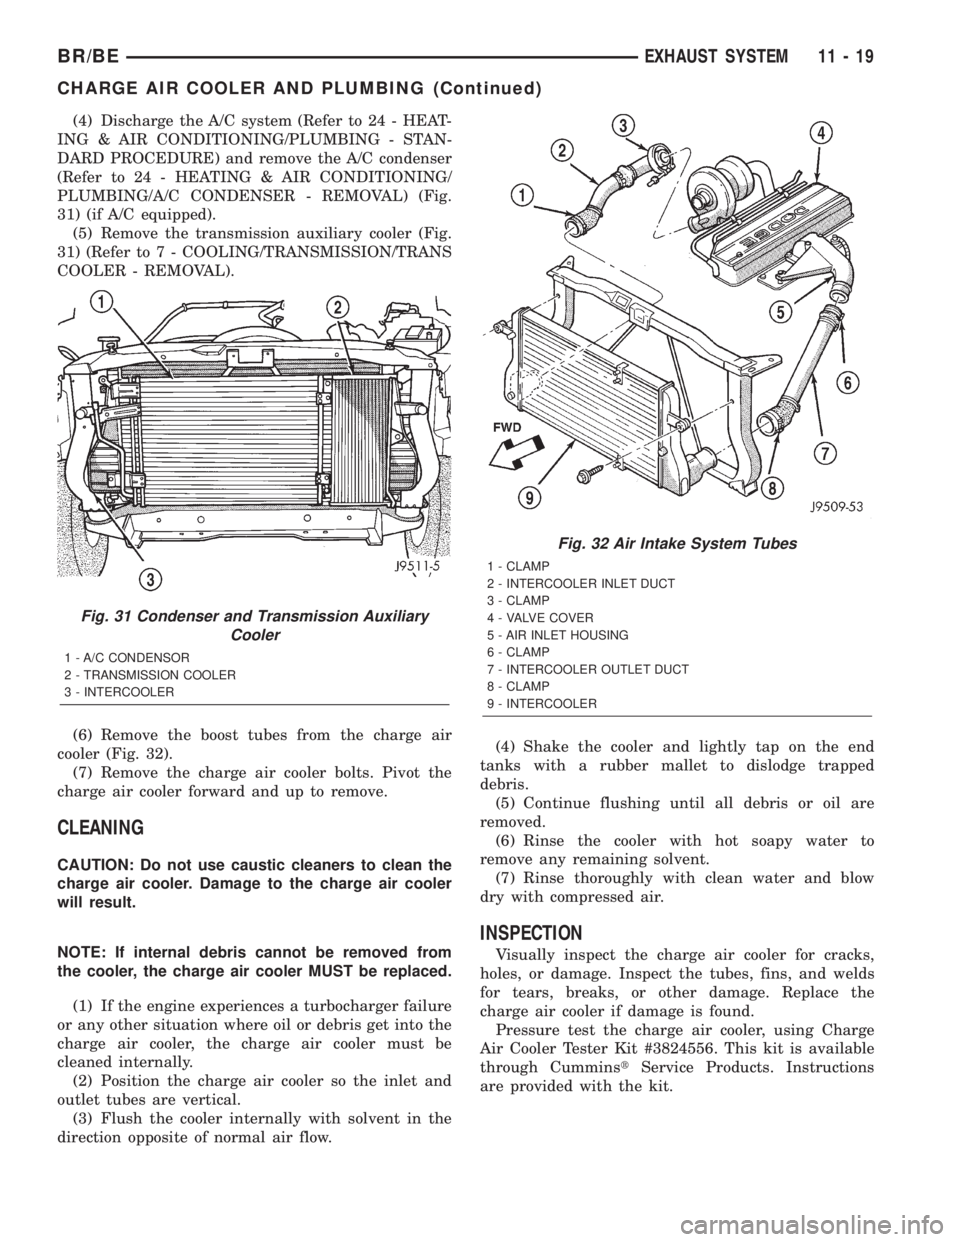
(4) Discharge the A/C system (Refer to 24 - HEAT-
ING & AIR CONDITIONING/PLUMBING - STAN-
DARD PROCEDURE) and remove the A/C condenser
(Refer to 24 - HEATING & AIR CONDITIONING/
PLUMBING/A/C CONDENSER - REMOVAL) (Fig.
31) (if A/C equipped).
(5) Remove the transmission auxiliary cooler (Fig.
31) (Refer to 7 - COOLING/TRANSMISSION/TRANS
COOLER - REMOVAL).
(6) Remove the boost tubes from the charge air
cooler (Fig. 32).
(7) Remove the charge air cooler bolts. Pivot the
charge air cooler forward and up to remove.
CLEANING
CAUTION: Do not use caustic cleaners to clean the
charge air cooler. Damage to the charge air cooler
will result.
NOTE: If internal debris cannot be removed from
the cooler, the charge air cooler MUST be replaced.
(1) If the engine experiences a turbocharger failure
or any other situation where oil or debris get into the
charge air cooler, the charge air cooler must be
cleaned internally.
(2) Position the charge air cooler so the inlet and
outlet tubes are vertical.
(3) Flush the cooler internally with solvent in the
direction opposite of normal air flow.(4) Shake the cooler and lightly tap on the end
tanks with a rubber mallet to dislodge trapped
debris.
(5) Continue flushing until all debris or oil are
removed.
(6) Rinse the cooler with hot soapy water to
remove any remaining solvent.
(7) Rinse thoroughly with clean water and blow
dry with compressed air.
INSPECTION
Visually inspect the charge air cooler for cracks,
holes, or damage. Inspect the tubes, fins, and welds
for tears, breaks, or other damage. Replace the
charge air cooler if damage is found.
Pressure test the charge air cooler, using Charge
Air Cooler Tester Kit #3824556. This kit is available
through CumminstService Products. Instructions
are provided with the kit.
Fig. 31 Condenser and Transmission Auxiliary
Cooler
1 - A/C CONDENSOR
2 - TRANSMISSION COOLER
3 - INTERCOOLER
Fig. 32 Air Intake System Tubes
1 - CLAMP
2 - INTERCOOLER INLET DUCT
3 - CLAMP
4 - VALVE COVER
5 - AIR INLET HOUSING
6 - CLAMP
7 - INTERCOOLER OUTLET DUCT
8 - CLAMP
9 - INTERCOOLER
BR/BEEXHAUST SYSTEM 11 - 19
CHARGE AIR COOLER AND PLUMBING (Continued)
Page 1287 of 2255
INSTALLATION
(1) Position the charge air cooler. Install the bolts
and tighten to 2 N´m (17 in. lbs.) torque.
(2) Install the air intake system tubes to the
charge air cooler. With the clamps in position, tighten
the clamps to 11 N´m (95 in. lbs.) torque.
(3) Install the transmission auxiliary cooler (if
equipped) (Refer to 7 - COOLING/TRANSMISSION/
TRANS COOLER - INSTALLATION).
(4) Install the A/C condenser (if A/C equipped)
(Refer to 24 - HEATING & AIR CONDITIONING/
PLUMBING/A/C CONDENSER - INSTALLATION).Recharge A/C system (Refer to 24 - HEATING & AIR
CONDITIONING/PLUMBING - STANDARD PRO-
CEDURE).
(5) Install the front support bracket. Install and
tighten the bolts.
(6) Install the front bumper (Refer to 13 -
FRAMES & BUMPERS/BUMPERS/FRONT
BUMPER - INSTALLATION).
(7) Connect the battery negative cables.
(8) Start engine and check for boost system leaks.
11 - 20 EXHAUST SYSTEMBR/BE
CHARGE AIR COOLER AND PLUMBING (Continued)
Page 1288 of 2255
FRAME & BUMPERS
TABLE OF CONTENTS
page page
BUMPERS
DESCRIPTION..........................1
SPECIFICATIONS - TORQUE...............1
FRONT AIR DAM
REMOVAL.............................2
INSTALLATION..........................2
FRONT FASCIA
REMOVAL.............................2
INSTALLATION..........................2
ADJUSTMENTS
ADJUSTMENT.........................2
FRONT LOWER FASCIA
REMOVAL.............................3
INSTALLATION..........................3
FRONT FASCIA - SPORT
REMOVAL.............................3
INSTALLATION..........................3
FRONT BUMPER
REMOVAL.............................4
INSTALLATION..........................4
FRONT BUMPER - SPORT
REMOVAL.............................5INSTALLATION..........................5
REAR BUMPER
REMOVAL.............................6
INSTALLATION..........................6
FRAME
DESCRIPTION
DESCRIPTION........................6
FRAME SERVICE......................7
SPECIFICATIONS
FRAME DIMENSION....................8
CAB CHASSIS ADAPTER BRACKET
REMOVAL.............................10
INSTALLATION.........................10
FRONT TOW HOOK
REMOVAL.............................10
INSTALLATION.........................10
TRAILER HITCH
REMOVAL.............................11
INSTALLATION.........................11
TRANSFER CASE SKID PLATE
REMOVAL.............................11
INSTALLATION.........................11
BUMPERS
DESCRIPTION
Bumpers are used at the front and rear of the
vehicle. Bumpers may be chrome or painted.Bumpers are designed to protect the exterior sheet-
metal in low impact situations. The bumpers are
attached to the frame and provide mounting points
for some optional accessories such as fog lights and
tow hooks.
SPECIFICATIONS - TORQUE
TORQUE SPECIFICATIONS
DESCRIPTION N´m Ft. Lbs. In. Lbs.
Cab chassis adapter nut 108 80 Ð
Front bumper bracket to frame nut 68 50 Ð
Front bumper outer brace bolt 68 50 Ð
Rear bumper to brace nut 40 30 Ð
Rear bumper brace to bracket nut 101 75 Ð
Rear bumper bracket to frame nut 101 75 Ð
Skid plate crossmember to frame bolt 54 40 Ð
Skid plate to crossmember bolt 40 30 Ð
Skid plate to transmission crossmember bolt 54 40 Ð
Spare tire winch bolt 27 20 Ð
Trailer hitch nut 108 80 Ð
BR/BEFRAME & BUMPERS 13 - 1
Page 1289 of 2255
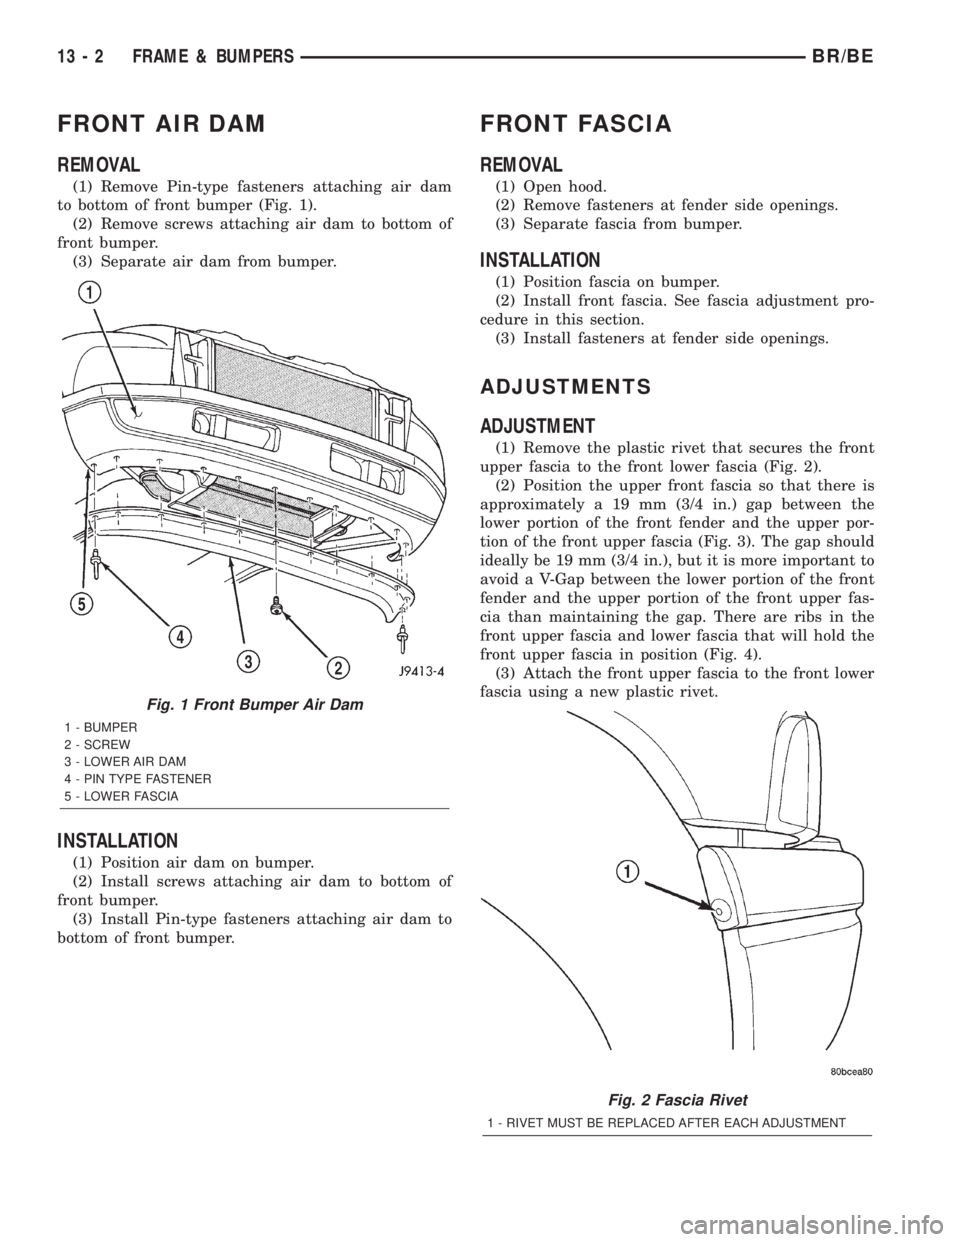
FRONT AIR DAM
REMOVAL
(1) Remove Pin-type fasteners attaching air dam
to bottom of front bumper (Fig. 1).
(2) Remove screws attaching air dam to bottom of
front bumper.
(3) Separate air dam from bumper.
INSTALLATION
(1) Position air dam on bumper.
(2) Install screws attaching air dam to bottom of
front bumper.
(3) Install Pin-type fasteners attaching air dam to
bottom of front bumper.
FRONT FASCIA
REMOVAL
(1) Open hood.
(2) Remove fasteners at fender side openings.
(3) Separate fascia from bumper.
INSTALLATION
(1) Position fascia on bumper.
(2) Install front fascia. See fascia adjustment pro-
cedure in this section.
(3) Install fasteners at fender side openings.
ADJUSTMENTS
ADJUSTMENT
(1) Remove the plastic rivet that secures the front
upper fascia to the front lower fascia (Fig. 2).
(2) Position the upper front fascia so that there is
approximately a 19 mm (3/4 in.) gap between the
lower portion of the front fender and the upper por-
tion of the front upper fascia (Fig. 3). The gap should
ideally be 19 mm (3/4 in.), but it is more important to
avoid a V-Gap between the lower portion of the front
fender and the upper portion of the front upper fas-
cia than maintaining the gap. There are ribs in the
front upper fascia and lower fascia that will hold the
front upper fascia in position (Fig. 4).
(3) Attach the front upper fascia to the front lower
fascia using a new plastic rivet.
Fig. 1 Front Bumper Air Dam
1 - BUMPER
2 - SCREW
3 - LOWER AIR DAM
4 - PIN TYPE FASTENER
5 - LOWER FASCIA
Fig. 2 Fascia Rivet
1 - RIVET MUST BE REPLACED AFTER EACH ADJUSTMENT
13 - 2 FRAME & BUMPERSBR/BE
Page 1290 of 2255
FRONT LOWER FASCIA
REMOVAL
(1) Open hood.
(2) Remove fasteners at side fender openings.
(3) Remove lower air dam.(Refer to 13 - FRAMES
& BUMPERS/BUMPERS/FRONT AIR DAM -
REMOVAL)
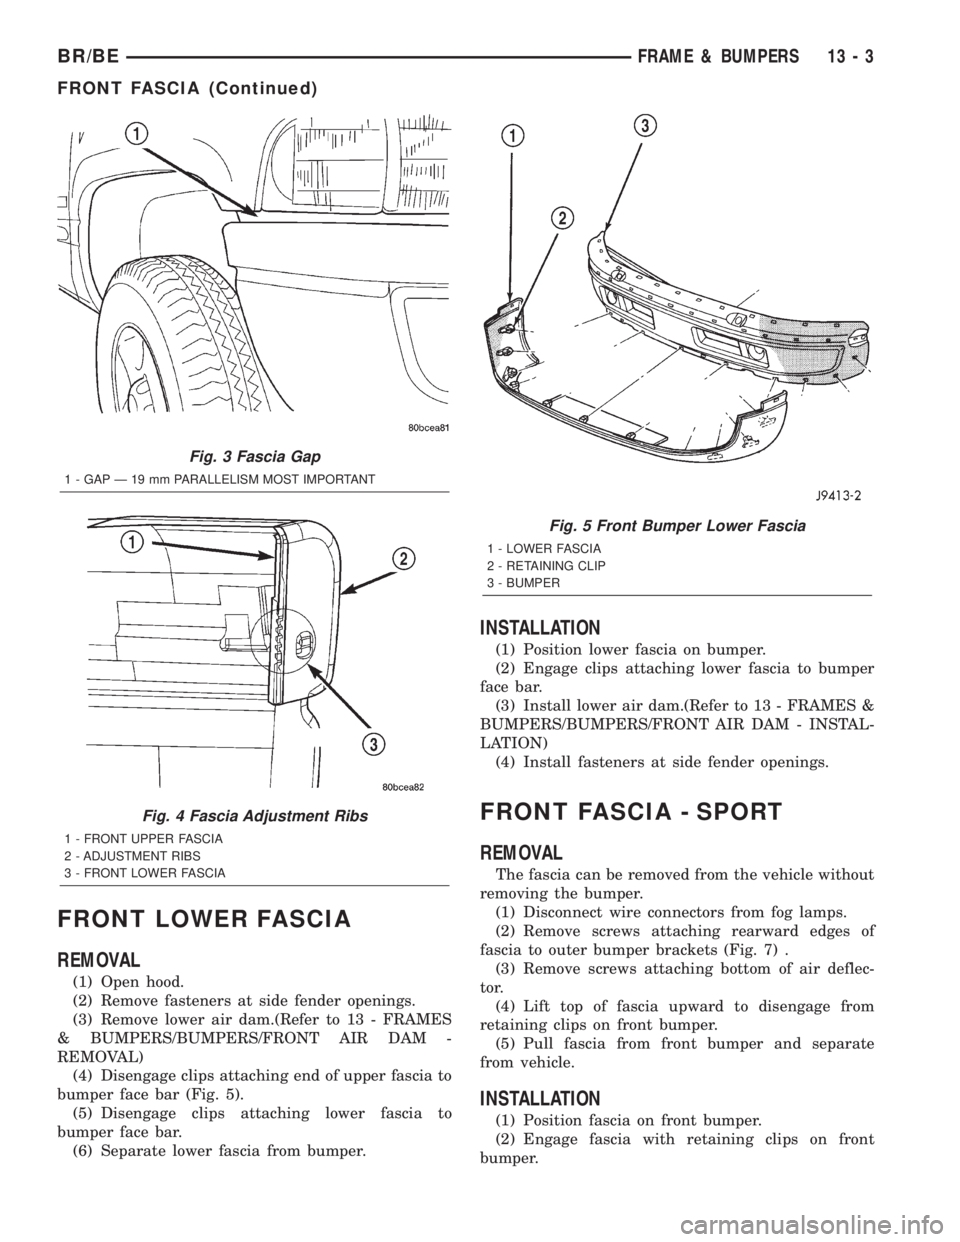
(4) Disengage clips attaching end of upper fascia to
bumper face bar (Fig. 5).
(5) Disengage clips attaching lower fascia to
bumper face bar.
(6) Separate lower fascia from bumper.
INSTALLATION
(1) Position lower fascia on bumper.
(2) Engage clips attaching lower fascia to bumper
face bar.
(3) Install lower air dam.(Refer to 13 - FRAMES &
BUMPERS/BUMPERS/FRONT AIR DAM - INSTAL-
LATION)
(4) Install fasteners at side fender openings.
FRONT FASCIA - SPORT
REMOVAL
The fascia can be removed from the vehicle without
removing the bumper.
(1) Disconnect wire connectors from fog lamps.
(2) Remove screws attaching rearward edges of
fascia to outer bumper brackets (Fig. 7) .
(3) Remove screws attaching bottom of air deflec-
tor.
(4) Lift top of fascia upward to disengage from
retaining clips on front bumper.
(5) Pull fascia from front bumper and separate
from vehicle.
INSTALLATION
(1) Position fascia on front bumper.
(2) Engage fascia with retaining clips on front
bumper.
Fig. 3 Fascia Gap
1 - GAP Ð 19 mm PARALLELISM MOST IMPORTANT
Fig. 4 Fascia Adjustment Ribs
1 - FRONT UPPER FASCIA
2 - ADJUSTMENT RIBS
3 - FRONT LOWER FASCIA
Fig. 5 Front Bumper Lower Fascia
1 - LOWER FASCIA
2 - RETAINING CLIP
3 - BUMPER
BR/BEFRAME & BUMPERS 13 - 3
FRONT FASCIA (Continued)