DODGE RAM 2002 Service Manual PDF
Manufacturer: DODGE, Model Year: 2002, Model line: RAM, Model: DODGE RAM 2002Pages: 2255, PDF Size: 62.07 MB
Page 61 of 2255
SPECIFICATIONS
PROPELLER SHAFT
TORQUE SPECIFICATIONS
DESCRIPTION N´m Ft. Lbs. In. Lbs.
Center Bearing Bolts 68 50 -
Front Shaft Flange Yoke 88 65 -
Front Shaft Axle Yoke 19 14 -
Rear Shaft Axle Yoke 29 22 -
SPECIAL TOOLS
PROPELLER SHAFT
PROPELLER SHAFT - FRONT
REMOVAL
(1) Shift the transmission and transfer case to
their neutral positions.(2) Raise and support vehicle and remove skid
plate, if equipped.
(3) Mark a line across the companion flange at the
transfer case and propeller shaft flange yoke for
installation reference.
(4) Mark a line across the propeller shaft yoke and
the pinion shaft yoke for installation reference.
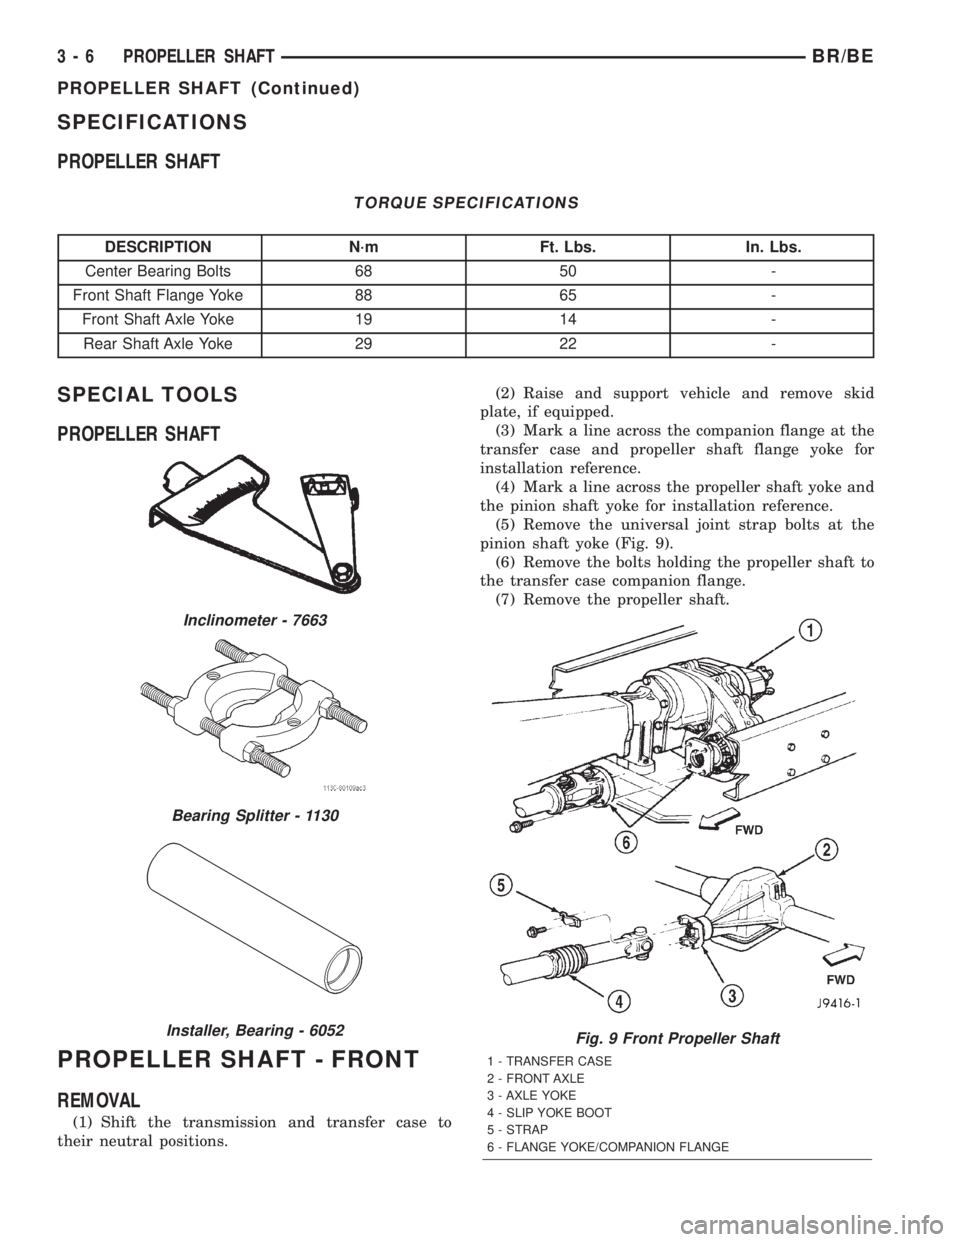
(5) Remove the universal joint strap bolts at the
pinion shaft yoke (Fig. 9).
(6) Remove the bolts holding the propeller shaft to
the transfer case companion flange.
(7) Remove the propeller shaft.
Inclinometer - 7663
Bearing Splitter - 1130
Installer, Bearing - 6052Fig. 9 Front Propeller Shaft
1 - TRANSFER CASE
2 - FRONT AXLE
3 - AXLE YOKE
4 - SLIP YOKE BOOT
5 - STRAP
6 - FLANGE YOKE/COMPANION FLANGE
3 - 6 PROPELLER SHAFTBR/BE
PROPELLER SHAFT (Continued)
Page 62 of 2255
INSTALLATION
(1) Position front propeller shaft under vehicle
with rear universal joint over the transfer case com-
panion flange.
(2) Place front universal joint into the axle pinion
yoke.
(3) Align the mark on the flange yoke to the mark
on the transfer case companion flange.
(4) Loosely install bolts to hold universal joint to
transfer case companion flange.
(5) Align mark on front universal joint to the mark
on the axle pinion yoke.
(6) Install bolts to hold front universal joint to axle
pinion yoke. Tighten bolts to 19 N´m (14 ft. lbs.).
(7) Tighten bolts to hold universal joint to transfer
case companion flange to 88 N´m (65 ft. lbs.).
(8) Install skid plate, if equipped.
(9) Lower vehicle and road test to verify repair.
PROPELLER SHAFT - REAR
REMOVAL
(1) Shift transmission into Neutral.
(2) Raise and support vehicle on safety stands.
(3) Mark a line across the axle pinion yoke or com-
panion flange and propeller shaft or flange yoke for
installation reference.
(4) Mark the outline of the center bearing on the
frame crossmember for installation reference, if
equipped.
(5) Remove bolts that attach the center bearing to
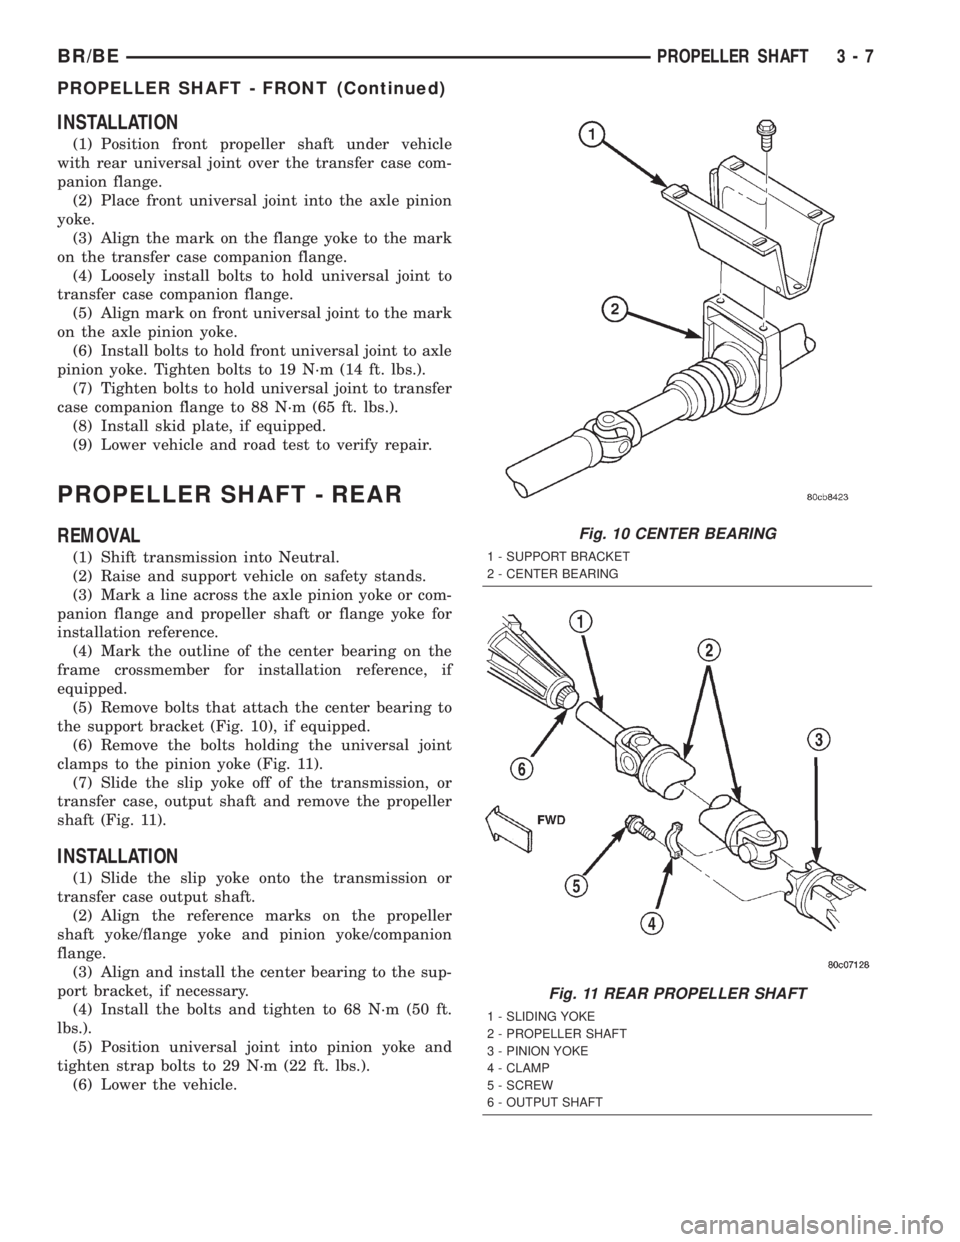
the support bracket (Fig. 10), if equipped.
(6) Remove the bolts holding the universal joint
clamps to the pinion yoke (Fig. 11).
(7) Slide the slip yoke off of the transmission, or
transfer case, output shaft and remove the propeller
shaft (Fig. 11).
INSTALLATION
(1) Slide the slip yoke onto the transmission or
transfer case output shaft.
(2) Align the reference marks on the propeller
shaft yoke/flange yoke and pinion yoke/companion
flange.
(3) Align and install the center bearing to the sup-
port bracket, if necessary.
(4) Install the bolts and tighten to 68 N´m (50 ft.
lbs.).
(5) Position universal joint into pinion yoke and
tighten strap bolts to 29 N´m (22 ft. lbs.).
(6) Lower the vehicle.
Fig. 10 CENTER BEARING
1 - SUPPORT BRACKET
2 - CENTER BEARING
Fig. 11 REAR PROPELLER SHAFT
1 - SLIDING YOKE
2 - PROPELLER SHAFT
3 - PINION YOKE
4 - CLAMP
5 - SCREW
6 - OUTPUT SHAFT
BR/BEPROPELLER SHAFT 3 - 7
PROPELLER SHAFT - FRONT (Continued)
Page 63 of 2255
CENTER BEARING
REMOVAL
(1) Remove rear propeller shaft.
(2) Remove slip joint boot clamp and separate the
two half-shafts.
(3) Use hammer and punch to tap slinger away
from shaft to provide room for bearing splitter.
(4) Position Bearing Splitter Tool 1130 between
slinger and shaft.
CAUTION: Do not damage shaft spline during
removal of center bearing.
(5)
Set shaft in press and press bearing off the shaft.
INSTALLATION
NOTE: Two types of center bearings are used and
are not interchangeable. Install the same type as
the vehicle was built with.
(1) Install new slinger on shaft and drive into posi-
tion with appropriate installer tool.
(2) Install new center bearing on shaft with Bear-
ing Installer Tool 6052. Drive on shaft with hammer
until bearing is seated.
(3) Clean shaft splines and apply a coat of multi-
purpose grease.
(4) Align master splines and slide front and rear
half-shafts together. Reposition slip yoke boot and
install new clamp.
(5) Install propeller shaft in vehicle.
ADJUSTMENTS
ADJUSTMENT - CENTER BEARING
Launch shudder is a vibration that occurs at first
acceleration from a stop. Shudder vibration usually
peaks at the engines highest torque output. Shudder is
a symptom associated with vehicles using a two-piece
propeller shaft. To decrease shudder, lower the center
bearing in 1/8 inch increments. Use shim stock or fab-
ricated plates. Plate stock must be used to maintain
compression of the rubber insulator around the bearing.
Do not use washers. Replace the original bolts with the
appropriate increased length bolts.
SINGLE CARDAN UNIVERSAL
JOINTS
DISASSEMBLY
Individual components of cardan universal joints
are not serviceable. If worn or leaking, they must be
replaced as an assembly.
(1) Remove the propeller shaft.
(2) With a soft drift, tap the outside of the bearing
cap assembly to loosen snap ring.
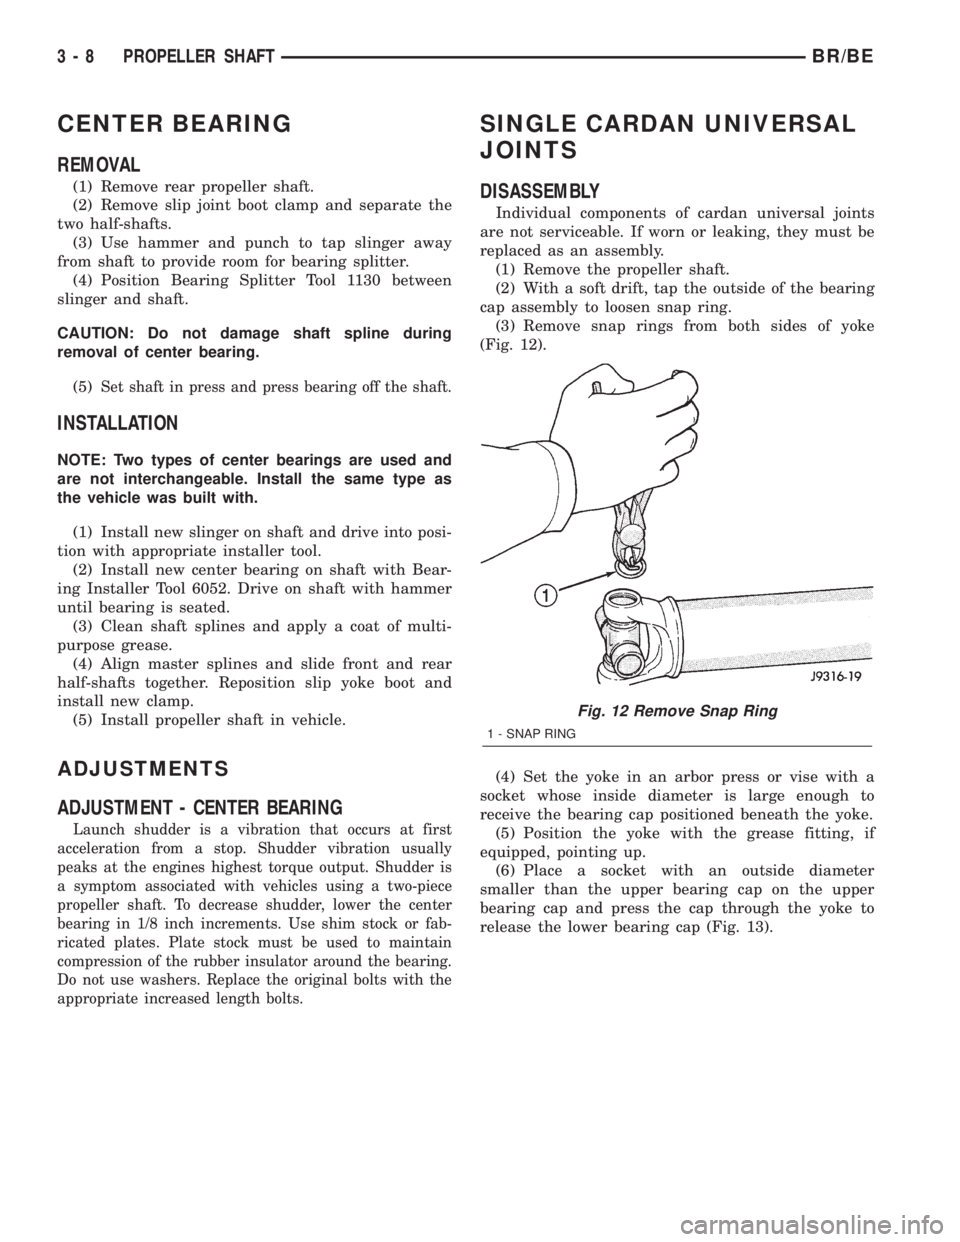
(3) Remove snap rings from both sides of yoke
(Fig. 12).
(4) Set the yoke in an arbor press or vise with a
socket whose inside diameter is large enough to
receive the bearing cap positioned beneath the yoke.
(5) Position the yoke with the grease fitting, if
equipped, pointing up.
(6) Place a socket with an outside diameter
smaller than the upper bearing cap on the upper
bearing cap and press the cap through the yoke to
release the lower bearing cap (Fig. 13).
Fig. 12 Remove Snap Ring
1 - SNAP RING
3 - 8 PROPELLER SHAFTBR/BE
Page 64 of 2255
(7) If the bearing cap will not pull out of the yoke
by hand after pressing, tap the yoke ear near the
bearing cap to dislodge the cap.
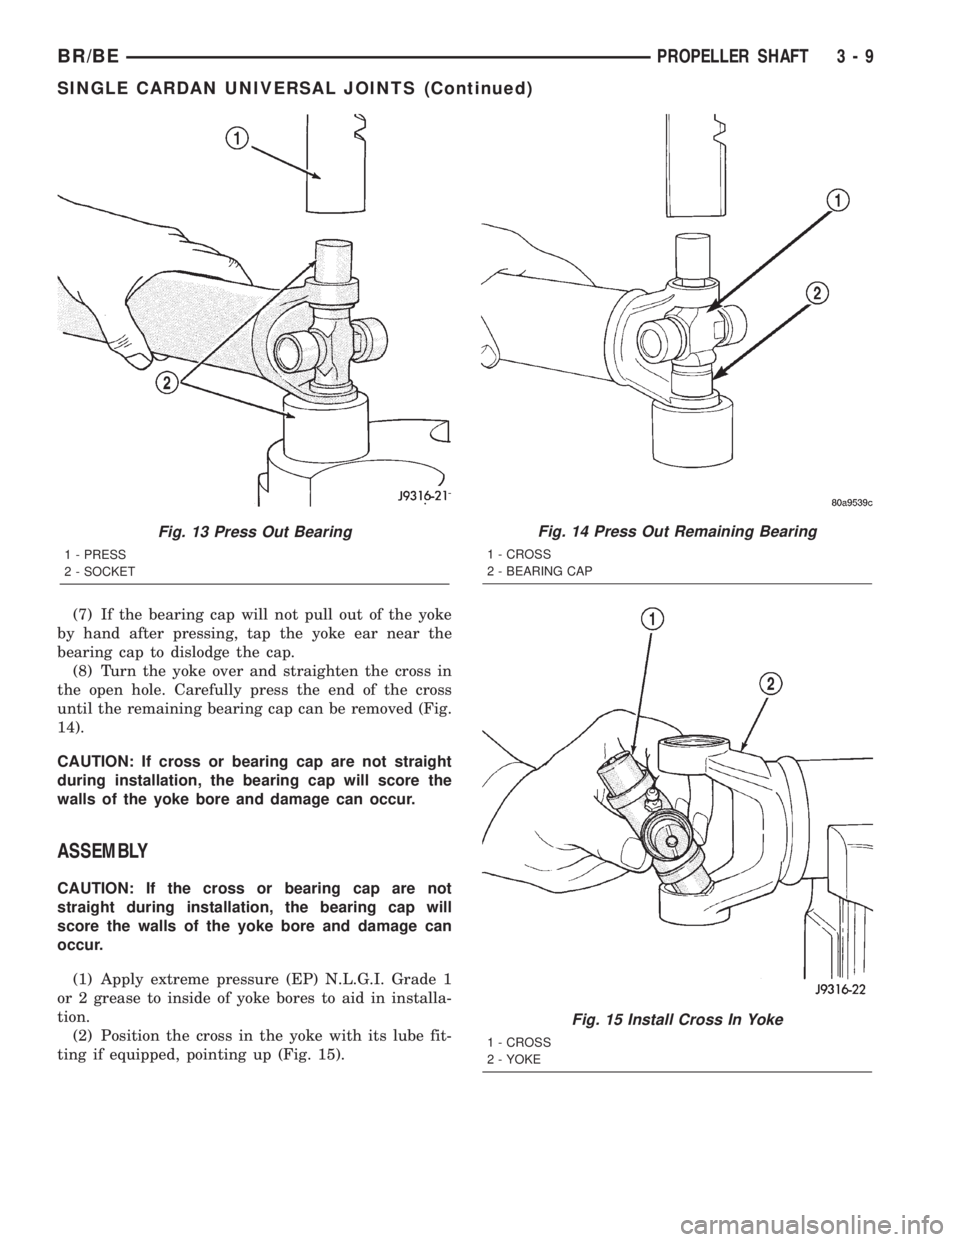
(8) Turn the yoke over and straighten the cross in
the open hole. Carefully press the end of the cross
until the remaining bearing cap can be removed (Fig.
14).
CAUTION: If cross or bearing cap are not straight
during installation, the bearing cap will score the
walls of the yoke bore and damage can occur.
ASSEMBLY
CAUTION: If the cross or bearing cap are not
straight during installation, the bearing cap will
score the walls of the yoke bore and damage can
occur.
(1) Apply extreme pressure (EP) N.L.G.I. Grade 1
or 2 grease to inside of yoke bores to aid in installa-
tion.
(2) Position the cross in the yoke with its lube fit-
ting if equipped, pointing up (Fig. 15).
Fig. 13 Press Out Bearing
1 - PRESS
2 - SOCKET
Fig. 14 Press Out Remaining Bearing
1 - CROSS
2 - BEARING CAP
Fig. 15 Install Cross In Yoke
1 - CROSS
2 - YOKE
BR/BEPROPELLER SHAFT 3 - 9
SINGLE CARDAN UNIVERSAL JOINTS (Continued)
Page 65 of 2255
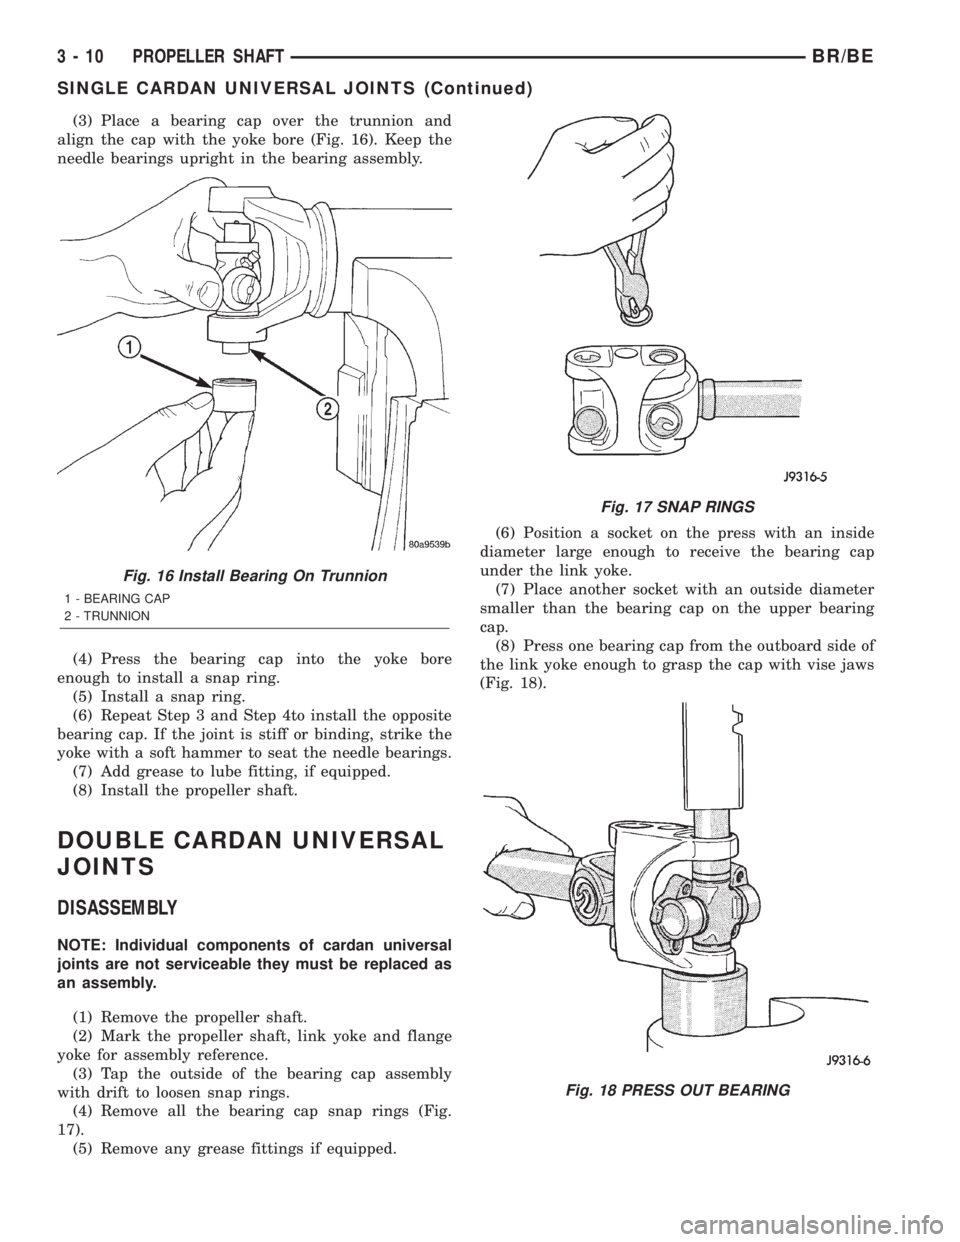
(3) Place a bearing cap over the trunnion and
align the cap with the yoke bore (Fig. 16). Keep the
needle bearings upright in the bearing assembly.
(4) Press the bearing cap into the yoke bore
enough to install a snap ring.
(5) Install a snap ring.
(6) Repeat Step 3 and Step 4to install the opposite
bearing cap. If the joint is stiff or binding, strike the
yoke with a soft hammer to seat the needle bearings.
(7) Add grease to lube fitting, if equipped.
(8) Install the propeller shaft.
DOUBLE CARDAN UNIVERSAL
JOINTS
DISASSEMBLY
NOTE: Individual components of cardan universal
joints are not serviceable they must be replaced as
an assembly.
(1) Remove the propeller shaft.
(2) Mark the propeller shaft, link yoke and flange
yoke for assembly reference.
(3) Tap the outside of the bearing cap assembly
with drift to loosen snap rings.
(4) Remove all the bearing cap snap rings (Fig.
17).
(5) Remove any grease fittings if equipped.(6) Position a socket on the press with an inside
diameter large enough to receive the bearing cap
under the link yoke.
(7) Place another socket with an outside diameter
smaller than the bearing cap on the upper bearing
cap.
(8) Press one bearing cap from the outboard side of
the link yoke enough to grasp the cap with vise jaws
(Fig. 18).
Fig. 16 Install Bearing On Trunnion
1 - BEARING CAP
2 - TRUNNION
Fig. 17 SNAP RINGS
Fig. 18 PRESS OUT BEARING
3 - 10 PROPELLER SHAFTBR/BE
SINGLE CARDAN UNIVERSAL JOINTS (Continued)
Page 66 of 2255
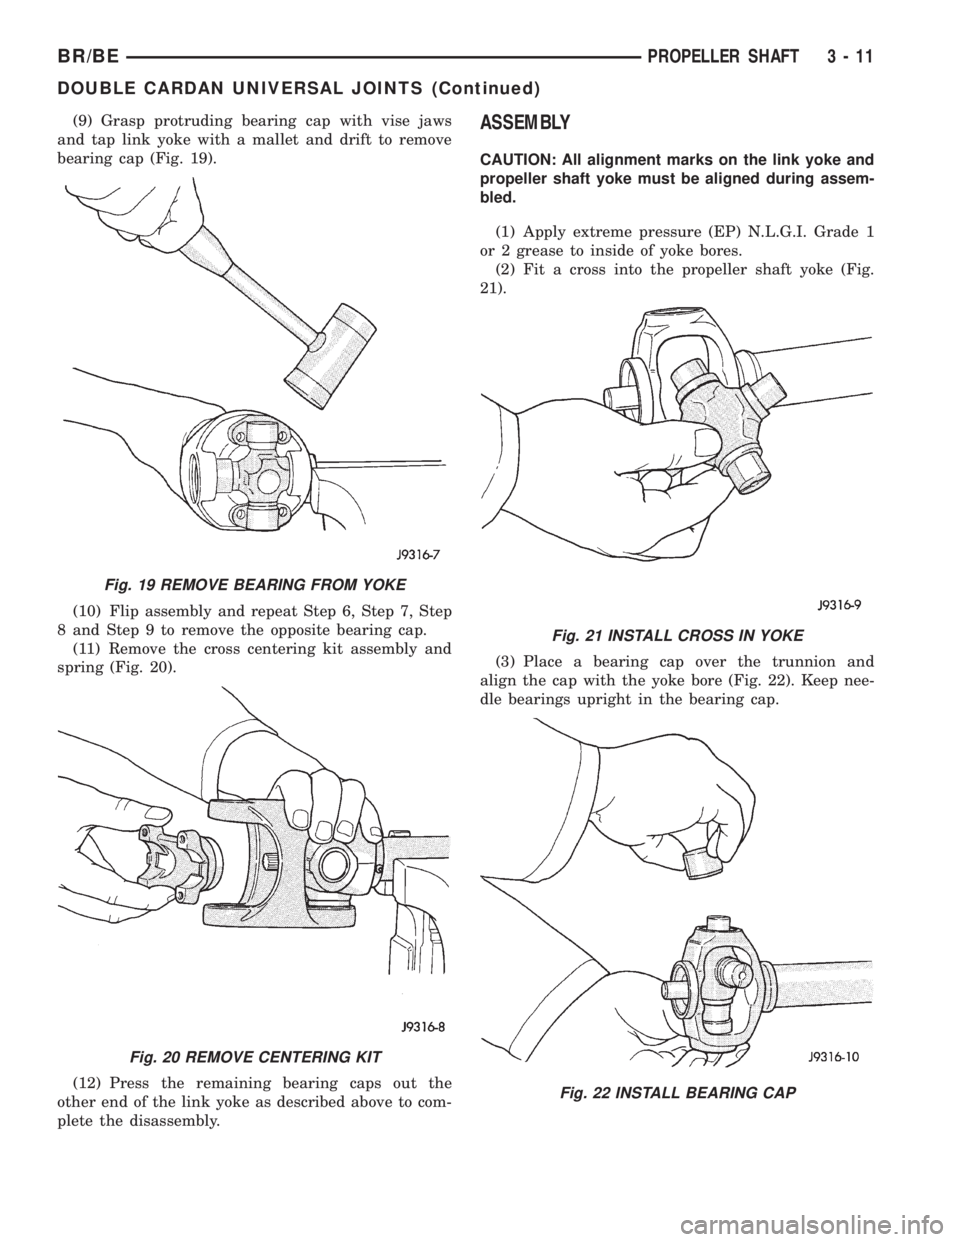
(9) Grasp protruding bearing cap with vise jaws
and tap link yoke with a mallet and drift to remove
bearing cap (Fig. 19).
(10) Flip assembly and repeat Step 6, Step 7, Step
8 and Step 9 to remove the opposite bearing cap.
(11) Remove the cross centering kit assembly and
spring (Fig. 20).
(12) Press the remaining bearing caps out the
other end of the link yoke as described above to com-
plete the disassembly.ASSEMBLY
CAUTION: All alignment marks on the link yoke and
propeller shaft yoke must be aligned during assem-
bled.
(1) Apply extreme pressure (EP) N.L.G.I. Grade 1
or 2 grease to inside of yoke bores.
(2) Fit a cross into the propeller shaft yoke (Fig.
21).
(3) Place a bearing cap over the trunnion and
align the cap with the yoke bore (Fig. 22). Keep nee-
dle bearings upright in the bearing cap.
Fig. 19 REMOVE BEARING FROM YOKE
Fig. 20 REMOVE CENTERING KIT
Fig. 21 INSTALL CROSS IN YOKE
Fig. 22 INSTALL BEARING CAP
BR/BEPROPELLER SHAFT 3 - 11
DOUBLE CARDAN UNIVERSAL JOINTS (Continued)
Page 67 of 2255
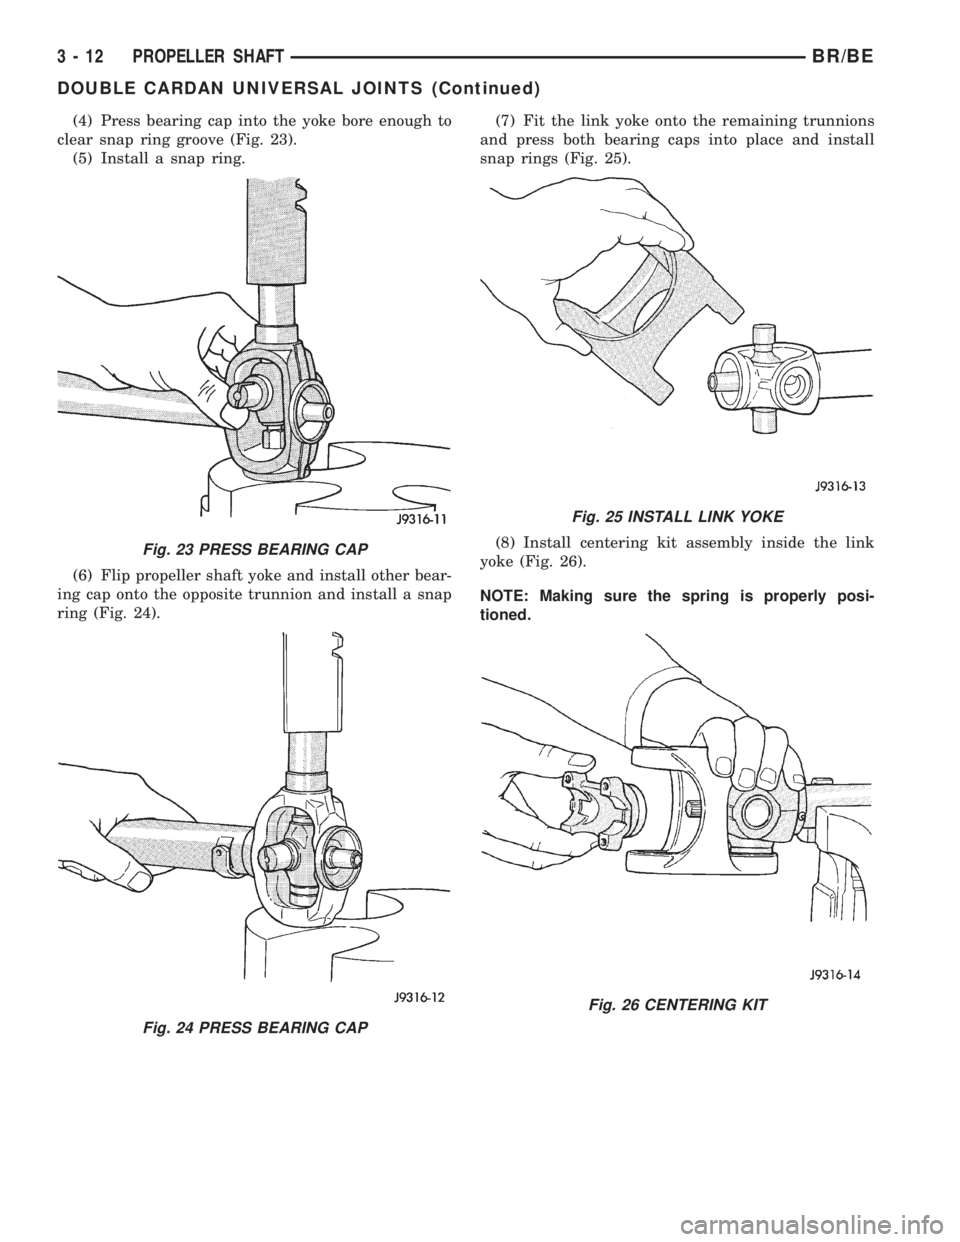
(4) Press bearing cap into the yoke bore enough to
clear snap ring groove (Fig. 23).
(5) Install a snap ring.
(6) Flip propeller shaft yoke and install other bear-
ing cap onto the opposite trunnion and install a snap
ring (Fig. 24).(7) Fit the link yoke onto the remaining trunnions
and press both bearing caps into place and install
snap rings (Fig. 25).
(8) Install centering kit assembly inside the link
yoke (Fig. 26).
NOTE: Making sure the spring is properly posi-
tioned.
Fig. 23 PRESS BEARING CAP
Fig. 24 PRESS BEARING CAP
Fig. 25 INSTALL LINK YOKE
Fig. 26 CENTERING KIT
3 - 12 PROPELLER SHAFTBR/BE
DOUBLE CARDAN UNIVERSAL JOINTS (Continued)
Page 68 of 2255
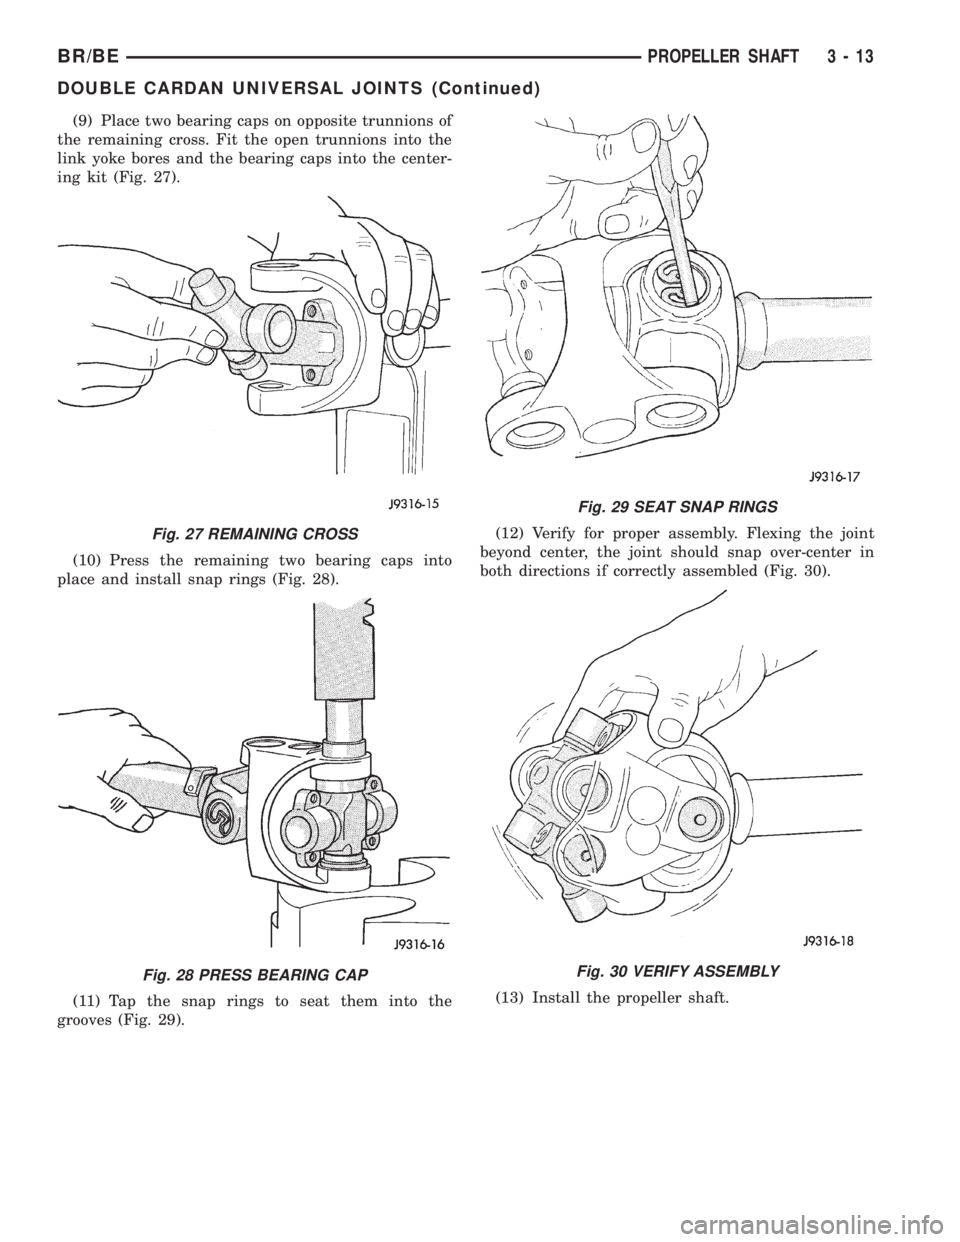
(9) Place two bearing caps on opposite trunnions of
the remaining cross. Fit the open trunnions into the
link yoke bores and the bearing caps into the center-
ing kit (Fig. 27).
(10) Press the remaining two bearing caps into
place and install snap rings (Fig. 28).
(11) Tap the snap rings to seat them into the
grooves (Fig. 29).(12) Verify for proper assembly. Flexing the joint
beyond center, the joint should snap over-center in
both directions if correctly assembled (Fig. 30).
(13) Install the propeller shaft.
Fig. 27 REMAINING CROSS
Fig. 28 PRESS BEARING CAP
Fig. 29 SEAT SNAP RINGS
Fig. 30 VERIFY ASSEMBLY
BR/BEPROPELLER SHAFT 3 - 13
DOUBLE CARDAN UNIVERSAL JOINTS (Continued)
Page 69 of 2255
FRONT AXLE - 248FBI
TABLE OF CONTENTS
page page
FRONT AXLE - 248FBI
DESCRIPTION.........................14
OPERATION...........................14
DIAGNOSIS AND TESTING - AXLE..........15
REMOVAL.............................18
INSTALLATION.........................18
ADJUSTMENTS........................19
SPECIFICATIONS
FRONT AXLE - 248FBI.................27
SPECIAL TOOLS
FRONT AXLE........................27
AXLE SHAFTS
REMOVAL.............................29
INSTALLATION.........................29
AXLE SHAFTS - INTERMEDIATE
REMOVAL.............................30
INSTALLATION - INTERMEDIATE AXLE......30
AXLE SHAFT SEALS
REMOVAL.............................31
INSTALLATION.........................31
AXLE VACUUM MOTOR
DESCRIPTION.........................31
OPERATION...........................31DIAGNOSIS AND TESTING - VACUUM MOTOR . 32
REMOVAL.............................34
DISASSEMBLY.........................34
ASSEMBLY............................34
INSTALLATION.........................34
SINGLE CARDAN UNIVERSAL JOINTS
REMOVAL.............................34
INSTALLATION.........................35
PINION SEAL
REMOVAL.............................35
INSTALLATION.........................35
DIFFERENTIAL
REMOVAL.............................37
DISASSEMBLY.........................38
ASSEMBLY............................38
INSTALLATION.........................39
DIFFERENTIAL CASE BEARINGS
REMOVAL.............................40
INSTALLATION.........................41
PINION GEAR/RING GEAR
REMOVAL.............................41
INSTALLATION.........................43
FRONT AXLE - 248FBI
DESCRIPTION
The Front Beam-design Iron (FBI) axle consists of a
cast iron center casting differential housing with axle
shaft tubes extending from each side. The tubes are
pressed into the differential housing and welded. The
axles is equipped with semi-floating axle shafts, mean-
ing that loads are supported by the hub bearings.
The differential case is a one-piece design. Differ-
ential bearing preload and ring gear backlash is
adjusted by the use of shims located between the dif-
ferential bearing cones and case. Pinion bearing pre-load is set and maintained by the use of a collapsible
spacer. The stamped steel cover provides a means for
inspection and servicing the differential.
OPERATION
The axle receives power from the transfer case
through the front propeller shaft. The front propeller
shaft is connected to the pinion gear which rotates
the differential through the gear mesh with the ring
gear bolted to the differential case. The engine power
is transmitted to the axle shafts through the pinion
mate and side gears. The side gears are splined to
the axle shafts.
3 - 14 FRONT AXLE - 248FBIBR/BE
Page 70 of 2255
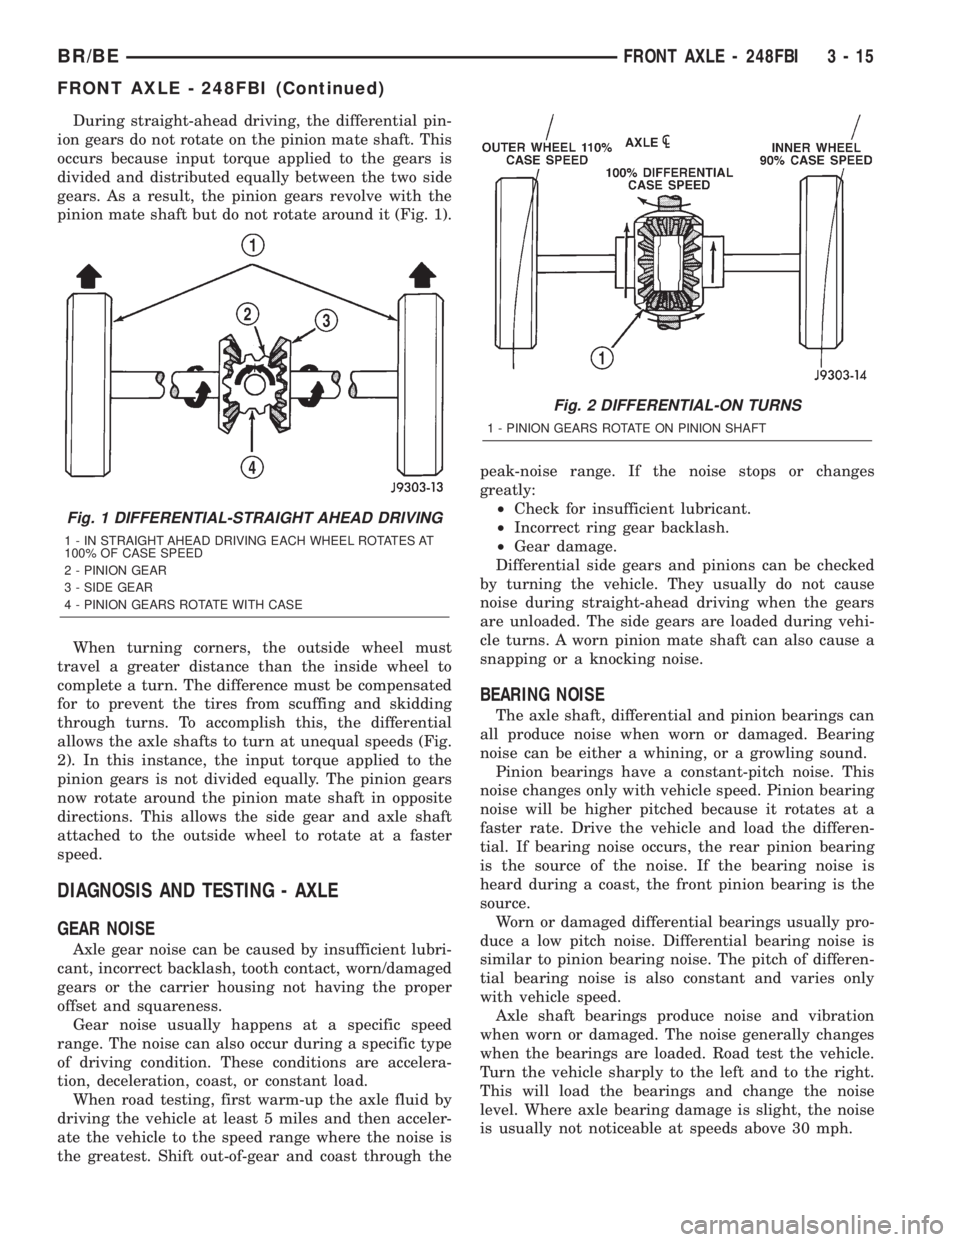
During straight-ahead driving, the differential pin-
ion gears do not rotate on the pinion mate shaft. This
occurs because input torque applied to the gears is
divided and distributed equally between the two side
gears. As a result, the pinion gears revolve with the
pinion mate shaft but do not rotate around it (Fig. 1).
When turning corners, the outside wheel must
travel a greater distance than the inside wheel to
complete a turn. The difference must be compensated
for to prevent the tires from scuffing and skidding
through turns. To accomplish this, the differential
allows the axle shafts to turn at unequal speeds (Fig.
2). In this instance, the input torque applied to the
pinion gears is not divided equally. The pinion gears
now rotate around the pinion mate shaft in opposite
directions. This allows the side gear and axle shaft
attached to the outside wheel to rotate at a faster
speed.
DIAGNOSIS AND TESTING - AXLE
GEAR NOISE
Axle gear noise can be caused by insufficient lubri-
cant, incorrect backlash, tooth contact, worn/damaged
gears or the carrier housing not having the proper
offset and squareness.
Gear noise usually happens at a specific speed
range. The noise can also occur during a specific type
of driving condition. These conditions are accelera-
tion, deceleration, coast, or constant load.
When road testing, first warm-up the axle fluid by
driving the vehicle at least 5 miles and then acceler-
ate the vehicle to the speed range where the noise is
the greatest. Shift out-of-gear and coast through thepeak-noise range. If the noise stops or changes
greatly:
²Check for insufficient lubricant.
²Incorrect ring gear backlash.
²Gear damage.
Differential side gears and pinions can be checked
by turning the vehicle. They usually do not cause
noise during straight-ahead driving when the gears
are unloaded. The side gears are loaded during vehi-
cle turns. A worn pinion mate shaft can also cause a
snapping or a knocking noise.
BEARING NOISE
The axle shaft, differential and pinion bearings can
all produce noise when worn or damaged. Bearing
noise can be either a whining, or a growling sound.
Pinion bearings have a constant-pitch noise. This
noise changes only with vehicle speed. Pinion bearing
noise will be higher pitched because it rotates at a
faster rate. Drive the vehicle and load the differen-
tial. If bearing noise occurs, the rear pinion bearing
is the source of the noise. If the bearing noise is
heard during a coast, the front pinion bearing is the
source.
Worn or damaged differential bearings usually pro-
duce a low pitch noise. Differential bearing noise is
similar to pinion bearing noise. The pitch of differen-
tial bearing noise is also constant and varies only
with vehicle speed.
Axle shaft bearings produce noise and vibration
when worn or damaged. The noise generally changes
when the bearings are loaded. Road test the vehicle.
Turn the vehicle sharply to the left and to the right.
This will load the bearings and change the noise
level. Where axle bearing damage is slight, the noise
is usually not noticeable at speeds above 30 mph.
Fig. 1 DIFFERENTIAL-STRAIGHT AHEAD DRIVING
1 - IN STRAIGHT AHEAD DRIVING EACH WHEEL ROTATES AT
100% OF CASE SPEED
2 - PINION GEAR
3 - SIDE GEAR
4 - PINION GEARS ROTATE WITH CASE
Fig. 2 DIFFERENTIAL-ON TURNS
1 - PINION GEARS ROTATE ON PINION SHAFT
BR/BEFRONT AXLE - 248FBI 3 - 15
FRONT AXLE - 248FBI (Continued)