check engine DODGE RAM 2002 Service Manual Online
[x] Cancel search | Manufacturer: DODGE, Model Year: 2002, Model line: RAM, Model: DODGE RAM 2002Pages: 2255, PDF Size: 62.07 MB
Page 478 of 2255
CAUTION: Do not leave any one spark plug cable
disconnected for longer than necessary during test-
ing. This may cause possible heat damage to the
catalytic converter. Total test time must not exceed
ten minutes.
With the engine running, remove spark plug cable
from spark plug (one at a time) and hold next to a
good engine ground. If the cable and spark plug are
in good condition, the engine rpm should drop and
the engine will run poorly. If engine rpm does not
drop, the cable and/or spark plug may not be operat-
ing properly and should be replaced. Also check
engine cylinder compression.
With the engine not running, connect one end of a
test probe to a good ground. Start the engine and run
the other end of the test probe along the entire
length of all spark plug cables. If cables are cracked
or punctured, there will be a noticeable spark jump
from the damaged area to the test probe. The cable
running from the ignition coil to the distributor cap
can be checked in the same manner. Cracked, dam-
aged or faulty cables should be replaced with resis-
tance type cable. This can be identified by the words
ELECTRONIC SUPPRESSION printed on the cable
jacket.
Use an ohmmeter to test for open circuits, exces-
sive resistance or loose terminals. If equipped,
remove the distributor cap from the distributor.Do
not remove cables from cap.Remove cable from
spark plug. Connect ohmmeter to spark plug termi-
nal end of cable and to corresponding electrode in
distributor cap. Resistance should be 250 to 1000
Ohms per inch of cable. If not, remove cable from dis-
tributor cap tower and connect ohmmeter to the ter-
minal ends of cable. If resistance is not within
specifications as found in the SPARK PLUG CABLE
RESISTANCE chart, replace the cable. Test all spark
plug cables in this manner.
SPARK PLUG CABLE RESISTANCE
MINIMUM MAXIMUM
250 Ohms Per Inch 1000 Ohms Per Inch
3000 Ohms Per Foot 12,000 Ohms Per Foot
To test ignition coil-to-distributor cap cable, do not
remove the cable from the cap. Connect ohmmeter to
rotor button (center contact) of distributor cap and
terminal at ignition coil end of cable. If resistance is
not within specifications as found in the Spark Plug
Cable Resistance chart, remove the cable from the
distributor cap. Connect the ohmmeter to the termi-
nal ends of the cable. If resistance is not within spec-
ifications as found in the Spark Plug CableResistance chart, replace the cable. Inspect the igni-
tion coil tower for cracks, burns or corrosion.
REMOVAL
CAUTION: When disconnecting a high voltage cable
from a spark plug or from the distributor cap, twist
the rubber boot slightly (1/2 turn) to break it loose
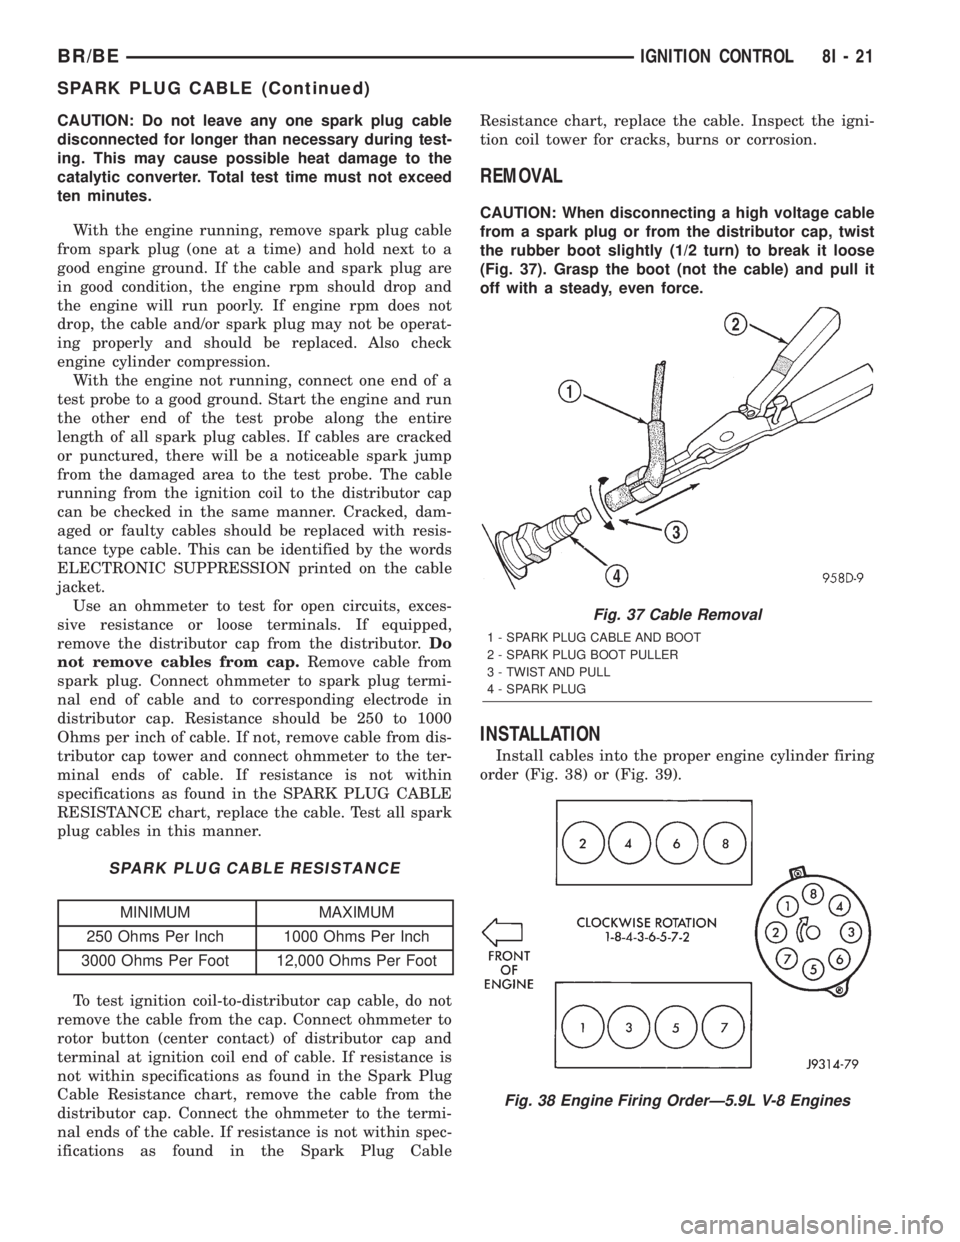
(Fig. 37). Grasp the boot (not the cable) and pull it
off with a steady, even force.
INSTALLATION
Install cables into the proper engine cylinder firing
order (Fig. 38) or (Fig. 39).
Fig. 37 Cable Removal
1 - SPARK PLUG CABLE AND BOOT
2 - SPARK PLUG BOOT PULLER
3 - TWIST AND PULL
4 - SPARK PLUG
Fig. 38 Engine Firing OrderÐ5.9L V-8 Engines
BR/BEIGNITION CONTROL 8I - 21
SPARK PLUG CABLE (Continued)
Page 480 of 2255
INSTRUMENT CLUSTER
TABLE OF CONTENTS
page page
INSTRUMENT CLUSTER
DESCRIPTION..........................2
OPERATION............................3
DIAGNOSIS AND TESTING - INSTRUMENT
CLUSTER............................6
REMOVAL.............................10
DISASSEMBLY.........................10
ASSEMBLY............................12
INSTALLATION.........................13
ABS INDICATOR
DESCRIPTION.........................14
OPERATION...........................14
AIRBAG INDICATOR
DESCRIPTION.........................15
OPERATION...........................15
BRAKE/PARK BRAKE INDICATOR
DESCRIPTION.........................15
OPERATION...........................15
DIAGNOSIS AND TESTING - BRAKE
INDICATOR..........................16
CHECK GAUGES INDICATOR
DESCRIPTION.........................17
OPERATION...........................17
CRUISE INDICATOR
DESCRIPTION.........................18
OPERATION...........................18
ENGINE TEMPERATURE GAUGE
DESCRIPTION.........................18
OPERATION...........................19
FUEL GAUGE
DESCRIPTION.........................19
OPERATION...........................20
GEAR SELECTOR INDICATOR
DESCRIPTION.........................20
OPERATION...........................21
HIGH BEAM INDICATOR
DESCRIPTION.........................21
OPERATION...........................21
DIAGNOSIS AND TESTING - HIGH BEAM
INDICATOR..........................21
LOW FUEL INDICATOR
DESCRIPTION.........................22
OPERATION...........................22
MALFUNCTION INDICATOR LAMP MIL
DESCRIPTION.........................23
OPERATION...........................23
ODOMETER
DESCRIPTION.........................24
OPERATION...........................24OIL PRESSURE GAUGE
DESCRIPTION.........................25
OPERATION...........................25
OVERDRIVE OFF INDICATOR
DESCRIPTION.........................26
OPERATION...........................26
SEATBELT INDICATOR
DESCRIPTION.........................27
OPERATION...........................27
SERVICE REMINDER INDICATOR
DESCRIPTION.........................27
OPERATION...........................28
SHIFT INDICATOR (TRANSFER CASE)
DESCRIPTION.........................28
OPERATION...........................28
DIAGNOSIS AND TESTING - FOUR-WHEEL
DRIVE INDICATOR....................29
SPEEDOMETER
DESCRIPTION.........................29
OPERATION...........................30
TACHOMETER
DESCRIPTION.........................30
OPERATION...........................30
TRANS OVERTEMP INDICATOR
DESCRIPTION.........................31
OPERATION...........................31
TURN SIGNAL INDICATOR
DESCRIPTION.........................32
OPERATION...........................32
DIAGNOSIS AND TESTING - TURN SIGNAL
INDICATOR..........................32
UPSHIFT INDICATOR
DESCRIPTION.........................32
OPERATION...........................33
VOLTAGE GAUGE
DESCRIPTION.........................33
OPERATION...........................33
WAIT-TO-START INDICATOR
DESCRIPTION.........................34
OPERATION...........................34
WASHER FLUID INDICATOR
DESCRIPTION.........................35
OPERATION...........................35
DIAGNOSIS AND TESTING - WASHER FLUID
INDICATOR..........................35
WATER-IN-FUEL INDICATOR
DESCRIPTION.........................36
OPERATION...........................36
BR/BEINSTRUMENT CLUSTER 8J - 1
Page 486 of 2255
(10) Disconnect and isolate the battery negative
cable. Remove the instrument cluster. Check for con-
tinuity between the ground circuit (Z2) cavity of the
instrument panel wire harness connector (Connector
C1) and a good ground. There should be continuity. If
OK, refer to ACTUATOR TEST . If not OK, repair
the open ground circuit to ground (G200) as required.
ACTUATOR TEST
WARNING: ON VEHICLES EQUIPPED WITH AIR-
BAGS, DISABLE THE AIRBAG SYSTEM BEFORE
ATTEMPTING ANY STEERING WHEEL, STEERING
COLUMN, OR INSTRUMENT PANEL COMPONENT
DIAGNOSIS OR SERVICE. DISCONNECT AND ISO-
LATE THE BATTERY NEGATIVE (GROUND) CABLE,
THEN WAIT TWO MINUTES FOR THE AIRBAG SYS-
TEM CAPACITOR TO DISCHARGE BEFORE PER-
FORMING FURTHER DIAGNOSIS OR SERVICE. THIS
IS THE ONLY SURE WAY TO DISABLE THE AIRBAG
SYSTEM. FAILURE TO TAKE THE PROPER PRE-
CAUTIONS COULD RESULT IN ACCIDENTAL AIR-
BAG DEPLOYMENT AND POSSIBLE PERSONAL
INJURY.
The instrument cluster actuator test will put the
instrument cluster into its self-diagnostic mode. In
this mode the instrument cluster can perform a self-
diagnostic test that will confirm that the instrument
cluster circuitry, the gauges, and the CCD data bus
message-controlled indicators are capable of operat-
ing as designed. During the actuator test the instru-
ment cluster circuitry position each of the gaugeneedles at various calibration points, illuminate each
of the segments in the Vacuum-Fluorescent Display
(VFD), and turn all of the CCD data bus message-
controlled indicators on and off.
Successful completion of the actuator test will con-
firm that the instrument cluster is operational. How-
ever, there may still be a problem with the CCD data
bus, the Powertrain Control Module (PCM), the
Engine Control Module (ECM), the Airbag Control
Module (ACM), the Controller Anti-lock Brake (CAB),
or the inputs to one of these electronic control mod-
ules. Use a DRBIIItscan tool to diagnose these com-
ponents. Refer to the appropriate diagnostic
information.
(1) Begin the test with the ignition switch in the
Off position.
(2) Depress the odometer/trip odometer switch but-
ton.
(3) While still holding the odometer/trip odometer
switch button depressed, turn the ignition switch to
the On position, but do not start the engine.
(4) Keep the odometer/trip odometer switch button
depressed for about ten seconds, untilCHEC
appears in the odometer display, then release the
odometer/trip odometer switch button.
(5) A series of three-digit numeric failure messages
may appear in the odometer display, depending upon
the failure mode. If a failure message appears, refer
to the Instrument Cluster Failure Message chart for
the description and proper correction. If no failure
message appears, the actuator test will proceed as
described in Step 6.
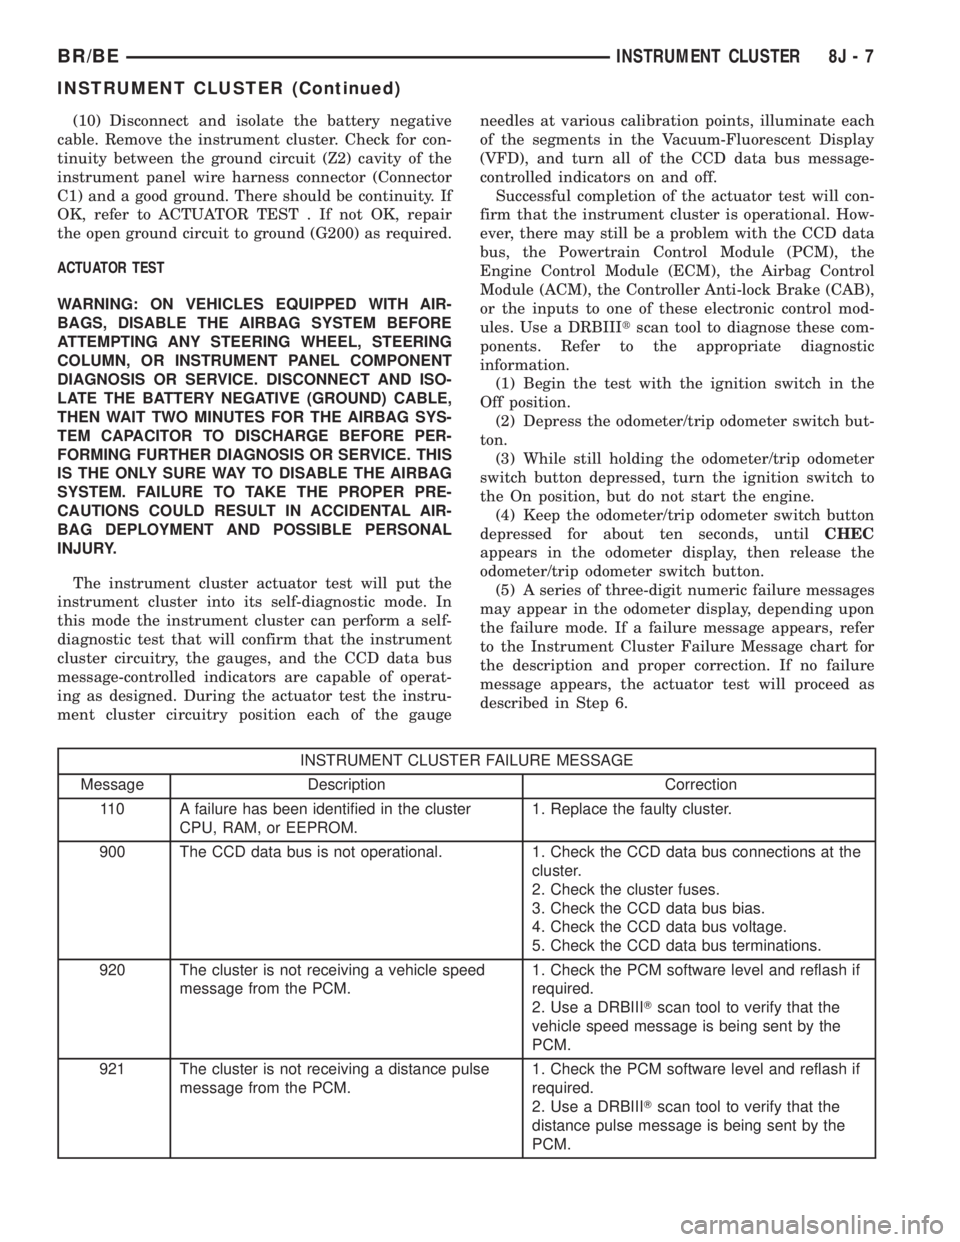
INSTRUMENT CLUSTER FAILURE MESSAGE
Message Description Correction
110 A failure has been identified in the cluster
CPU, RAM, or EEPROM.1. Replace the faulty cluster.
900 The CCD data bus is not operational. 1. Check the CCD data bus connections at the
cluster.
2. Check the cluster fuses.
3. Check the CCD data bus bias.
4. Check the CCD data bus voltage.
5. Check the CCD data bus terminations.
920 The cluster is not receiving a vehicle speed
message from the PCM.1. Check the PCM software level and reflash if
required.
2. Use a DRBIIITscan tool to verify that the
vehicle speed message is being sent by the
PCM.
921 The cluster is not receiving a distance pulse
message from the PCM.1. Check the PCM software level and reflash if
required.
2. Use a DRBIIITscan tool to verify that the
distance pulse message is being sent by the
PCM.
BR/BEINSTRUMENT CLUSTER 8J - 7
INSTRUMENT CLUSTER (Continued)
Page 495 of 2255
on the instrument cluster circuit board based upon a
hard wired input to the instrument cluster, cluster
programming, and electronic messages received by
the cluster from the Controller Antilock Brake (CAB)
over the Chrysler Collision Detection (CCD) data bus.
The brake indicator Light Emitting Diode (LED)
receives battery current on the instrument cluster
electronic circuit board through the fused ignition
switch output (st-run) circuit whenever the ignition
switch is in the On or Start positions; therefore, the
LED will always be off when the ignition switch is in
any position except On or Start. The LED only illu-
minates when it is provided a path to ground by the
instrument cluster transistor. The instrument cluster
will turn on the brake indicator for the following rea-
sons:
²Bulb Test- Each time the ignition switch is
turned to the On position the brake indicator is illu-
minated by the instrument cluster for about four sec-
onds as a bulb test.
²Park Brake-On- If the park brake is applied
or not fully released with the ignition switch in the
On position, the brake indicator is illuminated solid.
The brake indicator will blink on and off repeatedly
when the park brake is applied or not fully released
and the ignition switch is in the On position if a
vehicle with an automatic transmission is not in
Park or Neutral, or if the engine is running on vehi-
cles with a manual transmission.
²Brake Lamp-On Message- Each time the
cluster receives a lamp-on message from the CAB,
the brake indicator will be illuminated. The indicator
remains illuminated until the cluster receives a
lamp-off message from the CAB, or until the ignition
switch is turned to the Off position, whichever occurs
first.
²Actuator Test- Each time the instrument clus-
ter is put through the actuator test, the brake indi-
cator will be turned on during the bulb check portion
of the test to confirm the functionality of the LED
and the cluster control circuitry.
The park brake switch on the park brake pedal
mechanism provides a hard wired ground input to
the instrument cluster circuitry through the park
brake switch sense circuit whenever the park brake
is applied or not fully released. The CAB continually
monitors the brake pressure switch on the brake
combination valve to determine if the pressures in
the two halves of the split brake hydraulic system
are unequal. The CAB then sends the proper lamp-on
or lamp-off messages to the instrument cluster. If the
CAB sends a lamp-on message after the bulb test, it
indicates that the CAB has detected a brake hydrau-
lic system malfunction and/or that the ABS system
has become inoperative. The CAB will store a Diag-
nostic Trouble Code (DTC) for any malfunction itdetects. The park brake switch input to the instru-
ment cluster can be diagnosed using conventional
diagnostic tools and methods. For proper diagnosis of
the antilock brake system, the CAB, the CCD data
bus, or the message inputs to the instrument cluster
that control the brake indicator, a DRBIIItscan tool
is required. Refer to the appropriate diagnostic infor-
mation.
DIAGNOSIS AND TESTING - BRAKE INDICATOR
The diagnosis found here addresses an inoperative
brake indicator condition. If the brake indicator
comes on or stays on with the ignition switch in the
On position and the park brake released, or comes on
while driving, the brake system must be diagnosed
and repaired prior to performing the following tests.
(Refer to 5 - BRAKES - DIAGNOSIS AND TEST-
ING). If no brake system problem is found, the fol-
lowing procedure will help locate a faulty park brake
switch or park brake switch sense circuit. Refer to
the appropriate wiring information. The wiring infor-
mation includes wiring diagrams, proper wire and
connector repair procedures, details of wire harness
routing and retention, connector pin-out information
and location views for the various wire harness con-
nectors, splices and grounds.
WARNING: ON VEHICLES EQUIPPED WITH AIR-
BAGS, DISABLE THE AIRBAG SYSTEM BEFORE
ATTEMPTING ANY STEERING WHEEL, STEERING
COLUMN, OR INSTRUMENT PANEL COMPONENT
DIAGNOSIS OR SERVICE. DISCONNECT AND ISO-
LATE THE BATTERY NEGATIVE (GROUND) CABLE,
THEN WAIT TWO MINUTES FOR THE AIRBAG SYS-
TEM CAPACITOR TO DISCHARGE BEFORE PER-
FORMING FURTHER DIAGNOSIS OR SERVICE. THIS
IS THE ONLY SURE WAY TO DISABLE THE AIRBAG
SYSTEM. FAILURE TO TAKE THE PROPER PRE-
CAUTIONS COULD RESULT IN ACCIDENTAL AIR-
BAG DEPLOYMENT AND POSSIBLE PERSONAL
INJURY.
(1) Disconnect and isolate the battery negative
cable. Disconnect the instrument panel wire harness
connector for the park brake switch from the switch
terminal. With the park brake released, check for
continuity between the park brake switch terminal
and a good ground. There should be no continuity. If
OK, go to Step 2. If not OK, adjust or replace the
faulty park brake switch.
(2) Remove the instrument cluster from the instru-
ment panel. With the park brake switch still discon-
nected, check for continuity between the park brake
switch sense circuit cavity of the instrument panel
wire harness connector for the park brake switch and
a good ground. There should be no continuity. If OK,
go to Step 3. If not OK, repair the shorted park
8J - 16 INSTRUMENT CLUSTERBR/BE
BRAKE/PARK BRAKE INDICATOR (Continued)
Page 496 of 2255

brake switch sense circuit between the park brake
switch and the instrument cluster as required.
(3) Check for continuity between the park brake
switch sense circuit cavities of the instrument panel
wire harness connector for the park brake switch and
the instrument panel wire harness connector (Con-
nector C1) for the instrument cluster. There should
be continuity. If OK, proceed with diagnosis of the
instrument cluster. (Refer to 8 - ELECTRICAL/IN-
STRUMENT CLUSTER - DIAGNOSIS AND TEST-
ING). If not OK, repair the open park brake switch
sense circuit between the park brake switch and the
instrument cluster as required.
CHECK GAUGES INDICATOR
DESCRIPTION
A check gauges indicator is standard equipment on
all instrument clusters. The check gauges indicator is
located on the lower edge of the instrument cluster
overlay, to the right of center. The check gauges indi-
cator consists of a stenciled cutout of the words
ªCHECK GAGESº in the opaque layer of the instru-
ment cluster overlay. The dark outer layer of the
overlay prevents the indicator from being clearly vis-
ible when it is not illuminated. A red lens behind the
cutout in the opaque layer of the overlay causes the
ªCHECK GAGESº text to appear in red through the
translucent outer layer of the overlay when the indi-
cator is illuminated from behind by a Light Emitting
Diode (LED) soldered onto the instrument cluster
electronic circuit board. The check gauges indicator is
serviced as a unit with the instrument cluster.
OPERATION
The check gauges indicator gives an indication to
the vehicle operator when certain instrument cluster
gauge readings reflect a condition requiring immedi-
ate attention. This indicator is controlled by a tran-
sistor on the instrument cluster circuit board based
upon the cluster programming and electronic mes-
sages received by the cluster from the Powertrain
Control Module (PCM) over the Chrysler Collision
Detection (CCD) data bus. The check gauges indica-
tor Light Emitting Diode (LED) receives battery cur-
rent on the instrument cluster electronic circuit
board through the fused ignition switch output (st-
run) circuit whenever the ignition switch is in the On
or Start positions; therefore, the LED will always be
off when the ignition switch is in any position except
On or Start. The LED only illuminates when it is
provided a path to ground by the instrument cluster
transistor. The instrument cluster will turn on the
check gauges indicator for the following reasons:²Bulb Test- Each time the ignition switch is
turned to the On position the check gauges indicator
is illuminated for about two seconds as a bulb test.
²Engine Temperature High Message- Each
time the cluster receives a message from the PCM
indicating the engine coolant temperature of a gaso-
line engine is about 122É C (253É F) or higher, or a
diesel engine is about 112É C (233É F) or higher, the
check gauges indicator will be illuminated. The indi-
cator remains illuminated until the cluster receives a
message from the PCM indicating that the tempera-
ture of a gasoline engine is about 119É C (246É F) or
lower, a diesel engine is about 109É C (226É F) or
lower, or until the ignition switch is turned to the Off
position, whichever occurs first.
²Engine Oil Pressure Low Message- Each
time the cluster receives a message from the PCM
indicating the engine oil pressure of a gasoline
engine is about 3.45 kPa (0.5 psi) or lower, or a diesel
engine is about 51.71 kPa (7.5 psi) or lower, the
check gauges indicator will be illuminated. The indi-
cator remains illuminated until the cluster receives a
message from the PCM indicating that the engine oil
pressure of a gasoline engine is above 3.45 kPa (0.5
psi), a diesel engine is above 51.71 kPa (7.5 psi), or
until the ignition switch is turned to the Off position,
whichever occurs first. The cluster will only turn the
indicator on in response to an engine oil pressure low
message if the engine speed is greater than zero.
²System Voltage Low Message- Each time the
cluster receives a message from the PCM indicating
the electrical system voltage is less than 11.5 volts,
the check gauges indicator will be illuminated. The
indicator remains illuminated until the cluster
receives a message from the PCM indicating the elec-
trical system voltage is greater than 12.0 volts (but
less than 16.6 volts), or until the ignition switch is
turned to the Off position, whichever occurs first.
²System Voltage High Message- Each time
the cluster receives a message from the PCM indicat-
ing the electrical system voltage is greater than 16.6
volts, the check gauges indicator will be illuminated.
The indicator remains illuminated until the cluster
receives a message from the PCM indicating the elec-
trical system voltage is less than 16.1 volts (but
greater than 11.5 volts), or until the ignition switch
is turned to the Off position, whichever occurs first.
²Actuator Test- Each time the cluster is put
through the actuator test, the indicator will be
turned on during the bulb check portion of the test to
confirm the functionality of the LED and the cluster
control circuitry.
The PCM continually monitors the engine temper-
ature, oil pressure, and electrical system voltage,
then sends the proper messages to the instrument
cluster. For further diagnosis of the check gauges
BR/BEINSTRUMENT CLUSTER 8J - 17
BRAKE/PARK BRAKE INDICATOR (Continued)
Page 497 of 2255
indicator or the instrument cluster circuitry that con-
trols the LED, (Refer to 8 - ELECTRICAL/INSTRU-
MENT CLUSTER - DIAGNOSIS AND TESTING).
For proper diagnosis of the PCM, the CCD data bus,
or the message inputs to the instrument cluster that
control the check gauges indicator, a DRBIIItscan
tool is required. Refer to the appropriate diagnostic
information.
CRUISE INDICATOR
DESCRIPTION
A cruise indicator is standard equipment on all
instrument clusters. However, on vehicles not
equipped with the optional speed control system, this
indicator is electronically disabled. The cruise indica-
tor consists of the word ªCRUISEº, which appears in
the lower portion of the odometer/trip odometer Vac-
uum-Fluorescent Display (VFD). The VFD is part of
the cluster electronic circuit board, and is visible
through a cutout located in the lower left corner of
the cluster overlay. The dark lens of the VFD pre-
vents the indicator from being clearly visible when it
is not illuminated. The word ªCRUISEº appears in
an amber color and at the same lighting level as the
odometer/trip odometer information when it is illumi-
nated by the instrument cluster electronic circuit
board. The cruise indicator is serviced as a unit with
the VFD in the instrument cluster.
OPERATION
The cruise indicator gives an indication to the vehi-
cle operator when the speed control system is turned
On, regardless of whether the speed control is
engaged. This indicator is controlled by the instru-
ment cluster circuit board based upon the cluster
programming and electronic messages received by
the cluster from the Powertrain Control Module
(PCM) over the Chrysler Collision Detection (CCD)
data bus. The cruise indicator receives battery cur-
rent on the instrument cluster electronic circuit
board through the fused ignition switch output (st-
run) circuit whenever the ignition switch is in the On
or Start positions; therefore, the indicator will always
be off when the ignition switch is in any position
except On or Start. The indicator only illuminates
when it is switched to ground by the instrument clus-
ter circuitry. The instrument cluster will turn on the
cruise indicator for the following reasons:
²Bulb Test- Each time the ignition switch is
turned to the On position the cruise indicator is illu-
minated for about two seconds as a bulb test.
²Cruise Lamp-On Message- Each time the
cluster receives a cruise lamp-on message from the
PCM indicating the speed control system has beenturned On, the cruise indicator is illuminated. The
indicator remains illuminated until the cluster
receives a cruise lamp-off message from the PCM or
until the ignition switch is turned to the Off position,
whichever occurs first.
²Actuator Test- Each time the cluster is put
through the actuator test, the cruise indicator will be
turned on during the VFD portion of the test to con-
firm the functionality of the VFD, and again during
the bulb check portion of the test to confirm the func-
tionality of the cluster control circuitry.
The PCM continually monitors the speed control
switches to determine the proper outputs to the
speed control servo. The PCM then sends the proper
cruise indicator lamp-on and lamp-off messages to
the instrument cluster. For further diagnosis of the
cruise indicator or the instrument cluster circuitry
that controls the indicator, (Refer to 8 - ELECTRI-
CAL/INSTRUMENT CLUSTER - DIAGNOSIS AND
TESTING). For proper diagnosis of the speed control
system, the PCM, the CCD data bus, or the message
inputs to the instrument cluster that control the
cruise indicator, a DRBIIItscan tool is required.
Refer to the appropriate diagnostic information.
ENGINE TEMPERATURE
GAUGE
DESCRIPTION
An engine coolant temperature gauge is standard
equipment on all instrument clusters. The engine
coolant temperature gauge is located in the lower left
quadrant of the instrument cluster, below the voltage
gauge. The engine coolant temperature gauge con-
sists of a movable gauge needle or pointer controlled
by the instrument cluster circuitry and a fixed 90
degree scale on the cluster overlay that reads left-to-
right from 54É C (130É F) to 127É C (260É F) for gas-
oline engines, or from 60É C (140É F) to 116É C (240É
F) for diesel engines. An International Control and
Display Symbol icon for ªEngine Coolant Tempera-
tureº is located on the cluster overlay, directly below
the lowest graduation of the gauge scale. The engine
coolant temperature gauge graphics are white
against a black field except for a single red gradua-
tion at the high end of the gauge scale, making them
clearly visible within the instrument cluster in day-
light. When illuminated from behind by the panel
lamps dimmer controlled cluster illumination lighting
with the exterior lamps turned On, the white graph-
ics appear blue-green and the red graphics appear
red. The orange gauge needle is internally illumi-
nated. Gauge illumination is provided by replaceable
incandescent bulb and bulb holder units located on
the instrument cluster electronic circuit board. The
8J - 18 INSTRUMENT CLUSTERBR/BE
CHECK GAUGES INDICATOR (Continued)
Page 498 of 2255
engine coolant temperature gauge is serviced as a
unit with the instrument cluster.
OPERATION
The engine coolant temperature gauge gives an
indication to the vehicle operator of the engine cool-
ant temperature. This gauge is controlled by the
instrument cluster circuit board based upon the clus-
ter programming and electronic messages received by
the cluster from the Powertrain Control Module
(PCM) over the Chrysler Collision Detection (CCD)
data bus. The engine coolant temperature gauge is
an air core magnetic unit that receives battery cur-
rent on the instrument cluster electronic circuit
board through the fused ignition switch output (st-
run) circuit whenever the ignition switch is in the On
or Start positions. The cluster is programmed to
move the gauge needle back to the low end of the
scale after the ignition switch is turned to the Off
position. The instrument cluster circuitry controls
the gauge needle position and provides the following
features:
²Engine Temperature Message- Each time
the cluster receives a message from the PCM indicat-
ing the engine coolant temperature is between the
low end of normal [about 57É C (130É F) for gasoline
engines, or 60É C (140É F) for diesel engines] and the
high end of normal [about 129É C (264É F) for gaso-
line engines, or 116É C (240É F) for diesel engines],
the gauge needle is moved to the actual temperature
position on the gauge scale.
²Engine Temperature Low Message- Each
time the cluster receives a message from the PCM
indicating the engine coolant temperature is below
the low end of normal [about 57É C (130É F) for gas-
oline engines, or 60É C (140É F) for diesel engines],
the gauge needle is held at the lowest increment [57É
C (130É F) for gasoline engines, or 60É C (140É F) for
diesel engines] at the far left end of the gauge scale.
The gauge needle remains at the far left end of the
scale until the cluster receives a message from the
PCM indicating that the engine temperature is above
about 57É C (130É F) for gasoline engines, or 60É C
(140É F) for diesel engines, or until the ignition
switch is turned to the Off position, whichever occurs
first.
²Engine Temperature High Message- Each
time the cluster receives a message from the PCM
indicating the engine coolant temperature is above
about 122É C (253É F) for gasoline engines, or 112É C
(233É F) for diesel engines, the gauge needle is moved
to the appropriate position on the gauge scale, the
check gauges indicator is illuminated, and a single
chime tone is sounded. The check gauges indicator
remains illuminated until the cluster receives a mes-
sage from the PCM indicating that the engine tem-perature is below about 119É C (246É F) for gasoline
engines, or 109É C (226É F) for diesel engines, or
until the ignition switch is turned to the Off position,
whichever occurs first. The chime tone feature will
only repeat during the same ignition cycle if the
check gauges indicator is cycled off and then on
again by the appropriate engine temperature mes-
sages from the PCM.
²Message Failure- If the cluster fails to receive
an engine temperature message, it will hold the
gauge needle at the last indication until a new mes-
sage is received, or until the ignition switch is turned
to the Off position, whichever occurs first.
²Actuator Test- Each time the cluster is put
through the actuator test, the gauge needle will be
swept to several calibration points on the gauge scale
in a prescribed sequence in order to confirm the func-
tionality of the gauge and the cluster control cir-
cuitry.
The PCM continually monitors the engine coolant
temperature sensor to determine the engine operat-
ing temperature. The PCM then sends the proper
engine coolant temperature messages to the instru-
ment cluster. For further diagnosis of the engine cool-
ant temperature gauge or the instrument cluster
circuitry that controls the gauge, (Refer to 8 - ELEC-
TRICAL/INSTRUMENT CLUSTER - DIAGNOSIS
AND TESTING). If the instrument cluster turns on
the check gauges indicator due to a high engine tem-
perature gauge reading, it may indicate that the
engine or the engine cooling system requires service.
For proper diagnosis of the engine coolant tempera-
ture sensor, the PCM, the CCD data bus, or the mes-
sage inputs to the instrument cluster that control the
engine coolant temperature gauge, a DRBIIItscan
tool is required. Refer to the appropriate diagnostic
information.
FUEL GAUGE
DESCRIPTION
A fuel gauge is standard equipment on all instru-
ment clusters. The fuel gauge is located in the lower
right quadrant of the instrument cluster, below the
oil pressure gauge. The fuel gauge consists of a mov-
able gauge needle or pointer controlled by the instru-
ment cluster circuitry and a fixed 90 degree scale on
the cluster overlay that reads left-to-right from E (or
Empty) to F (or Full). An International Control and
Display Symbol icon for ªFuelº is located on the clus-
ter overlay, directly below the highest graduation of
the gauge scale. The text ªFUEL DOORº and an
arrowhead pointed to the left side of the vehicle is
imprinted on the cluster overlay directly below the
fuel gauge to provide the driver with a reminder as
BR/BEINSTRUMENT CLUSTER 8J - 19
ENGINE TEMPERATURE GAUGE (Continued)
Page 502 of 2255
Detection (CCD) data bus. The low fuel indicator
Light Emitting Diode (LED) receives battery current
on the instrument cluster electronic circuit board
through the fused ignition switch output (st-run) cir-
cuit whenever the ignition switch is in the On or
Start positions; therefore, the LED will always be off
when the ignition switch is in any position except On
or Start. The LED only illuminates when it is pro-
vided a path to ground by the instrument cluster
transistor. The instrument cluster will turn on the
low fuel indicator for the following reasons:
²Bulb Test- Each time the ignition switch is
turned to the On position the indicator is illuminated
for about two seconds as a bulb test.
²Less Than 12.5 Percent Tank Full Message-
Each time the cluster receives messages from the
PCM indicating the percent tank full is 12.5 (one-
eighth) or less for 10 consecutive seconds and the
vehicle speed is zero, or for 60 consecutive seconds
and the vehicle speed is greater than zero, the low
fuel indicator is illuminated and a single chime tone
is sounded. The low fuel indicator remains illumi-
nated until the cluster receives messages from the
PCM indicating that the percent tank full is greater
than 12.5 (one-eighth) for 10 consecutive seconds and
the vehicle speed is zero, or for 60 consecutive sec-
onds and the vehicle speed is greater than zero, or
until the ignition switch is turned to the Off position,
whichever occurs first. The chime tone feature will
only repeat during the same ignition cycle if the low
fuel indicator is cycled off and then on again by the
appropriate percent tank full messages from the
PCM.
²Less Than Empty Percent Tank Full Mes-
sage- Each time the cluster receives a message from
the PCM indicating the percent tank full is less than
empty, the low fuel indicator is illuminated immedi-
ately. This message would indicate that the fuel tank
sender input to the PCM is a short circuit.
²More Than Full Percent Tank Full Message
- Each time the cluster receives a message from the
PCM indicating the percent tank full is more than
full, the low fuel indicator is illuminated immedi-
ately. This message would indicate that the fuel tank
sender input to the PCM is an open circuit.
²Actuator Test- Each time the cluster is put
through the actuator test, the indicator will be
turned on during the bulb check portion of the test to
confirm the functionality of the LED and the cluster
control circuitry.
The PCM continually monitors the fuel tank send-
ing unit, then sends the proper messages to the
instrument cluster. For further diagnosis of the low
fuel indicator or the instrument cluster circuitry that
controls the LED, (Refer to 8 - ELECTRICAL/IN-
STRUMENT CLUSTER - DIAGNOSIS AND TEST-ING). For proper diagnosis of the fuel tank sending
unit, the PCM, the CCD data bus, or the message
inputs to the instrument cluster that control the low
fuel indicator, a DRBIIItscan tool is required. Refer
to the appropriate diagnostic information.
MALFUNCTION INDICATOR
LAMP MIL
DESCRIPTION
A Malfunction Indicator Lamp (MIL) is standard
equipment on all instrument clusters. The MIL is
located near the lower edge of the instrument cluster
overlay, to the left of center. The MIL consists of a
stencilled cutout of the International Control and
Display Symbol icon for ªEngineº in the opaque layer
of the instrument cluster overlay. The dark outer
layer of the overlay prevents the indicator from being
clearly visible when it is not illuminated. An amber
lens behind the cutout in the opaque layer of the
overlay causes the icon to appear in amber through
the translucent outer layer of the overlay when the
indicator is illuminated from behind by a Light Emit-
ting Diode (LED) soldered onto the instrument clus-
ter electronic circuit board. The MIL is serviced as a
unit with the instrument cluster.
OPERATION
The Malfunction Indicator Lamp (MIL) gives an
indication to the vehicle operator when the Power-
train Control Module (PCM) has recorded a Diagnos-
tic Trouble Code (DTC) for an On-Board Diagnostics
II (OBDII) emissions-related circuit or component
malfunction. In addition, on models with a diesel
engine an Engine Control Module (ECM) supple-
ments the PCM, and can also record an OBDII DTC.
The MIL is controlled by a transistor on the instru-
ment cluster circuit board based upon cluster pro-
gramming and electronic messages received by the
cluster from the PCM or ECM over the Chrysler Col-
lision Detection (CCD) data bus. The MIL Light
Emitting Diode (LED) receives battery current on the
instrument cluster electronic circuit board through
the fused ignition switch output (st-run) circuit
whenever the ignition switch is in the On or Start
positions; therefore, the LED will always be off when
the ignition switch is in any position except On or
Start. The LED only illuminates when it is provided
a path to ground by the instrument cluster transis-
tor. The instrument cluster will turn on the MIL for
the following reasons:
²Bulb Test- Each time the ignition switch is
turned to the On position the indicator is illuminated
for about seven seconds as a bulb test.
BR/BEINSTRUMENT CLUSTER 8J - 23
LOW FUEL INDICATOR (Continued)
Page 505 of 2255
²Engine Oil Pressure Low Message- Each
time the cluster receives a message from the PCM
indicating the engine oil pressure is below about 6.9
kPa (1 psi) for gasoline engines, or 55 kPa (8 psi) for
diesel engines, the gauge needle is moved to the 0
kPa (0 psi) graduation at the far left (low) end of the
gauge scale, the check gauges indicator is illumi-
nated, and a single chime tone is generated. The
gauge needle remains at the low end of the scale and
the check gauges indicator remains illuminated until
the cluster receives a message from the PCM indicat-
ing that the engine oil pressure is above about 6.9
kPa (1 psi) for gasoline engines, or 55 kPa (8 psi) for
diesel engines, or until the ignition switch is turned
to the Off position, whichever occurs first. The clus-
ter will only turn the check gauges indicator lamp on
in response to an engine oil pressure low message if
the engine speed message is greater than zero.
²Engine Oil Pressure High Message- Each
time the cluster receives a message from the PCM
indicating the engine oil pressure is above about 755
kPa (109.5 psi) for gasoline or diesel engines, the
gauge needle is moved to the 758.4 kPa (110 psi)
graduation at the far right (high) end of the gauge
scale. The gauge needle remains at the high end of
the scale until the cluster receives a message from
the PCM indicating that the engine oil pressure is
below about 755 kPa (109.5 psi) for gasoline or diesel
engines, or until the ignition switch is turned to the
Off position, whichever occurs first.
²Message Failure- If the cluster fails to receive
an engine oil pressure message, it will hold the
gauge needle at the last indication until a new mes-
sage is received, or until the ignition switch is turned
to the Off position, whichever occurs first.
²Actuator Test- Each time the cluster is put
through the actuator test, the gauge needle will be
swept to several calibration points on the gauge scale
in a prescribed sequence in order to confirm the func-
tionality of the gauge and the cluster control cir-
cuitry.
The PCM continually monitors the engine oil pres-
sure sensor to determine the engine oil pressure. The
PCM then sends the proper engine oil pressure mes-
sages to the instrument cluster. For further diagnosis
of the oil pressure gauge or the instrument cluster
circuitry that controls the gauge, (Refer to 8 - ELEC-
TRICAL/INSTRUMENT CLUSTER - DIAGNOSIS
AND TESTING). If the instrument cluster turns on
the check gauges indicator due to a low oil pressure
gauge reading, it may indicate that the engine or the
engine oiling system requires service. For proper
diagnosis of the engine oil pressure sensor, the PCM,
the CCD data bus, or the message inputs to the
instrument cluster that control the oil pressuregauge, a DRBIIItscan tool is required. Refer to the
appropriate diagnostic information.
OVERDRIVE OFF INDICATOR
DESCRIPTION
An overdrive off indicator is standard equipment
on all instrument clusters. However, on vehicles not
equipped with the optional overdrive automatic
transmission, this indicator is electronically disabled.
The overdrive off indicator is located near the lower
edge of the instrument cluster overlay, to the right of
center. The overdrive off indicator consists of a sten-
cilled cutout of the words ªO/D OFFº in the opaque
layer of the instrument cluster overlay. The dark
outer layer of the overlay prevents the indicator from
being clearly visible when it is not illuminated. An
amber lens behind the cutout in the opaque layer of
the overlay causes the ªO/D OFFº text to appear in
amber through the translucent outer layer of the
overlay when the indicator is illuminated from
behind by a Light Emitting Diode (LED) soldered
onto the instrument cluster electronic circuit board.
The overdrive off indicator is serviced as a unit with
the instrument cluster.
OPERATION
The overdrive off indicator gives an indication to
the vehicle operator when the Off position of the
overdrive off switch has been selected, disabling the
electronically controlled overdrive feature of the auto-
matic transmission. This indicator is controlled by a
transistor on the instrument cluster circuit board
based upon the cluster programming and electronic
messages received by the cluster from the Powertrain
Control Module (PCM) over the Chrysler Collision
Detection (CCD) data bus. The overdrive off indicator
Light Emitting Diode (LED) receives battery current
on the instrument cluster electronic circuit board
through the fused ignition switch output (st-run) cir-
cuit whenever the ignition switch is in the On or
Start positions; therefore, the LED will always be off
when the ignition switch is in any position except On
or Start. The LED only illuminates when it is pro-
vided a path to ground by the instrument cluster
transistor. The instrument cluster will turn on the
overdrive off indicator for the following reasons:
²Bulb Test- Each time the ignition switch is
turned to the On position the overdrive off indicator
is illuminated for about two seconds as a bulb test.
²Overdrive Off Lamp-On Message- Each time
the cluster receives an overdrive off lamp-on message
from the PCM indicating that the Off position of the
overdrive off switch has been selected, the overdrive
off indicator will be illuminated. The indicator
8J - 26 INSTRUMENT CLUSTERBR/BE
OIL PRESSURE GAUGE (Continued)
Page 506 of 2255
remains illuminated until the cluster receives an
overdrive off lamp-off message from the PCM, or
until the ignition switch is turned to the Off position,
whichever occurs first.
²Actuator Test- Each time the cluster is put
through the actuator test, the indicator will be
turned on during the bulb check portion of the test to
confirm the functionality of the LED and the cluster
control circuitry.
The PCM continually monitors the overdrive off
switch to determine the proper outputs to the auto-
matic transmission, then sends the proper messages
to the instrument cluster. For further diagnosis of
the overdrive off indicator or the instrument cluster
circuitry that controls the LED, (Refer to 8 - ELEC-
TRICAL/INSTRUMENT CLUSTER - DIAGNOSIS
AND TESTING). For proper diagnosis of the over-
drive control system, the PCM, the CCD data bus, or
the message inputs to the instrument cluster that
control the overdrive off indicator, a DRBIIItscan
tool is required. Refer to the appropriate diagnostic
information.
SEATBELT INDICATOR
DESCRIPTION
A seatbelt indicator is standard equipment on all
instrument clusters. The seatbelt indicator is located
near the lower edge of the instrument cluster overlay,
to the right of center. The seatbelt indicator consists
of a stencilled cutout of the International Control and
Display Symbol icon for ªSeat Beltº in the opaque
layer of the instrument cluster overlay. The dark
outer layer of the overlay prevents the indicator from
being clearly visible when it is not illuminated. A red
lens behind the cutout in the opaque layer of the
overlay causes the icon to appear in red through the
translucent outer layer of the overlay when the indi-
cator is illuminated from behind by a Light Emitting
Diode (LED) soldered onto the instrument cluster
electronic circuit board. The seatbelt indicator is ser-
viced as a unit with the instrument cluster.
OPERATION
The seatbelt indicator gives an indication to the
vehicle operator of the status of the driver side front
seatbelt buckle. This indicator is controlled by a tran-
sistor on the instrument cluster circuit board based
upon the cluster programming, and a hard wired
input from the seatbelt switch in the driver side front
seatbelt through the seat belt switch sense circuit.
The seatbelt indicator Light Emitting Diode (LED)
receives battery current on the instrument cluster
electronic circuit board through the fused ignition
switch output (st-run) circuit whenever the ignitionswitch is in the On or Start positions; therefore, the
indicator will always be off when the ignition switch
is in any position except On or Start. The LED only
illuminates when it is switched to ground by the
instrument cluster transistor. The instrument cluster
will turn on the seatbelt indicator for the following
reasons:
²Seatbelt Reminder Function- Each time the
cluster receives a battery current input on the fused
ignition switch output (st-run) circuit, the indicator
will be illuminated as a seatbelt reminder for about
seven seconds, or until the ignition switch is turned
to the Off position, whichever occurs first. This
reminder function will occur regardless of the status
of the seatbelt switch input to the cluster.
²Driver Side Front Seatbelt Not Buckled-
Following the seatbelt reminder function, each time
the cluster receives a ground input on the seat belt
switch sense circuit (seatbelt switch closed - seatbelt
unbuckled) with the ignition switch in the Start or
On positions, the indicator will be illuminated. The
seatbelt indicator remains illuminated until the seat
belt switch sense input to the cluster is an open cir-
cuit (seatbelt switch opened - seatbelt buckled), or
until the ignition switch is turned to the Off position,
whichever occurs first.
²Actuator Test- Each time the cluster is put
through the actuator test, the indicator will be
turned on during the bulb check portion of the test to
confirm the functionality of the LED and the cluster
control circuitry.
The seatbelt switch input to the instrument cluster
circuitry can be diagnosed using conventional diag-
nostic tools and methods. For further diagnosis of the
seatbelt indicator or the instrument cluster circuitry
that controls the LED, (Refer to 8 - ELECTRICAL/
INSTRUMENT CLUSTER - DIAGNOSIS AND
TESTING).
SERVICE REMINDER
INDICATOR
DESCRIPTION
A Service Reminder Indicator (SRI) is standard
equipment on all instrument clusters. However, on
vehicles not equipped with certain optional heavy
duty emission cycle gasoline engines, this indicator is
electronically disabled. The SRI is located near the
lower edge of the instrument cluster overlay, to the
left of center. The SRI consists of a stencilled cutout
of the words ªMAINT REQDº in the opaque layer of
the instrument cluster overlay. The dark outer layer
of the overlay prevents the indicator from being
clearly visible when it is not illuminated. An amber
lens behind the cutout in the opaque layer of the
BR/BEINSTRUMENT CLUSTER 8J - 27
OVERDRIVE OFF INDICATOR (Continued)